
ASA3213G-MW - Access Control System Dahua Technology - Free user manual and instructions
Find the device manual for free ASA3213G-MW Dahua Technology in PDF.


| Product Type | Face Recognition Time & Attendance System |
| Brand | Dahua Technology |
| Model | ASA3213G-MW |
| Display | 4.3-inch LCD, 480 × 272 resolution |
| Camera | 2MP wide-angle WDR lens (white light and IR) |
| Face Recognition Distance | 0.3 m – 1.5 m |
| Face Verification Accuracy | >99.5% |
| Profile Recognition Angle | 0° – 90° |
| Liveness Detection | Supported |
| Attendance Methods | Face, password, card (IC/ID) |
| Card Capacity per User | Up to 5 cards |
| Power Supply | DC 12V, 2A (typical) |
| Network | 10/100M Ethernet, optional Wi-Fi |
| USB | USB 2.0 for data export/import and firmware update |
| Alarm | Tamper alarm, external alarm input |
| Installation Height | Recommended 1.4 m – 1.6 m (lens to ground) |
| Mounting | Desktop or wall mount |
| Privacy Features | HTTPS, CGI, SSH, password reset, capture photo |
| Maintenance | Keep away from direct sunlight, dampness, dust; clean with soft cloth |
| Cybersecurity | Password protection, firmware updates, HTTPS, whitelist, account lock |
Frequently Asked Questions - ASA3213G-MW Dahua Technology
User questions about ASA3213G-MW Dahua Technology
0 question about this device. Answer the ones you know or ask your own.
Ask a new question about this device
Download the instructions for your Access Control System in PDF format for free! Find your manual ASA3213G-MW - Dahua Technology and take your electronic device back in hand. On this page are published all the documents necessary for the use of your device. ASA3213G-MW by Dahua Technology.
USER MANUAL ASA3213G-MW Dahua Technology
Face Recognition Time & Attendance User's Manual

natural_image
Abstract geometric composition with gray and blue color blocks (no text or symbols)Foreword
General
This manual introduces the installation and detailed operations of the Face Recognition Time & Attendance (hereinafter referred to as "attendance").
Safety Instructions
The following categorized signal words with defined meaning might appear in the manual.
| Signal Words | Meaning |
 DANGER DANGER | Indicates a high potential hazard which, if not avoided, will result in death or serious injury. |
 WARNING WARNING | Indicates a medium or low potential hazard which, if not avoided, could result in slight or moderate injury. |
 CAUTION CAUTION | Indicates a potential risk which, if not avoided, could result in property damage, data loss, lower performance, or unpredictable result. |
 TIPS TIPS | Provides methods to help you solve a problem or save you time. |
 NOTE NOTE | Provides additional information as the emphasis and supplement to the text. |
Revision History
| Version | Revision Content | Release Date |
| V1.0.0 | First Release. | June 2020 |
About the Manual
- The manual is for reference only. If there is inconsistency between the manual and the actual product, the actual product shall prevail.
- We are not liable for any loss caused by the operations that do not comply with the manual.
- The manual would be updated according to the latest laws and regulations of related regions. For detailed information, see the paper manual, CD-ROM, QR code or our official website. If there is inconsistency between paper manual and the electronic version, the electronic version shall prevail.
- All the designs and software are subject to change without prior written notice. The product updates might cause some differences between the actual product and the manual. Please contact the customer service for the latest program and supplementary documentation.
- There still might be deviation in technical data, functions and operations description, or errors in print. If there is any doubt or dispute, please refer to our final explanation.
- Upgrade the reader software or try other mainstream reader software if the manual (in PDF
format) cannot be opened.
- All trademarks, registered trademarks and the company names in the manual are the properties of their respective owners.
- Please visit our website, contact the supplier or customer service if there is any problem occurred when using the device.
- If there is any uncertainty or controversy, please refer to our final explanation.
Important Safeguards and Warnings
This chapter describes the contents covering proper handling of the attendance, hazard prevention, and prevention of property damage. Read these contents carefully before using the attendance, comply with them when using, and keep them well for future reference.
Operation Requirement
- Do not place or install the attendance in a place exposed to sunlight or near the heat source.
- Keep the attendance away from dampness, dust or soot.
- Keep the attendance installed horizontally on the stable place to prevent it from falling.
- Do not drop or splash liquid onto the attendance, and make sure there is no object filled with liquid on the attendance to prevent liquid from flowing into the attendance.
- Install the attendance in a well-ventilated place, and do not block the ventilation of the attendance.
- Operate the attendance within the rated range of power input and output.
- Do not dissemble the attendance randomly.
- Transport, use and store the attendance under the allowed humidity and temperature conditions.
Electrical Safety
- Improper battery use might result in fire, explosion, or inflammation.
- When replacing battery, make sure the same model is used.
- Use the recommended power cables in the region and conform to the rated power specification.
- Use the power adapter provided with the attendance; otherwise, it might result in people injury and device damage.
- The power source shall conform to the requirement of the Safety Extra Low Voltage (SELV) standard, and supply power with rated voltage which conforms to Limited power Source requirement according to IEC60950-1. Please note that the power supply requirement is subject to the device label.
- Connect the device (I-type structure) to the power socket with protective earthing.
- The appliance coupler is a disconnection device. When using the coupler, keep the angle for easy operation.
Table of Contents
Foreword ...... I
Important Safeguards and Warnings .... III
1 Overview.... 1
1.1 Introduction ...... 1
1.2 Features....1
1.3 Application....1
1.4 Dimension and Component ...... 2
2 Connection and Installation .... 3
2.1 Cable Connections....3
2.2 Installation Notes....4
2.3 Installation 5
3 System Operations....8
3.1 Common Icons....8
3.2 Initialization 8
3.3 Standby Interface 9
3.4 Main Menu 10
3.5 Attendance Methods ...... 11
3.5.1 Card 11
3.5.2 Face....11
3.5.3 User Password 11
3.6 User Management ...... 11
3.6.1 Adding New Users .... 11
3.6.2 Viewing User information....12
3.7 Attendance Setting....13
3.7.1 Attendance Type 13
3.7.2 Department 13
3.7.3 Shift....13
3.7.4 Holiday Plan....14
3.7.5 Schedule 15
3.7.6 Verification Interval Time 16
3.7.7 Attendance Mode 16
3.8 Network Communication....17
3.8.1 IP Address.... 17
3.8.2 Active Register....18
3.8.3 Wi-Fi....19
3.9 System 19
3.9.1 Time 19
3.9.2 Face Parameter 20
3.9.3 Image Mode....21
3.9.4 Volume Adjustment....21
3.9.5 Language Setting....21
3.9.6 Infrared Light Brightness Adjustment 21
3.9.7 Screen Setting 21
3.9.8 Restore to Factory Settings 22
3.9.9 Reboot 22
3.10 USB 22
3.10.1 USB Export 22
3.10.2 USB Import 23
3.10.3 USB Update 23
3.11 Features 24
3.11.1 Privacy Setting 25
3.11.2 Result Feedback....25
3.12 Record.... 28
3.13 System Info 29
4 Web Operations....30
4.1 Initialization 30
4.2 Login....32
4.3 Resetting the Password 32
4.4 Alarm Linkage 34
4.4.1 Setting Alarm Linkage....34
4.4.2 Alarm Log....35
4.5 Data Capacity 36
4.6 Video Setting.... 36
4.6.1 Data Rate 37
4.6.2 Image 38
4.6.3 Exposure....39
4.6.4 Motion Detection.... 40
4.6.5 Volume Setting.... 42
4.6.6 Image Mode 42
4.7 Face Detect....43
4.8 Network Setting.... 44
4.8.1 TCP/IP 44
4.8.2 Port 45
4.8.3 Register.... 46
4.8.4 P2P 46
4.9 Safety Management.... 47
4.9.1 IP Authority.... 47
4.9.2 Systems 48
4.10 User Management 49
4.10.1 Adding Users 49
4.10.2 Modifying User Information.... 49
4.10.3 ONVIF User 49
4.11 Maintenance....50
4.12 Configuration Management 50
4.12.1 Exporting Configuration File 50
4.12.2 Importing Configuration File 51
4.13 Upgrade 51
4.14 Version Information 52
4.15 Online User 52
4.16 System Log 53
4.16.1 Querying Logs 53
4.16.2 Backup Logs 54
4.16.3 Admin Log 54
4.17 Exit 54
5 SmartPSS AC Configuration 55
5.1 Login....55
5.2 Adding Devices 55
5.2.1 Auto Search 55
5.2.2 Manual Add....56
5.3 User Management 57
5.3.1 Card Type Setting 57
5.3.2 Adding User 58
5.3.3 Issuing Card in Batches....64
5.3.4 Exporting User Information....65
5.4 Permission Configuration....65
5.4.1 Adding Permission Group....65
5.4.2 Configuring Permission 67
5.5 Attendance Management....68
5.5.1 Report Search....68
5.5.2 Other Configurations 69
6 FAQ 70
Appendix 1 Notes of Face Recording/Comparison....71
Appendix 2 Cybersecurity Recommendations....74
1 Overview
Introduction 1.1
The attendance is an attendance panel that supports attendance through faces, passwords, cards, and supports attendance through their combinations.
Features 1.2
- LCD display, the resolution of 4.3-inch attendance is 480 × 272 .
- Support attendance through faces, passwords, cards, and supports attendance through their combinations.
- With face detection box; the largest face among faces that appear at the same time is recognized first; the maximum face size can be configured on the web
- 2MP wide-angle WDR lens; with auto/manual illuminator
- Face recognition distance is 0.3 m–1.5 m
- With face recognition algorithm, the attendance can recognize more than 360 positions on human face
- Face verification accuracy >99.5% ; low false recognition rate
- Support profile recognition; the profile angle is 0^ - 90^
• Support liveness detection - Support tamper alarm and external alarm
Application 1.3
The attendance is applicable for parks, office buildings, schools, factories, residential areas and other places.
Networking Figure 1-1
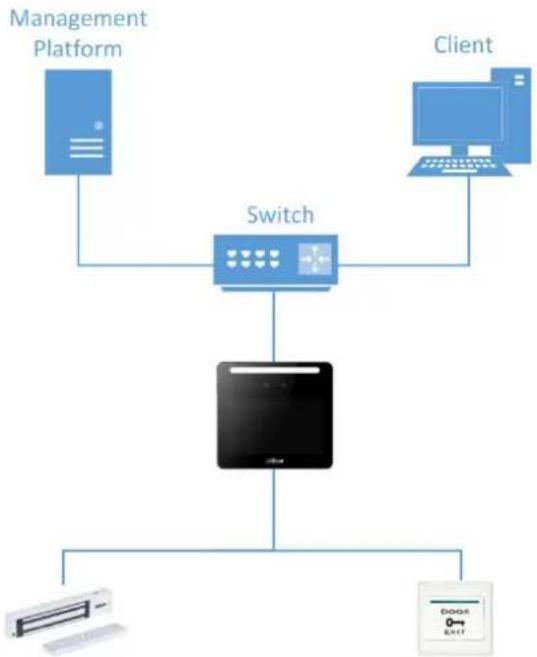
flowchart
graph TD
    A["Management Platform"] --> B["Switch"]
    C["Client"] --> B
    B --> D["Device"]
    D --> E["Client"]
    style A fill:#333,stroke:#fff,color:#fff
    style C fill:#333,stroke:#fff,color:#fff
    style B fill:#999,stroke:#000,color:#fff
    style D fill:#fff,stroke:#000
    style E fill:#fff,stroke:#000
Dimension and Component 1.4
Dimensions and components (mm [inch]) Figure 1-2
![116.0[4.57] 22.1[0.87] 1 3 108.1[4.26] 107.0[4.21] 1 2 4](/content/2026/05/973026/images/2f75f713160c60847be081257e5d0620526990bb695bce614db8cee8debc5973.jpg)
Table 1-1 Component description
| No. | Name | No. | Name |
| 1 | White LED illuminator | 3 | Dual cameras |
| 2 | Mic | 4 | Display |
2 Connection and Installation
Cable Connections 2.1
- Check whether the access control security module is enabled in Function > Security Module. If enabled, you need to purchase access control security module separately. The security module needs separate power supply.
- Once the security module is enabled, the exit button, turnstile control, and firefighting linkage will be invalid.
Cable Connection
Cable connection Figure 2-1
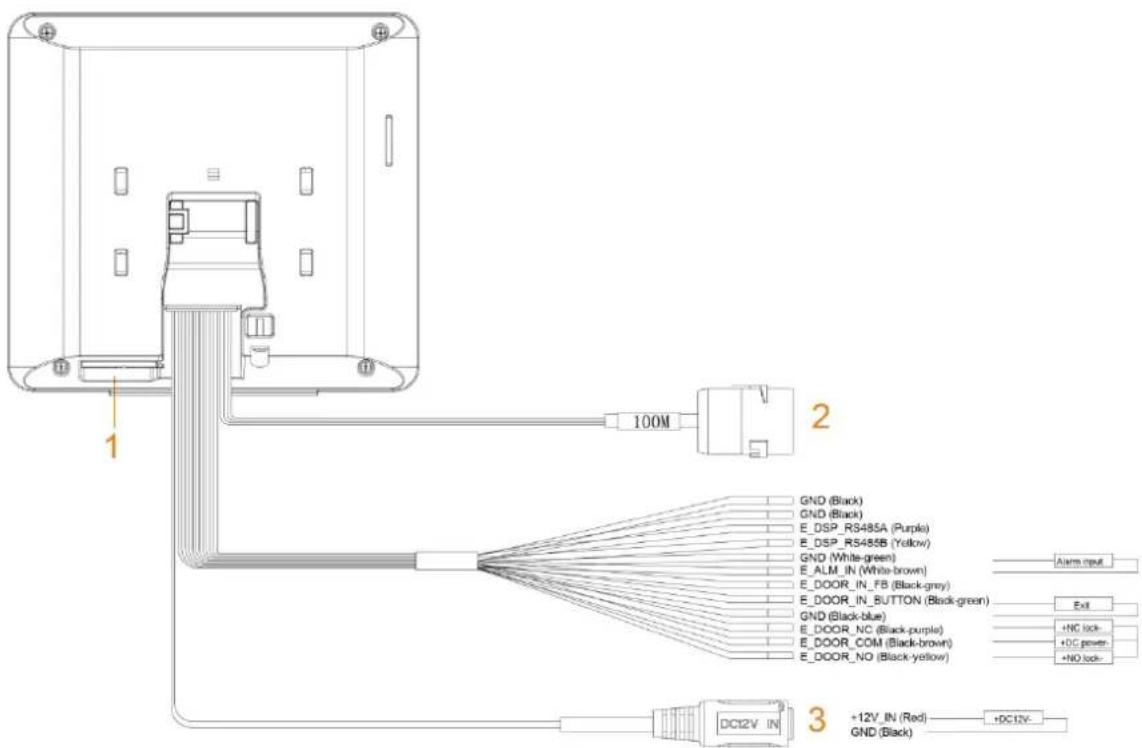
Ports Figure 2-2
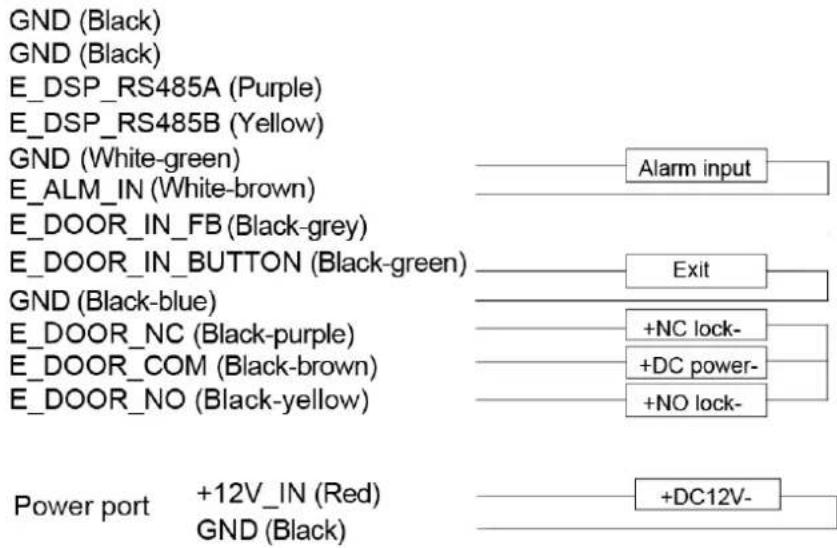
flowchart
graph TD
    A["GND (Black)"] --> B["E_DSP_RS485A (Purple)"]
    C["GND (Black)"] --> D["E_DSP_RS485B (Yellow)"]
    E["GND (White-green)"] --> F["E_ALM_IN (White-brown)"]
    G["E_DOOR_IN_FB (Black-grey)"] --> H["E_DOOR_IN_BUTTON (Black-green)"]
    I["GND (Black-blue)"] --> J["E_DOOR_NC (Black-purple)"]
    K["E_DOOR_COM (Black-brown)"] --> L["E_DOOR_NO (Black-yellow)"]
    M["Power port"] --> N["+12V_IN (Red)"]
    O["GND (Black)"] --> P["+DC12V-"]
    Q["Alarm input"] --> R["Exit"]
    S["+NC lock-"] --> T["+DC power-"]
    U["+NO lock-"] --> V["+DOOR_NO (Black-yellow)"]
    W["+DC12V-"] --> X["+DOOR_IN_BUTTON (Black-green)"]
    Y["+NC lock-"] --> Z["+DOOR_COM (Black-brown)"]
    AA["+DOOR_NO (Black-yellow)"] --> AB["+DOOR_IN_BUTTON (Black-green)"]
    AC["+DC power-"] --> AD["+DOOR_COM (Black-brown)"]
    AE["+NO lock-"] --> AF["+DOOR_IN_BUTTON (Black-green)"]

The RS485 port and door contact feedback (FB) port are reserved. Currently the corresponding functions are not supported.
Table 2-1 Component description
| No. | Name |
| 1 | USB port |
| 2 | 100M network port |
| 3 | Power port |
Installation Notes 2.2

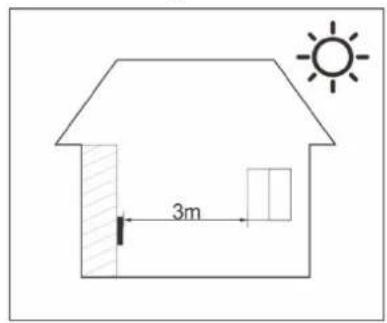
- If there is light source 0.5 meters away from the attendance, the minimum illumination should be no less than 100 Lux.
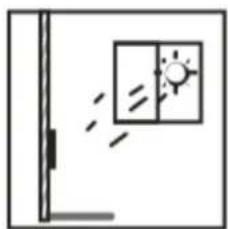
- It is recommended that the attendance is installed indoors, at least 3 meters away from windows and doors and 2 meters away from lights.
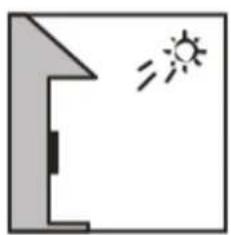
- Avoid backlight and direct sunlight.
Ambient Illumination Requirement
Ambient illumination requirement Figure 2-3

Candle: 10Lux

Light bulb: 100Lux-850Lux

Sunlight: ≥1200Lux
Places Recommended
Places recommended Figure 2-4
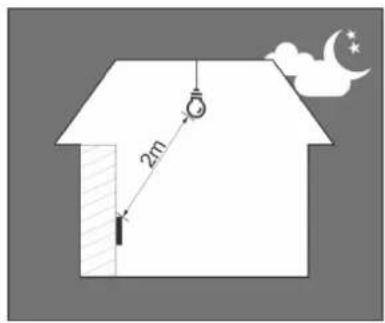
Places Not Recommended
Places not recommended Figure 2-5
natural_image
Simple line drawing of a corner with a sun icon above it (no text or symbols)
Backlight
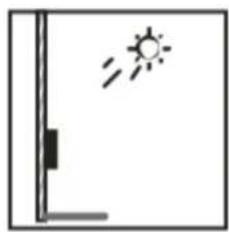
natural_image
Simple line drawing of a door with a sun icon above it (no text or symbols)
Direct sunlight
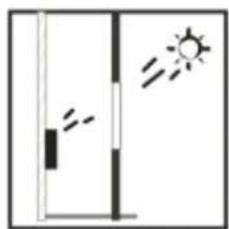
natural_image
Simple line drawing of a door with a sun icon above it (no text or symbols)
Sunlight goes
natural_image
Simple line drawing of a door with a window and sun symbol (no text or labels)through the window

Installation 2.3
Desktop Installation
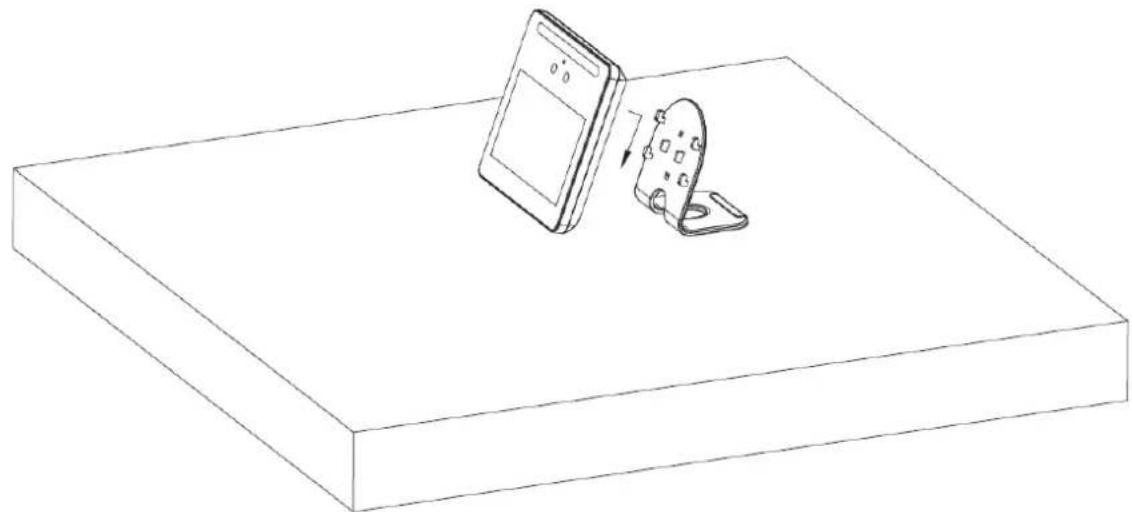
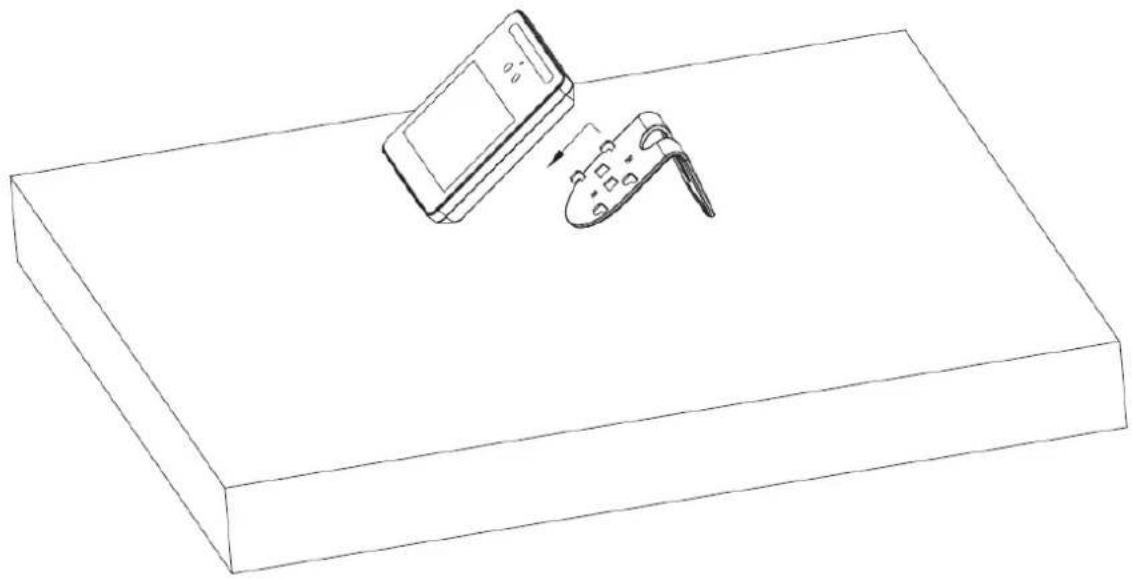
Insert the buckle of the desktop bracket into the rear slot of the attendance, and then slide it down to the end.
Desktop installation (1) Figure 2-6
natural_image
Line drawing of a smartphone mounted on a rectangular base with a magnified inset showing the device (no text or symbols)Desktop installation (2) Figure 2-7
natural_image
Line drawing of a mobile phone on a rectangular base with a small device nearby (no text or symbols)Wall Installation
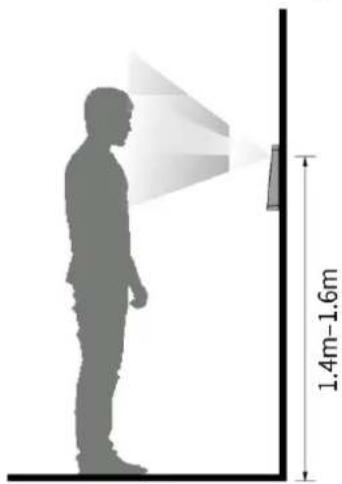
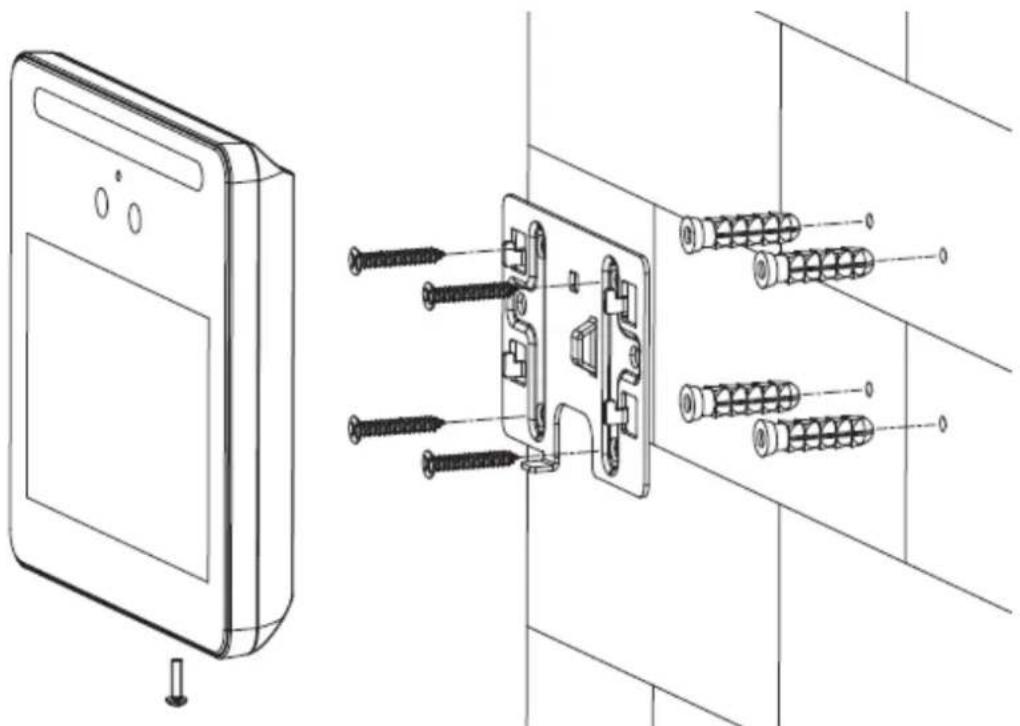
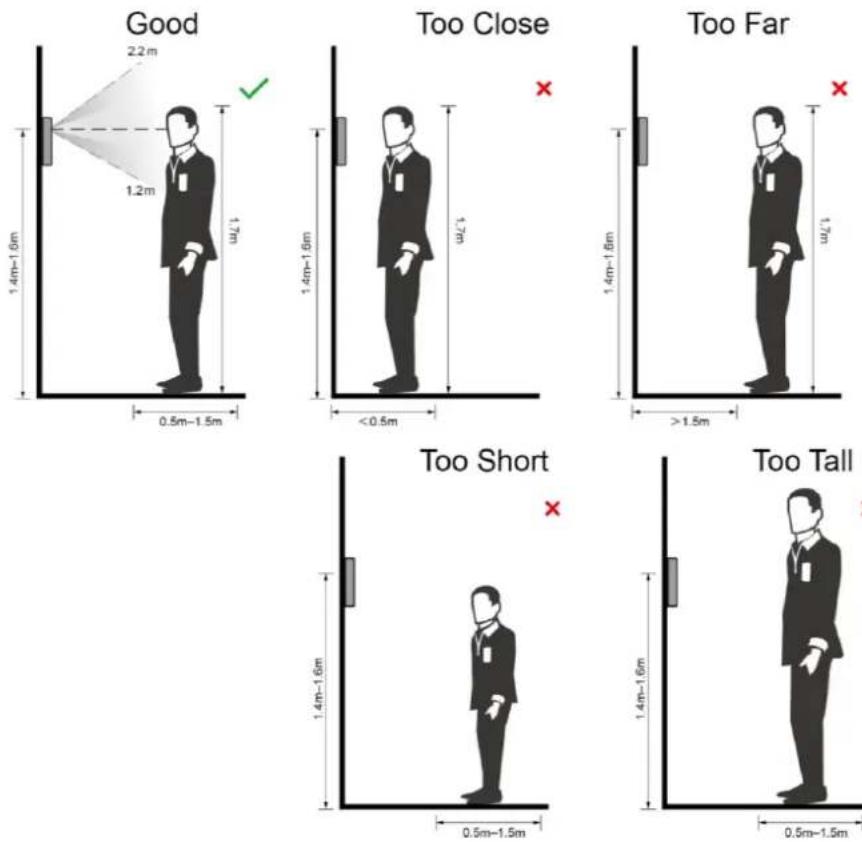
The recommended distance between the lens and ground is 1.4–1.6 meters.
Installation height Figure 2-8
natural_image
Silhouette of a person standing near a wall with a distance measurement label (1.4m–1.6m), no text or symbols on the diagram itself.Wall installation Figure 2-9
natural_image
Technical line drawing of a door panel and its internal components, showing exploded view of screw assembly (no text or labels)Drill four holes in the wall according to holes in the bracket. Step 1
Fix the bracket on the wall by installing the expansion screws into the four bracket Step 2 installation holes.
Step 3 Connect cables for attendance. See "2.1 Cable Connections".
____ Hang the attendance on the bracket hook. Step 4
____ Tighten the screws at the bottom of the attendance. Step 5
3 System Operations
Common Icons 3.1
Table 3-1 Icon description
| Icon | Description |
 | Confirm icon. |
 | Turn to the first page of the list. |
 | Turn to the last page of the list. |
 | Turn to the previous page of the list. |
 | Turn to the next page of the list. |
 | Return to the previous menu. |
| Enable. | |
 | Disable. |
 | Turn to previous page. |
| [4GBG] | Turn to next page. |
 | Add icon. |
 | Search icon. |
Initialization 3.2
Administrator password and an email should be set the first time the attendance is turned on or after reset; otherwise the attendance cannot be used.
Initialization Figure 3-1
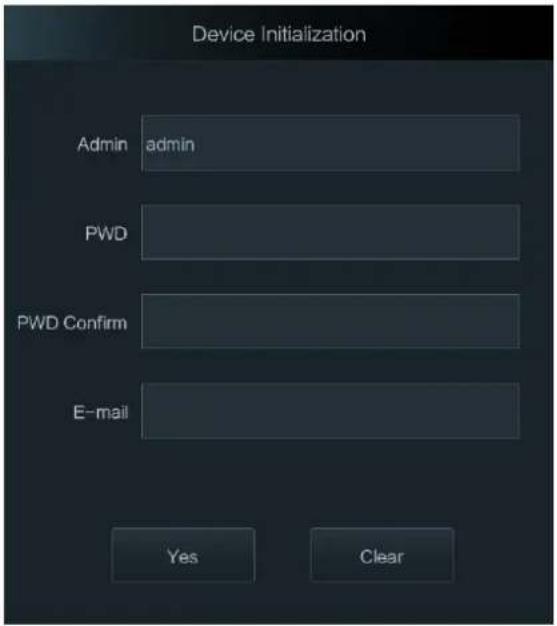

- Administrator and password set on this interface are used to log in to the web management platform.
- The administrator password can be reset through the email address you entered if the administrator forgets the password.
- The password must consist of 8 to 32 non-blank characters and contain at least two types of characters among upper case, lower case, number, and special character (excluding " "; : &).
Standby Interface 3.3
You can punch in or out through faces, passwords and cards.

- If there are no operations in 30 seconds, the attendance will go to the standby mode.
- The standby interface might vary with versions, and the actual interface shall prevail.
Standby interface Figure 3-2
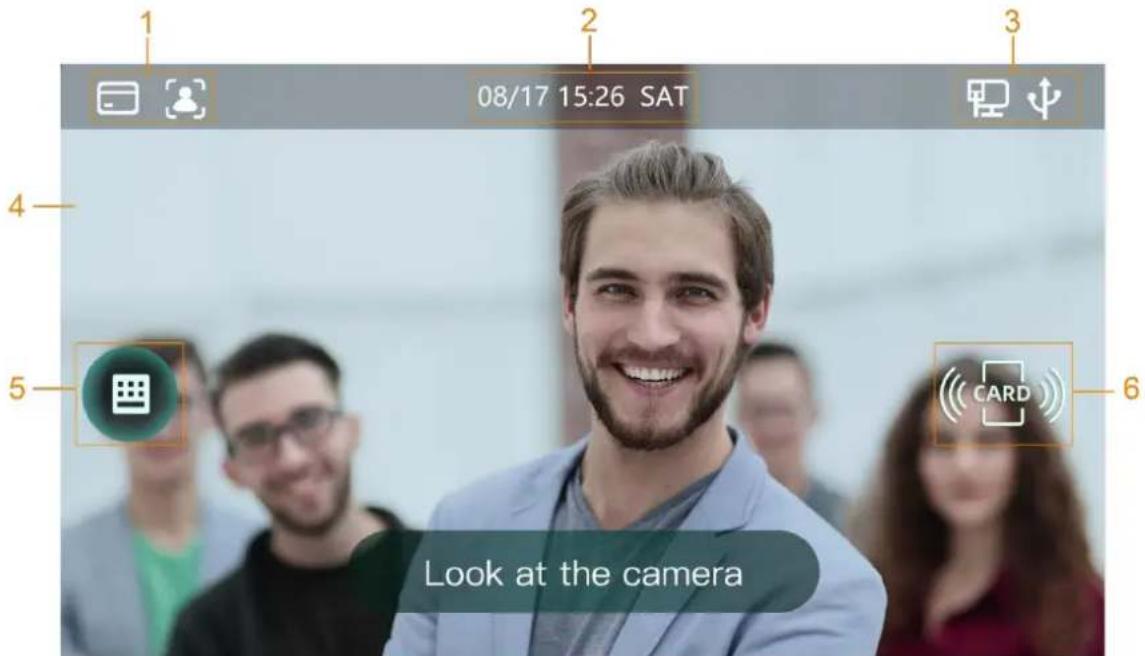
Table 3-2 Homepage description
| No. | Description |
| 1 | Attendance methods: Card, face, and password. |
| 2 | Date & Time. Displays the current date and time. |
| 3 | Display the network status and USB status. |
| 4 | Face recognition area. |
| 5 | Password attendance icon. |
| 6 | Card swiping area. |
Main Menu 3.4
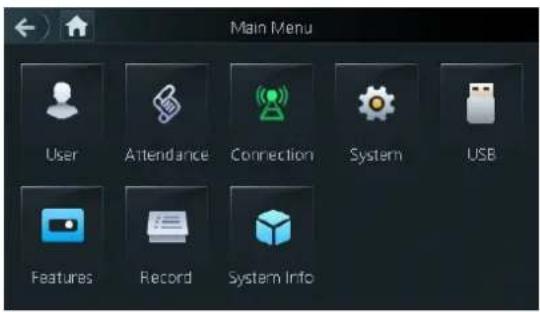
Administrators can add users of different levels, set access-related parameters, do network configuration, view attendance records and system information, and more in the main menu.
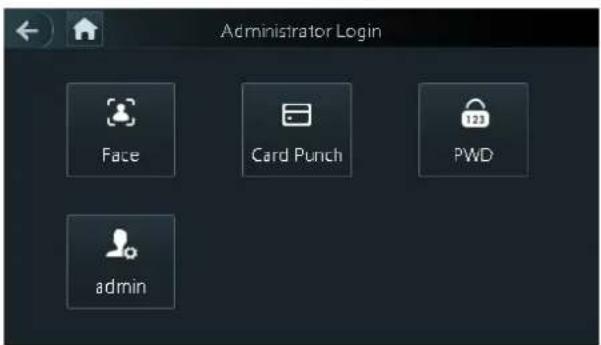
Step 1 On the standby interface, long press 3 s to go to the Administrator Login interface.
Select a main menu entering method. Step 2

Different modes support different attendance methods, and the actual interface shall prevail.
Administrator login Figure 3-3
The main menu interface is displayed.
Main menu Figure 3-4
Attendance Methods 3.5
You can punch in or out through faces, passwords, and cards.
3.5.1 Card
Put the card at the card swiping area to punch in or out.
3.5.2 Face
Make sure that your face is centered on the face recognition frame, and then you can punch in or out.
3.5.3 User Password
Enter the user password, and then you can punch in or out.

User Management 3.6
You can add new users, view user lists, admin lists on the User interface.
3.6.1 Adding New Users
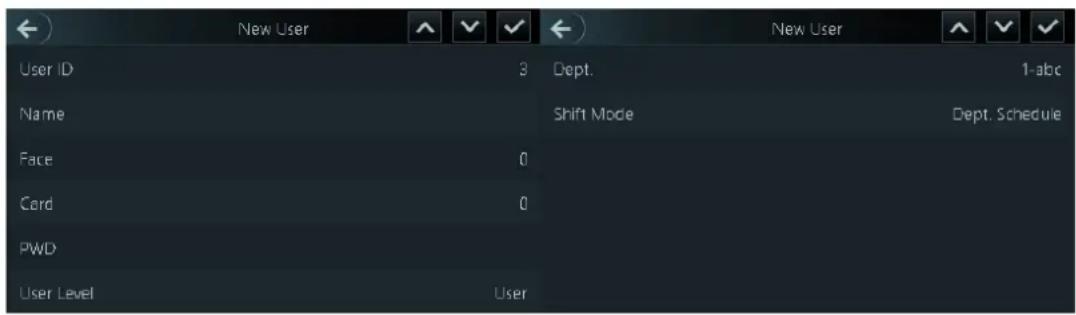
You can add new users by entering user IDs, names, face images, cards, passwords, selecting user levels, and more.

The following figures are for reference only, and the actual interface shall prevail.
Log in to the Main Menu interface. Step 1
Select User > New User. Step 2
Figure 3-5 New User Info
Configure parameters on the interface. Step 3
Table 3-3 New user parameter description
| Parameter | Description |
| User ID | Enter user IDs. The IDs at most consist of 32 characters (including numbers and letters), and each ID is unique. |
| Name | Enter names with at most 32 characters (including numbers, symbols, and letters). |
| Face | Make sure that your face is centered on the picture capturing frame, and then a picture of your face will be automatically captured. For details about face image recording, see "Appendix 1 Notes of Face Recording/Comparison". |
| Card | You can register at most five cards for each user. On the card registration interface, enter your card number or swipe your card, and then the card information will be read by the attendance. |
| PWD | The user password. The maximum length of the password is 8 digits. |
| User Level | You can select a user level for new users. There are two options: User and Admin.In case that you forget the administrator password, you had better create more than one administrator. |
| Dept. | Select a department that the user belongs to. |
| Shift Mode | Select a shift mode for the user.Dept. Schedule: Check attendance according to the schedule of department that the user belongs to.Personal Schedule: Check attendance according to personal schedule. |
____ Tap √ save the configuration. Step 4
3.6.2 Viewing User information
You can view user list and admin list through the User interface.
Attendance Setting 3.7
3.7.1 Attendance Type
There are 3 attendance types: Card, face and password. You can select attendance types as needed.
Log in to the Main Menu interface. Step 1
Step 2 Select Attendance > Atten Type.
Attendance type Figure 3-6
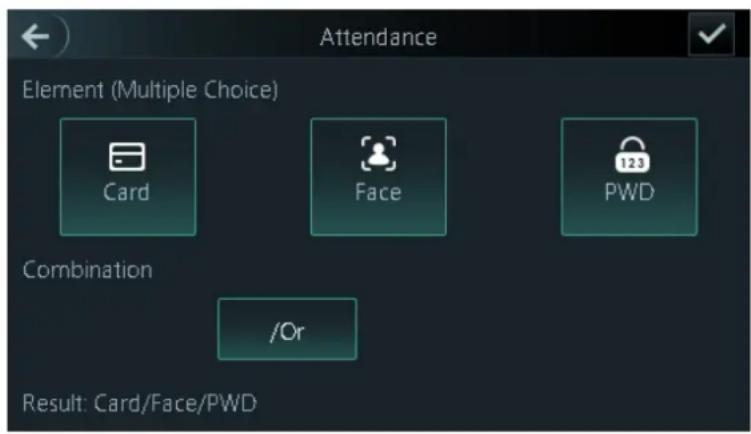
Select one or more attendance types. Step 3

Tap a selected attendance type again to cancel the selection.
____ Tap √ save the settings. Step 4
3.7.2 Department
There are 20 departments by default. You can modify the department names as needed.
Log in to the Main Menu interface. Step 1
Step 2 Select Attendance > Dep. Set.
Step 3 On the Dept. List interface, tap the department that you want to modify, and then enter the department name.
Step 4 Tap

3.7.3 Shift
There are 24 shifts by default. You can configure shifts as needed.
Log in to the Main Menu interface. Step 1
Step 2 Select Attendance > Shift Setting > Shift.
Step 3 On the Shift interface, tap or to select the shift that you want to modify, and then configure shift parameters.
| Parameter | Description |
| Shift Name | Enter a shift name.with at most 32 characters (including numbers, symbols, and letters). |
| Period 1 and Period 2 | Set attendance periods. When the period between check in and check out meets the set periods, it is a normal attendance; otherwise, it is an exception attendance. |
| Overtime Period | Set overtime period. If period between overtime check in and check out meets the set period, it is regarded to be overtime period. |
| Late-in Allowed | The time period that is allowed to be later than on-duty time. For example, when on-duty time is 8:00, if Late-in Allowed time is set to be 5 minutes, it is regarded to be late if you check in after 8:05. |
| Early-out Allowed | The time period that is allowed to be earlier than off-duty time. For example, when off-duty time is 17:00, if Early-out Allowed time is set to be 5 minutes, it is regarded to be early-out if you check out before 16:55. |
Tap ▼ tep 4
3.7.4 Holiday Plan
You can add maximum 64 holidays. Attendance is not checked during holidays.
Log in to the Main Menu interface. Step 1
Step 2 Select Attendance > Shift Setting > Holiday.
Holiday plan Figure 3-7
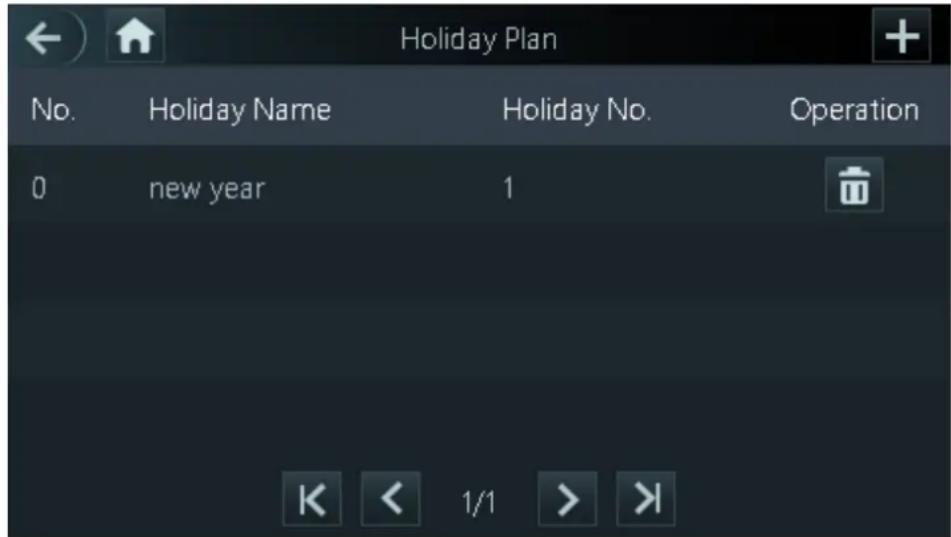
____ On the Holiday Plan interface, tap + Step 3 ____ Set holiday No., holiday name, start time and end time. Step 4 ____ Tap √ Step 5
3.7.5 Schedule
3.7.5.1 Personal Schedule
You can set shift of the current month and next month for a user. When the user selects Personal Schedule, attendance will be applied according to the shift configuration.
Log in to the Main Menu interface. Step 1
Step 2 Select Attendance > Schedule > Personal Schedule.
____ Enter the user ID, and then tap √ep 3
Tap a date on the calendar and select a shift. Step 4
Personal Schedule Figure 3-8
| Sun | Mon | Tue | Wed | Thu | Fri | Sat |
| 26 | 27 | 28 | 29 | 30 | 1 1 | 0 2 |
| 0 3 | 1 4 | 1 5 | 1 6 | 1 7 | 1 8 | 0 9 |
| 0 10 | 1 11 | 1 12 | 1 13 | 1 14 | 1 15 | 0 16 |
| 0 17 | 1 18 | 1 19 | 1 20 | 1 21 | 1 22 | 0 23 |
| 0 24 | 1 25 | 1 26 | 1 27 | 1 28 | 1 29 | 0 30 |
| 0 31 | 1 | 2 | 3 | 4 | 5 | 6 |

Shift 1 is for working days and shift 0 is for non-working days by default.
The shift ID will be displayed next to the corresponding date on the calendar.
____ Repeat Step 4 to select shifts for other dates as needed. Step 5
____ Tap to switch between the current month and next month. Step 6
Step 7 Tap √ter configuration.
3.7.5.2 Department Schedule
You can select a department, and set weekly department shift.
Log in to the Main Menu interface. Step 1
Step 2 Select Attendance > Schedule > Dept. Schedule.
Step 3 Tap a department that you want to set shift.
Step 4 Tap a week day and select a shift.

Shift 1 is for working days and shift 0 is for non-working days by default.
The shift ID will be displayed on the corresponding week day.
____ Repeat Step 4 to select shifts for other week days as needed. Step 5
Tap, and a prompt is displayed. Step 6
____ Tap Yes to save the setting. Step 7
3.7.6 Verification Interval Time
You can set the verification interval time. When there is continuous card swiping during the set time, only the first card swiping time will be recorded.
Log in to the Main Menu interface. Step 1
Step 2 Select Attendance > Verification Interval Time.
Verification Interval Time Figure 3-9
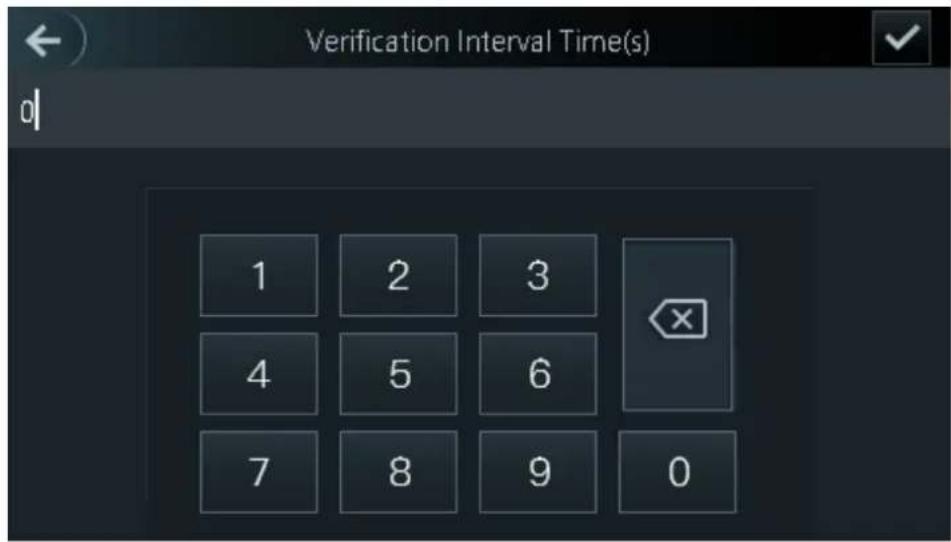
____ Enter the interval time. Step 3

The maximum interval time is 180 seconds.
Tap 4
3.7.7 Attendance Mode
You can enable attendance and set attendance mode.
There are 4 modes: Auto/Manual, Auto, Manual and Fixed.
There are 6 attendance statuses: Check In, Break Out, Break In, Check Out, OT-In, and OT-Out.
Log in to the Main Menu interface. Step 1
Step 2 Select Attendance > Local/Remote, and then tap to enable reporting attendance statuses to the remote platform.
It is enabled by default.
Step 3 Tap Mode Set to set attendance mode and time periods of different statuses.
- Auto/Manual Mode: Automatically display the attendance status according to the attendance time when you punch in or out on the standby interface. And you can also manually select an attendance status when you punch in or out on the standby interface.
- Auto Mode: Automatically display the attendance status according to the attendance time when you punch in or out on the standby interface.
- Manual Mode: You need to manually select an attendance status when you punch in or out on the standby interface.
- Fixed Mode: The attendance status is fixed when you punch in or out on the standby interface.
Network Communication 3.8
To make the attendance work normally, you need to configure parameters for network.
3.8.1 IP Address
Configure an IP address for the attendance to make it be connected to the network.
Log in to the Main Menu interface. Step 1
Step 2 Select Connection > Network >IP Address, and then configure IP address parameters.
IP address configuration Figure 3-10
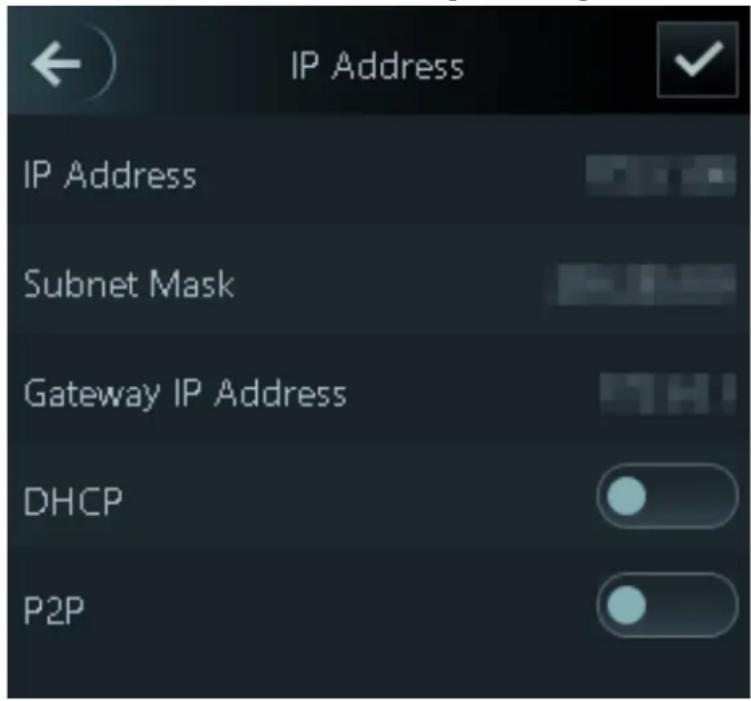
Table 3-4 IP configuration parameters
| Parameter | Description |
| IP Address/Subnet Mask/Gateway IP Address | The IP address, subnet mask, and gateway IP address should be on the same network segment. After configuration, tap √ to save the configurations. |
| DHCP | DHCP (Dynamic Host Configuration Protocol).When the DHCP is enabled, the IP address can be automatically acquired, and the IP address, subnet mask and gateway IP address cannot be manually configured. |
| P2P | P2P is a private network traversal technology which enables user to manage devices without requiring DDNS, port mapping or transit server. |

Make sure that the computer used to log in to the web is in the same LAN with the device.
3.8.2 Active Register
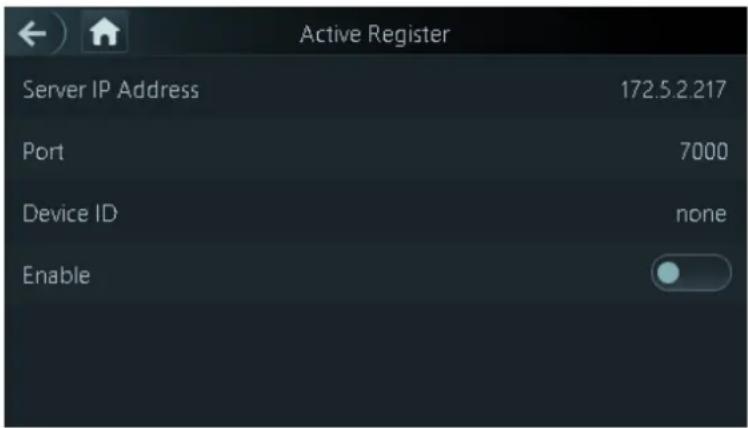
By active registering, you can connect the attendance to the management platform, and then you can manage the attendance through the management platform.

Configurations you have made can be cleared on the managing platform, and the attendance can be initialized, you need to protect the platform managing permission in case of data loss caused by improper operation.
Log in to the Main Menu interface. Step 1
Step 2 Select Connection > Network >Active Register, and the Active Register is displayed.
Active Register Figure 3-11
Step 3 Tap

to enable active register, and then configure parameters.
Table 3-5 Active register
| Name | Parameter |
| Server IP Address | IP address of the managing platform. |
| Port | Port number of the managing platform. |
| Device ID | Subordinate device number on the managing platform. |
3.8.3 Wi-Fi
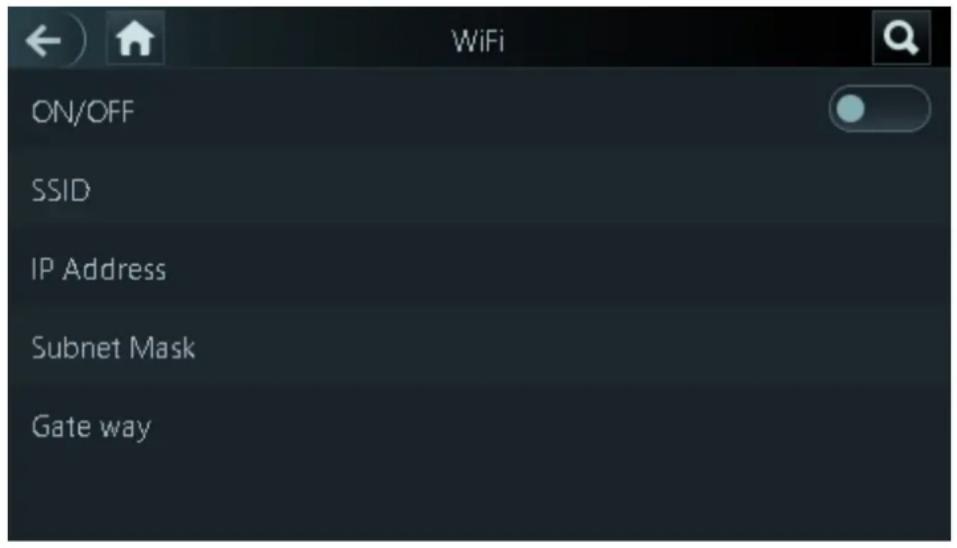
You can connect the attendance to the network through Wi-Fi if the attendance has Wi-Fi function.
Log in to the Main Menu interface. Step 1
Step 2 Select Connection > Network > WiFi, and the WiFi is displayed.
Step 3 Tap to enable Wi-Fi, and then configure Wi-Fi related parameters.
Wi-Fi Figure 3-12
System 3.9
3.9.1 Time
You can do date format setting, date setting, time setting, DST setting, NTP check, and time zone settings.
Log in to the Main Menu interface. Step 1
Select System > Time, and then configure time parameters. Step 2
Time Figure 3-13
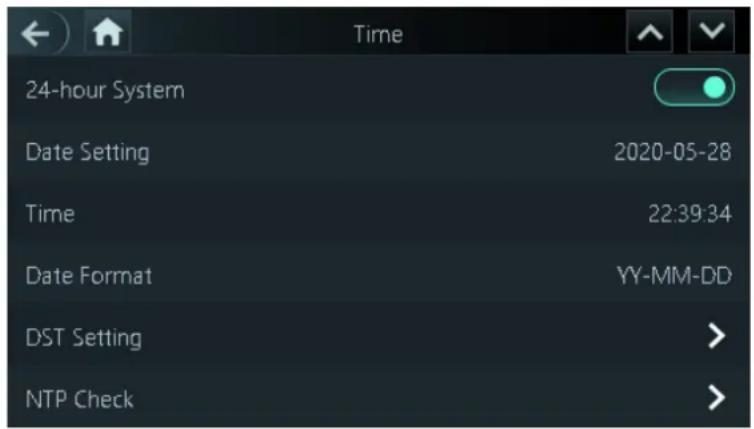

- When you select Network Time Protocol (NTP), you need to enable the NTP Check function first. Server IP Address: enter the IP address of the time server, time of the attendance will be synchronized with the time server.
- Port: Enter the port number of the time server.
- Interval (min): NPT check interval. Tap the save icon to save.
3.9.2 Face Parameter
Log in to the Main Menu interface. Step 1
Step 2 Select System > Face Parameter, and then the Face Parameter interface is displayed.
Face parameter Figure 3-14
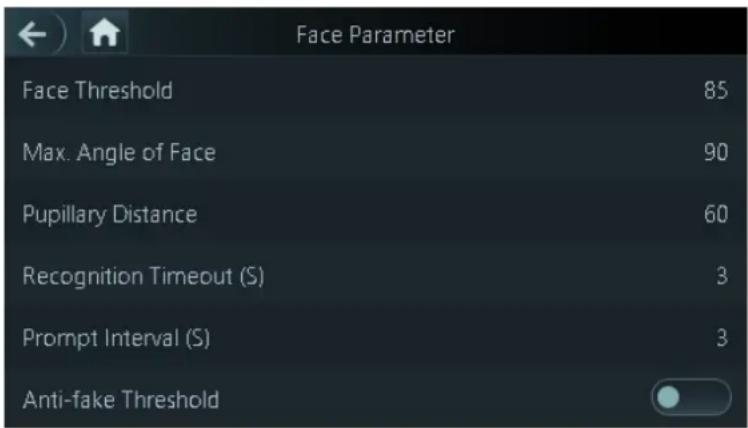
____ Tap a parameter and do configuration, and then tap ▼ step 3
Table 3-6 Face parameters
| Parameter | Description |
| Face Threshold | Face recognition accuracy can be adjusted. The larger the value is, the higher the accuracy will be. |
| Max. Angle of Face | Set the control panel shooting angle of profiles. The larger the value is, the wider range of the profiles will be recognized. |
| Pupillary Distance | Pupillary distance is the pixel value of the image between the centers of the pupils in each eye. You need to set an appropriate value so that the attendance can recognize faces as needed. The value changes according to the face sizes and the distance between faces and the lens. The closer the face is to the lens, the greater the value should be. If an adult is 1.5 meters away from the lens, the pupillary distance value can be within 50 to 70. |
| Recognition Timeout | The interval of the prompt during valid face recognition. |
| Prompt Interval | The interval of the prompt during invalid face recognition. |
| Anti-fake Threshold | This function prevents people from checking in or out by human face images or face models. The larger the value is, the more difficult face images can unlock the door. The recommended value range is above 80. |
3.9.3 Image Mode
There are three options:
- Indoor: Select Indoor when the attendance is installed indoors;
• Outdoor: Select Outdoor when the attendance is installed outdoors; - Other: Select Other when the attendance is installed at places with backlights like corridors and hallways.
3.9.4 Volume Adjustment
Tap

to adjust the volume.
3.9.5 Language Setting
The following languages are available: English, Italian, Spanish, Russian, Turkish, Polish, Arabic, Spanish (Latin America), and Thai.
3.9.6 Infrared Light Brightness Adjustment
Tap

to adjust the infrared light brightness.
The larger the value is, the brighter the infrared light will be.
3.9.7 Screen Setting
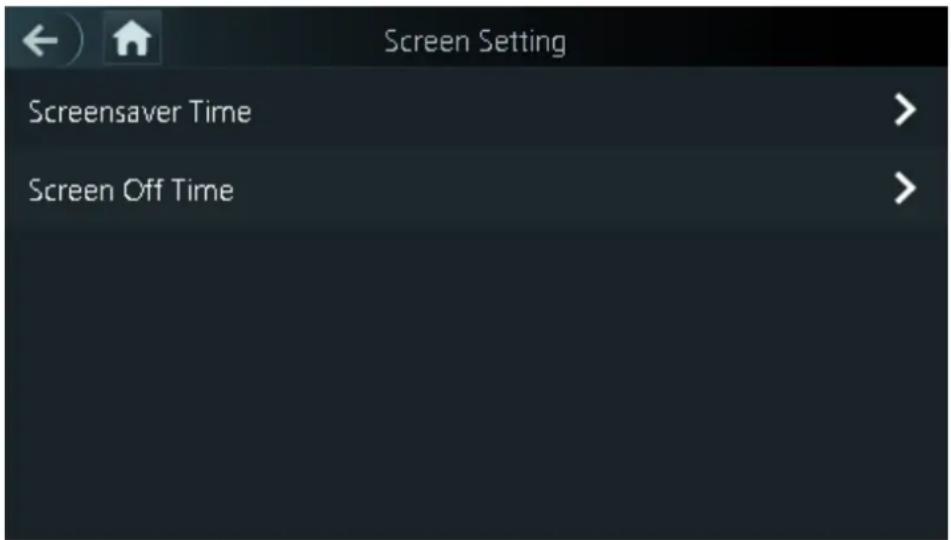
You can set the screen saver time and screen off time.
Log in to the Main Menu interface. Step 1
Step 2 Select System > Screen Settings, and the Screen Settings interface is displayed.
Screen settings Figure 3-15
3.9.8 Restore to Factory Settings

• Data will be lost if you restore the attendance to the factory settings.
- After the attendance is restored to the factory settings, IP address will not be changed.
You can select whether to retained user information and logs.
- You can select to restore the attendance to the factory settings with all user information and device information deleted.
- You can select to restore the attendance to the factory settings with user information and device information retained.
3.9.9 Reboot
Log in to the Main Menu interface. Step 1
Step 2 Select System > Reboot, and the attendance will be rebooted.
USB 3.10

- Make sure that the USB is inserted before exporting user information and updating. During exporting or updating, do not pull out the USB or do other operations; otherwise the exporting or updating will fail.
- You need to import information from one attendance to the USB before using USB to import information to another attendance.
- USB can also be used to update the program.
3.10.1 USB Export
You can export data from the attendance to the USB after inserting the USB. The data exported is encrypted and cannot be edited.
Step 1 Log in to the Main Menu interface.
Select USB > USB Export. Step 2
The USB Export interface is displayed.
USB export Figure 3-16
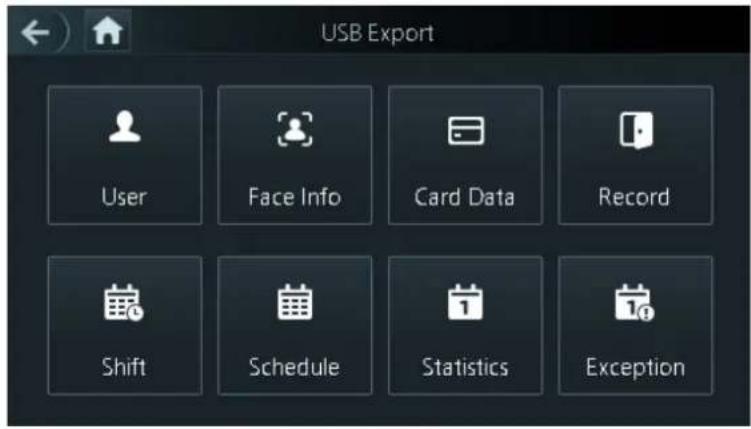
Select the data type that you want to export, and a prompt is displayed.
Tap OK. Step 3
Data exported will be saved in the USB.
3.10.2 USB Import
Only data in the USB that was exported from one attendance can be imported into another attendance.
Log in to the Main Menu interface. Step 1
Select USB > USB Import. Step 2
The USB Import interface is displayed.
USB Import Figure 3-17
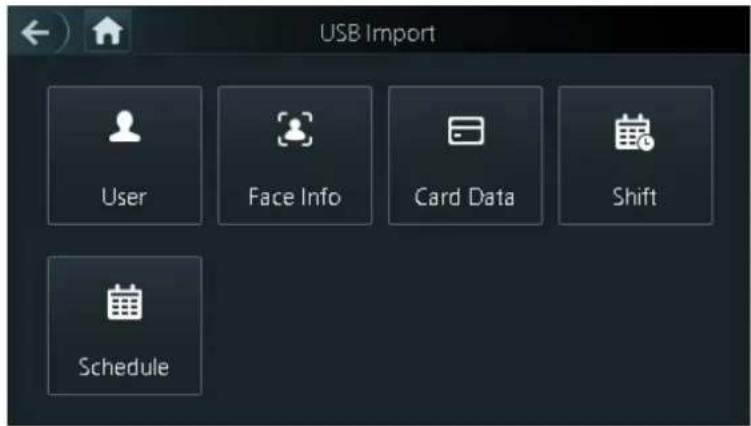
Step 3 Select the data type that you want to import, and a prompt is displayed.
Tap OK. Step 4
Data in the USB flash drive will be imported into the attendance.
3.10.3 USB Update
USB flash drive can be used to update the system.
____ Rename the updating file name to "update.bin", and save the "update.bin" file in the Step 1 root directory of the USB flash drive.

Make sure that the computer used to log in to the web is in the same LAN with the device.
Log in to the Main Menu interface. Step 2
Step 3 Select USB > USB Update, and a prompt is displayed.
Tap OK. Step 4
The update starts, and the attendance reboots after the update is finished.
Features 3.11
You can do settings about privacies, result feedback and door unlock.
Log in to the Main Menu interface. Step 1
Step 2 Tap Features, and then the Features interface is displayed.
Features Figure 3-18
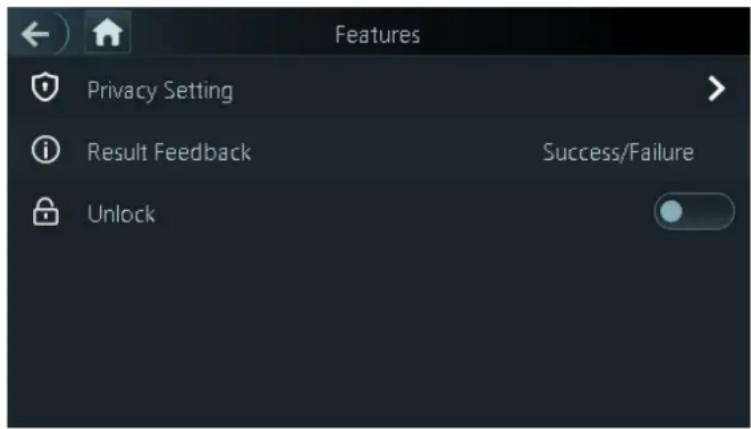
Table 3-7 Feature description
| Parameter | Description |
| Privacy Setting | See "3.11.1 Privacy Setting" for details. |
| Result Feedback | Select a result feedback mode during attendance.There are 4 result feedback modes: Success/Failure, Only Name, Photo&Name, and Photos&Name. |
| Unlock | Set whether to enable or disable the door unlock function. |
3.11.1 Privacy Setting
Privacy setting Figure 3-19
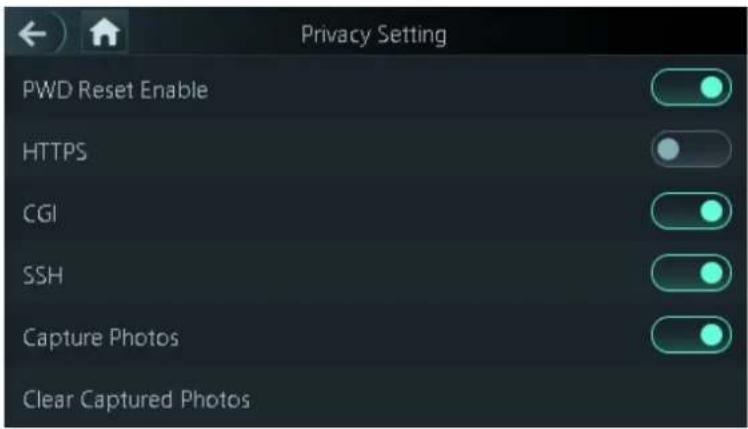
Table 3-8 Privacy setting
| Parameter | Description |
| PWD Reset Enable | If the PWD Reset Enable function is enabled, you can reset the password. The PWD Reset function is enabled by default. |
| HTTPS | Hypertext Transfer Protocol Secure (HTTPS) is a protocol for secure communication over a computer network.When HTTPS is enabled, HTTPS will be used to access CGI commands; otherwise HTTP will be used.When HTTPS is enabled, the attendance will restart automatically. |
| CGI | Common Gateway Interface (CGI) offers a standard protocol for web servers to execute programs that execute like console applications running on a server that generates web pages dynamically.When CGI is enabled, CGI commands can be used. The CGI is enabled by default. |
| SSH | Secure Shell (SSH) is a cryptographic network protocol for operating network services securely over an unsecured network.When SSH is enabled, SSH provides cryptographic service for the data transmission. |
| Capture photo | If you select ON, when a user unlocks the door, the user's photo will be automatically taken. This function is ON by default. |
| Clear all captured photos | Tap the icon, and you can delete all captured photos. |
3.11.2 Result Feedback
There are 4 result feedback modes: Success/Failure, Only Name, Photo&Name, and Photos&Name.
You can select a result feedback mode as needed.
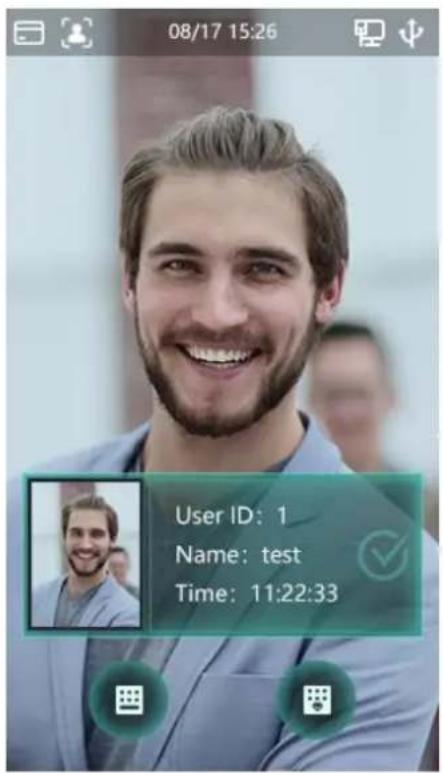
Photos&Name Mode
The captured face image, the image saved in the face database, user ID, user name and time are all displayed during attendance.
Photos&Name mode Figure 3-20
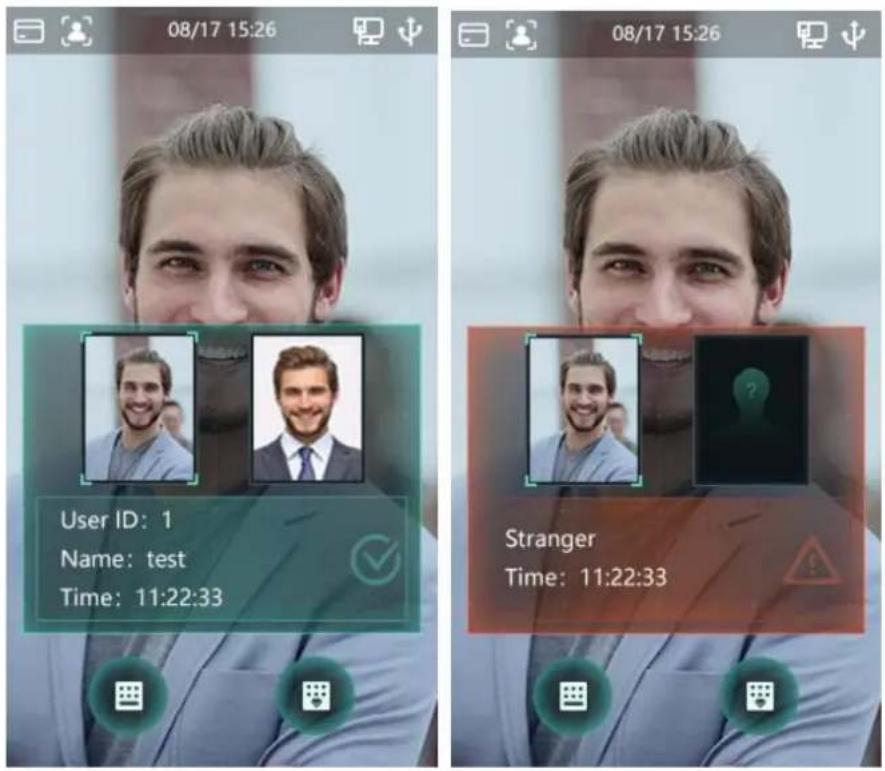
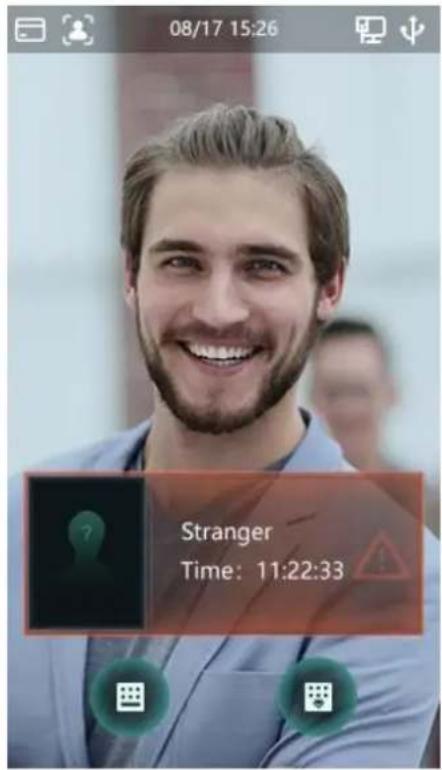
Photo&Name Mode
The image saved in the face database, user ID, user name and time are all displayed during attendance.
Photo&Name mode Figure 3-21
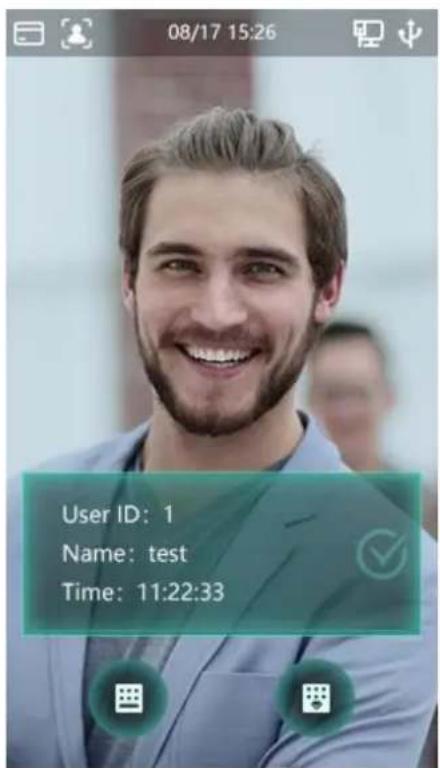
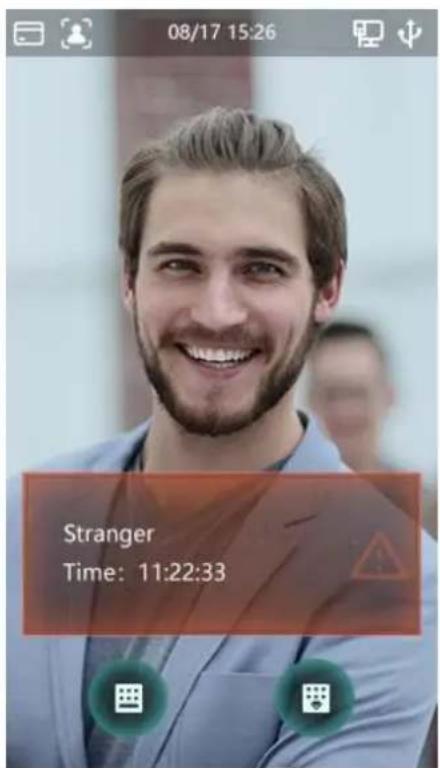
Only Name Mode
Only user ID, user name and time are displayed during attendance.
Only name mode Figure 3-22
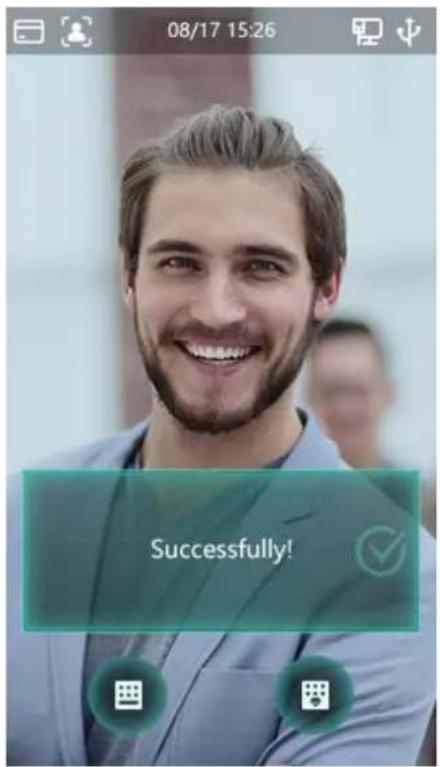
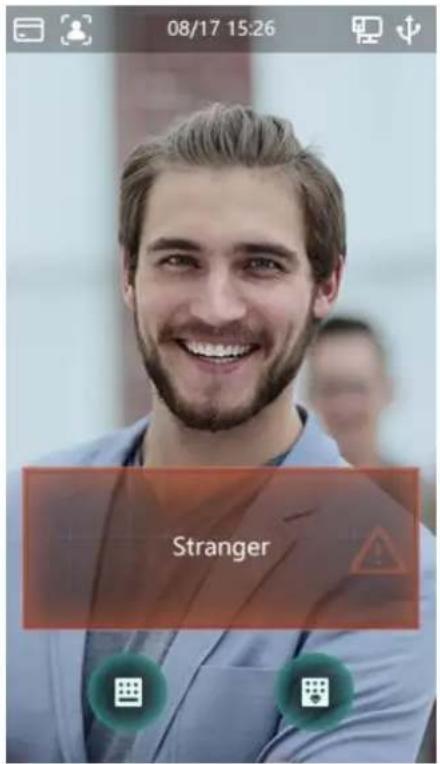
Success/Failure Mode
Only display success or failure during attendance.
Success/Failure mode Figure 3-23
Record 3.12
You can view all attendance records and search attendance records by user ID.
Log in to the Main Menu interface. Step 1
Step 2 Select Record > Search Attendance Records, and then the Search Attendance Records interface is displayed.
Search attendance records Figure 3-24
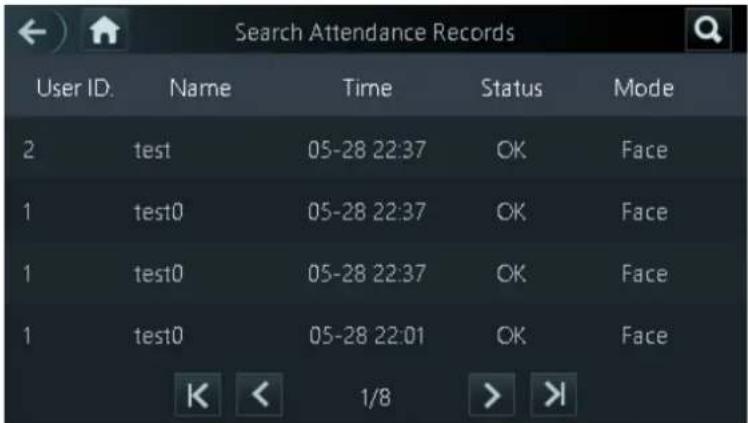
____ Tap and enter the user ID, and then tap . Step 3
The attendance records of the user will be displayed.
System Info 3.13
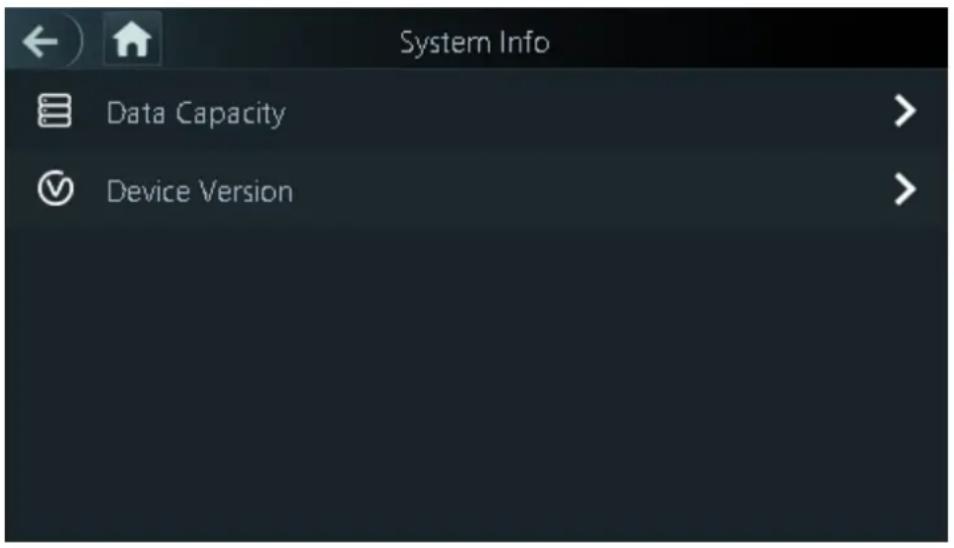
You can view data capacity, device version, and firmware information of the attendance on the System Info interface.
Log in to the Main Menu interface. Step 1
Step 2 Tap System Info, and the System Info interface is displayed.
System info Figure 3-25
4 Web Operations
The attendance can be configured and operated on the web. Through the web you can set network parameters, video parameters, and face detection parameters and more; and you can also maintain and update the system.
Initialization 4.1
You need to set a password and an email address before logging in to the web for the first time.
____ Open IE web browser, and enter the IP address (the default address is 192.168.1.108) Step 1 of the attendance in the address bar, and then press Enter.

- Use browser newer than IE 8, otherwise you might not log in to the web.
- Make sure that the computer used to log in to the web is in the same LAN with the device.
Initialization Figure 4-1
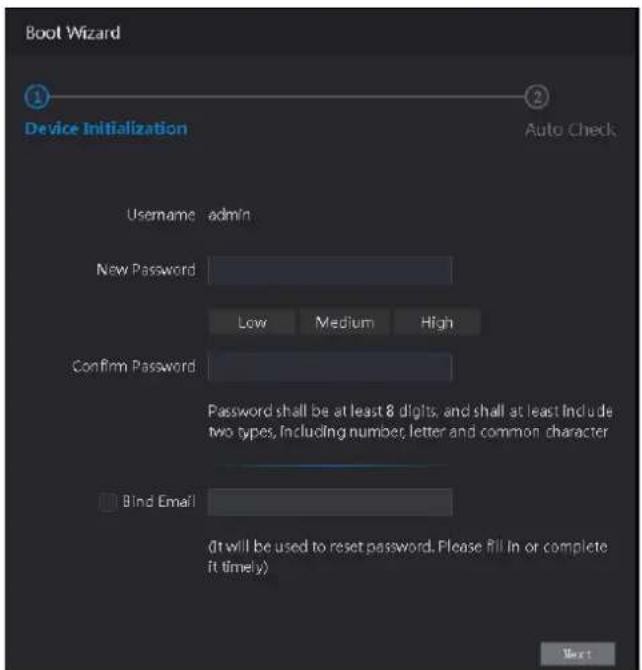
Enter the new password, confirm password, enter an email address, and then click Step 2 Next.

- The password must consist of 8 to 32 non-blank characters and contain at least two types of characters among upper case, lower case, number, and special character (excluding '"; : &). Set a password of high security level according to the password strength prompt.
- For security, keep the password properly after initialization and change the password regularly.
- When you need to reset the administrator password by scanning the QR code, you need an email address to receive the security code.
Click Next. Step 3
Auto check Figure 4-2
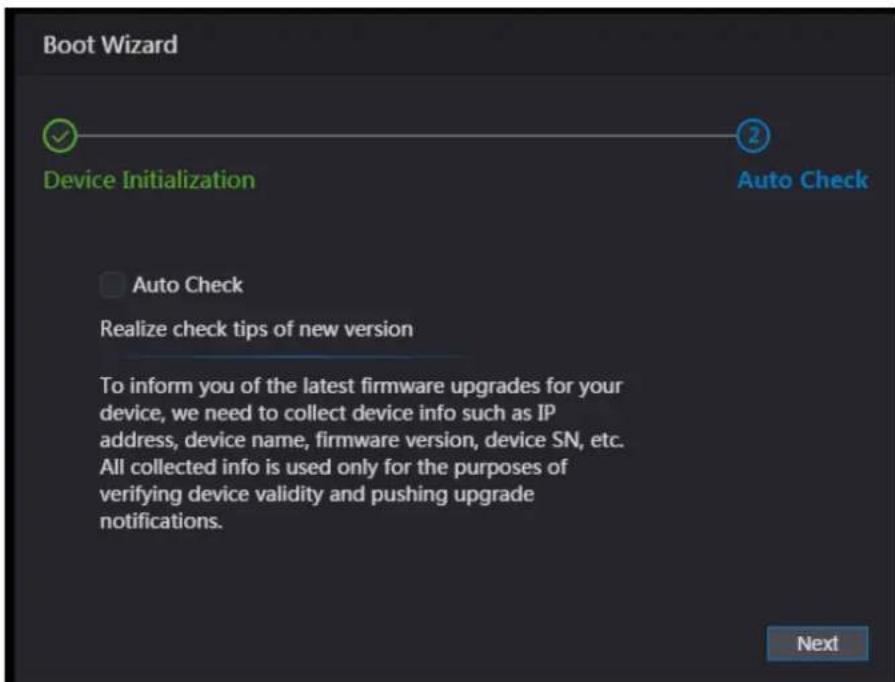
You can decide whether to select Auto Check or not. Step 4

It is recommended that Auto Check be selected to get the latest program in time.
Click Next. Step 5
Finished configuration Figure 4-3
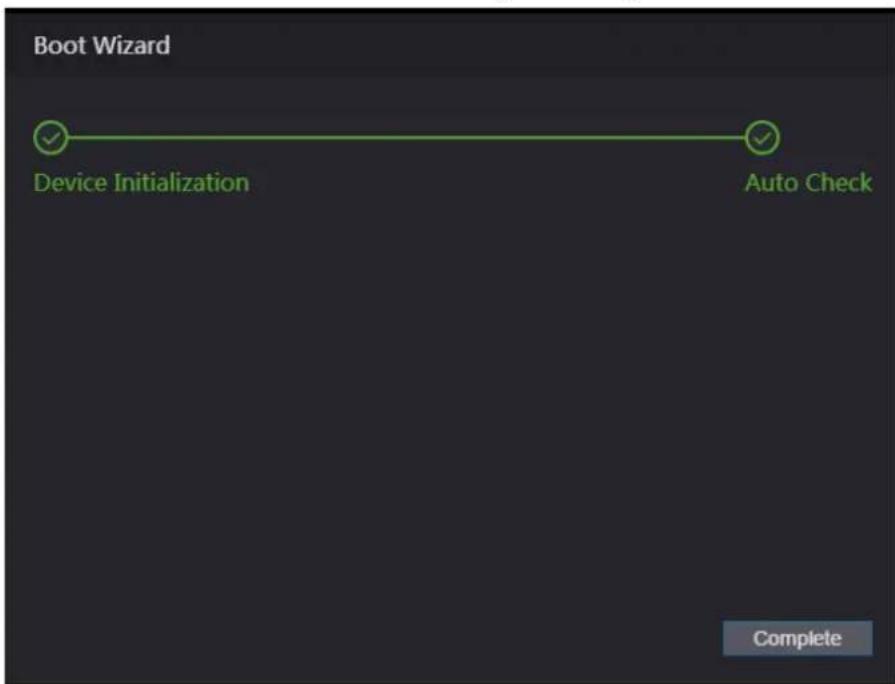
Click Complete, and the initialization is completed. Step 6
The web login interface is displayed.
Login 4.2
Step 1 Open IE web browser, enter the IP address of the attendance in the address bar, and press Enter.

- Use browser newer than IE 8, otherwise you might not log in to the web.
- Make sure that the computer used to log in to the web is in the same LAN with the device.
• The default IP address is 192.168.1.108.
Login Figure 4-4
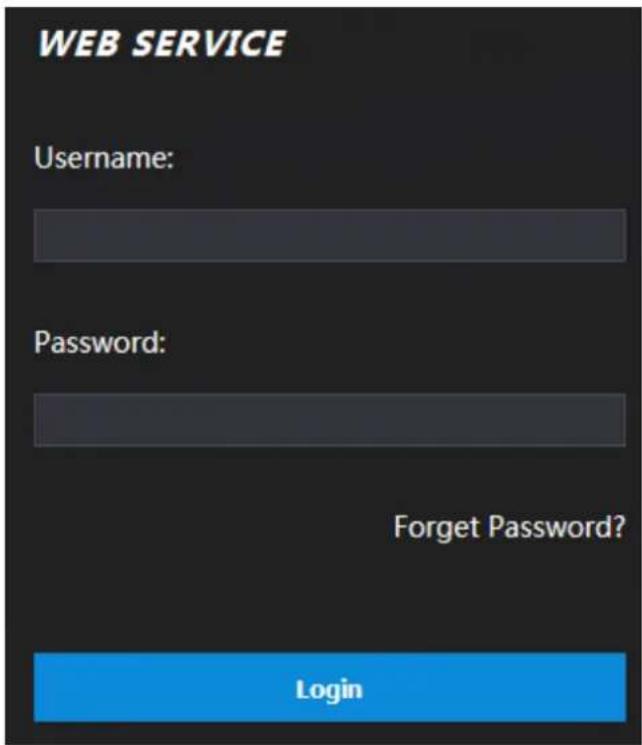
Enter the user name and password. Step 2

- The default administrator name is admin, and the password is the login password after initializing the attendance. Modify the administrator regularly and keep it properly for the sake of security.
- If you forget the administrator login password, you can click Forgot password? to reset it. See "4.3 Resetting the Password."
Click Login. Step 3
The web interface is logged in.
Resetting the Password 4.3
When resetting the password of the admin account, your email address will be needed.
Click Forgot password? on the login interface. Step 1
The Tips interface is displayed.
Tips Figure 4-5
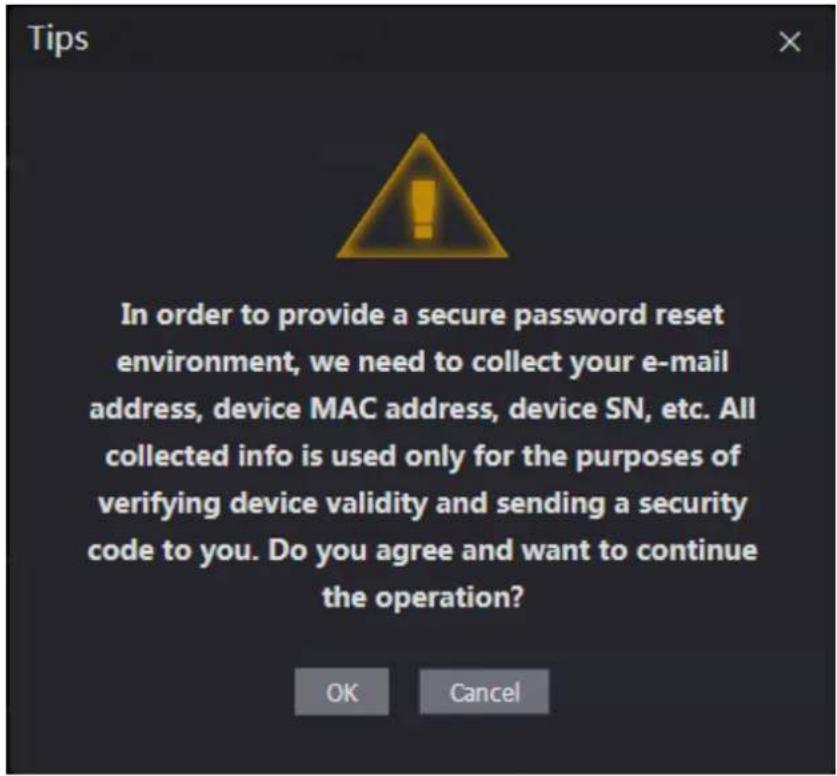
Read the tips. Step 2
Click OK. Step 3
The Reset Password interface is displayed.
Reset Password Figure 4-6
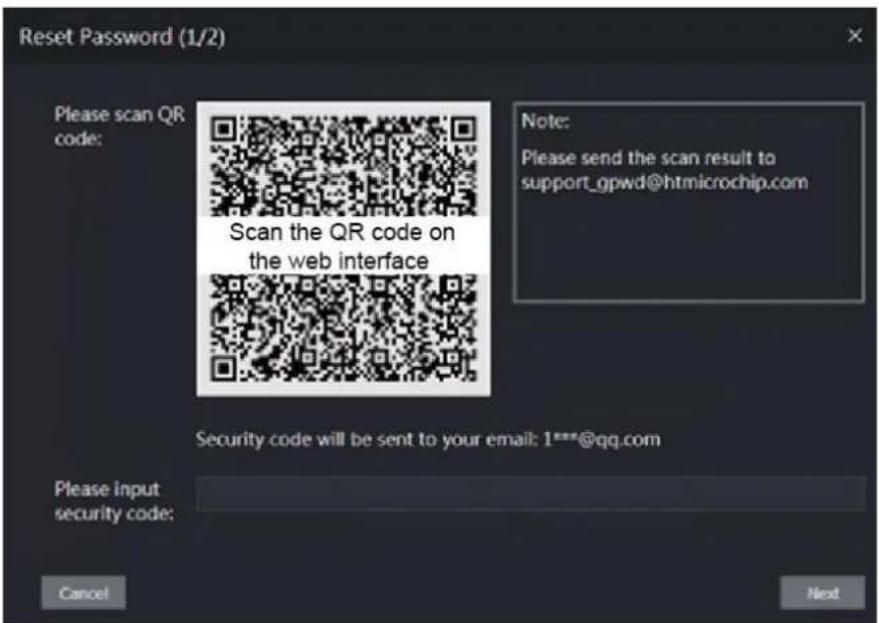
____ Scan the QR code on the interface, and you will get the security code. Step 4

- At most two security codes will be generated by scanning the same QR code. If security codes become invalid, to get more security codes, refresh the QR code.
- You need to send the content you get after you scanned the QR code to the designated email address, and then you will get the security code.
- Please use the security code within 24 hours after you receive it. Otherwise, it will become invalid. - If wrong security codes are entered for consecutive five times, the administrator will be frozen for five minutes.
Enter the security code you have received. Step 5
Click Next. Step 6
The Reset Password interface is displayed.
Reset and confirm the new password. Step 7

The password should consist of 8 to 32 non-blank characters and contain at least two types of characters among upper case, lower case, number, and special character (excluding '";: &).
Click OK, and the reset is completed. Step 8
Alarm Linkage 4.4
4.4.1 Setting Alarm Linkage
Alarm input devices can be connected to the attendance, and you can modify the alarm linkage parameter as needed.
Log in to the web interface. Step 1
Select Alarm Linkage on the navigation bar. Step 2
The Alarm Linkage interface is displayed.
Alarm linkage Figure 4-7
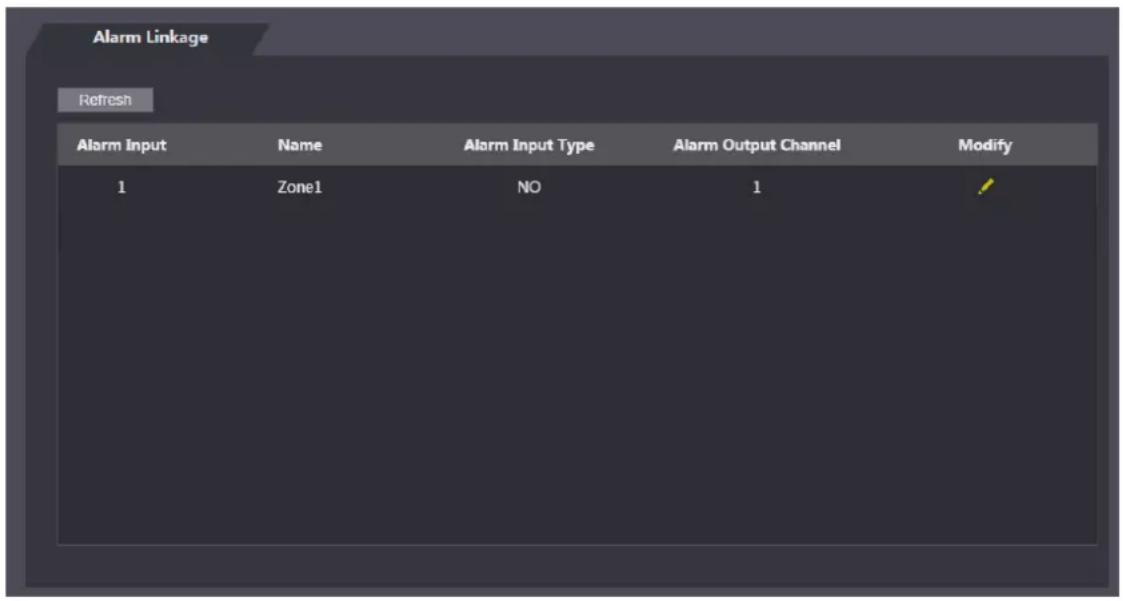
Step 3
Click

and then you can modify alarm linkage parameters.
Modifying alarm linkage parameter Figure 4-8
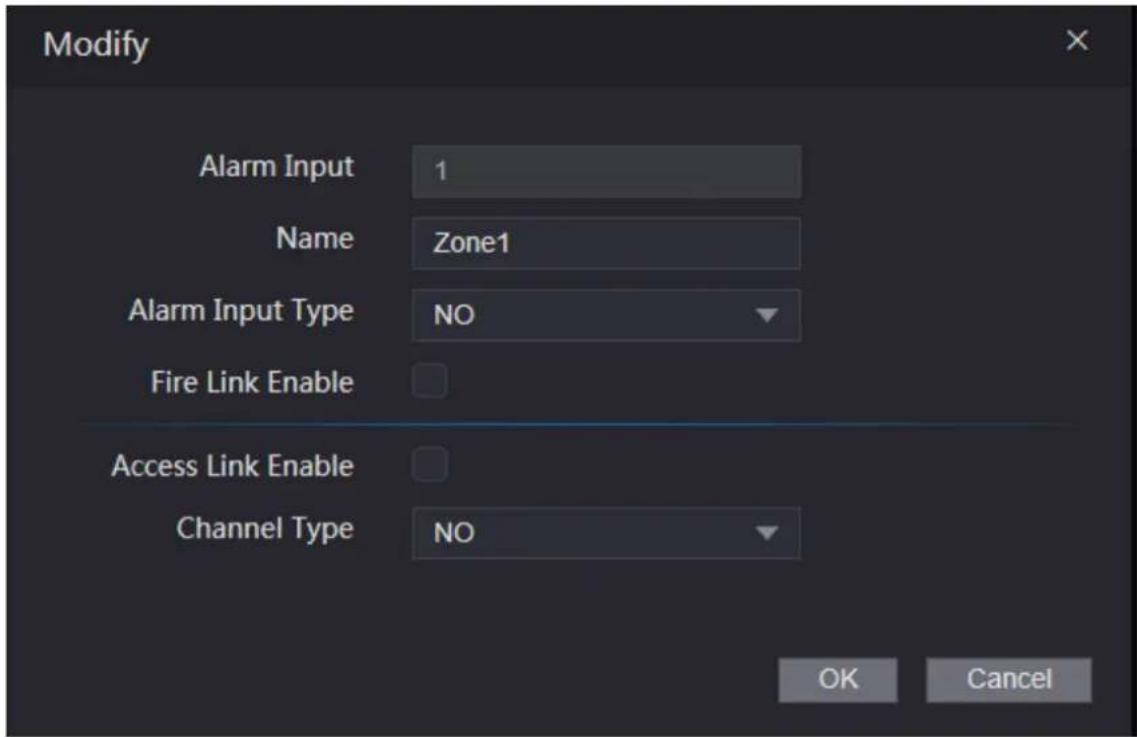
Table 4-1 Alarm linkage parameter description
| Parameter | Description |
| Alarm Input | You cannot modify the value. Keep it default. |
| Name | Enter a zone name. |
| Alarm Input Type | There are two options: NO and NC.If alarm input type of the alarm device you purchased is NO, then you should select NO; otherwise you should select NC. |
| Fire Link Enable | If fire link is enabled the attendance will output alarms when fire alarms are triggered. The alarm details will be displayed in the alarm log.Alarm output and access link are NO by default if fire link is enabled. |
| Access Link Enable | After the Access Link is enabled, the attendance will be normally on or normally closed when there are input alarm signals. |
| Channel Type | There are two options: NO and NC. |
Click OK, and then the configuration is completed. Step 4

The configuration on the web will be synchronized with the configuration in the client if the attendance is added to a client.
4.4.2 Alarm Log
You can view the alarm type and time range in the Alarm Log interface.
Log in to the web interface. Step 1
Select Alarm Linkage > Alarm Log. Step 2
The Alarm Log interface is displayed.
Alarm log Figure 4-9
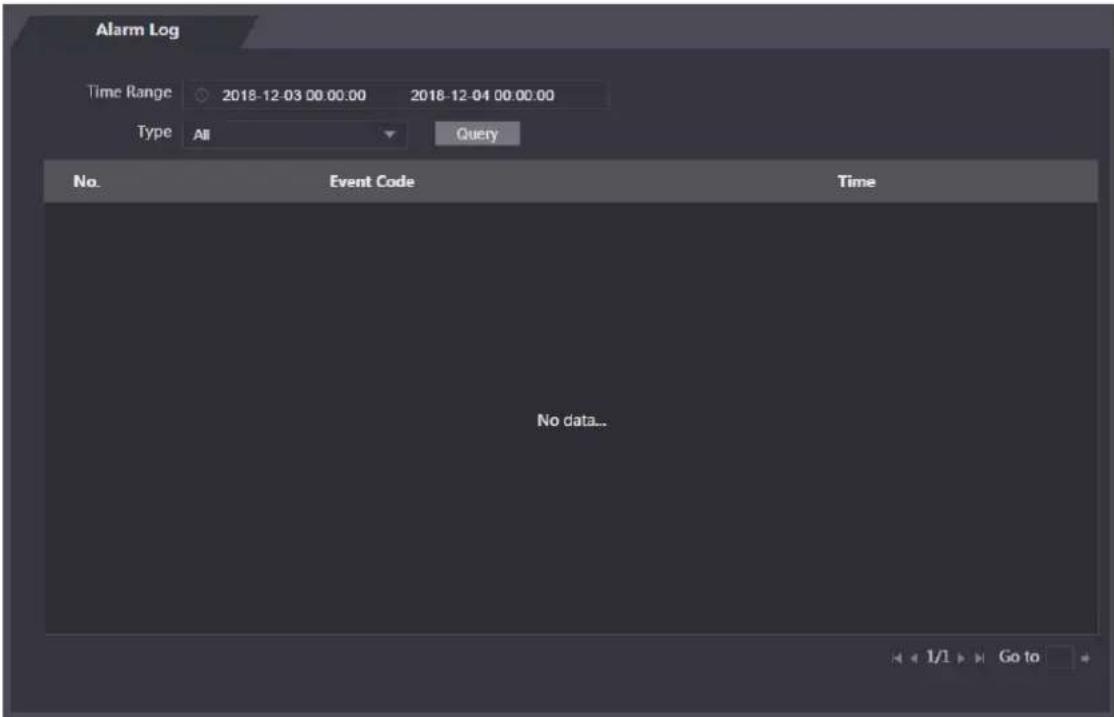
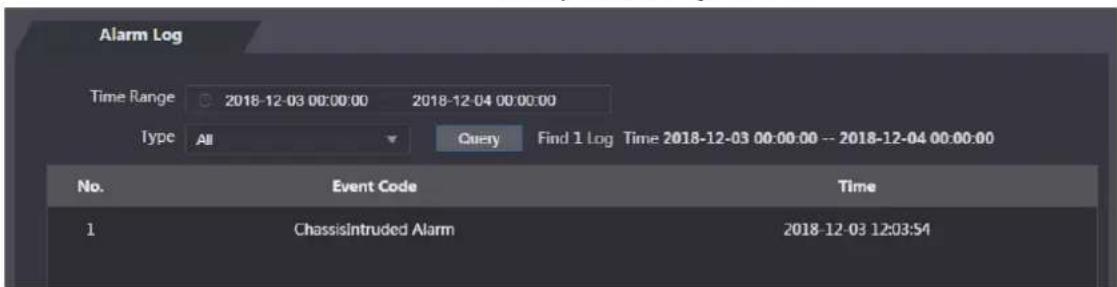
Select a time range and alarm type, and then click Query. Step 3 The query results are displayed.
Query results Figure 4-10
Data Capacity 4.5
You can see how many users, cards, fingerprints and face images the attendance can hold on the Data Capacity interface.
Log in to the web interface. Step 1
Select Data Capacity on the navigation bar. Step 2
The Data Capacity interface is displayed.
Video Setting 4.6
You can set parameters including data rate, image parameters (brightness, contrast, hue, saturation, and more), and exposure on the Video Setting interface.
4.6.1 Data Rate
You can configure stream parameters for channel 1.
Log in to the web interface. Step 1
Select Video Setting > Video Setting > Data Rate. Step 2
Data rate Figure 4-11
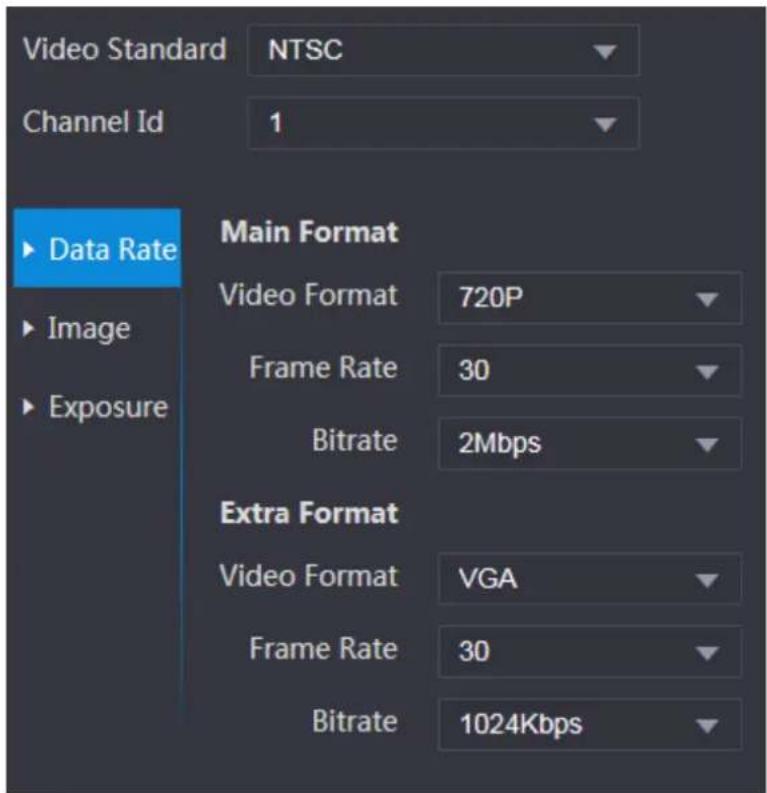
Table 4-2 stream parameter description
| Parameter | Description | |
| Video Standard | There are two options: NTSC and PAL. Select a standard according to the video standard of your region. | |
| Channel | There are two options: 1 and 2. 1 is white light camera and 2 is IR light camera. | |
| Main Format | Video Format | There are four options: D1, VGA, 720p and 1080p. Select an option according to the video quality you want. |
| Frame Rate | The rate at which consecutive frames appear on a display. The frame rate range is 1–30fps. | |
| Bit Rate | The number of bits that are conveyed or processed per unit of time. There are five options: 2Mbps, 4Mbps, 6Mbps, 8Mbps, and 10Mbps. | |
| Extra Format | Video Format | There are three options: D1, VGA, and QVGA. |
| Frame Rate | The rate at which consecutive frames appear on a display. The frame rate range is 1–30fps. | |
| Bit Rate | The number of bits that are conveyed or processed per unit of time. There are options: 512Kbps, 640Kbps, 768Kbps, 896Kbps, 1024Kbps, 1.25Mbps, 1.5Mbps, 1.75Mbps, and 2Mbps. | |
4.6.2 Image
There are two channels, and you need to configure parameters for each channel.
Log in to the web interface. Step 1
Select Video Setting > Video Setting > Image. Step 2
Image Figure 4-12
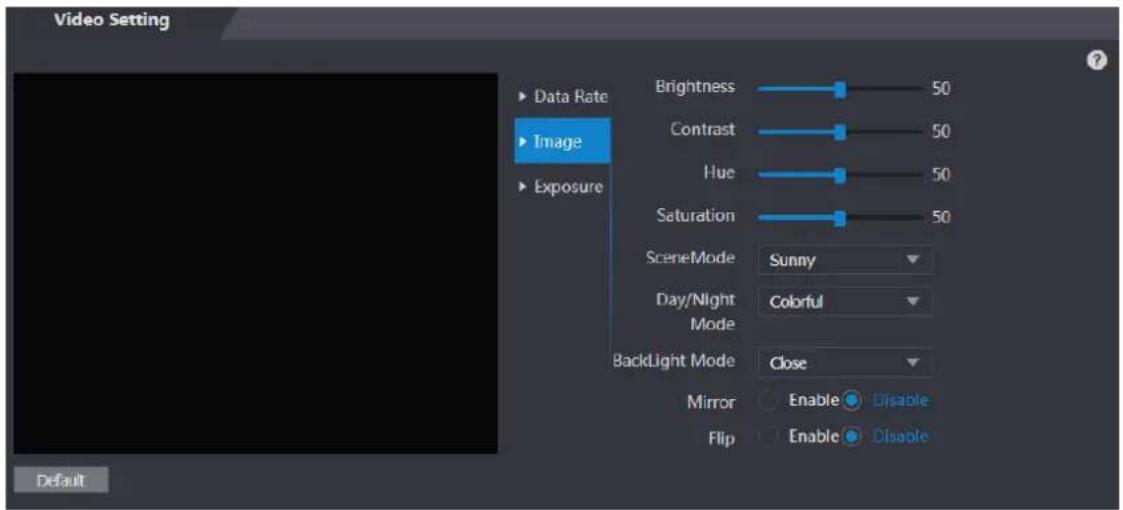
Select Wide Dynamic in the Backlight Mode. Step 3
Table 4-3 Image parameter description
| Parameter | Description |
| Brightness | The larger the value is, the brighter the images will be. |
| Contrast | Contrast is the difference in luminance or color that makes an object distinguishable. The larger the contrast value is, the greater the brightness and color contrast will be. |
| Hue | The larger the value is, the deeper the color will be. |
| Saturation | The larger the value is, the brighter the colors will be.[IMAGE]The value does not change image brightness. |
| Scene Mode | Close: Without modes.Auto: The system automatically adjusts scene modes.Sunny: In this mode, image hue will be reduced.Night: In this mode, image hue will be increased.[IMAGE]Sunnyis selected by default. |
| Day/Night Mode | Day/Night mode decides the working status of the fill light.Auto: The system automatically adjusts the day/night modes.Colorful: In this mode, images are with colors.Black and white: In this mode, images are in black and white. |
| Backlight Mode | Close: Without backlight compensation.BLC: Backlight compensation corrects regions with extremely high or low levels of light to maintain a normal and usable level of light for the object in focus.WDR: In the wide dynamic range mode, the system dims bright areas and compensates dark areas to ensure the definition of objects in the bright areas and dark areas.When human faces are in the backlight, you need to enable WDR.HLC: Highlight compensation is needed to compensate for overexposure of highlights or strong light sources like spotlights, headlights, porch lights, etc. to create an image that is usable and not overtaken by a bright light. |
| Mirror | When the function is enabled, images will be displayed with left and right side reversed. |
| Flip | When this function is enabled, images can be flipped over. |
4.6.3 Exposure
You can configure exposure parameters.
Log in to the web interface. Step 1
Select Video Setting > Video Setting > Exposure. Step 2
Exposure Figure 4-13
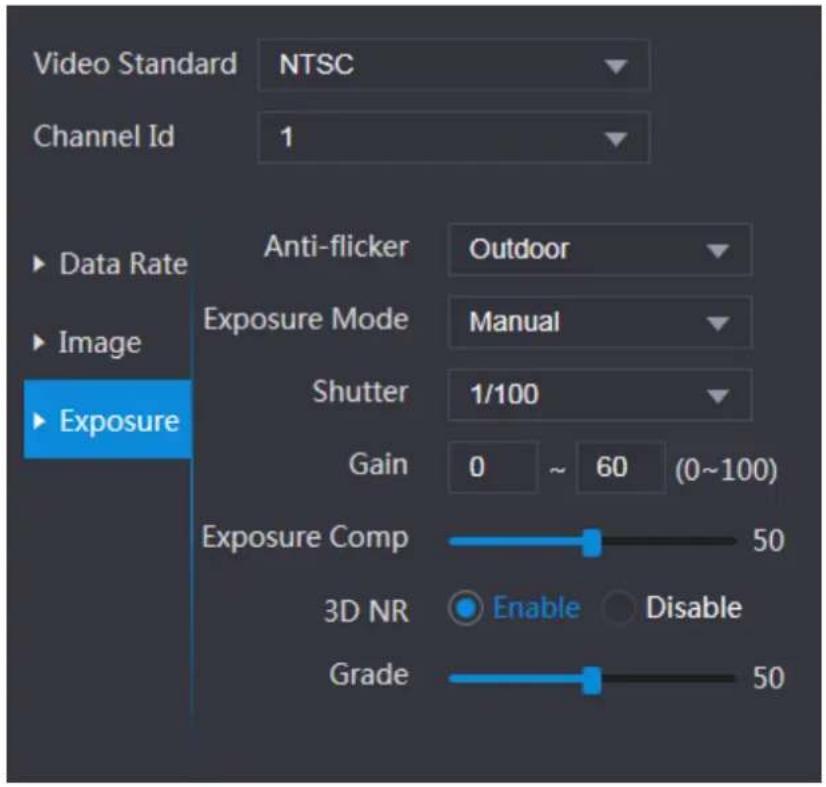
Table 4-4 Exposure parameter description
| Parameter | Description |
| Anti-flicker | 50Hz: When the utility frequency of alternating current is 50Hz, the exposure is automatically adjusted to make sure that there are no stripes on images.60Hz: When the utility frequency of alternating current is 60Hz, the exposure is automatically adjusted to make sure that there are no stripes on images.Outdoor: When Outdoor is selected, the exposure mode can be switched. |
| Exposure Mode | |
| When you select Outdoor in the Anti-flicker drop-down list, you can select Shutter Priority as the exposure mode.Exposure modes of different devices might vary, and the actual product shall prevail.You can select from:Auto: The attendance will automatically adjust brightness of images.Shutter Priority: The attendance will adjust image brightness according to shutter exposure value range. If the image brightness is not enough and the shutter value has reached upper or lower limit, the attendance will adjust gain value automatically to get ideal brightness.Manual: You can configure gain and shutter value manually to adjust image brightness. | |
| Shutter | The larger the shutter value is and the shorter the exposure time is, the darker the images will be. |
| Shutter Value Range | If you select Customized Range, you can customize the shutter value range. |
| Gain Value Range | When the gain value range is set, video quality will be improved. |
| Exposure Compensation | You can increase video brightness by adjusting exposure compensation value. |
| 3D NR | When 3D Noise Reduction (RD) is enabled, video noise can be reduced, and high definition videos will be produced. |
| Grade | You can adjust the value of the 3D NR when 3D NR is enabled.The larger the value is, the less the noise there will be. |
4.6.4 Motion Detection
Set a range in which moving objects can be detected.
Log in to the web interface. Step 1
Select Video Setting > Motion Detection. Step 2
The Motion Detection interface is displayed.
Motion detection Figure 4-14
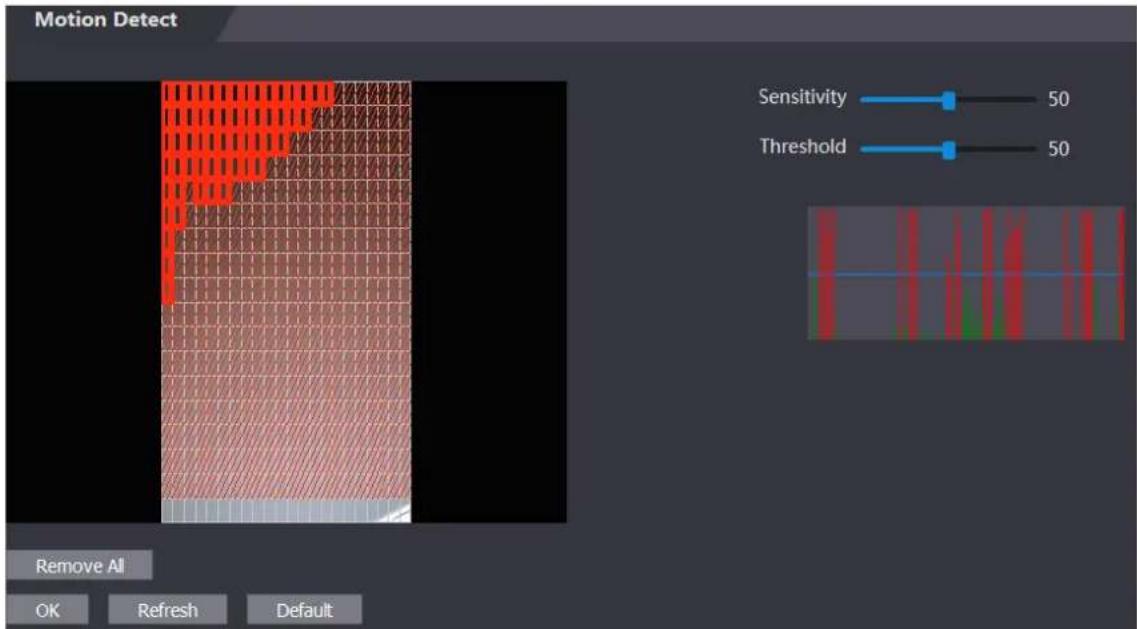
____ Press and hold the left mouse button, and then drag the mouse in the red area. The Step 3 Motion Detection area is displayed.

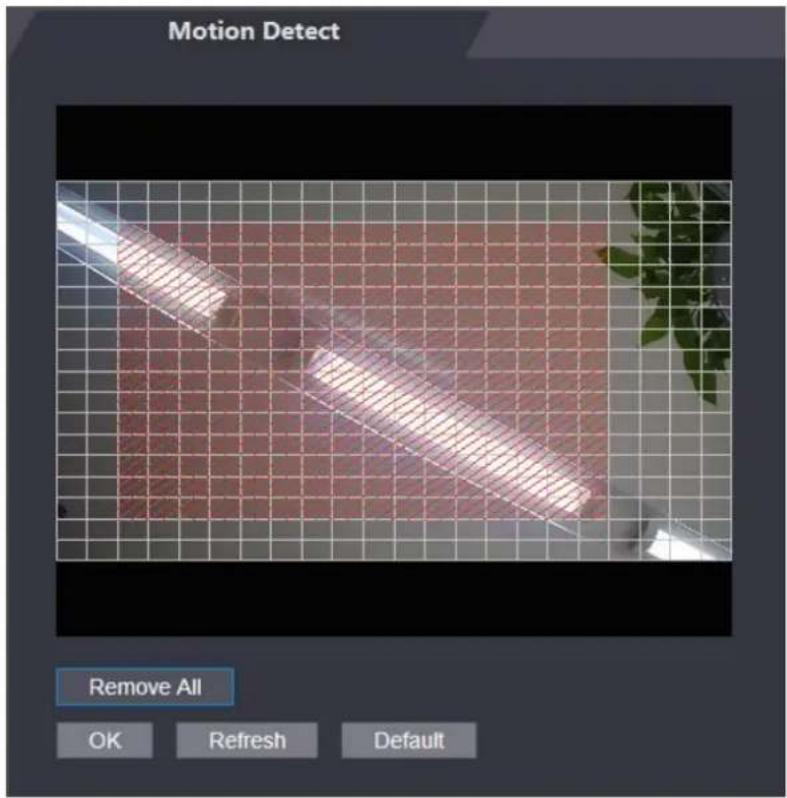
- The red rectangles are motion detection area. The default motion detection range is all the rectangles.
- To draw a motion detection area, you need to click Remove All first.
- The motion detection area you draw will be a non-motion detection area if you draw in the default motion detection area.
Motion detection area Figure 4-15
Set sensitivity and threshold. Step 4

- Sensitivity represents the ability of each grid to sense motion. The larger the value is, the higher the sensitivity is.
- Threshold is the condition of motion detection. When grid number reaches the threshold, motion detection will be triggered. The smaller the value is, the more likely the motion detection will be triggered.
- When grid number is smaller than the threshold, green line will appear; when grid number is more than the threshold, red line will appear. See Figure 4-14.
____ Click OK to finish the setting. Step 5
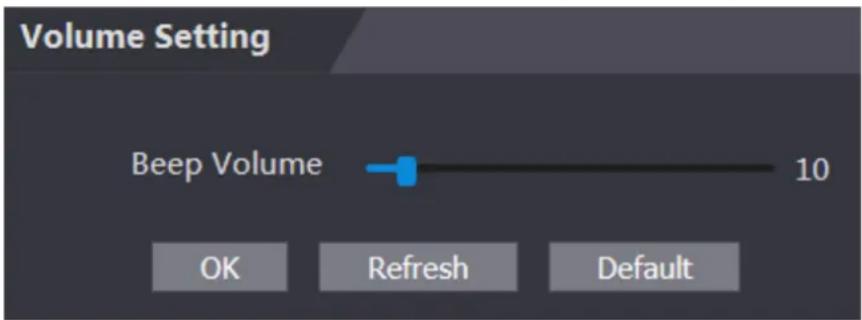
4.6.5 Volume Setting
You can adjust volume of the attendance speaker.
Log in to the web interface. Step 1
Select Video Setting > Volume Setting. Step 2
Volume setting Figure 4-16
4.6.6 Image Mode
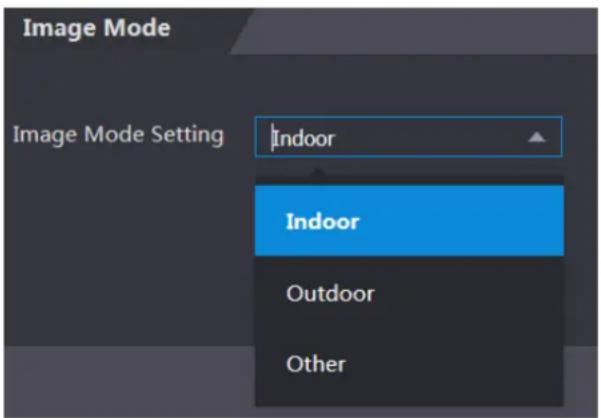
There are three options: indoor, outdoor and other. Select Indoor when the attendance is installed indoors; select Outdoor when the attendance is installed outdoors; and select Other when the attendance is installed at places with backlights like corridors and hallways.
Log in to the web interface. Step 1
Select Video Setting > Image Mode. Step 2
Figure 4-17 Image mode
Face Detect 4.7
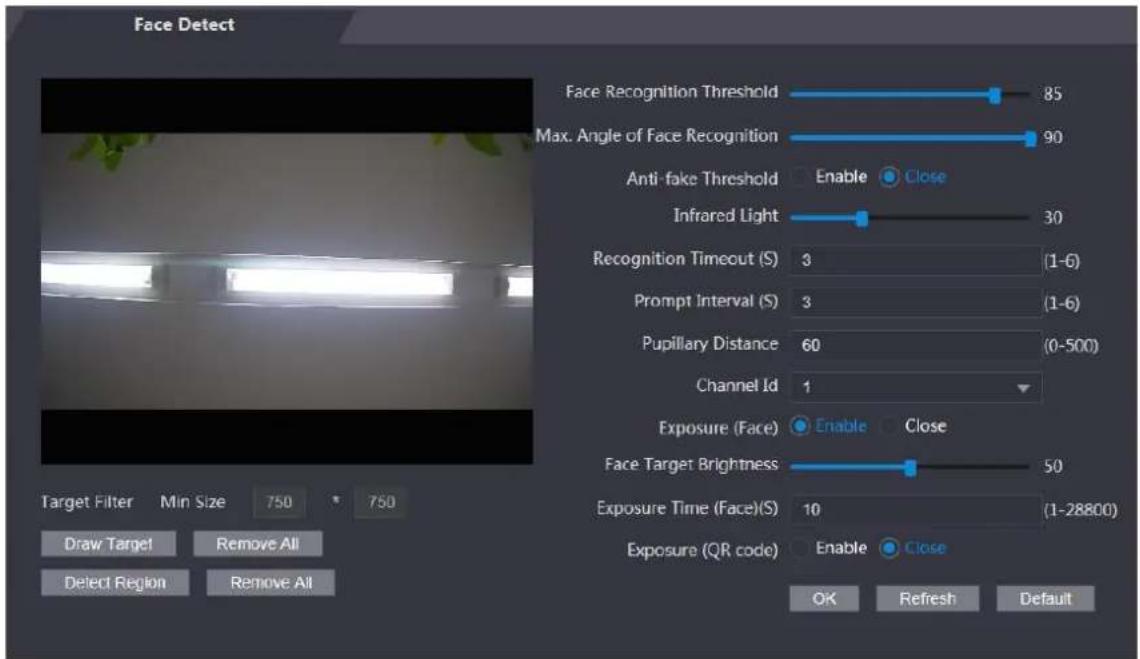
You can configure human face related parameters on this interface to increase the accuracy of the face recognition.
Log in to the web interface. Step 1
Select Face Detect. Step 2
Face detect Figure 4-18
Configure parameters. Step 3
Table 4-5 Face detect parameter description
| Parameter | Description |
| Face Recognition Threshold | The larger the value is, the higher the accuracy will be. |
| Max. Angle of Face Recognition | The larger the angle is, the wider range of the profiles will be recognized. |
| Anti-fake Threshold | This function prevents people from checking in or out by human face images or face models.There are two options: Enable and Close. |
| Infrared Light | Adjust IR brightnees by dragging the scroll bar. |
| Recognition Timeout | The interval of the prompt during valid face recognition. |
| Prompt Interval | The interval of the prompt during invalid face recognition. |
| Pupillary Distance | Pupillary distance is the pixel value of the image between the centers of the pupils in each eye. You need to set an appropriate value so that the attendance can recognize faces as needed. The value changes according to the face sizes and the distance between faces and the lens. The closer the face is to the lens, the greater the value should be. If an adult is 1.5 meters away from the lens, the pupillary distance value can be within 50 to 70. |
| Channel Id | There are two options: 1 and 2. 1 is white light camera and 2 is IR light camera. |
| Exposure(Face) | After face exposure is enabled, human face will be clearer when the attendance is installed outdoors. |
| Face Target Brightness | The default value is 50. Adjust the brightness as needed. |
| Exposure Time(Face) | After a face is detected, the attendance will give out light to illuminate the face, and the attendance will not give out light again until the interval you set has passed. |
| Exposure(QR code) | Currently the function is not supported. |
| Draw Target | Click Draw Target, and then you can draw the minimum face detection frame.Click Remove All, and you can remove all the frames you drew. |
| Detect Region | Click Detect Region, move your mouse, and you can adjust the face detection region.Click Remove All, and you can remove all the detection regions. |
Click OK to finish the setting. Step 4
Network Setting 4.8
4.8.1 TCP/IP
You need to configure IP address and DNS server to make sure that the attendance can communicate with other devices.
Make sure that the attendance is connected to the network correctly.
Log in to the web interface. Step 1
Select Network Setting > TCP/IP. Step 2
Figure 4-19 TCP/IP
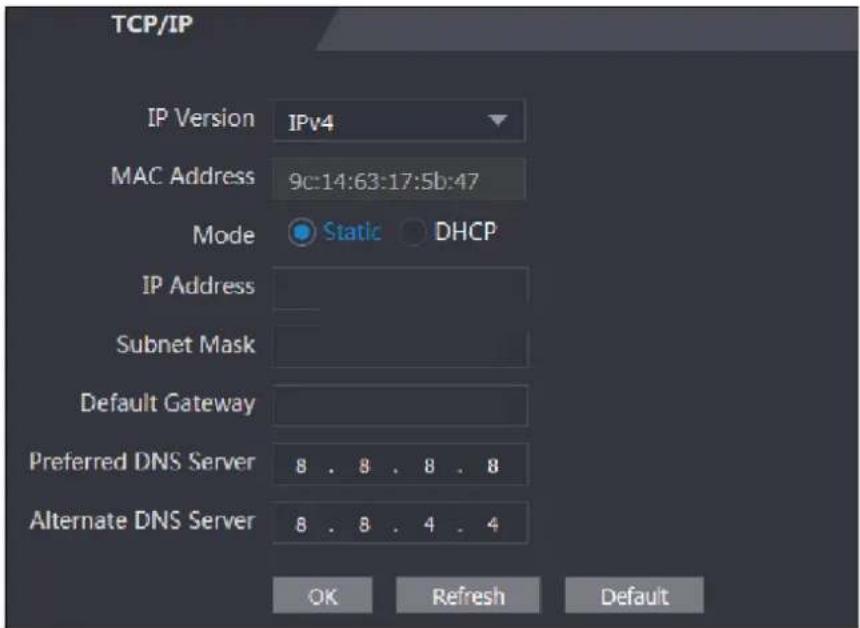
Table 4-6 TCP/IP
| Parameter | Description |
| IP Version | There is one option: IPv4. |
| MAC Address | MAC address of the attendance is displayed. |
| Mode | StaticSet IP address, subnet mask, and gateway address manually.DHCPAfter DHCP is enabled, IP address, subnet mask, and gateway address cannot be configured.If DHCP is effective, IP address, subnet mask, and gateway address will be displayed automatically; if DHCP is not effective, IP address, subnet mask, and gateway address will all be zero.If you want to see the default IP when DHCP is effective, you need to disable DHCP. |
| Link-local address | Link-local address is only available when IPv6 is selected in the IP version. Unique link-local addresses will be assigned to network interface controller in each local area network to enable communications. The link-local address cannot be modified. |
| IP Address | Enter IP address, and then configure subnet mask and gateway address. |
| Subnet Mask | IP address and gateway address must be in the same network segment. |
| Default Gateway | |
| Preferred DNS Server | Set IP address of the preferred DNS server. |
| Alternate DNS Server | Set IP address of the alternate DNS server. |
Step 4 Click OK to complete the setting.
4.8.2 Port
Set the maximum connections clients that the attendance can be connected to and port numbers.
Step 1 Log in to the web interface.
Step 2 Select Network Setting > Port.
The Port interface is displayed.
Step 3 Configure port numbers. See the following table.
The image contains no text.
Except max connection, you need to reboot the attendance to make the configuration effective after modifying values.
Table 4-7 Port description
| Parameter | Description |
| Max Connection | You can set the maximum connections of clients that the attendance can be connected to. |
| Platform clients like SmartPSS AC are not counted. | |
| TCP Port | Default value is 37777. |
| HTTP Port | Default value is 80. If other value is used as port number, you need to add this value behind the address when logging in through browsers. |
| HTTPS Port | Default value is 443. |
| RTSP Port | Default value is 554. |
Click OK to complete the setting. Step 4
4.8.3 Register
When connected to external network, the attendance will report its address to the server that is designated by the user so that clients can get access to the attendance.
Log in to the web interface. Step 1
Select Network Setting > Auto Register. Step 2
The Auto Register interface is displayed.
Select Enable, and enter host IP, port, and sub device ID. Step 3
Table 4-8 Auto register description
| Parameter | Description |
| Host IP | Server IP address or server domain name. |
| Port | Server port used for auto registration. |
| Sub Device ID | Access controller ID assigned by the server. |
____ Click OK to complete the setting. Step 4
4.8.4 P2P
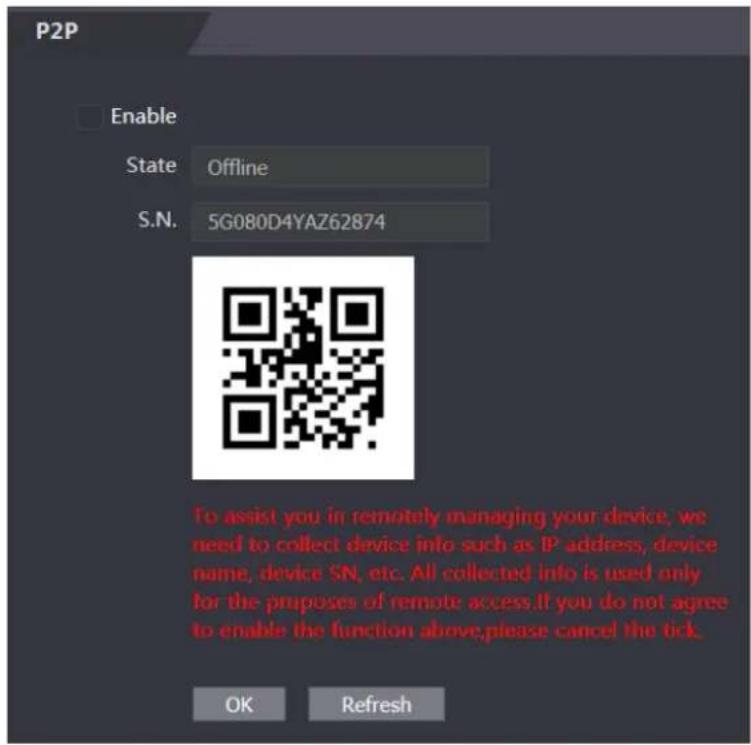
Peer-to-peer computing or networking is a distributed application architecture that partitions tasks or workloads between peers. Users can download mobile application by scanning QR code, and then register an account so that more than one attendance can be managed on the mobile app. You do not need to apply dynamic domain name, do port mapping or do not need transit server.

If you are to use P2P, you must connect the attendance to external network; otherwise the attendance cannot be used.
P2P Figure 4-20
Log in to the web interface. Step 1
Select Network Setting > P2P. Step 2
The P2P interface is displayed.
Select Enable to enable P2P function. Step 3
Click OK to complete the setting. Step 4

Scan the QR code on your web interface to get the serial number of the attendance.
Safety Management 4.9
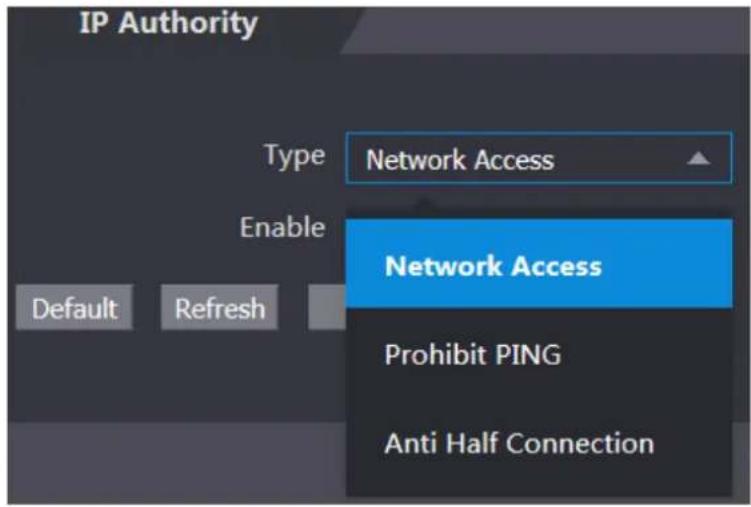
4.9.1 IP Authority
Select a cyber security mode as needed.
IP authority Figure 4-21
4.9.2 Systems
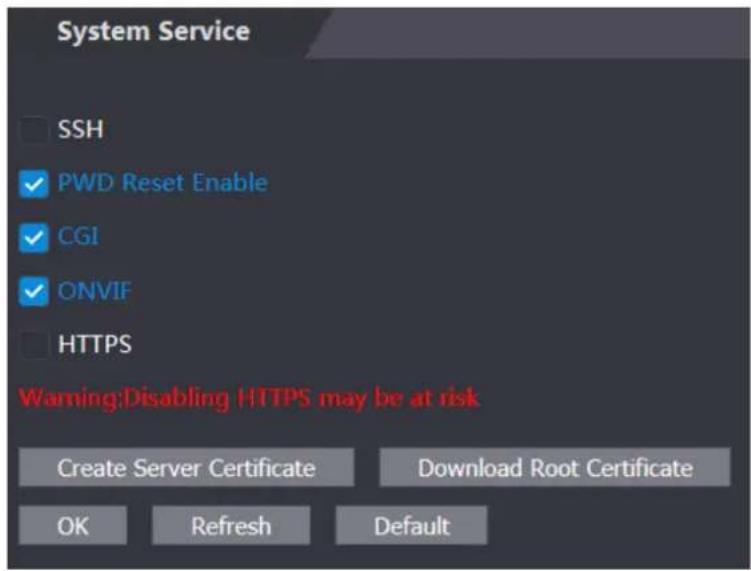
4.9.2.1 System Service
There are four options: SSH, PWD Reset Enable, CGI, and HTTPS. Refer to "3.11 Features" to select one or more than one of them.

The system service configuration done on the web page and the configuration on the Features interface of the attendance will be synchronized.
System service Figure 4-22
4.9.2.2 Creating Server Certificate
Click Create Server Certificate, enter needed information, click Save, and then the attendance will reboot.
4.9.2.3 Downloading Root Certificate
Click Download Root Certificate. Step 1
Select a path to save the certificate on the Save File dialog box.
Step 2 Double-click on the Root Certificate that you have downloaded to install the certificate.
Install the certificate by following the onscreen instructions.
User Management 4.10
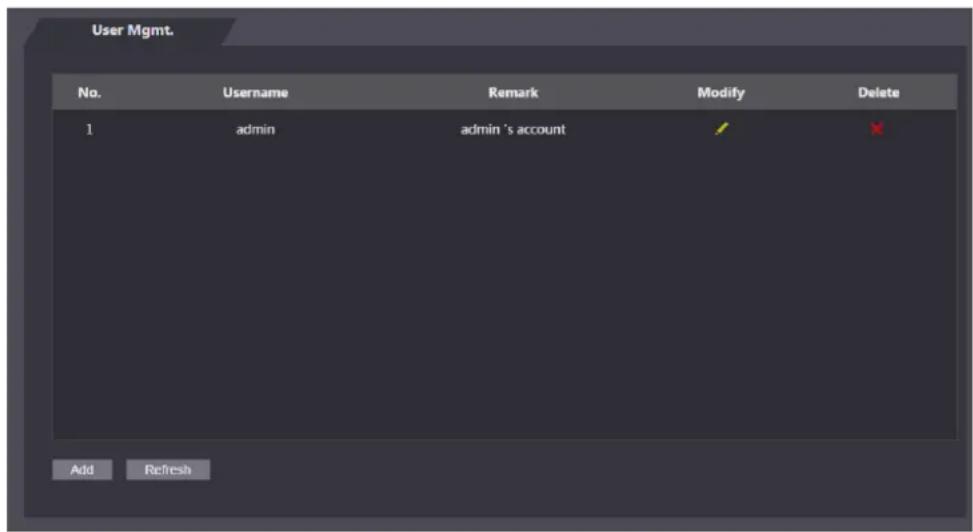
You can add and delete users, modify users' passwords, and enter an email address for resetting the password when you forget your password.
4.10.1 Adding Users
Click Add on the User Mgmt. interface to add users, and then enter username, password, confirmed password, and remark. Click OK to complete the user adding.
4.10.2 Modifying User Information
You can modify user information by clicking ↗ on the User Mgmt. interface.
User management Figure 4-23
4.10.3 ONVIF User
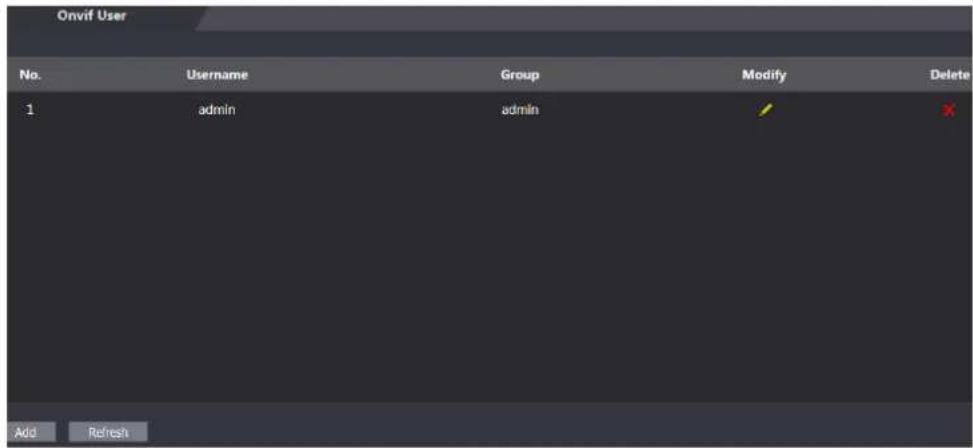
Open Network Video Interface Forum (ONVIF), a global and open industry forum with the goal of facilitating the development and use of a global open standard for the interface of physical IP-based security products. When ONVIF is used, administrator, operator, and user have different permission of ONVIF server. Create ONVIF users as needed.
Onvif user Figure 4-24
Maintenance 4.11
You can make the attendance reboot itself in idle time to improve the running speed of the attendance. You need to set the auto reboot date and time.
Log in to the web interface. Step 1
Select Maintenance on the navigation bar. Step 2
Set the auto reboot time, and then click OK. Step 3
Maintenance Figure 4-25
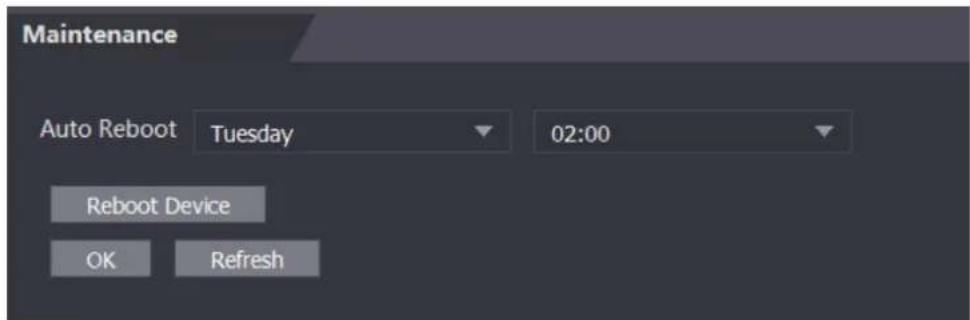
For example, the attendance will reboot at 2 O'clock in the morning every Tuesday. Click Reboot Device, the attendance will reboot immediately.
Configuration Management 4.12
When more than one attendance needs the same configuration, you can configure parameters for them by importing or exporting configuration files.
4.12.1 Exporting Configuration File
You can export the configuration file of the attendance for backup.
Log in to the web interface. Step 1
Step 2 Select Config Mgmt. on the navigation bar.
Configuration management Figure 4-26
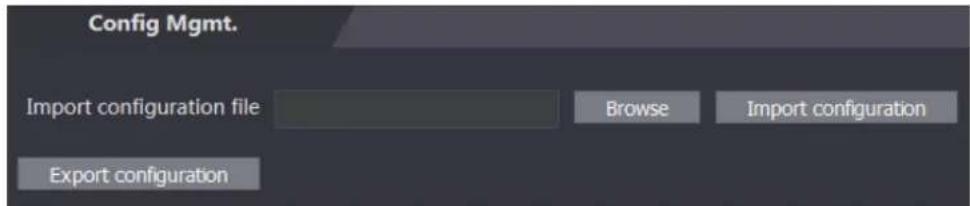
Step 3 Click Export configuration to save the configuration file locally.

IP information of the attendance will not be exported.
4.12.2 Importing Configuration File
You can import the configuration file that is exported from an attendance to another attendance with the same model.
Log in to the web interface. Step 1
Select Config Mgmt. on the navigation bar. Step 2
On the configuration management interface, click Browse to select the configuration Step 3 file that you want to import, and then click Import configuration.
The attendance will reboot after importing configuration file.
Upgrade 4.13

- Export the configuration file for backup before upgrade, and then import it after the upgrade is completed.
• Make sure that the upgrade file has been obtained. You can get it from technical support. - Do not disconnect the power or network, or reboot or shutdown the Device during upgrade.
Log in to the web interface. Step 1
Select Upgrade on the navigation bar. Step 2
Step 3 On the Upgrade interface, click Browse to select the upgrade file, and then click Upgrade.
Upgrade Figure 4-27
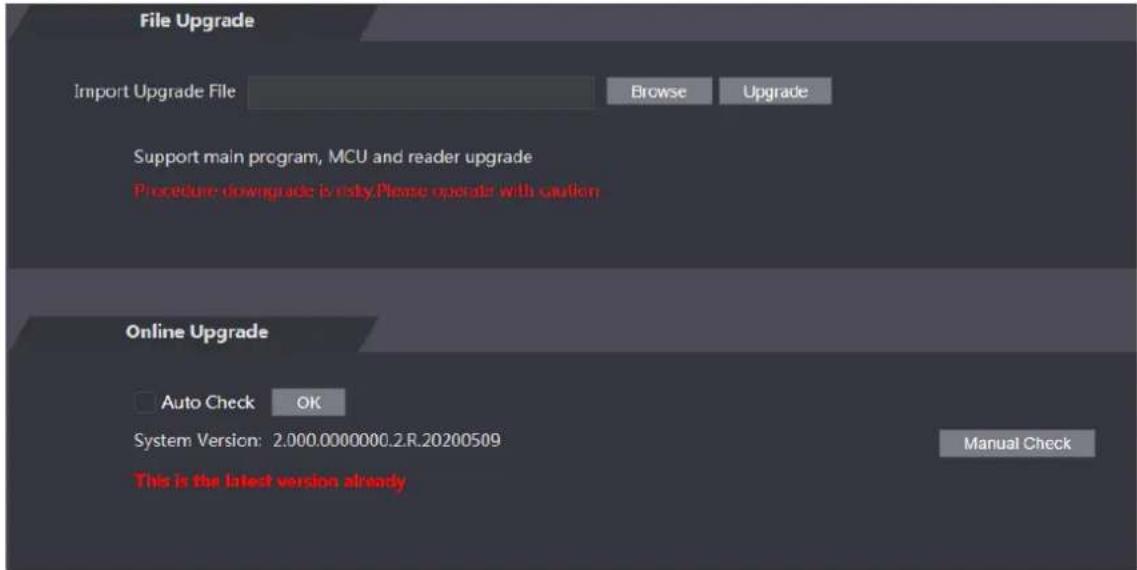
If the upgrade is succeeded, the system pops up a message indicating that the upgrade is completed. If the upgrade is failed, there will be corresponding prompts.

- You can select Auto Check to upgrade the system automatically. You can also select Manual Check to upgrade the system manually.
- The attendance will reboot after upgrade.
- You click Version Info on the left navigation menu to check version after upgrade.
4.14 Version Information
You can view information including MAC address, serial number, MCU version, web version, security baseline version, system version, and firmware version.
Log in to the web interface. Step 1
Select Version Info on the navigation bar. Step 2
The Version Info interface is displayed.
Online User 4.15
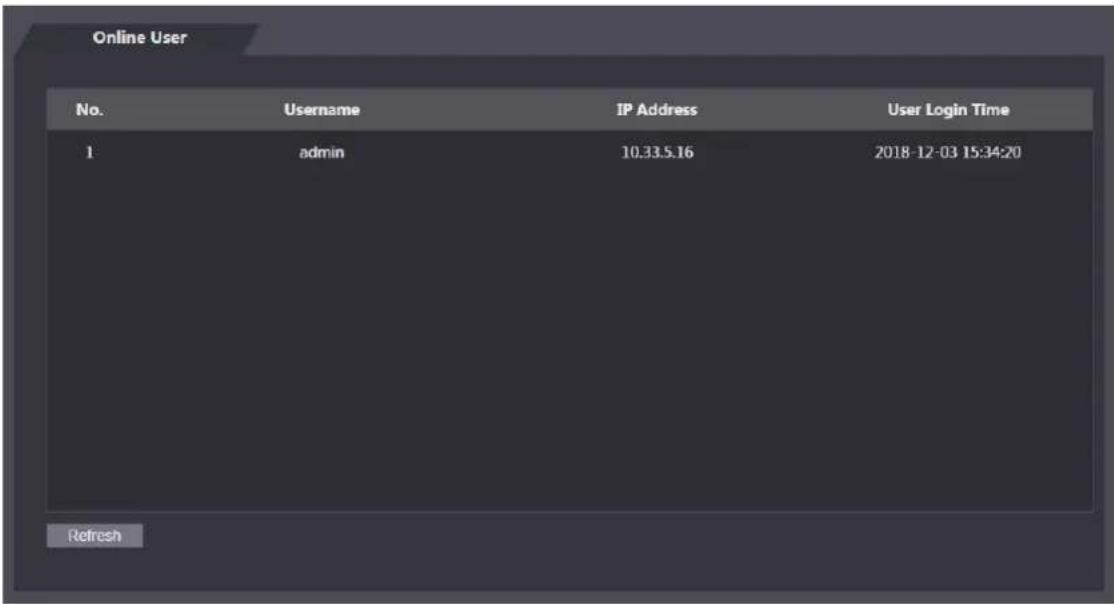
You can view username, IP address, and user login time on the Online User interface.
Log in to the web interface. Step 1
Select Online User on the navigation bar. Step 2
Online user Figure 4-28
System Log 4.16
You can query and backup system logs on the System Log interface.
4.16.1 Querying Logs
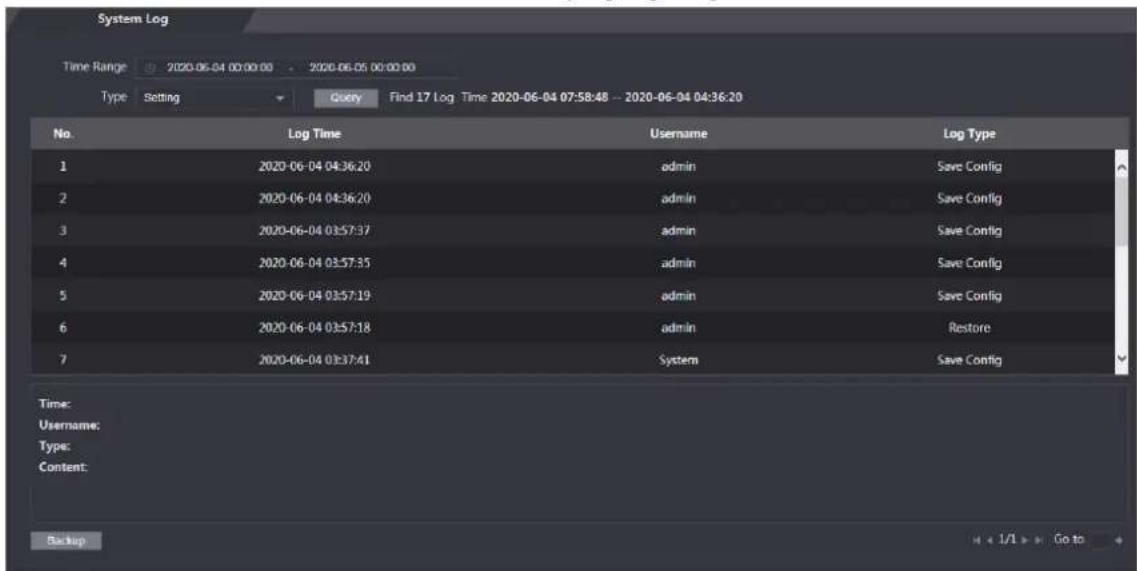
You can query system logs.
Log in to the web interface. Step 1
Select System Log on the navigation bar. Step 2
Select a time range and its type, and then click Query. Step 3
Logs meet the conditions will be displayed.
Querying logs Figure 4-29
4.16.2 Backup Logs
You can back up the queried logs.
Log in to the web interface. Step 1
Select System Log on the navigation bar. Step 2
Select a time range and its type, and then click Query. Step 3
Click Backup to back up the logs displayed. Step 4
4.16.3 Admin Log
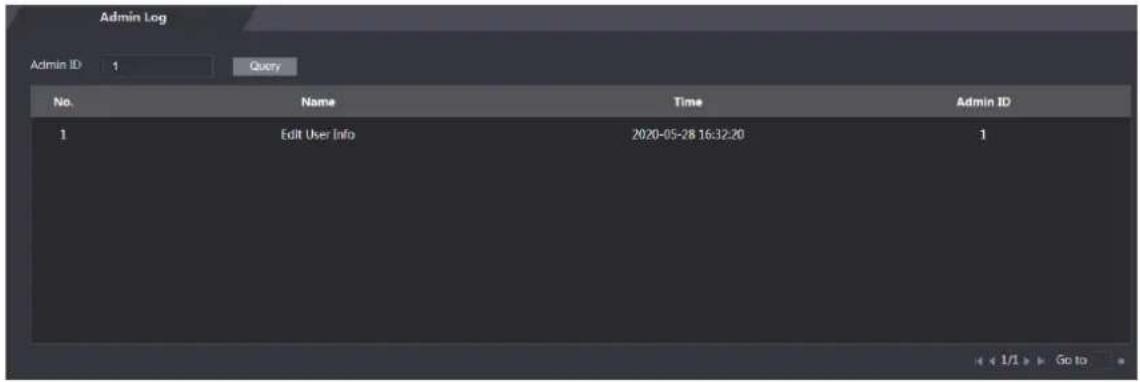
You can search Admin logs by Admin ID.
Log in to the web interface. Step 1
Step 2 Select System Log > Admin Log.
Step 3 On the Admin Log interface, enter Admin ID, and then click Query.
You will see the administrator's operation records.
Admin log Figure 4-30
Exit 4.17

Click , click OK, and then you will log out the web interface.
5 SmartPSS AC Configuration
You can manage the attendance through the SmartPSS AC client. For detailed configurations, see the SmartPSS AC user manual.

SmartPSS AC interfaces might vary with versions, and the actual interface shall prevail.
Login 5.1
Install the SmartPSS AC. Step 1
Double-click and then follow the instructions to finish the initialization and log in. Step 2
Adding Devices 5.2
You need to add attendances to the SmartPSS AC. You can click Auto Search to add and click Add to manually add devices.
5.2.1 Auto Search
You can search and add attendances at the same network segment to the SmartPSS AC.
Log in to SmartPSS AC. Step 1
Step 2 Click Device Manager at the lower left corner, and the Devices interface is displayed.
Devices Figure 5-1

Step 3 Click Auto Search, and the Auto Search interface is displayed.
Auto search Figure 5-2
![Auto Search Device Segment: Search Refresh Modify IP Initialization Search Device Number: 1 No. IP Device Type MAC Address Port Initialization Status 1 $[PRODUCT_NAME] 0 0 Initialized Add Cancel](/content/2026/05/973026/images/e79d72008fcff568e68580ca390adcbe2437f3d995826286a3f40b3e3fb332e7.jpg)
____ Enter the network segment, and then click Search. Step 4 A search result list will be displayed.
Step 5 Select attendances that you want to add to the SmartPSS AC, and then click Add. The Login information dialog box will be displayed.
____ Enter the username and the login password to login. Step 6 You can see the added attendance on the Devices interface.

Select an attendance, click Modify IP, and you can modify the attendance's IP address. For details about IP address modification, see SmartPSS AC user manual.
5.2.2 Manual Add
You can add attendances manually. You need to know IP addresses and domain names of attendances that you want to add.
Log in to SmartPSS AC. Step 1
Step 2 Click Device Manager at the lower left corner, and the Devices interface is displayed.
Step 3 Click Add on the Devices interface, and the Manual Add interface will be displayed.
Manual add Figure 5-3
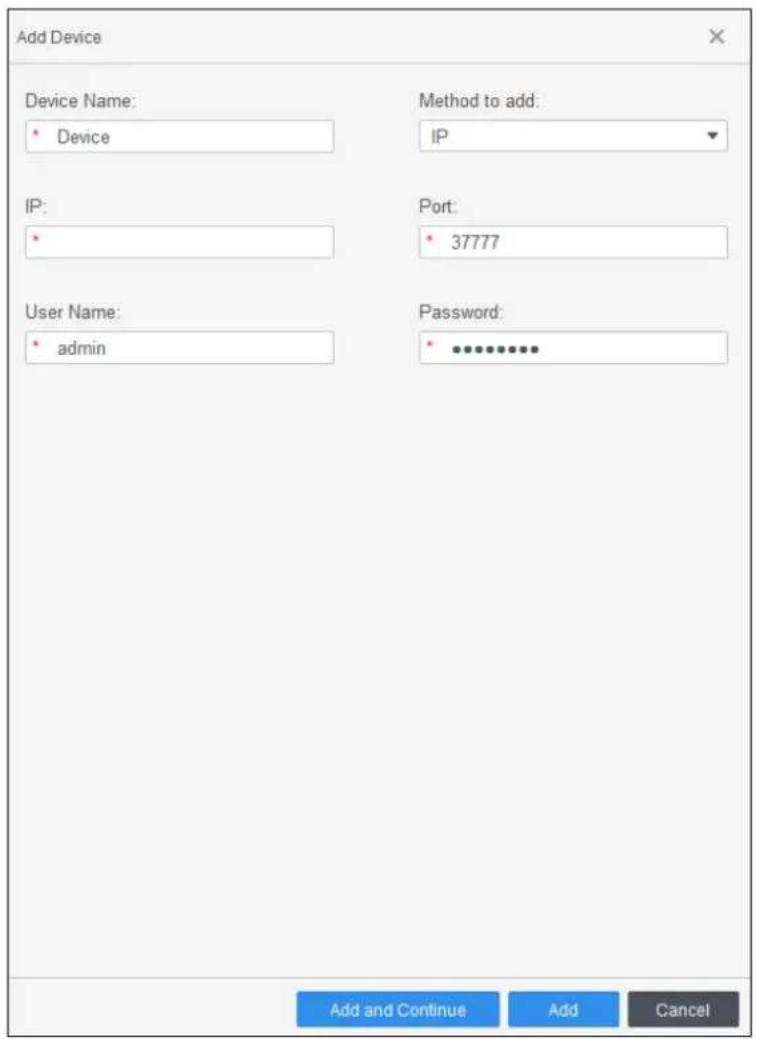
____ Enter the Device Name, select a method to add, enter the IP, Port number (37777 by Step 4 default), User Name, and Password.
Step 5 Click Add, and then you can see the added attendance on the Devices interface.
User Management 5.3
5.3.1 Card Type Setting
Before issuing card, set card type first. For example, if the issued card is ID card, select type as ID card.

Card types must be the same as card issuer types; otherwise card numbers cannot be read.
Log in to SmartPSS AC. Step 1
Step 2 Click Personnel Manager, and the Personnel Manager interface is displayed.
Personnel manager Figure 5-4

____ On the Personnel Manager interface, click , then click . Step 3
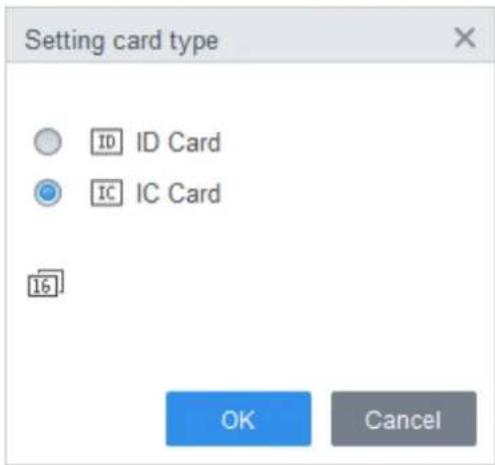
On the Setting Card Type interface, select a card type. Step 4
Click to select display method of card number in decimal or in hex. Step 5
Setting card type Figure 5-5
Click OK. Step 6
5.3.2 Adding User
Select one of the methods to add user.
- Add user one by one manually.
- Add user in batches.
- Extract user information from other devices.
- Import user information from the local.
5.3.2.1 Manual Add
You can add user one by one manually.
Log in to SmartPSS AC. Step 1
Step 2 Click Personnel Manger > User > Add.
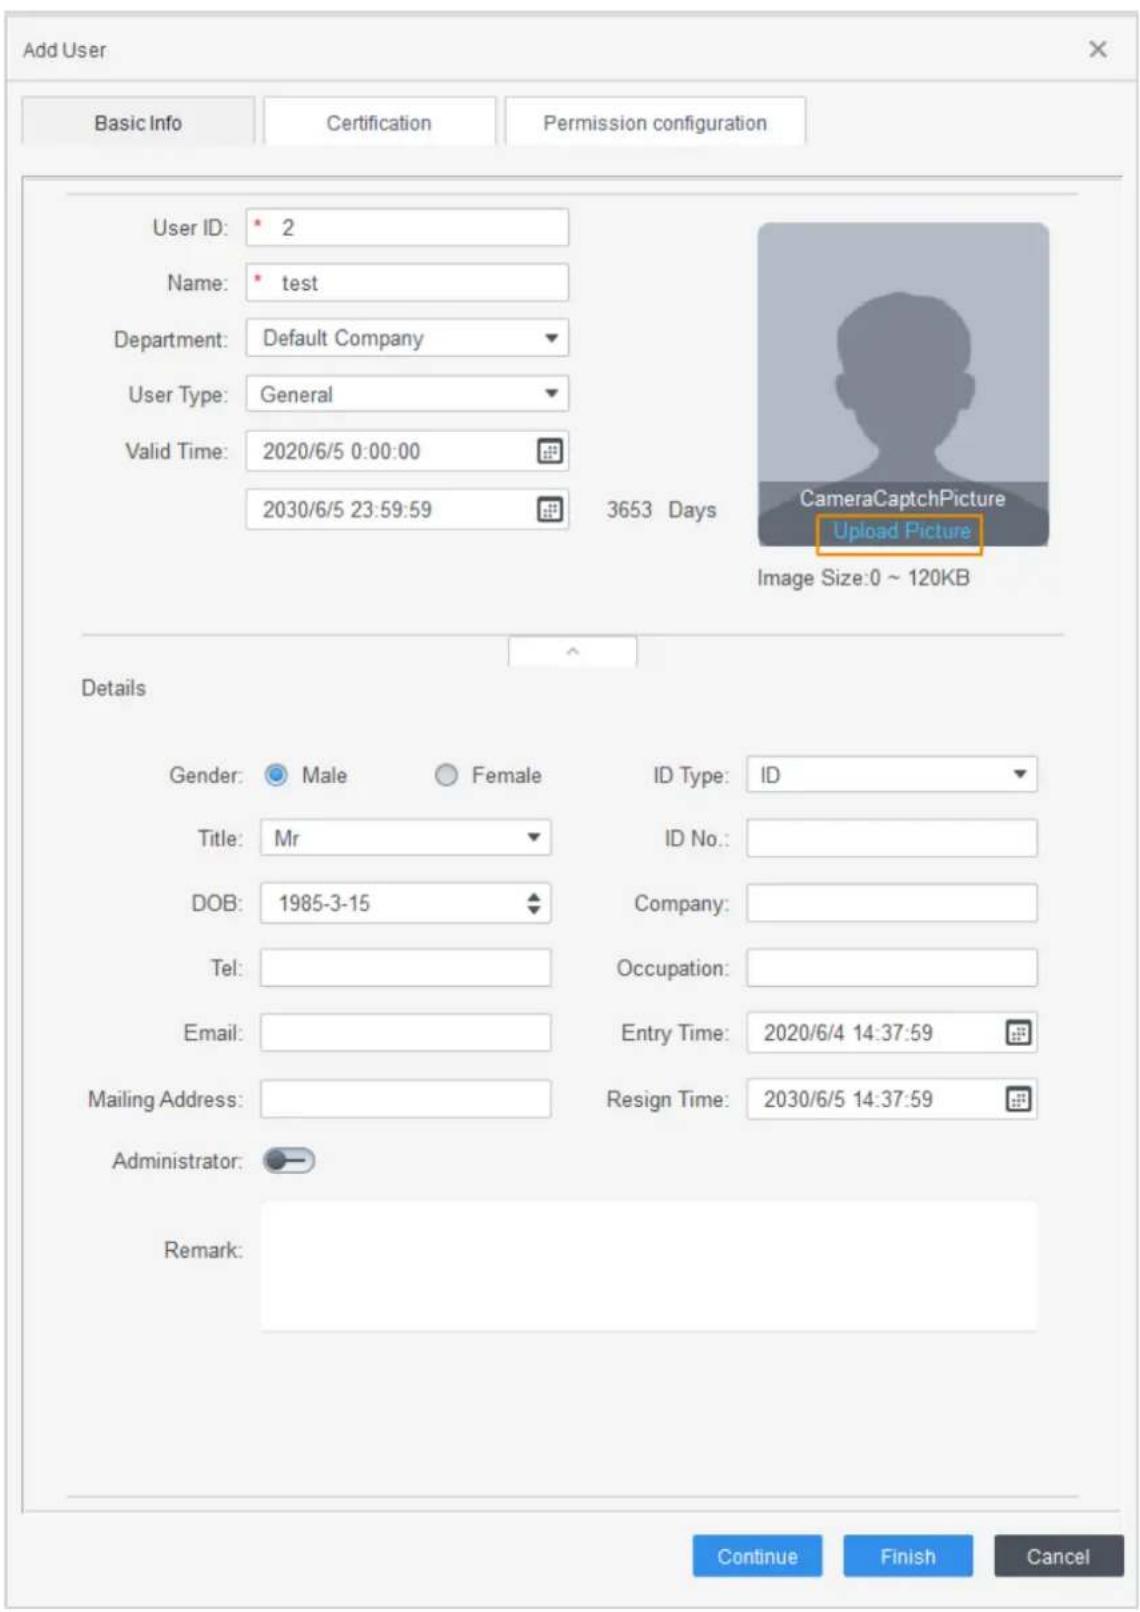
Step 3 Add basic information of the user.
1) Click the Basic Info tab on the Add User interface, and then add basic information of the user.
2) Click the image, and then click Upload Picture to add a face image. The uploaded face image will display on the capture frame.

Make sure that the image pixels are more than 500 × 500 ; image size is less than 120 KB.
Add basic information Figure 5-6
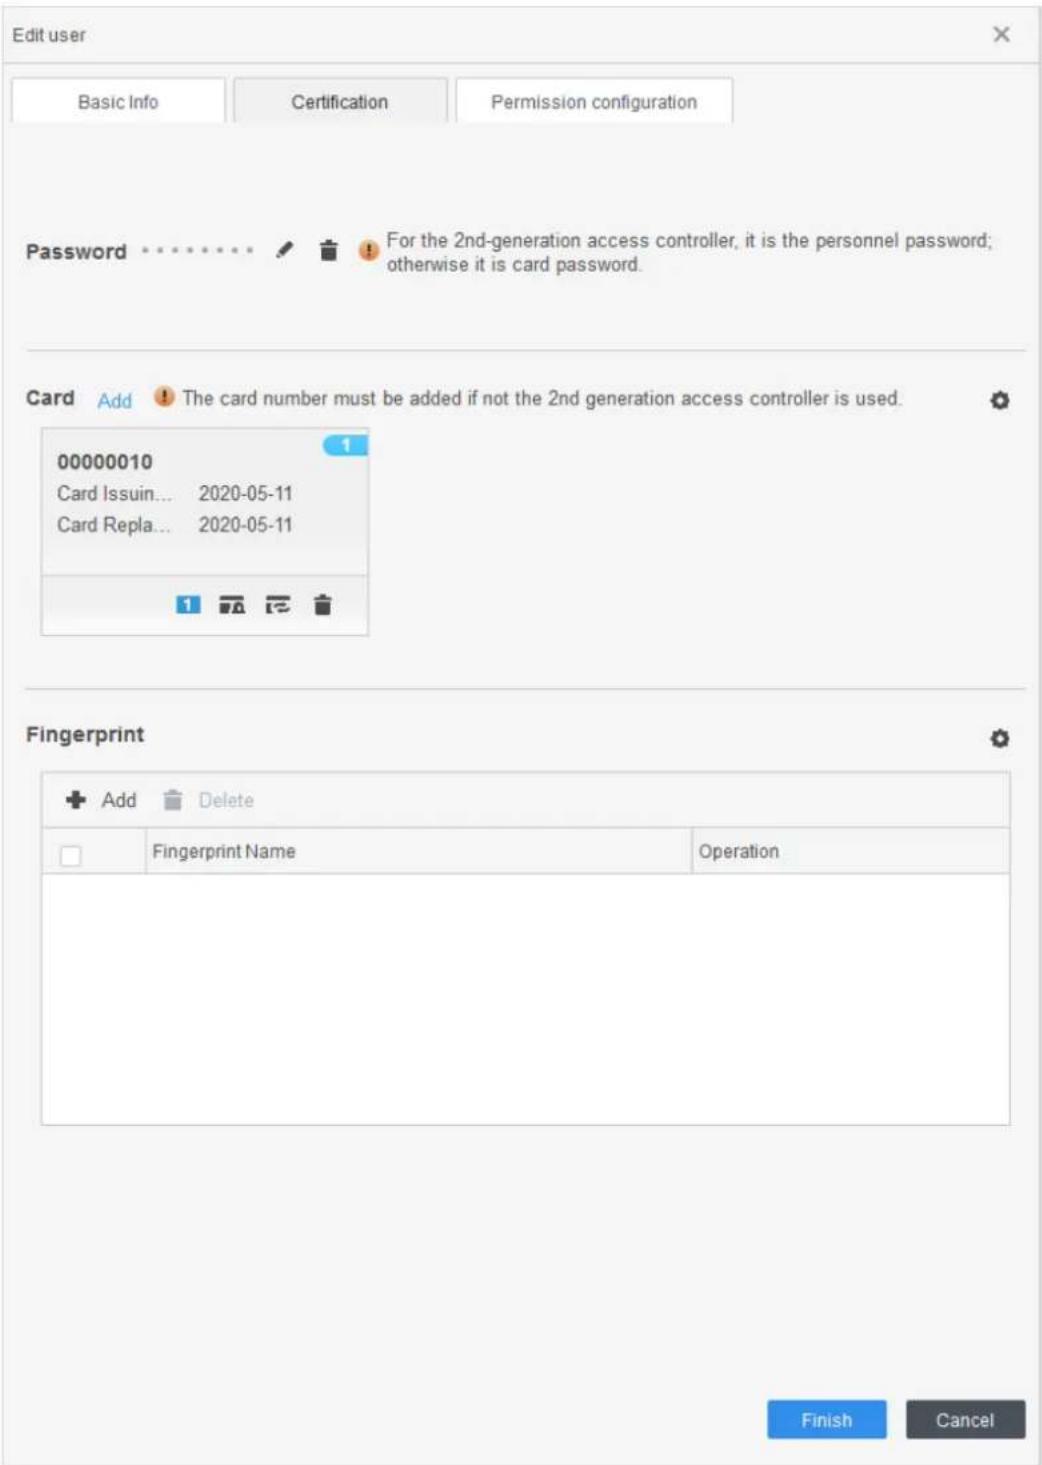
Step 4 Click the Certification tab to add certification information of the user.
- Configure password.
Set password. For the second generation attendances, set the personnel password; for other devices, set the card password. The new password must consist of 6 digits.
- Configure card.

The card number can be read automatically or filled in manually. For automatically read, select a card reader, and then place the card on the card reader. The card number is read automatically after that.
1) Click ⚙ to select Device or Card issuer as card reader.
2) Add card. The card number must be added if the non-second generation attendance is used.
3) After adding, you can select the card as main card or duress card, or replace the card with new one, or delete the card.
- Configure fingerprint.
1) Click ☑ to select Device or Fingerprint Scanner as fingerprint collector.
2) Add fingerprint. Click Add Fingerprint and press finger on the scanner three times continuously.
Configure certification Figure 5-7
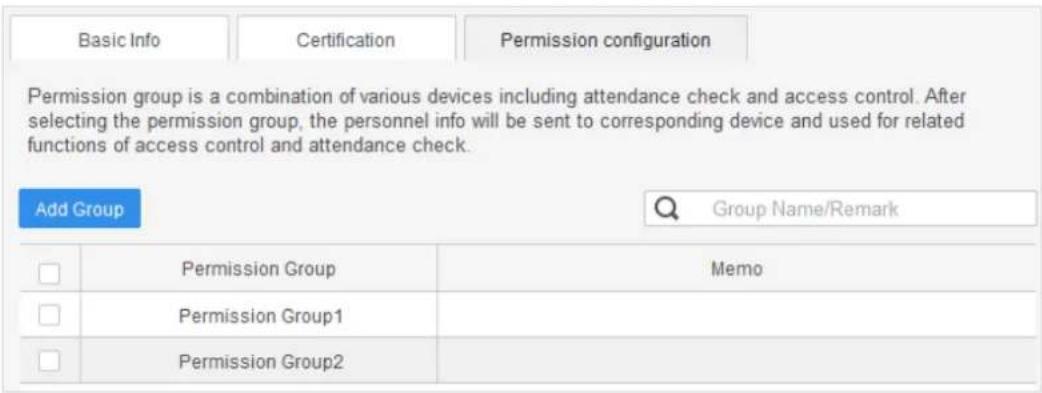
Configure permission for the user. Step 5 For details, see "5.4 Permission Configuration".
Permission configuration Figure 5-8
Click Finish. Step 6
5.3.2.2 Batch Add
You can add users in batches.
Log in to SmartPSS AC. Step 1
Click Personnel Manger > User > Batch Add. Step 2
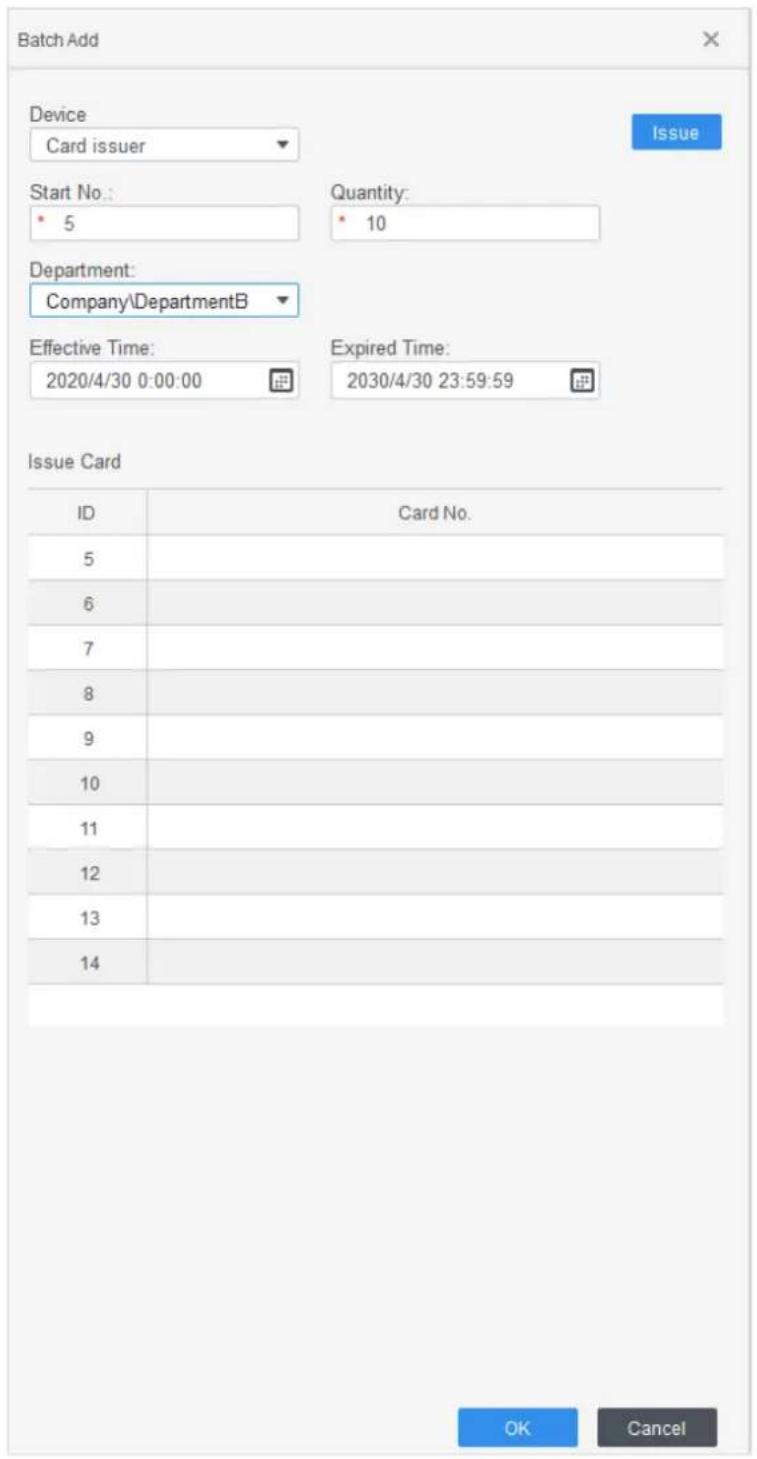
Step 3 Select card reader and the department of user. Set the start number, card quantity, effective time and expired time of card.
Click Issue to start issuing cards. Step 4
The card number will be read automatically.
Click Stop after issuing card, and then click OK. Step 5
Add user in batches Figure 5-9
In the list of user, click to modify information or add details of users. Step 6
5.3.2.3 Extracting User from Devices
You can extract user information from devices.
Log in to SmartPSS AC. Step 1
Click Personnel Manger > User > Extract. Step 2
Search and select the target device, and then click OK. Step 3
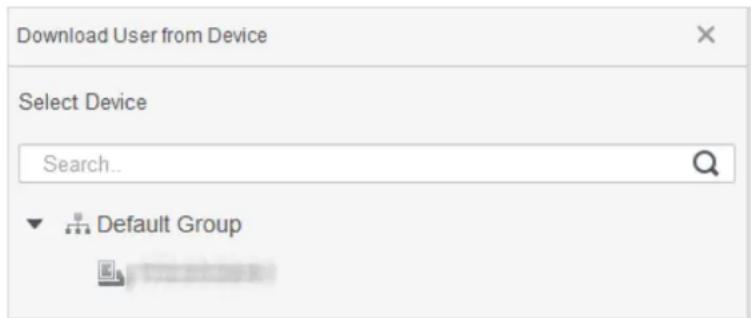
Select users as needed, and click Extract. Step 4
In the list of user, click to modify information or add details of user. Step 5
5.3.2.4 Importing User
You can import users locally.
Log in to SmartPSS AC. Step 1
Click Personnel Manger > User > Import. Step 2
____ Import user information according to instructions. Step 3
5.3.3 Issuing Card in Batches
You can issue cards to user who have been added but have no card.
Step 1 Log in to SmartPSS AC.
Select Personnel Manager > User. Step 2
Select users as needed and then click Batch Issue Card. Step 3
Issue card in batches. Card No. can be auto read by card reader or entered manually. Step 4
- Auto read
1) Select card reading device, and then click Issue.
2) According to the card list, put the cards of the corresponding user on card reader in sequence, and then the system will auto read the card No..
3) Modify user info, such as start time and end time for card validation.
- Enter manually
1) Select user in card list and enter the corresponding card No..
2) Modify user info, such as start time and end time for card validation.
Issue card in batches Figure 5-11
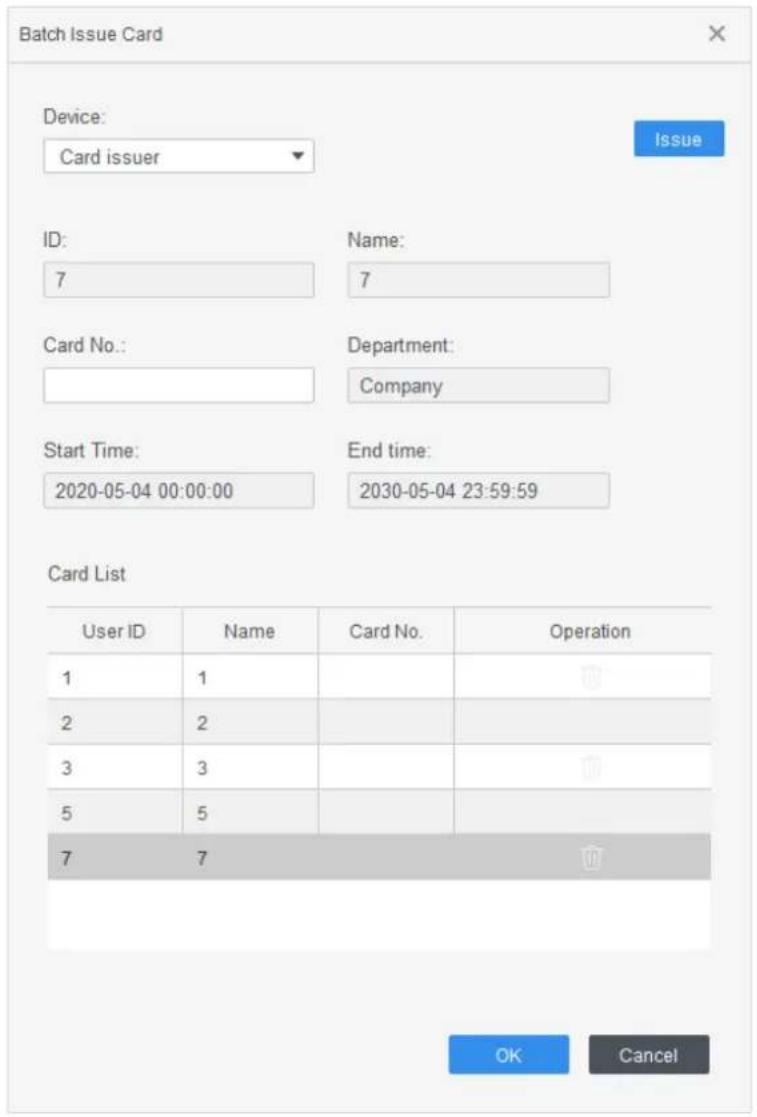
Click OK. Step 5
5.3.4 Exporting User Information
You can export user information.
Log in to SmartPSS AC. Step 1
Step 2 Select Personnel Manager > User.
Step 3 Select the user information which needs to be exported, and then click Export to export all user information to local.
Permission Configuration 5.4
5.4.1 Adding Permission Group
Log in to SmartPSS AC. Step 1
Click Personnel Manger > Permission Configuration. Step 2
Permission group list Figure 5-12
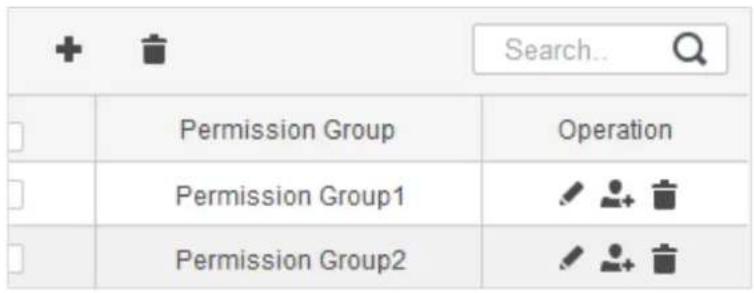
Click to add a permission group. Step 3
Set permission parameters. Step 4
1) Enter group name and remark.
2) Select the needed time template.

For details of time template setting, see SmartPSS AC user manual.
3) Select the corresponding device, such as door 1.
Add permission group Figure 5-13
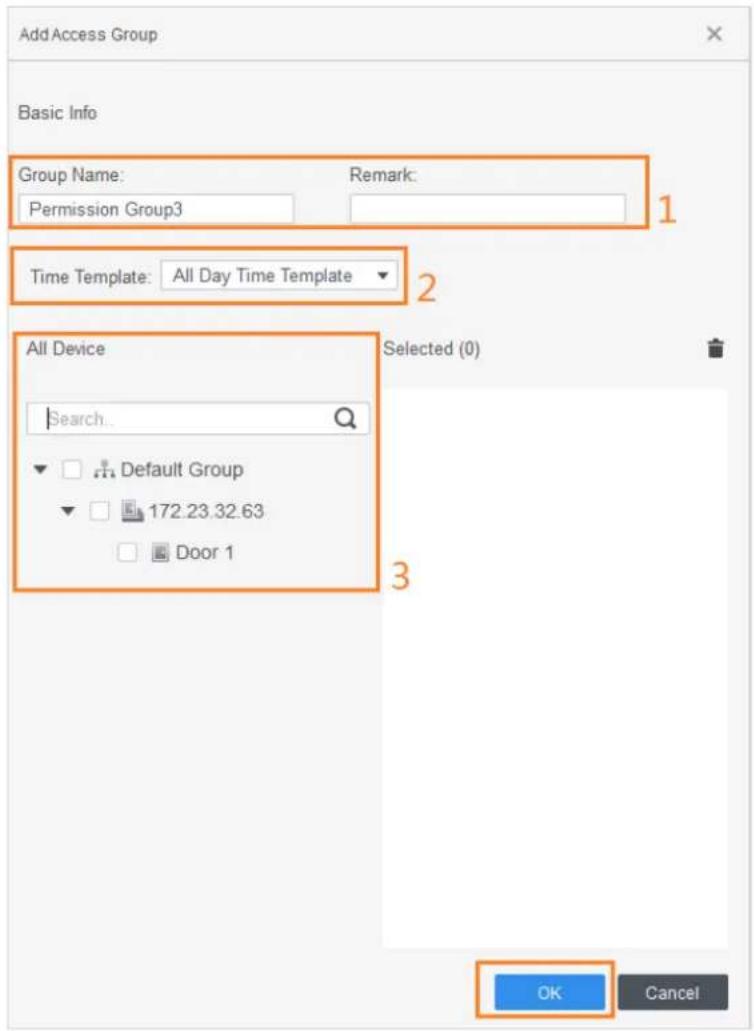
Click OK. Step 5

On the Permission Group List interface, you can do:
- Click to delete group.
- Click to modify group info.
- Double-click permission group name to view group info.
5.4.2 Configuring Permission
The method to configure permission for department and for users is similar. This section takes users as an example.
Log in to SmartPSS AC. Step 1
Click Personnel Manger > Permission Configuration. Step 2
Select the target permission group, and then click . Step 3
Configure permission Figure 5-14
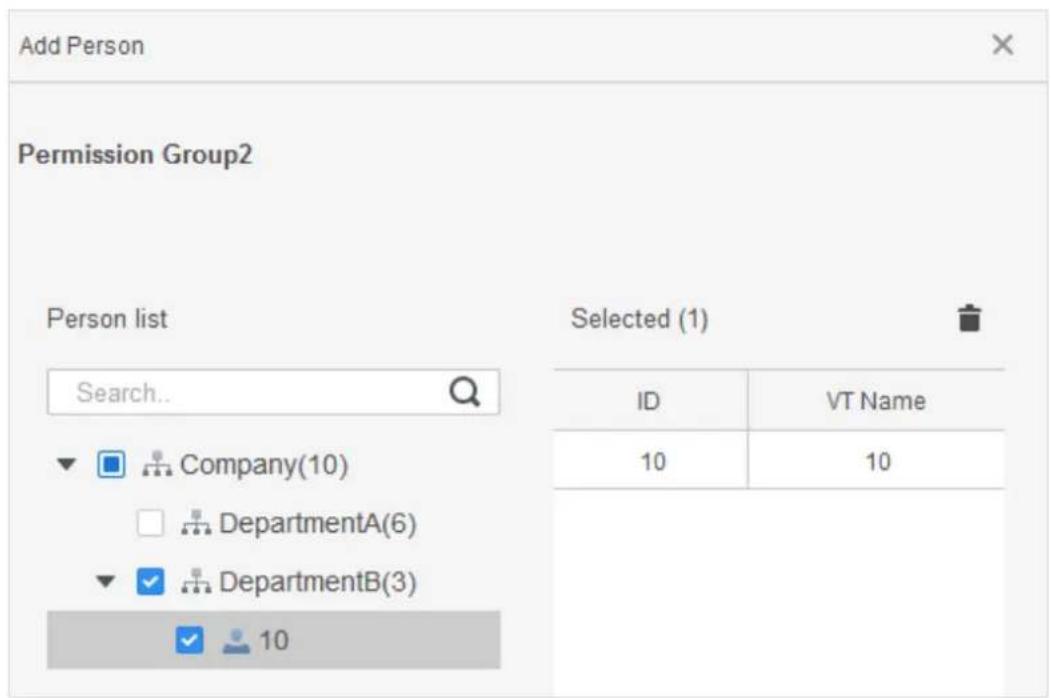
Select the user need to be configured permission. Step 4 Click OK.Step 5
5.5 Attendance Management
You can set attendance time, add attendance shifts, personnel scheduling, process attendance, manage attendance statistics, search reports, add holidays, and configure attendance.
5.5.1 Report Search
You can view the normal attendance, attendance abnormality, overtime attendance and staff information here. And the statistics can be exported as reports.
Log in to SmartPSS AC. Step 1
Step 2 Click Attendance Manager, and the Attendance Manager interface is displayed.
On the left menu bar, click Step 3
____ Select the time, department and statistic type, to view the corresponding reports. Step 4 Report search Figure 5-15
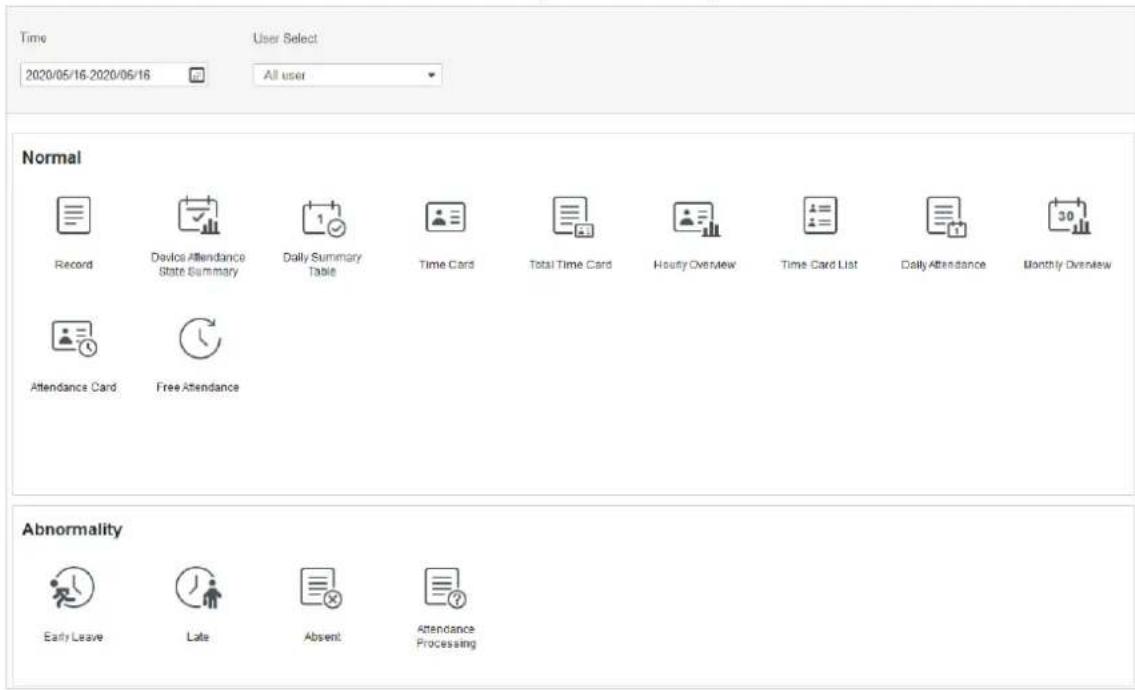
After the device is added and authenticated on the SmartPSS AC platform, the corresponding attendance status will be reported to the platform, and the platform will generate the corresponding attendance status report.
Figure 5-16 Attendance status report of the device

5.5.2 Other Configurations
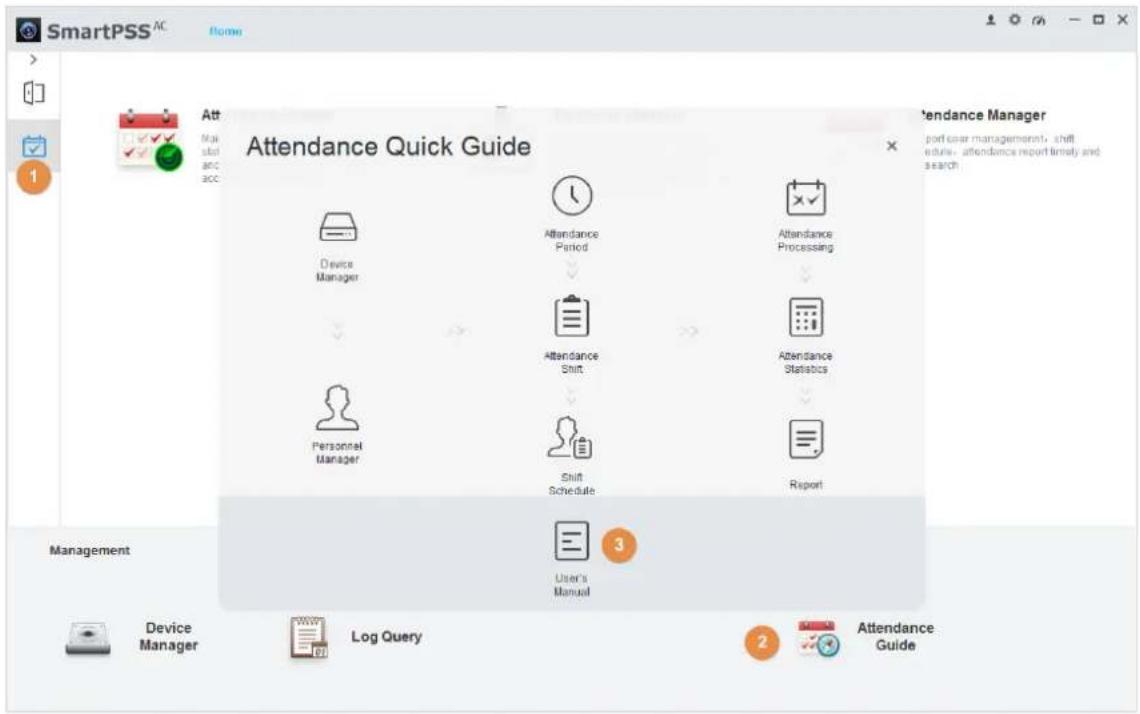
For other configurations such as attendance periods, attendance shifts, personnel scheduling, attendance processing and attendance statistics, adding holidays and attendance configurations, refer to the SmartPSS AC user's manual.
Log in to SmartPSS AC. Step 1
____ Click on the left menu bar, and the home page of the attendance solution is Step 2 displayed.
Click Attendance Guide at the lower-right corner. Step 3
View SmartPSS AC user's manual Figure 5-17
6 FAQ
1 The attendance fails to start after power-on.
Check whether the 12V power supply is correctly connected, and whether the power button is pressed.
2 Faces cannot be recognized after the attendance powers on.
Make sure that Face is selected as attendance type. See "3.7.1 Attendance Type".
3 Configurations cannot be made after the administrator and password are forgotten.
Delete administrators through the platform, or contact technical support to unlock the attendance remotely.
4 User information, and face images cannot be imported into the attendance.
Check whether names of XML files and titles of tables were modified because the system will identify the files through their titles.
5 When a user's face is recognized, but other users' information is displayed.
Make sure that when importing human faces, there are no other people around. Delete the original face, and import it again.
Notes of Face Appendix 1
Recording/Comparison
Before Registration
• Glasses, hats, and beards might influence face recognition performance.
- Do not cover your eyebrows when wearing hats.
- Do not change your beard style greatly if you will use the device; otherwise face recognition might fail.
- Keep your face clean.
- Keep the device at least two meters away from light source and at least three meters away from windows or doors; otherwise backlight and direct sunlight might influence face recognition performance of the device.
During Registration
You can register faces through the attendance or through the platform. For registration through the platform, see the platform user manual.
Make your head center on the photo capture frame. A picture of your face will be captured automatically.
Appendix Figure 1-1 Registration
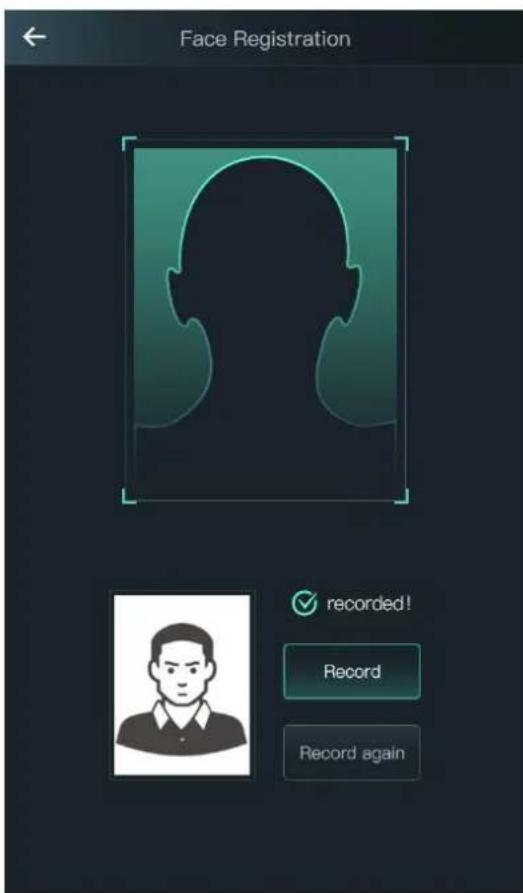

- Do not shake your head or body, otherwise the registration might fail.
- Avoid two faces appear in the capture frame at the same time.
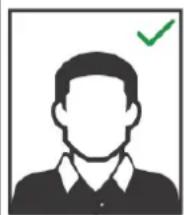
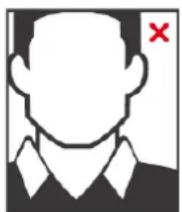
Face Position
If your face is not at the appropriate position, face recognition effect might be influenced.
Appendix Figure 1-2 Appropriate face position
Requirements of Faces
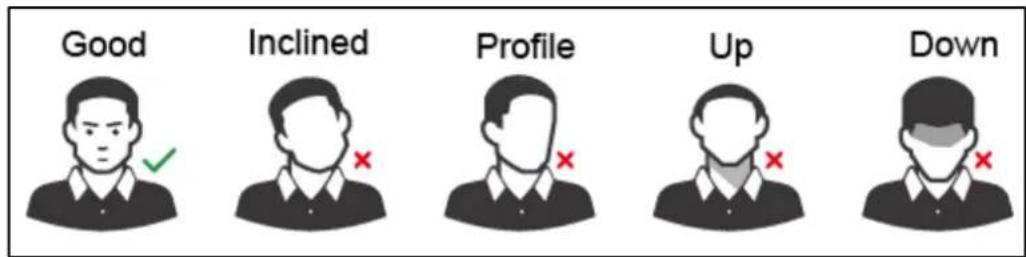
• Make sure that the face is clean and forehead is not covered by hair.
- Do not wear glasses, hats, heavy beards, or other face ornaments that influence face image recording.
- With eyes open, without facial expressions, and make your face toward the center of camera.
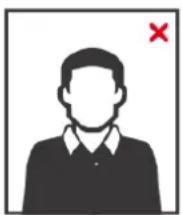
- When recording your face or during face recognition, do not keep your face too close to or too far from the camera.
Appendix Figure 1-3 Head position
Appendix Figure 1-4 Face distance
Good
natural_image
Generic user avatar icon with a green checkmark (no text or symbols)Too Close
Too Far
natural_image
Simple icon of a person in a collared shirt with a red X mark, no text or symbols present
- When importing face images through the management platform, make sure that image resolution is within the range 150 × 300 - 600 × 1200 ; image pixels are more than 500 × 500 ; image size is less than 75 KB, and image name and person ID are the same.
- Make sure that face does not take 2/3 of the whole image area, and the aspect ratio does not exceed 1:2.
Cybersecurity Recommendations Appe
Cybersecurity is more than just a buzzword: it's something that pertains to every device that is connected to the internet. IP video surveillance is not immune to cyber risks, but taking basic steps toward protecting and strengthening networks and networked appliances will make them less susceptible to attacks. Below are some tips and recommendations on how to create a more secured security system.
Mandatory actions to be taken for basic equipment network security:
1. Use Strong Passwords
Please refer to the following suggestions to set passwords:
- The length should not be less than 8 characters;
- Include at least two types of characters; character types include upper and lower case letters, numbers and symbols;
- Do not contain the account name or the account name in reverse order;
- Do not use continuous characters, such as 123, abc, etc.;
- Do not use overlapped characters, such as 111, aaa, etc.;
2. Update Firmware and Client Software in Time
- According to the standard procedure in Tech-industry, we recommend to keep your equipment (such as NVR, DVR, IP camera, etc.) firmware up-to-date to ensure the system is equipped with the latest security patches and fixes. When the equipment is connected to the public network, it is recommended to enable the “auto-check for updates” function to obtain timely information of firmware updates released by the manufacturer.
• We suggest that you download and use the latest version of client software.
"Nice to have" recommendations to improve your equipment network security:
1. Physical Protection
We suggest that you perform physical protection to equipment, especially storage devices. For example, place the equipment in a special computer room and cabinet, and implement well-done access control permission and key management to prevent unauthorized personnel from carrying out physical contacts such as damaging hardware, unauthorized connection of removable equipment (such as USB flash disk, serial port), etc.
2. Change Passwords Regularly
We suggest that you change passwords regularly to reduce the risk of being guessed or cracked.
3. Set and Update Passwords Reset Information Timely
The equipment supports password reset function. Please set up related information for password reset in time, including the end user's mailbox and password protection questions. If the information changes, please modify it in time. When setting password protection questions, it is suggested not to use those that can be easily guessed.
4. Enable Account Lock
The account lock feature is enabled by default, and we recommend you to keep it on to guarantee the account security. If an attacker attempts to log in with the wrong password several times, the corresponding account and the source IP address will be locked.
5. Change Default HTTP and Other Service Ports
We suggest you to change default HTTP and other service ports into any set of numbers between 1024\~65535, reducing the risk of outsiders being able to guess which ports you are using.
6. Enable HTTPS
We suggest you to enable HTTPS, so that you visit Web service through a secure communication channel.
7. Enable Whitelist
We suggest you to enable whitelist function to prevent everyone, except those with specified IP addresses, from accessing the system. Therefore, please be sure to add your computer's IP address and the accompanying equipment's IP address to the whitelist.
8. MAC Address Binding
We recommend you to bind the IP and MAC address of the gateway to the equipment, thus reducing the risk of ARP spoofing.
9. Assign Accounts and Privileges Reasonably
According to business and management requirements, reasonably add users and assign a minimum set of permissions to them.
10. Disable Unnecessary Services and Choose Secure Modes
If not needed, it is recommended to turn off some services such as SNMP, SMTP, UPnP, etc., to reduce risks.
If necessary, it is highly recommended that you use safe modes, including but not limited to the following services:
- SNMP: Choose SNMP v3, and set up strong encryption passwords and authentication passwords.
- SMTP: Choose TLS to access mailbox server.
- FTP: Choose SFTP, and set up strong passwords.
- AP hotspot: Choose WPA2-PSK encryption mode, and set up strong passwords.
11. Audio and Video Encrypted Transmission
If your audio and video data contents are very important or sensitive, we recommend that you use encrypted transmission function, to reduce the risk of audio and video data being stolen during transmission.
Reminder: encrypted transmission will cause some loss in transmission efficiency.
12. Secure Auditing
- Check online users: we suggest that you check online users regularly to see if the device is logged in without authorization.
- Check equipment log: By viewing the logs, you can know the IP addresses that were used to log in to your devices and their key operations.
13. Network Log
Due to the limited storage capacity of the equipment, the stored log is limited. If you need to save the log for a long time, it is recommended that you enable the network log function to ensure that the critical logs are synchronized to the network log server for tracing.
14. Construct a Safe Network Environment
In order to better ensure the safety of equipment and reduce potential cyber risks, we recommend:
- Disable the port mapping function of the router to avoid direct access to the intranet devices from external network.
- The network should be partitioned and isolated according to the actual network needs. If there are no communication requirements between two sub networks, it is
suggested to use VLAN, network GAP and other technologies to partition the network, so as to achieve the network isolation effect.
- Establish the 802.1x access authentication system to reduce the risk of unauthorized access to private networks.
- It is recommended that you enable your device's firewall or blacklist and whitelist feature to reduce the risk that your device might be attacked.
- Face Recognition Time & Attendance User's Manual
- Foreword
- General
- Safety Instructions
- Revision History
- About the Manual
- Important Safeguards and Warnings
- Operation Requirement
- Electrical Safety
- Table of Contents
- Foreword ...... I
- Important Safeguards and Warnings .... III
- Overview.... 1
- Connection and Installation .... 3
- System Operations....8
- Web Operations....30
- SmartPSS AC Configuration 55
- Appendix 1 Notes of Face Recording/Comparison....71
- Appendix 2 Cybersecurity Recommendations....74
- Overview
- Introduction 1.1
- Features 1.2
- Application 1.3
- Dimension and Component 1.4
- Connection and Installation
- Cable Connections 2.1
- Cable Connection
- Installation Notes 2.2
- Ambient Illumination Requirement
- Places Recommended
- Places Not Recommended
- Installation 2.3
- Desktop Installation
- Wall Installation
- System Operations
- Common Icons 3.1
- Initialization 3.2
- Standby Interface 3.3
- Main Menu 3.4
- Attendance Methods 3.5
- Card
- Face
- User Password
- User Management 3.6
- Adding New Users
- Viewing User information
- Attendance Setting 3.7
- Attendance Type
- Department
- Shift
- Holiday Plan
- Schedule
- Personal Schedule
- Department Schedule
- Verification Interval Time
- Attendance Mode
- Network Communication 3.8
- IP Address
- Active Register
- Step 3 Tap
- Wi-Fi
- System 3.9
- Time
- Face Parameter
- Image Mode
- Volume Adjustment
- Language Setting
- Infrared Light Brightness Adjustment
- Screen Setting
- Restore to Factory Settings
- Reboot
- USB 3.10
- USB Export
- USB Import
- USB Update
- Features 3.11
- Privacy Setting
- Result Feedback
- Photos&Name Mode
- Photo&Name Mode
- Only Name Mode
- Success/Failure Mode
- Record 3.12
- System Info 3.13
- Web Operations
- Initialization 4.1
- Login 4.2
- Resetting the Password 4.3
- Alarm Linkage 4.4
- Setting Alarm Linkage
- Alarm Log
- Data Capacity 4.5
- Video Setting 4.6
- Data Rate
- Image
- Exposure
- Motion Detection
- Motion detection Figure 4-14
- Volume Setting
- Image Mode
- Face Detect 4.7
- Network Setting 4.8
- TCP/IP
- Port
- Register
- P2P
- Safety Management 4.9
- IP Authority
- Systems
- System Service
- Creating Server Certificate
- Downloading Root Certificate
- User Management 4.10
- Adding Users
- Modifying User Information
- ONVIF User
- Maintenance 4.11
- Configuration Management 4.12
- Exporting Configuration File
- Configuration management Figure 4-26
- Importing Configuration File
- Upgrade 4.13
- Upgrade Figure 4-27
- Version Information
- Online User 4.15
- System Log 4.16
- Querying Logs
- Backup Logs
- Admin Log
- Exit 4.17
- SmartPSS AC Configuration
- Login 5.1
- Adding Devices 5.2
- Auto Search
- Manual Add
- Manual add Figure 5-3
- User Management 5.3
- Card Type Setting
- Adding User
- Manual Add
- Batch Add
- Extracting User from Devices
- Importing User
- Issuing Card in Batches
- Exporting User Information
- Permission Configuration 5.4
- Adding Permission Group
- Configuring Permission
- Attendance Management
- Report Search
- Other Configurations
- FAQ
- Notes of Face Appendix 1
- Recording/Comparison
- Before Registration
- During Registration
- Face Position
- Requirements of Faces
- Appendix Figure 1-4 Face distance
- Cybersecurity Recommendations Appe
- Mandatory actions to be taken for basic equipment network security:
- Use Strong Passwords
- Update Firmware and Client Software in Time
- "Nice to have" recommendations to improve your equipment network security:
- Physical Protection
- Change Passwords Regularly
- Set and Update Passwords Reset Information Timely
- Enable Account Lock
- Change Default HTTP and Other Service Ports
- Enable HTTPS
- Enable Whitelist
- MAC Address Binding
- Assign Accounts and Privileges Reasonably
- Disable Unnecessary Services and Choose Secure Modes
- Audio and Video Encrypted Transmission
- Secure Auditing
- Network Log
- Construct a Safe Network Environment
Brand : Dahua Technology
Model : ASA3213G-MW
Category : Access Control System