
BEC2SS - Coffee maker BAUMATIC - Free user manual and instructions
Find the device manual for free BEC2SS BAUMATIC in PDF.


| Product Type | Coffee Maker |
| Brand | Baumatic |
| Model | BEC2SS |
| Color | Stainless Steel |
| Dimensions (H x W x D) | 32 cm x 24 cm x 22 cm |
| Weight | 2.3 kg |
| Power Supply | 230 V, 50 Hz |
| Power Consumption | 1000 W |
| Capacity | 1.25 L (up to 12 cups) |
| Filter Type | Permanent filter (reusable) or paper filter (size #4) |
| Water Tank | Removable, transparent with water level indicator |
| Warm Keep Function | Automatic keep warm for up to 2 hours |
| Auto Shut-off | After 2 hours |
| Anti-Drip System | Yes, allows removing carafe mid-brew without drips |
| Carafe Material | Glass with stainless steel handle |
| Control Type | Push button with indicator light |
| Cord Length | 0.8 m |
| Cleaning | Descaling recommended every 3 months; removable parts dishwasher safe |
| Safety Features | Auto shut-off, boil-dry protection |
| Warranty | 2 years |
Frequently Asked Questions - BEC2SS BAUMATIC
User questions about BEC2SS BAUMATIC
0 question about this device. Answer the ones you know or ask your own.
Ask a new question about this device
Download the instructions for your Coffee maker in PDF format for free! Find your manual BEC2SS - BAUMATIC and take your electronic device back in hand. On this page are published all the documents necessary for the use of your device. BEC2SS by BAUMATIC.
USER MANUAL BEC2SS BAUMATIC
User Manual for your Baumatic
BEC2SS Coffee Machine
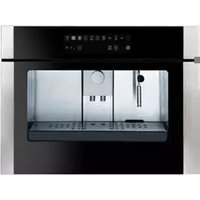
Integrated Coffee Maker in Stainless Steel

natural_image
Interior view of a kitchen appliance with a door panel and a close-up of a kitchen tool (no visible text or symbols)
NOTE: This User Instruction Manual contains important information, including safety & installation points, which will enable you to get the most out of your appliance. Please keep it in a safe place so that it is easily available for future reference.
11/07/05
CONTENTS
YOUR COFFEE MAKER'S SPECIFICATIONS ....3
IMPORTANT SAFETY INFORMATION / ENVIRONMENTAL NOTE......4
INTRODUCTION TO YOUR COFFEE MAKER....5-7
MAINTAINING AND CLEANING YOUR COFFEE MAKER .....16-17
INSTALLATION INSTRUCTIONS ....18-20
CONDITIONS OF GUARANTEE....21
CONTACT DETAILS....22
Congratulations on purchasing a Baumatic Coffee Making Machine!
To fully enjoy using your appliance long into the future, please firstly familiarise yourself with its specifications, safety advice and operational instructions included in this manual. You will also need this manual to ensure that your Coffee Maker has been installed properly.
SPECIFICATIONS:
√ Professional Coffee Maker
√ Pushbutton control operation
√ Mark resistant coating
√ Choice of 1 or 2 cup filters
√ Suitable for sealed coffee pods or ground coffee
√ Coffee Regulation (extra strong - normal - weak)
√ Steam spout for cappuccino, hot chocolate, tea & instant coffee
√ Pull-out drawer with compartment for cups & saucers and dish for coffee waste
√ Separate boiler & pump for coffee making and cappuccino / steam
○ Coffee Pump Pressure: 15 bar
○ Steam Pump Pressure: 2.5 bar
○ Total Output: 1450w
○ Coffee Boiler Output: 800w
○ Steam Boiler Output: 650w
◆ Removable water tank
- Empty water tank warning light with safety stop on pumps operation
◆ LED high density light
DIMENSIONS mm (H x W x D)
465 × 502 × 250
Your stainless steel Coffee Making Machine comes complete with:
- 1 x One espresso cup filter
• 1 x Two espresso cups filter - 1 x milk jug
• 2 x espresso cups with saucers
Optional Extra: BECKIT Plumbing Kit
Important Safety Information: Please Read this before installing & using.
Any installation / repair work must be carried out by a qualified electrician or competent person.
Your Coffee Maker must only be used by adults and kept out of the reach of children: SCALDING HAZARD!
The external parts of your Coffee Maker become very hot when it is on and stay hot after the appliance has been switched off.
- Check the details on the Coffee Maker's rating plate to ensure the rated mains voltage is suitable for its operation.
Before making the connections, ensure that proper earthing of the unit is possible. Earthing of the coffee machine is compulsory by law.
The manufacturer accepts no liability for any personal injury or damage to property deriving from failure to comply with this requirement.
For models without a plug - fit a standard plug capable of withstanding the specified load on the power cord. The cord's earthing conductor is coloured yellow & green. The plug must be accessible. Do not use an extension cable.
To connect the Coffee Maker's power cord, loosen and remove the cover on the terminal block in order to access the contacts inside. Make the connection, blocking the cord in place and then close the terminal block cover again immediately.
- If you must change the cord, the earthing (yellow/green) conductor must always be 10mm longer than the line conductor's
Before cleaning, make sure that your have disconnected your Coffee Maker from the power supply.
- Should your Coffee Maker not be functioning properly at any time and you cannot find the remedy for the fault in the troubleshooting section of this manual, please contact the service department in order to arrange for an authorised engineer to visit.
CONFORMITY TO W.E.E.E. DIRECTIVE
This appliance is marked according to the European directive 2002/96/EC on Waste electrical and Electronic Equipment (WEEE). By ensuring this product is disposed of correctly, you will help prevent potential negative consequences for the environment and human health, which could otherwise be caused by inappropriate waste handling of this product.
The symbol 📋 on the product, or on the documents accompanying the product, indicates that this appliance may not be treated as household waste. Instead it shall be handed over to the applicable collection point for the recycling of electrical and electronic equipment.
Disposal must be carried out in accordance with local environmental regulations for waste disposal.
For more detailed information about treatment, recovery and recycling of this product, please contact your local city office, your household waste disposal service or the shop where you purchased the product.

natural_image
Simple line drawing of a trash bin with no text or symbolsIntroduction to your Baumatic Coffee Maker
The first thing you need to do once you have installed your coffee maker is to fill the water reservoir:
1) PUSH THE RESERVOIR DOOR ONCE (FIG A-7 - BELOW) ON THE LEFT HAND SIDE OF THE COFFEE MAKER.
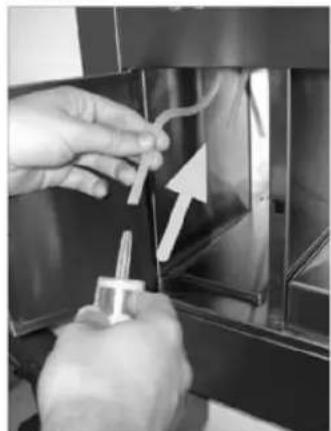
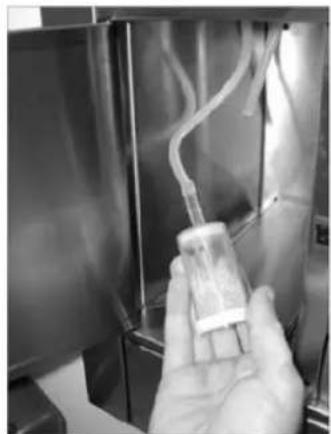
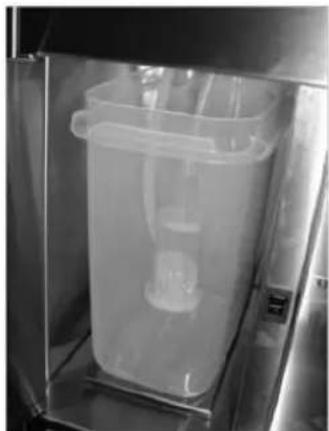
2) CONNECT THE FILTER (FIG A-5 - BELOW) TO THE WATER FEED TUBE INSIDE THE RESERVOIR (SEE FIGURES D-1, D-2 & D-3 ON FOLLOWING PAGE).
3) REMOVE THE RESERVOIR FROM THE CABINET (FIG A-10)
4) FILL UP THE RESERVOIR WITH FRESH WATER (FIG A-7) AND PUT BACK IN THE MACHINE'S RESERVOIR CABINET.
5) ENSURE THAT THE FILTER (FIG A-5) HAS BEEN PLACED IN COLD WATER FOR A FEW MINUTES BEFORE USING FOR THE FIRST TIME. DISCARD THIS WATER AND FILL WITH FRESH WATER BEFORE USING FOR FIRST TIME.
(Fig A)

natural_image
Three-panel image showing mechanical components and a close-up of a glass container with numbered parts (no visible text or symbols)


CAUTION: Before attempting to use your Coffee Maker, ensure that it has been properly installed (SEE INSTALLATION SECTION at the back of this manual).



natural_image
3D diagram of a dual-chamber HVAC or ventilation system with a mesh grille and circular vent, labeled with number 23 (no text or symbols beyond the label)KEY:
- Filter Holder for Coffee Pods
- Filter Holder for Ground Coffee
- 1-cup Filter
- 2-cup Filter
-
Water Filter
-
Coffee Ground Adapter
- Water Reservoir Door
- Steam Pipe Section
- Water Reservoir
-
Drip Tray
-
Allen Key for screwing blocking
- Filter
- Single-cup Filter Holder
- Removable Panel
-
ON / OFF Switch
-
LED lights
- Froth Maker
- Steam Pipe Holder Nut
- Coffee Pressing tool
Introduction to your Baumatic Coffee Maker
FIG. D
natural_image
Close-up of a hand using a tool to adjust or install a component, with no visible text or symbols.D1
natural_image
Hand holding a small vial with tubing inside a stainless steel enclosure (no visible text or symbols)D2
natural_image
Interior view of a laboratory apparatus with a transparent cylindrical container containing liquid, no visible text or symbolsD3
Please take a moment to familiarise yourself with the CONTROL PANEL. It looks like this:

- Power ON LED
- LED indicating coffee boiler heating and ready for use
- LED indicating Steam Boiler heating and ready for use
- Steam Release LED
- LED indicating empty water reservoir
- Coffee dispensing button
- Steam Boiler On/Off button
- Steam Release button
- Coffee boiler water flow adjustment knob
Introduction to your Baumatic Coffee Maker
READ THIS FIRST TO LEARN ABOUT YOUR COFFEE MAKER
√ With the Baumatic BEC2SS COFFEE MAKER, you are able to experience the taste of a delicious cup of authentic espresso or cappuccino without having to go to a café.
√ Making these types of coffee is radically different from using a conventional coffee maker. The Baumatic BEC2SS operates with pressure and steam so as to create the conditions needed to make espresso and cappuccino coffees.
√ An important thing to remember when you make coffee is that the taste will depend on the characteristics of the beans used. The flavour of a coffee bean is determined by several factors, such as blend and bean type (eg, Javan, Kenyan, etc.), but the roasting process is principally responsible for the taste.
√ Most coffee available at your supermarket is a light colour. Having a dry rather than an oily surface, these beans are unlike the coffee beans that have been roasted for a longer period at higher temperatures. These longer roasted beans will be darker in colour and create a more flavourful cup of coffee than the lightly roasted beans.
TIP – The less fat content in the milk you use in your machine, the denser the froth will be. Skimmed or semi-skimmed milk will provide a thicker, longer-lasting foam than full-fat milk.
Your Coffee Machine works by brewing the beverage of your choice using boiling water, before dispensing it in several ways to create exciting and authentic espressos and cappuccinos, among other drinks.
STARTING THE COFFEE MACHINE
a) SWITCH THE COFFEE MAKER ON BY PRESSING THE 'ON/OFF' BUTTON (SEE FIG. A-16 ON PAGE 5).
b) THE RED LED WARNING LIGHT ('1' ON KEY ON PAGE 6) WILL LIGHT UP AT THE SAME TIME AS THE COFFEE BOILER LED ('2' ON SAME KEY.)
c) THE MACHINE IS READY FOR USE WHEN THIS LED STOPS FLASHING AND REMAINS CONSTANT.
... However, before you use your Coffee Maker, you will need to load it.
NOTE: Your BEC2SS can be loaded and adapted to make coffee and tea using several methods, for example, coffee pods, ground coffee or loose tea leaves. Because of this, each method will call for a different approach to loading.
1. Coffee Pods
Using Coffee Pods (Fig A-14, PAGE 5) is an easy, practical and hygienic way to make coffee. This is due to the special packaging that keeps coffee from coming out and it can be easily removed after use. NOTE: Coffee pods are available from most good supermarkets.
To load a coffee pod:
- Switch on your Coffee Maker (see Fig. A-16, PAGE 5)
- Insert one pod into the filter-holder (Fig A-1, PAGE 5) and place into the ring nut (Fig A-18, PAGE 5), ensuring it is correctly secured by turning the filter-holder handle from left to right.
- Put the cup you want to fill underneath the nozzle (see Fig. A-1, PAGE 5).
-
Check that the red LED boiler light ('2' in Figure on page 6) is NOT flashing.
-
Push the coffee button ('6' in same figure).
- Pressing this button a second time will stop the coffee dispensing.
- Take the filter-holder out of the ring nut and remove the pod.
2. Using Ground Coffee
Your Coffee Maker can be used with ordinary ground coffee. Although the coffee boiler is set to hold coffee pods, you can install an adapter, allowing you to boil loose coffee. To do this:
1) Switch the coffee machine OFF and wait until your appliance cools (to reduce the risk of scalding). It is best to protect your hands by wearing gloves.
2) Use a screwdriver to unscrew the screw ('2' in Fig. below) which attaches the water filter ('1' in Fig. below) for coffee pods to the coffee boiler ('3' in Fig. below). KEEP THIS SCREW IN A SAFE PLACE.
3) Hook the adapter (Fig. A-6 on page 5) onto the dispensing unit, locking them together with the screw you have just removed.

LOADING YOUR BEC2SS
COFFEE DISPENSING – There are several methods of dispensing your coffee when it's ready...
PRESS BUTTON ('6' IN KEY ON PAGE 6) TO DISPENSE COFFEE.
a) MANUALLY DISPENSING COFFEE:
IF THE BUTTON IS HELD DOWN FOR LESS THAN ONE SECOND, THE MACHINE WILL DISPENSE COFFEE. PRESS THE BUTTON AGAIN TO STOP DISPENSING.
b) AUTOMATED FIXED TIME COFFEE DISPENSING:
IF THE BUTTON IS HELD DOWN FOR MORE THAN ONE SECOND BUT LESS THAN FIVE, THE MACHINE WILL DISPENSE COFFEE FOR THE LENGTH OF TIME PROGRAMMED.
c) DISPENSING/ PROGRAMMING TIME:
IF THE BUTTON IS HELD DOWN FOR MORE THAN FIVE SECONDS, THE MACHINE WILL DISPENSE COFFEE FOR AS LONG AS THE BUTTON IS HELD DOWN. WHEN THE BUTTON IS RELEASED, THE MACHINE WILL MEMORISE THE NEW TIME IT HAS JUST CALCULATED (which will then be used by the Function 'B').

WARNING: The various components will remain extremely hot for some time after the machine has been switched off - BURN HAZARD!
STEAM PUSH-BUTTON — Your Coffee Maker
features a steamer to enhance the coffee it makes as well as enable espresso of a professional standard.
PRESS KEY ('7' IN KEY ON PAGE 6) TO ACCESS THE STEAM BOILER. THE LED ('3' IN FIGURE ON PAGE 6) WILL FLASH TO INDICATE THE MACHINE IS HEATING UP. WHEN IT STOPS FLASHING AND STAYS ON, THE MACHINE IS READY TO RELEASE STEAM.
TO ACTIVATE THE STEAM RELEASE FEATURE, PRESS KEY '8' (as marked on Figure on page 6). Note that there are 3 modes by which Steam
Release can be used. These are: (SEE OVER)
Using your Baumatic Coffee Maker
MANUAL STEAM RELEASE:
If the button is held down for less than one second, the machine will release steam.
Press the button again to stop this process.
FIXED AUTOMATIC STEAM RELEASE:
If the button is held down for more than one second but less than five, the machine will release steam for the length of time programmed.
STEAM RELEASE / PROGRAMMING: If the button is held down for more than five seconds, the machine will release steam for as long as the button is held down.
When the button is released, the machine will memorise the new time it has just calculated (which will subsequently be used by Function 'B'). LED (Fig. B-4) will light up to show the steam release phase.
MAKING A CUP OF ESPRESSO
Ensure the coffee machine is kept clean to get the best cup of espresso. Your Coffee Maker makes espresso by forcefully dispensing water that has been heated to the correct brewing temperature.
Note:
There are a variety of dark roasts from which you can brew your espresso; for instance, Vienna roast, French roast, and Italian roast, etc. Each of these roasts is a blend of coffee beans that are roasted at a certain temperature so as to produce a definite and unique flavour.
The mark of real espresso is its dark colour, rich taste and the light brown natural froth Italians call 'crema'.
Espresso coffee should always be served immediately after it has been made.
Using your Baumatic Coffee Maker
❖ Make sure the filter units are cleaned after each use.
❖ Warm the cups prior to filling.
The quality and coarseness of the coffee grains can affect the flavour. Bear this in mind when you select a blend.
IMPORTANT
Make sure that you use the button marked 'A-16' on page 5 to PRESS the coffee.
PREPARING A CAPPUCCINO
Cappuccino is a combination of espresso and heated, frothy milk. Traditionally, equal amounts of espresso, froth and hot milk are used before being topped with cinnamon, nutmeg and chocolate shavings.
Your Coffee Maker allows you to make the froth for cappuccinos in two different ways:
METHOD 1:
- Use the Steam Pipe (Fig. A 9-15, page 5) and immerse the steam spout into a container of milk.
- Press button '7' (in Figure on page 6) to switch the steam boiler ON.
- The flashing LED ('3' in Figure on page 6) indicates that the machine is heating up.
- When the LED stops flashing, the machine is ready to use.
- Press the steam dispensing button ('8' in Figure on page 6) to dispense the steam either manually or automatically.
- When the steam starts coming out, move the container up and down slightly until the milk has made the froth for the cappuccino.
METHOD 2:
1) Remove the steam pipe (Fig. A 9-15, PAGE 5) and replace it with the special cappuccino maker (Fig. A-21, PAGE 5), available as an accessory.
2) This operation is very simple as the various parts are interchangeable. You just have to set the connection set underneath the control panel (Fig. A-22, PAGE 5).
3) Press button '7' (as shown in the Fig. on page 6) to switch the steam boiler on. The flashing LED ('3' in Figure on page 6) indicates that the machine is heating. When the LED stays on, the machine is ready for use.
4) After having fitted the 'cappuccino maker' onto the machine, immerse the small tube into a container of milk. Place the cup of coffee under the dispensing spout.
5) Then press the steam dispensing button ('8' in Figure on page 6) so it dispenses either manually or automatically.
6) The spout will dispense the froth to make the cappuccino.
Using your Baumatic Coffee Maker

E1

natural_image
Diagram of three different types of medical or laboratory instruments with curved and straight ends, no text or symbols present.WARNING: THE STEAM NOZZLE AND DISPENSING SPOUT MUST BE CLEANED EVERY TIME THEY HAVE BEEN USED. AS MILK COOLS, IT CREATES IMPURITIES WHICH BLOCK THE DISCHARGE HOLE. THIS, IN TURN, WILL CAUSE THE MACHINE TO FUNCTION BADLY. SEE FIG. E1 (above).
CAUTION: You will also need to monitor these parts for the development of limescale. Particularly in hard water areas, build up of limescale may lead to problems in your coffee machine's performance over time if you do not descale components.
- YOU CLEAN THE NOZZLE AND SPOUT BY DISCHARGING STEAM SEVERAL TIMES.
- CLEANING IS BEST CARRIED OUT WHEN THE COMPONENTS HAVE COOLED DOWN AND BY SEPARATING THE STEAM NOZZLE FROM THE DISPENSING SNOUT.
• WIPE THEM CAREFULLY USING A CLEAN SPONGE OR CLOTH.
CAUTION: ALWAYS CLEAN THE 'CAPPUCCINO MAKER' AFTER USE BY IMMERSING THE SMALL TUBE IN A CONTAINER FULL OF CLEAN WATER AND DISPENSE SEVERAL TIMES. THIS WILL CLEAR THE TUBE OF ANY RESIDUES WHICH COULD OTHERWISE BLOCK THE STEAM DISCHARGE TUBE.
Using your Baumatic Coffee Maker
OTHER DRINKS
MAKING TEA USING HOT WATER
1) PLACE THE STEAM NOZZLE (FIG. 'A-9' on page 5) onto the HOLDING NUT (FIG. A-22 on page 5).
2) PUT A CUP UNDERNEATH THE STEAM PIPE (FIG. A-9-15, page 5).
3) TURN MACHINE ON (FIG. A-16, page 5)
4) PUSH THE STEAM BUTTON 'ON/OFF' (FIG. A-7, page 5). An LED will flash ('3' in figure, page 6) while the boiler heats up. When solid, it is ready to dispense.
5) Push the steam release button ('8' in Figure on page 6).
MAKING A CUP OF TEA USING LOOSE TEA LEAVES
- USE FILTER HOLDER (FIG. A-2 on page 5) with FILTER CUP (FIG. A-3 / A-4 on page 5).
- PRESS THE TEA LEAVES WITH THE PRESS (FIG. A-6 on page 5), leaving the circular part of the press in place on the filter holder.
- PLACE FILTER HOLDER (FIG. A-2 on page 5) to RING NUT (FIG. A-18 on page 5) and TWIST FROM LEFT TO RIGHT, ENSURING IT IS IN PLACE.
- ADJUST COFFEE BOILER WATER FLOW KNOB ('9' in Figure on page 6) to the REQUIRED SETTING. The LOWER the SETTING, the STRONGER the TEA.
- CHECK THE RED LED LIGHT OF THE BOILER ('2' in Figure on page 5) is NOT FLASHING.
- PUSH the COFFEE BUTTON ('6' in Figure on page 6).
- TAKE THE FILTER-HOLDER OUT of the RING NUT and clean filter thoroughly.
NOTE: Pressing '6' again will stop the flow of Coffee altogether.

WARNING: THERE IS A SCALDING HAZARD. BE CAREFUL WHEN REMOVING VESSELS FROM THE COFFEE MAKING MACHINE – THERE IS A CHANCE YOU CAN BE BURNT, ESPECIALLY IF YOU REMOVE CUPS TOO EARLY.
COFFEE GLOSSARY
Caffe – the Italian word for a standard espresso.
Caffe Americano – a thin espresso with water added.
Caffe corretto – an espresso infused with a splash of liquor.
Caffe freddo – iced coffee that is an extended version of espresso but served over ice.
Caffe latte – is a double espresso mixed in a large cup with hot milk. It is topped with little or no foam.
Caffe moca – made from equal parts milk and cocoa.
Caffe ristretto – the most concentrated (therefore strongest) espresso. There are only two tablespoons (30ml) of water per serving.
Caffeine – espresso's caffeine content is only a third or half of that found in coffee. The stronger the roast, the less caffeine the espresso will contain.
Cappuccino – is espresso frothed with milk. It is equal parts of espresso, foam and hot milk.
Cappuccino chiaro – a ‘light’ cappuccino made using less espresso and more hot milk.
Cappuccino scuro – a ‘dark’ cappuccino with more espresso and less hot milk.
Cappuccino senza schiuma – a cappuccino without the froth.
Crema – this is the sign of the perfect cup of espresso: a fine, nutty or cinnamon brown foam on the surface of the espresso. This is only created when the pressure is sufficiently high. The crema contains the foamed oils which are rich in flavour and aroma.
Espresso – see 'Caffe'
Espresso lungo – a longer, less concentrated espresso served in a standard size coffee cup.
Espresso ristretto – the typical Italian espresso. It is a double-strength, short, strong, full-bodied espresso with a bitter tang. Has a pleasantly lingering flavour.
Arpeggio (dark purple) – this is the classic Mediterranean blend with a thick, enduring crema. Has a strong character, an intense body and a delicious, long-lived aftertaste.
Roma (dark gray) – Roma is a sweet, short espresso. While not too strong, it has a joyous woody signature.
Decaffeinato Intenso (red) – Although decaffeinated, this intense espresso has all the strength of a true espresso with its tang, intensity and affluence.
Livanto (copper brown) – A dense and velvety aroma are a signature of this well balanced, rounded espresso.
Capriccio (dark green) – Creamy, rich yet mild, this is nonetheless a full-bodied espresso. Its dense, delicate cream reflects the light.
Voluto (yellow gold) – The flavour is round, fresh and bready. This likely stems from the light roast but full body that captures the essence of this slightly acidic espresso.
Cosi (dark brown) – Punctuated by a tinge of lemon, it has a lavishly mild and fine crema.
Decaffeinato (red) – Notable for its hazel colour and smooth texture, this is a lighter, creamier decaffeinated blend.
Macchiato – espresso carrying a dollop of hot, foaming milk to give a dappled look.
Vivalto (sky blue) – an intense Lungo that combines a nicely roasted note with a floral aroma that is subtle and delicate. Delicious with milk.
Finezzo (buttercup yellow) – a mellow, slightly fruity blend that blossoms from a light body.
Decaffeinato lungo (coral) – gives a smooth body surfed over a fine, balanced roundness in the mouth. The aftertaste is a bonus of grilled charm.
WHEN THE WATER TANK IS EMPTY – As you make more drinks, it's inevitable that the water reservoir will run low. You will need to refill it by following the instructions given at the top of page 4 of this manual.
| How will I know when it's time to add water? | LED ('5' IN KEY ON PAGE 5) WILL LIGHT UP WHEN THE TANK IS EMPTY.ALL FUNCTIONS WILL STOP AUTOMTACIALLY, INCLUDING THE STEAM BOILER HEATING.FILL THE TANK AND RESELECT THE PROGRAM WHICH YOU HAD PREVIOUSLY SET YOUR COFFEE MAKER TO PERFORM. |
ADJUSTING THE FLOW OF WATER FROM THE BOILER
ROTATE KNOB ('9' IN KEY ON PAGE 6) ANTICLOCKWISE FROM "+” TOWARDS “-” IN ORDER TO DECREASE THE AMOUNT OF WATER WHICH FLOWS OUT OF THE COFFEE BOILER.
NOTE: THIS PROCESS IS USED TO MAKE DRINKS SUCH AS TEA OR TISANES WHICH REQUIRE A SLOWER FLOW OF WATER AND LESS OF IT.
CLEANING
IMPORTANT!: Before cleaning, always ensure that you have switched your cooker hood OFF at the omni-polar switch, set at the wall from the cable:
Cleaning
- OUTER PARTS OF THE COFFEE MAKER SHOULD ONLY BE CLEANED WITH WARM SOAPY WATER. USE EITHER A SPONGE OR A SOFT CLOTH.
☑ NEVER USE ABRASIVE CLEANERS!
○ THE DRIP TRAY CAN BE REMOVED AND SHOULD BE CLEANED PERIODICALLY. IT IS ALSO DISHWASHER PROOF.
○ THE FILTER WILL NEED CHANGING WHEN YOU CAN SEE WHITE GRANULES IN THE FILTER. THIS CAN BE OBTAINED FROM OUR SPARES DEPARTMENT.
○ WHEN CLEANING THE FILTER HOLDER OR STEAM NOZZLE, ENSURE THAT THEY HAVE BEEN LEFT TO COOL DOWN PRIOR TO CLEANING.
INSTALLATION INSTRUCTIONS
IMPORTANT!
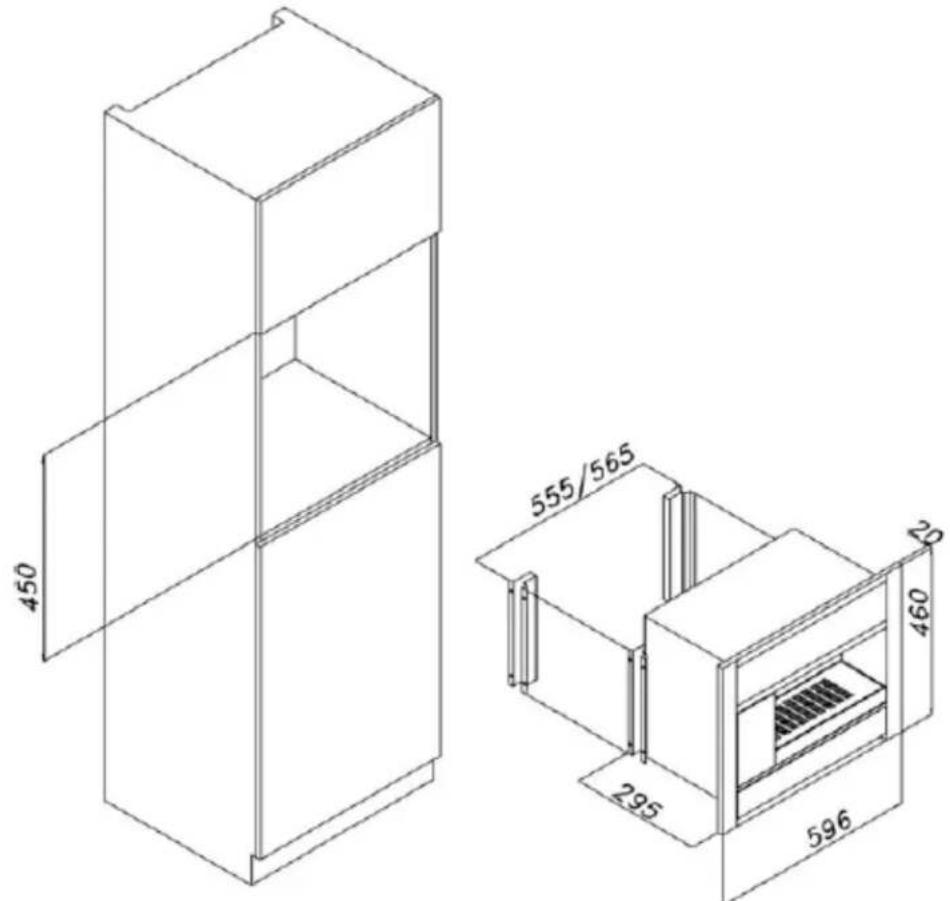
EXAMINE & MEASURE THE UNIT WITHIN WHICH YOU ARE GOING TO INSTALL THE COFFEE MAKER BEFORE ATTEMPTING TO INSTALL YOUR COFFEE MAKER
STEP 1.
MARK THE POSITIONS FOR THE BLOCKING SUPPORTS ON THE UNIT IN WHICH YOU WILL INSTALL YOUR APPLIANCE. SEE FIGURE C.1 (AT RIGHT)

STEP 2.
FIX THE BLOCKING SUPPORTS TO THE UNIT (SEE FIGURES ON NEXT PAGE)
INSTALLATION INSTRUCTIONS

natural_image
Hand pointing at a vertical metallic object mounted on a wall, no visible text or symbolsC2

natural_image
Close-up of a metallic container with a black arrow pointing downward (no text or symbols visible)C3

natural_image
Interior view of a room with two vertical metal panels and three intersecting arrows pointing outward (no text or symbols)C4
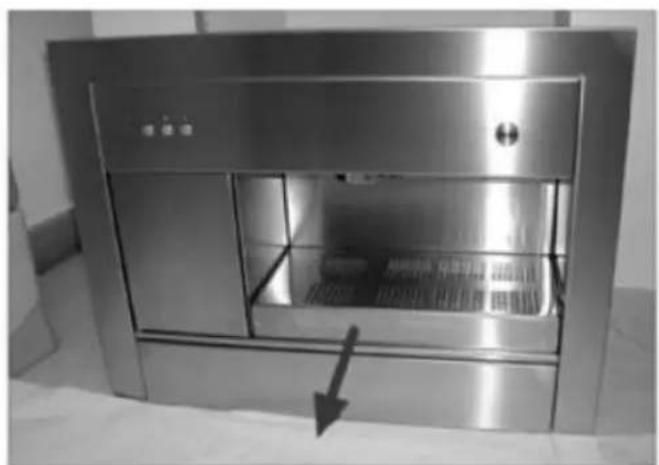
STEP 3 - PLACE THE COFFEE MACHINE IN THE UNIT, READY FOR INSTALLATION. NOTE: THE HOLES FOR THE BLOCKING SCREWS ARE:
• INSIDE THE WATER RESERVOIR AREA.
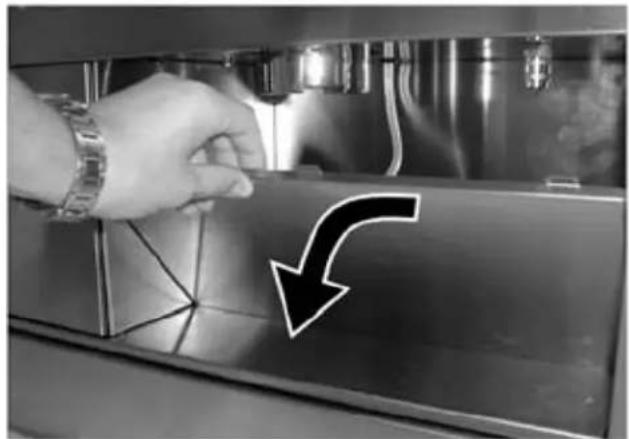
- ON THE BACK OF THE REMOVABLE PANEL (FIG. A-15). TO REMOVE IT, SEE THE INSTRUCTIONS IN THE PICTURES BELOW (FIGURES C-5, C-6, C-7 & C-8: BELOW AND ON NEXT PAGE).
natural_image
Exterior view of a stainless steel kitchen appliance with a downward arrow indicating a component (no visible text or symbols)C5

natural_image
Close-up of a metallic industrial component with four directional arrows pointing outward (no text or symbols)C6
INSTALLATION INSTRUCTIONS

natural_image
Close-up of a hand using a tool to press or install a metallic component, with an arrow symbol indicating upward motion (no text or symbols present)C7
natural_image
Close-up of a hand pressing down on a metal component with a curved arrow pointing downward (no text or symbols visible)C8
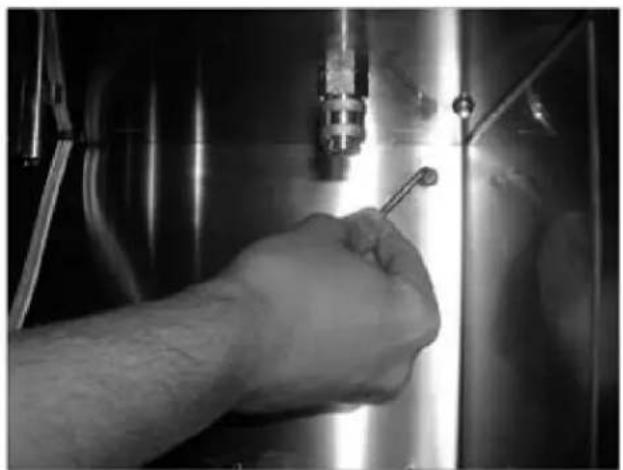
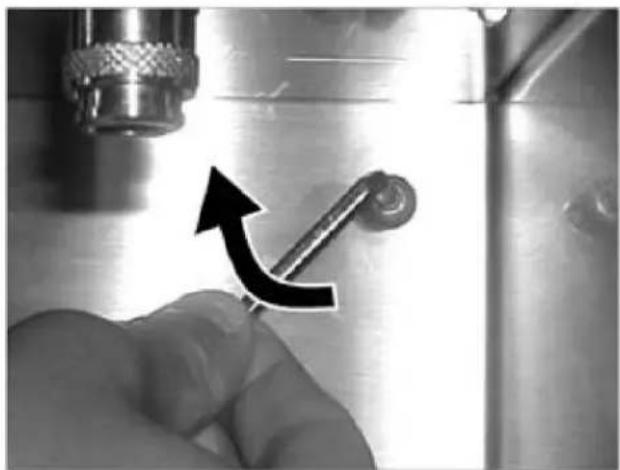
STEP 4 - FIX THE COFFEE MACHINE WITH THE SCREWS AND THE ALLEN KEY GIVEN. SEE FIG.S C-9, C-10.
natural_image
Close-up of a hand using a tool to adjust or install a metallic component, no visible text or symbolsC9
natural_image
Close-up of a hand holding a tool with a curved arrow pointing to a mechanical component (no text or symbols visible)C10
AFTER ENSURING YOU HAVE COMPLETED STEP 4, YOU WILL BE READY TO USE YOUR COFFEE MACHINE
BAUMATIC LTD. - CONDITIONS OF GUARANTEE.
Dear Customer,
The conditions of guarantee which apply to your Baumatic appliance are as follows: This product is guaranteed for 12 months from the date of original purchase.
Baumatic Ltd will repair any defect that arises due to faulty materials or workmanship free of charge during this period.
In addition, your appliance is covered by a 1 year parts warranty. Baumatic Ltd will provide free of charge the parts required to repair the appliance, only if they are fitted by a Baumatic engineer, for any defect that arises due to faulty materials or workmanship within a period of 5 years from the original purchase date.
An additional and annually renewable insurance scheme for labour is available should you wish to extend the warranty period.
Should any person other than an authorised representative of Baumatic Ltd interfere with the appliance, the policy is negated and Baumatic Ltd will be under no further liability.
The guarantee covers the appliance for normal domestic use only, unless otherwise stated.
Any claims made under the terms of the guarantee must be supported by the original invoice/bill of sale issued at the time of purchase.
This guarantee is transferable only with the written consent of Baumatic Ltd.
If the appliance fails and is considered either not repairable or uneconomical to repair between twelve months and five years from purchase date, a free of charge replacement will not be offered.
The guarantee for any replacement will only be for the remainder of the guarantee on the original product purchased.
This guarantee does not cover:
1 Sinks and taps
2 Failure to comply with the manufacturer's instructions for use.
3 The replacement of cosmetic components or accessories.
4 Accidental damage or wilful abuse.
5 Subsequent loss or damage owing to the failure of the appliance or electrical supply.
6 Incorrect installation.
7 Losses caused by Acts of God, civil war, failure to obtain spare parts, strikes or lockouts.
8 Filters, fuses, light bulbs, external hoses, damage to bodywork, paintwork, plastic items, covers, baskets, trays, shelves, burner bases, burner caps, decals, corrosion, rubber seals, refrigeration system blockage.
In the course of the work carried out it may be necessary to remove the appliance from its operating position. Whilst all reasonable care will be taken, Baumatic Ltd cannot accept responsibility for damage sustained to any property whatsoever in this process.
This guarantee is in addition to and does not diminish your statutory or legal rights.
Contacting Baumatic.
SALES
TEL: 0118 933 6900
FAX: 0118 931 0035
SERVICE
TEL: 0118 933 6911
FAX: 0118 986 9124
SPARES
TEL: 0118 933 6922
FAX: 0118 933 6942
TECHNICAL / ADVICE
TEL: 0118 9336933
FAX: 0118 9336942
For mainland UK and Northern Ireland, please contact one of the above numbers for further information or any other query you may have.
For ROI (Republic of Ireland), please contact one the numbers below:
TEL: 01-4030501 FAX: 01-4030503
Thank you for buying Baumatic.
Baumatic Ltd
Make-up for your kitchen
Headquarters
Baumatic Ltd.
Baumatic Buildings,
6 Bennet Road,
Reading,
Berkshire
RG2 0QX, United Kingdom
Sales Telephone
+44 118 933 6900
Sales Fax
+44 118 931 0035
Service Telephone
+44 118 933 6911
Service Fax
+44 118 986 9124
Spares Telephone
+44 118 933 6922
Technical / Advice Telephone
+44 118 933 6933
E-mail:
sales@baumatic.co.uk
technical@baumatic.co.uk
Http (Internet site):
www.baumatic.com
Baumatic UK/cod. 1230000666

Baumatic
www.baumatic.com
- User Manual for your Baumatic
- BEC2SS Coffee Machine
- CONTENTS
- Congratulations on purchasing a Baumatic Coffee Making Machine!
- SPECIFICATIONS:
- Your stainless steel Coffee Making Machine comes complete with:
- Important Safety Information: Please Read this before installing & using.
- CONFORMITY TO W.E.E.E. DIRECTIVE
- Introduction to your Baumatic Coffee Maker
- The first thing you need to do once you have installed your coffee maker is to fill the water reservoir:
- KEY:
- READ THIS FIRST TO LEARN ABOUT YOUR COFFEE MAKER
- STARTING THE COFFEE MACHINE
- Coffee Pods
- To load a coffee pod:
- Using Ground Coffee
- LOADING YOUR BEC2SS
- Using your Baumatic Coffee Maker
- MAKING A CUP OF ESPRESSO
- Note:
- IMPORTANT
- PREPARING A CAPPUCCINO
- Your Coffee Maker allows you to make the froth for cappuccinos in two different ways:
- METHOD 1:
- METHOD 2:
- OTHER DRINKS
- MAKING TEA USING HOT WATER
- MAKING A CUP OF TEA USING LOOSE TEA LEAVES
- COFFEE GLOSSARY
- ADJUSTING THE FLOW OF WATER FROM THE BOILER
- CLEANING
- INSTALLATION INSTRUCTIONS
- IMPORTANT!
- STEP 1.
- STEP 2.
- STEP 3 - PLACE THE COFFEE MACHINE IN THE UNIT, READY FOR INSTALLATION. NOTE: THE HOLES FOR THE BLOCKING SCREWS ARE:
- BAUMATIC LTD. - CONDITIONS OF GUARANTEE.
- Contacting Baumatic.
- Baumatic Ltd
- Headquarters
- E-mail:
- Baumatic
Brand : BAUMATIC
Model : BEC2SS
Category : Coffee maker