
BEC1SS - Coffee maker BAUMATIC - Free user manual and instructions
Find the device manual for free BEC1SS BAUMATIC in PDF.


| Product Type | Coffee Maker |
| Brand | Baumatic |
| Model | BEC1SS |
| Dimensions (approx.) | 30 x 20 x 35 cm |
| Weight (approx.) | 2.0 kg |
| Power Consumption | 850 W |
| Voltage / Frequency | 220-240 V / 50-60 Hz |
| Capacity | 1.25 L (approx. 10 cups) |
| Functions | Brew, Keep Warm, Auto Shut-Off |
| Filter Type | Permanent (reusable) filter included |
| Water Level Indicator | Yes, transparent window |
| Anti-Drip System | Yes, removable filter basket |
| Carafe | Glass carafe with lid |
| Cord Storage | Yes, under base |
| Maintenance | Regular descaling recommended |
| Cleaning | Wash carafe and filter basket after each use |
| Safety Features | Auto shut-off, boil-dry protection |
| Spare Parts Available | Carafe, filter basket, water tank |
| Warranty (typical) | 1-2 years |
Frequently Asked Questions - BEC1SS BAUMATIC
User questions about BEC1SS BAUMATIC
0 question about this device. Answer the ones you know or ask your own.
Ask a new question about this device
Download the instructions for your Coffee maker in PDF format for free! Find your manual BEC1SS - BAUMATIC and take your electronic device back in hand. On this page are published all the documents necessary for the use of your device. BEC1SS by BAUMATIC.
USER MANUAL BEC1SS BAUMATIC
natural_image
Modern stainless steel coffee machine with open lid and side panels, no visible text or symbolsINDEX
- DESCRIPTION OF THE COFFEE MACHINE (Fig A) Page 3
- DESCRIPTION OF THE CONTROL PANEL (Fig B)
| 3 | . | G | E | N | E | R | A | L | ||
| 4 | . | I | N | S | T | A | L | L | A | T |
| 5. | INSTRUCTIONS | FOR | FIRST | USE | |
| 6. | C | O | E | E | E |
| 7. | STEAM | PUSH-BUTTON | Page |
| 8. | EMPTY | WATER TANK | Page |
- ADJUSTING THE FLOW OF WATER FROM THE BOILER Page 6
| 10. | USE OF COFFEE PODS Page | ||||
| 11. | MAKING A CUP OF ESPRESSO | ||||
-
PREPARING A CAPPUCCINO Page 6
-
MAKING A CUP OF TEA USING LOOSE TEA LEAVES Page 7
| 14. MAKING TEA USING HOT WATER Page 7 | ||||||
| 15. | CLEANING | AND | SERVICING | Page | 7 | |
| 16. | ACCESSORIES | Page | 8 | |||
CONDITIONS OF GUARANTEE Page 8
1.DESCRIPTION OF THE COFFEE MACHINE (Fig A)
(Fig A)
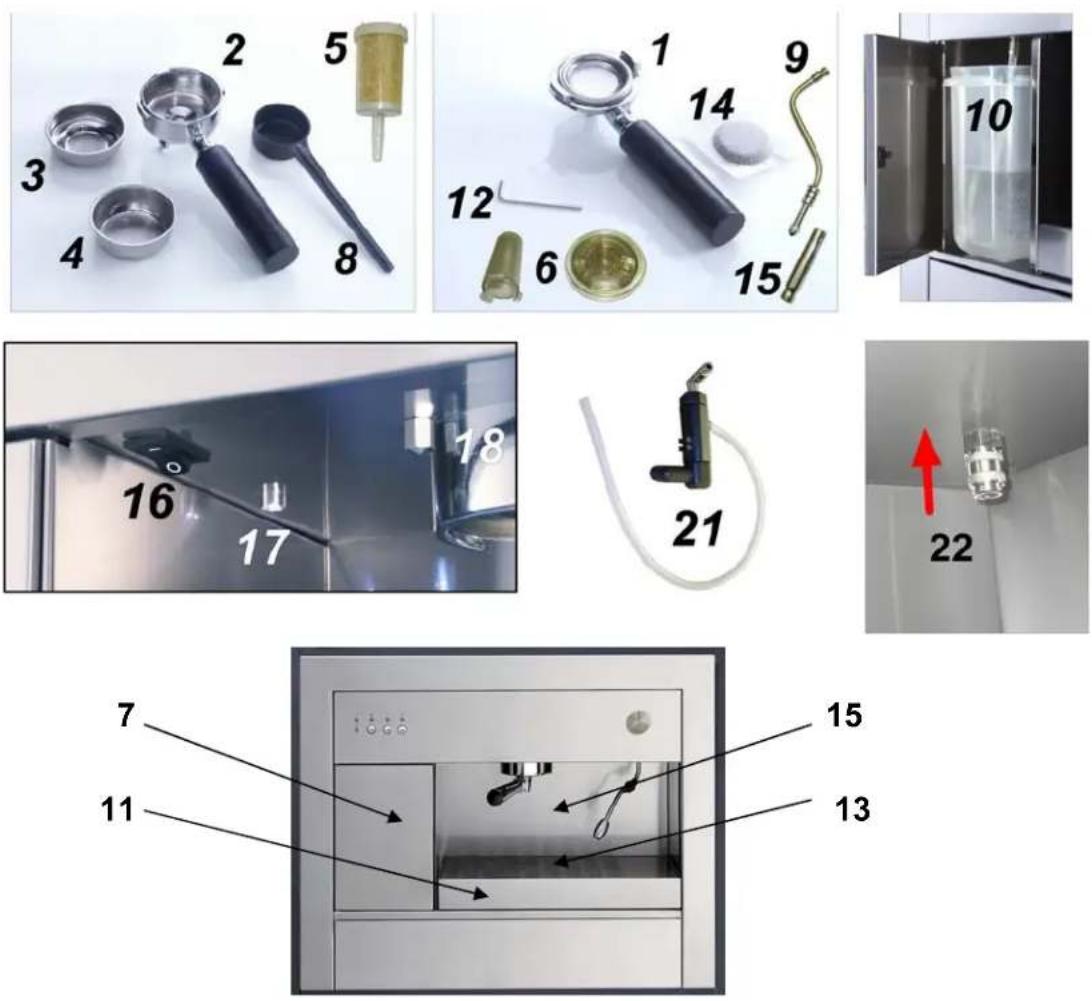
- Filter Holder for Coffee Pods
- Filter Holder for Ground Coffee
- 1-cup Filter
- 2-cup Filter
- Water Filter
- Coffee Pressing Tool
- Water Reservoir Door
- Scoop
9-15. Steam Pipe - Water Reservoir
- Drip Tray
- Allen Key for screw blocking
- Filter
14.Single-cup filter holder
15.Removable panel - On/Off Switch
- LED Lights
- Filter-holder ring nut
- Froth Maker
- Steam Pipe Holder Nut
2. DESCRIPTION OF THE CONTROL PANEL (Fig B)

- Power ON LED
- LED indicating coffee boiler heating and ready for use
- LED indicating Steam Boiler heating and ready for use
- Steam Release LED
- LED indicating empty water reservoir
- Coffee dispensing button
- Steam Boiler On/Off button
- Steam Release button
- Coffee boiler water flow adjustment knob
3. GENERAL
Please read carefully and thoroughly this instruction book before installing and operating your new coffee machine in order to get the best results.
Warning
To obtain good results the filtering unit has to be very hot, therefore please use the machine with extreme care to avoid accidental scalding.
- This appliance must only be used by adults and placed out of reach of children.
- The external parts of this appliance become very hot while it is on and remain hot after the appliance is switched off for a short period.
• Before cleaning, make sure that the appliance is disconnected from the electricity supply. - In the event that coffee machine is not functioning correctly and the information contained within the instruction book does not cover this, please contact the service department in order to arrange for an authorised engineer.
• Repairs must only be completed by an experienced engineer. - Packaging materials used are environmentally friendly and can be recycled. Please discard of all packaging material with due regard for the environment.
4. INSTALLATION
Electric connections
- Check the details given on the rating plate situated on the coffee machine making sure that the rated mains voltage and power available are suitable for its operation.
- Before making the electric connections, check the efficiency of the earthing system. Earthing of the coffee machine is compulsory by law. The manufacturer will accept no liability for any personal injury or damage to property deriving from failure to comply with this requirement.
- For models without a plug, fit a standard plug capable of withstanding the specified load on the power cord. The cord's earthing conductor is colored yellow and green. The plug must be accessible.
- If you prefer to make a fixed connection to the mains, insert an all-pole circuit breaker with a breaking gap of at least 3 mm between the cook top and the mains.
- To connect the coffee machine power cord, loosen and remove the cover on the terminal block in order to access the contacts inside. Make the connection, blocking the cord in place with the cable clamp provided and then close the terminal block cover again immediately.
- If you have to change the cord, the earthing (yellow / green) conductor must always be 10 mm longer than the line conductors.

Fixing the coffee machine to the unit
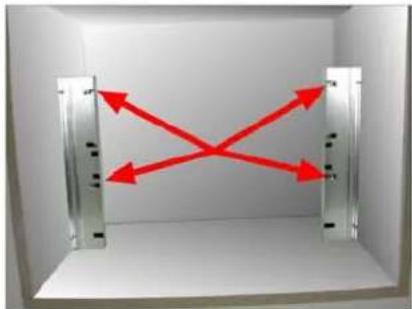
• Mark on the piece of furniture the measure for the positioning of the blocking supports.
Fig. C-1
• Fix to the piece of furniture the blocking supports.
- Fig. C-2, C-3, C-4
- Place the coffee machine on the piece of kitchen furniture so to be installed.
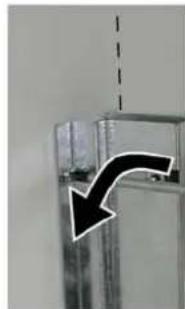
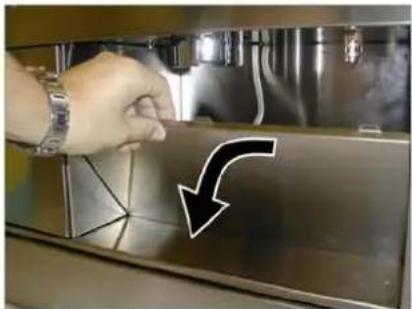
• The holes of the blocking screws are:
• Inside the area of the water reservoir.
- On the back of the removable panel(Fig A-15).To remove it, follow the instructions given by the figures.
Fig.C-5, C-6, C-7, C-8
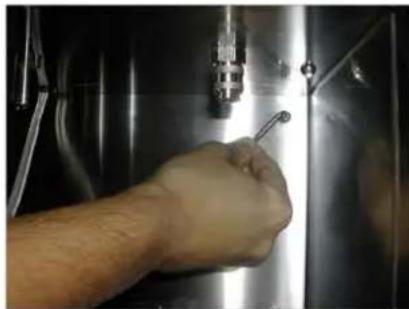
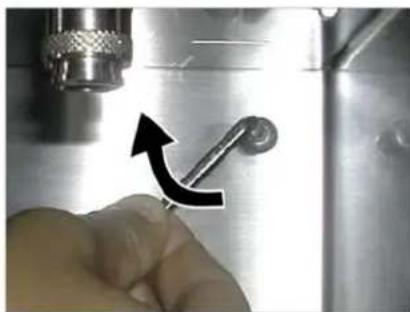
• Fix the coffee machine with the screws and the allen key given.
Fig. C-9, C-10
5. INSTRUCTIONS FOR FIRST USE
Filling the water reservoir
- Push the reservoir door (Fig A-7) on the right hand side
FIG. C

C1

natural_image
Hand holding a red object above a transparent cylindrical object, placed on a white surface (no text or symbols visible)C2
natural_image
Close-up of a glass container with a black arrow pointing downward (no text or symbols visible)C3
natural_image
Diagram showing two vertical metal panels with red arrows pointing outward from each panel, enclosed in a white container (no text or symbols)C4

natural_image
Exterior view of a stainless steel kitchen appliance with a red arrow pointing to the door (no visible text or symbols)C5

natural_image
Metallic industrial component with red arrows pointing downward and to the right (no text or symbols)C6

natural_image
Close-up of a hand using a tool to press or install a metallic component, with an arrow indicating upward motion (no text or symbols visible)C7
natural_image
Close-up of a hand pressing down on a metallic surface with a black arrow indicating direction (no text or symbols visible)C8
natural_image
Close-up of a hand using a tool to adjust or install a metallic component (no visible text or symbols)C9
natural_image
Close-up of a hand holding a tool near a metallic mechanical component, with an arrow indicating rotation (no text or symbols visible)C10
FIG. D
natural_image
Close-up of hands installing a pipe through a stainless steel appliance (no visible text or symbols)D1
natural_image
Hand holding a small transparent bottle containing yellow granular substance inside a stainless steel industrial machine (no visible text or symbols)D2
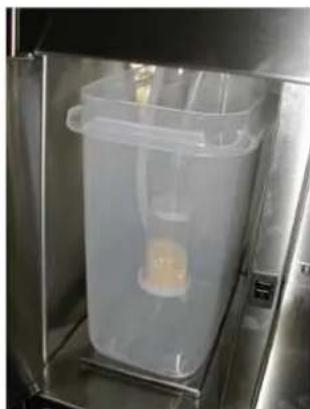
natural_image
Interior view of a laboratory apparatus with a transparent cylindrical container containing a yellow substance, no visible text or symbols.D3
FIG. E
E1

natural_image
Three types of medical or laboratory instruments with curved ends, one with a black arrow pointing downward (no text or symbols visible)- Remove reservoir from cabinet (Fig A-10)
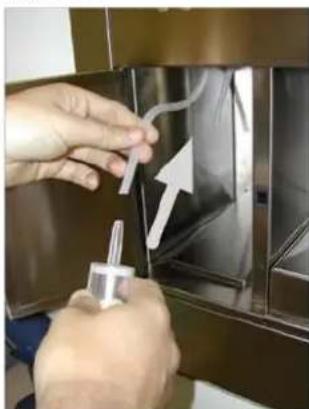
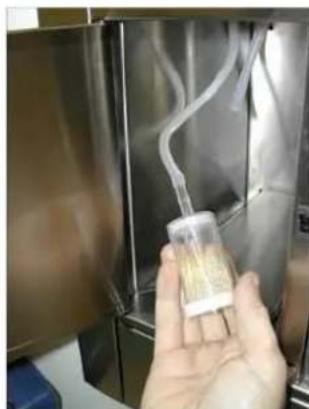
• Fill up reservoir with fresh water and place back in the cabinet, shut door(Fig A-7) - Ensure that the filter (Fig A-5) has been placed in cold water for a few minutes prior to first use. Fig. D-1, D-2, D-3
If the coffee machine has not been used for long periods of time, change the water in the reservoir.
Starting the Coffee Machine
- Switch the coffee machine on by switching the on/off button (Fig A-16)
- The red LED warning light (Fig B-1) will illuminate at the same time the coffee boiler LED (Fig B-2) will flash indicating the coffee boiler is heating up.
- The machine is ready for use when this LED stops flashing and remains on.
6. COFFEE DISPENSING
Press button (Fig B-6) to dispense coffee.
- Manually Dispensing Coffee: If the button is held down for less than one second, the machine will dispense coffee. Press the button again to stop dispensing.
- Automated Fixed Time Coffee Dispensing: If the button is held down for more than one second but less than five, the machine will dispense coffee for the length of time programmed.
- Dispensing/programming Time: the button is held down for more than five seconds, the machine will dispense coffee for as long as the button is held down. When the button is released, the machine will memorise the new time it has just calculated (which will subsequently be used by Function B).
7. STEAM PUSH-BUTTON
- Press key (Fig B-7) to access the steam boiler. LED (Fig B-3) will flash to indicate the machine is heating up. When it stops flashing and remains on, the machine is ready to release steam. Press key (Fig B-8) for steam release.
- Manual steam release button is held down for less than one second, the machine will release steam. Press the button again to stop this process.
- Fixed Time Automatic steam release : If the button is held down for more than one second but less than five, the machine will release steam for the length of time programmed.
- Steam release/programming of the button is held down for more than five seconds, the machine will release steam for as long as the button is held down. When the button is released, the machine will memorise the new time it has just calculated (which will subsequently be used by Function B). LED (Fig B-4) lights up to indicate the steam release phase.
8. EMPTY WATER TANK
- LED (Fig B-5) will illuminate when the tank is empty.
- All functions will stop automatically, including the steam boiler heating.
- Fill the tank and reselect the function which had previously been activated.
9. ADJUSTING THE FLOW OF WATER FROM THE BOILER
- Rotate knob (Fig B-9) anticlockwise from “+” towards “−” in order to decrease the amount of water which flows out of the coffee boiler. This process is used to make drinks such as tea or tisanes which require a slower flow of water and less of it.
10. USE OF COFFEE PODS
- The use of coffee pods (Fig A-14) is an easy, practical and hygienic way to make a coffee. This is due to the special packaging that avoids coffee coming out and it can easily be removed after use.
-
Switch On the machine (Fig A-16).
-
Insert one pod into the filter-holder (Fig A-1) and place into the ring nut (Fig A-18) making sure that it is correctly secured by turning the filter-holder handle from left to right.
- Put the cup underneath the nozzle (Fig A-1).
- Check the red LED light of the boiler (Fig B-2) is not flashing.
- Push the coffee button (Fig B-6).
- Pressing (Fig B-6) again will stop dispensing.
• Take the filter-holder out of the ring nut and remove the pod.
11. MAKING A CUP OF ESPRESSO
- Ensure the coffee machine is kept clean to get the best cup of espresso.
- Make sure the filter units are cleaned after each use.
- Warm the cups prior to filling.
- The quality and coarseness of the coffee grains can influence the flavour.
- Make sure the coffee is pressed in using (Fig A-6)
- After pressing, leave the circular part of the press (Fig A-6) in the filter holder (A-2) with Filter Cup (Fig A-3 or 4)
12. PREPARING A CAPPUCCINO
• This coffee machine enables the user to make froth for cappuccinos in two different ways.
- Method 1: use the "steam pipe" (Fig. A 9-15) and immerse the steam spout into a container of milk. Press button (Fig.B-7) to switch the steam boiler on. The flashing LED (Fig.B-3) indicates that the machine is heating up. When the LED stops flashing the machine is ready for use.
- Press the steam dispensing button (Fig.B-8) to dispense the steam either manually or automatically. When the steam starts coming out, move the container up and down slightly, until the milk makes the froth for the cappuccino.
- Other drinks, such as water, punch etc. can also be heated in this way.
Warning: the steam nozzle and dispensing spout must be cleaned every time they are used by discharging steam several times. Cleaning is best carried out when the components have cooled down and by separating the steam nozzle from the dispensing spout. Wipe them carefully using a clean sponge or cloth. When milk cools it creates impurities which block the steam discharge hole, causing the machine to function badly. Fig.E1
- Method 2: remove the steam pipe (Fig A9-15) and replace it with the special cappuccino maker (Fig A-21) available as an accessory. This operation is extremely simple as the various parts are interchangeable and the user simply has to use the connection set underneath the control panel (Fig.A-22).
- Warning: the various components remain extremely hot for some time after the machine has been switched off so may burn.
- Press button (Fig.B-7) to switch the steam boiler on. The flashing LED (3) (Fig.B-3) indicates that the machine is heating. When the LED stays on the machine is ready for use.
- After having fitted the "cappuccino maker" onto the machine, immerse the small tube into a container of milk. Place the cup of coffee under the dispensing spout and then press the steam dispensing button (Fig.B-8) to dispense either manually or automatically. The spout will dispense the froth to make the cappuccino.
Warning: always clean the "cappuccino maker" after use by immersing the small tube in a container full of clean water and dispense several times. This will clear the tube of any residues. When milk cools, it creates impurities which block the steam discharge hole.
13. MAKING A CUP OF TEA USING LOOSE TEA LEAVES
• Use filter holder (Fig A-2) with Filter Cup(Fig A-3 or 4)
- Press the tea leaves with the press (Fig A-6) leaving the circular part of the press in place on the filter holder.
- Place filter holder (Fig A-2) to ring nut (Fig A-18) and twist from left to right ensuring it is in place.
- Adjust Coffee boiler water flow knob (Fig B-9) to required setting. The lower the setting the stronger the tea.
- Check the red LED light of the boiler (Fig B-2) is not flashing.
- Push the coffee button (Fig B-6).
- Pressing (Fig B-6) again will stop dispensing.
• Take the filter-holder out of the ring nut and clean filter holder.
14. MAKING TEA USING HOT WATER
- Place the steam nozzle (Fig A 9-15) onto the holding nut (Fig A-22)
- Put a cup underneath the steam pipe (Fig A 9-15)
- Turn machine on (Fig A-16)
- Push the steam button on/off (Fig B-7). An LED will flash (Fig B-3) while the boiler heats up. When solid it is ready to dispense.
- Push steam release button (Fig B-8) to begin.
15. CLEANING AND SERVICING
- Outer parts of the coffee machine should only be cleaned with warm soapy water using either a sponge or soft cloth. No abrasive cleaners should be used.
- The Drip tray can be removed and should be cleaned periodically. It is also dishwasher proof.
- The filter will need changing when you can see white granules in the filter. This can be obtained from our Spares Department.
- When cleaning the filter holder or steam nozzle, ensure they have been left to cool down prior to cleaning.
16. ACCESSORIES
- The coffee machine is equipped with two filter holders (Fig A-1 and A-2). The filter (Fig A-2) is for use with 1-cup and 2-cup filter (Fig A-3 and A-4). The second one (Fig A-1) is for use with pods.
- The drawer can be used for holding cups and saucers and a compartment for all other accessories such as the filters.
BAUMATIC Ltd
CONDITIONS OF GUARANTEE
Dear Customer,
Included with your new Baumatic appliance is a guarantee registration card, please complete this and return and your earliest convenience.
This guarantee is in addition to your statutory legal rights and will not in any way hinder any legal rights.
The conditions of the guarantee, which applies, to your Baumatic appliance are as follows:
All 'Work' in relation to the Guarantee must be carried out by Baumatic Ltd or an approved service agent of Baumatic Ltd. Any claims made under the terms of the guarantee must be supported by the original invoice / bill of sale issued at the time of purchase.
The guarantee period starts from the date of the original purchase and the manufacturer will provide the parts and labour required to repair the appliance should breakdown occur as a result of mechanical / electrical failure. This service will be given Free of charge within the Guarantee period. An additional Insurance scheme is available should you wish to extend the warranty period.
This guarantee applies to UK mainland and Northern Ireland only.
THIS GUARANTEE DOES NOT COVER:
- Any damage caused by transit, misuse, or neglect.
- Cosmetic and perishable parts: plugs, fuses, light bulbs, light covers, cosmetic trims, cables, filters and attachments, knobs, any rubber and seals, ceramic or glass surfaces, dents, scratches, paintwork.
-
Attachments / Accessories, trivets and handles, griddles, pan stands, shelves, burner caps and collars, oven liners. Plus any additions thereafter.
• Periodic maintenance, the repair or replacement of parts due to natural wear and tear. -
Material discoloration, corrosion.
- Incorrect installations, modifications or repair by any unauthorised personnel.
- Use of non-Baumatic parts.
- Damage caused by foreign objects or substances.
- Appliances used for non-domestic use.
• Operation on unsuitable voltage, water or gas supplies.
• Accidents, Civil war, acts of God or any cause beyond the control of Baumatic Ltd.
PLEASE NOTE ALL GUARANTEES ARE NON TRANSFERABLE
SALES
SERVICE
SPARES
TEL 0118 933 6900 TEL 0118 933 6911 TEL 0118 933 6922
FAX 0118 931 0035 FAX 0118 986 9124
For further information or any other query you may have please contact one of the above numbers.
Thank you for buying Baumatic.
- INDEX
- 1.DESCRIPTION OF THE COFFEE MACHINE (Fig A)
- DESCRIPTION OF THE CONTROL PANEL (Fig B)
- GENERAL
- Warning
- INSTALLATION
- Electric connections
- Fixing the coffee machine to the unit
- INSTRUCTIONS FOR FIRST USE
- Filling the water reservoir
- Starting the Coffee Machine
- COFFEE DISPENSING
- STEAM PUSH-BUTTON
- EMPTY WATER TANK
- ADJUSTING THE FLOW OF WATER FROM THE BOILER
- USE OF COFFEE PODS
- MAKING A CUP OF ESPRESSO
- PREPARING A CAPPUCCINO
- MAKING A CUP OF TEA USING LOOSE TEA LEAVES
- MAKING TEA USING HOT WATER
- CLEANING AND SERVICING
- ACCESSORIES
- BAUMATIC Ltd
- CONDITIONS OF GUARANTEE
- THIS GUARANTEE DOES NOT COVER:
- PLEASE NOTE ALL GUARANTEES ARE NON TRANSFERABLE
Brand : BAUMATIC
Model : BEC1SS
Category : Coffee maker