FWS-125KN - Milling machine Ferm - Free user manual and instructions
Find the device manual for free FWS-125KN Ferm in PDF.


| Product Type | Wall Chaser (Milling Machine) |
| Brand | Ferm |
| Model | FWS-125KN |
| Rated Voltage | 230 V~ |
| Frequency | 50 Hz |
| Power Rating | 1300 W |
| No-Load Speed | 9000/min |
| Max Cutting Depth | 8-30 mm |
| Max Channel Width | 8-26 mm |
| Weight | 4.2 kg |
| Cutting Disc Diameter | 125 mm (2 discs included) |
| Sound Pressure Level (Lpa) | 90.9 dB(A) |
| Sound Power Level (Lwa) | 103.9 dB(A) |
| Vibration Level | 0.9 m/s² |
| Insulation Class | Double Insulated (EN 50144) |
| Protection Features | Overheat Protection, Overload Protection |
| Included Accessories | 2x Diamond Cutting Discs, Handgrip, Cam Wrench, Hex Key, Cold Chisel, Dust Extraction Adapter, Set Carbon Brushes |
| Dust Extraction Connection | Yes (mechanical dust extraction adapter included) |
| Guide Wheel | Yes, for channel guidance |
| Maintenance | Clean ventilation slots regularly; replace carbon brushes when worn |
| Recommended Use | Cutting channels in concrete, masonry, paving without water |
Frequently Asked Questions - FWS-125KN Ferm
User questions about FWS-125KN Ferm
0 question about this device. Answer the ones you know or ask your own.
Ask a new question about this device
Download the instructions for your Milling machine in PDF format for free! Find your manual FWS-125KN - Ferm and take your electronic device back in hand. On this page are published all the documents necessary for the use of your device. FWS-125KN by Ferm.
USER MANUAL FWS-125KN Ferm
- The ventilation slots are blocked with dirt. Clean with dry cloth.
- The machine does not start when switched on. Check the mains lead and the fuse/plug. Take to your Ferm Dealer for repair
- The motor is defective. Take to your Ferm Dealer.
MAINTAIN TOOLS WITH CARE
Keep the tool clean for better and safer performance. Store the discs properly in accordance with the maker's instructions.
Follow instructions for changing accessories. Inspect tool and extension cables periodically and if damaged, have them repaired by a qualified person or authorised service body. Keep handles free from oil or grease. Keep the ventilation slots clean to prevent motor overheating.
Check for damaged parts
Do not use a tool with damaged parts, before further use a damaged tool must be carefully checked by a qualified person to determine that it will operate properly. Check for alignment of moving parts, binding or breakage of parts, mounting and other conditions that may affect its operation.
A damaged part or guard should be properly repaired by an authorised service centre, unless indicated otherwise in the instruction manual. Have defective switches replaced by an authorised service centre. Do not use a tool if the switch does not turn on and off.
Have your tool repaired by an expert
This appliance is manufactured in accordance with relevant safety standards. Only experts must carry out repairing of electrical appliances, otherwise considerable danger for the user may result.
Storing tools
When not in use tools should be stored in the dry, out of reach of children.
ELECTRICAL INFORMATION
This product is complete with a pre-wired mains plug, it is double insulated in accordance with EN 50144—no earth wire is required
If the plug needs replacing follow these instructions.
Wire correctly
The wires in the mains lead are coloured in the following way:
BLUE -Neutral
BROWN -Live

Securing wires
Secure wires carefully and firmly to the correct terminals. Secure the mains cable in the plug cord grip firmly.
Fit a 13-amp fuse. If a 13amp (BS1363) plug is used a (BS1362) ASTA approved 13-amp fuse must be fitted.
Recycle/Dispose of old plug and cable
Prevent inadvertent connection to socket and risk of electric shock.
ENVIRONMENT
Recycle the packaging according to the identification marks on it.
At the end of the product or its accessories life please recycle where facilities exist - phone the Helpline for current advice on recycling.
Helpline
For any questions relating to operational or safety matters contact:
Ferm Customer Helpline on: 01159661199
Monday-Friday 8am-6pm
Saturday 9am-1pm
GUARANTEE
The guarantee conditions can be found on the separately enclosed guarantee card.
CE DECLARATION OF CONFORMITY (UK)
We declare under our sole responsibility that this
product is in conformity with the following
standards or standardized documents
EN-50144-1,prEN50144-2-3.
EN-55014-1,EN-55014-2.
EN61000-3-2,EN61000-3-3,
in accordance with the regulations:
98/37/EEC
73/23/EEC
89/336/EEC
from01-12-200
GENEMUIDEN NL
W.Kamhof
Quality department

0310-16
INSTRUCTIONS FOR USE

JUST A PERFECT TOOL
FWS-125KN

natural_image
Ferm electric shaver with black handle and metal casing (no visible text or symbols)WALL CHASER

Art.nr. WSM4002
GENERAL
Congratulations!
With the purchase of this high quality Ferm tool, you have made an excellent choice. Ferm products are rugged, safe and easy to use.
It is very important to exercise care when handling and servicing this tool. Please read these instructions thoroughly, and be sure to follow the directions given. You will then enjoy many years of service from your Ferm tool.
| Specifications | |
| Voltage 230 V– | |
| Frequency | 50 |
| Power rating 1300 W | |
| Rotational speed (not loaded) | 9000/min |
| Max. cutting depth 8-30 mm | |
| Max. channel width 8-26mm | |
| Weight 4,2 kg | |
| Cutting disc (2x) ∅ 125 x 22,2 x 2,0 | |
| Lpa (Sound pressure level) 90,9 dB(A) | |
| Lwa (Sound power level) | 103,9 dB(A) |
| Vibration level | 0,9 m/s ^2 |
Package contents
- Electric wall chaser
- Handgrip
• Diamond cutting discs (2 x) - Cam wrench
- Hex key
- Cold chisel
• Dust extraction adapter - Set carbon brushes
• Instructions for use
• Guarantee card
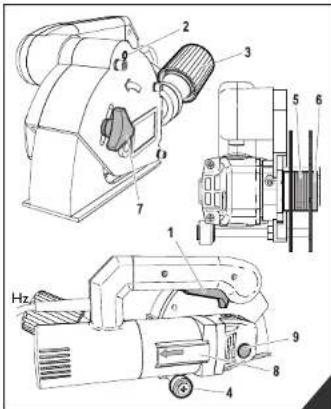
Product information
- On/off triggers switch
- Attachment point for
handgrip - Connection for
mechanical dust
extraction - Guide wheel
Safety Instructions
In these instructions for use, the following symbols are used:

Caution: risk of bodily harm, fatality or damage to the machine, from failure to follow the directions in these instructions for use.

Caution: electrical current.

The machine is double insulated compliant with EN50144; therefore no earth connection is required.

Visual check before starting to work
▼ MAITENANCE AND REPAIR
Overview spare parts

▼ GENERAL SAFETY INSTRUCTIONS
MAINTENCE, CARE AND REPAIR

Switch off and unplug the machine before carrying out any cleaning or maintenance work.
CLEANING
Do not use flammable liquids to clean the angle grinder,
FAULTS
Switch OFF immediately at the mains plug and remove the plug when:
- The plug or cable is damaged.
- The switch on the machine is defective.
- You smell or see smoke caused by scorched insulation in the machine.

FWS-125KN
FWS-125KN

▼ MAITENANCE AND REPAIR
- Maintain the tool with care.
- Keep the tool clean and sharp.
- Follow the directions for lubrication and fitting of accessories.
• Periodically inspect the power cord, and have any damage repaired by an authorised service agent. - Periodically inspect extension cords, and replace them if damaged.
- Keep handgrips dry, clean and free from grease and oil.
- Always remove the plug from the mains, whenever:
• the machine is not in use; -
you service the machine;
• exchanging accessories such as blades. -
Immediately repair any damage.
Regularly inspect all moving parts, attachments and all other parts that can affect correct operation. - Have all repair work carried out by an authorised service agent.
▼ MAITENANCE AND REPAIR
| Malfunctions | ||
| Problem | Possible cause | Solution |
| The electric motor becomes hot and cuts out. | The overheating protection has been activated. | Wait several minutes until the machine has cooled down, then re-start the machine. |
| The motor is defective. | Take the machine to your Ferm dealer for inspection and/or repair | |
| The machine switched will not run. | The overload protection has been activated. | Re-start the machine. |
| The overheating protection has been activated. | Wait several minutes until the machine has cooled down, and then re-start the machine. | |
| The switch is damaged. | Take the machine to your Ferm dealer for inspection and/or repair | |
| Cutting is difficult and the channel made is irregular. | The cutting discs are bent or blunt. | Replace the cutting discs. |
| When cutting, the workpiece begins to vibrate heavily | The cutting discs are overheated or deformed. | Replace the cutting discs. |
| The machine runs erratically and/or noisily. | The carbon brushes are worn. | Take the machine to your Ferm dealer for replacement of the carbon brushes. |

▼ GENERAL SAFETY INSTRUCTIONS
Caution!
Whenever working with electric tools, always take basic safety precautions including those described below, to reduce the risk of fire, electric shock, and personal injury.
Before using the product, read all safe use directions and keep them in a handy place.
Directions for safe use:
1 Keep the working environment tidy
- Untidy workplaces and benches can easily cause accidents.
2 Be alert to the conditions in your surroundings.
- Do not expose electric tools to rainwater.
- N ever use electric tools in damp or wet conditions.
- Ensure that the work area is well lit.
- N ever use electric tools where there is a hazard of combustion or explosion.
3 Protect yourself from electric shock
- A void bodily contact with earthed surfaces (such as pipes, radiators, heaters, refrigerators).
4 Keep children at a safe distance
- Do not allow bystanders to touch the tool or extension cord.
- Do not allow bystanders access to the worksite.
5 Store tools, which are not in use
- Store tools, which are not in use, in a dry, high, or lockable place, beyond the reach of children.
6 Do not overload the tool
- For a good and safe result, use the tool settings advised.
7 Use the right tool for the job
- Do not use light tools or accessories for heavy duty jobs.
- Never use the tool for work it was not designed to do. For example, do not use a circular saw to saw branches or cut down trees.
8 Wear suitable work clothing
- Wear no loose clothing or jewellery, as these could become entangled in moving parts of the machine.
- When working outdoors, rubber gloves and footwear with heavy profile soles are recommended.
- Wear a headband or hairnet to keep long hair out of the danger zone.
9 Wear safety glasses
- When your work generates dust, wear a dustmask or facemask.
10 Connect a dust extraction system
- If the tool provides for connection to a dust extraction system, ensure that this is connected and working correctly.
11 Only use the power cord for its intended use
- Never carry the tool by its power cord, and do not unplug the tool from the power by pulling on the power cord.
- P r otect the power cord from heat, oil, and/or sharpedges.
12 Do not overextend yourself
- Ensure you have secure footing, and maintain your balance at all times.
13 Maintain the tool with care
- Keep cutting equipment sharp and clean, so you will achieve a good result, safely.
- Follow the directions for lubrication and replacement of parts.
- Inspect the power cord regularly and have a damaged cord repaired by an authorised service agent.
- Inspect extension cords regularly, and replace any damaged cords.
- Keep handgrips dry, clean and free from grease and oil.
14 Remove the plug from the wall socket
- W henever the tool is not in use, and before exchanging parts such as blades, bits and knives.
▼ GENERAL SAFETY INSTRUCTIONS USING THE TOOL
15 Remove adjustment tools and wrenches
- Make it a habit to never switch on the machine, until you have checked that any adjusting tools or wrenches have been removed.
16 Avoid unintentional starting
- N ever carry a connected machine with a finger on the switch. Make certain that the switch is in the "OFF" position, before connecting the machine to the powersupply.
17 Use outdoor extension cords
- Whenever you use the tool outdoors, always use extension cords specifically designed for outdoor use.
18 Stay alert
- Watch what you are doing. Use your common sense. Do not use the tool when you are tired.
19 Inspect damaged parts
- Before making further use of the tool, if any safety feature such as a protective cover or other part has been damaged, make absolutely certain that the machine is still safe to use, and that the part can still perform its protective function.
- Check the alignment and free movement of moving parts, possible breakage of parts, attachments and any irregularities that could adversely affect operation.
- A safety cover or any other damaged part should be properly repaired or replaced by an authorised service agent, unless otherwise directed in these directions.
- H ave any defective switches replaced by an authorised service agent.
- N ever use the tool whenever the tool cannot be switched "ON" or "OFF" with its own switch.
20 Caution
U se of any part or accessory, other than described in these instructions for use, may possibly lead to bodily injury.
21 Have your machine repaired by a qualified service agent
- This electric tool is manufactured in conformance with the relevant safety requirements.
Only a qualified serviceman using original spare parts should carry out repairs, as inexpert repair will cause considerable risk for the user.
Use
Cutting of channels in materials such as concrete, masonry and paving, without the use of water, with a guide wheel.
Never drill, cut or chase in surfaces, in which electrical cabling, gas or water pipes could be concealed. Always use a suitable detector to seek out concealed wiring or piping, or obtain advice from the local energy or water company.
Switching on and off


natural_image
Illustration of a hand inserting a plug into an electrical socket (no text or symbols)

natural_image
Technical line drawing of a mechanical device with no visible text or symbols▼ USING THE TOOL
Cutting channels


natural_image
Technical line drawing of a mechanical device with a circular component and an arrow indicating a specific part (no text or symbols present)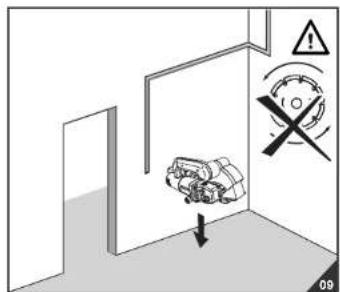
▼ FITTING AND ADJUSTMENT INSTRUCTIONS
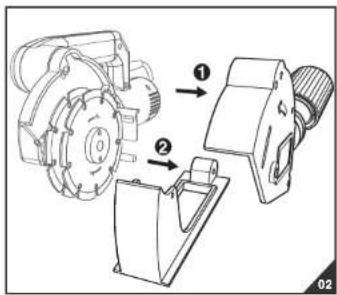
Fitting cutting discs

natural_image
Technical line drawing of a mechanical device with no visible text or symbols
natural_image
Technical line drawing of a mechanical assembly with a wrench and rotating component (no text or symbols)
natural_image
Technical line drawing of a mechanical assembly with no visible text or symbols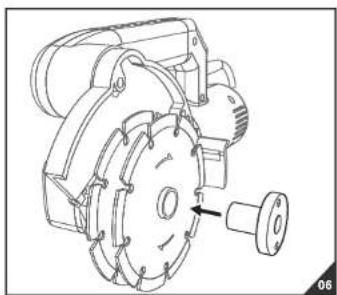
natural_image
Technical line drawing of a mechanical assembly with a flanged component and a bolted joint (no text or symbols)
12
FWS-125KN
FWS-125KN
5

▼ FITTING AND ADJUSTMENT INSTRUCTIONS
Fitting cutting discs Cutting channels

natural_image
Technical line drawing of a mechanical assembly with a rotating shaft and housing (no text or symbols)
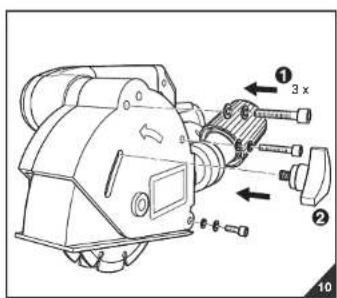
▼ USING THE TOOL

natural_image
Isometric line drawing of a room corner with a ruler and a pencil, no text or symbols present

natural_image
Technical diagram of a mechanical device with directional arrows and a warning symbol (no text or labels)

natural_image
Technical line drawing of a mechanical device with directional arrows and component symbols (no readable text or labels)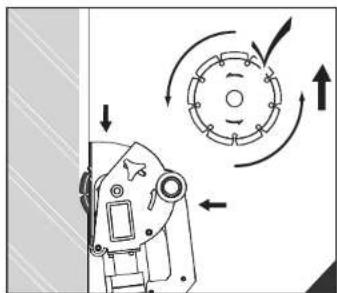
natural_image
Diagram of a mechanical device with directional arrows indicating motion or rotation (no text or symbols)
6
FWS-125KN
FWS-125KN
11

▼ FITTING AND ADJUSTMENT INSTRUCTIONS
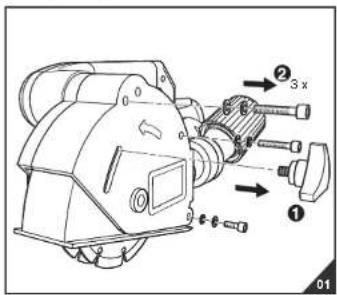
Connecting dust extraction

natural_image
Technical line drawing of a mechanical device with no visible text or symbols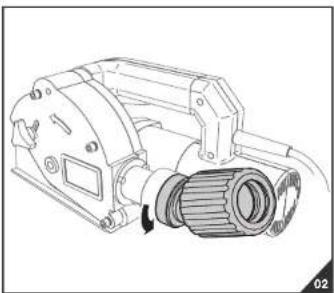
natural_image
Technical line drawing of a mechanical device with a rotating shaft and housing (no text or symbols)
natural_image
Technical line drawing of a mechanical device with a rotating shaft and threaded end (no text or symbols)▼ FITTING AND ADJUSTMENT INSTRUCTIONS
Adjusting channel width


natural_image
Technical line drawing of a mechanical device with no visible text or symbols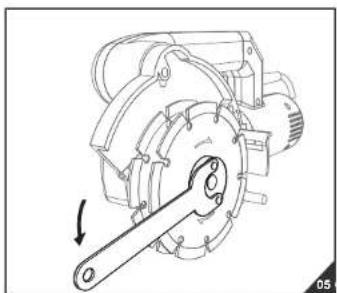
natural_image
Technical line drawing of a mechanical assembly with a lever and housing (no text or symbols)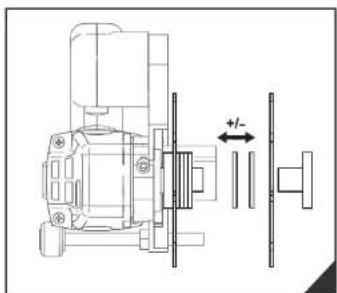

10
FWS-125KN
FWS-125KN
7

▼ FITTING AND ADJUSTMENT INSTRUCTIONS
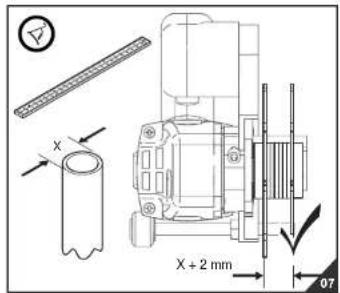
Adjusting channel width

natural_image
Technical line drawing of a mechanical assembly with a flanged component and housing (no text or symbols)
natural_image
Technical line drawing of a mechanical assembly with a lever and motor (no text or symbols)


8
FWS-125KN
▼ FITTING AND ADJUSTMENT INSTRUCTIONS
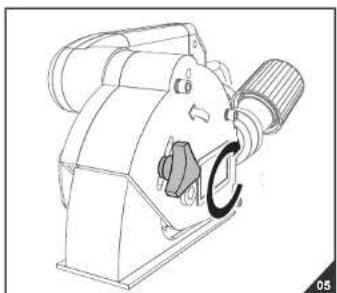
Adjusting channel depth


natural_image
Technical line drawing of a mechanical device with a knob and rotating button (no text or symbols)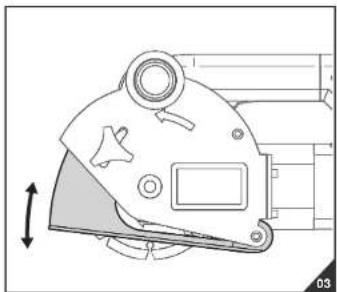
natural_image
Technical line drawing of a mechanical component with no visible text or symbols
natural_image
Line drawing of a mechanical device with no visible text or symbolsFWS-125KN
9

◀
- MAINTAIN TOOLS WITH CARE
- Check for damaged parts
- Have your tool repaired by an expert
- Storing tools
- ELECTRICAL INFORMATION
- Wire correctly
- BLUE -Neutral
- Securing wires
- Recycle/Dispose of old plug and cable
- ENVIRONMENT
- Helpline
- GUARANTEE
- CE DECLARATION OF CONFORMITY (UK)
- from01-12-200
- GENERAL
- Congratulations!
- Package contents
- Product information
- Safety Instructions
- ▼ MAITENANCE AND REPAIR
- ▼ GENERAL SAFETY INSTRUCTIONS
- MAINTENCE, CARE AND REPAIR
- CLEANING
- FAULTS
- Caution!
- Directions for safe use:
- ▼ GENERAL SAFETY INSTRUCTIONS USING THE TOOL
- Use
- ▼ USING THE TOOL
- ▼ FITTING AND ADJUSTMENT INSTRUCTIONS
Brand : Ferm
Model : FWS-125KN
Category : Milling machine