
DMG7129X - Oven DE DIETRICH - Free user manual and instructions
Find the device manual for free DMG7129X DE DIETRICH in PDF.


| Product Type | Built-in Electric Oven |
| Brand | De Dietrich |
| Model | DMG7129X |
| Dimensions (H x W x D) | 60 cm x 60 cm x 55 cm |
| Weight | 40 kg |
| Energy Source | Electric |
| Power Consumption | 2.8 kW |
| Oven Capacity | 70 L |
| Main Functions | Conventional, Fan-assisted, Grill, Pizza, Defrost, Keep Warm |
| Cleaning Type | Pyrolytic self-cleaning |
| Cooling System | Cool front door with multi-flow ventilation |
| Safety Features | Child lock, automatic switch-off, overheating protection |
| Display | Touch control with LED display |
| Temperature Range | 30°C to 250°C |
| Energy Efficiency Class | A+ |
| Spare Parts Availability | Available through authorized De Dietrich service centers |
| Repairability Index | 8/10 |
| Warranty | 2 years standard |
Frequently Asked Questions - DMG7129X DE DIETRICH
User questions about DMG7129X DE DIETRICH
0 question about this device. Answer the ones you know or ask your own.
Ask a new question about this device
Download the instructions for your Oven in PDF format for free! Find your manual DMG7129X - DE DIETRICH and take your electronic device back in hand. On this page are published all the documents necessary for the use of your device. DMG7129X by DE DIETRICH.
USER MANUAL DMG7129X DE DIETRICH
FR GUIDE D'UTILISATION
E
• 2

A
natural_image
Simple line drawing of two hands holding a circular object on a base (no text or symbols)B
natural_image
Technical line drawing of a circular component with three arms and a base, no text or symbols presentC
natural_image
Simple line drawing of an oval-shaped container with internal lines and a horizontal stripe (no text or symbols)D
natural_image
Two simple oval-shaped diagrams with diagonal hatching patterns, no text or symbols present.
CHÈRE CLIENTE, CHER CLIENT
L'AFFICHEUR
RELATIONS CONSOMMATEURS FRANCE
Discovering a De Dietrich product means experiencing the range of unique emotions.
The attraction is immediate, from the moment you set eyes on the product.
The sheer quality of the design
shines through, thanks to the timeless style and outstanding finishes which
make each component an elegant and refined masterpiece in its own right, each one
in perfect harmony with the others. Next, comes the irresistible urge to touch it.
De Dietrich design makes extensive use of robust and prestigious materials, where the accent is place firmly upon authenticity. By combining state-of-the-art technology
with top quality materials, De Dietrich produces
beautifully crafted products to help you get the most from the culinary arts, a passion
shared by all lovers of cooking and fine food. We hope that you enjoy using this new appliance.
Thank you for choosing a De Dietrich product.
Important safety advice and precautions ....3
Environment......6
Installation and electrical connection ....7
Description of the oven....8
The appliance ....8
The accessories....8
The control panel....9
The display ....10
Settings....11
Setting the time ....11
Changing the time 11
Using the timer....11
Locking the controls 11
Settings menu 11
Cooking 12
Operating principle....12
Cooking functions ......12
Microwave functions 12
The microwave function 13
Programming cooking 13
The PIZZA function 14
The grill function 14
The grill + microwave function 14
The defrost function 14
Automatic cooking functions 15
The automatic defrost function 15
Memory functions 16
Care 17
Problems and solutions ....17
Performance in use 18
After-Sales Service ....19
IMPORTANT SAFETY ADVICE AND PRECAUTIONS
IMPORTANT SAFETY INSTRUCTIONS - READ CAREFULLY AND RETAIN FOR FUTURE REFERENCE.
This user guide is available for download on the brand's website.

Important:
Before switching your appliance on, please read this installation guide carefully to familiarise yourself quickly with its operation. Keep this manual with the appliance. If you sell or give the appliance to someone else, make sure that you also give them this manual.
Please read these instructions before installing and using your device. They were written for your own safety and that of others.
— This appliance is designed to be used for domestic and similar applications such as: kitchen areas for the staff of shops, offices and other professional premises; farms; use by customers in hotels, motels and other residential environments; guest house type environments.
— This appliance may be used by children aged 8 years and older, and by persons with impaired physical sensory or mental capacities, or without
experience or knowledge, if they are supervised or have received prior instructions on how to use the appliance safely and have understood the risks involved Children must not be allowed to play with the appliance. This appliance should not be cleaned or maintained by children, unless supervised.
— Children must be supervised to prevent them from playing with the appliance.
WARNING:
Accessible parts of the appliance become hot during use. Be careful not to touch the heating elements inside the oven. Children under eight years of age should not be allowed near the appliance, unless they are constantly supervised.
It is dangerous for anyone other than a qualified person to perform maintenance or repairs that requires the removal of the cover providing protection against exposure to microwave power.
IMPORTANT SAFETY ADVICE AND PRECAUTIONS
WARNING: If the appliance is being used in combination mode, it is recommended that children only use the oven under adult supervision due to the temperatures generated.
— Use only microwave-safe utensils.
— When heating food items in plastic or paper containers, keep an eye on the microwave's contents, since there is a risk of spontaneous combustion.
— If smoke appears, stop or unplug the oven and leave the door closed to smother any flames that may appear.
WARNING: Liquids and other foods must not be heated in sealed containers, as they may explode.
Metal food and beverage containers must not be used when microwave cooking.
— Heating beverages in the microwave oven can cause the sudden and/or delayed spitting of boiling liquid, so care should be taken when handling containers.
— The contents of baby bottles and baby food pots should be stirred or shaken and the temperature should be checked before consumption so as to avoid burns.
— Heating eggs in their shells or whole hard-boiled eggs in a microwave oven is not recommended, since they may explode even after cooking has ended.
— This appliance has been designed for closed door cooking.
— A microwave oven is intended for heating food and drinks.
Drying food products or linen or heating heat pads, slippers, sponges, damp clothes or similar could cause injury or fire.

WARNING:
If the door or door seal is damaged, the oven should not be used until it has been repaired by an authorised person.
It is recommended that the
IMPORTANT SAFETY ADVICE AND PRECAUTIONS
oven is cleaned regularly and that any food residue is removed.
— If the appliance is not cleaned regularly, its surface could become damaged, permanently affecting the appliance's lifespan and possibly causing a safety hazard.
Do not use abrasive cleaners or hard metal scrapers to clean the glass door of the oven, which may scratch the surface and cause the glass to crack.
Do not use a steam cleaner.
The electrical plug must remain accessible after installation.
It must be possible to disconnect the appliance from the power supply, either using a plug or by fitting a switch on the fixed wiring system in accordance with installation rules.
If the power cable is damaged, it should be replaced by the manufacturer, its after-sales service department or by a similarly qualified person in order to avoid danger.
Centre the oven in the unit so as to ensure a minimum distance of 10 mm between the appliance and the surrounding unit. The material of the unit supporting the appliance must be heat-resistant (or covered with a heat-resistant material). For greater stability, attach the oven to the unit with 2 screws through the holes provided on the side panels.
WARNING:
Only allow children to use the oven without supervision if adequate instructions have been given so that the child is able to use the oven safely and understands the dangers of incorrect use.
This appliance is not designed to operate above an oven in pyrolysis mode.
This appliance must be installed more than 850mm up off the ground.
This appliance may be installed in a cabinet column, as indicated on the installation diagram.
CARE FOR THE ENVIRONMENT
This appliance's packaging can be recycled. Recycle and help protect the environment by disposing of packaging in local waste containers designed for this purpose.
Your appliance also contains a lot of recyclable material. This logo indicates that used appliances must not be mixed with other waste.
Appliance recycling organised by your manufacturer is carried out under optimum
conditions, in accordance with European Directive 2002/96/EC on the disposal of waste electrical and electronic equipment.
Contact your local authority or retailer for information on used appliance collection points close to your home.
Thank you for helping to protect the environment.
• 1 INSTALLATION

UNPACKING
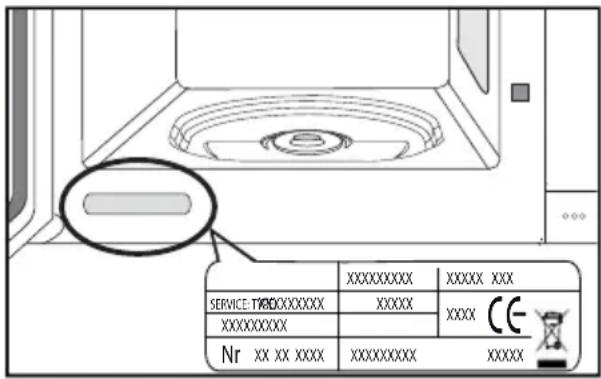
When you receive the appliance, unpack it or have it unpacked immediately. Check its general appearance. Make a note of any reservations on the delivery slip and keep a copy. Remove all protective packaging. Check the appliance's characteristics on the nameplate and make sure you comply (fig. A).
CHOICE OF LOCATION AND BUILDING IN
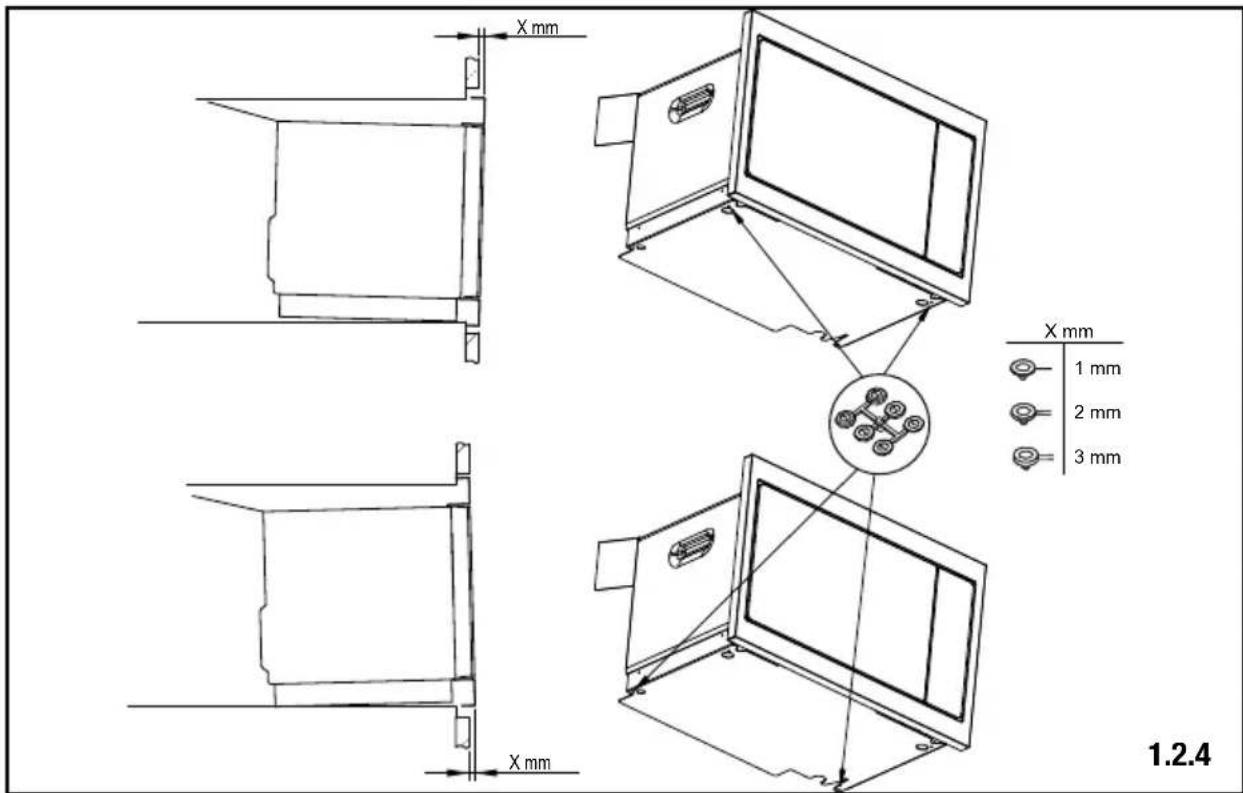
This appliance must be installed in a cabinet column as shown in the installation diagram (fig. B-C-D-E).
Do not use your appliance immediately (wait approximately 1 to 2 hours) after moving it from a cold location to a hot location, as the condensation may cause a malfunction.
Centre the oven in the unit so as to ensure a minimum distance of 10 mm between the appliance and the surrounding unit. The material of the unit supporting the appliance must be heat-resistant (or covered with a heat-resistant material).
For greater stability, attach the oven to the unit with 2 screws through the holes provided in the side panels.
ELECTRICAL CONNECTION

Important:
This appliance should only be installed by professionals and qualified technicians.
The appliance must be correctly built in to ensure electrical safety. Electrical connections should be made before the appliance is
installed in its housing.
Ensure that:
- the electrical installation has sufficient power (16 Amps),
If the electrical installation in your home requires a modification to connect the appliance, call a qualified electrician.
During maintenance, the appliance must be disconnected from the mains, the fuses must be cut off or removed.

Warning:
The safety wire (green-yellow) is connected to the appliance's terminal and must be connected to the installation's earth.
If the oven malfunctions in any way, unplug the appliance or remove the fuse corresponding to the sector where the oven is hooked up.

Warning:
We cannot accept liability for any accident or incident resulting from non-existent, defective or incorrect grounding.
• 2 DESCRIPTION OF THE OVEN

THE APPLIANCE
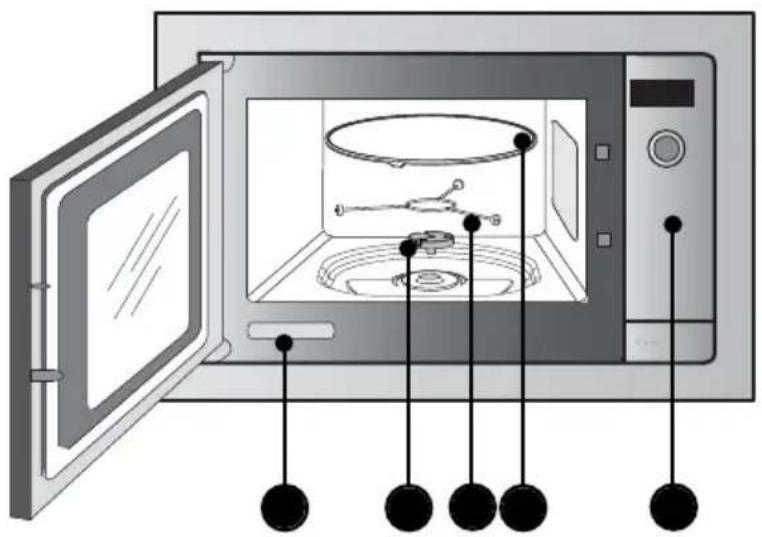
A Identification label
B Drive hub
C Wheel support
D Turntable
E Control panel
ACCESSORIES
• The turntable ensures even cooking of food throughout, with no need to intervene.
It rotates in either directions. If it does not turn, verify that all components are properly positioned.
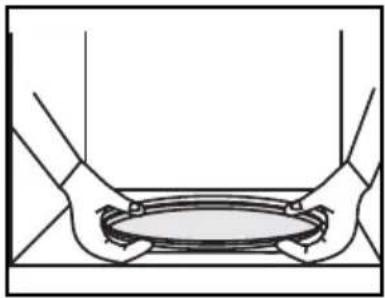
It may be used as a cooking dish. For easy removal, wells are provided on either side (fig.A). Do not try to turn it manually, as you could damage the drive system.
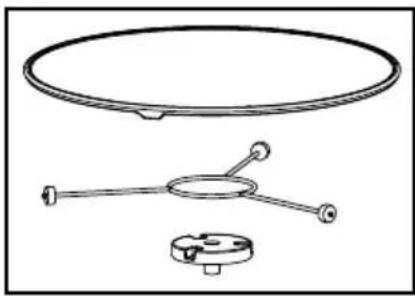
- Rotation is controlled by the drive hub (fig.B).
If you take out the support with the drive hub, make sure you do not let water get into the motor shaft orifice.
Remember to put back the drive hub, support wheels and the turntable.
Do not try to turn it manually, as you could damage the drive system.
• The roller support: If it does not turn properly, check that there is nothing
underneath the turntable stopping it from turning.
- When the turntable is in the stopped position, large dishes can be used which cover the entire surface of the oven. In this case, it is necessary to turn the container or mix its content half-way through the programme.
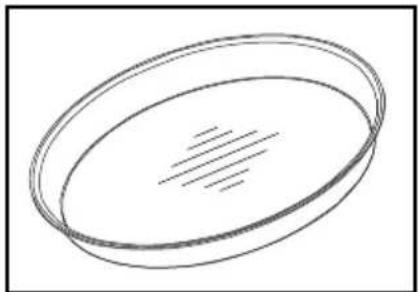
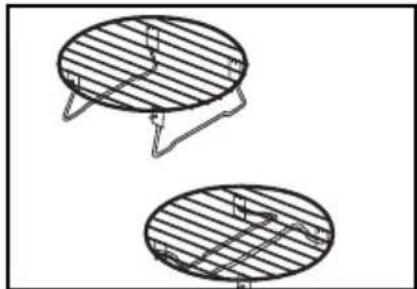
• The PIZZA plate (fig.C): The Pizza plate, with its special coating, absorbs microwaves from underneath. It spreads the heat under the food to cook or re-heat it and so give the desired colour and crispness, while the grill browns the top.
- Folding rack (fig.D): The rack should never be used with other metal containers in
microwave, grill + microwave or PIZZA modes.
• 2 DESCRIPTION OF THE OVEN

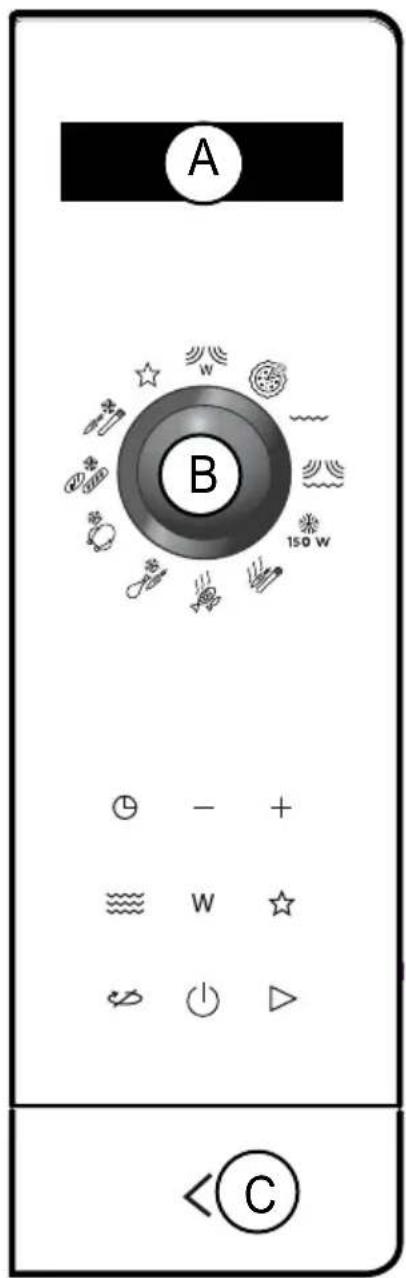
THE CONTROL PANEL

The display:
simplifies programming by displaying: the function, cooking time weight or time.

The rotary knob:
is used to select a cooking function.
The open door key:

The clock key
is used to set the time or access the timer.

The + and - keys
are used to adjust the weight, program a cooking time, set the timer or select a memory.

[Non-Text]
The Grill key
is used to set the Grill power.

The microwave key
sets the desired microwave power.

Memory keys 1-2-3:
are used to confirm and save a cooking programme (max. 3).

The Cancel key:
a long press on this key stops the current cooking or program.

The Stop turntable key:
stops the turntable from revolving.

The start key:
starts any programme.


• 2 DESCRIPTION OF THE OVEN

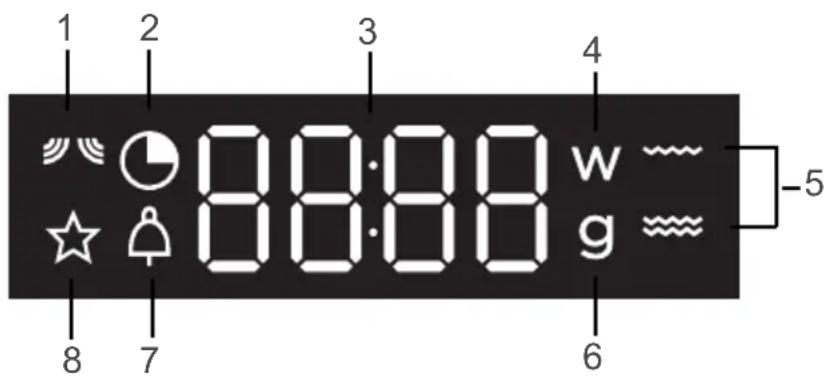
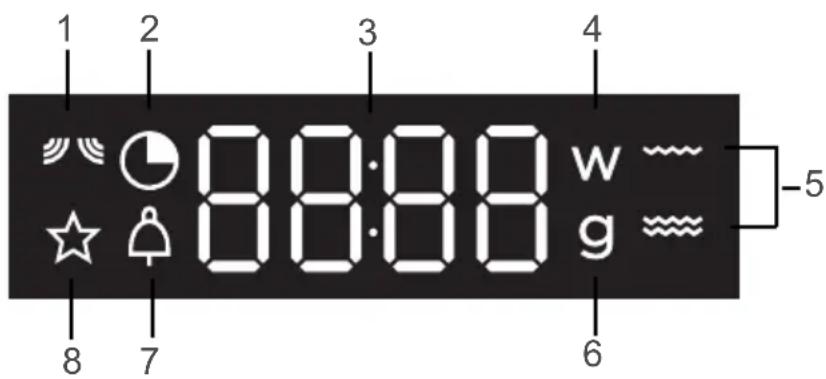
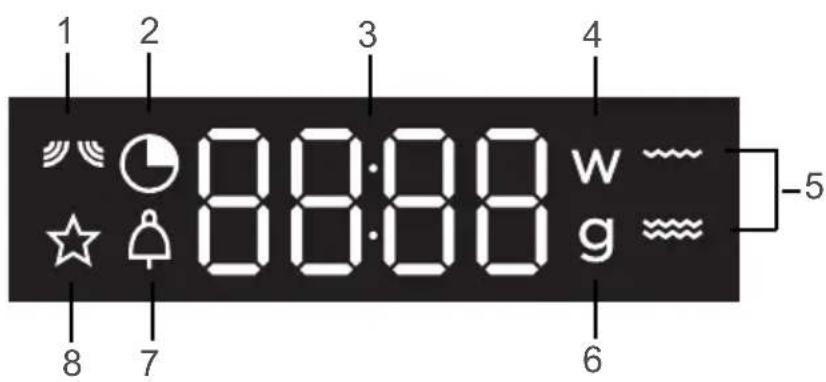
THE DISPLAY
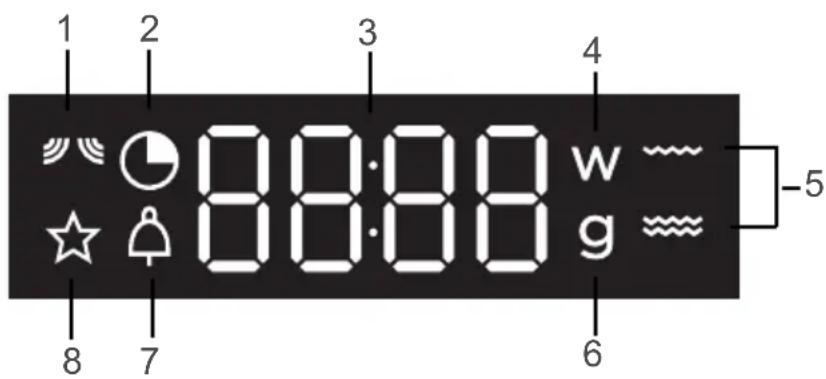
1 Micro-wave indicator.
2 Programming time and clock indicator.
3 Displays the microwave power, cooking time, clock time and weight.
4 Micro-wave power indicator.
5 Grill level indicator.
6 Weight indicator.
7 Minute indicator.
8 Saved programs indicator.
SETTING THE TIME
When you switch on or after a power cut, the display flashes 12:00.
Set the time using the + and - keys and then press the Ⓞkey to confirm.
CHANGING THE TIME
Press the Key until the clock flashes. Adjust the time setting with the + and - keys then press the Key to confirm. The clock now shows the right time.
USING THE TIMER
Press the Key and the timer indicator is displayed and the time set flashes.
Adjust the time set using the + and - keys and then press the ▶ to confirm. At the end of the timed period a beep sounds; press any key to stop it.

The timer function cannot be accessed during cooking.
SETTINGS MENU
You can adjust different settings on your oven:
sounds and demonstration mode.
For this, press and hold the - and + keys to access the settings menu.
See the table below:
| Default settings | |
 | Key sounds - beeps:ON position, sounds active.OFF position, no sounds. |
 | DEMO mode:ON position, mode active.OFF position, normal mode. |
To select the various parameters, if necessary, press the ▷ and press the + key to modify the selection.
Press (1) exit the settings menu at any moment.
LOCKING THE CONTROLS
Child safety lock
Hold the key pressed until the

symbol is displayed.
To unlock, hold the key pressed until

disappears from the
screen.
• 4 COOKING
OPERATING PRINCIPLE
Microwaves used for cooking are electromagnetic waves. They are commonly found in our environment in the form of radio waves, light and infrared rays.
Their frequency is in the 2450MHz range.
Their behaviour:
• They are reflected by metals.
• They pass through all other serials.
• They are absorbed by water, fat and sugar molecules.
When food is exposed to microwaves its
molecules begin moving rapidly, causing it to heat up.
The depth of penetration of the waves into the food is about 2.5 cm, if the food is thicker, cooking the centre of it is done by conduction just like traditional cooking.
In essence microwaves are simply causing a thermal change inside the food and are therefore not harmful to health.
COOKING FUNCTIONS
| Position | Use |
 | Microwaves variable between 100W and 900W in step of 100W. |
 | The Pizza function, with its special plate, allows simultaneous use of the grill and microwave. |
 | Variable grill recommended for grilling sausages or prawns or making toast. |
| [8GBA] | For cooking and browning food such as gratins and meat. |
 | For defrosting meat, fish, fruit, bread or delicate dishes. |
 | For cooking fresh vegetables. |
 | For cooking fish. |
 | For defrosting ready meals. |
 | For defrosting meat and poultry. |
 | For defrosting bread, pastries and cakes. |
 | For defrosting vegetables. |
 | For accessing the MEMORY program. |
| Power | Recommendations for use |
| 900W | To cook fresh vegetables and soup. To heat up all liquids. |
| 700W | To reheat all fresh or frozen pre-cooked dishes and frozen vegetables. To bring to temperature pre-cooked dishes and frozen vegetables. |
| 500W | To cook fish and poultry. To finish programs begun with the «fast cook» setting such as beans, lentils or milk-based dishes. |
| 300W | To finish programs begun with the «fast cook» setting, which might otherwise overcook on the outside, for instance veal or pork roast. |
PROGRAMMED COOKING
Open the door. Set the dish inside and close the door.

If the door is not properly shut, the appliance will not operate.
If the dish is too large to turn freely inside the oven, press the stop turntable key before or during the programme.
Setting a cooking programme:
- Select the function with the selector.
- Adjust the power by pressing the Wmicrowave key several times until the desired setting is obtained, e.g. 900W - fast cook).
- Program the cooking time using the + and - keys, e.g. 5 minutes.
- Press the start key ▷
The program begins: the turntable revolves, the oven light comes on.
Three beeps announce the end of a programme.
The beeps are repeated every minute for ten minutes until you open the door.

During the programme:
-You may stop or start the turntable by pressing ↗.
The [ Symbol] flashes in the display with the word OFF, telling you to stop the turntable.
To start the turntable again, press the key.
The symbol flashes in the display with the word ON telling you to re-start the turntable.
-If you open the door before the end of the program, close the door and press ▷ to resume the program.
-At the end of a program, the fan may continue to run to ensure proper cooling. It will stop automatically.
THE PIZZA FUNCTION
By using the Pizza function for a particular dish, you save time and energy, while retaining the pleasure of traditional recipes (taste, colour and texture).
Setting a cooking time:
Select the PIZZA function

- Set the cooking time using the + and - keys, e.g. 10 minutes.
- Press the start key ▷
THE GRILL FUNCTION
Setting a cooking programme:
Select using the Grill function selector
Press the key to select the grill power level.
There are two available power levels:
Setting a cooking program:
Select the Grill + Microwave function 🐎 Press the key to select the grill power level.
There are two available power levels:
\~\~: MEDIUM GRILL
: FAST GRILL
Press the W key several times to select the desired microwave power level.
- Set the cooking time using the + and - keys, e.g. 10 minutes.
- Press the start key ▷
SETTING A DEFROST PROGRAMME
Select the defrost function 150 W

- Set the cooking time using the + and - keys, e.g. 10 minutes).
- Press the start key ▷
In the defrost function (150W), a beep sounds in mid-program and TURN is displayed to tell you to turn the food over to obtain the best results. Close the door and press the start key ▷to resume defrosting.
PROGRAMMING AUTOMATIC COOKING
The automatic cooking functions select the appropriate cooking parameters according to the food being prepared and its weight. Select one of the following two automatic functions:

: Fresh vegetables*

: Fish
Select a function.
A suggested weight flashes on the screen.
Enter the weight of the food using the + and - keys and then confirm by pressing the start key.
The oven starts.
* A beep sounds in mid-program and TURN is displayed to tell you to turn the food over to achieve the best results. Close the door again and press the▶key to resume cooking.
PROGRAMMING AUTOMATIC DEFROSTING
The automatic functions select the appropriate defrost parameters for you based on the food being prepared and its weight. Select a pre-programmed food from the following list:

: Defrosting ready meals.

: Defrosting meat and poultry*.

: Defrosting bread, pastries and

: Defrosting vegetables.
Select an automatic defrost function and enter the weight of the food using the + and - keys (in steps of 50g) and then confirm by pressing ▷The oven starts.
* A beep sounds in mid-program and TURN is displayed to tell you to turn the food over to achieve the best results. Close the door and press the start key ▷to resume defrosting.
• 4 COOKING
THE MEMORY FUNCTION
The Memory functions allow you to store three frequently used programmes which you can then access by selecting the function using the functions selector. All programs can be saved to memory. Program as for an immediate start:
- Select any microwave function, e.g. FAST
COOK (900W).
-
Set the time, e.g. 2 minutes.
-
Instead of pressing the start key, give
a long press on the memory key ☆
MEM1 displays the screen.
Select MEM1, MEM2 or MEM3 using the + and - keys.
Press the start key. ▷
A beep sounds to confirm that your custom program has been saved.
To start a saved program:
Select the memory function key ☆ using the function selector.
Select MEM1, MEM2 or MEM3 using the + and - keys.
Press the start key ▷to start the program.
• 5 CARE

CLEANING THE INNER AND OUTER SURFACES
We recommend that you clean the oven regularly and remove any deposits of food inside and outside of the appliance. Use a damp sponge and a little soap. If the appliance is not cleaned regularly, its surface could become damaged, permanently affecting the appliance's lifespan and possibly causing a safety hazard.
If the door or door seal are damaged, the oven should not be used until it has been repaired by a qualified person.
The use of abrasive products, alcohol or thinners is not recommended as they
are likely to damage the appliance.
If the oven smells bad or is dirty, boil a cup of water with lemon juice for 2 minutes and clean the walls with a small amount of washing up liquid.
The turntable can be removed for easy cleaning. To remove it, pick it up using the hand-holds provided for the purpose. If you remove the drive hub, do not allow water to enter the motor shaft hole. Do not forget to put the turntable, the roller frame and the glass turntable plate back in.
• 6 PROBLEMS AND SOLUTIONS

- The appliance does not start.
Check that your appliance is plugged in properly.
Check that the oven door is properly closed.
The appliance is noisy.
The turntable does not rotate properly.
Clean the wheels and the rolling area under the turntable.
Ensure that the wheels are properly positioned.
You see steam on the window.
Wipe away the condensation with a cloth.
Food is not heated during a microwave program.
Ensure that the utensils are suitable for microwave ovens and that the power level is suitable.
Check that the oven is not set in «DEMO» mode (see p. 11).
There are sparks coming from the appliance.
Clean the appliance properly: remove any grease, food deposits, etc.
Remove any metal items from the walls of the oven.
• 7 PERFORMANCE IN USE
Function performance tests according to IEC/EN/NF EN 60705;
The International Electrotechnical Commission, SC.59K, has established a standard for comparative performance tests conducted on various micro-wave ovens. We recommend the following for this appliance:
| Test Load Approx | temps | Power level selector | Containers / Tips | |
| Custard (12.3.1) | 1000g 23 - 25 min 400W | Pyrex 227On the turntable plate | ||
| Savoie cake (12.3.2) | 475g 7 - 8 min 700W | Pyrex 827 | On the turntable | |
| Meat loaf (12.3.3) | 900g 12-15 min 700W | Pyrex 838Cover with plastic film.On the turntable | ||
| Defrosting meat (13.3) | 500g 12 - 13 min 200W | On a flat plateOn the turntable | ||
| Defrosting strawberries (B.2.1) | 250g 5 - 6 min 200W | On a flat plateOn the turntable | ||
| Potato gratin (12.3.4) | 1100g | 25 - 30 min | Slow grill + 700W | Pyrex 827On the turntable |
| Chicken (12.3.6) | 1200g 25 - 30 min | Fast grill + 400W | Place on the grill assembly + drip trayInsert the dish on level 1 from the bottomTurn over mid way through cooking. | |
• 8 AFTER-SALES SERVICE

INTERVENTIONS
Any repairs to your appliance must be made by a qualified professional accredited to work on the brand. When calling, please provide the full references of your appliance (commercial reference, service reference, serial number), so that we can handle your call more efficiently. This information appears on the manufacturer's nameplate on the equipment.
NOTE:
- With a view to constantly improving our products, we reserve the right to make changes to their technical, functional or aesthetic characteristics in line with technological progress.
Make a note of the references of your appliance on so that you can readily find them in future.
ES
ESTIMADO/A CLIENTE/A
• 2 VOORSTELLING VAN DE OVEN

HET DISPLAY
De oven schakelt in.
PROGRAMAR UMA COZEDURA
• 2 POPIS TROUBY

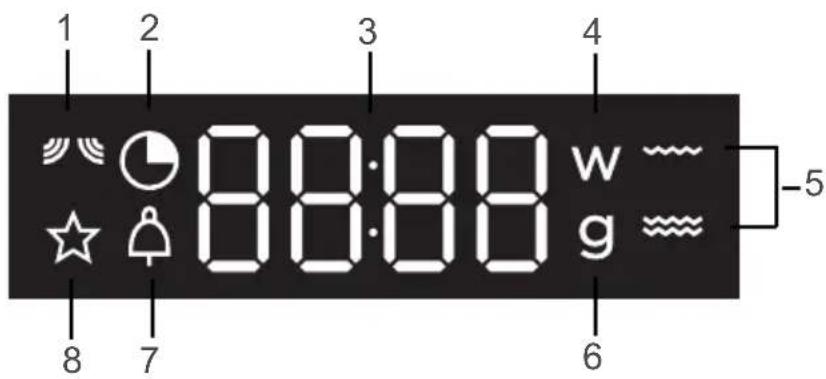
DISPLEJ
WYBÓR MIEJSCA INSTALACJI I WBUDOWANIA
• 2 PREZENTACJA KUCHENKI

WYŚWIETLACZ
• 2 POPIS RÚRY

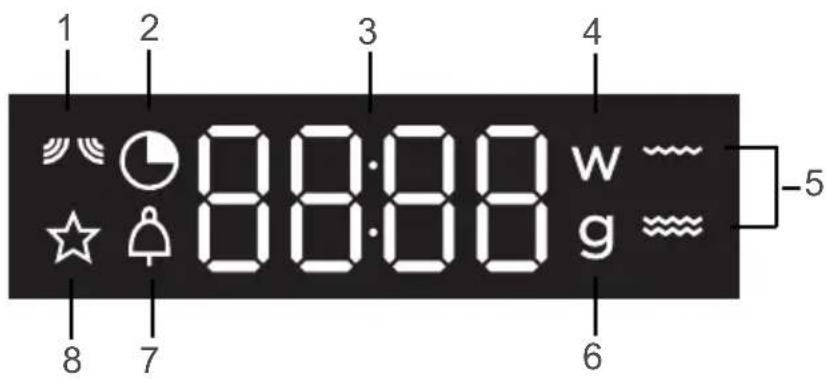
DISPLEJ
1 Ukazovatel' mikrovlnnej rúry.
2 Ukazovatel' času programovania a hodín.
3 Zobrazovanie výkonu mikrovlnnej rúry, trvania, času a hmotnosti.
4 Ukazovatel' výkonu mikrovlnnej rúry.
5 Ukazovatel' úrovne grilu.
6 Ukazovatel' hmotnosti.
7 Ukazovatel' času.
8 Ukazovatel' programov uložených v pamäti.
NASTAVENIE ČASU
- • 2
- CHÈRE CLIENTE, CHER CLIENT
- L'AFFICHEUR
- RELATIONS CONSOMMATEURS FRANCE
- IMPORTANT SAFETY ADVICE AND PRECAUTIONS
- IMPORTANT SAFETY INSTRUCTIONS - READ CAREFULLY AND RETAIN FOR FUTURE REFERENCE.
- WARNING:
- CARE FOR THE ENVIRONMENT
- • 1 INSTALLATION
- UNPACKING
- CHOICE OF LOCATION AND BUILDING IN
- ELECTRICAL CONNECTION
- Important:
- • 2 DESCRIPTION OF THE OVEN
- THE APPLIANCE
- ACCESSORIES
- THE CONTROL PANEL
- The display:
- The rotary knob:
- The clock key
- The + and - keys
- [Non-Text]
- The Grill key
- The microwave key
- Memory keys 1-2-3:
- The Cancel key:
- The Stop turntable key:
- The start key:
- THE DISPLAY
- SETTING THE TIME
- CHANGING THE TIME
- USING THE TIMER
- SETTINGS MENU
- LOCKING THE CONTROLS
- • 4 COOKING
- OPERATING PRINCIPLE
- PROGRAMMED COOKING
- Setting a cooking programme:
- During the programme:
- THE PIZZA FUNCTION
- Setting a cooking time:
- THE GRILL FUNCTION
- Setting a cooking program:
- SETTING A DEFROST PROGRAMME
- PROGRAMMING AUTOMATIC COOKING
- PROGRAMMING AUTOMATIC DEFROSTING
- THE MEMORY FUNCTION
- To start a saved program:
- • 5 CARE
- CLEANING THE INNER AND OUTER SURFACES
- • 6 PROBLEMS AND SOLUTIONS
- - The appliance does not start.
- The appliance is noisy.
- The turntable does not rotate properly.
- You see steam on the window.
- Food is not heated during a microwave program.
- There are sparks coming from the appliance.
- • 7 PERFORMANCE IN USE
- • 8 AFTER-SALES SERVICE
- INTERVENTIONS
- NOTE:
- ES
- ESTIMADO/A CLIENTE/A
- • 2 VOORSTELLING VAN DE OVEN
- HET DISPLAY
- PROGRAMAR UMA COZEDURA
- • 2 POPIS TROUBY
- DISPLEJ
- WYBÓR MIEJSCA INSTALACJI I WBUDOWANIA
- • 2 PREZENTACJA KUCHENKI
- WYŚWIETLACZ
- • 2 POPIS RÚRY
- NASTAVENIE ČASU
Brand : DE DIETRICH
Model : DMG7129X
Category : Oven