
SBW100 - Loudspeaker HITACHI - Free user manual and instructions
Find the device manual for free SBW100 HITACHI in PDF.


| Product Type | Portable Bluetooth Speaker |
| Brand | Hitachi |
| Model | SBW100 |
| Dimensions (W x H x D) | 200 x 100 x 100 mm |
| Weight | 0.8 kg |
| Power Source | Built-in rechargeable lithium-ion battery |
| Battery Capacity | 2000 mAh |
| Playback Time | Up to 8 hours |
| Charging Time | Approximately 3 hours |
| Bluetooth Version | 5.0 |
| Wireless Range | 10 meters |
| Supported Audio Inputs | Bluetooth, USB, microSD, AUX 3.5 mm |
| FM Radio | Yes |
| Speaker Driver | 5W x 1 |
| Frequency Response | 100 Hz - 20 kHz |
| Water Resistance Rating | IPX5 |
| Materials | Plastic with fabric grille |
| Included Accessories | USB charging cable, AUX cable, user manual |
| Cleaning Instructions | Wipe with a soft, dry cloth. Do not use liquids or abrasives. |
| Safety Warnings | Keep away from water and heat sources. Do not disassemble. |
| Repairability | Contact authorized service center for battery replacement or repairs. |
| Certifications | CE, RoHS |
Frequently Asked Questions - SBW100 HITACHI
User questions about SBW100 HITACHI
0 question about this device. Answer the ones you know or ask your own.
Ask a new question about this device
Download the instructions for your Loudspeaker in PDF format for free! Find your manual SBW100 - HITACHI and take your electronic device back in hand. On this page are published all the documents necessary for the use of your device. SBW100 by HITACHI.
USER MANUAL SBW100 HITACHI
Soundbar and Wireless Subwoofer

natural_image
Product display of a black electronic device with digital display and matching diamond-shaped accessories (no visible text or symbols)Owners Guide
Thank you for purchasing this Hitachi product. Please read these instructions carefully.
Keep this owners guide for future reference. Record the serial number of your Soundbar and Wireless Subwoofer Audio System for future reference.
SERIAL NO.
This information is located on the back of the Soundbar
IMPORTANT SAFETY INSTRUCTIONS 2-3
KEY FEATURES 4
SUPPLIED PARTS AND ACCESSORIES 5
GETTING STARTED 6
WALL MOUNTING 7
CONTROLS AND FUNCTIONS 8-9
SETUP INSTRUCTIONS (HOOKUP GUIDE) 10
WIRELESS LINK 11
HOOKUP DIAGRAM 12
SPECIFICATIONS 13
TROUBLESHOOTING 14
LIMITED WARRANTY 15
SAFETY POINTS YOU SHOULD KNOW ABOUT YOUR HITACHI SBW100 SOUNDBAR AND WIRELESS SUBWOOFER AUDIO SYSTEM.
Our reputation has been built on the quality and performance of the Hitachi Soundbar and Wireless Subwoofer Audio System.
Safety is also foremost in our minds in the design of these units. To help you operate these products properly, this section illustrates safety tips which will be of benefit to you. Please read it carefully and apply the knowledge you obtain from it to the proper operation of your Hitachi Soundbar and Wireless Subwoofer Audio System.


The lightning flash with arrowhead symbol, within an equilateral triangle, is intended to alert the user to the presence of uninsulated "dangerous voltage" within the product's enclosure that may be of a sufficient magnitude to constitute a risk of electric shock to a person.
The exclamation point within an equilateral triangle, is intended to alert the user to the presence of important operating and maintenance (servicing) instructions in the literature accompanying the appliance.
READ BEFORE OPERATING EQUIPMENT
Follow all warnings and instructions marked on this Soundbar and Wireless Subwoofer Audio System.
Read these instructions.1.
Keep these instructions.2.
Heed all warnings.3.
Follow all instructions.4.
Do not use this apparatus near water.5.
Clean only with a dry cloth.6.
Do not block any ventilation openings. Install in accordance 7. with the manufacturer's instructions.
Do not install near any heat sources such as radiators, heat 8. registers, stoves, or other apparatus (including amplifiers) that produce heat.
Do not defeat the safety purpose of the polarized or grounding-9. type plug. A polarized plug has two blades with one wider than the other. A grounding type plug has two blades and a third grounding prong. The wide blade or the third prong are provided for your safety. If the provided plug does not fit into your outlet, consult an electrician for replacement of the obsolete outlet.
-
Protect the power cord from being walked on or pinched particularly at plugs, convenience receptacles, and the point where they exit from the apparatus.
-
Only use the attachments/accessories specified by the manufacturer.
Use only with the cart, stand, tripod, bracket, or table specified 12. by the manufacturer, or sold with the apparatus. When a cart is used, use caution when moving the cart/apparatus combination to avoid injury from tip-over.
-
Unplug this apparatus during lightning storms or when unused for long periods of time.
-
Refer all servicing to qualified service personnel. Servicing is required when the apparatus has been damaged in any way, such as power-supply cord or plug is damaged, liquid has been spilled or objects have fallen into the apparatus, the apparatus has been exposed to rain or moisture, does not operate normally, or has been dropped.
-
The system is designed to comply with the recommended safety standards for tilt and stability. Do not apply excessive pulling force to the front, or top, of the cabinet which could cause the product to overturn resulting in product damage and/or personal injury.
-
Follow instructions for wall, shelf or ceiling mounting as recommended by the manufacturer.
Power Source
This audio system is designed to operate on 120 volts 60 Hz, AC current. Insert the power cords into a 120 volt 60 Hz outlet. The main plugs are used as the disconnect device and shall remain readily accessible.
To prevent electric shock, do not use the audio system's cords with an extension cord, receptacle, or other outlet unless the blades and ground terminal can be fully inserted to prevent blade exposure.
Never connect the audio system to 50 Hz, direct current, or anything other than the specified voltage.
Lead Notice

This product contains lead. Do not put in trash. Recycle or dispose of according to applicable laws. For product recycling and disposal information, contact your local government agency or visit www.eiae.org (in USA). FOR MORE INFORMATION, CALL 1-888-885-2782.

Caution
Never remove the back covers of the audio system as this can expose you to very high voltages and other hazards. If the system does not operate properly, unplug the audio system and call your authorized dealer or service center.
Adjust only those controls that are covered in the instructions, as improper changes or modifications not expressly approved by Hitachi could void the user's warranty.

Warning
• To reduce the risk of fire or electric shock, do not expose this apparatus to rain or moisture.
- The system should not be exposed to dripping or splashing and objects filled with liquids, such as vases, should not be placed on the system.
• This apparatus shall be connected to a mains socket outlet with a protective earthing connection.
FEDERAL COMMUNICATIONS COMMISSION NOTICE
This equipment has been tested and found to comply with the limits for a Class B digital device, pursuant to Part 15 of the FCC Rules. These limits are designed to provide reasonable protection against harmful interference in a residential installation. This equipment generates, uses and can radiate radio frequency energy and if not installed and used in accordance with the instructions, may cause harmful interference to radio communications. However, there is no guarantee that interference will not occur in a particular installation. If this equipment does cause harmful interference to radio or television reception, which can be determined by turning the equipment off and on, the user is encouraged to try to correct the interference by one or more of the following measures:
Reorient or relocate the receiving antenna.
- Increase the separation between the equipment and the receiver.
- Connect the equipment into an outlet on a circuit different from that to which the receiver is connected.
Consult the dealer or an experienced radio/television technician for help.
Modifications
The FCC requires the user to be notified that any changes or modifications made to this device that are not expressly approved by Hitachi America, Ltd., may void the user's authority to operate the equipment.
Declaration of Conformity
This device complies with part 15 of the FCC Rules. Operation is subject to the following two conditions: (1) This device may not cause harmful interference and (2) This device must accept any interference received, including interference that may cause undesired operation.
For questions regarding this declaration, contact:
Hitachi America, Ltd.
Tel. 1-888-885-2782
ATTN: Customer Relations
Precautions
- Do not place the system on uneven surfaces or near the edge of the cabinet, it has high potential to tumble over, it may damage the product, it may also cause personal injury.
- Do not climb on the system, it may drop or may damage the system, it may also cause personal injury.
- Unplug immediately if any foreign materials falls into the system, or if the system fell down.
- Unplug immediately if there is a malfunction on the system like no sound or if there is smoke and bad odor coming from the system.
- Do not open the system's cabinet.
- Avoid direct sunlight, dusty, high humidity and smoky locations.
- Remember to unplug the power cord from the AC outlet before cleaning. Do not use liquid cleaners or aerosol cleaners to clean the system.
- Do not place the system near water, such as a bathtub, shower rooms, kitchen sink, laundry tub or swimming pool. Avoid placing liquid containers on top of the system.
- Do not place the system in confined spaces or inside a box when the system is operating.
- Make sure to unplug the system when not in use for a long period of time (days).
Notice for Remote Control
- Avoid dropping the unit.
- Avoid liquids on it.
- Avoid aerosol cleaners.
Congratulations on your purchase of the Hitachi SBW100 Soundbar and Wireless Subwoofer audio system. The SBW100 is designed to be the easiest way to get much better sound with your flat panel television. It is designed to mount either on the desk top with the supplied table stands or on the wall with the supplied wall mount kit.
You will enjoy outstanding audio performance due to use of patented ClassHD™ amplifiers and a novel surround processor called FX (Fractal Expansion). The SBW100 is best used with TV's from 32" up to 42" where its compact size and styling will unobtrusively complement your TV and the room décor.
Advanced Technologies in the UltraThin Home Theater Soundbar and Wireless Subwoofer
natural_image
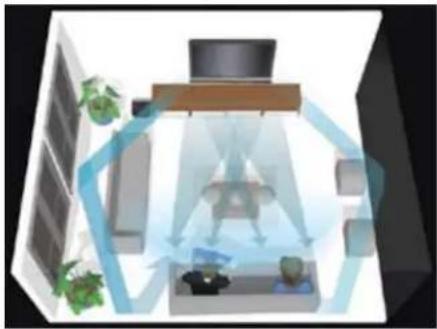
3D architectural rendering of a modern office space with furniture and plants (no text or symbols visible)Wider Sound Stage: Vector Firing (VF) Side Drivers
The Vector Firing Side Drivers(4) enhance both stereo and FX surround modes. The sweet spot for listening is wider and the surround effects are more dramatic as a result of the VF side driver design and Fractal Expansion processing.

natural_image
Modern living room interior with large wall-mounted TV, white sofa, and red cushion (no visible text or symbols)High Efficiency Amplifier Technology: ClassHD™
The UltraThin Soundbar employs a new class of patented audio amplifier called ClassHD™. The ClassHD™ amplifier is more efficient at normal listening levels than conventional amplifiers and even more efficient than Class D digital amplifiers. This new technology allows for a very compact audio system design with the performance of a much larger audio system. Another advantage to the ClassHD™ amplifier is that there is no need for bulky external power adapters. The Soundbar and Wireless Subwoofer have independent AC power cords so that the Subwoofer can be placed anywhere in the listening room.
natural_image
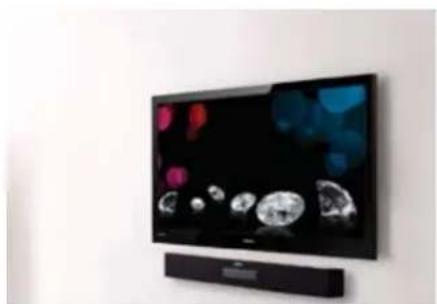
Modern TV mounted on a wall-mounted stand, displaying multiple circular images and a small screen (no visible text or symbols)State-of-the-Art Processing: Fractal Expansion (FX)
Experience a convincing surround sound presentation from the 10-speaker Soundbar and Subwoofer. Fractal Expansion is an advanced audio processing technology that converts the 2 channel stereo into a wide sound stage with virtual center and surround images that will amaze and thrill you. This advanced processing preserves the tonal accuracy of the original sound source to create rich sound. You can enjoy your favorite music using Fractal Expansion or select the high fidelity stereo mode.
natural_image
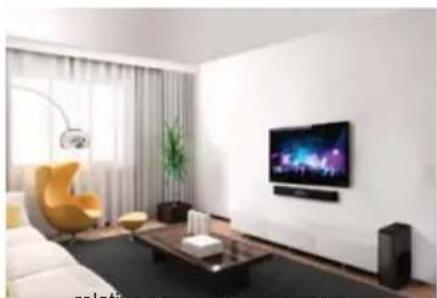
Modern living room interior with white walls, a yellow sofa, TV, and large window (no visible text or symbols)Dramatic Low Frequency Response: High BL\* Wireless Subwoofer
The Wireless Subwoofer delivers deep, strong, and dynamic bass all the way down to 35 Hz. The ClassHD™ amplifier in the Subwoofer has the capability to outperform conventional amplifiers of its rating. The extra performance of the amplifier is matched to the very strong High BL woofer to give movie special effects dynamic impact. The independent Subwoofer level control allows you to adjust only the level of deep low frequencies without changing the crossover frequencies to preserve the tonal accuracy of the entire Soundbar and Subwoofer system.
* BL is determined by the flux density (B) in the magnetic gap and the length (L) of voice coil wire in the gap. A higher BL will generally mean a speaker will have a higher
relative sensitivity (efficiency).
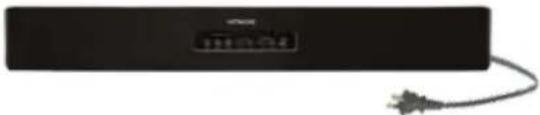
① SBW100 Soundbar
natural_image
Black rectangular electronic device with a logo and cable, no visible text or symbols on the body② SBW100 Wireless Subwoofer
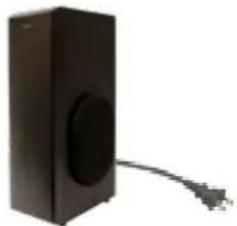
natural_image
Black rectangular speaker with a circular head and cable, isolated on white background (no text or symbols)③ Remote Control
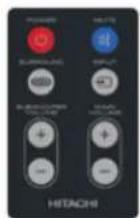
④ CR2025 Lithium Battery for Remote Control

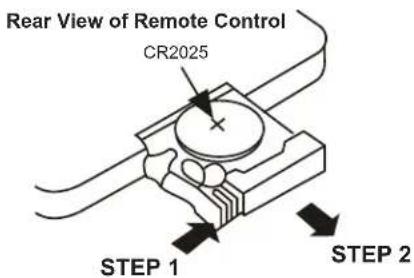
HOW TO REPLACE THE BATTERY
STEP 1: Press the button toward right.
STEP 2: Pull the battery loader out.
STEP 3: Replace CR2025 battery.
Make sure that the bottom (Plus Mark) side of the battery is facing toward you.

- Do not insert battery with '+' and '-' polarities reversed as this may cause the battery to swell or rupture resulting in leakage.
- Remove the battery if the remote control is not going to be used for an extended period of time.
- Do not put the battery in the general household trash. Dispose of the battery according to applicable laws.
⑤ Table Stands
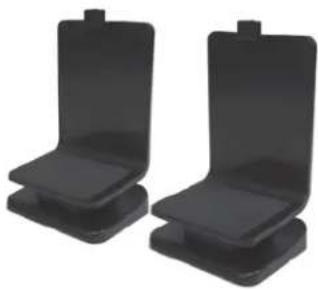
natural_image
Two black plastic stand holders with adjustable base and top (no text or symbols visible)⑥ Owners Guide

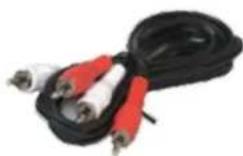
⑦ Hookup Cable - RCA 3 Feet
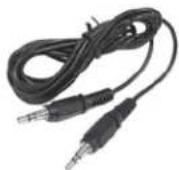
⑧ Hookup Cable - Stereo Mini Cable
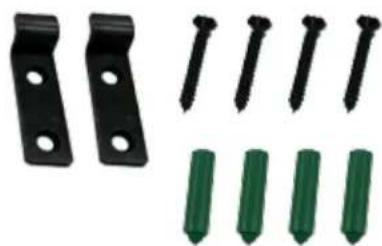
⑨ Wall Mount Kit
natural_image
Collection of black metal bracket and five green pushpin pins (no text or symbols)Determine how you want to set up your Soundbar and Wireless Subwoofer Audio System.
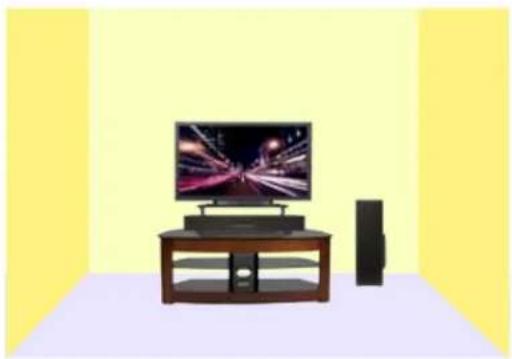
The following figures show 2 (two) typical installation styles. One is the Table Top style and the other is the Wall Mount style.
natural_image
Interior view of a modern room with yellow walls, featuring a TV set, a black speaker, and a monitor (no text or symbols visible)Table Top Style
You can set the Soundbar on the cabinet that is properly designed to place the Soundbar and the TV. Please install the supplied stands by following the instruction that is shown on the bottom of this page. You can place the Subwoofer on the floor.
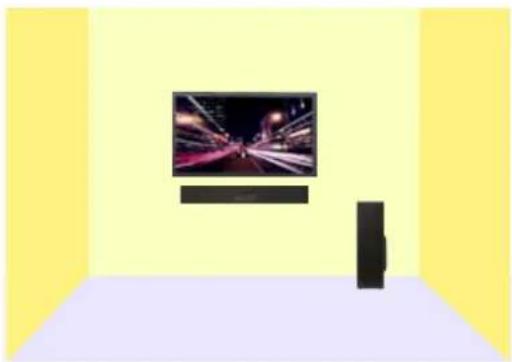
natural_image
Interior view of a room with yellow walls and a black TV set, no visible text or symbolsWall Mount Style
You can mount the Soundbar on a wall by using the supplied hardware kit. The input jacks and power cord are designed to allow a flush mount. Please follow the instructions that are shown on page 7 of this Owners Guide. You can place the Subwoofer on the floor.
Location
Select an area where sunlight will not fall directly on the products. Also, be sure that the location selected allows a free flow of air to and from the products. In order to prevent an internal temperature increase, maintain the following space requirements.
Soundbar
Top / Bottom / Back: No clearance required - can be flush mounted.
Left / Right: At least 6" (150 mm) clearance required.
Front: Open between the Soundbar and the listeners.
Subwoofer
Top / Back / Left / Right: At least 2" (50 mm) clearance required.
Front: Open between the Soundbar and the listeners.
The wireless range of your SBW100 is up to 100 feet, but it may vary depending on your operating environment.
Installing the stands
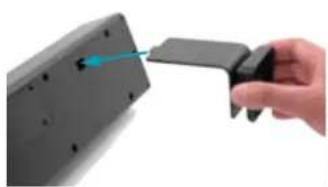
In order to place the Soundbar on the cabinet or the shelf, you need to install the supplied 2 (two) stands by using the following installation guide. Please make sure that the cabinet or the shelf is strong enough and well secured.
natural_image
Hand inserting a small electronic device into a black plastic housing (no text or symbols visible)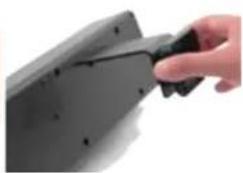
natural_image
Close-up of a hand holding a black plastic clip attached to a dark metal panel (no text or symbols visible)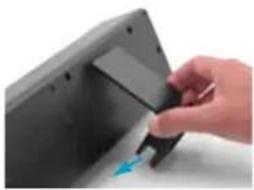
natural_image
Hand inserting a small component into a computer monitor (no text or symbols visible)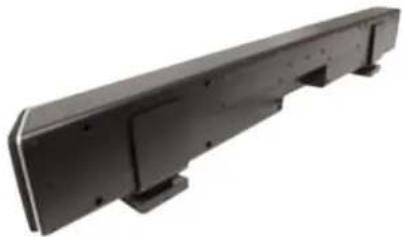
natural_image
Exterior view of a black metal bracket component (no text or symbols visible)Step 1
Insert the top tab of the stand into the hole provided for the stand in the back of the Soundbar.
Step 2
Make sure that the top tab is fully inserted into the hole.
Step 3
Swing down the stand all the way until the stand hits the Soudbar so that the base of the stand will be underneath of the bottom of the Soundbar. Then push up the stand to fit the Soundbar.
Step 4
Make sure that the both stands are installed as shown in the above picture.
Wall Mounting
The SBW100 system comes with a wall mounting kit to be used with a wall mounted TV. The input jacks and power cord are designed to allow a flush mount where the Soundbar extends only 2" (50 mm) from the wall. Also, the Soundbar is provided with an extra long power cord so the user may hide the AC line by using a wall track that could be painted to match the wall. Follow these steps to mount the Soundbar on a wall:
-
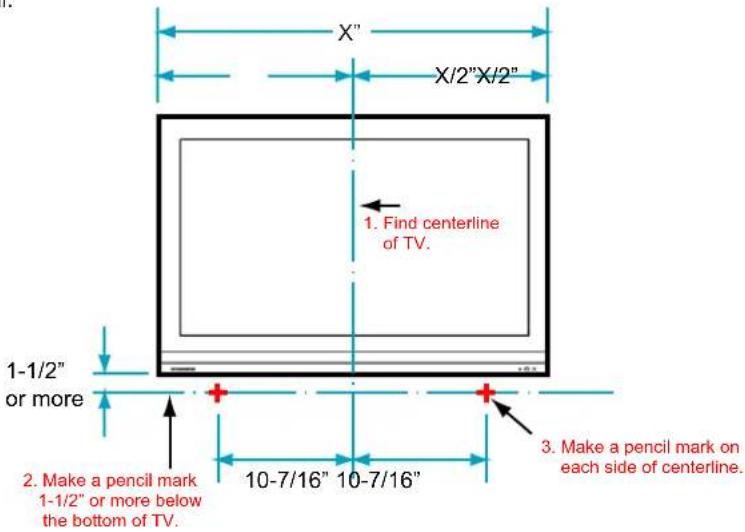
Measure the width of the TV – the Soundbar should be mounted so it is centered with the TV. Divide the TV width measurement by 2 – that will be the centerline distance from the edges of the TV.
-
If the Soundbar is to be mounted below the TV, measure from the TV edge to the centerline distance on the open wall below the TV. Mark the distance with a pencil 1-1/2" (38 mm) or more below the bottom of the TV.
-
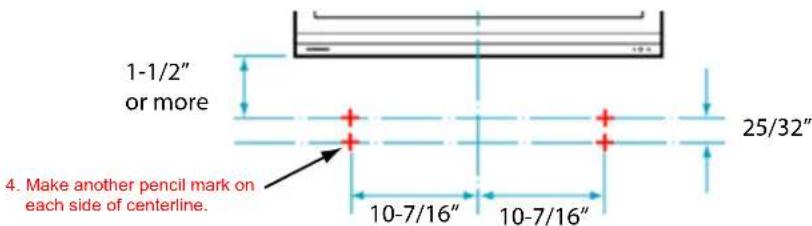
Make a pencil mark 10-7/16" (265 mm) on each side of the centerline. Make sure the mark is the same distance down from the TV on each side.
-
Make another mark 25/32" (20 mm) directly below the 1st mark on each side.
-
Drill a 14 " hole in the wall at each of the four pencil marks.
-
Hammer the 4 wall mount anchors into the holes - the anchors should be flush with the wall.
-
Now, using a Philips screwdriver, screw the wall brackets in place with the screws going into the anchors.
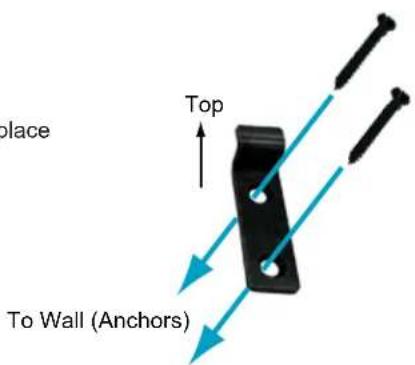
- Tilting the bottom of the Soundbar slightly away from the wall, guide the brackets into the matching holes on the back of the Soundbar. The Soundbar is now securely wall mounted.
[NOTES] The supplied mounting kit can be used for typical drywall construction. Mounting to wood, concrete, brick or other types of wall construction will require different hardware. Hitachi recommends seeking professional assistance for such installations. The instructions on this page and the supplied wall mount kit are only for the vertical wall mount. Professional assistance is required for other mounting or installation orientations (e.g., horizontal, tilted).
The controls and functions of the SBW100 and the Remote Control are explained below.
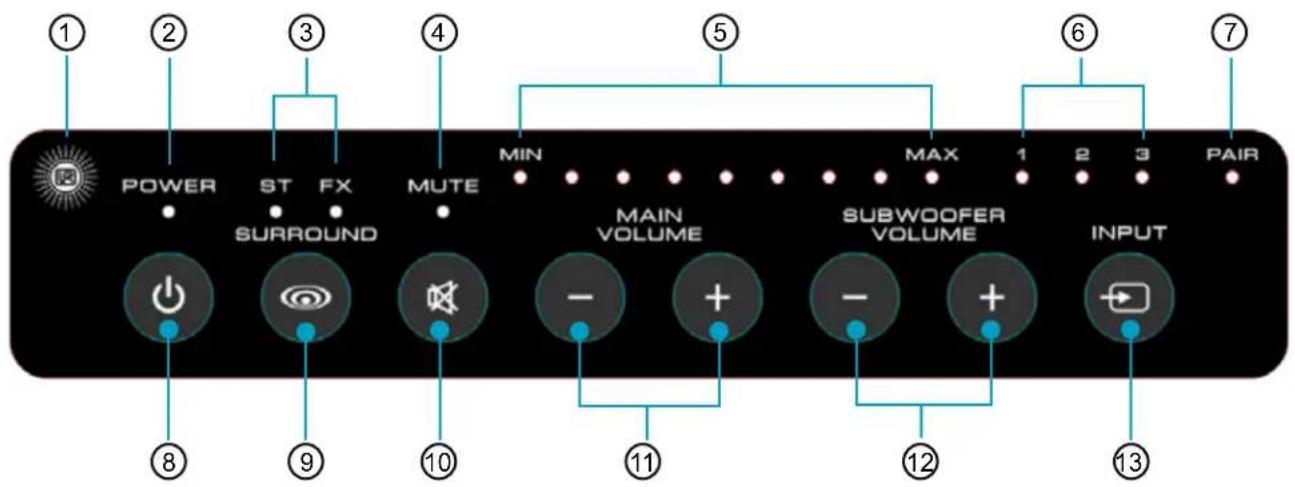
Front Panel Controls / LED Indicators
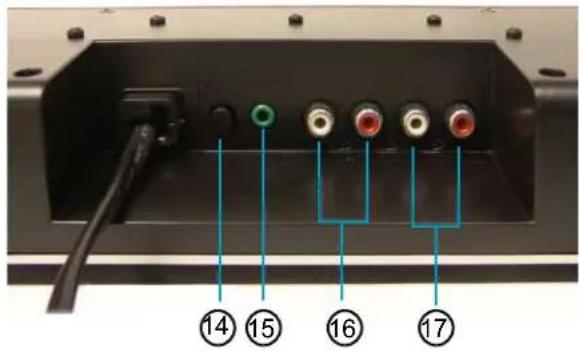
Rear Panel of Soundbar
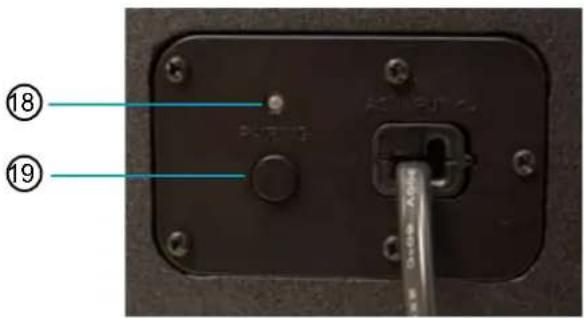
Rear Panel of Subwoofer
① REMOTE CONTROL Sensor
Point your remote control at this area when you use the remote control.
② POWER ON Indicator
Plug the power cord into the AC outlet. The Soundbar goes to the standby mode, and this indicator is also turned off. Press the POWER button to turn the Soundbar on, this indicator will illuminate to indicate the Soundbar is on. This indicator will remain on as long as an input signal is active. If the input becomes inactive the Soundbar will change to standby mode to conserve power and this indicator will turn off.
③ FX SURROUND (FX) / STEREO (ST) Indicator
The FX indicator lights up when FX Surround is selected. The ST indicator lights up when Stereo Mode is selected. This indicator will turn off after about 3 seconds from selecting the surround setting.
④ MUTE ON Indicator
This indicator lights up when mute is on. This indicator will turn off after about 3 seconds from turning mute on.
⑤ MAIN VOLUME / SUBWOOFER VOLUME Level Indicator
This indicator shows the level of the main volume or Subwoofer volume when you use the MAIN VOLUME Button or the SUBWOOFER VOLUME Button respectively. The indicator will turn off after about 3 seconds from adjusting the volume.
⑥ INPUT SELECTION Indicator
The 1, 2, or 3 indicator lights up when INPUT 1, INPUT 2, or INPUT 3 is selected, respectively, by pressing the INPUT Button.
The indicator will turn off after about 3 seconds from selecting the input.
⑦ PAIR Indicator
This indicator flashes during the pairing process between the Soundbar and Subwoofer. After the link between the Soundbar and Subwoofer is established, this indicator will turn off.
⑧ POWER Button
Plug the power cord into the AC outlet. The Soundbar goes to the standby mode.
Press this button to turn the Soundbar on. The POWER indicator will illuminate to indicate the Soundbar is on. The Soundbar will remain on as long as an input signal is active. If the input becomes inactive the Soundbar will change to standby mode to conserve power. To completely turn off the Soundbar, press this button again.
⑨ SURROUND Button
This button is used to select either the FX SURROUND mode or the STEREO mode.
⑩ MUTE Button
Press this button when you want to activate the audio mute. Press it again to deactivate the mute function. Pressing the VOLUME buttons will also deactivate the mute function.
⑪ MAIN VOLUME Buttons
Press the + or - button to adjust the main volume up or down respectively.
⑫ SUBWOOFER VOLUME Buttons
Press the + or - button to adjust the Subwoofer volume up or down respectively.
The Subwoofer volume sets the balance of the Subwoofer with the Soundbar. So the output level of the Subwoofer is adjusted by both the main volume and the Subwoofer volume.
⑬ INPUT SELECTOR Button
Press this button to select INPUT 1, INPUT 2, or INPUT 3.
⑭ PAIRING Button
This is used to recover the wireless connection between the Soundbar and the Subwoofer. Press and hold this button at least 3 seconds until the PAIR indicator on the front panel starts flashing. Then press the PAIRING button on the rear panel of the Subwoofer. The two units should link back up.
⑮ INPUT 3
Connection type - 3.5 mm mini stereo. If your TV has a headphone output, this is a primary input to use by using the supplied 3.5 mm mini stereo cable.
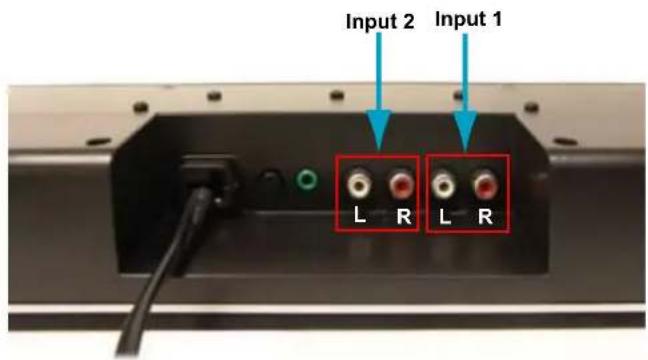
⑯ INPUT 2
Connection Type - RCA. Use this input to connect with your external devices (Blu-ray Players, DVD Players, CD Players, MP3 Players, or Home Video Game Systems).
⑰ INPUT 1
Connection Type - RCA. If your TV does not have a headphone output, use this input to connect with the set-top-box by using the supplied RCA cable.
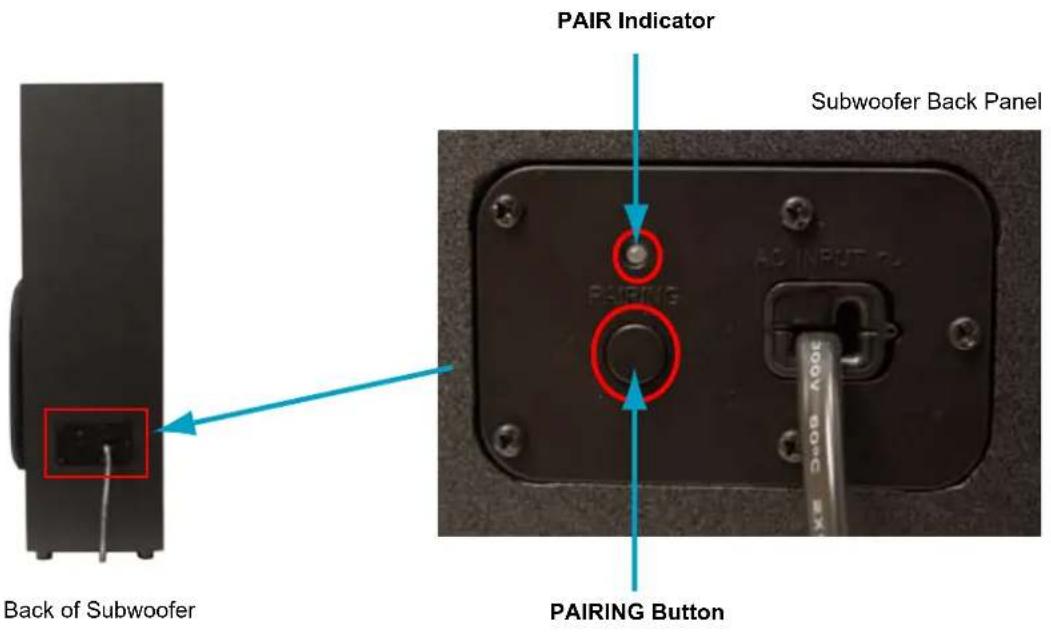
18 PAIR Indicator
Upon confirming the PAIR indicator on the front panel of the Soundbar flashes, press the PAIRING button on this panel. It will turn on when the wireless connection is recovered.
19 PAIRING Button
This is used to recover the wireless connection between the Soundbar and the Subwoofer. Upon confirming the PAIR indicator on the front panel of the Soundbar flashes, Press this button. The two units should link back up.
Remote Control
POWER Button
Press this button to turn the Soundbar on or off.
SURROUND Button
This button is used to select either the FX SURROUND mode or the STEREO mode.
SUBWOOFER VOLUME Buttons
Press the + or - button to adjust the Subwoofer volume up or down respectively.
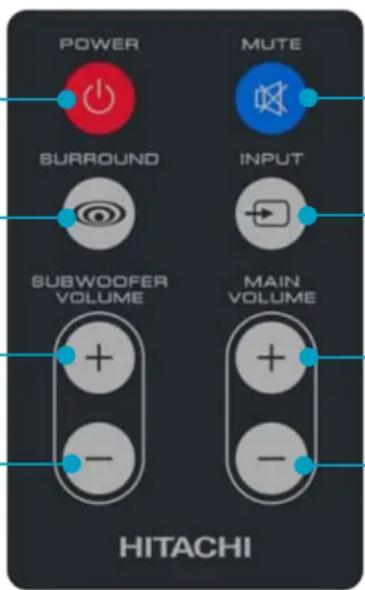
MUTE Button
Press this button when you want to activate the audio mute. Press it again to deactivate the mute function.
INPUT SELECTOR Button
Press this button to select INPUT 1, INPUT 2, or INPUT 3.
MAIN VOLUME Buttons
Press the + or - button to adjust the main volume up or down respectively.
-
Unpack all the parts noted on page 5.
-
If your TV has a headphone output, plug the supplied 3.5 mm mini stereo cable into the headphone jack output of your TV and the other end goes to the Input 3 jack on the back of your Soundbar (shown below).
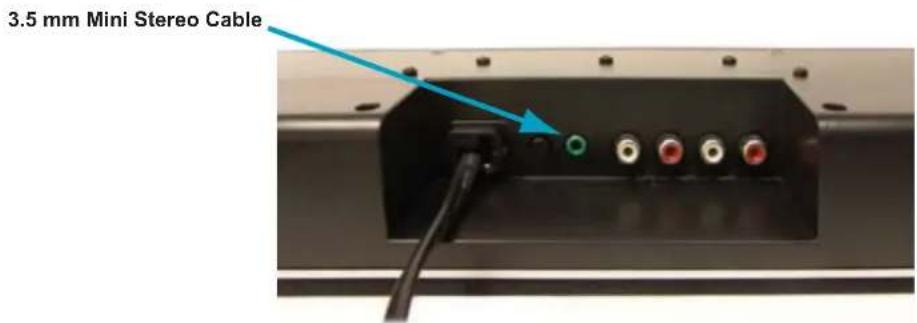
This method will disable your TV's sound system and allow direct control of the SBW100 Soundbar audio with your TV's remote control.
- If your TV does not have a headphone output and you are using a set top box, plug one end of the included RCA cable into the audio outputs of your set top box and the other end into Input 1 on the back of your Soundbar. The SBW100 remote control and the control buttons on the front panel of the Soundbar will always function no matter what the audio input source is.
[Note] Some TV's do not have a headphone output but do have Audio outputs with RCA jacks. You can connect them to Input 1 by using the RCA cable. This will also work fine except that the SBW100 volume must now be adjusted using the SBW100 remote.
-
The remaining inputs (Input 2) can be attached to Blu-ray, DVD or CD players or to personal music players.
-
Install the table stands and plug the Soundbar power cord into the wall.
-
Find a convenient location in the room for the Subwoofer and plug its power cord into the wall.
-
The Soundbar and Subwoofer should automatically link together. Leave the Subwoofer on – it will go into a low power consumption mode when not in use but will wake up automatically when a signal is present.
Wireless Link
The Soundbar and Subwoofer should automatically link together. However, it is sometimes possible, in conditions of very high radio interference (such as from microwave ovens or strong wireless network equipment), for the Soundbar and the Subwoofer to lose their wireless link. In that case the Subwoofer will mute and the audio will sound weak (no bass).
To correct this, press and hold the PAIRING button on the back of the Soundbar at least 3 seconds until the PAIR indicator on the front panel starts flashing.
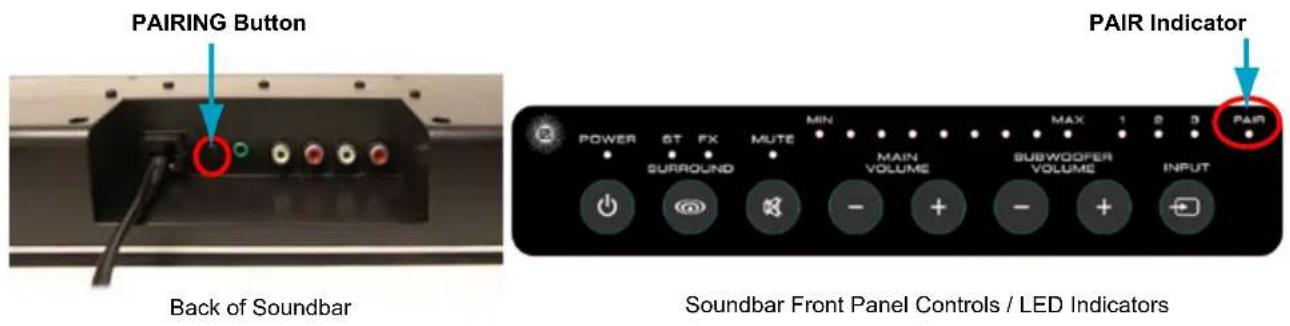
Then go to the back of the Subwoofer and press its PAIRING button. The two units should link back up and the PAIR indicator on the Subwoofer turns on.
The PAIR indicator on the Soundbar will turn off, after the link between the Soundbar and the Subwoofer is established.
[Note] You can leave the Subwoofer on – it will go into a low power consumption mode when not in use but will wake up automatically when a signal is present.
TV Audio Hookup - Case 1
If your TV has a headphone output, plug the supplied 3.5 mm mini stereo cable into the headphone output from your TV and plug the other end to the Input 3 jack on the back of your Soundbar.
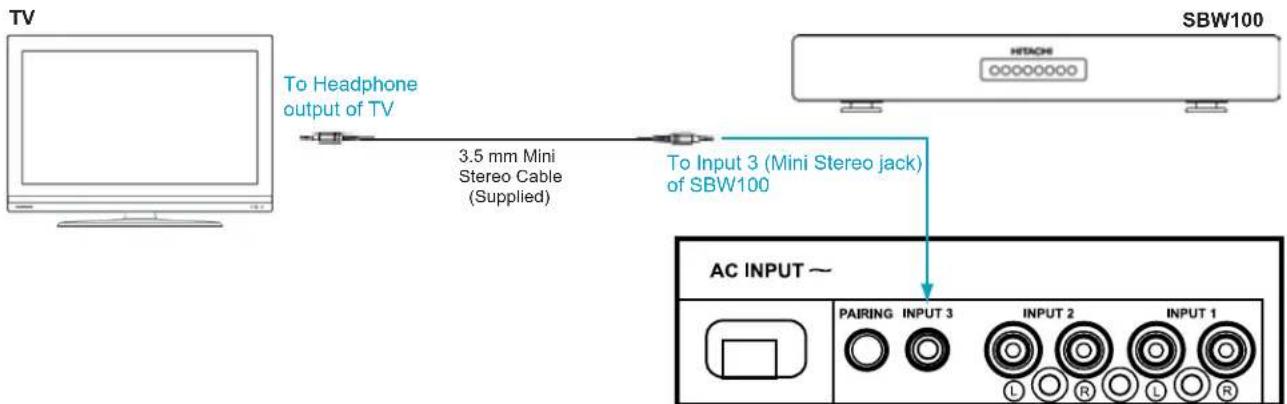
SBW100 Rear Connectors
TV Audio Hookup - Case 2
If your TV does not have a headphone output and you are using a set top box, plug one end of the included RCA cable into the audio outputs from your set top box and plug the other end into Input 1 on the back of your Soundbar.
![Set Top Box OR TV To Audio Output of Set Top Box or TV RCA Cable (Supplied) To Input 1 (RCA jack) of SBW100 SBW100 HTACH [Note] Some TV's do not have a headphone output but do have Audio outputs with RCA jacks. You can connect them to Input 1 by using the RCA cable. This will also work fine except that the SBW100 volume must now be adjusted using the SBW100 remote. AC INPUT ~ PAIRING INPUT 3 INPUT 2 INPUT 1 SBW100 Rear Connectors](/content/2026/05/969464/images/5a7afa4f60eff563fc1d4109614e2b2db3e0e03d5aba2d96bbe046c4039cadb6.jpg)
Audio Hookup - Other Device
The Input 2 can be attached to Blu-ray, DVD or CD players. It can also be used to connect devices such as MP3 players or Home Video Game systems.
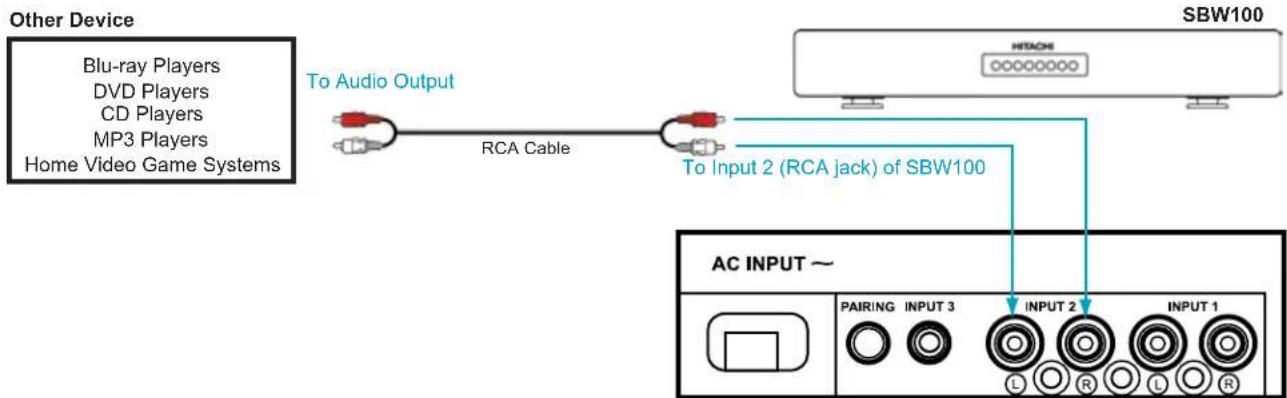
flowchart
graph TD
    A["Other Device"] --> B["SBW100"]
    B --> C["AC INPUT ~"]
    C --> D["TAIANG INPUT 3"]
    C --> E["TAIANG INPUT 2"]
    C --> F["TAIANG INPUT 1"]
    B --> G["To Input 2 (RCA jack) of SBW100"]
    B --> H["To Audio Output"]
    B --> I["Blu-ray Players"]
    B --> J["DVD Players"]
    B --> K["CD Players"]
    B --> L["MP3 Players"]
    B --> M["Home Video Game Systems"]
SBW100 Rear Connectors
SBW100 Specifications
Design
Soundbar
• 10-Driver Multi Reflectional Design
- Thick wall reinforced polymer
- Cloth Grill
• Wall Flush Mount Capable
Subwoofer
- Satin Black Sealed Enclosure
Performance Features
- Wide Frequency Response 35 \~ 20,000Hz
• 162 Watts RMS Total Power Output
• High Power ClassHD™ Amplifiers - Low distortion VHR (Voltage Head Room)
Soundbar
• (8) 40 mm Long Throw Full Range Driver
• (2) 19 mm Aluminum Dome Tweeter
- 64 Watts Peak (32W x 2)
• 32 Watts RMS (16W x 2)
• Frequency Response 180 \~ 20,000Hz
Wireless Subwoofer
• (1) 6.5" Long Throw High BL Woofer
• 260 Watts Peak
• 130 Watts RMS @ 10% T.H.D.
• Frequency Response 35 \~ 180Hz
• 2.4GHz proprietary Audio Transmission System
• Automatic Plug-and-play Connection
- Only AC Power plug-in is required
- Wireless range: up to 100 feet - Clear line-of-sight
Inputs
• (2) RCA Stereo Connectors
(TV, DVD, DVRs, or Set-Top-Box)
• (1) 3.5 mm Stereo Mini Jack (TV, MP3 Players)
• Power Input
Soundbar: AC 120V, 60Hz
Subwoofer: AC 120V, 60Hz
Convenience Features
• LED Display with Auto Dimming (Volume, Mute, Surround Mode)
- Recessed Input Terminals for Flush Wall
- Mount Capability
• Table Stands included
Dimensions
Soundbar
- 781 mm (30-13/16") width
- 96 mm (3-13/16") height
- 50 mm (2") depth
Subwoofer
- 150mm (5-15/16") width
- 510mm (20-1/8") height
• 257mm (10-1/8") depth
Weight
Soundbar
• 2.0 kg (4.3 lbs.)
Subwoofer
• 8.0 kg (17.7 lbs.)
General
- Operating Temperature: 5^ 40^ 32^ 104^
• FCC Class B for Consumer Use
• Power Requirements Soundbar: 100 \~ 130 VAC, 60Hz Subwoofer: 100 \~ 130 VAC, 60Hz
• Power Consumption Soundbar: 65W Subwoofer: 130W
ClassHD is a trademark of Audera International Sales Inc.
All specifications, features and dimensions are subject to change without notice.
If you encounter problems when using this Soundbar and Wireless Subwoofer Audio System, check the following points before requesting service. If the problem remains unsolved, please call Hitachi Technical Support 1-888-885-2782.
In order to keep the warranty valid, please DO NOT try to repair the system yourself.
1. No power
1-1. Make sure power cords are securely connected to the AC outlet.
1-2. Make sure that there is power at the AC outlet.
1-3. Press the power button on the remote control or the front of the Soundbar.
2. No sound
2-1. Press the Volume + (Up) button on the remote control or the front of the Soundbar.
2-2. Make sure that you selected correct input (Input 1, Input 2, or Input 3).
2-3. Press MUTE on the remote to make sure the Soundbar is not muted.
2-4. Make sure audio cables are securely connected at the terminals of the Soundbar and the external devices.
3. No Bass
3-1. Make sure power cord of the Subwoofer is securely connected to the AC outlet.
3-2. Make sure that the PAIR Indicator on the back of the Subwoofer is ON. If not, please follow the instructions for the wireless link that is on page 11 of this Owners Guide.
3-3. Make sure the Subwoofer and Soundbar are close enough for the wireless link to pair properly.
4. Buzzing or humming noise
4-1. Make sure audio cables are securely connected at the terminals of the Soundbar and the external devices.
4-2. Test on an alternate device or replace the audio cable.
4-3. Test the device and cable on an alternate input on the Soundbar.
5. The remote control does not work
5-1. Aim the remote control directly at the sensor on the front of the Soundbar.
5-2. Reduce the distance between the remote control and the Soundbar.
5-3. Make sure that the battery is inserted with its polarities (+/- signs) aligned as indicated.
5-4. Replace the battery.
6. The buttons on both the remote control and front panel do not work
6-1. Unplug the power cords of both the Soundbar and the Subwoofer from the AC outlet, and plug both of them back after a few seconds.
HITACHI LIMITED PRODUCT WARRANTY
Product: SBW100
This HITACHI branded Product, as supplied and distributed by HITACHI and delivered new in the original carton to the original purchaser is warranted by HITACHI against manufacturing defects in materials and workmanship for a limited warranty period of one (1) year on labor and parts. However, there will only be a 90 day parts and labor limited warranty for commercial use.
Proof of purchase within one year from date of purchase in the form of a bill of sale, receipt or received invoice is the only acceptable evidence the Product is within the limited warranty period. The bill of sale, receipt or received invoice must be presented as a pre-condition to obtaining limited warranty service.
This limited warranty begins on the original date of purchase, and is valid only on Products purchased through HITACHI authorized dealers and used in the United States, Canada, and Puerto Rico by the original purchaser. To receive warranty service, the purchaser must contact the telephone number on this HITACHI limited product warranty statement for problem determination and service procedures. Warranty service may only be performed by a duly authorized HITACHI service center. The original dated bill of sale, receipt or receipted invoice must be presented upon request as proof of purchase to HITACHI or a HITACHI authorized service center.
HITACHI will repair or if repairs cannot be made, HITACHI will replace this Product at no charge if the Product is defective as specified in this limited warranty during the limited warranty period. HITACHI may use new or remanufactured parts or products to repair or replace the Product with a similar Product of equal or better quality at HITACHI'S sole discretion. All replaced parts and Products become the property of HITACHI and must be returned to HITACHI. Replacement parts and Products assume the remaining original limited warranty of the product, or ninety (90) days, whichever is longer.
Product freight, if applicable, needs to be prepaid by the original purchaser and shipped in either its original packaging or packaging affording an equal degree of protection. HITACHI shall not be responsible for or obligated to replace damaged goods.
Upon notice from HITACHI that the Product was received with transportation damage, it is the responsibility of the original purchaser to file a claim against the applicable carrier. HITACHI will only store the damaged Product for 30 days and reserves the right, at its sole discretion, to dispose of the damaged Product or ship it back to the original purchaser at original purchaser's expense after 30 days.
This limited warranty covers manufacturing defects in materials and workmanship encountered in normal and, except to the extent otherwise expressly provided for in this statement, noncommercial use of this Product, and shall not apply to the following, including, but not limited to: consumable parts, such as batteries, unless damage has occurred as a result of a defect in materials and workmanship of the product; missing batteries from Product, store display Products; Products sold as a "marked down" special, "close out", "liquidation sale", "clearance sale" or Products sold in "as is" or "open box" condition; Products missing accessories; Products received with no fault found; Products damaged at time of delivery to HITACHI; damage to Product which occurs in shipment; delivery and installation; applications and uses for which this Product was not intended; altered Product; Products with altered/defaced serial numbers; cosmetic damage or exterior finish; accidents, abuse, neglect, fire, water, lightning or other acts of nature; use of products, equipment, systems, utilities, services, parts, supplies, accessories, applications, installations, repairs, external wiring or connectors not supplied or authorized by HITACHI which damage this Product or result in service problems; incorrect electrical line voltage, fluctuations and surges; customer adjustments and failure to follow operating instructions, cleaning, maintenance and environmental instructions that are covered and prescribed in the instruction handbook or manual; reception problems and audio distortion related to noise, echo, interference or other signal transmission and delivery problems. HITACHI does not warrant uninterrupted or error-free operation of the Product.
THERE ARE NO EXPRESS WARRANTIES OTHER THAN THOSE LISTED AND DESCRIBED ABOVE. NO WARRANTIES, WHETHER EXPRESS OR IMPLIED, INCLUDING BUT NOT LIMITED TO ANY IMPLIED WARRANTIES OF MERCHANTABILITY OR FITNESS FOR A PARTICULAR PURPOSE SHALL APPLY AFTER THE WARRANTY PERIOD STATED ABOVE, AND NO OTHER EXPRESS WARRANTY OR GUARANTY GIVEN BY ANY PERSON, FIRM OR CORPORATION WITH RESPECT TO THIS PRODUCT SHALL BE BINDING ON HITACHI. REPAIR OR REPLACEMENT AS PROVIDED UNDER THIS LIMITED PRODUCT WARRANTY IS THE EXCLUSIVE REMEDY OF THE ORIGINAL PURCHASER. HITACHI SHALL NOT BE LIABLE FOR ANY INCIDENTAL, OR CONSEQUENTIAL DAMAGES FOR BREACH OF ANY EXPRESS OR IMPLIED WARRANTY APPLICABLE TO THIS PRODUCT; EXCEPT TO THE EXTENT PROHIBITED BY APPLICABLE LAW, ANY IMPLIED WARRANTY OF MERCHANTABILITY OR FITNESS FOR A PARTICULAR PURPOSE FOR THIS PRODUCT IS LIMITED IN DURATION TO THE DURATION OF THIS LIMITED WARRANTY. THIS LIMITED WARRANTY SHALL NOT EXTEND TO ANYONE OTHER THAN THE ORIGINAL PURCHASER OF THIS PRODUCT, IS NONTRANSFERABLE AND STATES YOUR EXCLUSIVE REMEDY.
Some states do not allow limitations on how long an implied warranty lasts, or the exclusion or limitation of incidental or consequential damages, so the above limitations or exclusions may not apply to you. This warranty gives you specific legal rights, and you may also have other rights which vary from state to state. Any provision contained herein which is found contrary to state or local laws shall be deemed null and void and the remaining provisions shall continue in full force and effect.
To obtain warranty service as provided for in this HITACHI LIMITED PRODUCT WARRANTY, please contact us at:
- Soundbar and Wireless Subwoofer
- Owners Guide
- SAFETY POINTS YOU SHOULD KNOW ABOUT YOUR HITACHI SBW100 SOUNDBAR AND WIRELESS SUBWOOFER AUDIO SYSTEM.
- READ BEFORE OPERATING EQUIPMENT
- Power Source
- Lead Notice
- Caution
- Warning
- FEDERAL COMMUNICATIONS COMMISSION NOTICE
- Modifications
- Declaration of Conformity
- Precautions
- Notice for Remote Control
- Advanced Technologies in the UltraThin Home Theater Soundbar and Wireless Subwoofer
- Wider Sound Stage: Vector Firing (VF) Side Drivers
- High Efficiency Amplifier Technology: ClassHD™
- State-of-the-Art Processing: Fractal Expansion (FX)
- Dramatic Low Frequency Response: High BL\* Wireless Subwoofer
- HOW TO REPLACE THE BATTERY
- Table Top Style
- Wall Mount Style
- Location
- Soundbar
- Subwoofer
- Installing the stands
- Step 1
- Step 2
- Step 3
- Step 4
- Wall Mounting
- ⑦ PAIR Indicator
- ⑧ POWER Button
- ⑨ SURROUND Button
- ⑩ MUTE Button
- ⑪ MAIN VOLUME Buttons
- ⑫ SUBWOOFER VOLUME Buttons
- ⑬ INPUT SELECTOR Button
- ⑭ PAIRING Button
- ⑮ INPUT 3
- ⑯ INPUT 2
- ⑰ INPUT 1
- PAIR Indicator
- PAIRING Button
- POWER Button
- SURROUND Button
- SUBWOOFER VOLUME Buttons
- MUTE Button
- INPUT SELECTOR Button
- MAIN VOLUME Buttons
- Wireless Link
- TV Audio Hookup - Case 1
- TV Audio Hookup - Case 2
- Audio Hookup - Other Device
- SBW100 Specifications
- Design
- Performance Features
- Inputs
- Convenience Features
- Dimensions
- Weight
- General
- No power
- No sound
- No Bass
- Buzzing or humming noise
- The remote control does not work
- The buttons on both the remote control and front panel do not work
- HITACHI LIMITED PRODUCT WARRANTY
- Product: SBW100
Brand : HITACHI
Model : SBW100
Category : Loudspeaker