580.77107 - Air conditioner KENMORE - Free user manual and instructions
Find the device manual for free 580.77107 KENMORE in PDF.


| Product Type | Air Conditioner / Room AC |
| Model | 580.77107 |
| Brand | Kenmore |
| Cooling Capacity (BTU) | 7,000–8,000 BTU/h (typical for model range) |
| Energy Efficiency Ratio (EER) | ~10.0 |
| Recommended Room Size | Up to 350 sq. ft. |
| Installation Type | Window-mounted |
| Voltage / Frequency | 115 V / 60 Hz |
| Amperage | 7.5 A |
| Power Plug | 3-prong grounding type (NEMA 5-15) |
| Dimensions (W x H x D) | ~24 x 18 x 20 inches (approx.) |
| Net Weight | ~70 lbs (approx.) |
| Refrigerant Type | R-410A (likely) |
| Modes | Cool, Fan, Energy Saver, Sleep |
| Fan Speeds | Low, Medium, High |
| Thermostat Control | Digital with remote control |
| Air Filter | Washable, reusable foam filter |
| Filter Maintenance | Clean every 2 weeks; replace if damaged |
| Condensate Removal | Self-evaporating (most runtime) |
| Safety Features | Overload protection, tip-over auto shutoff |
| Included Accessories | Remote control, window installation kit, filter |
| Spare Parts / Repair | Contact Kenmore or authorized service centers |
| Warranty | 1-year limited (typical) |
Frequently Asked Questions - 580.77107 KENMORE
User questions about 580.77107 KENMORE
0 question about this device. Answer the ones you know or ask your own.
Ask a new question about this device
Download the instructions for your Air conditioner in PDF format for free! Find your manual 580.77107 - KENMORE and take your electronic device back in hand. On this page are published all the documents necessary for the use of your device. 580.77107 by KENMORE.
USER MANUAL 580.77107 KENMORE
IMPORTANT SAFETY INSTRUCTIONS 3-5
GROUNDING REQUIREMENTS ....5
FEATURES AND BENEFITS
Key Parts and Components 6
Electrical Data 6
INSTALLATION REQUIREMENTS
Key Dimensions and Specifications ....7
Items Included....7
Tools Required 7
INSTALLATION INSTRUCTIONS
Window Requirements....8
Preparation of Cabinet 8
Cabinet Installation.... 9-11
HOW TO USE
Control Panel and Remote Control....12
Inserting the Remote Control Battery....13
Ventilation....13
Air Direction....13
Additional Features 14
Smart Features 14
FCC Notice 15
Wireless LAN Module Specifications 15
Open Source Software Notice....15
CARE AND CLEANING
Air Filter....16
Cleaning the Air Conditioner 16
TROUBLESHOOTING GUIDE
Normal Sounds You May Hear....17
Before Calling for Service 18-19
WARRANTY....20
SERVICE ....BACK COVER
DUCT RECORD
In the space below, record the date of purchase, model, and serial number of your product. You will find the model and serial number printed on an identification plate located on the outside of the cabinet, or behind the filter at the bottom of the unit. Use a flashlight to help read the numbers, or remove the cabinet front as instructed in the Care and Cleaning section. Have these items of information available whenever you contact Sears concerning your product.
Model No.
Date of Purchase
Serial No.
Save these instructions and your sales receipt for future reference.
SAFETY MESSAGES
There are many important safety messages in this manual and on your appliance. Always read and obey all safety messages.

This is the safety alert symbol. This symbol alerts you to potential hazards that can result in property damage and/or serious bodily harm or death.
All safety messages will follow the safety alert symbol and the word WARNING or CAUTION as shown below.

WARNING
Indicates a hazardous situation which, if not avoided, could result in death or serious injury.

CAUTION
Indicates a hazardous situation which, if not avoided, could result in minor or moderate injury.
All safety messages are intended to make you aware of potential hazards and how to reduce the chances of any injury. The safety message may also point out the negative consequences in case instructions are not properly followed.
IMPORTANT SAFETY INSTRUCTIONS
Read all instructions before using this air conditioner.

WARNING
Risk of Fire or Explosion
Do not store or use gasoline or other flammable vapors and liquids in the vicinity of this or any other appliance. Read product labels for flammability and other warnings.
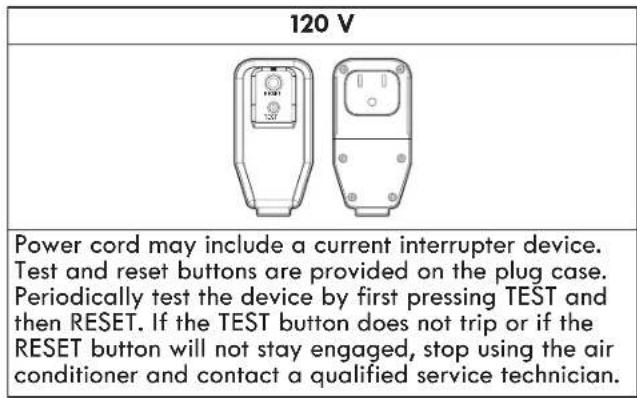
NOTE: The power supply cord with this air conditioner contains a current detection device designed to reduce the risk of fire. Refer to the Electrical Data section for operation of the current device.
In the event that the power supply cord is damaged, it cannot be repaired, and it must be replaced with a cord from the product manufacturer.

WARNING
Avoid fire hazard or electric shock.
Do not use an extension cord or an adapter plug. Do not remove any prong from the power cord.
3-prong grounding type wall receptacle
3-prong grounding plug and current detection device
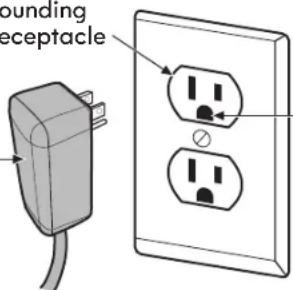
Do not, under any circumstances, cut, remove, or bypass the grounding prong.

WARNING
Electrical Requirements
The complete electrical rating of your new room air conditioner is stated on the product label. Refer to the rating when checking the electrical requirements.
- Be sure the air conditioner is properly grounded. To minimize shock and fire hazards, proper grounding is important. The power cord is equipped with a three-prong grounding plug for protection against shock hazards.
- The air conditioner must be connected to a properly grounded wall receptacle. If the wall receptacle you intend to use is not adequately grounded or protected by a time delay fuse or circuit breaker, have a qualified electrician install the proper receptacle.
- Do not run air conditioner without cabinet in place. This could result in mechanical damage within the air conditioner.
- Do not use an extension cord or an adapter plug.
IMPORTANT SAFETY INSTRUCTIONS

WARNING
To reduce the risk of fire, electric shock, or injury to persons when using this appliance, follow basic precautions, including the following.
Basic Safety Precautions
- Be sure the electrical supply is adequate for the model you have chosen. This information can be found on the product label, which is located on the side of the cabinet.
- If the air conditioner is to be installed in a window, you will probably want to clean both sides of the glass first. If the window is a triple-track type with a screen panel included, remove the screen completely before installation.
- During installation, make sure that the unit is secured firmly in the window and installed as detailed in the installation instructions in this Use & Care Guide. Save this manual and the installation instructions for possible future use in removing or reinstalling this unit.
- When handling the air conditioner, be careful to avoid cuts from sharp metal fins on front and rear coils.
- Use an assistant to help lift and place the air conditioner in the window.
Installation
- Do not use a damaged power cord or plug, or connect to a socket which is loose or damaged.
- Do not modify or extend the power cord.
- Do not disassemble or modify the product.
- Do not place heavy objects on the power cord, and keep the cord out of traffic areas where it presents a trip hazard.
- Plug the product into a dedicated outlet. Do not use an adapter to plug multiple appliances into one outlet.
- Do not place power cord near a heater.
Operation and Maintenance
- In the event of a gas leak, do not operate this or any other appliance. Open doors or windows to ventilate the room.
- Do not stop or start the product by inserting or pulling out the power plug.
- If the power cord needs to be replaced, the work must be performed by authorized personnel only, using genuine replacement parts.
- Unplug the product by pulling the plug head, not the power supply cord.
- Do not operate with wet hands or in a damp environment.
- Do not open the suction inlet grille of the product during operation.
- Unplug the product if strange sounds, odors, or smoke come from it.
- Turn off and unplug the unit before cleaning.
- Never touch the metal parts of the product while removing the filter.
- Do not allow water to run into electric parts of the product.
- Use a soft cloth to clean. Do not use wax, thinners, or strong detergents.
- Unplug the air conditioner when not in use for long periods.
- For repair and maintenance, contact an Authorized Service Center. See the warranty page for details or call 1-844-553-6667.

CAUTION
Installation
- Follow installation instructions exactly to avoid vibration or water leakage.
Operation and Maintenance
- This product is intended for indoor residential use only, not for industrial or other commercial applications. The warranty is void if this product is ever used for other than private household purposes.
-
Do not block the air circulation/ventilation openings.
-
Do not step on the unit or place objects on top of it.
- Clean the filter every two weeks. Insert the filter properly before operating.
- Do not drink water drained from the air conditioner.
- Do not insert hands or objects into the air intake or outlet during operation.
- If batteries leak onto skin or clothing, rinse affected areas well with clean water. Do not use the remote if the battery has leaked.
- If battery fluid is ingested, rinse well with water and consult a physician immediately.
IMPORTANT SAFETY INSTRUCTIONS
GROUNDING REQUIREMENTS
IMPORTANT: Please read carefully.
To Connect Electricity

WARNING
Improper connection of the equipment-grounding conductor can result in risk of electric shock. Check with a qualified electrician or service technician if you are in doubt as to whether the appliance is properly grounded. Do not modify the plug provided with the appliance. If it does not fit the outlet, have a proper outlet installed by a qualified electrician. Failure to follow these warnings can cause serious injury, fire, electric shock, or death.
Grounding Instructions
This appliance must be grounded. In the event of malfunction or breakdown, grounding will reduce the risk of electric shock by providing a path of least resistance for electric current. This appliance is equipped with a cord having an equipment-grounding conductor and grounding plug. The plug must be plugged into an appropriate outlet that is properly installed and grounded in accordance with all local codes and ordinances.
DO NOT CUT OR REMOVE THE THIRD (GROUND) PRONG FROM THE POWER PLUG.

Risk of Fire or Explosion
- Do not use any means to accelerate the defrosting process or to clean the product, other than those recommended by the manufacturer.
- Store the appliance in a room without continuously operating ignition sources such as open flames, an operating gas appliance or an operating electric heater.
- Do not pierce or burn the appliance. Be aware that refrigerants may not contain an odor.

WARNING
- Being exposed to direct airflow for an extended period could be hazardous to your health.
- Running the fan will not prevent oxygen depletion. Make sure to open doors or windows occasionally to ventilate the room.
WARNING: This product contains chemicals known to the State of California to cause cancer and birth defects or other reproductive harm. Wash hands after handling.

CAUTIONWARNING
Risk of Fire or Explosion
This unit contains R32, a flammable refrigerant, and has special safety precautions not normally associated with older units. Please follow all precautions and advisories.
- Use caution while handling and prevent damage to the unit. Do not put any holes into the product for any reason, as this can cause damage to the product and prevent it from cooling.
- Maintenance and cleaning of the product should be performed by trained personnel. Failure to properly clean the product can result in damage to the refrigeration system and or the electrical system.
- Keep the air circulation/ventilation openings free from obstruction.
- Service should only be performed by technicians properly trained and certified in the use of flammable refrigerants. Any service performed by unauthorized servicers/individuals will void all warranties.
- When storing the appliance, do not put in a room with any open flame appliances, such as gas water heaters or furnaces. Also keep away from electric heaters. Damaged units should be repaired before storage.
FEATURES AND BENEFITS
Key Parts and Components

WARNING
Install this appliance in accordance with National Electric Code guidelines.
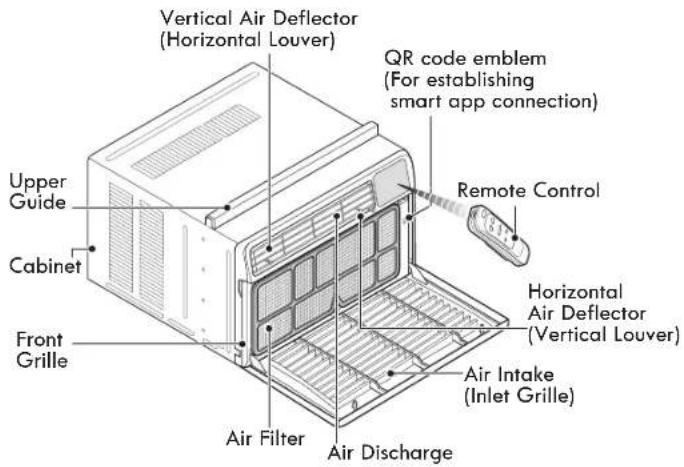
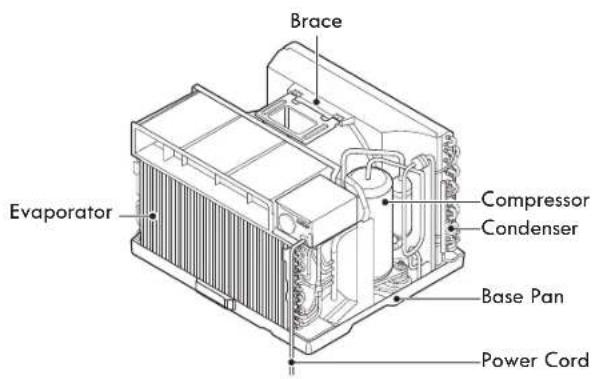
Electrical Data

CAUTION
The conductors inside this cord are surrounded by shields, which monitor leakage current. These shields are not grounded. Periodically examine the cord for any damage. Do not use this product in the event the shields become exposed. Avoid shock hazard. This unit cannot be user-serviced. Do NOT open the tamper-resistant sealed portion. All warranties and performance will be voided.
| BTU & Wall Receptacle Power Supply | |
10000 BTU and 12000 BTU  Standard 120 V, 3-wire grounding receptacle rated 15 A/120 VAC/60 Hz Standard 120 V, 3-wire grounding receptacle rated 15 A/120 VAC/60 Hz | Use 15 A, time-delay fuse or 15 A circuit breaker. |

WARNING
DO NOT USE EXTENSION CORDS RISK OF FIRE, SERIOUS INJURY OR DEATH.
- Do not use an extension cord with this product.
- Do not use surge protectors or multi-outlet adapters with this product.

WARNING
Never push the test button during operation. Doing so can damage the plug.
- Do not remove, modify, or immerse this plug. If this device trips, the cause should be corrected before further use.
INSTALLATION REQUIREMENTS
Key Dimensions and Specifications
| Description Window Air Conditioner | |
| Electrical Requirements See electrical rating plate on unit | |
| Dimensions (without curtain panels) | 23.6 in. (W) X 22.2 in. (D) X 15 in. (H)60 cm (W) X 56.4 cm (D) X 38.1 cm (H) |
| Net Weight 10000 BTU: 74 lb. (33.6 kg) / 12000 BTU: 81 lb. (36.7 kg) | |
Items Included
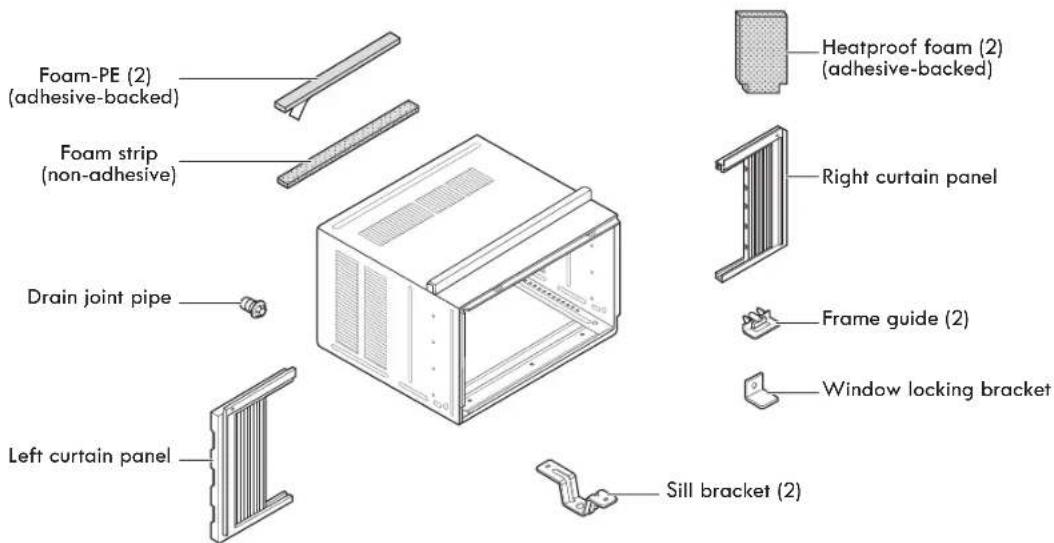
| Type A (14) Type | B (3) Type C (5) Carriage Bolt (2) Lock Nut (4) | |||
Tools Required
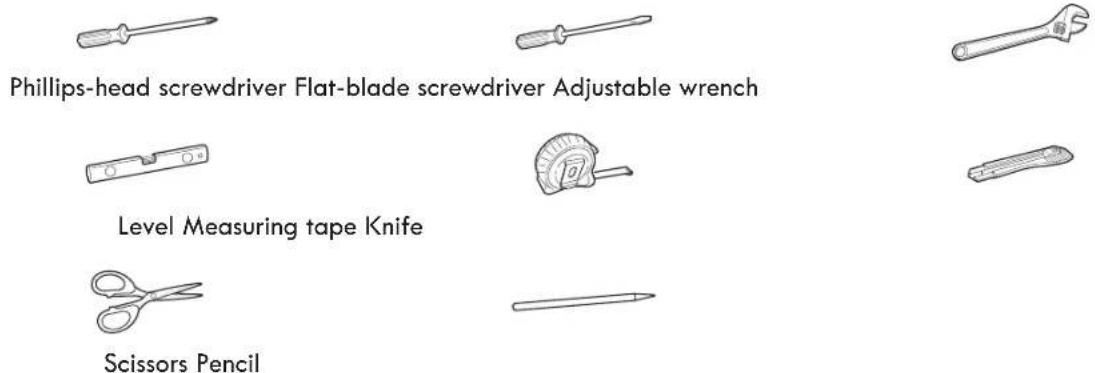
INSTALLATION INSTRUCTIONS
Window Requirements
Size
NOTE: Secure all supporting parts to firm wood, masonry, or metal.
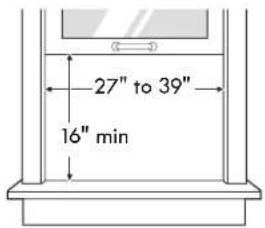
- This room air conditioner is designed for installation in standard double-hung windows with actual opening widths from 27" to 39".
- The upper and lower window sash must open sufficiently to allow a clear vertical opening of 16" from the bottom of the upper sash to the inside sill.
- The height offset between the inside sill and outside sill must be less than 1 14 .
Clearance
Proper clearance enhances the cooling efficiency of the product.
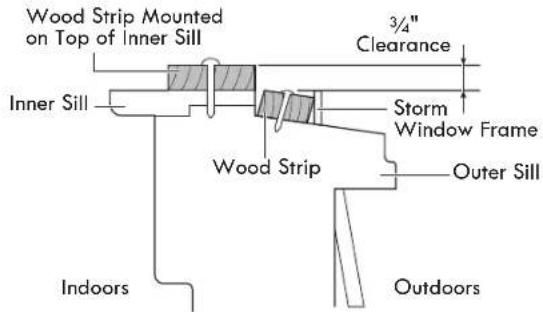
If a storm window presents interference, fasten a 2" wide wood strip to the inner window sill across the full width of the sill. The wood strip should be thick enough to raise the height of the window sill so that the unit can be installed without interference by the storm window frame.
(See drawing.) The top of the wood strip on the inside sill should be approximately 34 " higher than the storm window frame or wood strip on the outside sill to help condensation to drain properly to the outside.
3 If necessary, install a second wood strip (same thickness as first strip) across the full width of the outer sill, flush against the back of the inner sill.
Preparation of Cabinet
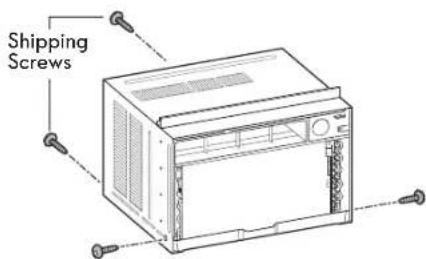
1 Remove the 4 screws which fasten the cabinet at both sides and at the back. (2 of the screws will be used later to refasten the sides of the cabinet to the unit.)
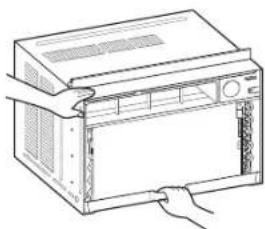
2 Slide the unit from the cabinet by gripping the base pan handle and pulling forward while bracing the cabinet.
natural_image
Line drawing of a computer oven with a hand inserting a cable (no text or symbols)
CAUTION
The unit is heavy. To prevent injury, use proper lifting techniques when pulling unit forward from cabinet. Obtain assistance from another person if possible.
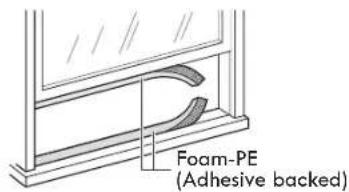
3 Cut the window sash seals (Foam-PE) to the proper length. Peel off the backing and attach the adhesive-backed foam to the underside of the window sash and the bottom of the window frame.
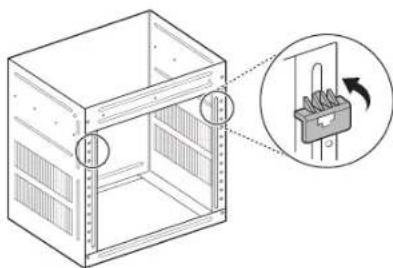
4 Insert the lower curtain panel guides into the bottom of the cabinet. Insert the guides so that the flange faces to the rear of the cabinet.
natural_image
Diagram of a rectangular enclosure with internal partitions and a magnified inset showing a mechanical component (no text or symbols)INSTALLATION INSTRUCTIONS
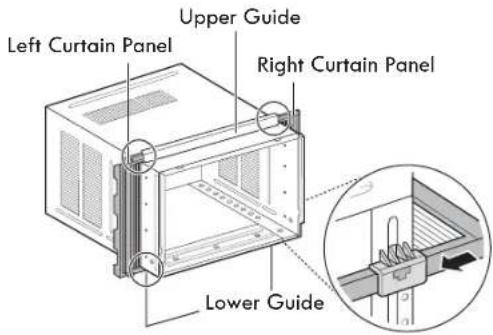
5 Insert the top and bottom rails of the curtain panels into the upper and lower panel guides.

CAUTION
The lower panel guides are easily broken. Be careful with them when installing the cabinet.
6 Fasten the curtain panels to the unit with 8 type A screws.

Cabinet Installation
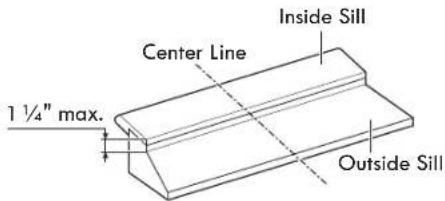
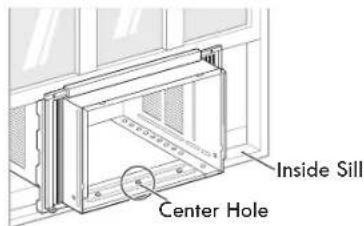
1 Open the window. Mark a line on the center of the inside sill.
Carefully place the cabinet in the window and align the center hole on the cabinet bottom front with the center line marked on the window sills.
2 Pull the bottom window sash down behind the upper guide until they meet.
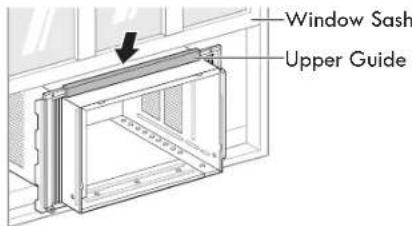
NOTE: Do not pull the window sash down so tightly that the movement of the curtain panels is restricted.
3 Loosely assemble each sill support.
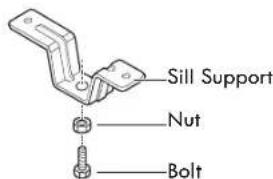
NOTE: If the distance to the outer window sill is not that deep, you may not need the bolt and nut.
INSTALLATION INSTRUCTIONS
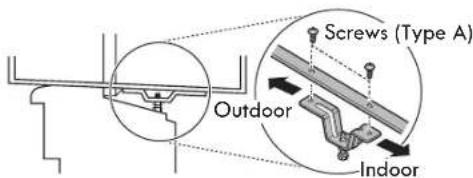
4 Use 2 type A screws to attach a sill support to the cabinet track holes on one side. Use the cabinet track holes that will place the sill support nearest to the outer edge of the sill. Repeat with the second sill support on the opposite side of the cabinet.
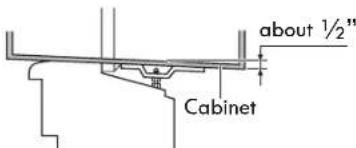
5 Install the cabinet with a slight tilt (about 12 ") downward on the outside. Use the bolt and nut to adjust the tilt of the cabinet.
CAUTION
Do not drill a hole in the bottom pan. The product is designed to operate with approximately 12 " of water in the bottom pan. There is no need to add water if the pan is dry.
6 Attach the cabinet to the inside sill by driving 3 type B screws through the cabinet front angle and into the sill.
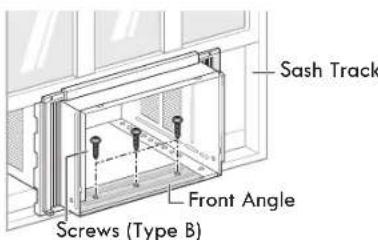
NOTE: If the gap between the bottom of the cabinet and the inside sill is too great, install a wood strip to make up the difference. See the Clearance instructions for details.
7 Pull each curtain panel out to the side until it meets the window sash track. Pull the bottom window sash down behind the upper guide until it meets the top of the cabinet.
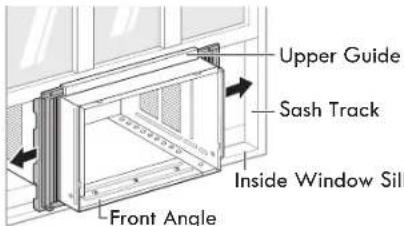
NOTE: Do not pull the window sash down so tightly that the movement of the curtain panels is restricted.
8 Use a screwdriver or power drill to attach the curtain panels to the window sashes by driving type C screws into the sashes through the cabinet holes shown in the figure below.
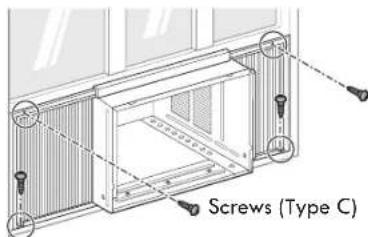
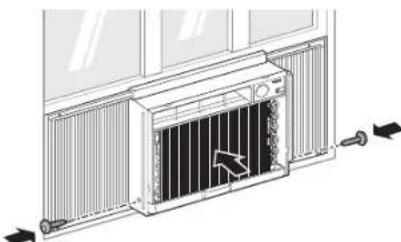
9 With the aid of an assistant, slide the unit into the cabinet. Reinstall the screws removed from the cabinet sides in step 1.
natural_image
Diagram of a heat exchanger or radiator unit with cooling fins and directional arrows indicating airflow (no text or symbols)CAUTION
- The unit is heavy. Use an assistant to help lift the unit and set it in place. Lifting and maneuvering the unit by yourself could result in injury.
- Hold the unit firmly in place until the window frame is lowered to meet the top surface of the unit directly behind the upper guide. If the unit falls from the window, it could cause personal injury or property damage.
INSTALLATION INSTRUCTIONS
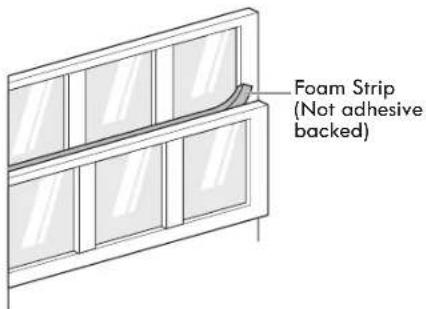
10 Cut the non-adhesive foam strip to the proper length and insert it between the upper window sash and the lower window sash.
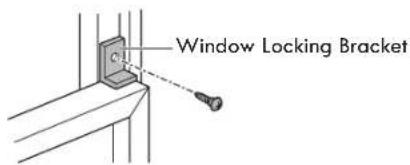
11 Attach the window locking bracket with a type C screw.
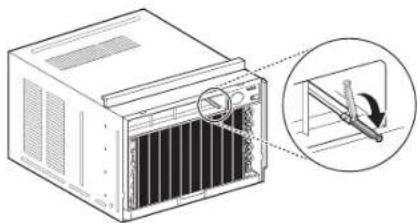
Before installing the front grille, fold out the vent control lever located to the left of the control panel as shown.
natural_image
Technical line drawing of a mechanical device with a magnified inset showing internal components (no text or symbols)Cut the adhesive-backed heatproof foam to match the size of the curtain panels. Remove the backing from the heatproof foam and attach it to the curtain panels.
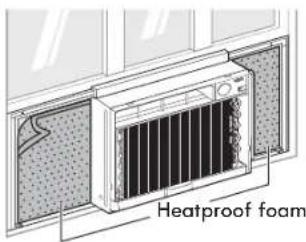
NOTE: The heatproof foam improves the cooling capability of the air conditioner.
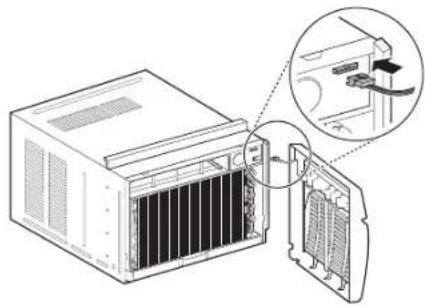
14 Connect the wire harness from the front grille assembly to the air conditioner.
natural_image
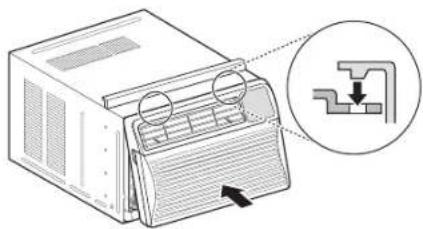
Diagram of a server rack with an inset showing internal components (no text or symbols)15 Attach the front grille assembly to the cabinet by inserting the grille tabs into the slots on the front of the cabinet. Push the grille in until it snaps into place.
natural_image
Diagram of an air conditioner unit with airflow direction and a magnified inset showing internal structure (no text or symbols)NOTE: Carefully guide the vent control lever through the grille as you push the grille in.
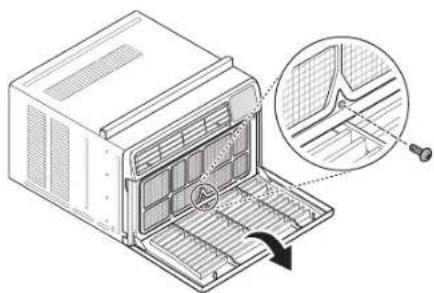
16 Open the air inlet grille and secure the front grille assembly with 1 type A screw through the bottom of the front grille. (There are 2 type A screws packed in a small bag. Use one and store one as a spare.)
natural_image
Diagram of a microwave oven with airflow path and magnified detail view (no text or symbols)The window installation of the room air conditioner is now complete. See the Electrical Data section for information on attaching the power cord to an electrical outlet.
HOW TO USE

WARNING
To reduce the risk of fire, electric shock, or injury to persons, read and follow this entire Use & Care Guide, including the Important Safety Instructions, before operating this air conditioner.

Control Panel and Remote Control
flowchart
graph TD
    A["8 Cool"] --> B["Filter Reset"]
    C["7 Energy Saver"] --> B
    D["Fan Only"] --> E["SMART"]
    F["Dry"] --> G["Timer"]
    H["6 Fan Speed"] --> I["High"]
    J["5 Temp"] --> K["✓"]
    L["1 Mode"] --> M["Timer"]
    N["2 Fan Speed"] --> O["✓"]
    P["3 3 2 1"] --> Q["In"]

POWER
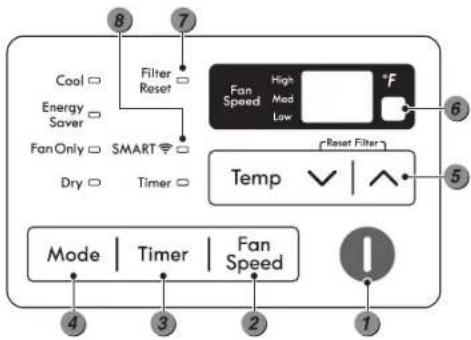
Press to turn the air conditioner ON or OFF.

FAN SPEED BUTTON
Press to set the fan speed to Low, Medium, or High. The display will show one, two or three bars.

DELAY ON/OFF TIMER
Delay ON - When the air conditioner is off, set it to automatically turn on from 1 to 24 hours later, at its previous mode and fan settings.
Delay OFF - When the air conditioner is on, set it to automatically turn off from 1 to 24 hours later.
Each press of the Timer button advances the timer by 1 hour. After the last press the display returns to the temperature setting.

- Press the Mode button to cycle between 4 types of air conditioner operation: Cool / Energy Saver / Fan Only / Dry.
Cool - This mode is ideal on hot days to cool and dehumidify the room quickly. Use the Temp ▲ | √ buttons to set the desired room temperature and use the Fan Speed button to set the desired fan circulation speed.
Energy Saver - In this mode the compressor and fan turn off when the set temperature is achieved. Approximately every 3 minutes the fan turns on to allow the unit sensor to accurately determine if more cooling is needed.
Fan Only - In this mode the fan circulates air but the compressor does not run. Use the Fan Speed button to set fan speed to High, Medium or Low. In this mode, you can not adjust the set temperature.
Dry - This mode is ideal for rainy and damp days to dehumidify the room rather than cooling it significantly. Humidity is removed from the room by the combination of compressor operation and the fan speed fixed at Low. The compressor and fan turn off once the set temperature is reached. Fan speed cannot be adjusted in Dry mode.
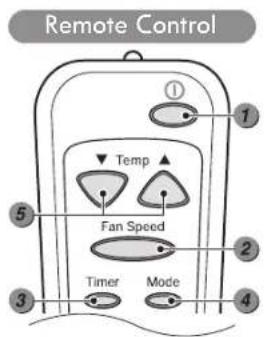

TEMPERATURE CONTROL
The thermostat monitors room temperature to maintain the desired temperature. The thermostat can be set between 60 °F–86 °F (16 °C–30 °C). Press or arrows to increase or decrease temperature setting.

REMOTE CONTROL SENSOR
Receives signal from Remote Control.

FILTER RESET
The Filter Reset LED lights up to notify you that the filter needs to be cleaned. After cleaning the filter, press Temp and together on the control panel to turn off the Filter Reset light. (The filter reset must be done using the control panel, not the remote control.)
NOTE: This feature is a reminder to clean the air filter for more efficient operation. The LED light turns on after 250 hours of operation.

SMART CONNECT FUNCTION
SMART icon LED turns ON when unit is successfully connected to the internet.
AUTO RESTART
If the air conditioner turns off due to a power outage, it will restart automatically once the power is restored, with the same settings as were set before the unit turned off.
ENERGY SAVER
The unit defaults to the Energy Saver mode each time the unit is switched on except in Fan mode or when power is restored after an electrical power outage.

CAUTION
The remote control will not function properly if the AC infrared sensor is exposed to direct light or if there are obstacles between the remote controller and the air conditioner.
HOW TO USE
- Inserting the Remote Control Battery
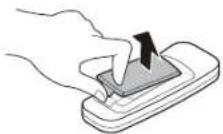
1 Push the release in with your thumb and remove the cover on the back of the remote control.
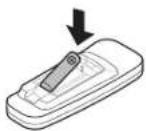
② Insert one new AAA 1.5 V battery, paying attention to the polarity.
NOTE: One new battery is supplied with the air conditioner for use in the remote control.
③ Reattach the cover on the remote control.
NOTE
- Do not use a rechargeable battery. Make sure that the battery is new.
- In order to prevent discharge, remove the battery from the remote control if the air conditioner is not going to be used for an extended period of time.
- Keep the remote control away from extremely hot or humid places.
- To maintain optimal operation of the remote control, the remote sensor should not be exposed to direct sunlight.
Ventilation
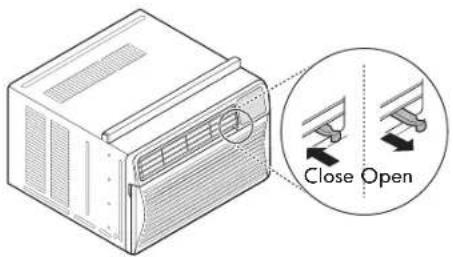
Push the ventilation lever in to the closed position to maintain the best cooling performance. Pull the ventilation lever out to open the vent and draw fresh air into the room.
Air Direction
Airflow can be adjusted by changing the direction of the air conditioner's louvers.
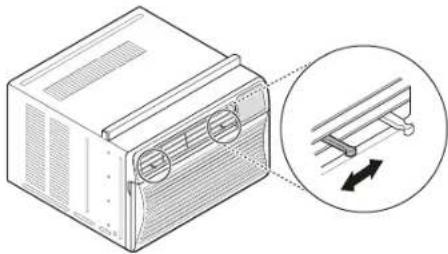
Adjusting Horizontal Airflow Direction
The horizontal airflow is adjusted by moving the lever to the left or right.
natural_image
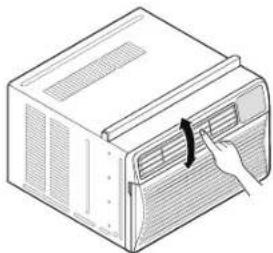
Illustration of a mechanical device with a magnified inset showing a bracket and directional arrows (no text or symbols)Adjusting Vertical Airflow Direction
Touch the horizontal louvers to adjust the airflow up or down.
natural_image
Line drawing of a box with ventilation grilles and a hand pointing to the lid (no text or symbols)NOTE: When the weather is extremely hot, the unit may turn off automatically to protect the compressor.
HOW TO USE
Additional Features
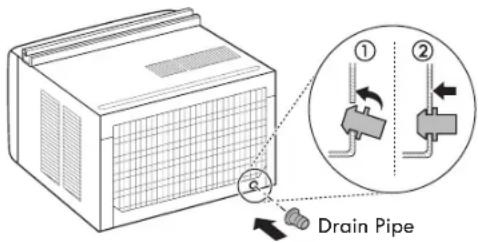
Drain Pipe
In humid weather, excess water may cause the base pan to overflow. To drain the water, remove the drain cap and secure the drain pipe to the rear hole of the base pan.

CAUTION
Take care when inserting the drain pipe. Push away from the sharp fins to avoid slipping and injuring yourself.
Press the drain pipe into the hole by pushing down and away from the fins to avoid injury.
Slinger Fan
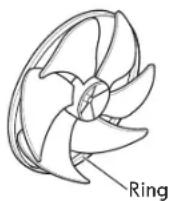
This air conditioner is equipped with a slinger fan. (See drawing.)
The fan's outer ring picks up the condensed water from the base pan if the water level gets high enough. The water is then picked up by the fan and expelled through the condenser, making the air conditioner more efficient.
Smart Features
Getting Connected
You need the following devices and applications to use the smart features of your air conditioner.
Required Devices: A wireless connection, Kenmore Smart AC app, and a mobile device.
Required Application: Kenmore Smart AC app.
IMPORTANT: You must download the Kenmore Smart AC app to your mobile device, connect your Kenmore Elite Smart appliance to the internet, and register the appliance to your account by following the prompts.
Connecting the Air Conditioner
Refer to the Quick Start Guide that came with your smart appliance for detailed instructions on creating a Kenmore account and setting up the appliance for connected operation from your mobile device. For additional assistance, visit http://www.kenmore.com/smart
Remote Operation
Use a mobile device to control the air conditioner remotely. Start, stop, change modes, adjust temperature, and set schedules, all from a mobile device.
NOTE: When successfully connected to the internet, the SMART icon LED on the unit control panel will turn ON.
HOW TO USE
FCC Notice
(for transmitter module contained in this product)
This equipment has been tested and found to comply with the limits for a Class B digital device, pursuant to Part 15 of the FCC Rules. These limits are designed to provide reasonable protection against harmful interference in a residential installation. This equipment generates, uses, and can radiate radio frequency energy and, if not installed and used in accordance with the instructions, may cause harmful interference to radio communications. However, there is no guarantee that interference will not occur in a particular installation. If this equipment does cause harmful interference to radio or television reception, which can be determined by turning the equipment off and on, the user is encouraged to try to correct the interference by one or more of the following measures:
- Reorient or relocate the receiving antenna.
- Increase the separation between the equipment and receiver.
- Connect the equipment to an outlet on a circuit different from that to which the receiver is connected.
- Consult the dealer or an experienced radio/TV technician for help.
This device complies with part 15 of the FCC rules. Operation is subject to the following two conditions:
(1) this device may not cause harmful interference, and
(2) this device must accept any interference received, including interference that may cause undesired operation of the device.
Any changes or modifications in construction of this device which are not expressly approved by the party responsible for compliance could void the user's authority to operate the equipment.
FCC RF Radiation Exposure Statement
This equipment complies with FCC radiation exposure limits set forth for an uncontrolled environment. This transmitter must not be co-located or operating in conjunction with any other antenna or transmitter. This equipment should be installed and operated with a minimum distance of 20 cm (7.8 inches) between the antenna and your body. Users must follow the specific operating instructions for satisfying RF exposure compliance.
Wireless LAN Module Specifications
| Operating Frequency | 2.412–2.462 GHz |
| Complies with IEEE 802.11b/g/n | |
Open Source Software Notice
To obtain the source code that is contained in this product under open source licenses, visit https://kenmore.com/opensource.
In addition to the source code, all referred license terms, warranty disclaimers, and copyright notices are available for download.
CARE AND CLEANING

WARNING
To reduce the risk of fire, electric shock, or injury to persons, read and follow this entire Use & Care Guide, including the Important Safety Instructions, before operating this air conditioner.
- Unplug the air conditioner before cleaning to avoid the risk of electric shock. Failure to follow this warning can cause serious injury, fire, electric shock, or death.
- Never use harsh chemicals, abrasive cleaners, or solvents to clean the air conditioner. They will damage the finish.

Air Filter
Check the air filter at least twice a month to see if cleaning is necessary. Trapped particles in the filter can build up and block the airflow, reducing cooling capacity and causing an accumulation of frost on the evaporator.
Cleaning the Air Filter
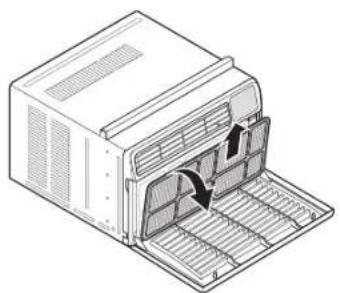
1 Pull down the air inlet grille by placing fingertips in the depressions at the top of each side. Grasp the fingertip tab at the top middle of the air filter and pull the filter forward then up to remove.
natural_image
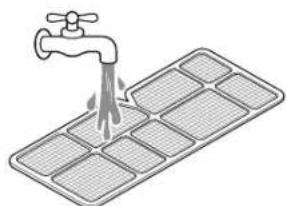
Diagram of a computer oven with ventilation grilles and airflow arrows (no text or symbols)② Wash the filter in lukewarm water (below 104^ F/ 40^ C).
natural_image
Illustration of a faucet spraying water onto a grid-patterned surface (no text or symbols)3 Gently shake the excess water from the filter and reinstall it.

Cleaning the Air Conditioner
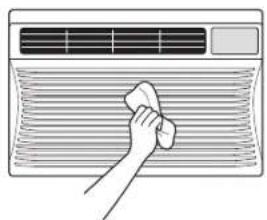
Wipe the front grille and inlet grille with a cloth dampened in a mild detergent solution.
Clean the cabinet with a mild soap or detergent and lukewarm water, then polish with liquid appliance wax.
natural_image
Illustration of a hand cleaning an air conditioner grille (no text or symbols)TROUBLESHOOTING GUIDE
Normal Sounds You May Hear
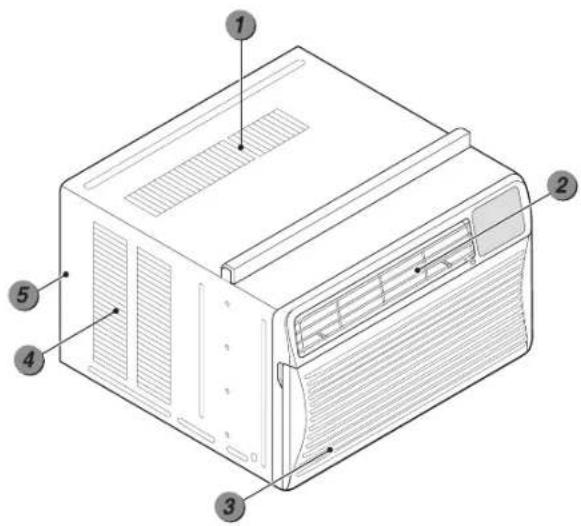
NOTE: Do not drill any holes in the base pan to eliminate these normal sounds. Doing so will void the warranty.
① High Pitched Whine
Today's high efficiency compressors may have a high-pitched whine during the cooling cycle.
② Sound of Rushing Air
At the front of the unit, you may hear the sound of rushing air being moved by the fan.
③ Gurgle/Hiss
Gurgling or hissing noise may be heard due to refrigerant passing through evaporator during normal operation.
4 Pinging or Swishing
Droplets of water hitting condenser during normal operation may cause pinging or swishing sounds.
⑤ Vibration
Unit may vibrate and make noise because of poor wall or window construction or incorrect installation.
TROUBLESHOOTING GUIDE
Before Calling for Service
If your air conditioner does not function properly or does not function at all, check the following before you call for service. If you cannot find a solution, turn off the air conditioner and call the Kenmore Customer Care Hotline at 1-844-553-6667.
| Problem Possible | Cause Solutions | |
| Air conditioner turns on and off rapidly. | Outside temperature is extremely high. Set fan speed at the fastest setting for maximum cooling. | |
| Dirty air filter. Airflow is restricted. Clean the air filter. | ||
| Noise when unit is cooling. | Window is vibrating due to improper installation. | Refer to the installation instructions or check with the installer. |
| Normal sound of air movement. This is normal. If too loud, set the fan to a lower speed. | ||
| Remote will not operate air conditioner. | The remote control is out of range of the sensor. | Hold the remote control within 20 feet and a 120^ radius of the front of the air conditioner. |
| Path between sensor and remote is blocked. | Remove the obstruction or stand where there is a clear path between the remote and the sensor. | |
| Battery is not installed properly. Reinstall battery, checking the polarity. | ||
| Sensor is in direct path of sunlight. Position d piece of furniture or other object to cast a shadow over the sensor. | ||
| Room too cold. Set temperature is too low. Increase the set temperature. | ||
| Air conditioner does not start. | The air conditioner is unplugged. Make sure the air conditioner plug is pushed completely into the outlet. | |
| The current interrupter device on the power cord has tripped. | Press the RESET button located on the power cord plug. If the RESET button will not stay engaged, discontinue use of the air conditioner and contact a qualified service technician. | |
| House fuse has blown or circuit breaker tripped. | Check the house fuse/circuit breaker box and replace the fuse or reset the breaker. | |
| Temperature setting is warmer than room temperature. | Set temperature to a lower setting. | |
| Unit was turned OFF and ON too quickly. Built-in delay will prevent compressor from turning on for 3 minutes. | ||
| Air conditioner blows fuses or trips circuit breaker. | Too many electrical devices are being used on the same circuit. | Unplug or relocate electrical devices using same circuit. |
| Unit is rated over 7.5 Amps. | Unit should be plugged into a single circuit outlet. | |
| Unit is plugged into an extension cord. | Do not use an extension cord to run the unit. | |
| Unit was turned OFF and ON too quickly. | Turn unit OFF and wait 3 minutes before restarting. | |
TROUBLESHOOTING GUIDE
| Problem Possible | Cause Solutions | |
| Air conditioner does not cool as it should. | Airflow is restricted. Make sure there are no | curtains, blinds, or furniture blocking the front of the air conditioner. |
| The temperature control is not set correctly. | In COOL mode, press Decrease (v). | |
| The air filter is dirty. Clean the filter at least | every 2 weeks. (See the Care and Cleaning section.) | |
| The room was very hot. After the air conditioner is turned on, allow time for the room to cool down. | ||
| Cold air is escaping. Check for open furnace | floor registers and cold air returns. | |
| Cooling coils have iced up. See “Air conditioner freezing up” below. | ||
| Air conditioner freezing up. | The cooling coils are iced over. Ice may block the airflow and prevent the air conditioner from properly cooling the room. Set the mode control to High Fan or High Cool. | |
| Water drips outside. Room is hot and humid. This is normal when the weather is hot and humid. | ||
| Water drips inside. Air conditioner is not installed properly for water drainage. | Make sure the air conditioner slants slightly downward from the front of the cabinet to the rear. Reposition or shim the cabinet as necessary. DO NOT drill into the drain pan. | |
| Water collects in base pan. | Moisture is removed from the air and drains into the base pan. | This is normal. It will occur for short periods in areas where there is low humidity and for longer periods in very humid areas. |
For detailed information on the Energy Star program, visit www.energystar.gov.
If "CH" appears in the display, call the Kenmore Customer Care Hotline at 1-844-553-6667.
WARRANTY
Kenmore Elite Limited Warranty
WITH PROOF OF SALE, the following warranty coverage applies when this appliance is correctly installed, operated and maintained according to all supplied instructions.
FOR ONE YEAR from the date of sale this appliance is warranted against defects in material or workmanship. A defective appliance will receive free repair or replacement at option of seller.
For warranty coverage details to obtain free repair or replacement, visit the web page: www.kenmore.com/warranty
This warranty applies for only 90 DAYS from the date of sale if this appliance is ever used for other than private household purposes.
This warranty covers ONLY defects in material and workmanship, and will NOT pay for:
- Expendable items that can wear out from normal use, including but not limited to filters, belts, bags or screw-in base light bulbs.
- A service technician to clean or maintain this appliance, or to instruct the user in correct appliance installation, operation and maintenance.
- Service calls to correct appliance installation not performed by Sears authorized service agents, or to repair problems with house fuses, circuit breakers, house wiring, and plumbing or gas supply systems resulting from such installation.
- Damage to or failure of this appliance resulting from installation not performed by Sears authorized service agents, including installation that was not in accord with electrical, gas or plumbing codes.
- Damage to or failure of this appliance, including discoloration or surface rust, if it is not correctly operated and maintained according to all supplied instructions.
- Damage to or failure of this appliance, including discoloration or surface rust, resulting from accident, alteration, abuse, misuse or use for other than its intended purpose.
- Damage to or failure of this appliance, including discoloration or surface rust, caused by the use of detergents, cleaners, chemicals or utensils other than those recommended in all instructions supplied with the product.
- Damage to or failure of parts or systems resulting from unauthorized modifications made to this appliance.
- Service to an appliance if the model and serial plate is missing, altered, or cannot easily be determined to have the appropriate certification logo.
Disclaimer of implied warranties; limitation of remedies
Customer's sole and exclusive remedy under this limited warranty shall be product repair or replacement as provided herein. Implied warranties, including warranties of merchantability or fitness for a particular purpose, are limited to one year or the shortest period allowed by law. Seller shall not be liable for incidental or consequential damages. Some states and provinces do not allow the exclusion or limitation of incidental or consequential damages, or limitation on the duration of implied warranties of merchantability or fitness, so these exclusions or limitations may not apply to you.
This warranty applies only while this appliance is used in the United States.
This warranty gives you specific legal rights, and you may also have other rights which vary from state to state.
Sears Brands Management Corporation, Hoffman Estates, IL 60179
NOTES
ÍNDICE DE CONTENIDOS R
INSTRUCCIONES DE SEGURIDAD IMPORTANTES......23-25
REQUERIMIENTOS DE PUESTA A TIERRA....25
CARACTERÍSTICAS Y BENEFICIOS
Partes y componentes clave....26
natural_image
Line drawing of a microwave oven with a hand inserting a cable (no text or symbols)
PRECAUCIÓN
natural_image
Technical line drawing of a rectangular enclosure with internal partitions and a magnified inset showing a switch mechanism (no text or symbols)natural_image
Diagram of a fire extinguisher with cooling fins and ventilation ducts, showing airflow direction (no text or labels)
PRECAUCIÓN
natural_image
Technical illustration of a portable air conditioner unit with a magnified inset showing internal components (no text or symbols)natural_image
Diagram of a server rack with internal components and an inset showing a device's internal structure (no text or symbols present)natural_image
Diagram of a printer with ventilation slots and a magnified inset showing internal structure (no text or symbols)natural_image
Diagram of a microwave oven with ventilation grilles and a close-up inset showing internal structure (no text or symbols)natural_image
Illustration of a mechanical device with a magnified inset showing a bracket and directional arrow (no text or symbols)natural_image
Line drawing of a computer air conditioner unit with a hand inserting a button (no text or symbols)natural_image
Line drawing of a microwave oven with ventilation slots and airflow arrows (no text or symbols)natural_image
Illustration of a faucet pouring liquid into a grid-patterned tray (no text or symbols)natural_image
Illustration of a hand cleaning an air conditioner grille (no text or symbols)Sears Brands Management Corporation, Hoffman Estates, IL 60179
NOTAS
Kenmore®
Customer Care Hotline
To schedule in-home repair service or order replacement parts
- IMPORTANT SAFETY INSTRUCTIONS 3-5
- FEATURES AND BENEFITS
- INSTALLATION REQUIREMENTS
- INSTALLATION INSTRUCTIONS
- HOW TO USE
- CARE AND CLEANING
- TROUBLESHOOTING GUIDE
- DUCT RECORD
- SAFETY MESSAGES
- WARNING
- CAUTION
- IMPORTANT SAFETY INSTRUCTIONS
- Risk of Fire or Explosion
- Avoid fire hazard or electric shock.
- Electrical Requirements
- Basic Safety Precautions
- Installation
- Operation and Maintenance
- GROUNDING REQUIREMENTS
- CAUTIONWARNING
- Key Parts and Components
- Electrical Data
- Items Included
- Tools Required
- Window Requirements
- Size
- Clearance
- Preparation of Cabinet
- Cabinet Installation
- Control Panel and Remote Control
- POWER
- FAN SPEED BUTTON
- DELAY ON/OFF TIMER
- TEMPERATURE CONTROL
- REMOTE CONTROL SENSOR
- FILTER RESET
- SMART CONNECT FUNCTION
- AUTO RESTART
- ENERGY SAVER
- - Inserting the Remote Control Battery
- NOTE
- Ventilation
- Air Direction
- Adjusting Horizontal Airflow Direction
- Adjusting Vertical Airflow Direction
- Additional Features
- Drain Pipe
- Slinger Fan
- Smart Features
- Getting Connected
- Connecting the Air Conditioner
- Remote Operation
- FCC Notice
- FCC RF Radiation Exposure Statement
- Open Source Software Notice
- Air Filter
- Cleaning the Air Filter
- Cleaning the Air Conditioner
- Normal Sounds You May Hear
- Before Calling for Service
- WARRANTY
- Kenmore Elite Limited Warranty
- This warranty covers ONLY defects in material and workmanship, and will NOT pay for:
- Disclaimer of implied warranties; limitation of remedies
- NOTES
- ÍNDICE DE CONTENIDOS R
- INSTRUCCIONES DE SEGURIDAD IMPORTANTES......23-25
- CARACTERÍSTICAS Y BENEFICIOS
- PRECAUCIÓN
- NOTAS
- Kenmore®
- Customer Care Hotline
Brand : KENMORE
Model : 580.77107
Category : Air conditioner