
PLC-WXU10N - Projector SANYO - Free user manual and instructions
Find the device manual for free PLC-WXU10N SANYO in PDF.


User questions about PLC-WXU10N SANYO
0 question about this device. Answer the ones you know or ask your own.
Ask a new question about this device
Download the instructions for your Projector in PDF format for free! Find your manual PLC-WXU10N - SANYO and take your electronic device back in hand. On this page are published all the documents necessary for the use of your device. PLC-WXU10N by SANYO.
USER MANUAL PLC-WXU10N SANYO
MODEL/MODELE/MODELO/MODELL/MODELLO PLC-WXU10N / WXU10E / WXU10B
To the Owner
Before operating this projector, read this manual thoroughly and operate the projector properly.
This projector provides many convenient features and functions. Operating the projector properly enables you to manage those features and maintains it in better condition for a considerable time.
Improper operation may result in not only shortening the product-life, but also malfunctions, fire hazard, or other accidents.
If your projector seems to operate improperly, read this manual again, check operations and cable connections and try the solutions in the "Troubleshooting" section in the end of this booklet. If the problem still persists, contact the dealer where you purchased the projector or the service center.

CAUTION
RISK OF ELECTRIC SHOCK DO NOT OPEN

CAUTION:TO REDUCE THE RISK OF ELECTRIC SHOCK,DO NOT REMOVE COVER (OR BACK).NO USER-SERVICEABLE PARTS INSIDE EXCEPT LAMP REPLACEMENT. REFER SERVICING TO QUALIFIED SERVICE PERSONNEL.

THIS SYMBOL INDICATES THAT DANGEROUS VOLTAGE CONSTITUTING A RISK OF ELECTRIC SHOCK IS PRESENT WITHIN THIS UNIT.

THIS SYMBOL INDICATES THAT THERE ARE IMPORTANT OPERATING AND MAINTENANCE INSTRUCTIONS IN THE OWNER'S MANUAL WITH THIS UNIT.
READ AND KEEP THIS OWNER'S MANUAL FOR LATER USE.

Safety Precaution
WARNING: TO REDUCE THE RISK OF FIRE OR ELECTRIC SHOCK, DO NOT EXPOSE THIS APPLIANCE TO RAIN OR MOISTURE.
- This projector produces intense light from the projection lens. Do not stare directly into the lens, otherwise, eye damage could result. Be especially careful that children do not stare directly into the beam.
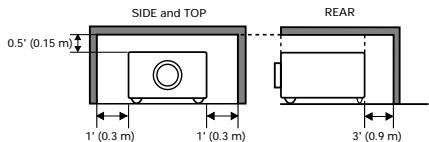
Install the projector in a proper position. If not, it may result in a fire hazard. - Provide appropriate space on the top, sides and rear of the projector cabinet for allowing air circulation and cooling the projector. Minimum clearance must be maintained. If the projector is to be built into a compartment or similarly enclosed, the minimum distances must be maintained. Do not cover the ventilation slot on the projector. Heat build-up can reduce the service life of your projector, and can also be dangerous.
- If the projector is not to be used for an extended time, unplug the projector from the power outlet.

CAUTION
DO NOT SET THE PROJECTOR IN GREASY, WET, OR SMOKY CONDITIONS SUCH AS IN A KITCHEN TO PREVENT A BREAKDOWN OR A DISASTER. IF THE PROJECTOR COMES IN CONTACT WITH OIL OR CHEMICALS, IT MAY BECOME DETERIORATED.
NOTE: This symbol and recycle system are applied to EU countries only and not applied to the countries in the other area of the world.

13/14
Your SANYO product is designed and manufactured with high quality materials and components which can be recycled and reused.
This symbol means that electrical and electronic equipment, at their end-of-life, should be disposed of separately from your household waste.
Please dispose of this equipment at your local community waste collection/recycling centre. In the European Union there are separate collection systems for used electrical and electronic products.
Please help us to conserve the environment we live in!
CAUTION
Not for use in a computer room as defined in the Standard for the Protection of Electronic Computer/Data Processing Equipment, ANSI/NFPA 75.
All the safety and operating instructions should be read before the product is operated.
Read all of the instructions given here and retain them for later use. Unplug this projector from AC power supply before cleaning. Do not use liquid or aerosol cleaners. Use a damp cloth for cleaning.
Follow all warnings and instructions marked on the projector.
For added protection to the projector during a lightning storm, or when it is left unattended and unused for long periods of time, unplug it from the wall outlet. This will prevent damage due to lightning and power line surges.
Do not expose this unit to rain or use near water... for example, in a wet basement, near a swimming pool, etc...
Do not use attachments not recommended by the manufacturer as they may cause hazards.
Do not place this projector on an unstable cart, stand, or table. The projector may fall, causing serious injury to a child or adult, and serious damage to the projector. Use only with a cart or stand recommended by the manufacturer, or sold with the projector. Wall or shelf mounting should follow the manufacturer's instructions, and should use a mounting kit approved by the manufacturers.
An appliance and cart combination should be moved with care. Quick stops, excessive force, and uneven surfaces may cause the appliance and cart combination to overturn.

Slots and openings in the back and bottom of the cabinet are provided for ventilation, to ensure reliable operation of the equipment and to protect it from overheating.
The openings should never be covered with cloth or other materials, and the bottom opening should not be blocked by placing the projector on a bed, sofa, rug, or other similar surface. This projector should never be placed near or over a radiator or heat register.
This projector should not be placed in a built-in installation such as a book case unless proper ventilation is provided.
Never push objects of any kind into this projector through cabinet slots as they may touch dangerous voltage points or short out parts that could result in a fire or electric shock. Never spill liquid of any kind on the projector. Do not install the projector near the ventilation duct of air-conditioning equipment.
This projector should be operated only from the type of power source indicated on the marking label. If you are not sure of the type of power supplied, consult your authorized dealer or local power company.
Do not overload wall outlets and extension cords as this can result in fire or electric shock. Do not allow anything to rest on the power cord. Do not locate this projector where the cord may be damaged by persons walking on it.
Do not attempt to service this projector yourself as opening or removing covers may expose you to dangerous voltage or other hazards. Refer all servicing to qualified service personnel.
Unplug this projector from wall outlet and refer servicing to qualified service personnel under the following conditions:
a. When the power cord or plug is damaged or frayed.
b. If liquid has been spilled into the projector.
c. If the projector has been exposed to rain or water.
d. If the projector does not operate normally by following the operating instructions. Adjust only those controls that are covered by the operating instructions as improper adjustment of other controls may result in damage and will often require extensive work by a qualified technician to restore the projector to normal operation.
e. If the projector has been dropped or the cabinet has been damaged.
f. When the projector exhibits a distinct change in performance this indicates a need for service.
When replacement parts are required, be sure the service technician has used replacement parts specified by the manufacturer that have the same characteristics as the original part. Unauthorized substitutions may result in fire, electric shock, or injury to persons.
Upon completion of any service or repairs to this projector, ask the service technician to perform routine safety checks to determine that the projector is in safe operating condition.
Air Circulation
Openings in the cabinet are provided for ventilation and to ensure reliable operation of the product and to protect it from overheating, and these openings must not be blocked or covered.

CAUTION
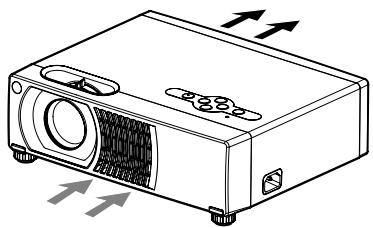
Hot air is exhausted from the exhaust vent. When using or installing the projector, the following precautions should be taken.
- Do not put any flammable object or spray can near the projector, hot air is exhausted from the ventilation holes.
- Keep the exhaust vent at least 90 cm away from any objects.
- Do not touch a peripheral part of the exhaust vent, especially screws and metallic part. This area will become hot while the projector is being used.
- Do not put anything on the cabinet. Objects put on the cabinet will not only get damaged but also cause fire hazard by heat.
Cooling fans are provided to cool down the projector. The fans' running speed is changed according to the temperature inside the projector.
Moving the Projector
When moving the projector, replace the lens cap and retract the elevator feet to prevent damage to the lens and cabinet. When the projector is not in use for an extended period, put it into a suitable case with the lens side up to protect the projector.
When handling the projector, do not drop, bump, subject it to strong forces, or put other things on the cabinet.
Installing the Projector in Proper Position
Install the projector properly. Improper Installation may reduce the lamp life and cause a fire hazard.
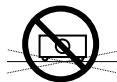
Do not tilt the projector sideways.

Do not point the projector up to project an image.

Do not point the projector down to project an image.

Do not put the projector on either side to project an image.
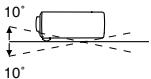
Do not pitch the projector more than 10 degrees backward and forward.

USE CAUTION IN CARRYING OR TRANSPORTING THE PROJECTOR
- Do not drop or bump the projector, otherwise damages or malfunctions may result.
- When carrying the projector, use a suitable carrying case.
- Do not transport the projector by using a courier or transport service in an unsuitable transport case. This may cause damage to the projector. To transport the projector through a courier or transport service, consult your dealer for their information.
- Do not put the projector in a case before the projector is cooled enough.
Compliance
Federal Communications Commission Notice
Note: This equipment has been tested and found to comply with the limits for a Class B digital device, pursuant to Part 15 of the FCC Rules. These limits are designed to provide reasonable protection against harmful interference in a residential installation. This equipment generates, uses, and can radiate radio frequency energy, and if not installed and used in accordance with the instructions, may cause harmful interference to radio communications. However, there is no guarantee that interference will not occur in a particular installation. If this equipment does cause harmful interference to radio or television reception, which can be determined by turning the equipment off and on, the user is encouraged to try to correct the interference by one or more of the following measures:
- Reorient or relocate the receiving antenna.
- Increase the separation between the equipment and receiver.
- Connect the equipment into an outlet on a circuit different from that to which the receiver is connected.
- Consult the dealer or an experienced radio/TV technician for help.
Use of shielded cable is required to comply with class B limits in Subpart B of Part 15 of FCC Rules. Do not make any changes or modifications to the equipment unless otherwise specified in the instructions.
If such changes or modifications should be made, you could be required to stop operation of the equipment.
Model Number :PLC-WXU10N
Trade Name : Sanyo
Responsible party : SANYO FISHER COMPANY
Address : 21605 Plummer Street, Chatsworth, California 91311
Telephone No. : (818)998-7322
AC Power Cord Requirement
The AC Power Cord supplied with this projector meets the requirement for use in the country you purchased it.
AC Power Cord for the United States and Canada:
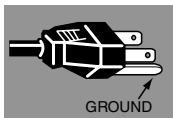
AC Power Cord used in the United States and Canada is listed by the Underwriters Laboratories (UL) and certified by the Canadian Standard Association (CSA). AC Power Cord has a grounding-type AC line plug. This is a safety feature to be sure that the plug will fit into the power outlet. Do not try to defeat this safety feature. Should you be unable to insert the plug into the outlet, contact your electrician.
AC Power Cord for the United Kingdom:
This cord is already fitted with a moulded plug incorporating a fuse, the value of which is indicated on the pin face of the plug. Should the fuse need to be replaced, an ASTA approved BS 1362 fuse must be used of the same rating, marked thus 念 . If the fuse cover is detachable, never use the plug with the cover omitted. If a replacement fuse cover is required, ensure it is of the same colour as that visible on the pin face of the plug (i.e. red or orange). Fuse covers are available from the Parts Department indicated in your User Instructions.
If the plug supplied is not suitable for your socket outlet, it should be cut off and destroyed.
The end of the flexible cord should be suitably prepared and the correct plug fitted.
WARNING : A PLUG WITH BARED FLEXIBLE CORD IS HAZARDOUS IF ENGAGED IN A LIVE SOCKET OUTLET.
The Wires in this mains lead are coloured in accordance with the following code:
Green-and-yellow ....Earth
Blue. Neutral
Brown .Live
As the colours of the wires in the mains lead of this apparatus may not correspond with the coloured markings identifying the terminals in your plug proceed as follows:
The wire which is coloured green-and-yellow must be connected to the terminal in the plug which is marked by the letter E or by the safety earth symbol or coloured green or green-and-yellow.
The wire which is coloured blue must be connected to the terminal which is marked with the letter N or coloured black.
The wire which is coloured brown must be connected to the terminal which is marked with the letter L or coloured red.
WARNING: THIS APPARATUS MUST BE EARTHED.
THE SOCKET-OUTLET SHOULD BE INSTALLED NEAR THE EQUIPMENT AND EASILY ACCESSIBLE.
Notes on AC Power Cord
AC Power Cord must meet requirement of country where you use a projector. Confirm an AC plug type with graphics below and proper AC Power Cord must be used. If supplied AC Power Cord does not match your AC outlet, contact your sales dealer. This projector is equipped with a grounding type AC line plug. Make sure that your outlet fits the plug. Do not defeat the safety purpose of this grounding type plug. We highly recommend using a video source device also equipped with a grounding type AC line plug to prevent from signal interference due to voltage fluctuation.
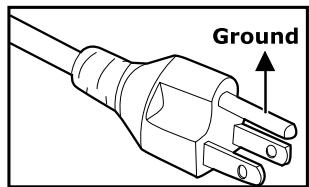
For the U.S.A. and Canada
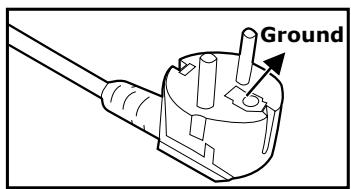
For Continental Europe
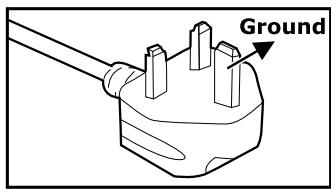
For the U.K.

CAUTION
The socket-outlet should be installed near the equipment and easily accessible.
CONTENTS
Introduction 8
Projector Features 8
Package Contents 9
Projector Overview 10
Using the Product 12
Control Panel 12
Connection Ports 13
Remote Control 14
Installing the Batteries 15
Remote Control Operation 16
Installation 17
Connecting the Projector 17
Powering On/Off the Projector 18
Adjusting the Projected Image 19
Menu Operation 22
Picture (Computer Mode) 24
Picture (Video Mode) 25
Image (Computer Mode) 26
Image (Video Mode) 28
Setting (Computer / Video Mode) 29
Sound (Computer / Video Mode) 30
Advanced (Computer / Video Mode) 30
Language (Computer / Video Mode) 30
Maintenance 31
Cleaning the Lens 31
Cleaning the Projector Housing 31
Cleaning the Air Filter 32
Replacing the Lamp 33
Specifications 35
Appendix 36
LED Indicator Messages 36
Optional Parts 36
Compatibility Modes 37
Troubleshooting 38
Serial Control Interface 40
Introduction
Projector Features
The projector integrates high-performance optical engine projection and a user-friendly design to deliver high reliability and ease of use.
The projector offers the following features:
3 panel 0.56 inch LCD projector
WXGA (1280 x 800 pixels)
1.2X manual zoom lens
Auto image re-sizing (Auto-Sync.) to 1280 x 800 full screen with scaling compression compatibility for VGA, SVGA, XGA and SXGA*
Compatibility with Macintosh® computers
Compatibility with NTSC, PAL, SECAM, and HDTV
Multi-function remote control
D-Sub 15-pin terminal for input / output signal
DVI 24-pin terminal for connecting DVI output from a computer
User-friendly, multi-language on-screen display (OSD)
Advanced electronic keystone correction

*means compressed.
Package Contents
When you unpack the projector, make sure you have all these components:
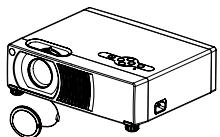
Projector with Lens Cap
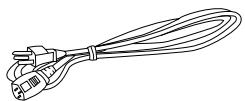
AC Power Cord (USA: J2552-0109-00) (UK: J2552-0108-00) (Europe: J2552-0107-00
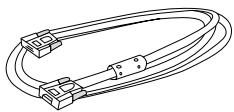
VGA Cable (D-Sub to D-Sub) (J2552-0072-03)
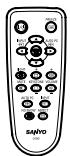
Remote Control (IR)
AAA size batteries for remote control

Owner's Manual
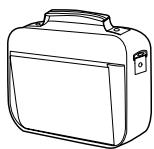
Projector Carrying Case
Quick Start Guide

- Save the original shipping carton and packing material; they will come in handy if you ever to ship your unit. For maximum protection, repack your unit as it was originally packed at the factory.
- Accessories and components may vary by retailer and region.
Projector Overview
Front View
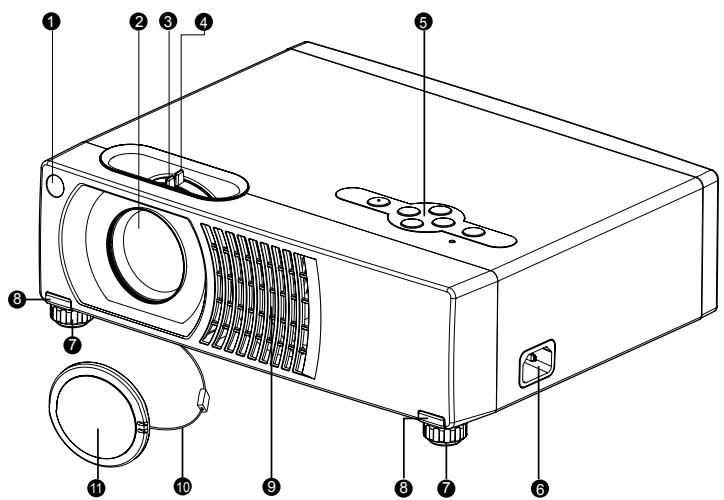
1 Front IR remote control sensor
Projection lens
3 Focus ring
4 Zoom ring
Control panel
6 AC power socket
7 Elevator foot
Elevator button
9 Ventilation holes
10 Lens cap strap
Lens cap
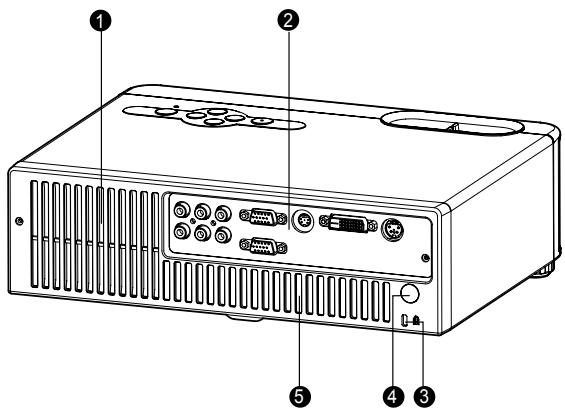
Rear View
1 Ventilation holes
2 Connection ports
Kensington lock
4 Rear IR remote control sensor
6 Speaker
Bottom View
Air filter cover
Lamp cover
Ceiling mount (3-M4*6)
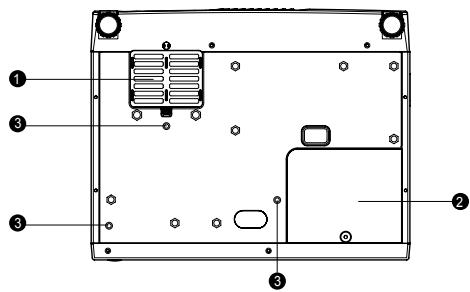

This projector can be used with a ceiling mount for support. The ceiling mount is not included in the package.
Using the Product
Control Panel
LED
Lamp LED indicator
Refer to "LED Indicator Messages".
2 Power LED indicator
Refer to "LED Indicator Messages".
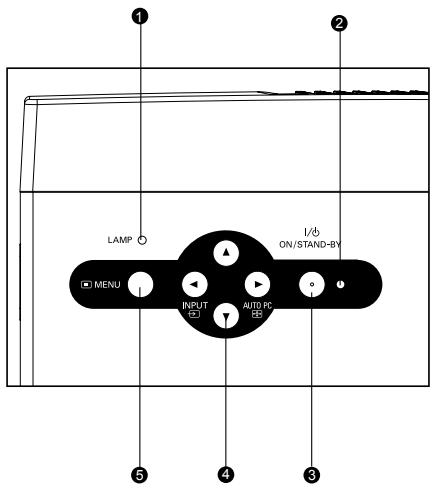
Button Function
3 ON/STAND-BY
Refer to "Powering On/Off the Projector".
4 Four directional (INPUT/AUTO PC) buttons
- Use four directional buttons to select items or make adjustments to your selection.
- Manually selects an input source. (Left button)
- Automatically adjusts Fine Sync and Total Dots. This function is available for computer mode only. (Right button)
5 MENU
Displays or exits the on-screen display menus.
Connection Ports
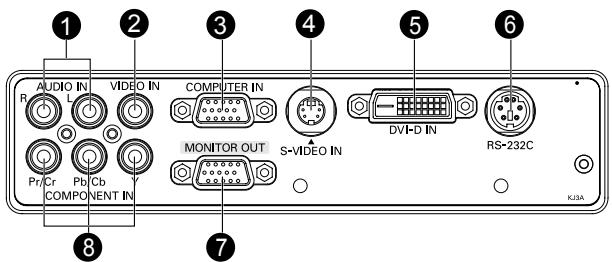
1 AUDIO IN (R/L)
Connects an audio output from video equipment or computer to this jack.
2VIDEO IN
Connects composite video output from video equipment to this jack.
3 COMPUTER IN
Connects analog RGB output signal from a computer to this jack.
S-VIDEO IN
Connects S-Video output from video equipment to this jack.
5 DVI-D IN
Connects DVI output from a computer to this jack.
RS-232C
When operating the projector via a computer, connect this to the controlling computer's RS-232C port.
7 MONITOR OUT
This terminal can be used to output the incoming signal from COMPUTER IN terminal to the other monitor.
3 COMPONENT IN (Y Cb/Pb Cr/Pr)
Connects Y Cb/Pb Cr/Pr output from video equipment to this jack.
Remote Control
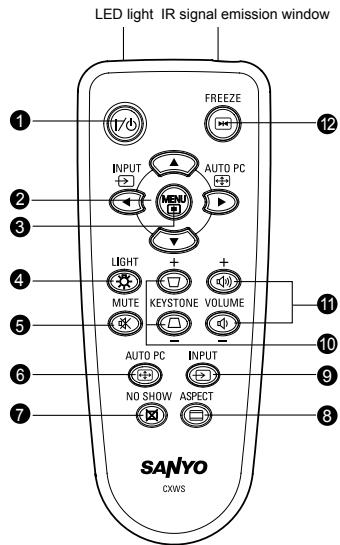
1 ON/STAND-BY
Refer to "Powering On/Off the Projector".
2 Four directional (INPUT/AUTO PC) buttons
- Use four directional buttons to select items or make adjustments to your selection.
- Manually selects an input source. (Left button)
- Automatically adjusts Fine Sync and Total Dots. This function is available for computer mode only. (Right button)
3 MENU
Displays or exits the on-screen display menus.
4 LIGHT
Press and hold this button to activate the LED light. If you press and hold the LIGHT button continuously or frequently, the batteries may terminate the life in a shorter period.
5 MUTE
Cuts off the sound temporarily. Press again to cancel the MUTE function.
6 AUTO PC
Automatically adjusts Fine Sync and Total Dots. This function is available for computer mode only.
NO SHOW
Cuts off the screen temporarily. Press again to cancel the NO SHOW function.
8 ASPECT
Switch the image aspect ratio.
9 INPUT
Manually selects an input source.
10 KESTONE ^+ /-
Adjusts image distortion caused by tilting the projector.
11 VOLUME +I -
Press Volume + button to increase the volume.
Press Volume - button to reduce the volume.
FREEZE
Press "FREEZE" to pause the screen image.
Press again to cancel the FREEZE function.
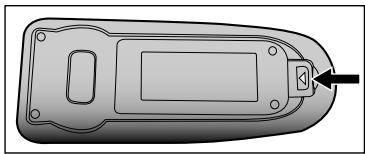
Installing the Batteries
- Open the battery cover in the direction shown.
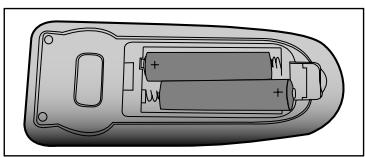
- Install batteries as indicated by the diagram inside the compartment.
- Close the battery cover into position.
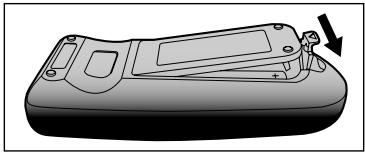

- Keep the batteries out of the reach of children. There is a danger of death by accidentally swallowing the battery.
Remove batteries from remote control when not using for extended periods. - Do not dispose of the used battery along with household waste. Dispose of used batteries according to local regulations.
- Danger of explosion may happen if batteries are incorrectly replaced. Replace all the batteries with new ones.
Remote Control Operation
Point the remote control at the infrared remote sensor and press a button.
Operating the projector from the front
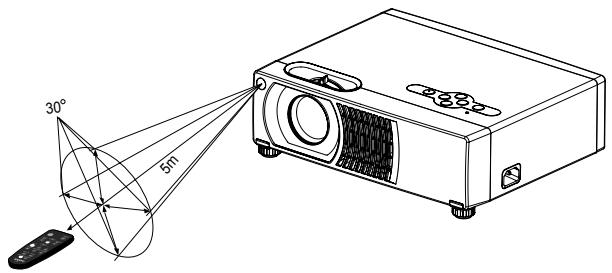
Operating the projector from the rear
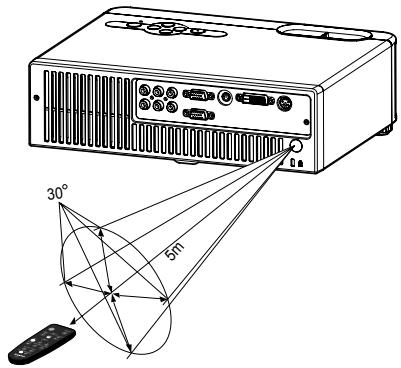

- Do not point the LED light pointer directly to the people's eyes (especially small children). There is a danger of injury to the eyes.
The remote control may not operate when there is sunlight or other strong light such as a fluorescent lamp shining on the remote sensor.
Operate the remote control from a position where the remote sensor is visible.
Do not drop the remote control or jolt it. - Keep the remote control out of locations with excessively high temperature or humidity.
- Do not get water on the remote control or place wet objects on it.
Do not disassemble the remote control.
Installation
Connecting the Projector
1 Audio Cable
5 YCbCr Cable
2 VGA Cable (D-Sub to D-Sub)*
6 Composite Video Cable
DVI Cable
VGA (D-Sub) to HDTV (RCA) Cable
RS232C Cable
S-Video Cable
- One cable is supplied. Other cables are not supplied with the projector.
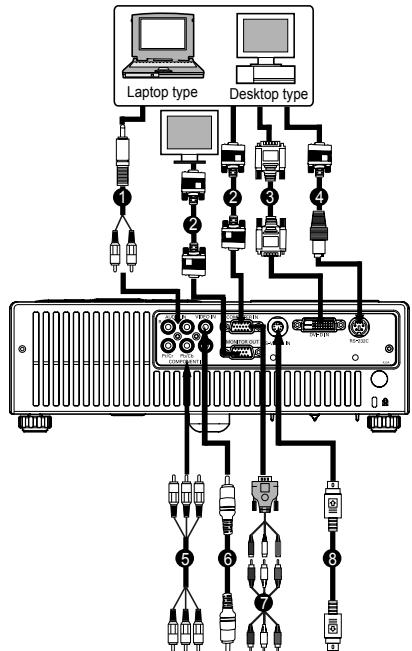
Video Source (example)
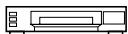
VCR
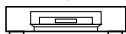
Settop Box
Component video
output equipment
(such as DVD player or
high-definition TV source)
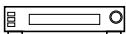

- When connecting cable, power cords of both a projector and external equipment should be disconnected from AC outlet.
The figure above is a sample connection. This does not mean that all of these devices can or must be connected simultaneously. - The cables that come with the projector may differ from the above illustration. The included cables are based on actual shipment delivery. See page 36 for ordering optional cables.
Powering On/Off the Projector
Powering on the projector:
- Remove the projector lens cap.
- Complete the AC power cord and peripheral signal cable(s) connections.
- Press ON / STAND-BY button to turn on the projector.
-
Turn on your source (computer, notebook, DVD, etc.). The projector automatically detects your source.
-
When searching message appears on the screen, ensure that the appropriate signal cable(s) are securely connected.
The signal message will appear on the screen when the source is detected.
If you are connecting multiple sources to the projector simultaneously, press INPUT button.
Warning:
■ Remove the lens cap first before powering on.
■ Never look into the lens when the lamp is on. This can damage your eyes. It is especially important that children are not allowed to look into the lens.
To avoid image sticking, it is not recommended that you project the same still image for more than 15 minutes.
- Faster on-off-cycles will damage the lamp and reduce lamp life. Wait at least for 7 minutes to turn off the projector after powering on.
Powering Off the Projector:
- Press ON / STAND-BY button to turn off the projector lamp. You will see a message "Power Off? Press Power again" appear on the screen.
- Press ON / STAND-BY button again to confirm.
- The cooling fans continue to operate for cooling cycle and the Lamp LED goes out. When the Power LED begins flashing, the projector has entered standby mode.
If you wish to turn the projector back on, you must wait until the projector has completed the cooling cycle and has entered standby mode.
Once in standby mode, simply press ON / STAND-BY button to restart the projector.
- Disconnect the power cord from the electrical outlet and the projector.

Please wait until the fan motor and the Lamp LED turn off before removing the AC power cord from the projector.
- Faster on-off-cycles will damage the lamp and reduce lamp life. Wait at least for 7 minutes to turn off the projector after powering on.
Adjusting the Projected Image
Adjusting the Projector Height
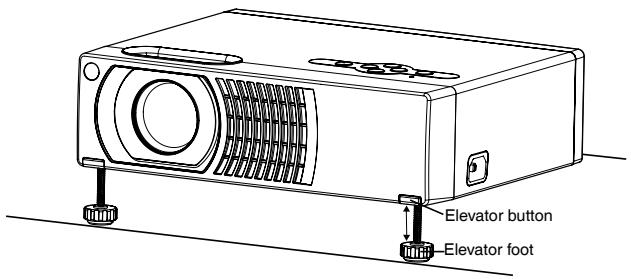
The projector is equipped with two elevator feet to adjust the image height up to 9.0 degrees.
To raise the image:
- Press the elevator button.
- Raise the image to the desired height angle, then release the button to lock the elevator feet into position.
To lower the image:
- Press the elevator button.
- Lower the image, then release the button to lock the elevator feet into position.

- To avoid damaging the projector, make sure that the elevator feet are fully retracted before placing the projector in its carrying case (supplied).
Adjusting the Projector Zoom and Focus
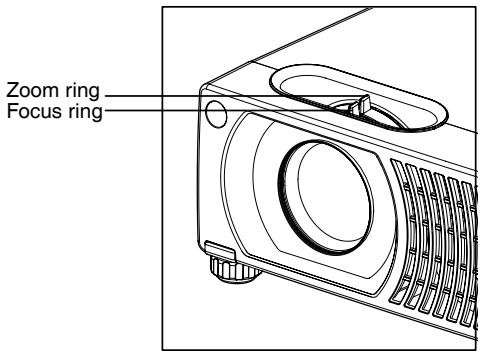
- Adjust the image by rotating the zoom ring. Rotate to the right to reduce the image. Rotate to the left to enlarge the image.
- Focus the image by rotating the focus ring. A still image is recommended for focusing.
Adjusting Projection Image Size
Refer to the graphic and table below to determine the screen size and projection distance.
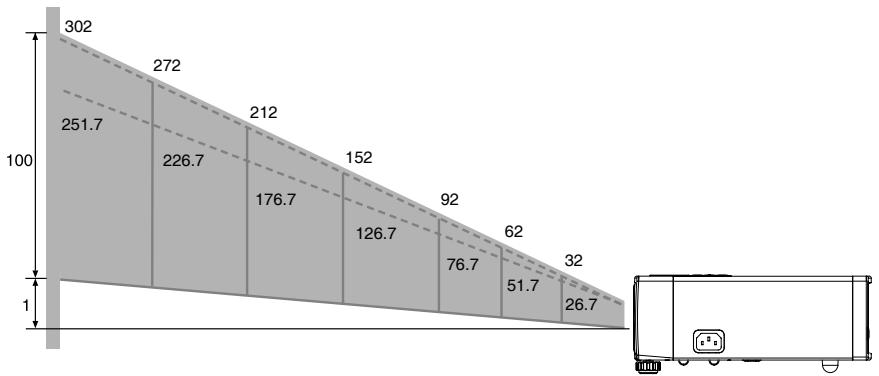
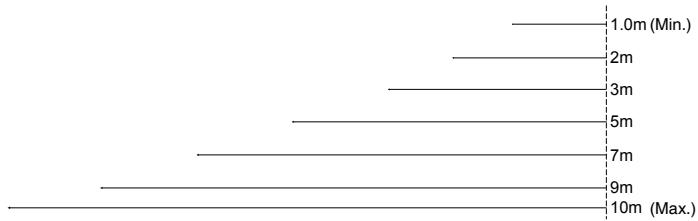
| PROJECTION DISTANCE (METER) | 1.0 | 2.0 | 3.0 | 5.0 | 7.0 | 9.0 | 10.0 | |
| 16:10 SCREEN SIZE-DIAGONAL (INCH) | Wide | 32 | 62 | 92 | 152 | 212 | 272 | 302 |
| Tele | 26.7 | 51.7 | 76.7 | 126.7 | 176.7 | 226.7 | 251.7 | |

Position the projector in a horizontal position; other positions can cause heat build-up and damage to the projector.
Make sure the heat ventilation holes are not blocked.
- Do not use the projector in a smoky environment. Smoke residue may cause buildup on critical parts.
Menu Operation
The projector has multilingual On Screen Display menus that allow you to make image adjustments and change a variety of settings.
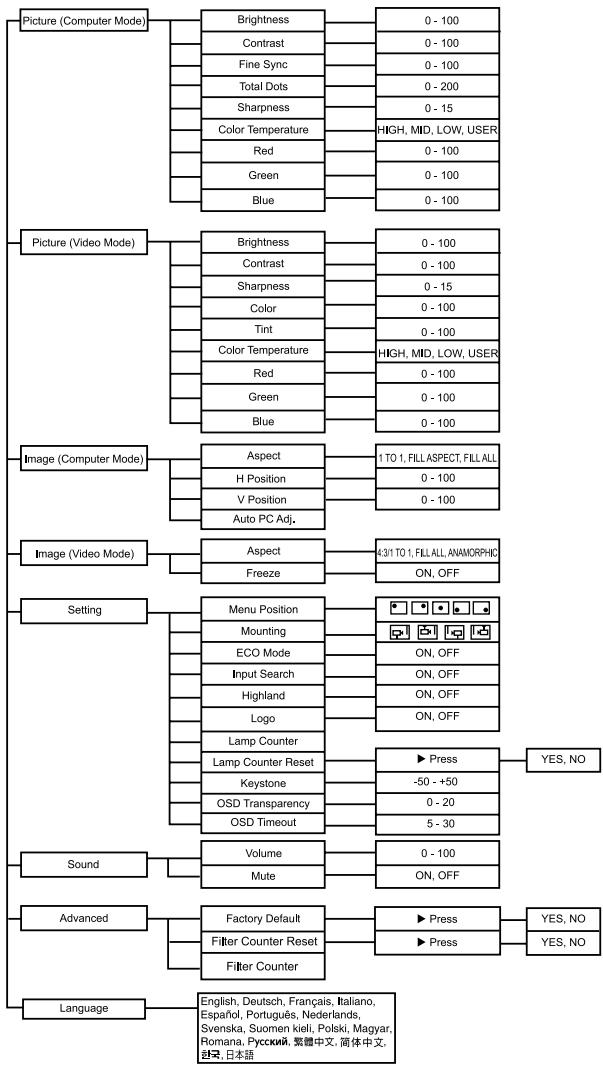
How to operate
- Press MENU button to open the OSD menu.
- When OSD is displayed, use / buttons to select any feature in the main menu. After selecting the desired main menu feature, press button to enter sub-menu for feature setting.
- Adjust the settings with / buttons.
- Press MENU button, the screen will return to the main menu.
- To exit OSD, press MENU button again. The OSD menu will close and the projector will automatically save the new settings.
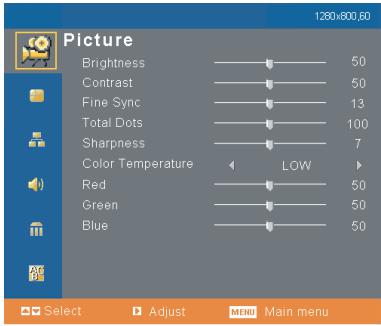
Picture (Computer Mode)
Brightness
Adjusts brightness of the image.
Press to darken the image.
Press to lighten the image.
Contrast
Adjusts contrast of the image.
- Press to decrease the contrast.
Press to increase the contrast.
Fine Sync
"Fine Sync" synchronizes the signal timing of the display with that of the graphic card. If you experience an unstable or flickering image, use the fine sync function to correct it.
Total Dots
"Total Dots" changes the display data frequency to match the frequency of your computer's graphic card. If you experience a vertical flickering bar, use this function to make an adjustment.
Sharpness
Adjusts the sharpness of the image.
- Press to decrease the sharpness.
Press to increase the sharpness.
Color Temperature
Adjusts color temperature. At higher temperature, the screen looks colder; at lower temperature, the screen looks warmer. If you select "USER", "Red", "Green" and "Blue" can be adjusted.
Red
Manually adjusts red.
Green
Manually adjusts green.
Blue
Manually adjusts blue.
Picture (Video Mode)
Brightness
Adjusts the brightness of the image.
Contrast
Adjusts contrast of the image.
Sharpness
Adjusts the sharpness of the image.
Color
Adjusts the color saturation of the image.
Tint
Adjusts the color balance of red and green.
Color Temperature
Adjusts color temperature. At higher temperature, the screen looks colder; at lower temperature, the screen looks warmer. If you select "USER", "Red", "Green" and "Blue" can be adjusted.
Red
Manually adjusts red.
Green
Manually adjusts green.
Blue
Manually adjusts blue.
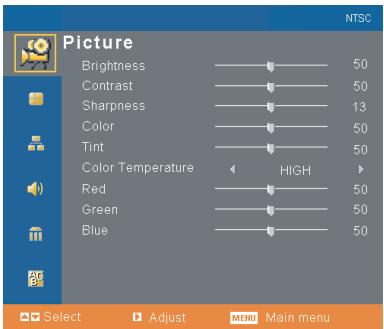
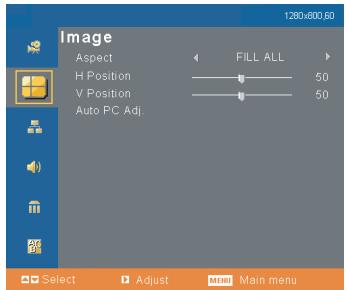
Image (Computer Mode)
Aspect
Use this function to choose your desired image size.
- 1 TO 1: Keep the image with original width-height ratio.
- FILL ASPECT: Maintain the original aspect ration of the input signal while enlarging to fill as much of the output display as possible. 16: 9 input on a 4:3 output will result in back bars on the top and bottom.
- FILL ALL: The input source will be scaled to fit the projection screen.
1 TO 1
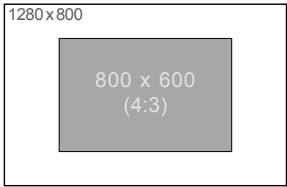
If input signal is smaller than LCD resolution, it will keep the original size and aspect ratio.
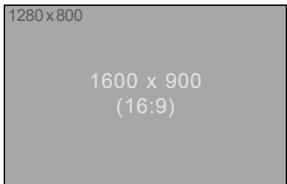
If input signal is bigger than LCD resolution, it will full all the whole screen and ignore the aspect ratio. ex. 1600x960 is 16:9 signal, but the actual image is 16:10.
FILL ASPECT (PC only)
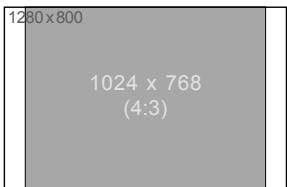
If the aspect ratio is different with the LCD, it will keep the input signal aspect and fit the maximun size.
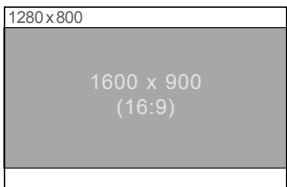
FILL ALL
1280×800
Any type ofresolution.
Always fill the whole LCD.
H Position (Horizontal Position)
Press to move the image left.
Press to move the image right.
V Position (Vertical Position)
Press to move the image down.
Press to move the image up.
Auto PC Adj.
Automatically scans the input source.
Image (Video Mode)
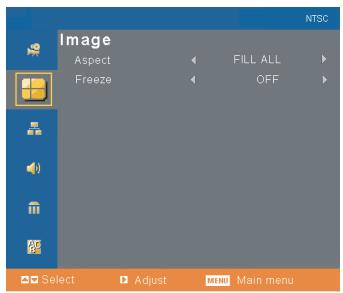
Aspect
Use this function to choose your desired image size.
- 4:3 : Change the original aspect 1:1 to 4:3 at the composite video input or S-video input.
- 1 TO 1 : Keep the image with original width-height ratio at the component input.
- FILL ALL : The input source will be scaled to fit the projection screen.
- ANAMORPHIC: Maintain the original aspect ratio in the center of the output image and place the majority of the distortion towards the horizontal edges of the image.
ANAMORPHIC (Video only)
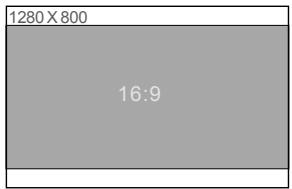
No matter what input signal is, out put aspect ratio is 16:9 and fit to the whole screen.
Freeze
- Choose "ON" to freeze the screen image.
- Choose "OFF" to unfreeze the screen image.
Setting (Computer / Video Mode)
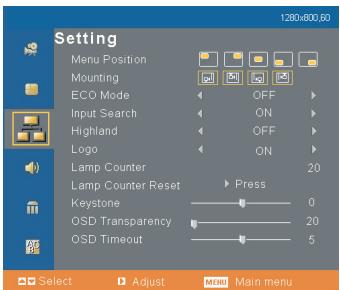
Menu Position
Choose the menu location on the display screen.
Mounting

Front-Desktop
The factory default setting.

Front-Ceiling
When you select this function, the projector turns the image upside down for ceiling-mounted projection.

Rear-Desktop
When you select this function, the projector reverses the image so you can project behind a translucent screen.

Rear-Ceiling
When you select this function, the projector reverses and turns the image upside down at same time. You can project from behind a translucent screen with ceiling mounted projection.
ECO Mode
Use this function to dim the projector lamp light output which will lower power consumption and increase lamp life.
Input Search
Use to automatically search input signal.
Highland
Turn on Highland mode operates the fans at full speed continuously to allow for proper high altitude cooling of the projector.
Logo
Choose to display the logo or not.
Lamp Counter
Displays Hour the lamp's elapsed operating time (in hours).
Lamp Counter Reset
Press to enter its sub-menu. Press MENU button to turn the lamp hour counter to 0 hours.
Keystone
Adjusts image distortion caused by tilting the projector.
OSD Transparency
Use to adjust OSD's transparency.
OSD Timeout
Duration OSD menu stays active (at idle state by second).
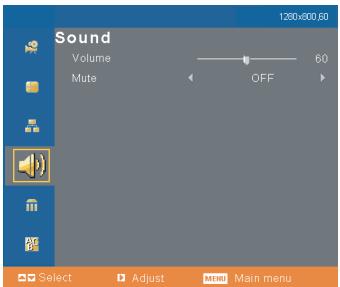
Sound (Computer / Video Mode)
Volume
Press to decrease the volume.
Press to increase the volume.
Mute
- Choose "ON" to turn mute on.
- Choose "OFF" to turn mute off.
Advanced (Computer / Video Mode)
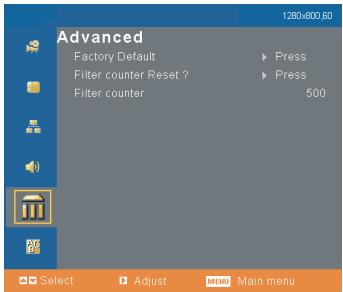
Factory Default
Press to enter its menu. Press MENU button to return the display parameters on all menus to the factory default settings.
Filter Counter Reset
Press to enter its sub-menu. Press MENU button to set the filter counter to 0.
Filter Counter
Displays Hour the filter's elapsed operating time (in hours).
Language (Computer / Video Mode)
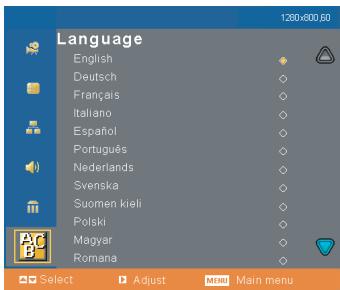
Choose the multilingual OSD menu. Use / to select your preferred language. Press to finalize the selection.
Maintenance
The projector needs proper maintenance. You should keep the lens clean as dust, dirt or spots will project on the screen and diminish image quality. If any other parts need replacing, contact your dealer or qualified service personnel. When cleaning any part of the projector, always switch off and unplug the projector first.
Warning:
Never open any of the covers on the projector. Dangerous electrical voltages inside the projector can cause severe injury. Do not attempt to service this product yourself. Refer all servicing to qualified service personnel.
Cleaning the Lens
Gently wipe the lens with lens cleaning paper. Do not touch the lens with your hands.
Cleaning the Projector Housing
Gently wipe with a soft cloth. If dirt and stains are not easily removed, use a soft cloth damped with water, or water and neutral detergent, and wipe dry with a soft, dry cloth.
Cleaning the Air Filter
The air filter, which is located at the bottom of the projector, should be cleaned after every 100 hours of use. If it is not cleaned periodically, it can become clogged with dust and prevent the projector from being ventilated properly. This can cause over heating and damage the projector.
When the projector reached a specified time, the filter warning message "Please clean up filter" appears on the screen, notifying the cleaning is necessary.
To clean the air filter:
- Switch the projector off and unplug the AC power cord from the wall socket.
- Place a protective sheet (cloth) beneath the projector. Turn the projector over so you can see its underside.
■ Be sure that the projector is stable after turning it over.
- Remove the air filter by pushing the filter tab.
- Clean the air filter.
To clean the filter, you are advised to use a small vacuum cleaner designed for computers and other office equipment.
If the dirt is difficult to remove or if the filter is torn, replace it. Consult your dealer for details. Replacement Filter Part No.: 610 337 9623
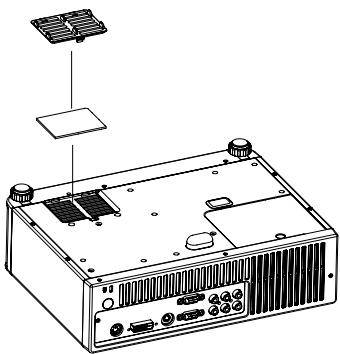
- Replace the filter.
- Plug the power back into the projector.
- Be sure to reset the filter counter after cleaning or replacing the filter. See "Filter Counter Reset" on page 30.

- Turn off the projector and remove the AC power cord from the power outlet before beginning maintenance work.
Make sure the lens is cool before cleaning. - Do not use detergents or chemicals other than those noted above. Do not use benzene or thinners.
Do not use chemical sprays.
Use a soft cloth or lens paper only. - Be sure to reset the filter counter only after cleaning or replacing the air filter.
The filter warning message also appears at turning on.
The filter warning message will not turn off until the filter counter is reset. - Do not operate the projector with the filter removed. Dust may accumulate on the optical elements degrading picture quality.
Replacing the Lamp
Projector lamps have a finite life. Replace the lamp when:
A warning message "Lamp is approaching the end of its useful life in full power operation. Replacement suggested!" appears on the screen.
The image becomes darker and hues become weaker after a lamp has been for a long period of time.
Refer to section titled "LED Indicator Messages" for further details.

The lamp becomes high temperature after turning off the projector with the ON/STAND-BY button. If you touch the lamp, you may scald your finger. When you replace the lamp, wait for at least 45 minutes for the lamp to cool down.
- Do not touch the lamp glass at any time. The lamp may explode due to improper handling, including the touching of the lamp glass.
Lamp lifetime may differ from lamp to lamp and according to the environment of use. There is no guarantee of the same lifetime for each lamp. Some lamps may fail or terminate their lifetime in a shorter period of time than other similar lamps.
A lamp may explode as a result of vibration, shock or degradation as a result of hours of use as its lifetime draws to an end. Risk of explosion may differ according to the environment or conditions in which the projector and lamp are being used.
Wear protective gloves and eyeglasses when fixing or detaching the lamp.
- Faster on-off-cycles will damage the lamp and reduce lamp life. Wait at least for 7 minutes to turn off the projector after powering on.
- Do not operate the lamp in proximity to paper, cloth, or other combustible material nor cover it with such materials. Otherwise it could cause a fire.
- Do not operate the lamp in an atmosphere containing an inflammable substance, such as thinner. Otherwise it could cause a fire or explosion.
Thoroughly ventilate the area or the room when operating the lamp in an oxygen atmosphere (in the air). If ozone is inhaled, it could cause headaches, nausea, dizziness, etc.
The inorganic mercury is involved in the lamp. If the lamp bursts, the mercury inside the lamp will go out of the projector. Leave the area immediately if the lamp shatters while being operated and ventilate the area for at least 30 minutes in order to avoid the inhalation of mercury fumes. Otherwise it could be harmful to user's health.
- Turn off the projector and unplug the AC power cord.
- Place a protective sheet (cloth) beneath the projector. Turn the projector over so you can access the lamp cover.
- Loosen the access panel screw and open the panel.
- Loosen the screws on the bottom of the lamp assembly.
- Grasp the lamp handle and pull the lamp assembly directly out of the projector.
- Replace with the new lamp.
- Tighten the screws on the bottom of lamp assembly.
- Tighten the screw on the lamp cover.
- Reset the lamp hour. Refer to the "Setting (Computer/Video Mode)" menu.
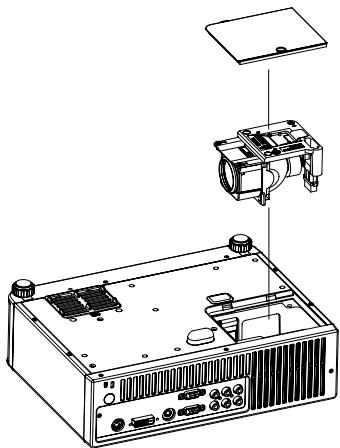

Dispose of the used lamp according to local regulations.
Ensure that screws are tightened properly. Screws not tightened fully may result in injury or accidents.
Since the lamp is made of glass, do not drop the unit and do not scratch the glass.
Do not reuse the old lamp. This could cause the lamp to explode.
- Be sure to turn off the projector and unplug the AC power cord before replacing the lamp.
Do not use the projector with the lamp cover removed.
ORDER REPLACEMENT LAMP
Replacement lamp can be ordered through your dealer. When ordering a projection lamp, give the following information to the dealer.
Model No. of your projector: PLC-WXU10N/ WXU10E/ WXU10B
Replacement Lamp Type No.: POA-LMP113 (Service Parts No. 610 336 0362)
Specifications
| Display Type | 3 panel 0.56 inch LCD projector |
| Resolution (Pixels) | 1280 x 800 (1,024,000 dot x 3) |
| Lens | Manual Zoom (1.2X) |
| Aspect Ratio | 16:10 (Default) |
| Screen Size | 26.7" - 302" |
| Lamp | 210W |
| Video Compatibility | NTSC3.58, NTSC4.43 PAL-60, PAL-M,N SECAM HDTV (480i/p, 576i/p, 720p, 1080i) |
| Input Source | D-Sub 15 pin, S-Video, Composite Video,YCbCr, DVI, RCA type x 2, RS232 |
| Output Source | D-Sub 15 pin |
| Scanning Frequency Horizontal Frequency Vertical Frequency | 15K - 80 KHz 50 - 85 Hz |
| Integrated Speaker | 1 x 2W |
| Storage Temperature | -20 - + 60°C |
| Operation Temperature | 0 - + 35°C |
| Power Requirement | AC 100 - 240V, 50 / 60 Hz |
| Power Consumption | 280W |
| Dimension (W x D x H) | 298 x 237 x 98mm |
| Weight | 3.2kg (7.0lb) |
- Design and Specifications are subject to change without prior notice.
- LCD panels are manufactured to the highest possible standards. Even though 99.99% of the pixels are effective, a tiny fraction of the pixels (0.01% or less) may be ineffective by the characteristics of the LCD panels.
Remote Control
| Batteries | AAA size batteries x 2 |
| Operating Range | 5m |
| Dimensions | 108 x 42 x 20mm |
| Net Weight | 40g (without batteries) |
Appendix
LED Indicator Messages
| Projector Status | LED Type | Meaning | |||
| Power LED | Lamp LED | ||||
| Color | Status | Color | Status | ||
| Standby | Green | Flashing | - | Off | The projector is powered and ready. |
| Lamp waiting | Green | On | - | Off | Preparing lamp ignition. |
| Lamp on | Green | On | Green | On | The lamp is in good condition. |
| Lamp ignition failure | Green | On | Red | Flashing | The lamp ignition failed at turning on. The lamp ignition failed during normal operation. |
| Fan lock | Amber | On | Green | On | Fan locked. The lamp will turn off. |
| Over Temperature | Green | On | Green / Amber | Flashing | Temperature is too high. The lamp will turn off and the fan will spend a while to cool the system. |
| Over temperature (Filter) | - | - | - | - | Temperature is too high. Please clean up the filter. OSD shows “Please clean up filter”. |
| Green | On | Green / Amber | Flashing | Temperature is too high. Please clean up the filter. System will power down and spend a while to cool the system. OSD shows “Warning! PJ temperature is too high.” | |
| Cooling | Green | On | Green | Flashing | Cooling the system. |
| Lamp Replacement | Green | On | Green / Red | Flashing | The lamp draws to an end. Please replace the lamp with a new one promptly. |
Optional Parts
The parts listed below are optionally available. When ordering those parts, give the item name and Model No. to the sales dealer.
- COMPONENT-VGA Cable : POA-CA-COMPVGA
RS232C cable : POA-MCSRL02
Compatibility Modes
Computer (COMPUTER IN / DVI-D IN terminal):
| Mode | Resolution | fH (kHz) | fV (Hz) |
| VGA mode 3 | 640 x 480 | 31.469 | 59.940 |
| VGA VESA 72 Hz | 37.861 | 72.809 | |
| VGA VESA 75 Hz | 37.500 | 75.000 | |
| VGA VESA 85 Hz | 43.269 | 85.008 | |
| SVGA VESA 56 Hz | 800 x 600 | 35.156 | 56.250 |
| SVGA VESA 60 Hz | 37.879 | 60.317 | |
| SVGA VESA 72 Hz | 48.077 | 72.188 | |
| SVGA VESA 75 Hz | 46.875 | 75.000 | |
| SVGA VESA 85 Hz | 53.674 | 85.061 | |
| XGA VESA 60 Hz | 1024 x 768 | 48.363 | 60.004 |
| XGA VESA 70 Hz | 56.476 | 70.069 | |
| XGA VESA 75 Hz | 60.023 | 75.029 | |
| XGA VESA 85 Hz | 68.677 | 84.997 | |
| SXGA VESA 70 Hz | 1152 x 864 | 63.995 | 70.016 |
| SXGA VESA 75 Hz | 67.500 | 75.000 | |
| SXGA VESA 85 Hz | 77.487 | 85.057 | |
| SXGA VESA 60 Hz | 1280 x 960 | 60.000 | 60.000 |
| SXGA VESA 75 Hz | 75.000 | 75.000 | |
| SXGA VESA 60 Hz | 1280 x 1024 | 63.981 | 60.020 |
| WXGA VESA 60Hz | 1280 x 768 | 47.776 | 59.870 |
| WXGA VESA 75Hz | 60.289 | 74.893 | |
| WXGA VESA 85Hz | 68.633 | 84.837 | |
| WXGA VESA 60Hz | 1280 x 800 | 49.306 | 59.910 |
| WXGA VESA 60Hz | 49.702 | 59.810 | |
| WXGA VESA 75Hz | 62.795 | 74.934 | |
| WXGA VESA 85Hz | 71.554 | 84.880 |
Video (COMPONENT terminal)
| Signals | Horizontal Frequency (kHz) | Vertical Frequency (Hz) |
| 480i | 15.8 | 60 |
| 480p | 31.5 | 60 |
| 576i | 15.6 | 50 |
| 576p | 31.3 | 50 |
| 720p | 45.0 | 60 |
| 1080i | 33.8 | 60 |
| 1080i | 28.1 | 50 |
Troubleshooting
Refer to the symptoms and measures listed below before sending the projector for repairs. If the problem persists, contact your local reseller or service center.
Please refer to "LED Indicator Messages" (p.36) as well.
| Symptom | Cause | Solution |
| No power. | The AC power cord is not plugged in. | Plug in the AC power cord. |
| The AC power cord is not connected to the projector. | Connect the AC power cord to the projector correctly. | |
| The lamp cover is loose. | Tighten the screw on the lamp cover. | |
| Power goes out during use. | The temperature is too high. | Unplug the AC power cord and wait for a short while, then turn the power back on. |
| The ventilation holes are blocked. | Place the projector so that the ventilation holes are not blocked. | |
| No image appears on screen. | The projector is not turned on. | Turn the projector on. |
| The connections setup is not correctly. | Check that all connections are setup correctly. | |
| The connected devices are not functioning properly. | Check that all connected devices are functioning properly. | |
| Lens cap is not removed. | Remove the lens cap and turn the projector on. | |
| “NO SHOW” function is activated. | Cancel “NO SHOW” function. (p. 14) | |
| Partial, scrolling or incorrectly displayed image. | The input signal is not supported by the projector. | Press remote control's “AUTO PC” button. (p. 12, 14, 27) |
| Image is unstable or flickering. | The signal timing of the display does not synchronize with the graphic card. | Use “Fine Sync” to correct it. Refer to Picture section. (p. 12, 14, 24) Change the monitor color setting from your computer. |
| Image has vertical flickering bar. | The display data frequency does not match the frequency of your computer's graphic card. | Use “Total Dots” to make an adjustment. Refer to Picture section. (p. 12, 14, 24) Check and reconfigure the display mode of your graphic card to make it compatible with the product. |
| Image is out of focus. | The lens focus is not adjusted optimally. | Adjust the focus with the focus ring. (p. 20) Place the projector within the supported range. |
| Remote control doesn't work. | The batteries could be weak. | Replace with a new set of batteries. (p. 15) |
| The polarity is not correct. | Install the batteries with correct polarities. (p. 15) | |
| The remote control is not being used within the effective range. | Use the remote control within the effective range. (p. 16) | |
| There are some obstructions between the remote control and projector. | Check that there are no obstructions between the remote control and projector. | |
| There are some fluorescent or other bright lights shining at the projector's infrared remote sensor. | Check that there are not any fluorescent or other bright lights shining at the projector's infrared remote sensor. |
Serial Control Interface
This projector provides a function to control the projector's operations by using the RS-232C serial port.
Connection and Operation
1 Connect a RS-232C serial cross cable to RS-232C PORT on the projector and serial port on the PC.
2 Launch a communication software provided with PC and setup the communication condition as follows:
3 Send the command strings by the HEX key (HEX is in the range of 0-9 and a-f) for controlling the projector.
| Baud rate : 19200 bps Parity check : none Stop bit : 1 Flow control : none Data bit : 8 |
Command Format
The command is sent from PC to the projector with the format as below table. The projector decodes the command and returns the confirmation 'ACK' = '06'.
The below table shows the typical command lists for controlling the projector. Please consult your local dealer for further information of another commands.
| Command | Command Strings (HEX) | ||||||||||||
| Power ON | BE | EF | 10 | 05 | 00 | C6 | FF | 11 | 11 | 01 | 00 | 01 | 00 |
| Power OFF | BE | EF | 02 | 06 | 00 | 57 | D0 | 2E | 00 | 00 | 00 | 00 | 00 |
| Menu | BE | EF | 02 | 06 | 00 | C8 | D7 | 01 | 00 | 00 | 00 | 00 | 00 |
| ▲ UP | BE | EF | 02 | 06 | 00 | FB | D7 | 02 | 00 | 00 | 00 | 00 | 00 |
| ▼ DOWN | BE | EF | 02 | 06 | 00 | 2A | D6 | 03 | 00 | 00 | 00 | 00 | 00 |
| Left | BE | EF | 02 | 06 | 00 | 9D | D7 | 04 | 00 | 00 | 00 | 00 | 00 |
| Right | BE | EF | 02 | 06 | 00 | 4C | D6 | 05 | 00 | 00 | 00 | 00 | 00 |
| Input | BE | EF | 02 | 06 | 00 | 7F | D6 | 06 | 00 | 00 | 00 | 00 | 00 |
| Auto PC Adj. | BE | EF | 02 | 06 | 00 | 58 | D5 | 11 | 00 | 00 | 00 | 00 | 00 |
| Mute | BE | EF | 02 | 06 | 00 | 51 | D7 | 08 | 00 | 00 | 00 | 00 | 00 |
| Keystone UP | BE | EF | 02 | 06 | 00 | E0 | D1 | 29 | 00 | 00 | 00 | 00 | 00 |
| Keystone DOWN | BE | EF | 02 | 06 | 00 | D3 | D1 | 2A | 00 | 00 | 00 | 00 | 00 |
| Volume UP | BE | EF | 02 | 06 | 00 | 62 | D7 | 0B | 00 | 00 | 00 | 00 | 00 |
| Volume DOWN | BE | EF | 02 | 06 | 00 | D5 | D6 | 0C | 00 | 00 | 00 | 00 | 00 |
| NO Show | BE | EF | 02 | 06 | 00 | CE | D0 | 27 | 00 | 00 | 00 | 00 | 00 |
| Freeze | BE | EF | 02 | 06 | 00 | 02 | D0 | 2B | 00 | 00 | 00 | 00 | 00 |
| Aspect | BE | EF | 02 | 06 | 00 | 31 | D0 | 28 | 00 | 00 | 00 | 00 | 00 |
| Select Computer (Analog) | BE | EF | 02 | 06 | 00 | OB | D2 | 32 | 00 | 00 | 00 | 00 | 00 |
| Select Component | BE | EF | 02 | 06 | 00 | DA | D3 | 33 | 00 | 00 | 00 | 00 | 00 |
| Select S-Video | BE | EF | 02 | 06 | 00 | 6D | D2 | 34 | 00 | 00 | 00 | 00 | 00 |
| Select Video | BE | EF | 02 | 06 | 00 | BC | D3 | 35 | 00 | 00 | 00 | 00 | 00 |
| Select Computer (Digital) | BE | EF | 02 | 06 | 00 | 8F | D3 | 36 | 00 | 00 | 00 | 00 | 00 |