L18MOV13 - Oven Logik - Free user manual and instructions
Find the device manual for free L18MOV13 Logik in PDF.


| Product Type | Built-in Electric Oven |
| Brand | Logik |
| Model | L18MOV13 |
| Colour | Stainless Steel |
| Capacity | 65 Litres |
| Dimensions (W x H x D) | 595 x 595 x 545 mm |
| Weight | 30 kg |
| Power Supply | 230 V ~ 50 Hz |
| Power Rating | 2.8 kW |
| Energy Efficiency Class | A |
| Number of Functions | 8 (including conventional, fan, grill) |
| Temperature Range | 50 u00b0C to 250 u00b0C |
| Control Type | Knobs and Digital Display |
| Timer | Yes, programmable |
| Cleaning | Easy-clean enamel interior |
| Safety Features | Child lock, automatic shut-off |
| Door | Double glazed, cool touch handle |
| Interior Light | Yes |
| Accessories Included | Baking tray, wire shelf |
| Warranty | 2 years |
Frequently Asked Questions - L18MOV13 Logik
User questions about L18MOV13 Logik
0 question about this device. Answer the ones you know or ask your own.
Ask a new question about this device
Download the instructions for your Oven in PDF format for free! Find your manual L18MOV13 - Logik and take your electronic device back in hand. On this page are published all the documents necessary for the use of your device. L18MOV13 by Logik.
USER MANUAL L18MOV13 Logik
natural_image
Black LOGIK portable microwave oven with control knobs and open lid (no visible text or symbols on main body)Contents 2
Safety Warnings....3
Unpacking....6
Product Overview....7
First Time Use....7
Control Panel 8
Thermostat Control....8
Function Selector Control....8
Indicator Light....8
Timer Control 8
Operation & Summary Table....9
General Tips 9
Toast 10
Tips for good toasting:....10
Specifications....11
- Read all the instructions carefully before using the appliance and keep them for future reference.
- Retain the manual. If you pass the appliance onto a third party make sure to include this manual.
- Check that the voltage marked on the rating label matches your mains voltage.
Damage
- Please inspect the appliance for damage after unpacking.
- Do not continue to operate the appliance if you are in any doubt about it working normally, or if it is damaged in any way - switch off, unplug from the mains socket and consult your dealer.
Location
- The appliance must be placed on a flat stable surface and not subjected to vibrations.
- Do not place the appliance on sloped or unstable surfaces as the appliance may fall off or tip over.
- The mains socket must be located near the appliance and should be easily accessible.
- This appliance is intended for indoor household use and similar applications such as:
– farm houses and by clients in hotels, motels and other residential type environments;
— bed and breakfast type environments;
– catering and similar non-retail applications.
Temperature
- Avoid extreme degrees of temperature, either hot or cold. Place the appliance well away from heat sources such as radiators or gas / electric fires.
- Avoid exposure to direct sunlight and other sources of heat.
- Do not touch hot surfaces. The temperature of accessible surfaces may be very high when the appliance is in use. Use the detachable handle to remove the grill rack / baking pan from the oven. Allow the oven to fully cool down before moving or cleaning it.
Naked Flames
- Never place any type of candle or naked flame on the top of or near the appliance.
Moisture
- To reduce the risk of fire, electric shock or product damage, do not expose this appliance to rain, moisture, dripping or splashing. No objects filled with liquids, such as vases, should be placed on the appliance.
- If you spill any liquid into the appliance, it can cause serious damage. Switch it off at the mains immediately. Withdraw the mains plug and consult your dealer.
Ventilation
- To prevent the risk of electric shock or fire hazard due to overheating, ensure that curtains and other materials do not obstruct the ventilation vents.
- A minimum distance of 5cm around the appliance should be maintained to allow for sufficient ventilation.
- Do not install or place this appliance in a bookcase, built-in cabinet or in another confined space. Ensure the appliance is well ventilated.
Safety
- The appliance is not intended to be operated by means of an external timer or separate remote-control system.
- Always disconnect the appliance from the mains supply before moving the appliance.
- In the interests of safety and to avoid unnecessary energy consumption, never leave the appliance unattended for long periods of time, e.g. overnight, while on holiday or while out of the house. Disconnect the mains plug from the mains socket.
- Bread may burn. Your appliance must not be used near or below curtains or other combustible materials. It must be watched when in use.
- Only place toast bread in your appliance. Do not attempt to toast any pastry or bread product which is filled with a fruit or sugary filling (pop tarts etc). The stuffings may leak and cause damage to your appliance or cause a fire risk.
- Oversized food, metal foil packages or utensils must not be inserted in the appliance as they may cause fire or electric shock.
- Don't attempt to dislodge food while the appliance is in use.
• Take the bread out carefully after toasting to avoid injury. - Do not use the appliance for uses other than its intended use.
- During use the appliance becomes hot. Care should be taken to avoid touching the heating elements inside the oven.
- Accessible parts may become hot during use. Young children should be kept away from the appliance.
Mains Cable
- Make sure the appliance is not resting on top of the mains cable, as the weight of the appliance may damage the mains cable and create a safety hazard.
- Do not let the mains cable overhang the edge of the work surface or allow it to touch hot surfaces or sources of heat or flame.
- If the mains cable is damaged it must be replaced by the manufacturer, its service agent, or similarly qualified persons in order to avoid a hazard.
- Keep the appliance and its cord out of reach of children less than 8 years old.
Supervision
- This appliance can be used by children aged from 8 years and above and persons with reduced physical, sensory or mental capabilities or lack of experience and knowledge if they have been given supervision or instruction concerning use of the appliance in a safe way and understand the hazards involved. Children shall not play with the appliance. Cleaning and user maintenance shall not be made by children without supervision.
- Children should be supervised to ensure that they do not play with the appliance.
- Never let anyone especially children push anything into the holes, slots or any other openings in the case – this could result in a fatal electric shock.
Service
- To reduce the risk of electric shock, do not remove screws. The appliance does not contain any user-serviceable parts. Please leave all maintenance work to qualified personnel.
- Do not open any fixed covers as this may expose dangerous voltages.
Maintenance
- Ensure the appliance in fully unplugged and far away from the mains socket before cleaning.
- Allow the appliance to cool completely before cleaning or storing.
- Do not use any type of abrasive pad or abrasive cleaning solutions as these may damage the appliance's surface.
- Do not use harsh abrasive cleaners or sharp metal scrapers to clean the glass door as they can scratch the surface which may result in the glass shattering.
- Do not use steam cleaning to clean the appliance.
Thank you for purchasing your new Logik Mini Oven.
We recommend that you spend some time reading this instruction manual in order that you fully understand all the operational features it offers. You will also find some hints and tips to help you resolve any issues. Read all the safety instructions carefully before use and keep this instruction manual for future reference.

Unpacking
Remove all items from the packaging. Retain the packaging. If you dispose of it please do so according to local regulations.
The following items are included:
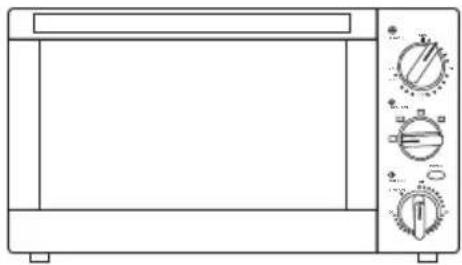
natural_image
Line drawing of a microwave oven with control knobs and a blank front panel (no text or symbols)Main Unit
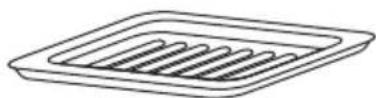
Baking Tray
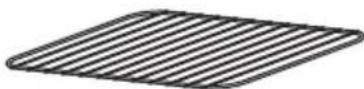
Baking Rack
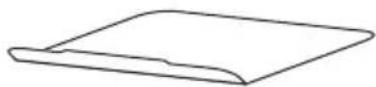
Crumb Tray
Instruction Manual x 1

If items are missing, or damaged please contact Partmaster (UK only). Tel: 0844 800 3456 for assistance.
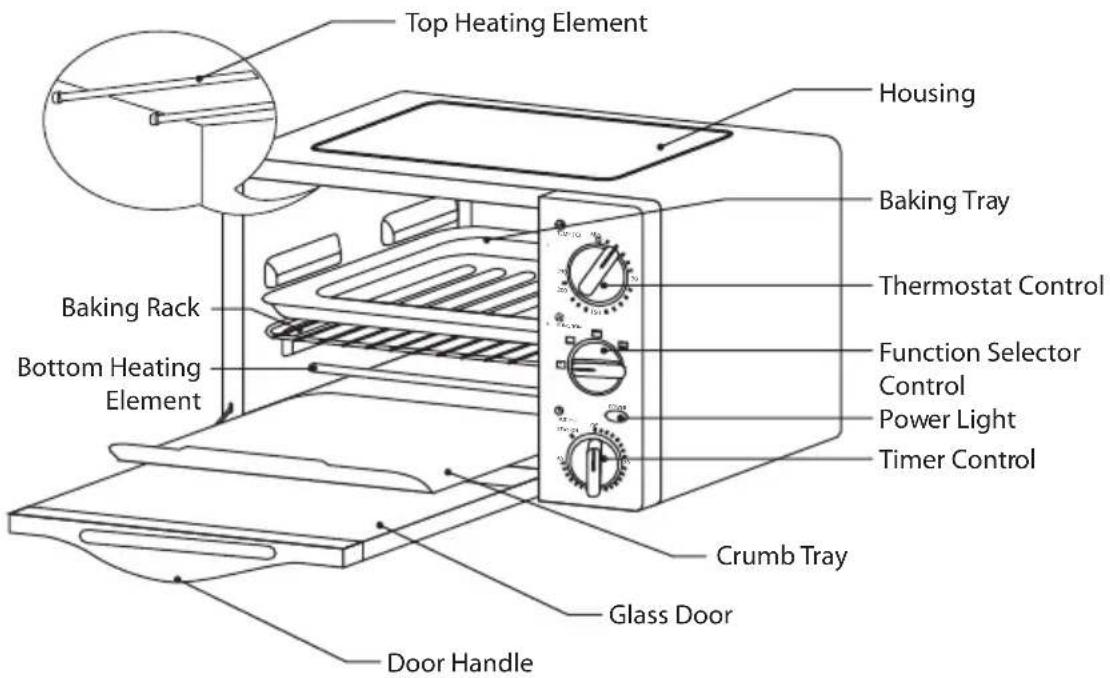

First Time Use
Unpack the oven and place it on a horizontal surface. Remove any packaging, cards or plastic bags. Use a damp cloth to carefully wipe the inner cavity wall and housing. Clean all the detachable parts in hot, soapy water before using.
-
Heat the oven at 230^ C on ☐ for 15 minutes. There may be a little smoke and odour upon initial start up (for about 15 mins). This is normal. This is due to the protective substance on the heating elements which protects them from the effects of corrosion during shipping from the factory.
-
For the best cooking results, the smallest distance allowed between the food and the upper heating element is 30 mm.
-
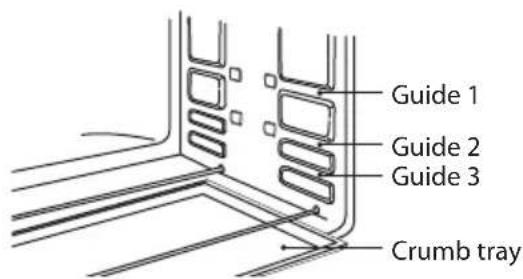
On the wall of the inner cavity there are 3 different rack guide slots. You can place the rack at different heights to achieve the best cooking performance depending on the heat of the heating elements and the size of the food. If only the upper heating element is on, we suggest that you place the rack on guide 1 (make sure that there is a minimum distance of 30 ~mm between the food and the upper heating element).
-
Always monitor the food during operation to ensure that you are not overcooking it.
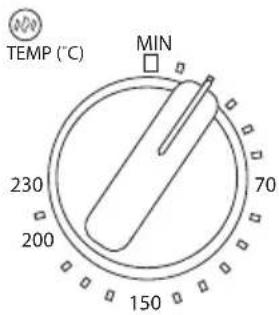
Thermostat Control
The temperature can be set from 70^ C - 230^ C. Turn the dial to select the desired temperature.
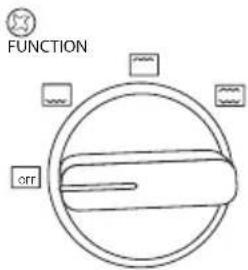
Function Selector Control
This control is used to select the cooking functions available:
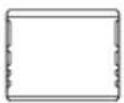 | Off Off(Both the top and bottom heating elements are off) |
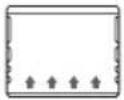 | BAKE(Only the bottom heating element is on) |
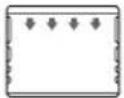 | BROIL(Only the top heating element is on) |
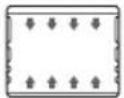 | TOAST(Both the top and bottom heating elements are on. This is perfect for baking pizza, bread and cookies and roasting pork and steak) |
Indicator Light
When the oven is in use, the power light will light up.
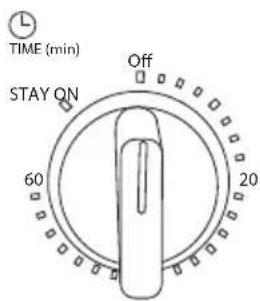
Timer Control
- The oven will not turn on without the timer being set.
- Turn the timer control to set the operation time (Max 60 mins, or stay on).
- The power LED lights up when the timer is in any position except "Off".
• To set the timer, turn the knob clockwise to the desired time. - When the timer reaches the "Off" position, the oven turns off and dings. The power supply will be cut off automatically.
- The timer can be adjusted during the cooking cycle.

- Bread may catch fire if the toasting time is too long.
- Close supervision is necessary during toasting.
| Function selector control position | Baking rack and baking tray position | Notes / Tips | |
 | Bake | 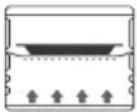 | Place the food on the baking tray and use the baking rack insert into guide 1. Ideal for grilling meat, fish and vegetables. |
 | Broil | 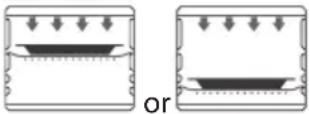 | Use the grill rack or baking tray inserted in guide 2 or 3. Ideal for cooking stuffed vegetables, fish, plum cakes and small poultry. |
 | Toast | 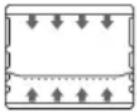 | Place the food on the grill rack inserted in guide 2. Ideal for toasting slices of bread. Toast for a max. 7 mins. |
* Always use oven mitts to remove cooked dishes from the oven. They will be hot.

General Tips
- Place the grill rack in the rack guide that will accommodate the height of the food to be cooked.
- Set the food on the grill rack. Make sure that you always use an ovenproof container in the oven, never use plastic or cardboard containers in the oven.
- Never use glass or ceramic pans or lids.
- Do not let juices run to the bottom of the oven. Use the baking pan and crumb tray when cooking.
- Set the temperature as suggested by the recipe or as desired.
- Securely shut the door and set the cooking time to begin using the oven.
- When cooking with the convection oven, traditional oven and grilling, always preheat the oven for 5 minutes to set the temperature.
- The cooking times depend on the quality of the food products, the temperature of the food and on your own personal tastes. The times indicated in the table are subject to variation, and do not include the time required to preheat the oven.
• To cook frozen foods refer to the recommended times on the food product packaging. - Do not place food on only one side of the grill rack / baking pan. Make sure food is distributed evenly on the grill rack / baking pan.
- The rear surface of appliance shall be placed against a wall.

The maximum weight of food on the grill rack/baking pan is max 2.0kg.
Toast
Use the ☐past function for foods such as corn, bread, cookies and heating food. The following is a bread slices placement guide only.
- The dimensions of the grill rack allows for four slices of bread to be toasted at the same time.
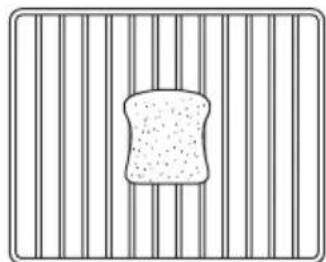
• To automatically toast frozen bread, sandwiches, muffins and waffles, always use the grill rack. - When toasting the bread, place the slices as shown below:
natural_image
Simple line drawing of a bread loaf with flour, placed on vertical slats (no text or symbols)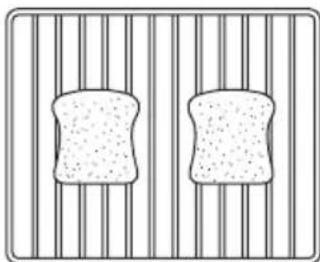
natural_image
Simple line drawing of two bread slices inside a cage (no text or symbols)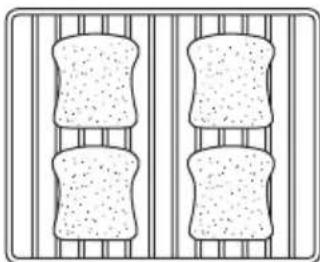
natural_image
Simple line drawing of two bread rolls on a conveyor belt (no text or symbols)Toasting one slice Toasting two slices Toasting four slices
- Place the grill rack in guide 2.
- Place the bread to be toasted in the centre of the grill rack. Close the door.
- Turn the function selector control to the ☐.
- Rotate the thermostat control clockwise to the desired temperature.
- Toast for the desired length of time.
- Check food temperatures before removing from the oven to ensure the food is thoroughly cooked.
- Always remove food with oven mitts. Food and oven are very hot.
Tips for good toasting:
- For consecutive uses, reduce the set toasting time.
- Larger pieces of bread and frozen bread take longer to toast. Just one slice of bread requires a lower setting than four slices.

- If lighter toasting is preferred, simply stop the automatic cycle by turning the Timer control to the "Off" position to switch the oven off.
- For darker toasting re-start the cycle by turning the timer control clockwise
- until reaching the desired level. Then manually turn the thermostat control and the toast timer control off, as described previously.
- The best positions for each type of bread can be identified when using the oven regularly.
and bad odours during cooking. Do not let fat accumulate inside the appliance.
Before any maintenance or cleaning, unplug the oven and wait for it to fully cool down.
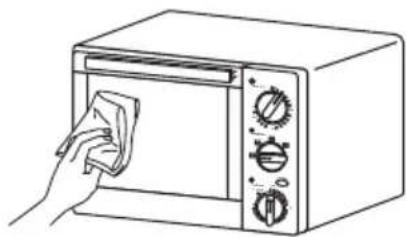
Clean the door, the inside walls and the enamel or painted surfaces of the oven with soap and water solution and then dry thoroughly.
When cleaning the surfaces on the inside of the oven, never use products that corrode aluminium (e.g., detergents in spray cans) and never scrape the walls with sharp objects to avoid damage to the non-stick coating.
Always use a damp sponge to clean the outside surface of the oven. Avoid using abrasive products that may damage the exterior surface.
Make sure water or liquid soap does not seep into the vents on the top of the oven.
Never immerse the appliance in water and never wash it under a jet of water.
All the accessories can be washed like normal dishes, either by hand or in the dishwasher.
Slide the crumb tray out from under the bottom of your oven. Wash by hand. Rinse the crumb tray with hot soapy water and if necessary, scour it delicately, without scratching it.
natural_image
Line drawing of a hand cleaning a microwave oven with a cloth (no text or symbols)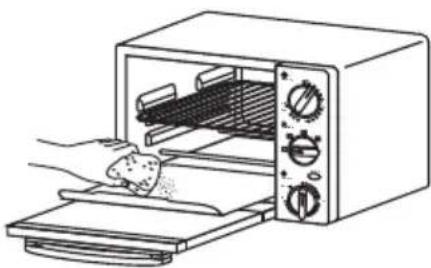
natural_image
Line drawing of a microwave oven with a hand placing food into the oven (no text or symbols)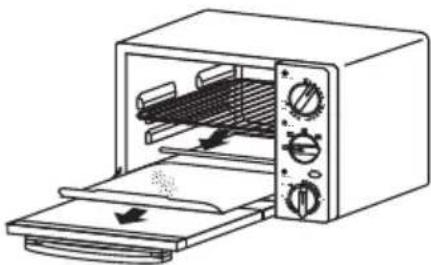
natural_image
Line drawing of a microwave oven with open lid and side panels (no text or symbols)
Specifications
| Model L18MOV13 | |
| Power Consumption 220-240V ~50Hz | |
| Output 1300W | |
| Electric Oven Capacity 18 Litres | |
Features and specifications are subject to change without prior notice.

For general information about this appliance and handy hints and tips, please visit
www.knowhow.com/knowledgebank or call 0844 5611234.

Visit Partmaster.co.uk today for the easiest way to buy electrical spares and accessories. With over 1 million spares and accessories available we can deliver direct to your door the very next day. Visit
www.partmaster.co.uk or call 0844 800 3456 (UK customers only) Calls charged at National Rate.
This symbol on the product or in the instructions means that your electrical and electronic equipment should be disposed at the end of its life separately from your household waste. There are separate collection systems for recycling in the EU. For more information, please contact the local authority or your retailer where you purchased the product.
DSG Retail Ltd. (co. no. 504877)
Maylands Avenue, Hemel Hempstead, Herts., HP2 7TG, UK
- Damage
- Location
- Temperature
- Naked Flames
- Moisture
- Ventilation
- Safety
- Mains Cable
- Supervision
- Service
- Maintenance
- Thank you for purchasing your new Logik Mini Oven.
- Unpacking
- First Time Use
- Thermostat Control
- Function Selector Control
- Indicator Light
- Timer Control
- General Tips
- Toast
- Tips for good toasting:
- Specifications
Brand : Logik
Model : L18MOV13
Category : Oven