
AP33 - Air purifier WHIRLPOOL - Free user manual and instructions
Find the device manual for free AP33 WHIRLPOOL in PDF.


| Product Type | Air Purifier |
| Brand | Whirlpool |
| Model | AP33 |
| Dimensions (HxWxD) | 60 x 40 x 20 cm |
| Weight | 5.0 kg |
| Power Supply | 110-240 V, 50/60 Hz |
| Power Consumption | 50 W |
| Filter Type | HEPA H13 + Activated Carbon |
| CADR (Smoke/Pollen/Dust) | 200 m³/h |
| Coverage Area | Up to 25 m² |
| Noise Level | 25 - 50 dB |
| Timer | 1 - 8 hours |
| Fan Speeds | 3 (Low, Medium, High) |
| Auto Mode | Yes |
| Sleep Mode | Yes |
| Air Quality Indicator | LED Ring (Blue/Green/Red) |
| Filter Replacement Indicator | Yes |
| Display | Touch Panel |
| Remote Control | No |
| Energy Star Certified | Yes |
| Warranty | 2 years |
Frequently Asked Questions - AP33 WHIRLPOOL
User questions about AP33 WHIRLPOOL
0 question about this device. Answer the ones you know or ask your own.
Ask a new question about this device
Download the instructions for your Air purifier in PDF format for free! Find your manual AP33 - WHIRLPOOL and take your electronic device back in hand. On this page are published all the documents necessary for the use of your device. AP33 by WHIRLPOOL.
USER MANUAL AP33 WHIRLPOOL
Before operating the unit, please read this manual thoroughly, and retain for future reference.
Various symbols are used throughout this manual and on the product to alert you to measures for safe use.
These symbols are shown below as prohibited or recommended.
Please read this section carefully and follow all instructions.
Yoursafetyandthesafetyofothersareveryimportant
We have shown a number of important safety tips in this manual and on your appliance. Always read and observe these safety tips.

This is the safety alert symbol.
This alerts you to potential hazards that could kill or injure you or others.
These safety tips follow the safety alert symbol and the word 'danger' or 'warning.'
The meaning of these words is:
! DANGER
Dangerofdeathorseriousinjuryify you don't immediately follow these instructions.
WARNING
Dangerofdeathorseriousinjuryifyoudon't followtheseinstructions.
All safety tips inform you what the potential hazard is, how to minimise the chance of injury, and what may happen if the instructions are not followed.
Important safety instructions
WARNING: Toreducetheriskoffireorelectricalshock, donotusetheunit with asolid-statespeedcontrol device.
WARNING: Toreduceriskoffire, electricshock and personal injury, donot installing awindow.
Unplugtheunitbeforeservicing.
Readandkeeptheseinstructions.
WARNING

Dangerofelectricshock
Plugintoanearthed3-pinoutlet.
Donotremoveearthpin.
Donotuseanadapter.
Donotuseanextension.
Failuretofollowtheseinstructionscouldresultin death,fireorelectricshock.
In order to prevent damage to property or persons, be sure to observe the following warnings.

Actions prohibited

Actions Recommended
WARNING
Only qualified personnel are to repair this machine.  | Unplug before cleaning, inspecting or moving the unit. R |
Do not touch the mains plug or operate with wet hands.  | Do not use mains voltage other than that specified. Do not exceed the voltage specified for the mains and the wiring. X |
Do not operate with damaged power cord or plug or loose electrical outlet.  | Do not leave the unit unattended during operation. R |
Do not damage, cut, expose to heat, bend, twist, pull, press or twist the cable.  | Periodically remove dust and dirt from the power plug. R |
Do not expose to water.  | Do not insert any foreign objects into the air inlet or outlet. X |
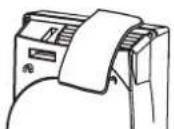
Do not expose to naked flame, such as cigarette: 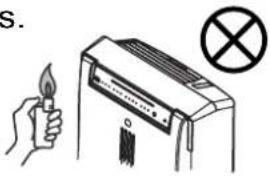 | Do not cover the air inlet or outlet.  |
 | |
Do not clean with petrol or thinner or apply in  | Do not use in the vicinity of flammable or corrosive gases  or metal dust. or metal dust. |
WARNING
Do not use in wet places such as the bathroom.


Do not operate in the vicinity of smoke-producing insecticide machines.

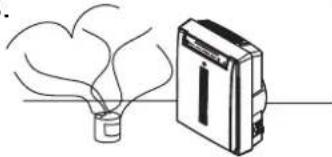
This unit cannot eliminate carbon monoxide. So if a fire is lit in the same room, ensur proper ventilation.

Do not place near fish tanks, vases or water containers.

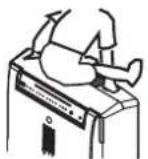
Do not sit on the unit.

Detergent must not be used.

Install at least 1 meter from lighting.

Do not mount high on wall or shelf.

Do not expose to sunlight or heat.

Do not expose to oily vapours.
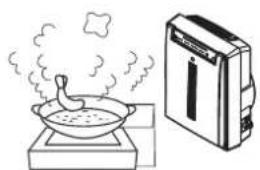

Do not use in an unstable position, where unit may tip or fall over.


Always grip the mains plug when unplugging.


WARNING
| Position at least 2 meters away from television, radio or similar. | The machine must not be allowed to ingest dehumidifier steam.  |
 | |
To move, unplug the unit, grip it by the handhold on the back or hold underneath.  | Keep the remote in a safe place out of the reach of children. It contains small parts that may cause choking.  |
| If the power cable is damaged, it must be replaced by the manufacturer, their service agent or other qualified technicians in order to prevent hazards. |
Parts and Terms
Front Back

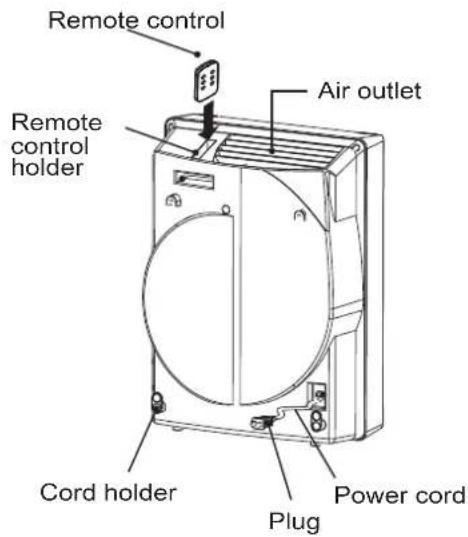
■Filters ■Accessories
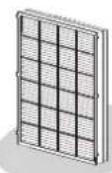
Filter
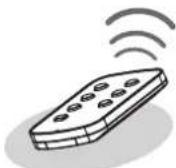
Remote
Please remove the transparent sheet when using.
![graph LR A["Grid Panel"] --> B["Stage ①"] B --> C["Stage ②"] C --> D["Stage ③"] D --> E["Final Box"]](/content/2026/05/966489/images/7f8754012880b207d672761320a0926f40a22adeeeeee3bebee04ce7a26a7ad9.jpg)
Can Clean Pre-filter
(Do not need to be changed)
To remove rough particles like hairs and visible dust.
①Nano-silver filter suppresses germ activity.
②HEPA filter
* HEPA (High Efficiency Particulate Air);
removes 99.97% airborne particles. (at 0.3 micron)
③NS deodorizing filter
* eliminates animal and food smells.
* Eliminates unpleasant smells.
Uses UV light to catch germs, microbes and bacilli and curb viruses.
3-in-1 Filter
Charcoal Filter
Photocatalyst filter (Do not need to be changed)
Preparation Before Using
※Before using be sure to remove the 3-in-1 filter from its bag
Unplug the unit before installing the filter
1. Removing the 3-in-1 filter
* Place the unit in a stable location.
- To remove front coverDepress the finger pieces at bottom of cover to release it, then pull to remove.
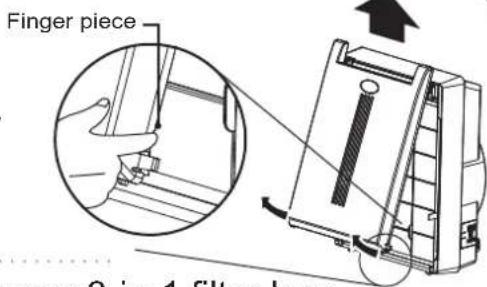
- Removing the pre-filter Detach the 6 claws on both sides from holes in main unit.

- Remove 3-in-1 filter bag.
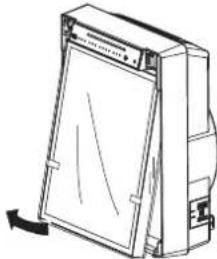
2. Installing the 3-in-1 filter
- Position with front facing outwards. Do not reverse or deform it.
- Installing the pre-filter. Insert the claws on both sides into holes in main unit.
- Installing the front cover. Hook both sides to top of front cover on to main body, then fasten the hooks on bottom.
* The unit does not operate without its front cover.
3. Instructions for use of 3-in-in Filter with Charcoal Filter
* Please remove the plastic of the filter before use.
* You can choose whether use the 3-in-1 Filter only or together with the Charcoal Filter.
3

if you wish to use 3-in-1 Filter with the Charcoal Filter, please stick the 4 single-sided viscose tapes to the 4 corners at the back of 3-in-1 filter.
1
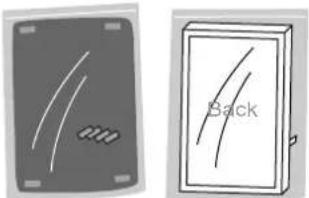
4
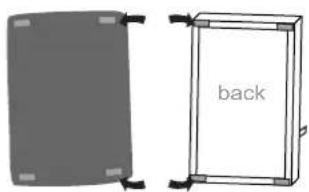
After adhering, stick the 3-in-1 filter with Charcoal Filter.
②

In Charcoal Filter package, there is filter with single-sided viscose tapes at the 4 corners and 4 separate single-sided viscose tapes.
5

After assembling, you can install the filter into the main unit.
Installing remote control battery
Remove the transparent sheet protecting battery power.
The battery is pre-installed in the remote control.
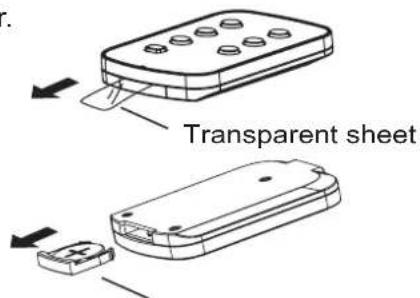
Battery + pole must align with mark on holder
Replacing battery
- Remove battery holder from back of remote.
- Insert new battery correct side up.
- Replace cover.
About the battery
One CR2032 battery is required
■ Battery lifetime is about six months. It needs changing when remote signal fails.
As the battery will have been in stock for some time, its life may be less for first use.
■ Incorrect handling of battery may cause electric shock, fire, fluid leakage, heat or explosion.
Do not short-circuit, disassemble, heat it or burn it.
Remove when not in use for long periods.
Using the remote control
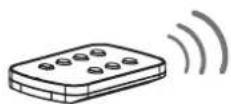
Aim the remote at the main unit.
■ Signal range is about 5 metres (directly ahead).
■ Ensure there is no obstacle obstructing the signal.
■ Signal is sent when key is released.
■ Unit beeps when signal is received.
If there is a light in the way, range may be shorter.

To prevent damage:
Do not jolt.
■ Do not immerse in water.
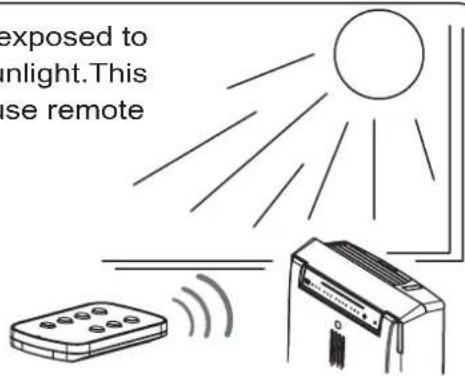
■ Do not place near heat or expose to direct sunlight.
Can be put on the floor or the desk.
Do not use the remote control in the following places
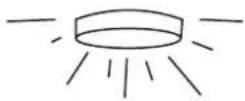
Rooms with fluorescent light, especially inverter typeThis
may cause remote failure. Keep away from the light or try a different direction.

Rooms exposed to direct sunlight. This may cause remote failure.
Installation hints
Set the unit in line with air quality required.
* In rooms with small dust and smells such as smoke - install over 1m above floor.
* In rooms with larger dust, such as pollen - install near floor.
Keep more than 1 metre from television and radio to prevent interference.

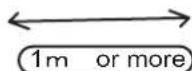

Avoid places with wind blowing on the sensor. This may cause malfunction.

Dust sensor is on bottom right. Keep away from walls and furniture.
Leave at least 10 cm from walls
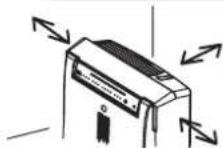
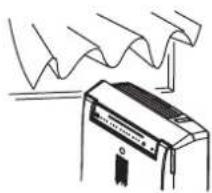
Do not place near curtains, which may be soiled or cause malfunction.
Choose a well-ventilated place. Air conditioning, as
pictured at right, improves ventilation and enhances dust sensor performance.
![graph TD A["Window"] --> B["Conventional Ventilation"] B --> C["Conventional Air Condition"] C --> D["Conventional Air Condition"] D --> E["Conventional Air Condition"] E --> F["Conventional Air Condition"] F --> G["Conventional Air Condition"] G --> H["Conventional Air Condition"] H --> I["Conventi…](/content/2026/05/966489/images/28c04bbf4a4c81ccdd63985300aad4d041841a75adb2fa35986786a13e513476.jpg)
Avoid placing in the vicinity of smokers, since such fumes quickly disable the unit.

Panelandoperation
![graph TD A["Cleanness light"] --> B["Smells and dirt are shown in 3 levels"] B --> C["Clean"] B --> D["Green Green"] B --> E["Green Red"] B --> F["Dry"] B --> G["Red Red"] H["Power/mode key"] --> I["To turn on and off, select operating mode and change airflow."] J["Gas sensor"] --> K["Reset key"] K…](/content/2026/05/966489/images/3ab45231783c8c21310fb391b21d00e6fd812ae50404a5fae18b8ff9bd6f9663.jpg)
Following stable installation, insert the mains plug.
Operation by the main unit
![graph LR A["Filter"] --> B["R"] B --> C["Δ"] C --> D["C"] E["Timer"] --> F["1"] F --> G["4"] G --> H["8"] I["Speed"] --> J["..."] K["Mode"] --> L["6"<br>sense"] L --> M["AA"] L --> N["-ION"] O["Air Purity"] --> P["On/Off"]](/content/2026/05/966489/images/af6c2dffb3f1da859ad0769cc5d0dca32e1e740fd1063275c2648afdc69b32f0.jpg)
Press the power/mode key for automatic operation.
Sensors take about 30 seconds to start working.
Press the key again to change operation as follows:
![graph LR A["6^m AT least"] --> B["Anti Allergy(AA)"] B --> C["Lo(%)"] C --> D["boM/d(%)"] D --> E["( )"] E --> F["Stop"] F --> G["Automatic Manual"] G --> A](/content/2026/05/966489/images/6c1759c98c9245e81b4b1250bf69956ee1445ee304d8748f8d79f9cb82a3a2c9.jpg)
6th mode: sets airflow according to air quality. (does not switch to turbo operation)
Anti Allergy (AA) mode: alternates airflow automatically.
Manual mode: runs at selected airflow irrespective of air quality.
Main unit cannot set timer, negative ions or cleanness level light. Use remote.
If sensor detects clean air quality for 30 minutes consecutively, 'Low' airflow is set and the UV light extinguishes.
Sensor sensitivity switch
In auto mode the dust and gas sensors monitor air quality. These record quality in by the 3 stages of cleanness light and adjust airflow accordingly. (Unit operates at the higher of the two readings)
Since sensor sensitivity varies according to the condition of the room, adjust sensors as required between 'Lo' and 'Hi'
(Factory setting is 'Lo')
- Dust sensor
Detects airborne particles such as pollen, domestic dust, tick bodies and droppings and smoke.
Dust quantity differs from visible dust, so the cleanness level light indication may appear different from that expected.
Gas sensor
Detects airborne gases such as kitchen rubbish, toilet, pet and smoke smells. (May also react to rapid changes in temperature or humidity)
The sensor may react to, for example, makeup, but this does not cause failure of the unit.
Operation with remote control

① ON key
- Press to start automatic mode.
- When first switching on, you will find the cleanness level light flashes for 30 seconds before display appears.
- If the main unit is set to manual, press this key to change to automatic.
2 Anti ALLERGY (AA) key
- Press in automatic or manual mode to start pollen operation.
* The key must be pressed then released immediately.
3 SPEED key
- Press to switch airflow between 'Lo,' 'Mid,' 'Hi' and 'Turbo'.
![graph LR A["Lo ( )"] --> B["M"] B --> C["Hi ( Turbo ( )"] C --> A style A fill:#000,stroke:#fff,color:#fff style B fill:#000,stroke:#fff,color:#fff style C fill:#000,stroke:#fff,color:#fff linkStyle 0 stroke:#000,stroke-width:2px linkStyle 1 stroke:#000,stroke-width:2px linkStyle 2 stroke:#000,strok…](/content/2026/05/966489/images/2fbf19d10d77965145c31cb8a9636b0b1bf551185db00c07114bd4a9e2ea1c46.jpg)
- The selected airflow operates irrespective of air quality.
4 TIMER key
- Press to set the time when the machine is intended to stop. Choose between 1, 4 and 8 hours.
- Time changes each time key is pressed.
![graph LR A["1 hr"] --> B["h r4 h0 r a"] B --> C["c e l"] C --> D[" "]](/content/2026/05/966489/images/02f0fc3f74de8312757b22051fa52fb4c8c878a67642e71ff28ed9c9cdae48cf.jpg)
5 OFF key
- Press to stop the machine.
6 -ION key
- Switches negative ion generation on and off.
7 PURITY LIGHT
- switches cleanness level light on and off if necessary.
Maintenance
Cleaning the unit periodically maintains efficient operation. Proper cleaning function is disrupted by accumulation of dirt, so clean frequently.
※Unplug before cleaning.
■ Front cover (once a month)
- Unplug from the mains
-
Clean front cover
-
Clean air inlet with vacuum cleaner.
- Remove if dirty (see page 5, 6) and wash in cold water. Wipe with clean cloth and dry before replacing.
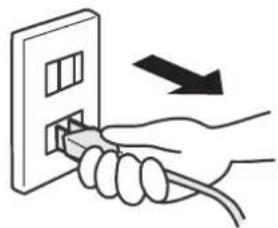
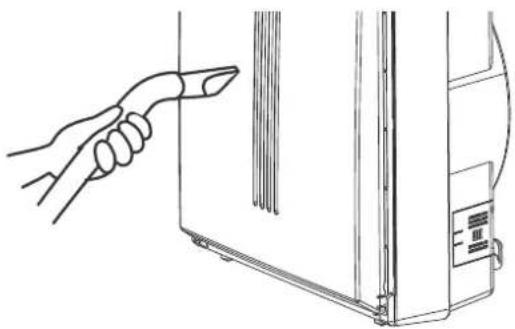
■Main unit
- Unplug from the mains.
- Wipe with soft cloth.
Note
Do not use abrasives, solvent or thinner, since they damage the unit surface.
Sensitivity becomes unstable if this is dirty or blocked.
Remove dust from sensor opening with vacuum cleaner.

■Dust sensor
- Remove sensor cover on right of unit.
①Push to release latch
② Pull in arrow direction
③ Pull forwards
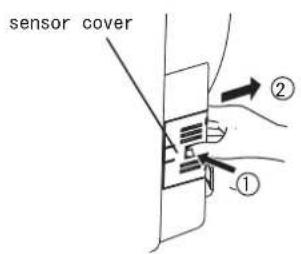
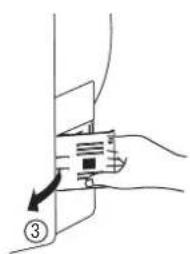
- Carefully use a swab to wipe the shiny surface of the lens.

- Replace sensor cover on unit
* Sensor may malfunction without cover.
Filter
- When cleaning light illuminates, clean the filter. If filter is not cleaned, light stays illuminated about one month, depending on conditions.

- Remove front cover
Grip finger pieces on lower front cover, pull to release hook and raise to remove front cover.
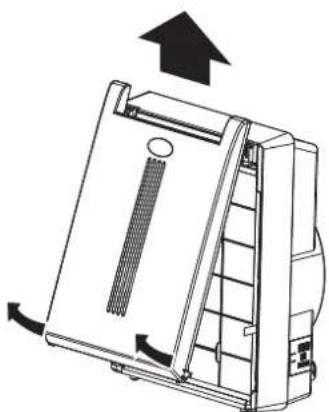
- Clean the pre-filter
Remove pre-filter from unit and clean with vacuum cleaner, or wash in cold water.
- Clean the 3-in-1 filter
Clean with vacuum cleaner without removing from unit.

Note
Do not apply pressure with vacuum cleaner, and do not damage the filter when washing.
- Install the pre-filter
Insert claws on both sides of pre-filter into holes on main unit. * Take care not to break the belts attached to the HEPA filter.
- Attach the front cover
Fit the top of front cover into top of main unit and push both sides in to lock lower hooks fully.

- If you plug in and switch on and find the cleaning light
illuminated, push the reset button with a pin. When you remove the pin, a sound is produced and the light extinguishes.
Do not push for over 5 seconds (otherwise this changes filter replacement period)
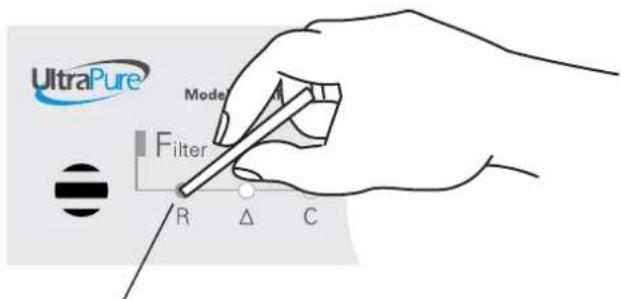
Filter reset button
Cleaning time varies with air quality, so periodic cleaning should be carried out.
FilterReplacement
■ Filter replacement time
When the filter is dirty, the light illuminates.
• Time until illumination depends on air quality.
- The state of filter is saved even when unit is unplugged or moved.
Conditions leading to shorter replacement period:
- Soot or the like is ingested.
- If used in busy places such as restaurants, games halls and beauty salons.
- If Turbo or High modes are frequently used.

Filter replacement light
Filter replacement
Step 1: Unplug the machine.
Step 2: Put on mask and gloves.
Step 3: Follow filter removal process on page 6.
Step 4: Place dirty filter in a sealed bag and discard.
Step 5: Discard gloves and mask.
Step 6: Wash hands with soap.
Afterwards the machine should be plugged in.
- Push filter reset button for more than 5 seconds until a sound is heard.
- Filter replacement light extinguishes.
* Remember to reset the filter reset button
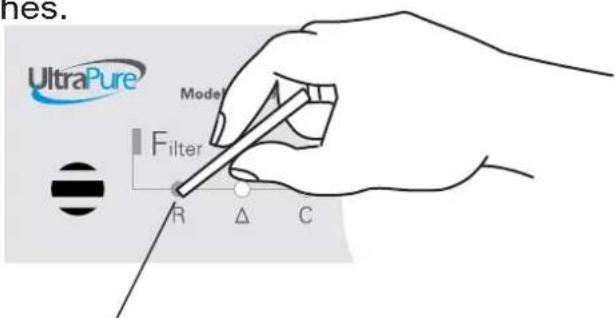
Filter reset button
Note
* If filter is mounted in reverse, the unit will not work. Also never reuse a dirty filter, otherwise dust stuck to it will be emitted.
* A dirty filter should not be reused even if washed. Not only is this ineffective, but it may cause malfunction.
Troubleshooting

Warning
Do not repair or disassemble without qualified assistance.
When this happens check
| The unit does not work | ·Is there a power failure (perhaps caused by fuse or circuit breaker)? ·Is it plugged in? ·Are filter and front cover securely fitted? |
| Unit does not remove smell or smoke | ·Has filter been removed from bag? ·Has 3-in-1 filter been installed backwards? ·Is filter dirty? ·Is air outlet covered? ·Is the room too large? (Perform manual Turbo operation) ·Do people smoke in the room often? ·Is UV light illuminated? (In case of light failure, please contact manufacturer) ·Operate the machine in a clean room for about eight hours to refresh photocatalyst filter. ·(If large amount of smell has been cleaned, the machine may temporarily be slow to eliminate smells) |
| It does not operate even to remove cigarette smoke | ·Is the unit in a place not allowing smells and cigarette smoke to be easily detected? ·Are gas and dust sensor openings closed or clogged? (clean them by referring to pages 11 and 12) ·Is sensor sensitivity set at 'Lo'? |
| Cleanness light shows dirty, though air seems clean | ·The sensor reacts to cosmetics, perfume, alcohol and insecticide spray. (Change sensitivity setting or room ventilation) ·When connecting to the mains, the cleanness light may show dirty at the beginning because the sensor is not ready. ·This will read normally once the air becomes cleaner. |
| Loud operation noise | ·Is unit set up in an unstable place? ·Is filter very dirty? |
| Remote control doesn't work | ·Is the battery dead? ·Has transparent tape been removed from battery? ·Is the battery wrongly installed? ·Is the unit placed too close to fluorescent lighting? |
When it happens check
| Cleaning light or replacement reminder light illuminates too soon | ·When using in a dirty place other than ordinary domestic situations the light might illuminate early.·Are Turbo and High used frequently? Even if room is clean, if operated on High or Turbo, light illuminates early |
| Foreign objects have entered the unit | ·Switch off and seek help from your service agent. |
| Water has been poured on the unit | ·Switch off and seek help from your service agent. |
* It is normal to notice a slight smell when using a new product.
This causes no physical damage to humans, and the smell will soon fade.
Checking an air purifier after many years of use.
The following are signs of ageing:
■ After switching on the unit, it doesn't operate, or stops intermittently.
■ After switching on the unit, it doesn't operate, or stops intermittently.
■ Fan rotation causes strange noises and vibration.
■ The unit is unusually hot or there is a smell of burning.
■ Other unusual signs.
Unplug and contact the manufacturer.
Specifications
When you connect to the mains, about 2W is required to prime the circuit.
| Voltage | 220-240V 50Hz |
| Current (Turbo/High/Medium/Low) | 100/40/30/20 W |
| Dimensions | 410W x 220D x 550H mm |
| Weight | 7.5 Kg |
components
- AP33 3-in-1 Filter
Model: APF003H
- AP33 Charcoal Filter
Model: APF002C
please indicate which item you require to Whirlpool spare parts department.
Tel: 24063861/24063862
Correct disposal of this product

This symbol indicates this product should not be disposed of with other domestic waste anywhere in the EU. To prevent possible damage to the environment or human health from uncontrolled waste disposal, help by recycling responsibly. To return your used unit, please take it to the place where it was purchased, and they will dispose of it safely.
安全注意事項
警告
濾網

遥控器
使用前請移除透明紙。
■濾網■配件

3. 移除3合1濾網的包裝袋

2. 把3合1濾網安回主機
面板及運作
![graph LR A["UltraPure Model No. AP33"] --> B["Filter"] B --> C["R"] B --> D["Δ"] B --> E["C"] F["Air Purity"] --> G["Speed"] G --> H["1"] G --> I["4"] G --> J["8"] K["On/Off"] --> L["Mode"] L --> M["6th sense"] L --> N["AA"] L --> O["-ION"]](/content/2026/05/966489/images/1a127c6568a26dc5b3e56502a5a6fd9ee8dca0bd157a7b50326d79a402928317.jpg)

■主機
3. 清洗前置濾網
請把前置濾網從主機中移除,
及使用吸塵機清洗前置濾網。
如前置濾網堆積塵垢,請使用冷水清洗。
4. 清潔3合1濾網
注意
濾網更換顯示燈
■建議的濾網更換過程
惠而浦星級情報站
Star Service Hotline 24069138
www.whirlpool.com.hk
- YOURSAFETYANDTHESAFETYOFOTHERSAREVERYIMPORTANT
- DANGER
- WARNING
- PARTS AND TERMS
- FILTERS ■ACCESSORIES
- PREPARATION BEFORE USING
- UNPLUG THE UNIT BEFORE INSTALLING THE FILTER
- REMOVING THE 3-IN-1 FILTER
- INSTALLING THE 3-IN-1 FILTER
- INSTRUCTIONS FOR USE OF 3-IN-IN FILTER WITH CHARCOAL FILTER
- INSTALLING REMOTE CONTROL BATTERY
- REPLACING BATTERY
- ABOUT THE BATTERY
- USING THE REMOTE CONTROL
- DO NOT USE THE REMOTE CONTROL IN THE FOLLOWING PLACES
- INSTALLATION HINTS
- SET THE UNIT IN LINE WITH AIR QUALITY REQUIRED
- PANELANDOPERATION
- OPERATION BY THE MAIN UNIT
- SENSOR SENSITIVITY SWITCH
- OPERATION WITH REMOTE CONTROL
- ① ON KEY
- 2 ANTI ALLERGY (AA) KEY
- 3 SPEED KEY
- 4 TIMER KEY
- 5 OFF KEY
- 6 -ION KEY
- 7 PURITY LIGHT
- MAINTENANCE
- FRONT COVER (ONCE A MONTH)
- MAIN UNIT
- NOTE
- DUST SENSOR
- FILTER
- FILTERREPLACEMENT
- FILTER REPLACEMENT TIME
- FILTER REPLACEMENT
- TROUBLESHOOTING
- WHEN IT HAPPENS CHECK
- SPECIFICATIONS
- COMPONENTS
- CORRECT DISPOSAL OF THIS PRODUCT
- 安全注意事項
- 警告
- 移除3合1濾網的包裝袋
- 把3合1濾網安回主機
- 面板及運作
- 主機
- 清洗前置濾網
- 清潔3合1濾網
- 注意
- 建議的濾網更換過程
Brand : WHIRLPOOL
Model : AP33
Category : Air purifier