
804-005 - Lawn mower Marquant - Free user manual and instructions
Find the device manual for free 804-005 Marquant in PDF.


| Product Type | Hair Clipper / Trimmer |
| Brand | Marquant |
| Model | 804-005 |
| Power Supply | Mains-powered (corded) |
| Voltage | 230 V (typical) |
| Power Consumption | Approx. 15 W |
| Weight | Approx. 0.5 kg |
| Dimensions (approx.) | 18 x 5 x 5 cm |
| Cord Length | Not specified (typical 1.8 m) |
| Cutting Length Range | 0.5 mm (without comb) to 12 mm (with comb no. 4) |
| Accessory Combs | 4 included: 3 mm, 6 mm, 9 mm, 12 mm |
| Blade Adjustment | Lever for fine-tuning cutting length without comb |
| Blade Material | Not specified (likely stainless steel) |
| Lubrication | Oil supplied, must be applied regularly |
| Safety Features | Automatic shut-off? Not specified; keep away from water, unplug before cleaning |
| Cleaning | Remove blades for cleaning, wipe with dry cloth, do not immerse |
| Maintenance | Oil blades after each use, align blades if needed |
| Intended Use | Home hair cutting for dry hair |
| Repairability | Blades replaceable, cord must be replaced by authorized service centre |
| Manufacturer | Jula AB, Box 363, 532 24 SKARA |
| Warranty | Not specified, contact service department |
Frequently Asked Questions - 804-005 Marquant
User questions about 804-005 Marquant
0 question about this device. Answer the ones you know or ask your own.
Ask a new question about this device
Download the instructions for your Lawn mower in PDF format for free! Find your manual 804-005 - Marquant and take your electronic device back in hand. On this page are published all the documents necessary for the use of your device. 804-005 by Marquant.
USER MANUAL 804-005 Marquant
natural_image
Electric hair styling tool with black and silver buttons, scissors, and comb (no text or symbols visible)
Värna om miljön!
Care for the environment!
Must not be discarded with household waste! This product contains electrical or electronic components that should be recycled. Leave the product for recycling at the designated station e.g. the local authority's recycling station.
SE - Bruksanvisning i original
EN - Operating instructions (Translation of the original instructions)
Jula reserves the right to make changes. In the event of problems, please contact our service department. www.jula.com
Tillverkare/ Produsent / Produenci/ Manufacturer
Jula AB, Box 363, 532 24 SKARA
Importör/ Importör/ Importer/ Importer
Blade adjustment lever 20
Preparation 21
Cutting....21
Accessory combs (see Accessories) 21
Short hairstyles – straight top edge on the head and decreasing hair length 23
SÄKERHETSANVISNINGAR
natural_image
Diagram of a mechanical device with directional arrows indicating motion (no text or symbols)Figur 4
Bladjusterspak
natural_image
Illustration of a neck and shoulder anatomy showing anatomical structures (no text or labels)Figur 5

natural_image
Silhouette of a human head with a triangular pointer above the forehead and a trachea below, no text or symbols present.Figur 6

natural_image
Side profile line drawing of a human head and neck (no text or symbols)Figur 7
natural_image
Side profile illustration of a person wearing a conical hat with an arrow pointing to the head (no text or symbols)Figur 8

natural_image
Line drawing of a person receiving a medical or therapeutic procedure with a tool (no text or symbols)Figur 9

natural_image
Illustration of a person applying a medical or therapeutic tool to their head, with no visible text or symbols.Figur 10
Steg 5 – finish
natural_image
Side-view anatomical illustration of human head and neck structures (no text or labels)Figur 11
natural_image
Line drawing of a stylized human head in profile with ornate headdress and feathered earpiece (no text or symbols)Figur 12
natural_image
Diagram of a mechanical device with directional arrows indicating motion (no text or symbols)Figur 4
Bladjusteringsspak
natural_image
Illustration of a person's head and neck with a triangular object on the forehead, shown in two different angles (no text or symbols)Figur 5

natural_image
Simple line drawing of a human head with a triangular pointer above the forehead and a trachea below, no text or symbols present.Figur 6
natural_image
Side profile line drawing of a human head and neck with earphones (no text or symbols)Figur 7
Trinn 2 – bakhodet
Trinn 4 – hodets overside
natural_image
Line drawing of a human head profile with a feathered hairpin on the crown (no text or symbols)Figur 8

natural_image
Line drawing of a person receiving a medical or therapeutic aid from a tool, no text or symbols presentFigur 9

natural_image
Illustration of a person applying a medical or therapeutic tool to their head, with no visible text or symbols.Figur 10
Trinn 5 - finish
natural_image
Side-view anatomical illustration of human head and neck structures (no text or labels)Figur 11
Korte frisyrer – rett overkant på hodet og avtagende hårlengde
natural_image
Line drawing of a stylized human head in profile with ornate headdress and feathered earpiece (no text or symbols)Figur 12
natural_image
Diagram of a mechanical device with directional arrows indicating motion (no text or symbols)Rysunek 4
natural_image
Illustration of a neck and shoulder anatomy showing anatomical structures (no text or labels)Rysunek 5

natural_image
Silhouette of a human head with a triangular pointer above the forehead and a trachea below, no text or symbols present.Rysunek 6

natural_image
Side profile line drawing of a human head in profile view (no text or symbols)Rysunek 7
Krok 2 - tył głowy
natural_image
Side profile illustration of a person wearing a conical hat with an arrow pointing to the head (no text or symbols)Rysunek 8
natural_image
Line drawing of a person receiving a medical or therapeutic procedure with a tool (no text or symbols)Rysunek 9

natural_image
Illustration of a person applying a medical or surgical tool to their head (no text or symbols present)Rysunek 10
natural_image
Side-view anatomical illustration of human head and neck structures (no text or labels)Rysunek 11
natural_image
Line drawing of a stylized human head in profile with decorative patterns (no text or symbols)Rysunek 12
Read these instructions carefully before use!
This appliance can be used by children aged from 8 years and above and persons with reduced physical, sensory or mental capabilities or lack of experience and knowledge if they have been given supervision or instruction concerning use of the appliance in a safe way and understand the hazards involved. Children shall not play with the appliance. Cleaning and user maintenance shall not be made by children unless they are older than 8 and supervised.
Keep the appliance and its cord out of reach of children less than 8 years.
Always observe basic safety precautions when using electrical appliances, particularly if children are nearby. This includes the following:
To reduce the risk of serious or fatal injury due to electric shock:
• Always unplug the machine from the mains supply before cleaning.
- Do not place or store the machine where it could fall or be pulled down into a washbasin, bath, etc.
- Do not use the machine while you are showering or bathing.
• Take care not to immerse or drop the machine in water or any other liquid.
- Immediately disconnect the machine from the power outlet before reaching for the machine if it has fallen into water.
To reduce the risk of burns, deadly electric current, fire or other personal injuries:
- Only use the machine for its intended purpose in accordance with the description in these Operating Instructions. Only use accessories recommended by the manufacturer.
• Never leave the machine unattended when it is connected to the mains. - Careful supervision is required when the machine is being used on, by or in the vicinity of children and people with disabilities.
- Do not use the machine if it is not working correctly, if it has been dropped or is damaged in any way.
- Do not use the machine if the power cord and/or plug are damaged in any way. For safety reasons, the power cord must only be replaced or repaired by an authorised service centre. Consult your dealer.
- Keep the power cord away from hot surfaces.
- Do not pull the power cord and do not wind it around the machine.
- Make sure that no objects penetrate any opening in the machine.
- Before use, check that the cutting blades are correctly aligned.
- Do not put the machine down on any surface while it is running.
- Do not use the machine with a broken or damaged comb or with a cutting blade without any teeth – this can lead to injury.
DESCRIPTION
ACCESSORY COMBS

OPERATION
Blade alignment
- The trimmer is checked carefully in the factory before delivery with regard to the alignment and lubrication of the cutting blades.
• However, the blades must be aligned every time after it has been dismantled for cleaning or replacement. - Align the blades so that the upper blade's teeth are approximately 1.2 mm behind the lower blade (fig. 1).
- If the alignment of the cutting blades is incorrect, apply a few drops of oil to the blades and operate the machine for a few seconds. Then turn off the machine and disconnect it from the mains supply. Undo the screws a little (fig. 2) and align the blades. Tighten the screws again.
Lubrication
- To keep the machine in top condition, the cutting blades must be oiled at short intervals when working (fig. 3).
- Only use the oil supplied – do not use hair oil, grease, oil mixed with paraffin or any solvents. Such products evaporate and leave behind a thick coating of oil on the blades, causing the machine to run slowly.
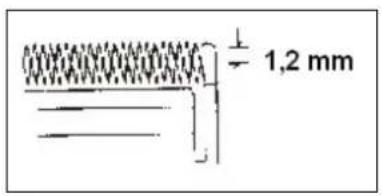
Figure 1

Figure 2

Figure 3

natural_image
Diagram of a mechanical device with rotating components and directional arrows (no text or symbols)Figure 4
Blade adjustment lever
- With this adjustment lever you can easily regulate the machine with your right thumb while the machine is in use.
• Using the lever, you can gradually change the cutting length without having to use a comb. -
With the lever in the highest position (fig. 4) you obtain the shortest cutting length. This cuts the hair very short. By gradually moving the lever down, the cutting length is gradually increased to a corresponding extent.
• In the lowest position, the machine cuts the hair to a length equivalent to a number 1 comb (3 mm). -
The adjustment lever also extends the use of the cutting blades, as different cutting edges are used for the different settings.
- You can also use the adjustment lever to remove very thick hair that catches between the two cutting blades, without needing to dismantle the blades. While the machine is running, move the adjustment lever rapidly from the lowest position to the highest a few times. Do this after each use to keep the cutting blades free from cut hair.
- If the machine stops cutting or does not cut well, and the above action does not rectify the problem, the blades have become worn and therefore need to be replaced.
Preparation
- Inspect the machine and check that there is no oil between the cutting blades' teeth. Turn on the machine to distribute the oil. Check that the machine is working evenly without jamming. Wipe off surplus oil. This must be done each time after use. Keep an eye on the power cord to ensure it does not become entangled while working.
- Position the person whose hair is to be cut so that their head is roughly level with your eyes. This gives you a good view of the head and the machine is easy to operate.
- Comb the hair to remove any tangles.
- Place a towel around the person's neck and over their shoulders.
Cutting
- Cutting hair requires practice and experience. It is therefore advisable to allow the hair to grow a little longer the first few times you cut it, until you are accustomed to how much each accessory comb cuts.
• Cut the hair with slow, relaxed movements. Use short movements to gradually cut the entire head.
• Only cut off a little hair at a time. You can always trim off more hair afterwards if necessary. - While working, comb the hair frequently back to the style you want to cut.
- It is easier to cut dry rather than wet hair with this machine. It is then much easier to see how much hair has been cut off.
Accessory combs (see Accessories)
- Accessory comb no. 1 cuts the hair to a length of 3mm .
- Accessory comb no. 2 cuts the hair to a length of 6 mm.
- Accessory comb no. 3 cuts the hair to a length of 9 mm.
-
Accessory comb no. 4 cuts the hair to a length of 12 mm.
Each accessory comb is marked on the outside with the number of mm. -
In order to fit a comb, hold it with the teeth facing up and slide it on along the cutting blade until the front of the comb is properly in contact with the blade.
- To remove a comb, simply pull it up and away from the cutting blade.
- For an even cut, allow the comb/cutting blade to do the work. Let them cut through the hair. Do not force the machine quickly through the hair. Remember to comb the hair frequently to remove cut hair and release uneven long strands of hair.
Step 1 – back of the neck
- Fit the "3 mm" or "6 mm" accessory comb.
- Hold the machine pointing up and start cutting in the middle at the base of the back of the neck (fig. 5).
- Hold the machine so that is fits comfortably in the hand. Hold it gently against the head with the teeth pointing up. Lift the machine gradually and slowly, and work upwards and outwards through the hair so that you only cut a little hair at a time.
- While cutting, lift the machine gradually towards you. Continue to cut the rear area from the bottom edge of the back of the neck up to the ears.

natural_image
Illustration of a neck and shoulder anatomy showing anatomical structures (no text or labels)Figure 5
natural_image
Silhouette of a human head with a triangular pointer above the forehead and a trachea below, no text or symbols present.Figure 6
natural_image
Side profile line drawing of a human head in profile view (no text or symbols)Figure 7
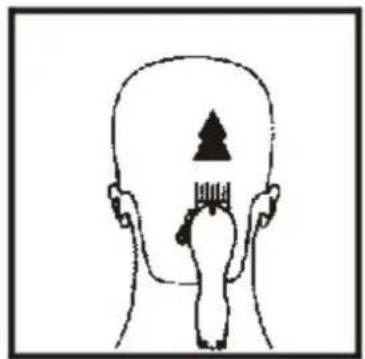
Step 2 – back of the head
Change to one of the longer accessory combs, "9 mm" or "12 mm", and cut the hair on the back of the head (fig. 6).
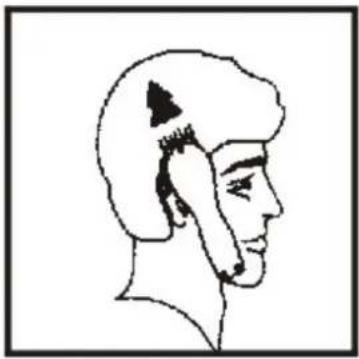
Step 3 – sides of the head
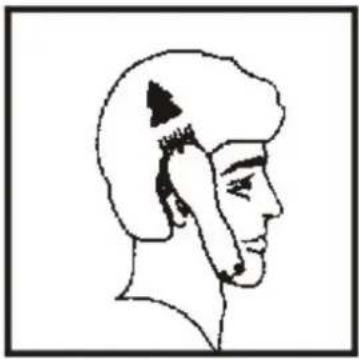
Change to one of the shorter combs, "3 mm" or "6 mm", and trim the sideburns, i.e. the hair directly in front of the ears. Then change to one of the longer accessory combs and continue cutting up towards the top of the head (fig. 7).
Step 4 – top of the head
- Use one of the longer accessory combs and cut the hair on the top of the head, from the back towards the front, against the hair's normal direction of growth (fig. 8). In some cases, this may mean you need to cut from the front towards the back.
- Use the shorter accessory combs to achieve a shorter hair length.
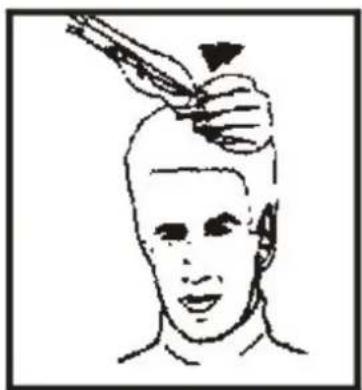
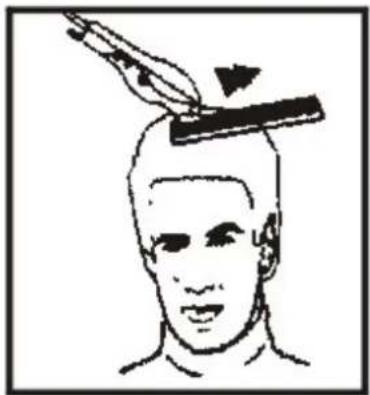
- To achieve longer hair on top of the head, use the enclosed comb and lift up the hair. Cut the hair above the comb or hold the hair between your fingers and cut to the desired length (fig. 9 and 10). Always work from the back of the head. You can gradually cut the hair shorter by reducing the distance between the comb/your fingers and the head. Comb out the hair to release unevenly long hairs.

natural_image
Side profile illustration of a person wearing a conical hat with an arrow pointing to the head (no text or symbols)Figure 8

natural_image
Line drawing of a person receiving a medical or therapeutic procedure with a tool (no text or symbols)Figure 9
natural_image
Illustration of a person applying a medical or therapeutic tool to their head, with no visible text or symbols.Figure 10
Step 5 – finish
- To finish, use the machine without any accessory combs to trim close to the skin around the base and sides of the neck and around the ears.
- To create a straight hairline at the sideburns, turn the machine as illustrated in fig. 11.
- Hold the machine at right angles against the head, so that the tips of the cutting blades are just touching the skin, and work down. In this way you achieve the same type of cut as when using a razorblade.

natural_image
Side-view anatomical illustration of human head and neck structures (no text or labels)Figure 11
Short hairstyles – straight top edge on the head and decreasing hair length
-
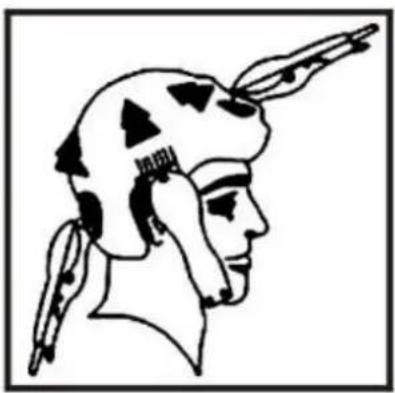
Start with the longest accessory comb (12 mm) and cut from the back of the neck towards the top of the head. Hold the accessory comb flat against the head and move the machine slowly through the hair (fig. 12).
-
Perform the same procedure from the lower part of the side of the head towards the top, as illustrated. Then cut the hair against its direction of growth from the front towards the top, and then even out the cut towards the sides.
natural_image
Line drawing of a stylized human head profile with feathered beak and pointed object (no text or symbols)Figure 12
-
To cut the hair at the top with a straight top edge, the hair on top of the head must be cut with a flat comb instead of an accessory comb.
-
Use the shorter accessory combs to shorten the hair in the desired manner down towards the neckline. Comb the hair and inspect the cut for uneven areas and contours at the sideburns, as described earlier.
- Värna om miljön!
- Care for the environment!
- SÄKERHETSANVISNINGAR
- Bladjusterspak
- Steg 5 – finish
- Bladjusteringsspak
- Trinn 2 – bakhodet
- Trinn 4 – hodets overside
- Trinn 5 - finish
- Korte frisyrer – rett overkant på hodet og avtagende hårlengde
- Krok 2 - tył głowy
- Read these instructions carefully before use!
- To reduce the risk of serious or fatal injury due to electric shock:
- To reduce the risk of burns, deadly electric current, fire or other personal injuries:
- DESCRIPTION
- ACCESSORY COMBS
- OPERATION
- Blade alignment
- Lubrication
- Blade adjustment lever
- Preparation
- Cutting
- Accessory combs (see Accessories)
- Step 1 – back of the neck
- Step 2 – back of the head
- Step 3 – sides of the head
- Step 4 – top of the head
- Step 5 – finish
- Short hairstyles – straight top edge on the head and decreasing hair length
Brand : Marquant
Model : 804-005
Category : Lawn mower