Drift - Tent Zempire - Free user manual and instructions
Find the device manual for free Drift Zempire in PDF.


| Product Type | Tent |
| Brand | Zempire |
| Model | Drift |
| Capacity | 4-person |
| Floor Dimensions | 240 x 210 cm (94 x 83 in) |
| Center Height | 150 cm (59 in) |
| Packed Weight | 7.5 kg (16.5 lbs) |
| Pole Material | Fiberglass |
| Flysheet Fabric | Polyester 190T with PU coating |
| Floor Fabric | Polyethylene 120 g/m² |
| Waterproof Rating | 2000 mm |
| Taped Seams | Yes, on flysheet and floor |
| Ventilation | Mesh roof vent and rear vent |
| Doors | 1 front door with mesh inner |
| Setup Type | Dome with color-coded poles |
| Included Accessories | Steel pegs, guy ropes, carry bag |
| Repairability | Spare pole segments and fabric patch kit available |
| Cleaning Instructions | Wipe with mild soap and water; air dry before storage |
| Storage | Store in a cool, dry place away from direct sunlight |
| Warranty | 1 year limited warranty |
Frequently Asked Questions - Drift Zempire
User questions about Drift Zempire
0 question about this device. Answer the ones you know or ask your own.
Ask a new question about this device
Download the instructions for your Tent in PDF format for free! Find your manual Drift - Zempire and take your electronic device back in hand. On this page are published all the documents necessary for the use of your device. Drift by Zempire.
USER MANUAL Drift Zempire
- Clear your site making sure there are no sharp objects. Try to get a site that is as flat as possible. Stretch out the tent with the door facing the front.

- Thread the RED poles through the pole sleeves that run diagonally across the centre of the tent. Tension the poles inserting the pins located directly underneath each pole sleeve into the ends of the poles. It may be easier to have someone to support the crossover of the poles during this step.

natural_image
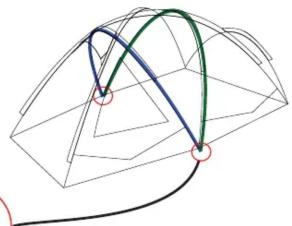
3D wireframe diagram of a dome-like structure with red and gray lines, no text or symbols present- Thread the BLUE pole through the front and the GREEN pole through the rear pole sleeves that run across the centre of the tent. Tension the poles inserting the pins located directly underneath each pole sleeve into the ends of the poles.
natural_image
3D wireframe diagram of a dome-shaped structure with colored curved lines and red markers (no text or symbols)
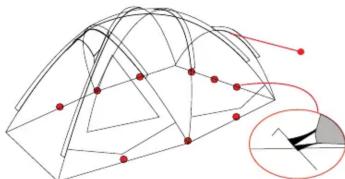
- Thread the YELLOW pole through the pole sleeve at the rear of the tent. Tension the poles inserting the pins located at the rear corners of the tent.
- Peg out the four corners firmly ensuring that the floor sits at flat as possible.

natural_image
3D wireframe diagram of a dome structure with red dots and connecting lines, plus an inset magnified view (no text or symbols)-
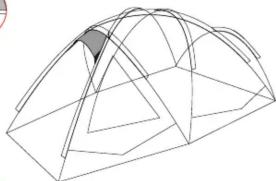
Thread the remaining think (4mm) pole through the pole sleeve underneath the vent cover above the door and insert the pole ends into the small pockets on each side.
-
Peg out all the remaining peg points around the tent. Firmly peg out the rear guy rope attached to the large fin at the rear of the tent at a 45^ angle.
natural_image
Wireframe diagram of a dome-shaped structure with internal triangular divisions (no text or symbols)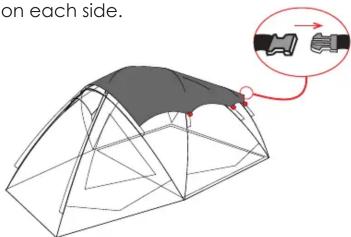
- Pull the fly over the tent and connect the SR buckle sewn onto the fin at the rear of the tent. Attach the hooks onto the loops sewn around the pole sleeves.

natural_image
3D wireframe diagram of a geometric structure with red support legs (no text or symbols)- Peg out all the guy ropes. Try to have guy ropes at a 45^ angle to the ground. Also peg out the lower draft vents on each side of the tent.
This tent design is under copyright protection by Freedom Camping, New Zealand. The "Freedom Camping" and "airflow" logos are registered trademarks of Flow Imports Ltd. Any reproduction of this manual is prohibited without the prior consent of Flow Imports Ltd.
PITCHING INSTRUCTIONS - DRIFT airflowseries

natural_image
Technical diagram of a tent structure with highlighted components and red arrows indicating motion (no text or symbols)-
For extra warmth and privacy you may decide to attach the inner inside the tent. Lay out the inner inside the tent with the door facing the front and the floor facing downwards. Attach the corner male buckles to the female buckles sewn into the inside rear corners of the tent. Connect the toggles through the corresponding rings sewn on the tent working your way front the rear to the front of the inner. Peg down the front of the inner and cover.
-
Ensure guy ropes are pegged out at all times during use
- Never pack your tent away wet. If you must take your tent down when wet, ensure that you dry you tent completely as soon as possible to prevent mildew forming.
- If mildew does form on your tent wash off pours with warm water and a soft brush to prevent further growth. Do not use detergents.
- Do not use an open flame inside your tent. The fabric has been treated with a fire retardant but is in no way fire proof
- Clean all pegs and poles before storing
- If your poles do break, use the repair sleeve to cover over the broken section. Once you have returned contact your local retailer for a replacement pole section.
Freedom zempire
Freedom Zempire is proud to be a 100% New Zealand owned and operated business.
For more information about this and other great products we offer please visit our website.
DRIFT airflowseries pitching instructions

Brand : Zempire
Model : Drift
Category : Tent