Aerodome I plus - Tent Zempire - Free user manual and instructions
Find the device manual for free Aerodome I plus Zempire in PDF.


| Product Type | Inflatable Tent |
| Brand | Zempire |
| Model | Aerodome I Plus |
| Capacity | 1 Person |
| Dimensions (L x W x H) | 210 x 105 x 90 cm |
| Packed Size | 45 x 20 x 20 cm |
| Weight | 3.5 kg |
| Material - Flysheet | 75D Polyester, 3000mm water column |
| Material - Inner | Breathable Polyester |
| Material - Floor | 150D Polyester, 5000mm water column |
| Inflation System | High pressure TPU air tubes with dual valves |
| Poles | Inflatable beams (pre-curved for shape) |
| Setup Time | Approximately 2 minutes |
| Ventilation | Mesh vents with adjustable covers |
| Doors | 1 D-shaped door with mesh |
| Windows | 2 mesh windows with roll-up covers |
| Storage | Internal mesh pockets (2) |
| Groundsheet | Integrated sewn-in groundsheet |
| Included Accessories | Repair kit, pump, pegs, guy ropes, carry bag |
| Season | 3-season |
| Warranty | 2 years |
Frequently Asked Questions - Aerodome I plus Zempire
User questions about Aerodome I plus Zempire
0 question about this device. Answer the ones you know or ask your own.
Ask a new question about this device
Download the instructions for your Tent in PDF format for free! Find your manual Aerodome I plus - Zempire and take your electronic device back in hand. On this page are published all the documents necessary for the use of your device. Aerodome I plus by Zempire.
USER MANUAL Aerodome I plus Zempire
INNER TENT ATTACHMENT
- Lay out the inner inside the tent with the door facing the centre and the black floor facing downwards.
- Attach the buckles at the rear corners of the tent and connect the toggles on the inner through the corresponding rings working your way from the rear to the front.
- The room can remain attached when deflating the tent.

Side Release Buckles
IN THE UNLIKELY EVENT OF YOUR TENT DEVELOPING A LEAK
- Firstly check all valves are screwed in correctly.
- Deflate the faulty Air Pole and unzip the flysheet sleeve.
- Remove the tube from the Outer by cutting the cable tie holding the zipper ends together and unzip.
CAUTION: DO TO OPEN THESE ZIPS WHEN THE POLE IS INFLATED.
- Remove the clear tube from the Sleeve.
- Partially inflate the tube and check for leaks (bubbles) in a basin of water.
- Using a the repair patch provided cover the hole and seal.
- Partially inflate the tube and re insert into the pole sleeve. Zip together.
- Connect the zipper ends with the replacement Cable ties provided.
For a detailed description of all the features and specifications of this product please visit our website.
WWW.ZEMPIRECAMPING.COM
Tested in New Zealand. Made with care in China

ZemPIRE "FREEDOM CAMPING"
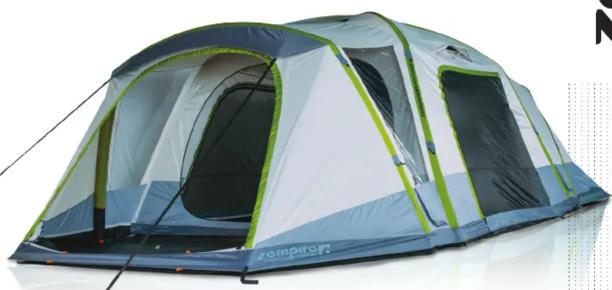
AERODOME I+
INFLATABLESERIES
INSTRUCTIONS
AERODOME I+ INFLATABLESERIES
INSTRUCTIONS
- Clear your site making sure there are no sharp objects where you are going to pitch your tent. Try to get a site that is as flat as possible. Spread tent out, the PVC windows are located at the front.
- Peg out the 4 peg points on the main body of the tent as shown.


-
Unzip the triangle Valve Cover on the right hand side of the tent and locate the AERO-FRAME valves.
-
Remove the valves completely and re-screw in to ensure the valve is not cross-threaded. Screw in firmly but do not over tighten. Open the valve caps.
- The pump features a double hose adapter which allows two tubes to be inflated at the same time.
Ensure the pump is configured as per the following diagram.
Attach the of the hoses to the AERO-FRAME valve inlets.

-
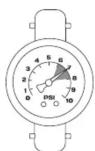
Begin to inflate the centre and rear AERO-FRAME. Have someone walk inside to help raise the frame during inflation. Inflate to 7 PSI. DO NOT INFLATE ABOVE 8PSI. THIS MAY CAUSE DAMAGE TO THE POLES AND THE TENT.
-
Once inflated to the correct pressure, remove the pump hoses and securely attach the valve caps. Close the Valve Cover.
-
Remove the double adapter and attach one hose directly to the pressure gauge as shown.


-
Inflate the front awning AERO-FRAME following the previous procedure, then remove the hose and securely attach the valve cap.
-
Peg out the remaining peg points around the tent ensuring that the floor sits flat. It is easier to align the front door correctly with the door closed.
- Peg out the front and rear anchor webbings. These should sit at a 45° angle to the ground.
- Peg out the 2 draft vents on either side of the bedrooms. These can be pegged closed during cooler weather conditions.
- It is recommended that guy ropes are pegged out at all times and windows are opened whenever possible to allow adequate ventilation.
Insert pegs at a 45° angle

DEFLATION
- Remove the valves from the AERO-FRAME. Take care as poles will be under pressure.
- It may be necessary to remove some excess air from the AERO-FRAME before rolling up your tent. This can be done by carefully walking down the length of the tube towards the valve end.

Brand : Zempire
Model : Aerodome I plus
Category : Tent