
Evo TXL V2 - Tent Zempire - Free user manual and instructions
Find the device manual for free Evo TXL V2 Zempire in PDF.


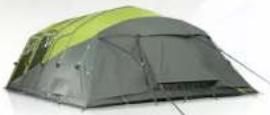
| Product Type | Air Tent |
| Brand | Zempire |
| Model | Evo TXL V2 |
| Sleeping Capacity | 6 persons |
| Bedroom Configuration | Multi-Room system with 6 layouts (4, 3, 2, or 1 room) |
| Inflation Method | Boston valve, 7-9 PSI |
| Pump Included | Yes, Pro Series Pump with pressure gauge and release valve |
| Ventilation | High/low ventilation system with mesh vents and 360° front door cover |
| Windows | 3-way windows with mesh and removable curtain |
| Doors | Mesh door and door/window cover |
| Pegging | Steel pegs included, anchor webbing straps at 45° |
| Guy Ropes | Pre-attached, should be taut but not overtightened |
| Carry Bag | Oversized with compression straps |
| Compatible Accessories | Awning Wall Set, Roof Cover, Aerobase Link, Solid Ground Sheet |
| Care Instructions | Wash with warm water, dry completely before storage; avoid soap |
| Warranty | 3 years limited |
| Fire Retardant | Fabric treated with fire retardant (not fire-proof) |
| UV Protection | Use optional Roof Cover to reduce UV degradation |
| Setup Tips | Peg corners first, inflate tubes sequentially from second front tube |
| Condensation Management | Keep all vents open at all times; open 360° door cover for airflow |
Frequently Asked Questions - Evo TXL V2 Zempire
User questions about Evo TXL V2 Zempire
0 question about this device. Answer the ones you know or ask your own.
Ask a new question about this device
Download the instructions for your Tent in PDF format for free! Find your manual Evo TXL V2 - Zempire and take your electronic device back in hand. On this page are published all the documents necessary for the use of your device. Evo TXL V2 by Zempire.
USER MANUAL Evo TXL V2 Zempire
natural_image
Exterior view of a modern camping tent with green and black panels, set against a bright yellow background (no text or symbols visible)EVO TXL ^v2
AIR TENT

natural_image
Green and gray camping tent with open doors and windows (no visible text or symbols)SIDE

FRONT
REAR
External Dimensions
Internal Dimensions
Removable Curtain
→ Entry/Exit
Mesh Vent
3-Way Window
Mesh Door
Mesh Window
Door/ Window Cover
Internal Floor Area
Bedroom Area
□ Bedroom Area
□ Awning Area
- Awling Area
Powercord Access
Lantern Hanging Point


natural_image
Exterior view of a green camping tent with white chairs and patterned roof, surrounded by trees (no signage or text visible)
KEY TIPS

Before inflating your tent, start by pegging the corners and ensure the tent is fully pegged with the floor sitting flat. The floor seam should have tension between each peg loop.

Ensure all doors are zipped closed before inflating and deflating. This helps the tent keep its shape and prevents undue stress on panels and zips.
Ensure your air tubes are inflated to the correct pressure by using the pressure release valve and gauge on the pump.

Twist anchor webbing straps into a spiral before pegging to prevent them flapping in the wind.

Do not over tension guy ropes as your tent is designed to be free standing without the need for these. The guy ropes should be taught but shouldn't pull your tent out of shape.

Internal window panels can be half opened to control airflow and privacy. Fold window panels so they sit between the lower cover and mesh panel.

When rolling up door panels, fold the outer corners into the centre and roll inwards. This prevents the edges hanging loose and prevents water from pooling in the roll.

On warm or humid nights, zip down the top of the 360° door cover. This provides maximum ventilation while maintaining your privacy.

EVO TXL ^v2 AWNING WALL SET
Enclose the awning space of your Evo TXL ^13 tent with an Awning Wall Set. Both a fully waterproof poly wall and bug-proof mesh wall are included.

EVO TXL ^v2 ROOF COVER
Helps reduce internal temperature and keeps the inside of your tent darker. Also protects your roof from pollen, tree sap and other debris.
EVO TXL ^v2 AEROBASE LINK
Connects your Aerobase 3 or 3 Pro shelter to your Evo TXL ^2 tent to extend your outdoor living space. Ideal as kitchen, lounging or dining space.

EVO TXL ^v2 SOLID GROUND SHEET
Designed to protect the tent floor & simplify clean-up. Made from PE, it fits perfectly under your tent with corner peg points.
PITCHING INSTRUCTIONS
1. Test Run
Practice pitching your tent at home to ensure you understand the process.
2. Pick A Site
When picking a site for your tent, try to find an area that is sheltered, flat and free from sharp objects. If possible, position your tent with the front door facing away from the prevailing wind. Try not to pitch your tent under trees as falling branches or sap can damage the tent.
3. Ground Sheet
To protect your tent from dirt and damage, it is recommended to use a ZEMPIRE® Ground Sheet. Ground Sheets not only protect your tent floor but also make pack down faster and cleaner. The Ground Sheet should be pegged down in the correct position first, then the tent placed on top. ZEMPIRE® Ground Sheets are slightly smaller than the size of the tent floor to ensure water does not collect between the two layers.
4. Unpacking
When you take your tent out for the first time, take a moment to see how it is packed or take a photo with your phone. This will help you when it comes to packing your tent away. Separate and identify the different parts included with your tent. The package should include the following:
- Tent inner (pre-attached)
- Pump
- Pressure gauge
- Tent - Pump pressure release valve
5. Pump Setup
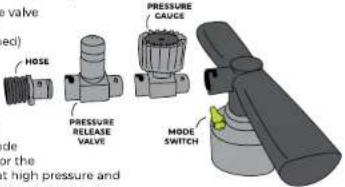
Your ZEMPIRE® Pro Series Pump included with your tent comes with a pressure gauge and pressure release valve to ensure that the air tubes are inflated to the correct level.
The pump switches between two modes. Double action mode allows you to add high volume at low pressure and is ideal for the first half of inflation. Single action mode offers low volume at high pressure and enables you to get the last few PSI into the tubes easily. The pump accessories should be assembled in the shown configuration.
6. Layout
Unroll the tent with the floor facing down. The large awning/entrance is located at the front of the tent. Peg out the 4 corners of the sewn-in ground sheet, (0) ensuring there is significant tension between each point and that the floor sits as flat as possible. Peg the front corners of your awning so the awning walls are in-line with the body of the tent. Ideally the pegs should be angled away from your tent at 45°.
7. Airflow
Your tent will arrive with the bottom of the front door open to help increase airflow during the first pitch. It is important however that the doors remain predominantly closed during the pitching process to ensure the tent holds its correct shape during inflation and is not over tightened, which can cause damage. To enable air to enter during the pitching process, all window covers should be opened.
8. Boston Valve
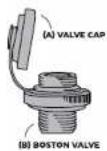
The external inflation valves are located under the rain socks along the right side of the tent. Before inflating, remove the valve cap (A) and screw the boston valve (B) into the threaded section attached to the tubes. It is important that the valve is not cross threaded and is firmly tightened. Make sure no fabric is stuck in the valve, as this will cause air to leak.
9. Inflation
Start with the second tube from the front and work your way to the rear tube. The last tube to be inflated is the front tube, inflate each tube to 7-9 PSI. The pressure release valve will "hiss" when 9 PSI is reached. It is important not to over-inflate the tubes.
It is recommended that during very hot weather, 7 PSI is used to provide room for expansion during the day. In cooler or windier conditions, 9 PSI is recommended. As each tube inflates, it may be necessary to support the centre of the tubes until they assume their correct shape.


10. Setting the Floor
It may be necessary to align the base of each air tube so that the floor sits flat and taught. You may also need to realign the corner pegging points so the floor sits flat.
II. Pegging
Peg the remaining peg loops around the tent. Durable steel pegs are included with your tent which will be suitable for the majority of conditions. However, when camping at a rocky or sandy location, you may wish to purchase more specialised pegs. A range of specialised ZEMPIRE® Pegs may be available in your local region or on our website.
12. Anchor Webbing Straps
Anchor webbing straps are located at each end of your tent. These webbing straps are essential for the stability of your tent. They should be firmly pegged out at a 45° angle. In windy conditions or when camping on soggy ground you may need to double peg the steel "O" rings at the base of each strap. Anchor webbing straps should be used at all times.
13. Vents
To reduce condensation, it is important that the vents are opened at all times. Your tent is designed with a high/low ventilation system that relies on all vents being opened to achieve good air circulation. If you find condensation building up on the inside of your fly, it is recommended that the 360° front door cover is opened to allow maximum airflow. ZEMPIRE® tents have a large number of ventilation options, however in certain conditions condensation may occur. Condensation and its effects are not covered by warranty.
14. Guy Ropes
Guy ropes are pre-attached on all ZEMPIRE® tents. It is recommended that guy ropes are used at all times. It is important not to over-tighten the guy ropes, they should sit taught but should not distort the shape of the tent.
15. Multi-Room Inner
Although the inner for the bedroom is pre-attached, it will be necessary to tension each of the corner webbing straps after the tent is pitched. These should be loosened before taking the tent down, but do not need to be removed.
The Multi-Room system allows you to configure your inner into 6 different layouts of 4, 3, 2, or 1 room(s) of various sizes. Please see the examples shown on the following page.
16. Deflation
- Close all the mesh doors, leaving the covers open to allow air to escape from the tent.
- Loosen the inner room's webbing straps.
- Unpeg all guy ropes and roll up to ensure they do not get tangled during packing.
- Unpeg the anchor webbing straps
- Unpeg all peg points except the four corners.
- Clean and dry all pegs before storing in the bag
- Unscrew the boston valves on each air tube. Wait for all the air to be expelled.
- Unpeg the four corners of the tent. Clean and pack the pegs.
- Lay the carry bag at one end of the tent. Fold the tent to 2/3s of the length of the bag. The tent should
be folded parallel to the air tubes.
Place the pump and peg bags on top of the folded tent at the end opposite the valves. Roll the tent from the "non-valve" side to the "valve-side" to help expel any remaining air from the tubes. It may take more than one roll to expel all the air from the tent.
Use the webbing compression straps to secure the rolled tent and stand on its end.
Pull the carry bag over the rolled tent. Flip the tent over and tension the carry bag drawcord and
compression straps.
The carry bag is over sized to ensure easy packing
Condensation
It is important that lower vents are opened at all times to reduce the risk of condensation. During humid or damp conditions, it is recommended that the window covers are opened to expose the mesh layer, enabling additional airflow throughout your tent.
Do not use foam swabs or non-bonded mats directly on the tent floor. This will cause condensation between the mat and floor and if not dried out, can lead to mildew forming.
UV Degradation
Tent fabrics can be weakened by prolonged exposure to sunlight. Under normal holiday use, your ZEMPIRE® tent will give you many years of camping enjoyment. However, extended use in strong sunlight will cause degradation. It is recommended that during periods of strong sunlight a ZEMPIRE® Roof Cover is used to help protect from UV damage. UV degradation is not covered under warranty. The warranty does not cover permanent sites, displays or commercial use.
For a detailed description of all the features and specifications please visit our website.



Multi-Room Configurations
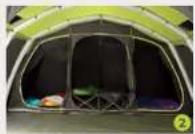
Our Multi-Room system offers superior flexibility in how you configure the layout of your inner bedrooms. Zip-out bedroom dividers along with a clever multi-zip door panel gives you 6 different layout options to dial in comfort and privacy.
-
4 bedrooms. With all dividers in place, your inner is configured as 2 double rooms and 2 single rooms.
-
3 bedrooms. Remove the center divider to configure your inner as 3 double rooms.
-
3 bedrooms. Remove the left divider to configure your inner as 1 double, 1 single, and 1 triple room.
-
2 bedrooms. Remove both the left and right dividers to configure your inner as 2 triple rooms.
-
2 bedrooms. Remove the left and center dividers to configure your inner as 1 double room and 1 quad room.
-
1 bedroom. With all dividers removed, your inner is configured as a single, 6-person room.
CARE INSTRUCTIONS
- Ensure guy ropes are out at all times during use.
- Make sure you have all vents open at all times. Constant airflow will drastically reduce condensation in humid weather conditions. Never cook in your tent as it is unsafe and would also heavily increase condensation.
- Ensure all doors are zipped closed before inflating and deflating. This helps keep the tent's shape and prevents stress on panels/zips.
- Never pack your tent away wet. If you must take your tent down when wet, ensure that it is dried completely as soon as possible to prevent mildew forming.
- If mildew does form on your tent, wash off with
NEED HELP WITH YOUR TENT?
We have a range of videos on our website which can help you.
Follow the QR code or type the link below in your browser. We suggest to check out our videos beforehand in case you don't have service at your holiday destination.


ZEMPIRE CAMPING.INFO/VIDEO-GALLERY
warm water and a soft brush to prevent further growth. Do not use soap or detergents.
- Do not use aerosol spray cans or an open flame inside your tent. The fabric has been treated with a fire retardant but is in no way fire-proof.
7 Always use a peg puller to remove pegs. Never remove pegs by pulling the tent or peg loops; always clean and dry pegs before storing. - This tent is not designed to withstand storm conditions. During a severe storm, it is recommended that the tent be taken down.
- Do not leave your tent pitched unnecessarily for extended periods of time. UV light damages the fly and will shorten the life of your tent.
3 Year Limited Warranty
Please take time to read about the protection we offer you.
All our products come with a guarantee designed to protect you as our valued customer. ZEMPIRE® Camping Equipment will repair or replace this product, at their discretion, should it fail due to faulty materials or manufacture for a period of 3 years from the date of purchase.
The Guarantee is subject to the following conditions:
- The Guarantee only applies to an original purchaser who purchased this product in an unopened condition from an approved retail outlet.
- The Guarantee does not apply if the product has been used for anything other than reasonable personal use. Commercial use (e.g. rental) or continuous use are expressly excluded.
- Damage due to normal wear and tear, accident, acts of God, negligence (other than by ZEMPIRE® Camping Equipment), failure by the purchaser to ensure instructions for setting up and care are observed, deterioration due to abnormal exposure to ultraviolet light, insect or mildew attack, or any other cause reasonably beyond the control of ZEMPIRE® Camping Equipment are not covered.
- If redress is sought under the terms of this Guarantee, then the product must be returned by the purchaser to the outlet from where it was purchased within the Guarantee period, in a clean, dry state and with proof of purchase.
- All transport costs and any other indirect costs are excluded from the Guarantee.
- ZEMPIRE® Camping Equipment reserves the right to make a reasonable charge for repairs which it determines are not within the scope of the Guarantee.
- The Guarantee does not limit, modify or exclude any rights under any law if doing so would contravene that law or make any part of this Guarantee invalid. However, ZEMPIRE® Camping Equipment:
a) excludes (to the extent permitted by applicable law) all conditions and warranties that might otherwise be implied; and
b) limits its liability for breach of any such condition or Guarantee that it cannot exclude together with its liability under the Guarantee, to repairing or replacing the Goods or paying the cost of having the Goods repaired or replaced (at ZEMPIRE® Camping Equipment's option).
Australia Only
Our goods come with guarantees that cannot be excluded under Australian Consumer Law. You are entitled to a replacement or refund for a major failure and compensation for any other reasonably foreseeable loss or damage. You are also entitled to have the goods repaired or replaced if the goods fail to be of acceptable quality and the failure does not amount to a major failure.
USA Only
Some states do not allow the exclusion or limitation of incidental or consequential damages, so the above limitation or exclusion may not apply to you. This warranty gives you specific legal rights, and you may also have other rights which vary from State to State.
Europe Only
The consumer has legal rights under applicable national legislation governing the sale of consumer goods and those rights are not affected by the guarantee.
All warranty claim processes are explained on our Zempire® website. Please go to www.zempire.co.nz, select your location and follow the instructions to lodge a warranty claim.
International Distributors:
New Zealand & Australia
ZEMPIRE® Camping Equipment 6 Karewa Place, Pukete, Hamilton, 3200, New Zealand Ph: +64 7 848 1610
United Kingdom, Belgium,
Netherlands & Luxembourg Outdoor & Sports Company Ltd, Redfern House, Dawson Street Hyde, Cheshire, SK14 1RD, UK Ph: +44 161 366 5020
North America
Outdoor & Sports Company Inc. 610 Alden Road Unit 101 Markham, ON, L3R 921, Canada Ph: +1 905 940 9511
Germany, Austria, &
Switzerland
Sport-tech
Goldbeckstrasse 6
69493 Hirschberg, Germany
Ph: +49 6201 8439710
South Korea
Coldspin Corporation
20 Gurodong-ro 15-gil
Guro-gu, Seoul,
South Korea
Ph: +82 2 3397 7711
Designed and tested in New Zealand. Made with care in China.
AS PART OF OUR ZEMPIRE FAMILY, SHARE YOUR CAMPING MOMENTS ON SOCIAL


@zempirecamping #zempirefamily
- EVO TXL v2
- EVO TXL v2 AWNING WALL SET
- EVO TXL v2 ROOF COVER
- EVO TXL v2 AEROBASE LINK
- EVO TXL v2 SOLID GROUND SHEET
- PITCHING INSTRUCTIONS
- Test Run
- Pick A Site
- Ground Sheet
- Unpacking
- Pump Setup
- Layout
- Airflow
- Boston Valve
- Inflation
- Setting the Floor
- Pegging
- Anchor Webbing Straps
- Vents
- Guy Ropes
- Multi-Room Inner
- Deflation
- Condensation
- UV Degradation
- Multi-Room Configurations
- CARE INSTRUCTIONS
- NEED HELP WITH YOUR TENT?
- We have a range of videos on our website which can help you.
- Year Limited Warranty
- Please take time to read about the protection we offer you.
- Australia Only
- USA Only
- Europe Only
- International Distributors:
- New Zealand & Australia
- United Kingdom, Belgium,
- North America
- Germany, Austria, &
- South Korea
Brand : Zempire
Model : Evo TXL V2
Category : Tent