
Extreme X5 - Action Camera NIKKEI - Free user manual and instructions
Find the device manual for free Extreme X5 NIKKEI in PDF.


| Product Type | Action Camera |
| Brand | Nikkei |
| Model | Extreme X5 |
| Video Resolution | 4K at 30 fps |
| Photo Resolution | 12 MP |
| Field of View | 170° wide angle |
| Image Stabilization | Electronic (EIS) |
| Waterproof | Up to 30m with housing |
| Battery | Lithium-ion, 1050 mAh |
| Battery Life | Approx. 90 minutes |
| Storage | microSD up to 64 GB |
| Connectivity | Wi-Fi, Bluetooth |
| Dimensions | 60 x 40 x 25 mm |
| Weight | 65 g |
| Power Input | USB-C (5V/1A) |
| Main Functions | Video, Photo, Timelapse, Slow Motion, Loop Recording |
| Cleaning and Maintenance | Wipe with a soft, dry cloth. Avoid salt water. |
| Safety | Do not expose to extreme temperatures or direct sunlight for long periods. |
| Spare Parts and Repairability | Battery, mounts, USB cable available. Not user-serviceable. |
| General Information | Warranty: 1 year. Made in China. |
Frequently Asked Questions - Extreme X5 NIKKEI
User questions about Extreme X5 NIKKEI
0 question about this device. Answer the ones you know or ask your own.
Ask a new question about this device
Download the instructions for your Action Camera in PDF format for free! Find your manual Extreme X5 - NIKKEI and take your electronic device back in hand. On this page are published all the documents necessary for the use of your device. Extreme X5 by NIKKEI.
USER MANUAL Extreme X5 NIKKEI
natural_image
Exterior view of a transparent underwater camera module (no text or symbols visible)MODEL: EXTREME X5
CONTENTS PAGE
| Contents Page 1 | |
| Introduction 2 | |
| Safety Instructions 2 | |
| Important Safety Precautions 4 | |
| Product Specification 5 | |
| Contents 6 | |
| Getting to know your Camera | 7 |
| Using the Action Camera 9 | |
| Action Camera Operation 10 | |
| WIFI Mode 30 | |
| Connections 33 | |
| Using the Remote Control | 35 |
| Using the Mounting Accessories 36 | |
| Troubleshooting 42 |
INTRODUCTION
Congratulations on the purchase of your new Action Camera.
This manual contains important safety and operating information. Please read all the information carefully before you use the device to avoid accidents and keep it for future reference. Follow these important safety and operation instructions.
SAFETY INSTRUCTIONS
- The Action camera without underwater casing shall not be exposed to dripping or splashing and no objects filled with liquids, such as vases, shall be placed over the product. Dry location use only.
-
Keep the camera clean. Never store it next to a heat source or in dirty, humid or wet places. Keep it out of direct sunlight.
-
Press the buttons gently. Pressing too hard can damage the product.
- Do not use the camera in an extremely dry environment.
- Do not put the camera in high temperature places (over 40°C), especially not in a car with the windows closed in summer.
- Do not subject the camera to harsh impacts, to avoid damage, do not drop the unit.
- Do not attempt to dismantle or repair this camera yourself. Qualified personnel should perform repairs.
- Disconnect the camera from the power source before cleaning.
• Use a dry soft cloth to clean this camera. - This product is not intended for commercial use. Household/personal use only.
- Do not disassemble this unit. To prevent the risk of electric shock, do not remove the cover. No
user-serviceable parts inside. Refer servicing to qualified personnel.
- The USB cord for the device should be unplugged from the computer when the unit is left unused for a long period of time.
IMPORTANT SAFETY PRECAUTIONS
In order to prevent program failure, never disconnect the product suddenly from a PC while file transferring is in progress.
Disconnect the appliance from PC when cleaning. Use a dry soft cloth to clean this appliance. Do not dismantle the product or use alcohol, thinners or benzene to clean the surface of the product.
Attention: We have done our best to produce a complete and accurate manual. However, we cannot ensure that there are no errors during the printing process.
PRODUCT SPECIFICATION
- 5MP CMOS sensor
• Wi-Fi Module for wireless streaming to Smartphone
• Free App available from Google Play or iTunes
• Video Resolution: 1080P (1920x1080,30 fps), 720P (1280x720,30 fps), 720P (1280x720,60 fps) - Still Image Resolution: 12MP, 8MP, 5MP, 3MP, 2MP, VGA
- Wide angle lens
• Waterproof to 45m with Case
• 1.5" Preview Screen - Expandable Micro SD Slot up to 32GB
• High-speed USB 2.0 interface
• Built-in rechargeable lithium battery
• Operation Temperature: -10°C to 40°C
• Storage Temperature: 15°C to 35°C
• Works with Windows 8, 7, Vista and XP, Mac 10.2 above
NOTE: As a result of continual improvements, the design and specifications of the product within may differ slightly from the unit illustrated on the packaging.
CONTENTS
Please make sure that the items shown below are included in the package. Should an item be missing, please contact the local retailer from which you purchased this product
• Action Camera 1 piece
• 45m Waterproof Case 1 piece
- Bike Mount 1 piece
- Helmet Mount and Strap 1 piece
- Sticker for Helmet Mount 1 piece
- Remote Control with Strap 1 piece
- Mounting Adaptor for GoPro Accessories 1 piece
- USB Cable 1 piece
- User Manual 1 piece
GETTING TO KNOW YOUR CAMERA
DEVICE OVERVIEW

| 1 Menu button 2 OK button | ||
| 3 LCD screen 4 Down button | ||
| 5 Up /Wifi button | 6 | LED indicator light |
| 7 Shutter/Power button 8 Mode button | ||
| 9 Microphone | 10 | Micro SD card slot |
| 11 HDMI socket 12 USB socket | ||
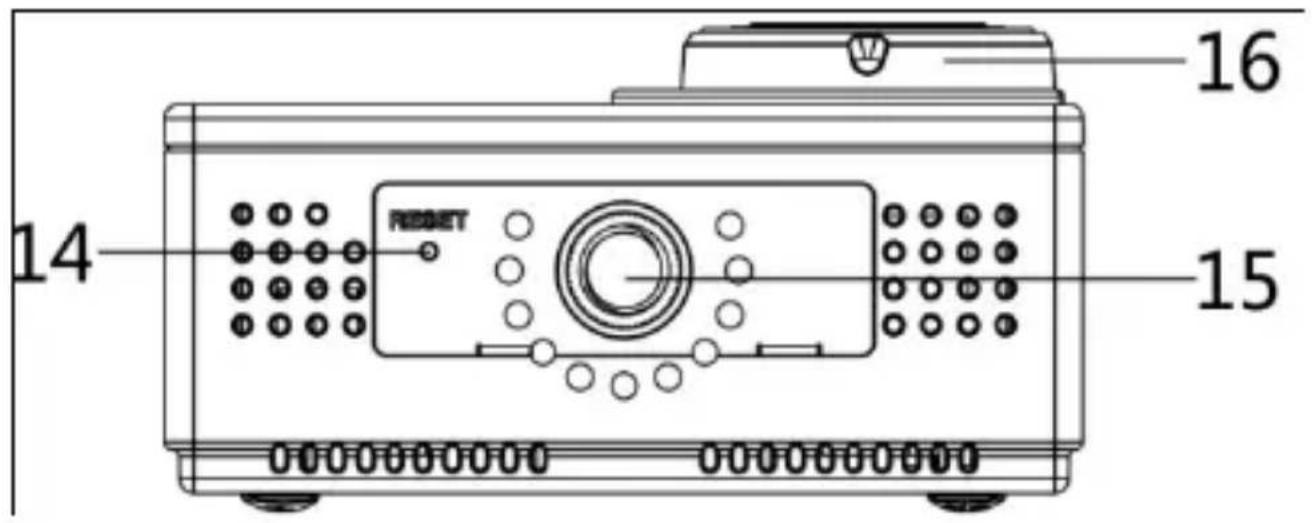
| 13 Speaker 14 Reset | ||
| 15 Tripod hole 16 Lens |

USING THE ACTION CAMERA
BATTERY OPERATION
- Make sure the action camera is turned off.
- To charge the internal battery, connect the action camera with the USB cable provided to a computer or a 1Amp wall charger.
- The led indicator will light up red when charging.
- The battery will become fully charged after 4 hours.
- Once fully charged the charging indicator will disappear.
- Approximate battery life depending on the situation is:
| 1080P 30fps with Wi-Fi | 50 minutes |
| 1080P 30fps 115 minutes | |
| 720P 60fps with Wi-Fi | 55 minutes |
720P 60fps 120 minutes
INSERTING MICRO SD CARD
This action camera does not have internal memory.
A Micro SD (TF) card (Class 10) and above must be inserted for this action camera to operate and record.
- Turn off the action camera
- Find the Micro SD card slot, and then insert the Micro SD card.
ACTION CAMERA OPERATION
START-UP/SHUTDOWN
Press and hold the “Power” button for 3 seconds, the screen will turn on.
To Turn the action camera off Press and hold the “Power” button for 3 seconds, the screen will turn off.
NOTE: The action camera has a power saving setting and will automatically turn itself off after 5mins of inactivity to save power.
MODES
The camera has four modes for the action camera video mode, capture mode, car mode, playback mode. Press the “Mode” button to switch between these modes.
 | Video mode | Recording movie clips |
 | Capture mode | Taking still images |
 | Car Mode | Recording while in the car |
 | Playback mode | Viewing the recorded files |
ACTION CAMERA SETTINGS
Before taking photos or recording videos, press the “Power” button to switch on the action camera first. Press the “Menu” button and the menu will appear on the LCD screen, and then press the “Mode” button to access the settings menu as below. Use the “Up” “Down” and “OK” buttons to make your selections, also the “Mode” button to toggle the selections.
| MENU FUNCTION | |
| Sounds | Allows you to change the sounds on the camera:Shutter:【On】/【Off】Start-up: allows you to choose 3 different sounds where camera is turned on.Beep:【On】/【Off】Volume: adjust the volume from 0 - 3 |
| Back Light | Set the backlight (Turns off the screendisplay while recording) :【1min】/【3min】/【5min】/【ON】 |
| LED | Allows you turn the LED 【On】/【Off】 |
| Power Save | To save power, the video camera is turned off automatically after a period of time.After you select the "off" that means the power save function is switched off【1min】/【3min】/【5min】/【off】 |
| Date and Time | Sets the date and time for the camera. |
| Language | Set the on-screen language:【EN】/【DE】/【IT】/【ES】/【PT】/【NL】/【FR】 |
| Power Frequency | Light Frequency should be set depending on your region for Netherlands/Europe settingshould be 50Hz:【50HZ】/ 【60HZ】 |
| USB | There are two functions when using USB【MSDC】/【PCCAM】 |
| WIFIPassword | Allows you to change the wifi password,standard password is set as 1234567890 |
| Format | Format your SD card including protectedfiles, removing the SD card duringformatting may damage the card.【YES】/ 【NO】 |
| Reset All | Restores the action camera to defaultsettings:【YES】/【NO】 |
VIDEO MODE
-
Turn on the action camera; the camera should automatically be set to video mode when camera is turned on.
-
Press "Shutter" button to start recording.
- The LCD monitor will display how long it has been recording for.
- While recording, to pause press the “Up” button, to turn the LCD screen off press the “Down” button
- Press the "Shutter" button again to stop recording.
- The action camera will stop recording automatically when the memory capacity is full. (While under the loop recording setting, once memory capacity is reached, it will erase files taken from the beginning.
NOTE: When recording videos, the action camera will automatically save it in 28minute files. You can record continuously for as long as possible but every 28minutes it will save a new file and start again.
VIDEO MODE SCREEN
When in Video mode, the below screen will show.
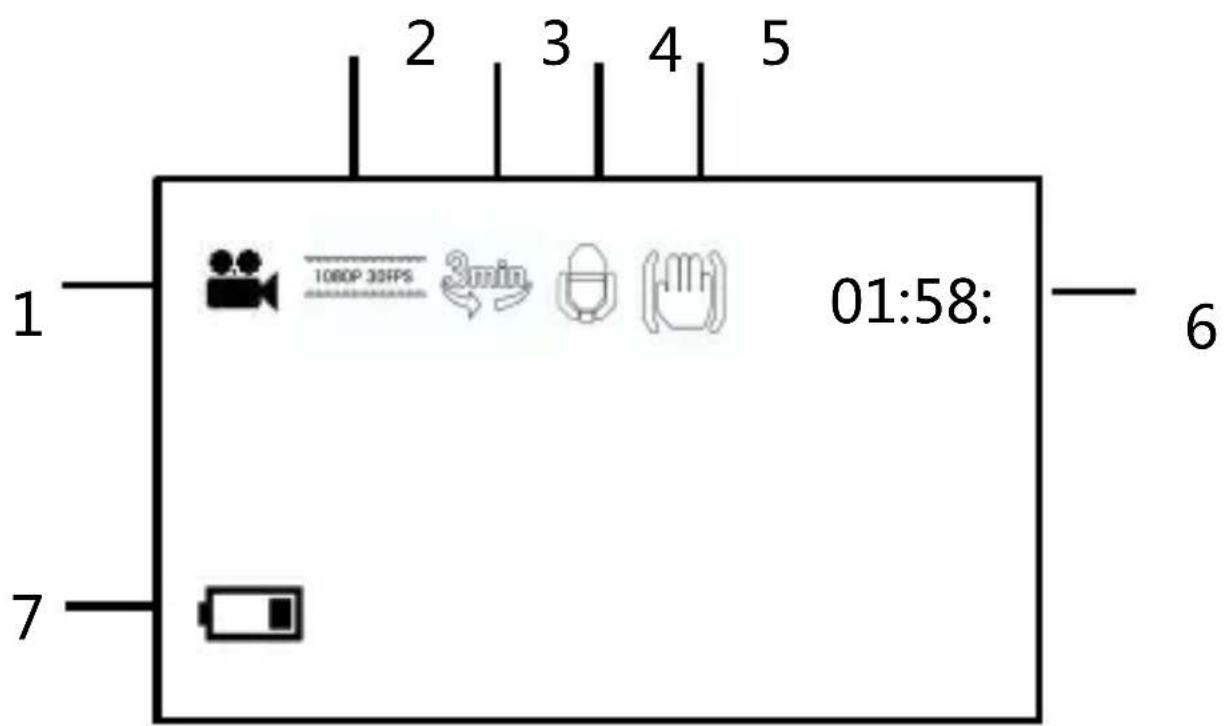
| 1.Video mode2.Movie Resolution3.Loop Recording4.Audio | 5.Stabilizer6.The Record Time7.Battery level |
SETTINGS IN VIDEO MODE
While in video mode, press the “Menu” button and the below settings will appear.
| MENU FUNCTION | |
| Size | Changing the video resolution for the recording. Select small movie size to record longer time. There are four items for option:【1080p】/ 【720p】/ 【720P 60fps】 |
| White Balance | Adjust the white balance to suit different light sources. There five items for option: |
| 【Auto】/【Daylight】/【Cloudy】/【Fluorescent】/【Tungsten】 | |
| Video Quality | Adjust the quality of the recording 【Super Fine】/【Fine】/【Normal】 |
| Stabilizer | Helps to keep the recording stable 【On】/【Off】 |
| Voice Rec | Record voice when recording movie clips 【On】/【Off】 |
| Loop recording | While under the loop recording setting, once memory capacity is reached, it will erase files taken from the beginning. Set the loop recording time: 【Off】/【1min】/【3min】/【5min】 |
| Motion Detection | When the setting is set to ON the camera will automatically detect any movement within 4 metres and start automatically recording.【On】/【Off】 |
| SlowMotion | Enables slow motion recording【On】/【Off】 |
| Time-lapse | Enables time-lapse recording【Off】/【3sec】/【5sec】/【10sec】/【30sec】/【1min】/【3min】 |
| Time-lapseDuration | Choose the duration of your time-lapse recording【Unlimited】/【3min】/【5min】/【10min】【15min】/【20min】/【30min】/【60min】 |
| DateStamp | This function can be used to add a date and time to your pictures.【Off】/【Date】/【Date&Time】 |
PHOTO MODE
- Turn on the action camera; the camera should automatically be set to video mode when camera is turned on. Press the
"Mode" button to change to capture mode.
-
Take a still image by pressing the shutter button.
-
After the image has been taken the LCD will display black for a brief second.
-
The memory capacity in the top right of screen will decrease as each image is taken.
SETTINGS IN PHOTO MODE
While in photo mode, press the “Menu” button to access the photo settings.
| MENU FUNCTION | |
| Resolution | Allows you to change the image resolution:【12M】/【8M】/【5M】/【3M】/【2M】/【VGA】 |
| WhiteBalance | Adjust the white balance to suit different light sources. There five items for option:【Auto】/【Daylight】/【Cloudy】/【Fluorescent】/【Tungsten】 |
| Image Quality | Select a lower image quality to decrease the image size in order to take more images. There are three options for choice: 【Super Fine】/【Fine】/【Normal】 |
| Metering | Changes the metering method, which enables to change the brightness of the picture: 【Centre】/【Multi】/【Spot】 |
| Sharpness | You can set the level of sharpness in the images taken with your camera. The sharpness level dictates if the edges of objects in the image are more or less distinct.【Hard】/【Normal】/【Soft】 |
| ISO | The ISO menu allows you to set the level of sensitivity that your camera has to light inthe surrounding environment.【Auto】/【50】/【100】/【200】/【400】/【800】/【1600】 |
| Exposure | Set the exposure value manually tocompensate for unusual lightingconditions:【-2】/【-1.7】/【-1.3】/【-1】/【-0.7】/【-0.3】/【0】/【+0.3】/【+0.7】/【+1】/【+1.3】/【+1.7】【+2】 |
| Stabilizer | Helps to keep the recording stable【On】/【Off】 |
| AutoReview | After taking photo the will be displayed onthe LCD screen for the below amount oftime.【Off】/【1sec】/【3sec】/【5sec】 |
| Self-Timer | Each time you press the “Shutter” button itwill count down the number of secondsbefore the image is taken:【Off】/【2sec】/【10sec】 |
| Photo Burst | Each time you press the “Shutter” button it will continuously take a few pictures: 【Off】/【3】/【5】/【10】 |
| Time-lapse | Enables time-lapse photography, it will take one photo per the below timing: 【Off】/【3sec】/【5sec】/【10sec】/【30sec】/【1min】/【3min】 |
| Time-lapse Duration | Choose the duration of your time-lapse photographing 【Unlimited】/【3min】/【5min】/【10min】 【15min】/【20min】/【30min】/【60min】 |
| Date Stamp | This function can be used to add a date and time to your pictures. 【Off】/【Date】/【Date&Time】 |
PHOTO MODE SCREEN
When in Photo mode, the below screen will show.

| 1.Photo mode2.Resolution3.Photo Burst4.Exposure | 5.Stabilizer6.Memory capacity7.Battery level |
CAR MODE
Press the "Mode" button to bring up the car mode.
When in car mode the screen will automatically rotate 180 degrees. This is for when your camera is connected to a windshield/windscreen mount (Not included), it will record the correct the way and not be upside down.
The Process for recording and changing the settings is as per the Video mode.
PLAYBACK MODE
- Press the "Mode" button until your reach playback mode.
Here you will be able to review all the files you have recorded. - When entering playback mode a menu will appear showing
Video File, Car File, JPG File, and Protect File. - Use the "Up" "Down" and "Ok" buttons to select the files
you want to review. - To review the Video or Car File press the "Ok" button to start
playing the video file, to pause the video press the "Up" button.
Press the “Menu” button to stop playing the video file. - When viewing the images, use the "Up" and "Down"
buttons to scroll through the images, press the "OK" button
and it will create a slideshow. - To exit from each of the file menus and take you back to the
original screen press the "mode" button.
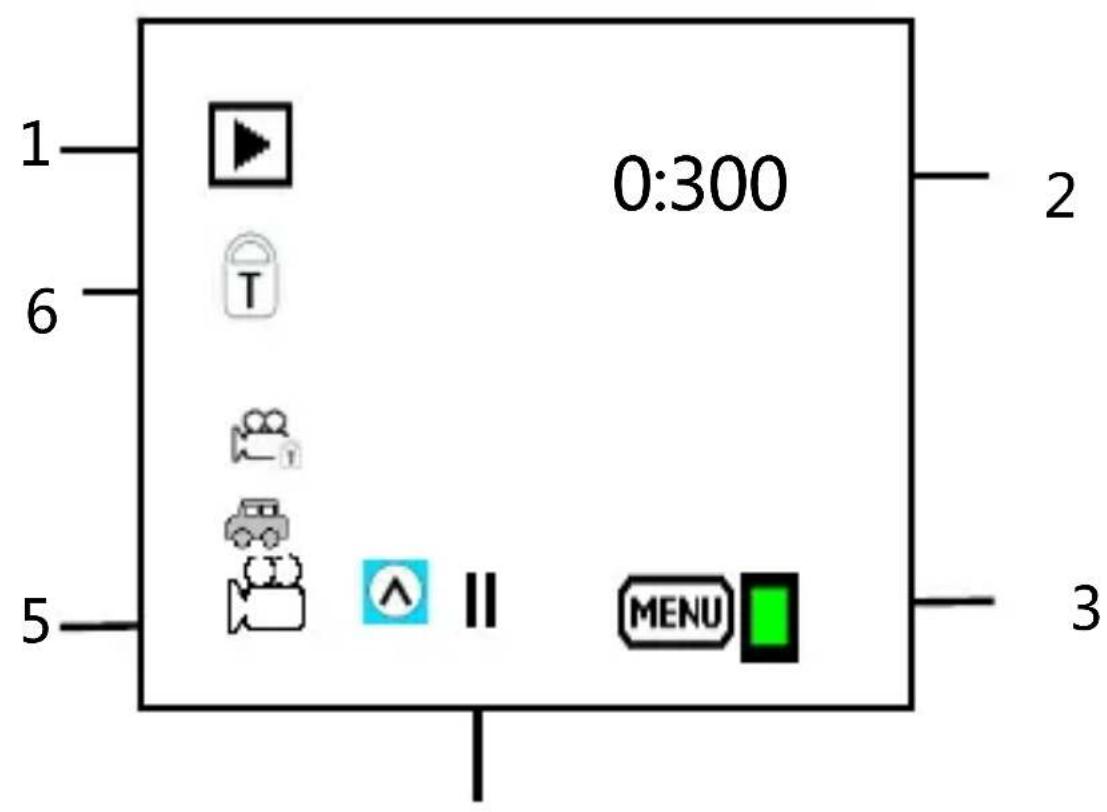
PLAYBACK VIDEO/CAR/PROTECT FILE
| 1. Playback mode2. The time3. Exit | 4. Pause5. Video /car/protect File6. Lock |
427
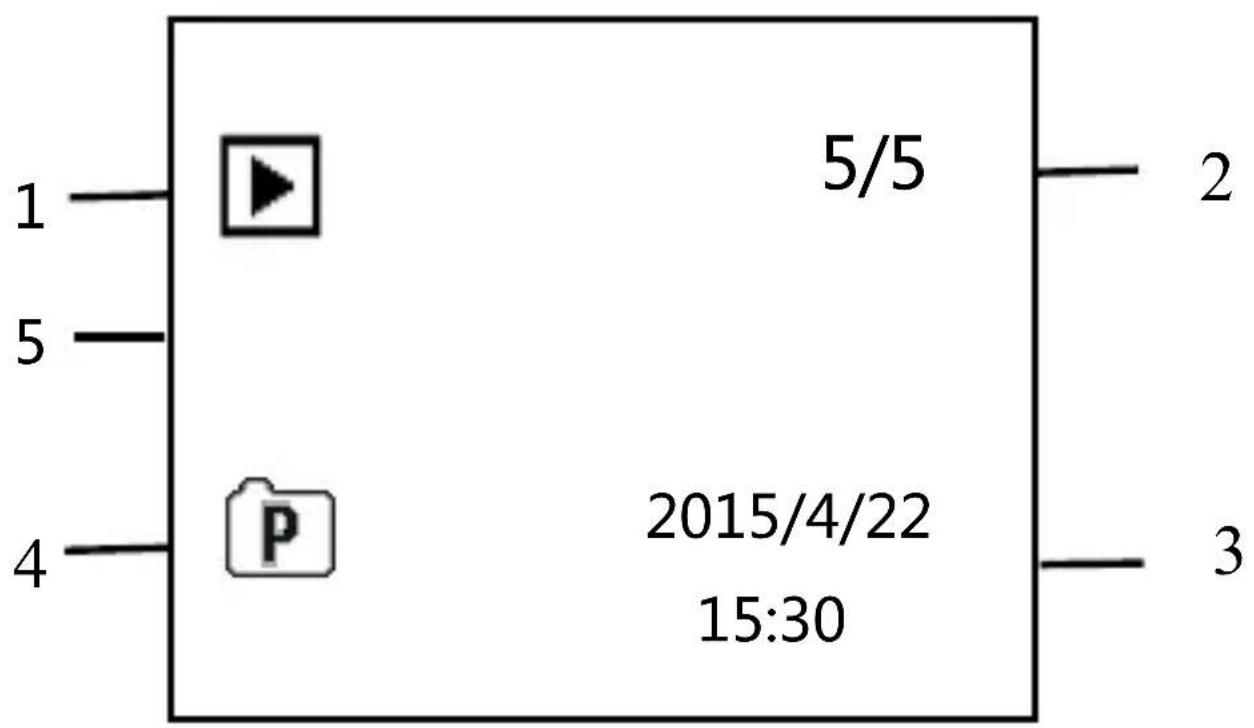
PLAYBACK JPG FILE
| 1. Playback mode2. Sequence of File3. Date and Time | 4. Image File5. Lock |
SETTINGS IN PLAYBACK MODE
While in playback mode, press the “Menu” button to access the settings.
| MENU FUNCTION | |
| Lock | Use this function to protect the files from being deleted by accident.【Single】/【Lock All】/【Unlock All】 |
| Delete | Use this function to delete a single file or all files.【Single】/【All】 |
| Slide Show* | Change the slide show settings when using the slideshow function for reviewing photos【Start】/【Interval】/【Transition】/【Repeat】 |
| Rotate* | Use this function to rotate the images.【Rotate】/【Save】/【Back】 |
| Resize* | Resize images to a smaller resolution.【5M】/【3M】/【2M】/【VGA】 |
* Functions only available when viewing photos.
WIFI MODE
The action camera comes with Wi-Fi function so you can wirelessly stream your video to your Smartphone or control your action camera by your phone.
Firstly download the free APP “iShare Cam” which can be downloaded from the iTunes store or Google Play store.
- After the App has been downloaded and installed. Insert Micro SD card into the action camera.
- To turn on the Wi-Fi function, press the “Up” button to activate Wi-Fi. The screen will display “Waiting for WIFI Connection...”
- Now with your mobile phone, disconnect from any current wireless networks and search for a WIFI connection called EXTREME X5 and connect using password: 1234567890, the LCD screen on the camera will now say “WIFI Connection Ready” once connected. (In order to save power, the Wi-Fi will automatically turn off if it cannot be connected after 60 seconds)
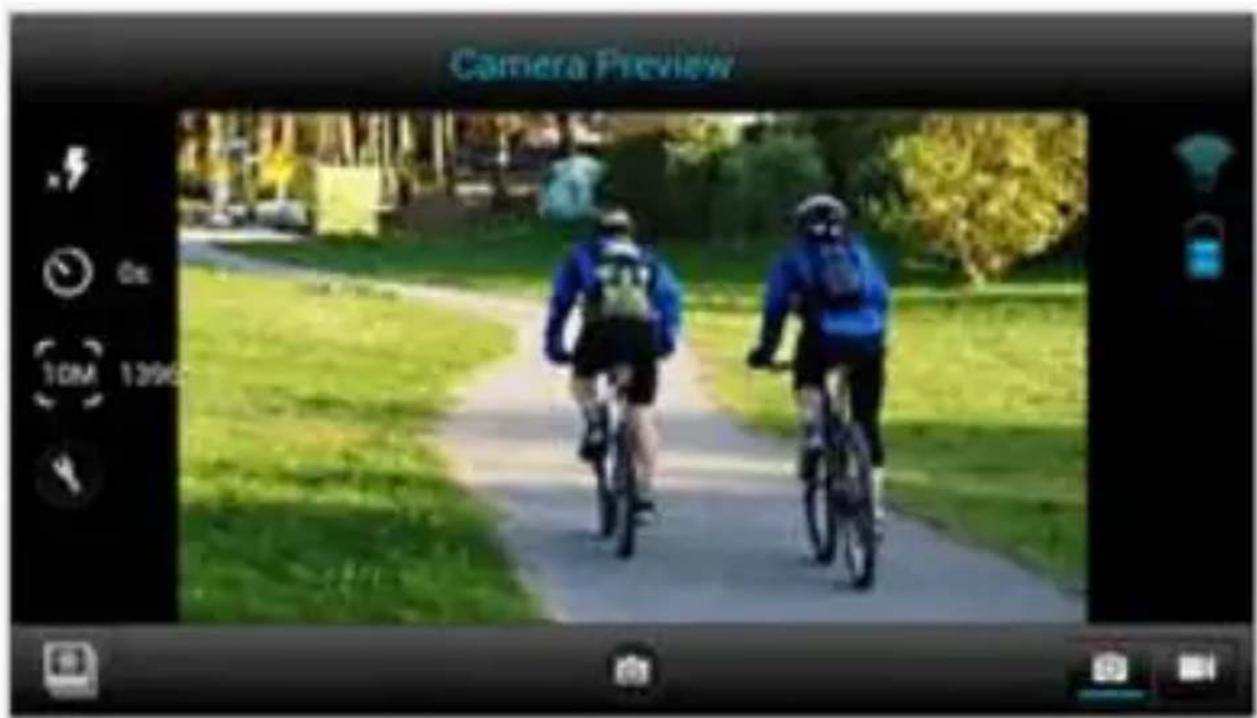
- Once connected successfully, open the iShare Cam App.
-
You can control the action camera with the App to take photos, videos and change different settings.
-
To watch the recorded videos you will need to download these from the APP to your phone, then watch the video as per you normally would on your phone

CONNECTIONS
CONNECTING TO HDTV
The action camera can be connected to a HDTV via a Mini
HDMI cable (not supplied).
Note: Before connecting or removing the HDMI cable, please stop video recording, playback and disconnect Wi-Fi.
- Connect the action camera to a TV via a Mini HDMI cable (not supplied).

-
Turn on the TV and the action camera, and then set the TV to HDMI mode.
-
When HDTV is connected, the action camera screen will go black and the TV will display what is shown on your camera. From here you can playback your files on your TV by following the previous steps in playback mode.
CONNECTING TO PC
Turn on the action camera and connect it to the USB port of the PC via the supplied USB cable. The action camera will enter MSDC mode and will be displayed on your cameras screen.
Once connected to the PC the driver will automatically install.
Now you can view the photos or videos taken by action camera on the PC/Mac.
Note: when watching the videos on your computer, please ensure you are using the latest version of your media player.
USING THE REMOTE CONTROL
The remote control uses 2.4GHz wireless technology so you don't need to point it towards the camera for it to work. The remote control has a 10-15m working range. The remote
control is powered by 1 x AAA battery (not included), please remove the battery cover and install the battery.
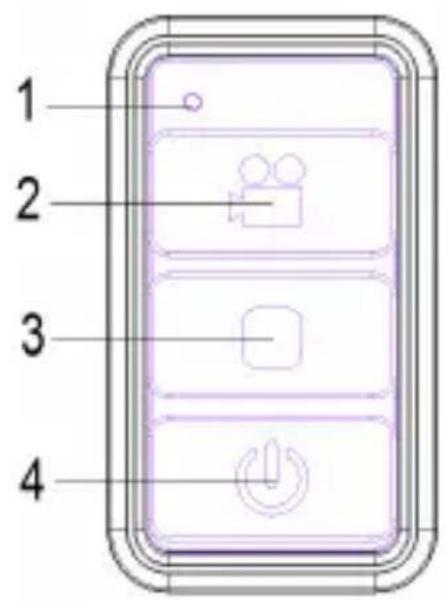
- LED Indicator
- Use this button to record video on Video/Car Mode. When in Standby mode use this button to wake camera up and start recording.
-
Use this button to stop recording.
-
Enters standby mode while in Video/Car Mode.
USING THE MOUNTING ACCESSORIES
There are two mounts included in the action camera box.
A. Bike Mount
B. Helmet Mount

natural_image
Line drawing of a robotic device with wheels and a handle (no text or symbols)A

natural_image
Technical line drawing of a mechanical component with multiple cylindrical pins (no text or symbols)B
The bike and helmet mounts can be attached to either the action camera directly or waterproof case (with the camera inside)
FIXING THE ACTION CAMERA TO A BIKE
- Find the Bike Mount A
- This mount is separated into 3 parts.
Main Section (1)
Mounting Bracket (2)
Connectors
- Choose the connectors from the three given below depending on how you want to mount your camera, and then fix them to the part 1 of the main mount and part 2 the mounting bracket.


natural_image
Technical line drawing of a vehicle's internal components, including a flatbed chassis and a rectangular device (no text or symbols)Make sure all the screws are done up tightly.
FIXING THE ACTION CAMERA TO A HELMET
-
Find the Helmet Mount B
-
This mount is separated into 3 parts.
Main Section (3)
Mounting Bracket (2)
Connectors
- You can either connect the mounting bracket directly to the main section or choose some of the connectors from the three
given below depending on how you want to mount your camera, and then fix them to the part 3 of the main section and part 2 the mounting bracket.

- After fixing the action camera to the mount, use the strap provided or Sticker to attach to your helmet.
MOUNTING ADAPTOR
Supplied with the action camera is a Mounting Adaptor for GoPro Accessories, to use this adaptor connect to the action camera or the underwater case via the tripod Socket. Then the Mount can be used with any GoPro Accessory which can be bought from the local retailer. The GoPro Accessory will attach to the bottom of the mount and held in place by a screw.

natural_image
Technical line drawing of a mechanical gear assembly (no text or symbols)WATERPROOF CASE CARING INSTRUCTIONS
Before sealing the waterproof case, keep the camera housing's rubber seal clean, a single hair or grain of sand can cause a leak.
You can test by closing the case without inserting the camera. Submerse the case completely in water for about a minute.
Remove the case from the water, dry off its exterior with a towel, and then open the case. If the entire interior is dry, the case is safe for use under water
After every use in salt water you will need to rinse the outside of the housing with non-salt water and dry. Not doing this can eventually cause corrosion of the hinge pin and salt buildup in the seal, which can cause failure.
To clean the seal, rinse in fresh water and shake dry (drying with a cloth may cause lint to compromise the seal). Re-install the seal into the grooves in the backdoor of the housing.
Please note: the waterproof case is rated for use up to 45 metres deep.
TROUBLESHOOTING
| Problem Solution | |
| I cannot upload images to the PC | Check all cable connections are secured. |
| Set the camera to MSDC mode. | |
| I press the shutter button but no response. | Wait for data process to complete and then take your next image.OrDelete some images in SD/MMC card, if the memory is full. |
| The product does not respond | Reset the camera by pressing the reset button |
| The video files are very slow and bad | Please ensure you have downloaded the latest version of |
| resolutions when playing on my computer | your media player, or try such programs as VLC media player, Windows media, QuickTime. |
| My phone cannot play the recorded video | Download the video to your phone, Ensure your phone has the latest video player, otherwise try to download another video player for your phone |
| Cannot connect to mobile App | Check to make sure you have connected to the Action Camera's Wi-Fi. Or turn camera off and on and connect the Wi-Fi again following the steps. |
| When SD card is inserted shows | Please remove the SD card and format the card via your |
| 0:00 recording time | computer. Please also ensure you are using a class10 or higher Micro SD Card. Also ensure there is spare memory inside the card |
| There is no sound on my recording | If recording while in the waterproof case, there will be no sound. |
- INTRODUCTION
- SAFETY INSTRUCTIONS
- IMPORTANT SAFETY PRECAUTIONS
- PRODUCT SPECIFICATION
- CONTENTS
- GETTING TO KNOW YOUR CAMERA
- DEVICE OVERVIEW
- USING THE ACTION CAMERA
- BATTERY OPERATION
- INSERTING MICRO SD CARD
- ACTION CAMERA OPERATION
- START-UP/SHUTDOWN
- MODES
- ACTION CAMERA SETTINGS
- VIDEO MODE
- SETTINGS IN VIDEO MODE
- PHOTO MODE
- SETTINGS IN PHOTO MODE
- CAR MODE
- PLAYBACK MODE
- PLAYBACK JPG FILE
- SETTINGS IN PLAYBACK MODE
- WIFI MODE
- CONNECTIONS
- CONNECTING TO HDTV
- CONNECTING TO PC
- USING THE REMOTE CONTROL
- USING THE MOUNTING ACCESSORIES
- FIXING THE ACTION CAMERA TO A BIKE
- Mounting Bracket (2)
- Connectors
- FIXING THE ACTION CAMERA TO A HELMET
- MOUNTING ADAPTOR
- WATERPROOF CASE CARING INSTRUCTIONS
- TROUBLESHOOTING
Brand : NIKKEI
Model : Extreme X5
Category : Action Camera