LCPCKX11 - Cooker Logik - Free user manual and instructions
Find the device manual for free LCPCKX11 Logik in PDF.
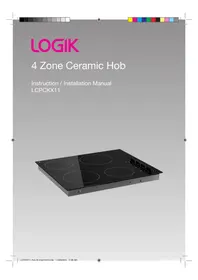


| Product Type | Freestanding Cooker |
| Brand | Logik |
| Model | LCPCKX11 |
| Hob Type | Gas (4 burners) |
| Oven Type | Electric (conventional) |
| Oven Capacity | 65 liters |
| Oven Functions | Conventional, Grill, Defrost, Fan-assisted |
| Dimensions (W x H x D) | 60 cm x 85 cm x 60 cm |
| Weight | 48 kg |
| Power Supply | 220-240V ~ 50Hz, 3.5 kW (electric oven), gas mains |
| Energy Efficiency Class | A (Oven) |
| Cleaning Type | Enamel interior, removable oven door for easy cleaning |
| Safety Features | Flame failure device on gas burners, child lock on oven door |
| Spare Parts Availability | Replacement burners, oven elements, knobs, and thermostats |
| Repairability Index | 7.2 / 10 |
| Control Type | Front-mounted knobs for hob and oven |
| Includes | Grill pan, baking tray, LPG conversion kit |
| Warranty | 2 years |
| Manual Languages | English, French, German, Dutch, Polish |
Frequently Asked Questions - LCPCKX11 Logik
User questions about LCPCKX11 Logik
0 question about this device. Answer the ones you know or ask your own.
Ask a new question about this device
Download the instructions for your Cooker in PDF format for free! Find your manual LCPCKX11 - Logik and take your electronic device back in hand. On this page are published all the documents necessary for the use of your device. LCPCKX11 by Logik.
USER MANUAL LCPCKX11 Logik



Contents
Unpacking....4
Product Overview....5
Top View....5
Control Panel....5
Before Using Your New Ceramic Hob 6
Choosing the Right Cookware....6
Using Your Ceramic Hob 7
To Start Cooking ....7
Hot Hob Warning Indicator....7
When You Have Finished Cooking ....7
Cooking Guidelines 8
Cooking Tips....8
Simmering, Cooking Rice ....8
Searing Steak 8
For Stir-Frying 8
Care and Cleaning 9
Hints and Tips 10
Specification 10
Installation....11
Preparing the Worktop....11
Ensuring Adequate Ventilation 11
Fastening the Fixing Brackets 12
Connecting the Hob to the Mains Power Supply 13
Safety Warnings....15
Thank you for purchasing your new Logik Built-in Ceramic Hob.
We recommend that you spend some time to read this manual in order to fully understand how to install and operate it correctly.
Read all the safety warnigs carefully before use and keep this manual for future reference.

Unpacking
Remove all packaging from the unit. Retain the packaging. If you dispose of it please do so according to local regulations.
The following items are included:
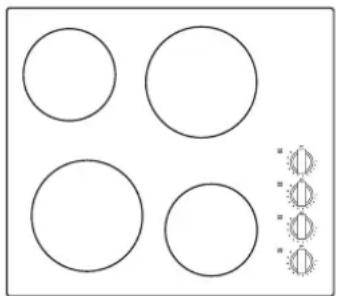
Main Unit GB818 / M4*10-PFH Screw × 4
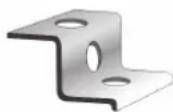
Brackets × 4
P.N.: 303207800067

for securing the bracket
P.N.: 301500101084
Instruction / Installation Manual
P.N.: LCPCKX11H-001

If items are missing, or damaged please contact Partmaster (UK only).
Tel: 0844 800 3456 for assistance.

Product Overview
Top View
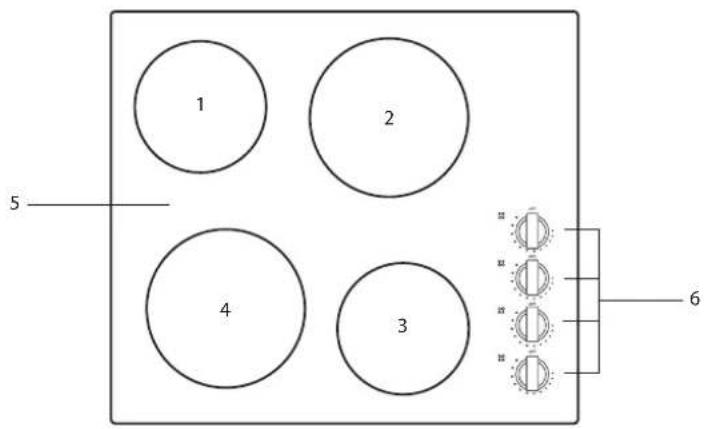
-
Max.1200 W zone
-
Max.1800 W zone
-
Max.1200 W zone
-
Max.1800 W zone
-
Ceramic Glass
-
Control Panel
Control Panel
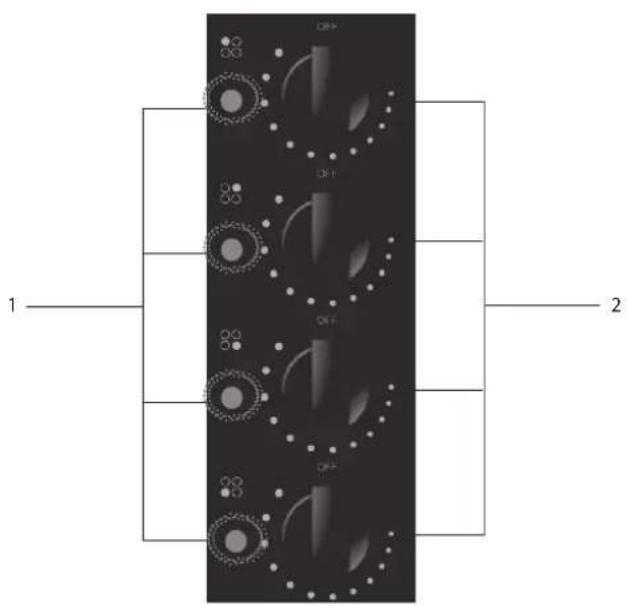
-
Hot Hob Warning Indicators
-
Power Regulating Controls

Before Using Your New Ceramic Hob
- Read this guide, taking special note of the 'Safety Warnings' section.
- Remove any protective film that may still be on your ceramic hob.

Choosing the Right Cookware
Do not use cookware with jagged edges or a curved base.
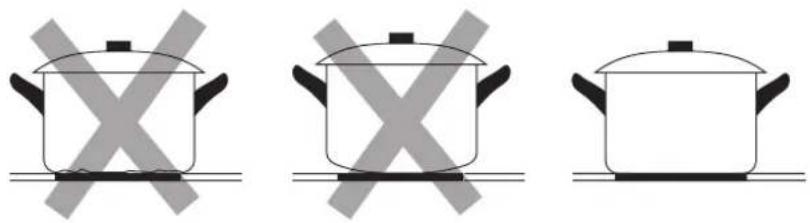
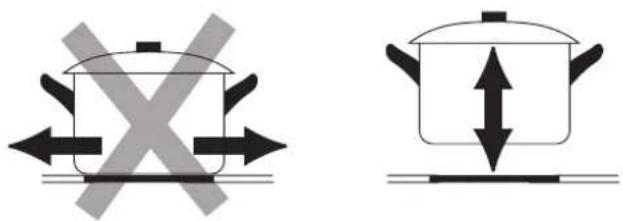
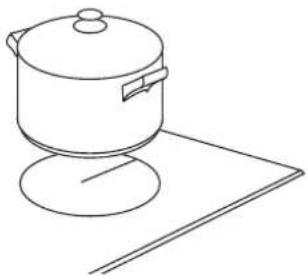
Make sure that the base of your pan is smooth, sits flat against the glass, and is the same size as the cooking zone. Always centre your pan on the cooking zone.
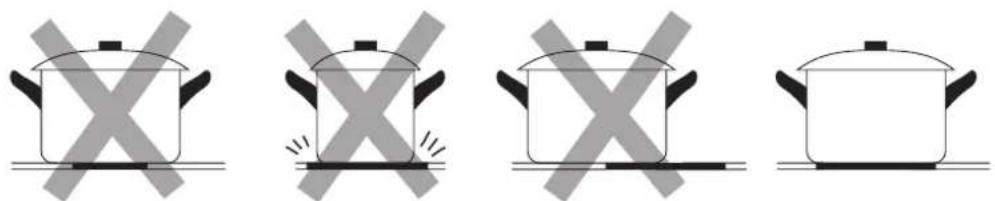
Always lift pans off the ceramic hob – do not slide, or they may scratch the glass.

- Occasionally the heated areas may be seen to switch on and off when higher heat settings are used. This is due to a safety device, which prevents the glass from overheating. Some switching on and off when cooking at high temperatures, e.g. deep fat frying is quite normal, causes no damage to the hob and little delay in cooking times. Excessive switching may however be caused by the use of an unsuitable saucepan or a saucepan which is smaller than the heated area. If excessive switching occurs, discontinue the use of the saucepan.
• To improve performance, and reduce energy, always use pans with close fitting lids.

Using Your Ceramic Hob
To Start Cooking
- Place a suitable pan on the cooking zone you wish to use.
• Make sure the bottom of the pan and the surface of the cooking zone are clean and dry.
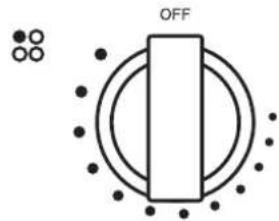
- Adjust the power regulating control to the desired level to turn on the control.
Hot Hob Warning Indicator
When the glass plate is hot, the hot hob warning indicator will illuminate. Don't touch the glass plate until the indicator turns off.
It can also be used as an energy saving function if you want to heat further pans, use the hotplate that is still hot.
When You Have Finished Cooking
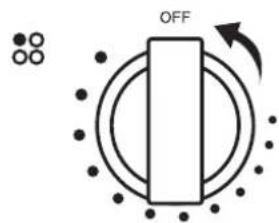
Turn the cooking zone off by turning the power regulating control to the "OFF" position.

Cooking Guidelines

Take care when frying as oil and fat heat up very quickly. At extremely high temperatures oil and fat will ignite spontaneously and this presents a serious fire risk.

Cooking Tips
- When food comes to the boil, reduce the temperature setting.
• Using a lid will reduce cooking times and save energy by retaining the heat. - Minimise the amount of liquid or fat to reduce cooking times.
- Start cooking on a high setting and reduce the setting when the food has heated through.
Simmering, Cooking Rice
- Simmering occurs below boiling point, at around 85°C , when bubbles are just rising occasionally to the surface of the cooking liquid. It is the key to delicious soups and tender stews because the flavours develop without overcooking the food. You should also cook egg-based and flour thickened sauces below boiling point.
- Some tasks, including cooking rice by the absorption method, may require a setting higher than the lowest setting to ensure the food is cooked properly in the time recommended.
Searing Steak
To cook juicy flavoursome steaks:
- Stand the meat at room temperature for about 20 minutes before cooking.
- Heat up a heavy-based frying pan.
- Brush both sides of the steak with oil. Drizzle a small amount of oil into the hot pan and then lower the meat onto the hot pan.
-
Turn the steak only once during cooking. The exact cooking time will depend on the thickness of the steak and how cooked you want it. Times may vary from about 2 – 8 minutes per side. Press the steak to gauge how cooked it is – the firmer it feels the more 'well done' it will be.
-
Leave the steak to rest on a warm plate for a few minutes to allow it to relax and become tender before serving.
For Stir-Frying
- Choose an induction compatible flat-based wok or a large frying pan.
- Have all the ingredients and equipment ready. Stir-frying should be quick. If cooking large quantities, cook the food in several smaller batches.
- Preheat the pan briefly and add two tablespoons of oil.
- Cook any meat first, put it aside and keep warm.
- Stir-fry the vegetables. When they are hot but still crisp, turn the cooking zone to a lower setting, return the meat to the pan and add your sauce.
- Stir the ingredients gently to make sure they are heated through.
- Serve immediately.

Care and Cleaning
The settings below are guidelines only. The exact setting will depend on several factors, including your cookware and the amount you are cooking. Experiment with the ceramic hob to find the settings that best suit you. Steam cleaner is NOT to be used.
| What? How? Important! | ||
| Everyday soiling on glass(fingerprints, marks, stains left by food or non-sugary spillovers on the glass) | 1. Switch the power to the ceramic hob off.2. Apply a ceramic hob cleaner while the glass is still warm (but not hot!)3. Rinse and wipe dry with a clean cloth or paper towel.4. Switch the power to the ceramic hob back on. | When the power to the ceramic hob is switched off, there will be no 'hot surface' indication but the cooking zone may still be hot!Take extreme care.Heavy-duty scourers, some nylon scourers and harsh/abrasive cleaning agents may scratch the glass. Always read the label to check if your cleaner or scourer is suitable.Never leave cleaning residue on the ceramic hob: the glass may become stained. |
| Boilovers, melts, and hot sugary spills on the glass | Remove these immediately with a fish slice, palette knife or razor blade scraper suitable for ceramic glass ceramic hob, but beware of hot cooking zone surfaces:1. Switch the power to the ceramic hob off at the wall.2. Hold the blade or utensil at a 30° angle and scrape the soiling or spill to a cool area of the ceramic hob.3. Clean the soiling or spill up with a dish cloth or paper towel.4. Follow steps 2 to 3 for 'Everyday soiling on glass' above. | Remove stains left by melts and sugary food or spillovers as soon as possible. If left to cool on the glass, they may be difficult to remove or even permanently damage the glass surface.Cut hazard: when the safety cover is retracted, the blade in a scraper is razor-sharp. Use with extreme care and always store safely and out of reach of children. |
| Spillovers on the power regulating controls | 1. Switch the power to the ceramic hob.2. Soak up the spill.3. Wipe the power regulating control area with a clean damp sponge or cloth.4. Wipe the area completely dry with a paper towel. | Make sure you wipe the power regulating control area dry before turning the ceramic hob back on. |

Hints and Tips
| Problem Possible Causes What To Do | ||
| The ceramic hob cannot be turned on. | No power. Make sure the ceramic hob is connected to the mains power supply and that it is switched on. Check whether there is a power outage in your home or area. If you've checked everything and the problem persists, call a qualified technician. | |
| The glass has been scratched. Rough-edged cookware. Use cookware with flat and smooth bases. See ‘Choosing the right cookware’. Unsuitable, abrasive scourer or cleaning products being used. | Unsuitable, abrasive scourer or cleaning products being used. | See ‘Care and cleaning’. |
Please do not disassemble the unit by yourself to avoid any dangers and damages to the ceramic hob.

Specification
| Model LCPCKX11 (Hob) | |
| Rated Voltage 230 – 240V~ | |
| Rated Frequency 50 Hz | |
| Overall Dimension (W x D X H) 590 (W) × 520(D) × 55(H) (in mm) | |
| Power Consumption 6000 – 6600W | |
Features and specifications are subject to change without prior notice.

Installation
Preparing the Worktop
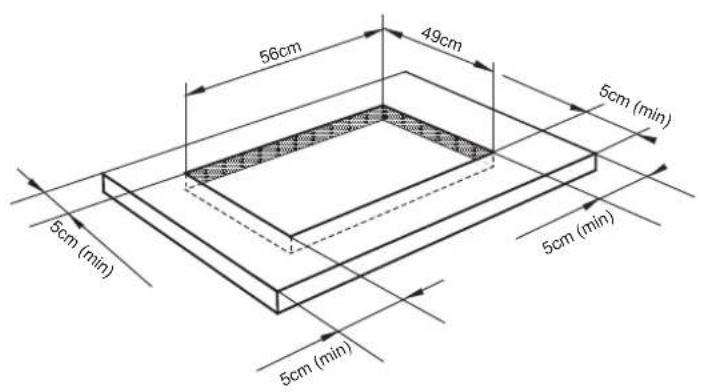
Cut out the work surface following the dimensions shown in the drawing below.
For the purpose of installation and use, a minimum distance of 5cm space must be left around the cut out.
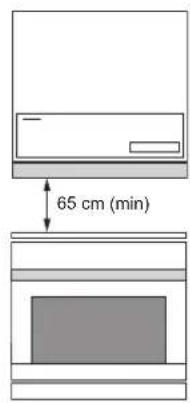
Be sure the thickness of the work surface is at least 20mm. Use a heat-resistant work surface material to avoid deformation caused by the heat from the hob. The minimum distance between the hob and the cupboard should be at least 65cm.
Ensuring Adequate Ventilation
Always make sure the ceramic cooker hob is well ventilated and that the air inlet and outlet are not blocked. This hob requires an adequate supply of fresh, cool air to fully function. The base of the hob must have direct unrestricted ventilation to the room where the hob is installed. Follow the requirements below.
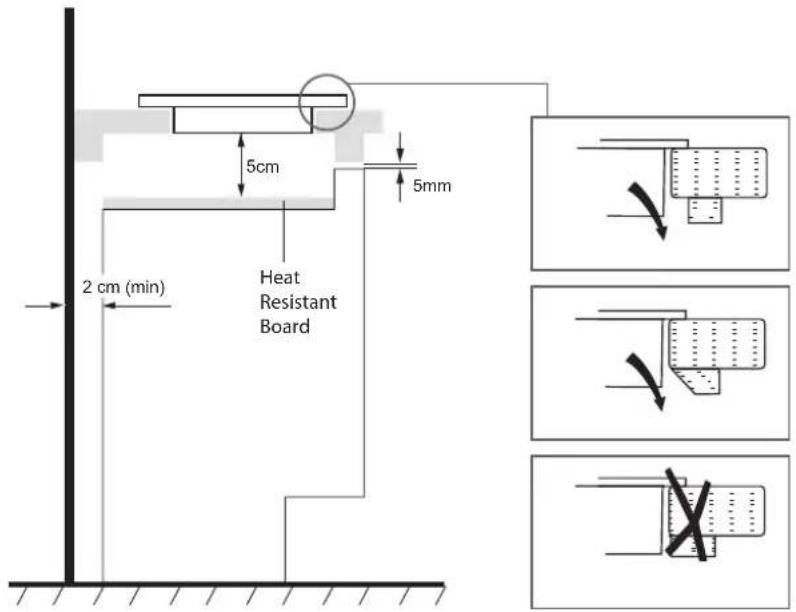

There are ventilation holes around the outside of the hob. YOU MUST ensure that these holes are not blocked by the worktop, when you put the hob into position.
Fastening the Fixing Brackets
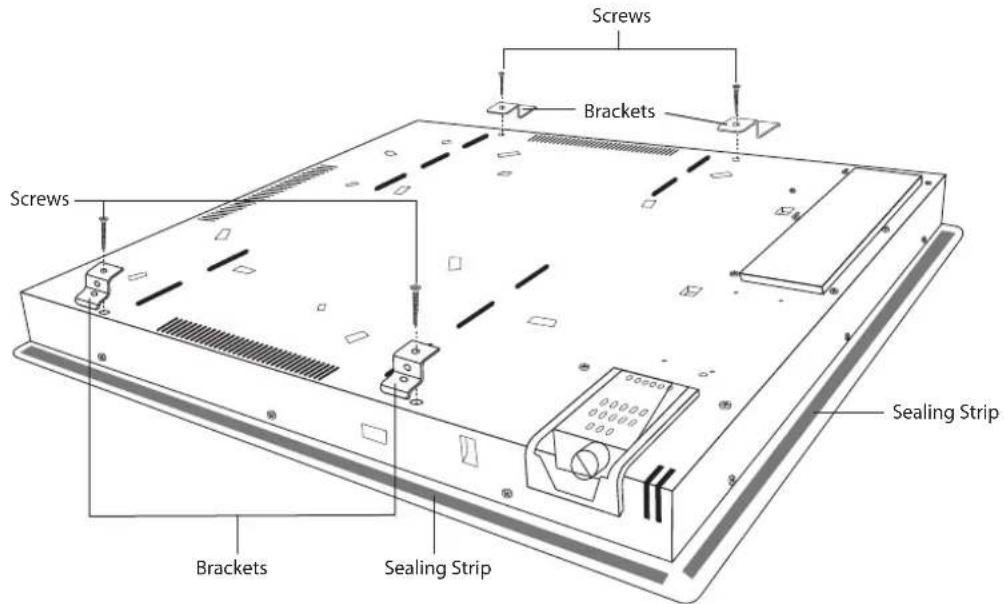
The unit should be placed on a stable, smooth surface (use the packaging).
- Turn the hob upside down, place it on a soft surface and fasten the brackets to the appropriate holes. DO NOT tighten the screws at this stage.
- Apply sealing strips around the edge of the hob.


• The hob must be installed by qualified personnel or technicians.
• The hob should not be mounted above cooling equipment, dishwashers and rotary dryers.
- All surfaces around the hob should be able to withstand the heat generated by the hob.
- Never use a steam cleaner to clean the hob.
- Do not use a silicon sealant to seal the appliance against the aperture. This will make it difficult to remove the hob from the aperture, particularly if it needs to be serviced.
- Insert the hob into the cut out and position it correctly.
- Tighten the screws to secure the hob to the worktop.
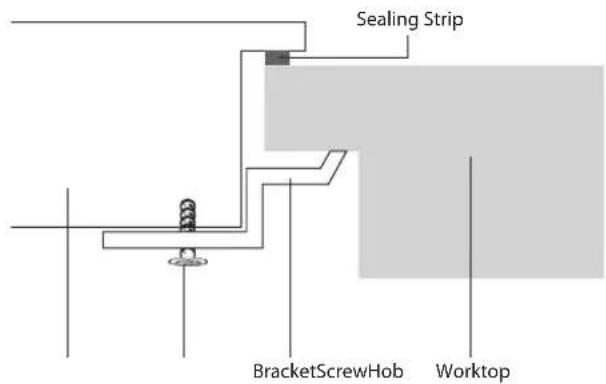

Do not over tighten the hob clamps as distortion of the hob may occur.
Connecting the Hob to the Mains Power Supply
- Remove the screw A. 2. Remove the screw A.
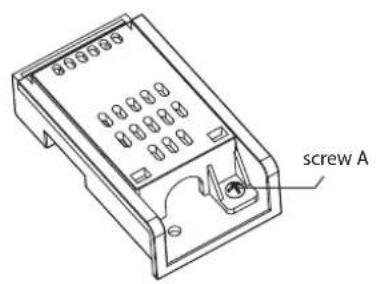
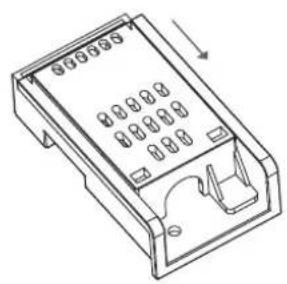
- Remove the 2 screws B. 4. Remove the 4 screws C in the terminal box and
insert the power cord at the connection.
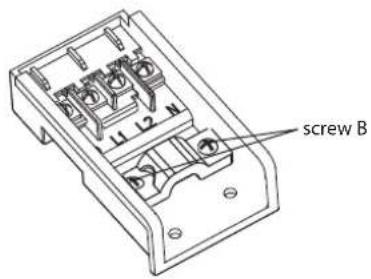
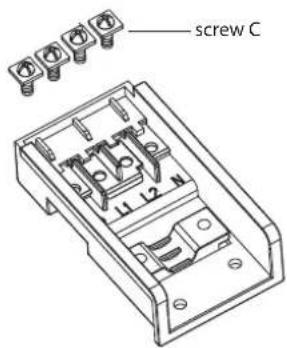
The power supply should be connected in compliance with the relevant standard, or a single-pole circuit breaker. The method of connection is shown below.
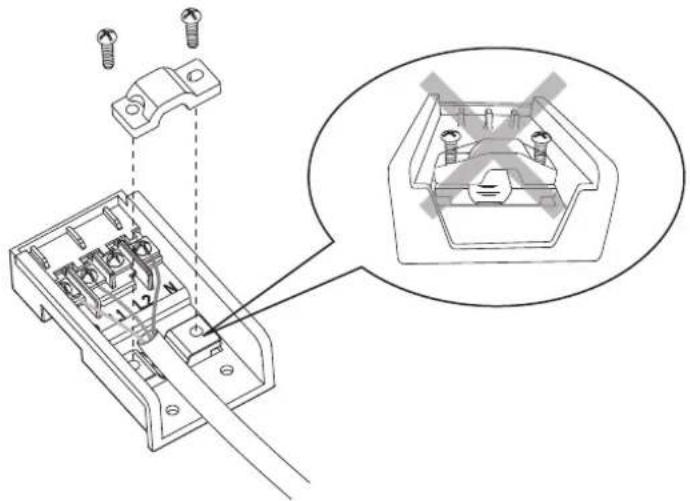
- Assemble the cable clamp, be aware that the ellipse hole on cable clamp must match the ellipse hole on. Fix
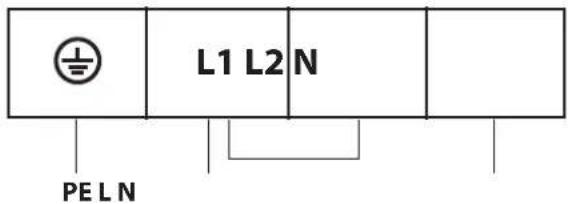
5 × 1.5 mm2 / 4 × 2.0 mm2 / 3 × 2.5 mm2
• This appliance must be earthed.
- For this connection a power lead of wire type H05RR-F should be used.

- If the mains cable is damaged or needs replacing, this should be done by a qualified person using the proper tools, so as to avoid any accidents.
- If the hob is being connected directly to the mains supply, an omnipolar circuit breaker must be installed with a minimum gap of 3mm between the contacts.
- The installer must ensure that the correct electrical connection has been made and that it complies with safety regulations.
• The mains cable must not be bent or compressed.
• The mains cable must be checked regularly and only replaced by a qualified person.

the top plate.
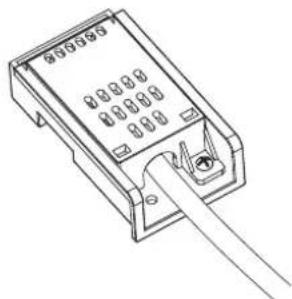
- Fix the top plate.

Safety Warnings
Your safety is important to us. Please read this information before using your ceramic hob.
Installation
Electrical Shock Hazard
- Disconnect the appliance from the mains electricity supply before carrying out any work or maintenance on it.
- Connection to a good earth wiring system is essential and mandatory.
• Alterations to the domestic wiring system must only be made by a qualified electrician. - Failure to follow this advice may result in electrical shock or death.
Cut Hazard
• Take care - panel edges are sharp.
• Failure to use caution could result in injury or cuts.
Important Safety Instructions
- Read these instructions carefully before installing or using this appliance.
- No combustible material or products should be placed on this appliance at any time.
- Please make this information available to the person responsible for installing the appliance as it could reduce your installation costs.
- In order to avoid a hazard, this appliance must be installed according to these instructions for installation.
- This appliance must be installed and earthed only by a suitably qualified person.
- This appliance should be connected to a circuit which incorporates an isolating switch providing full disconnection from the mains power supply.
- Failure to install the appliance correctly could invalidate any warranty or liability claims.
Operation and Maintenance
Electrical Shock Hazard
- Do not cook on a broken or cracked ceramic hob. If the ceramic hob surface should break or crack, switch the appliance off immediately at the mains power supply (wall switch) and contact a qualified technician.
- Switch the ceramic hob off at the socket before cleaning or maintenance.
- Failure to follow this advice may result in electrical shock or death.
Health Hazard
- This appliance complies with electromagnetic safety standards.
• Failure to follow this advice may result in death.
Hot Surface Hazard
- During use, accessible parts of this appliance will become hot enough to cause burns.
- Do not let your body, clothing or any item other than suitable cookware contact the ceramic glass until the surface is cool.
- Never leave metal objects (such as kitchen utensils) or empty pans on the ceramic hob as they can become hot very quickly.
- Keep children away.
- WARNING: Accessible parts may become hot. Young children should be kept away.
- Handles of saucepans may be hot to touch. Check saucepan handles do not overhang other cooking zones that are on. Keep handles out of the reach of children.
- Failure to follow this advice could result in burns and scalds.
Cut Hazard
- The razor-sharp blade of a ceramic hob scraper is exposed when the safety cover is retracted. Use with extreme care and always store safely and out of reach of children.
- Failure to use caution could result in injury or cuts.
Important Safety Instructions
- Never leave the appliance unattended when in use. Boilover causes smoking and greasy spillovers that may ignite.
- Never use your appliance as a work or storage surface.
- Never use your appliance for warming or heating the room.
• After use, always turn off the cooking zones and the ceramic hob as described in this manual. - Do not allow children to play with the appliance or sit, stand, or climb on it.
- Do not store items of interest to children in cabinets above the appliance. Children climbing on the ceramic hob could be seriously injured.
- Do not leave children alone or unattended in the area where the appliance is in use.
- Do not repair or replace any part of the appliance unless specifically recommended in the manual. All other servicing should be done by a qualified technician.
- Do not use a steam cleaner to clean your ceramic hob.
- Do not place or drop heavy objects on your ceramic hob.
• Do not stand on your ceramic hob.
- Do not use pans with jagged edges or drag pans across the ceramic glass surface as this can scratch the glass.
- Do not use scourers or any other harsh abrasive cleaning agents to clean your ceramic hob, as these can scratch the ceramic glass.
- If the mains cable is damaged, it must be replaced by a qualified technician.
- Do not operate your ceramic hob by means of an external timer or separate remote-control system.
- WARNING: If the surface is cracked, switch off the appliance to avoid the possibility of electric shock.
- Do not leave any objects such as knives, forks, spoons and lid should not be placed on the hob surface since they can get hot.
- This appliance is not intended for use by persons (including children) with reduced physical, sensory or mental capabilities, or lack of experience and knowledge, unless they have been given supervision or instructions concerning the use of the appliance by a person responsible for their safety.
| If you require a replacement for any of the items listed below, please quote their corresponding part numbers: | |
| Replacement Part Part Number | |
| Bracket 303207800067 | |
| GB818 / M4*10-PFH Screw 301500101084 | |
Partmaster .co.uk
Visit Partmaster.co.uk today for the easiest way to buy electrical spares and accessories. With over 1 million spares and accessories available we can deliver direct
to your door the very next day. Visit www.partmaster.co.uk or call 0844 800 3456 (UK customers only) Calls charged at National Rate.
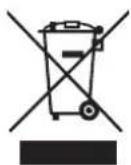
This symbol on the product or in the instructions means that your electrical and electronic equipment should be disposed at the end of its life separately from your household waste. There are separate collection systems for recycling in the EU.
For more information, please contact the local authority or your retailer where you purchased the product.
DSG Retail Ltd. • Maylands Avenue • Hemel Hempstead Herts • HP2 7TG • England
(P.N.: LCPCKX11H-001)







- CONTENTS
- UNPACKING
- PRODUCT OVERVIEW
- BEFORE USING YOUR NEW CERAMIC HOB
- CHOOSING THE RIGHT COOKWARE
- USING YOUR CERAMIC HOB
- COOKING GUIDELINES
- COOKING TIPS
- CARE AND CLEANING
- HINTS AND TIPS
- SPECIFICATION
- INSTALLATION
- SAFETY WARNINGS
- TO START COOKING
- HOT HOB WARNING INDICATOR
- WHEN YOU HAVE FINISHED COOKING
- SIMMERING, COOKING RICE
- SEARING STEAK
- FOR STIR-FRYING
- PREPARING THE WORKTOP
- ENSURING ADEQUATE VENTILATION
- FASTENING THE FIXING BRACKETS
- CONNECTING THE HOB TO THE MAINS POWER SUPPLY
- ELECTRICAL SHOCK HAZARD
- CUT HAZARD
- IMPORTANT SAFETY INSTRUCTIONS
- OPERATION AND MAINTENANCE
- HEALTH HAZARD
- HOT SURFACE HAZARD
- PARTMASTER .CO.UK
Brand : Logik
Model : LCPCKX11
Category : Cooker