LCHOBTC14 - Cooker Logik - Free user manual and instructions
Find the device manual for free LCHOBTC14 Logik in PDF.
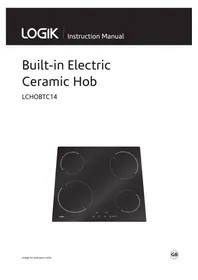


| Product Type | Freestanding Cooker |
| Brand | Logik |
| Model | LCHOBTC14 |
| Hob Type | Gas (4 burners) |
| Oven Type | Electric fan-assisted |
| Oven Capacity | Approx. 65 litres |
| Overall Dimensions (H x W x D) | 90 x 50 x 60 cm |
| Weight | Approx. 42 kg |
| Power Supply | 220-240 V ~ 50/60 Hz (for oven) |
| Gas Connection | Natural gas (convertible to LPG) |
| Energy Rating | Class A |
| Main Functions | Conventional baking, grilling, top/bottom heat |
| Control Type | Dial knobs for hob and oven |
| Oven Door | Drop-down with cool-touch handle |
| Cleaning | Manual cleaning with mild detergent |
| Safety Features | Flame failure device on gas burners, oven door lock |
| Spare Parts & Repairability | Available through service centres; 10-year parts guarantee |
| Warranty | 2 years |
Frequently Asked Questions - LCHOBTC14 Logik
User questions about LCHOBTC14 Logik
0 question about this device. Answer the ones you know or ask your own.
Ask a new question about this device
Download the instructions for your Cooker in PDF format for free! Find your manual LCHOBTC14 - Logik and take your electronic device back in hand. On this page are published all the documents necessary for the use of your device. LCHOBTC14 by Logik.
USER MANUAL LCHOBTC14 Logik
Built-in Electric Ceramic Hob
LCHOBTC14

Contents
Safety Warnings....3
Unpacking 5
Product Overview....6
Top View....6
Control Panel....6
Before Using Your New Ceramic Hob 7
Choosing the Right Cookware....7
Using the touch controls 8
- Covering the controls....8
Using your ceramic hob 8
Switching on and off....8
Selecting a cooking zone ....9
Setting the power level 9
Warming setting....9
Automatic shut off....10
Switching a cooking zone off....10
Power boost function 10
Residual Heat Indicator 11
Setting the child lock 11
- Switching off the child lock 11
Cleaning and Maintenance....12
Installing the hob 13
Fitting the hob into the work surface 14
Attaching the fixing brackets....15
Wiring the hob....16
Specifications....17
IMPORTANT SAFETY INSTRUCTIONS
READ CAREFULLY AND KEEP FOR FUTURE REFERENCE
- It is recommended that this appliance is installed by a qualified electrical engineer. The manufacturer is not responsible for any damage caused by incorrect installation.
- Check whether there is any damage to the appliance after you have unpacked it. If any damage is found, do not use the appliance and contact the store where you purchased it.
- This appliance is for Domestic Use only.
- For disconnection from the mains supply you must have a switch with a contact separation of at least 3.0 mm in all poles and rated 32 Amp that provides full disconnection, this must be incorporated in the fixed wiring in accordance with the local wiring rules.
- If your mains cable gets damaged, it should be replaced by an authorized service agent or qualified electrician in order to avoid danger or electric shock.
- Only operate your appliance in a dry atmosphere.
- Keep the electrical cables of your other appliances away from hot areas; do not let them touch the appliance.
- Ensure that the appliance is switched off at the mains supply switch and allowed it to completely cool down before cleaning or performing any maintenance to avoid the possibility of an electric shock.
- Use of your appliance creates moisture in the room in which it is placed, make sure that your kitchen is well ventilated. Maintain the natural ventilation ducts properly.
- This appliance can be used by children aged from 8 years and above and persons with reduced physical, sensory or mental capabilities or lack of experience and knowledge if they have been given supervision or instruction concerning use of the appliance in a safe way and understand the hazards involved.
- Cleaning and user maintenance shall not be made by children without supervision.
- Children should be supervised to ensure that they do not play with the appliance.
- The appliance and its accessible parts become hot during use. Young children should be kept away.
- During use the appliance becomes hot. Care should be taken to avoid touching the cooking zones.
- Unattended cooking on a hob with fat or oil can be dangerous and may result in fire. NEVER try to extinguish a fire with water, but switch off the appliance and then cover the flame e.g. with a lid or a fire blanket.
- Danger of fire: Do not store items on the cooking surfaces.
- Do not use harsh abrasives cleaners to clean the glass since they can scratch the surface.
- Glass ceramic hobs should not be used as a worktop. Sharp objects may cause scratches.
- Before starting to use your appliance, keep curtains, tulle, paper or flammable materials away from your appliance. Do not keep combustible or flammable things in or on the appliance.
- This appliance is for cooking purposes only. It must not be used for other purposes, for example room heating.
- Do not use steam cleaners for cleaning the appliance.
- If the hob surface is cracked, switch off the appliance to avoid possibility of electric shock.
• Take care when handling parts with glass, knocks, chips, heavy handling and dropping could cause the glass to shatter.
- The appliance is not intended to be operated by means of an external timer or separate remote-control system.
- Any objects such as knives, folks, spoons and lids should not be placed on the hob surface since they can get hot/melt.
- This appliance is not designed to be used with hob guards. Use of inappropriate hob guards can cause accidents.
Remove all packaging from the unit. Retain the packaging. If you dispose of it please do so according to local regulations.
The following items are included:

The Main Unit
Fixing Bracket x4
Screws x4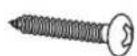

If items are missing, or damaged please contact Partmaster (UK only). Tel: 0844 800 3456 for assistance.
* All images are for indication only; please refer to your individual unit for actual item.
Top View
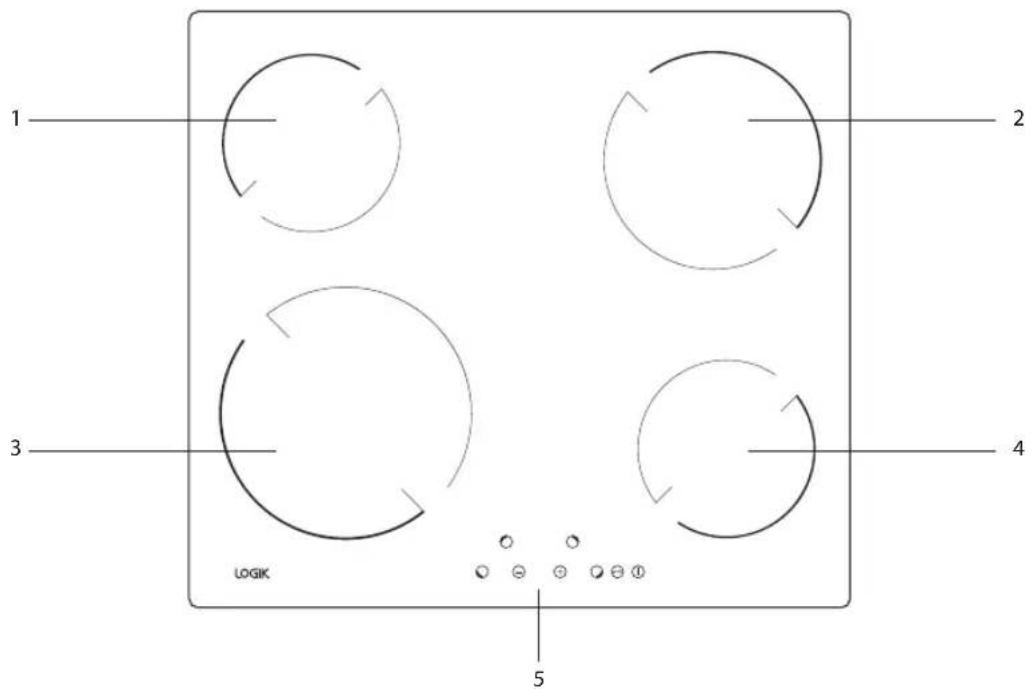
- 145mm diameter zone
- 145mm diameter zone
- 180mm diameter zone
- Control panel
- 210mm diameter zone
Control Panel

- 145mm diameter zone control and power level indicator
- 145mm diameter zone control and power level indicator
- 180mm diameter zone control and power level indicator
- Child lock indicator
- 210mm diameter zone control and power level indicator
- Power level controls
- Child lock control
- Power control

Before Using Your New Ceramic Hob
- Remove all protective film that may be still on your ceramic hob.
- Clean the glass ceramic surface with a damp cloth. Do not use aggressive detergents such as abrasive cleaners that can scratch the surface, abrasive dishwashing sponges, or stain removers.

Choosing the Right Cookware
Do not use cookware with jagged edges or a curved base.

Make sure that the base of your pan is smooth, sits flat against the glass, and is the same size as the cooking zone. Always centre your pan on the cooking zone.

Always lift pans off the ceramic hob – do not slide, or they may scratch the glass.

* All images are for indication only; please refer to your individual unit for actual item.

Using the touch controls
- The controls respond to touch, so you don't need to apply any pressure. • Use the ball of your finger.
- You will hear an audible tone each time a touch is registered.
- Make sure the controls are always clean and dry, and that there is no object (e.g. a utensil or a cloth) covering them. Even a thin film of water may make the controls difficult to operate.
Covering the controls
If you accidentally cover the controls or the control panel is very dirty, the hob will beep and the display will flash four 'F's.


Using your ceramic hob
Switching on and off
- Touch the ⏻ control. The hob will switch on, and the power level 0's will be displayed, and the active indicators will flash. If no controls are touched, the hob will switch off after 9 seconds.
- Touch the ① control again to switch the hob off. If a cooking zone is still hot, the letter 'H' will be displayed to show it's still very hot, then it will change to 'h' when it's hot but cooling.

- The 'H' symbols will flash in the display the first time your hob is connected and switched on. This is because the hob has been heat tested at the factory, then switched off while still hot. This may also happen if you are using the hob and you have a power cut. This is not a fault. The 'H's' will disappear from the display when you start using the hob.
- Do NOT touch the cooking zones when the hob is switched on or when a 'H' or 'h' are displayed, as the cooking zones will be hot.
- The touch controls may become very warm to the touch after prolonged use. Please take care when operating the controls; they could be very warm.
Selecting a cooking zone
Your ceramic hob has 4 cooking zones: two small 145mm diameter zones, one medium 180mm diameter zone, and one large 210mm diameter zone.
- Touch the desired cooking zone control to select the cooking zone. The zone active indicator will flash for 8 seconds to show that the zone is ready for you to select a power level.

Setting the power level
Each cooking zone has 9 power levels and a warming setting.
- Select a cooking zone, then while the zone indicator light is flashing, touch the ⊕ or ⊖ controls to select a temperature setting. The zone selection will cancel if no temperature selection is made within 8 seconds.
- You will hear a bleep and the zone indicator light will switch off when the cooking zone has reached your desired setting.

If you want to adjust the temperature setting at any point you will first have to select the cooking zone, adjustments can only be made when the zone indicator light is flashing. It will flash for 7 seconds.

- Occasionally the heated areas may be seen switching on and off when higher heat settings are used. This is due to a safety device, which prevents the glass from overheating. Some switching on and off when cooking at high temperatures, e.g. deep fat frying is quite normal, causes no damage to the hob and little delay in cooking times. Excessive switching may however be caused by the use of an unsuitable saucepan or a saucepan which is smaller than the heated area. If excessive switching occurs, discontinue the use of the saucepan.
- To improve performance, and reduce energy, always use pans with close fitting lids. Do NOT touch the cooking zones when the hob is switched on or when a 'H' or 'h' are displayed as the cooking zones will be hot.
Warming setting
This hob features a warming setting on all cooking zones. Selecting the warming setting will keep food warm at a constant 65°C.
- Select the cooking zone by touching the cooking zone control.
- While the zone indicator light is flashing, touch the + control to select power level 1, then touch the - control. The symbol 📋 will appear on the display.

Automatic shut off
For improved safety your hob is designed to shut off after a pre set maximum time for each power level. Even though the hob will automatically switch off, this will not prevent food from over cooking and burning. This is to prevent the hob accidentally being left on. Each power level has a specific operating time (see table below). The cut off time is measured from the last power level adjustment made per cooking zone.
| Power Level | u 1 2 3 4 5 6 7 8 9 | |||||||
| Maximum operating time (hours) | 6 6 6 5 5 4 1.5 1.5 1 5 1.5 |
If the automatic shut off function has been activated, the cooking zone will show a residual heat indication.
Switching a cooking zone off
- First select the cooking zone that you want to switch off by touching the cooking zone selector control.
- While the zone indicator light is flashing repeatedly touch the ⏻ control until the setting reaches '0'. or
Touch and hold the ⏚ and ⓣ controls together and the power level will automatically select '0'.

Power boost function
The power boost function sets a cooking zone to full power for a set time (this varies depending on the power level you have selected) then reduces the power level to your desired level. This is useful if you want a pan to come to the boil quickly then simmer.
| Power Level | u 1 2 3 4 5 6 7 8 9 | |||||||
| Number of Minutes at Full Power | - 1 3 4.8 6.5 8.5 2.5 3.5 4.5 - |
- Select a cooking zone.
- Touch the + or - control and set the power level to 9. Then touch the + control, the display will show an alternating 'A' and '9'.
- Touch the ⏻ control within 8 seconds to set the power to your desired level. The power boost feature can be set at any power level (1-8). The display will flash with the power level set and then an 'A'. If power level is not set the cooking zone will be set to level 9

The power boost function will be cancelled if you reduce the power level at any time.

* All images are for indication only; please refer to your individual unit for actual item.
Residual Heat Indicator
The heating zones will still be hot once switched off. A warning symbol will appear on the display to indicate that it is still hot:
'H' on the display indicates that the temperature of the heating zone is above 60°C
'h' indicates that the heating zone temperature is between 45°C and 60°C
These symbols will disappear once the temperature drops below 45°C.


If you have a power cut there will be no residual heat warning symbols showing on the display, but the heating zones may still be very hot.
Setting the child lock
Setting the child lock will stop any of the controls from working so a child can't operate the hob or if you leave anything on the controls it won't switch on.
- Touch the Ⓘ control to switch the hob on.
- Touch and hold the ⓝ control for 3 seconds. The hob will beep and the lock indicator light will flash on and off.
- None of the controls will now work.
The child lock can also be activated while a cooking zone is in use. If the child lock is set the hob can only be switched off, when switched back on all of the controls will be locked.

Switching off the child lock
- Touch the control to switch the hob on.
- Touch and hold the ⏻ control for 3 seconds. The hob will beep and the lock indicator light will flash on and off. You will now be able to use all the controls again.
Before attempting any cleaning, make sure the hob is switched off and has cooled down.
| What? How? Important! | ||
| Everyday soiling on glass (fingerprints, marks, stains left by food or non-sugary spillovers on the glass) | 1. Switch the power to the ceramic hob off.2. Apply a ceramic hob cleaner while the glass is still warm (but not hot!)3. Rinse and wipe dry with a clean cloth or paper towel. | ·When the power to the ceramic hob is switched off, there will be no ‘hot surface’ indication but the cooking zone may still be hot! Take extreme care.·Heavy-duty scourers, some nylon scourers and harsh/abrasive cleaning agents may scratch the glass. Always read the label to check if your cleaner or scourer is suitable.·Never leave cleaning residue on the ceramic hob: the glass may become stained. |
| Boilovers, melts, and hot sugary spills on the glass | Remove these immediately with a scraper, fish slice, palette knife or razor blade scraper suitable for ceramic glass ceramic hobs, but beware of hot cooking zone surfaces:1. Switch the power to the ceramic hob off.2. Hold the blade or utensil at a 30° angle and scrape the soiling or spill to a cool area of the ceramic hob.3. Clean the soiling or spill up with a dish cloth or paper towel.4. Follow steps 2 to 3 for ‘Everyday soiling on glass’ above. | ·Remove stains left by melts and sugary food or spillovers as soon as possible. If left to cool on the glass, they may be difficult to remove or even permanently damage the glass surface.·Cut hazard: when the safety cover is retracted on a razor blade scraper, the blade in a scraper is razor-sharp. Use with extreme care and always store safely and out of reach of children. |
| Spillovers on the touch controls | 1. Switch the power to the ceramic hob off.2. Soak up the spill.3. Wipe the touch control area with a clean damp sponge or cloth.4. Wipe the area completely dry with a paper towel. | ·The ceramic hob may make an audible tone or turn itself off, and the touch controls may not function while there is liquid on them. Make sure you wipe the touch control area dry before turning the ceramic hob back on. |
Measurements shown in the diagram are minimum distances.
If the hob is going to be installed on top of a built-in oven without forced air cooling, proper air vents must be installed to guarantee adequate ventilation.

Fitting the hob into the work surface
The hob can be installed into a work surface with a depth between 28-38mm. Cut a hole in the work surface 560mm (W) x 490mm (D). Ensure that the work surface is clear of debris and dust before placing the hob into the hole. Make sure you have stuck the sealing tape onto the hob.
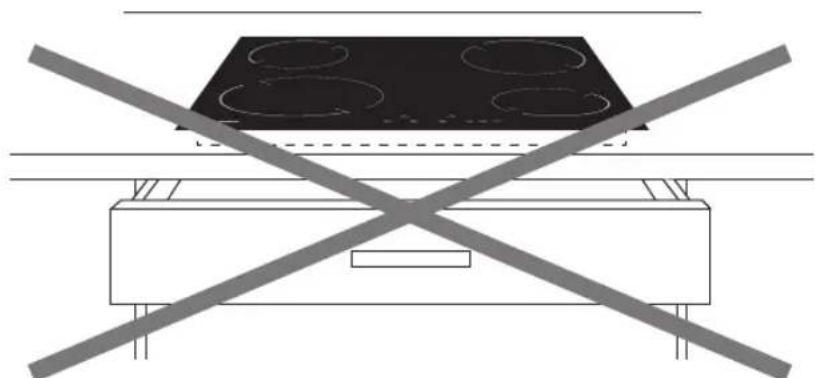
If you are not fitting the hob above an oven, you must leave a 25mm space below the hob.

If you are not fitting the hob above an oven, you must leave a 25mm space below the hob. Install a heat-resistant barrier at a distance of 25mm from the base of the hob.

As a heat-resistant barrier has to be fitted 25mm away from your hob, it is not possible to install the hob directly above a drawer.
* All images are for indication only; please refer to your individual unit for the actual item.
Attaching the fixing brackets
- Slide the hob into the hole in the work surface. Then, from underneath, loosely attach the 4 fixing brackets to the underside of the hob using the 4 screws provided. Do not tighten at this stage.
Option 2: Attach the clips at the side of the hob.
Option 1: Attach the clips at the front and back of the hob.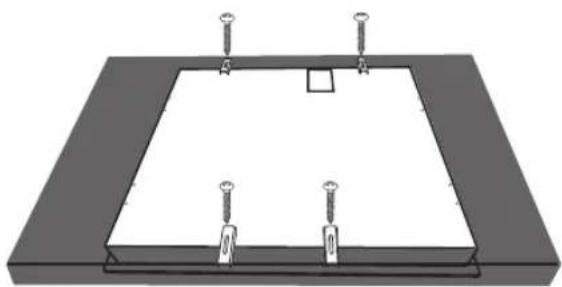
Front of hob Front of hob

- You can use either of the two options above to secure your hob; it just depends on the space you have available. Make sure you attach the clips the right way around; the spike end must grip the work surface.
- Once you are happy with the position of the hob tighten all the fixing screws.
38mm work surfaces 28mm work surfaces

- If your work surface is 28mm thick you will need to add a 15mm batten to the work surface to be able to attach the fixing brackets.
Wiring the hob

- If the mains cable is damaged and needs to be replaced, this should be done by a qualified person using the proper tools, so as to avoid any accidents.
- The ceramic hob must be connected directly to the mains supply, an omnipolar circuit breaker must be installed with a minimum gap of 3mm between the contacts.
- The installer must ensure that the correct electrical connection has been made and that it complies with safety regulations.
- The mains cable must not be bent or compressed.
- The mains cable must be checked regularly and only replaced by a qualified person.
- Before proceeding with the electrical connection, verify that the current carrying capacity of the system and the socket is adequate for the maximum power rating of the hob.
- Electrical installation of the residence and the electrical current plug in use must be earthed and conform with safety regulations.
- If there is no dedicated hob circuit and fused switch, they must be installed by a qualified electrician before the hob is connected.
- Fused switch must be easily accessible once the hob has been installed.
- Do not use adaptors, multiple sockets and/or extension leads.
- A circuit breaker with a contact opening of at least 3mm, rated 32A and delayed functioning type must be installed inside the supply circuit.
- For the vitroceramic hob, the cable must have these minimum specifications. Type H05VV-F or H05RR-F 4X1.5mm² for 3 phase or 3X4mm² for single phase. You will find the connection diagram shown on the bottom of your appliance and in this instruction book (for single phase connection).
- Make sure the cable is routed away from hot parts of the hob.
- An incorrect connection might damage your appliance. The guarantee will not cover such damages.
- All repairs must be carried out by an authorised service personal or a qualified electrician.
- Make sure your hob is disconnected from the mains supply before any maintenance.
- Cooking hobs are not provided with a supply cord.
This appliance must be earthed
Green / Yellow (Earth) to the PE ⏻ terminal Brown (Live) wire to the terminal marked L Blue (Neutral) wire to the terminal marked N
Ensure the cable exits through the cable grip clamping on the outer sheath of the cable and fix in place by tightening the fixing screw.
Ensure all screws are adequately tightened. Do not over tighten as you may risk damaging the screw threads.


Grounding lead must be connected to screw with symbol.
| Model LCHOBTC14 | |
| Rated Voltage 230 – 240 V | |
| Rated Frequency 50 Hz | |
| Power Consumption | |
| Hotplate: 2 x 145mm diameter | 1200 W |
| Hotplate: 1 x 180mm diameter | 1800 W |
| Hotplate: 1 x 210mm diameter | 2300 W |
| Net Weight 7.8 kg | |
| Product Dimensions | |
| External Width | 576 mm |
| External Depth | 518 mm |
| Product Dimensions | |
| Internal Width | 552 mm |
| Internal Depth | 482 mm |
Features and specifications are subject to change without prior notice.

For general information about this appliance
and handy hints and tips, please visit
www.knowhow.com/knowledgebank or call 0344 5611234.

Visit Partmaster.co.uk today for the easiest way to buy electrical spares and accessories. With over 1 million spares and accessories available we can deliver direct to your door the very next day.
Visit www.partmaster.co.uk or call 0844 800 3456 (UK customers only). Calls charged at National Rate.

The symbol on the product or its packaging indicates that this product must not be disposed of with your other household waste. Instead, it is your responsibility to dispose of your waste equipment by handing it over to a designated collection point for the recycling of waste electrical and electronic equipment. The separate collection and recycling of your waste equipment at the time of disposal will help conserve natural resources and ensure that it is recycled in a manner that protects human health and the environment.
For more information about where you can drop off your waste for recycling, please contact your local authority, or where you purchased your product.
- BUILT-IN ELECTRIC CERAMIC HOB
- CONTENTS
- SAFETY WARNINGS
- UNPACKING
- PRODUCT OVERVIEW
- BEFORE USING YOUR NEW CERAMIC HOB
- CHOOSING THE RIGHT COOKWARE
- USING THE TOUCH CONTROLS
- USING YOUR CERAMIC HOB
- CLEANING AND MAINTENANCE
- INSTALLING THE HOB
- SPECIFICATIONS
- IMPORTANT SAFETY INSTRUCTIONS
- READ CAREFULLY AND KEEP FOR FUTURE REFERENCE
- TOP VIEW
- CONTROL PANEL
- COVERING THE CONTROLS
- SWITCHING ON AND OFF
- SELECTING A COOKING ZONE
- SETTING THE POWER LEVEL
- WARMING SETTING
- AUTOMATIC SHUT OFF
- SWITCHING A COOKING ZONE OFF
- POWER BOOST FUNCTION
- RESIDUAL HEAT INDICATOR
- SETTING THE CHILD LOCK
- SWITCHING OFF THE CHILD LOCK
- FITTING THE HOB INTO THE WORK SURFACE
- ATTACHING THE FIXING BRACKETS
- WIRING THE HOB
Brand : Logik
Model : LCHOBTC14
Category : Cooker