
PRO-842 - Security Camera SWANN - Free user manual and instructions
Find the device manual for free PRO-842 SWANN in PDF.


| Product Type | Security Camera |
| Brand | Swann |
| Model | PRO-842 |
| Dimensions (H x W x D) | 7.5 x 4.5 x 4.5 inches |
| Weight | 1.2 lbs |
| Power Supply | 12V DC via AC adapter (included) |
| Power Consumption | 5W (max) |
| Video Resolution | 1080p Full HD |
| Field of View | 90° diagonal |
| Night Vision | Up to 30 ft with infrared LEDs |
| Motion Detection | Yes, with adjustable sensitivity |
| Audio | Built-in microphone and speaker (two-way audio) |
| Connectivity | Wired (BNC) or wireless via included receiver |
| Storage | DVR compatible (sold separately) or microSD card (up to 32GB) |
| Weather Resistance | IP66 rated for outdoor use |
| Operating Temperature | -4°F to 122°F (-20°C to 50°C) |
| Mounting | Wall or ceiling mountable with included bracket |
| Maintenance | Clean lens with soft dry cloth; check cables periodically |
| Safety | Class II power supply; do not expose to rain unless IP66 |
| Spare Parts & Repairability | Contact Swann support for replacement parts; limited user serviceable parts |
| General Information | Manual available in PDF from Swann website |
Frequently Asked Questions - PRO-842 SWANN
User questions about PRO-842 SWANN
0 question about this device. Answer the ones you know or ask your own.
Ask a new question about this device
Download the instructions for your Security Camera in PDF format for free! Find your manual PRO-842 - SWANN and take your electronic device back in hand. On this page are published all the documents necessary for the use of your device. PRO-842 by SWANN.
USER MANUAL PRO-842 SWANN
Multi-Purpose Day / Night Security Camera

INSTRUCTION MANUAL
Limited Warranty Terms & Conditions
Swann Communications warrants this product against defects in workmanship and material for a period of one (1) year from its original purchase date. You must present your receipt as proof of date of purchase for warranty validation. Any unit which proves defective during the stated period will be repaired without charge for parts or labour or replaced at the sole discretion of Swann. The end user is responsible for all freight charges incurred to send the product to Swann's repair centres. The end user is responsible for all shipping costs incurred when shipping from and to any country other than the country of origin.
The warranty does not cover any incidental, accidental or consequential damages arising from the use of or the inability to use this product. Any costs associated with the fitting or removal of this product by a tradesman or other person or any other costs associated with its use are the responsibility of the end user. This warranty applies to the original purchaser of the product only and is not transferable to any third party. Unauthorized end user or third party modifications to any component or evidence of misuse or abuse of the device will render all warranties void.
By law some countries do not allow limitations on certain exclusions in this warranty. Where applicable by local laws, regulations and legal rights will take precedence.
For Australia: Our goods come with guarantees which cannot be excluded under Australian Consumer Law. You are entitled to a replacement or refund for a major failure and for compensation for any other reasonably foreseeable loss or damage. You are also entitled to have the goods repaired or replaced if the goods fail to be of acceptable quality and the failure does not amount to major failure.
FCC Verification
NOTE: This equipment has been tested and found to comply with the limits for Class B digital device, pursuant to part 15 of the FCC Rules. These limits are designed to provide reasonable protection against harmful interference in a residential installation. This equipment generates, uses and can radiate radio frequency energy and, if not installed and used in accordance with the instructions, may cause harmful interference to radio or television reception, which can be determined by turning the equipment off and on, the user is encouraged to try to correct the interference by one or more of the following measures:
- Reorient or relocate the receiving antenna
- Increase the separation between the equipment and the receiver
- Consult the dealer or an experienced radio/TV technician for help
- Connect the equipment into an outlet on a circuit different from that to which the receiver is connected
These devices comply with part 15 of the FCC Rules. Operation is subject to the following two conditions:
• These devices may not cause harmful interference, and
- These devices must accept any interference received, including interference that may cause undesired operation.
Important Note:
All jurisdictions have specific laws and regulations relating to the use of cameras. Before using any camera for any purpose, it is the buyer's responsibility to be aware of all applicable laws and regulations that prohibit or limit the use of cameras and to comply with the applicable laws and regulations.
WARNING
Modifications not approved by the party responsible for compliance could void user's authority to operate the equipment.
IMPORTANT SAFETY INSTRUCTIONS
- Make sure product is fixed correctly and stable if fastened in place.
- Do not operate if wires and terminals are exposed.
About the Camera
Congratulations on your purchase of this Swann Multi-Purpose Day / Night Security Camera!
This instruction manual will walk you through the basics of installing and connecting your camera.
This camera is very sensitive to light and therefore can make use of even the smallest amount of light to provide an image of what it sees. In low light, this comes through as a black and white image. In complete or near-total darkness, the camera uses built-in infrared LEDs to illuminate the area in front of it. This light is invisible to the human eye, although you might notice a faint red glow coming from the front of the camera - this is normal.
Installation and Connection
Choosing the Location for the Camera
The camera is very flexible, and can be installed practically anywhere. Some of the things you'll have to consider when choosing a location are:
- What you want to monitor, and where you'll get the best view of it.
- How you're going to connect the camera to your monitoring system. Remember that cables and connections should be kept out of the weather.
- How to keep the camera out of harm's way.
General Guidelines
- Place the camera in an position that a potential security threat will find it difficult to avoid. A strategy which is often effective is to monitor entrances and exits - after all, a security threat has to get in somewhere.
- Install the camera where it's out of reach or not easily accessible by vandals. For example, under the eaves of a roof or high up in protected corners of a wall. The higher the camera is mounted, the harder it'll be for vandals to interfere with it.
- Typically, the best view is obtained approximately 7ft (2m) to 10ft (3m) high, looking slightly downwards. Try to aim the camera at an area which is evenly lit, as objects or people in shadows near brightly lit objects are very hard to see.
- The internal components of the camera can be damaged by prolonged exposure to direct sunlight. Don't let direct sunlight into the lens!
- Avoid having bright light sources in your image. This includes the obvious (such as the sun or an artificial light source) but also things such as reflections. Cars are notorious for reflected light sources, as are buildings with a lot of windows, mirrors and so forth.
- The camera's night vision will give well-exposed images if the area is dark. However, if there's a bright point source in the camera's view (a streetlight, car headlights or similar) then it might not engage night vision mode.
Mounting the Camera
The camera can be mounted onto a flat surface using screws. The surface must have sufficient strength to hold the camera. Materials such as hardwood, brick or masonry are good options, and we've included all the gear you'll need to mount it there (except the tools - sorry, you'll still need your own drill). You can mount the camera onto a metal surface, but you'll need to supply your own mounting hardware.
To mount the camera:
- Position the camera in the location you want to mount it, and mark the screw holes on the surface to position the screws. Then, using appropriate screws for the surface you're fixing the camera to, screw the camera into place.
- If you're mounting to a wooden surface, then screw the camera directly to the surface.
- If you're mounting to a masonry surface (bricks, concrete or similar) then you'll need to use the included wall plugs.
Connecting the Camera
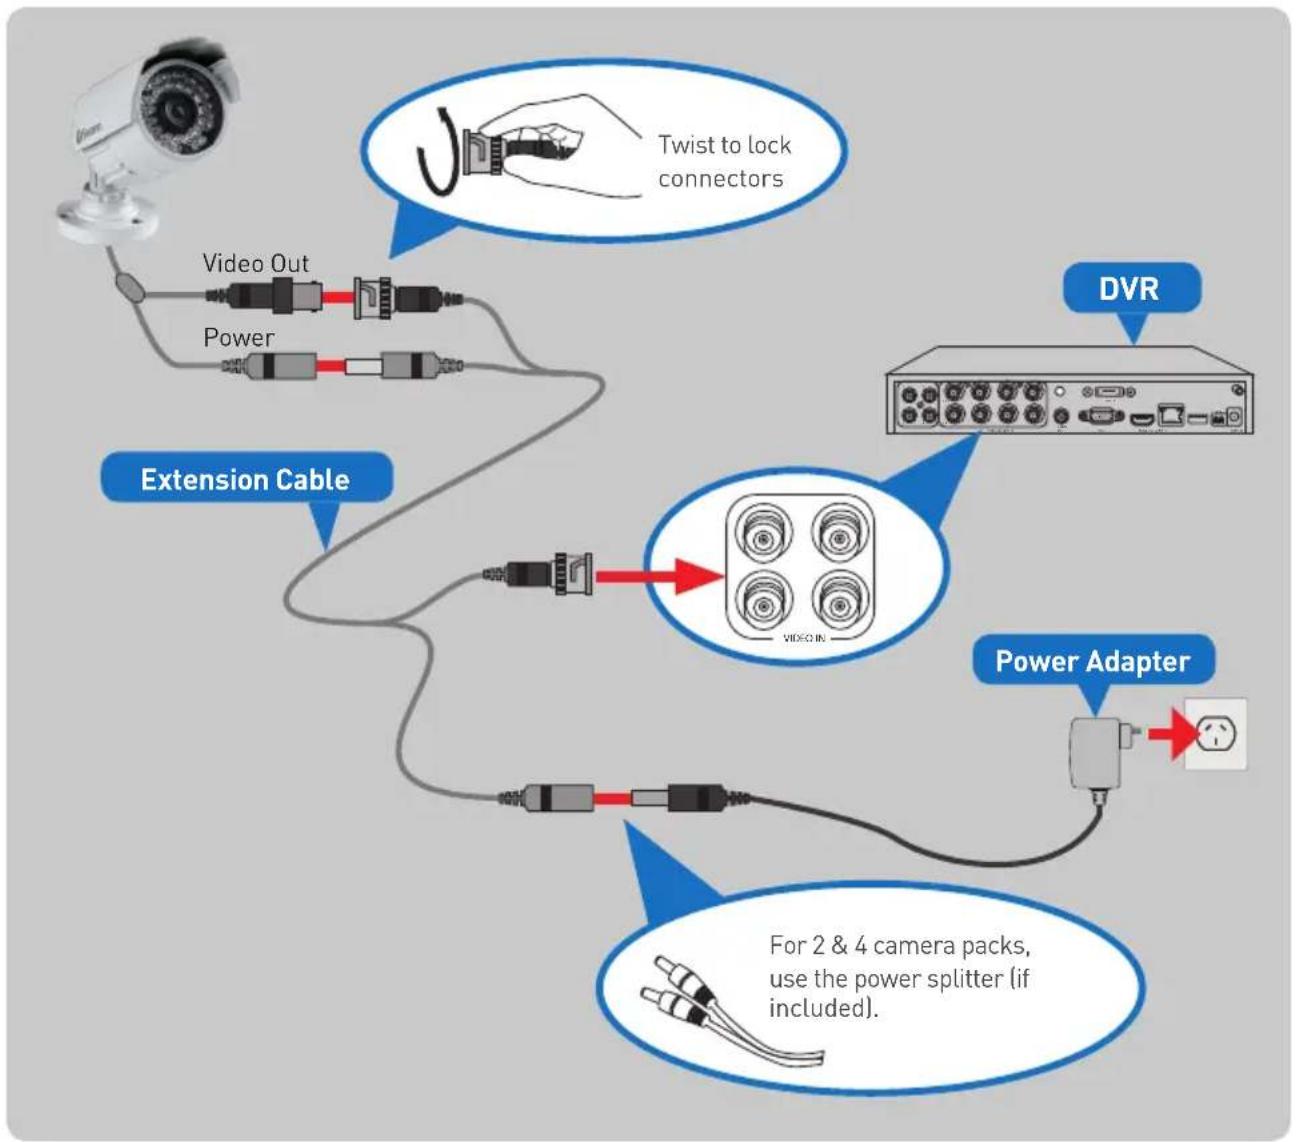
flowchart
graph TD
    A["Camera"] --> B["Video Out"]
    A --> C["Power"]
    B --> D["Extension Cable"]
    C --> D
    D --> E["Video In"]
    E --> F["DVR"]
    F --> G["Power Adapter"]
    G --> H["For 2 & 4 camera packs, use the power splitter (if included)."]
    style A fill:#f9f,stroke:#333
    style B fill:#ccf,stroke:#333
    style C fill:#ccf,stroke:#333
    style D fill:#cfc,stroke:#333
    style E fill:#fcc,stroke:#333
    style F fill:#cff,stroke:#333
    style G fill:#ffc,stroke:#333
    style H fill:#cfc,stroke:#333
Cable Management
- When running your cable, try to avoid bending it at sharp angles.
- Don't put your cable near live electrical wiring. AC electricity generates radio "noise" which can interfere with the signal from your camera.
Weather & Tampering
The camera's casing is resistant to water, different weather conditions and tampering. It would take an overwhelming event of this kind to damage the housing of the camera (severe weather such as hurricanes or someone intentionally damaging the lens would be enough). However, the cable and connector are vulnerable and require protection.
Adjusting the Camera Angle
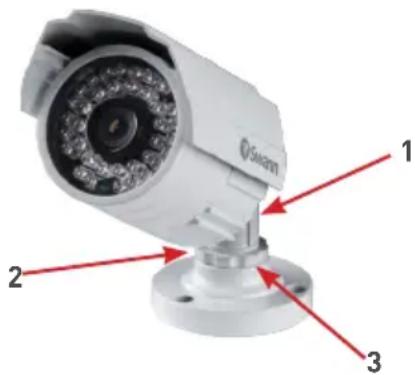
- Loosening screw 1 will allow you to tilt the camera up and down. Tighten the screw when you have finished.
- Loosening screw 2 will adjust the camera, so it can look left or right. Tighten the screw when you have finished.
- Loosening the locking ring (3) will allow you to rotate the barrel of the camera, so no matter what direction it faces, you can rotate the camera so that your images are correctly oriented.
Troubleshooting
Q: On my Swann DVR, 'Video Loss' appears where the image from my camera should be.
A: Check the extension cable (power and video) is securely connected to the camera. Check the video output from the camera is securely connected to a video input channel on the DVR. Check the power from the camera is securely connected to a power supply.
Q: When I view an image from the camera at night I only see a bright spot and no image.
A: A reflection can be caused in night vision mode if the camera is looking through a window. At night, the infrared light the camera uses to see in the dark can 'bounce back' off a reflective surface (such as glass, water, spider webs, some ceramics and so on) and effectively blind the camera. If you want to see outside, mount the camera outside - we made it weatherproof for a reason!
Q: The BNC extension cable will not connect to my TV.
A: Many TV's and monitors do not have a BNC connector but do have an RCA connector. Connect a BNC to RCA adapter (not supplied) to the end of the extension cable and then plug into the RCA socket on your TV or monitor.
Technical Support Details
Swann Technical Support
All Countries E-mail: tech@swann.com
Telephone Helpdesk
USA toll free
1-800-627-2799
USA Parts & Warranty 1-800-627-2799
(M-F,
9am-5pm
US
PT)
AUSTRALIA
1300 138 324
NEW ZEALAND toll free 0800 479 266
UK
0203 027 0979
Antes de comenzar
- Multi-Purpose Day / Night Security Camera
- Limited Warranty Terms & Conditions
- FCC Verification
- Important Note:
- WARNING
- IMPORTANT SAFETY INSTRUCTIONS
- About the Camera
- Installation and Connection
- Choosing the Location for the Camera
- General Guidelines
- Mounting the Camera
- To mount the camera:
- Connecting the Camera
- Cable Management
- Weather & Tampering
- Adjusting the Camera Angle
- Troubleshooting
- Technical Support Details
- Swann Technical Support
- Telephone Helpdesk
- Antes de comenzar
Brand : SWANN
Model : PRO-842
Category : Security Camera