
VC-HD6200BT - Car radio VIETA - Free user manual and instructions
Find the device manual for free VC-HD6200BT VIETA in PDF.


| Product Type | Car Stereo with Bluetooth |
| Brand | Vieta |
| Model | VC-HD6200BT |
| Dimensions (W x H x D) | 1-DIN (approx. 178 x 50 x 100 mm) |
| Weight | Approx. 1 kg (2.2 lbs) |
| Power Supply | 12V DC (negative ground) |
| Bluetooth | Yes, for hands-free calling and audio streaming |
| USB Port | Front USB for MP3/WMA playback and device charging |
| SD Card Slot | Yes, supports up to 32GB |
| AUX Input | 3.5mm front auxiliary input |
| Radio Bands | FM/AM with RDS |
| Output Power | 4 x 45W (max) |
| Display | LCD with adjustable color |
| Remote Control | Included wireless remote |
| Maintenance | Clean with a soft, dry cloth; avoid liquids |
| Safety | Built-in fuse for overload protection |
| Spare Parts | Contact Vieta support for replacement parts |
| Repairability | Repairs should be carried out by qualified personnel |
| General Information | Designed for 12V vehicles; supports steering wheel controls (adapter may be required) |
Frequently Asked Questions - VC-HD6200BT VIETA
User questions about VC-HD6200BT VIETA
0 question about this device. Answer the ones you know or ask your own.
Ask a new question about this device
Download the instructions for your Car radio in PDF format for free! Find your manual VC-HD6200BT - VIETA and take your electronic device back in hand. On this page are published all the documents necessary for the use of your device. VC-HD6200BT by VIETA.
USER MANUAL VC-HD6200BT VIETA

VC-HD6200BT

Manual de usuario
Radio DVD/Bluetooth/NFC 6,2"

User Manual
DVD/Bluetooth/NFC Radio 6,2"
natural_image
Nighttime cityscape with illuminated skyscrapers reflected in a river, captured via a camera interface (no text or symbols on the main image)Please read the user manual first before using the product, keep well for future referring.
C

1. Mute
Track-Down, Play/Pause, Track-up button.


8.
natural_image
Diagram of a device with a labeled component (1) and directional arrows indicating assembly or movement (no text or symbols present)natural_image
Simple line drawing of a rectangular object with a separate mechanical component attached (no text or symbols)natural_image
Isometric line drawing of a rectangular electronic component with a small metallic connector attached (no text or symbols)natural_image
Line drawing of a microwave oven connected to a smartphone via wireless signal (no text or symbols)Ejemplo de montaje
Especificación
General
VIETA AUDIO S.A. guarantees its products for a period of 24 months. The guarantee period starts on the date of purchase of brand new products that have never been used by the first end user.
This guarantee covers any possible manufacturing flaws for any Vieta products sold on Spanish territory by authorised distributors. Vieta products acquired in other countries will be covered by the guarantee supplied by the local distributor.
This guarantee will only be valid when accompanied by an invoice for the product that includes the client's name, the distributor and the date of purchase. VIETA AUDIO S.A. agrees to repair any product with a problem occurring during normal use as detailed in the user's manual and when being used for the purpose for which it was designed.
The guarantee will not be extended because a component is changed or the product is replaced.
INCIDENTS THAT ARE EXEMPT FROM GUARANTEE:
- The guarantee period exceeds the stipulated time.
- When the product has been handled by centres or personnel that are not authorised by VIETA AUDIO S.A.
- When the product has been damaged by incorrect handling or use for purposes other than those it is intended for and that are not contemplated in the user's manual, or when it has broken pieces, scratches, cracks, wear and tear, damage produced by particles of paint, sand, water or food within the unit..
- This guarantee does not cover expenses or damages caused by transport.
- Loss, robbery or accidents produced by fire, liquid, chemical substances, excessive heat, inadequate ventilation, vandalism, electrical storms, incorrect or excessive power supply, lightening, impact, other external forces, radiation.
-
Any additional cost related to installing or uninstalling the product.
-
Products purchased outside Spanish territory or from distributors that are not authorised.
-
The data contained on our products (photo files, music, digital support, etc.) are not covered by the guarantee under any circumstance; it is the client's responsibility to make back-up files before giving us the product. Likewise, any incorrect configuration or installation of software or incompatibility issues with hardware belonging to other equipment, including drivers and controllers.
-
Maintenance, repairs or parts replacement due to use and wear and tear.
-
Rechargeable and/or disposable batteries (life cycle depends on usage frequency).
-
Small faults or variations in the quality of the product that do not affect its value or the purpose for which it was created.
-
Negligence.
-
Accessories:
-
Plugs and cases.
- Connector cables.
- Headband.
- Eartip and sleeve kits.
-
Decorative finishes.
-
Any issue detected on receipt of the goods must be notified to customer care 902.367.607 or sat@vieta.es. In accordance with article 366 of trade law, VIETA AUDIO S.A. will not accept any claims regarding broken goods, impacts or missing packages 24 hours after the goods have been delivered.
Contents
Notes on Installation....26
Precautions....26
Wiring Diagram....27
Panel illustration 28
Main menu....29
Media player....29
Bluetooth 30
SD/USB Play 31
Setting menu mode 31
Radio operation 32
DVD/CD mode....33
Location of the remote control....34
Remote Control Operation.... 35
Motion sensor....41
NFC 42
Installation 43
Specification 44
Simple Trouble shooting Guide 45
Notes on Installation
- The unit is designed for 12V DC, negative ground operation system only.
- Before installing the unit, make sure the vehicle is connected to DC 12V negative ground electrical system. The negative battery terminal must be disconnected before making connections, which can reduce damage to the unit due to short circuit.
- Be sure to connect the color coded leads correctly according to the diagram. Incorrect connection may cause the unit to malfunction or damage the vehicle electrical system. Be sure to connect the speaker (-) leads to the speaker (-) terminal. Never connect the left and right channel speaker cables together or to the vehicle body.
- Do not block vents or radiator panels. Blocking them will cause heat to build up inside the unit and may damage it.
Precaution
This unit can play the following disc only:
| Type of disc | Label on the disc | Recorded material | Size of disc | ||
| DVD | Pictures | Sound and moving | 12cm | ||
| VCD |  |  | Sound and moving | 12cm | |
| MP3 | MP3 | Pictures | Sound and moving | 12cm | |
| MP4 | MP4 | Pictures | Sound and moving | 12cm | |
| CD |  | Sound only | 12cm | ||
Note: 1. The unit is compatible with DVD. VCDI. 012. 013. 0, CD-R.PICTURE-CD version Disc. 2. The manual conforms to D VD, VCD, MP 3 and CD, If no D VD, VCD or MP 3 on some models you should ignore them. While enjoying DVD, VCD, MP3 and CD, the display will automatically identify the disc and indicate the corresponding words.
- Do not attempt to modify the unit. Unauthorised modification may damage the unit.
- Stop the vehicle before carrying Out any operation that could interfere with your driving.
- Do not operate the unit in extreme Temperature inside the vehicle.
- The operating temperature of the Unit is between -20°C to +60°C .
- To enjoy optimum sound and Images while playing, handle the Disc as follows:
Handle the disc by its edge to keep the disc Clean. Do not touch the surface.

- Do not use CD with paste residue Or ink on the surface.

- Do not use CD with labels or stickers Attached. It may cause failure of the Loader mechanism. (Shown in picture).

- Clean the disc with cleaning cloth. Wipe each disc from the center to outside. (Shown in picture)

Wiring diagram
Standard Connect

flowchart
graph TD
    A["Radio ANT"] --> B["Radio"]
    B --> C["Automatic antenna"]
    C --> D["Small light control"]
    C --> E["Handbrake control"]
    C --> F["To ignition Key"]
    C --> G["To Power Antenna"]
    C --> H["Front L ch Speaker"]
    C --> I["Rear L ch Speaker"]

    B --> J["Radio ANT"]
    J --> K["Audio R Input"]
    J --> L["Audio R output"]
    J --> M["Video output"]
    J --> N["Audio L output"]
    J --> O["Camer Input"]
    J --> P["Subwoofer output"]

    K --> Q["Blue"]
    K --> R["Orange"]
    K --> S["Brown"]
    K --> T["Red"]
    K --> U["Blue/White"]

    L --> V["Green"]
    L --> W["Green/Black"]

    M --> X["Orange/white"]
    M --> Y["Brown/Black"]
    M --> Z["Pink"]

    N --> AA["Reverse control"]
    N --> AB["Yellow Memory back-up12v"]

    O --> AC["Blue/White"]

    P --> AD["Black"]

    Q --> AE["Blue"]

    R --> AF["Blue/White"]

    S --> AG["Blue/White"]

    T --> AH["Blue/White"]

    U --> AI["Blue/White"]

    V --> AJ["Negative Ground"]
    V --> AK["Battery"]

    AC --> AL["Grey"]

    AD --> AM["Grey/Black"]

    AE --> AN["Violet"]

    AF --> AO["Violet/Black"]

    AG --> AP["Front R ch Speaker"]
    AH --> AQ["Rear R ch Speaker"]
- Fuse Holder (15A)
• Output Socket (male)
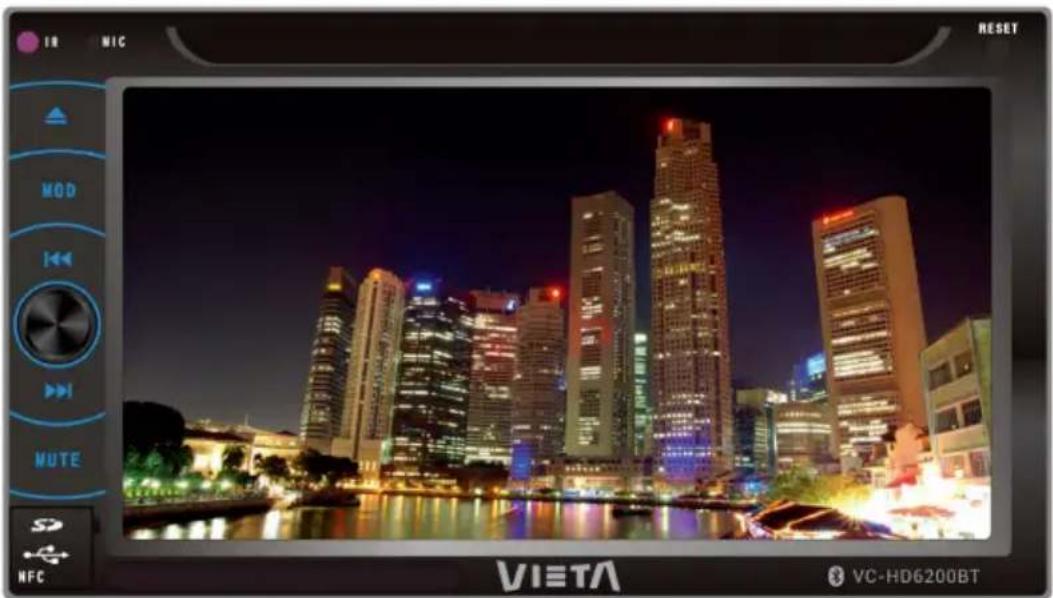
Panel illustration

- MIC hole
- IR hole
- VOL button
- Previous button
- Next button
- MODE button
- RES reset button
- MUTE button
- Eject button
- USB/SD Jack
-
Hand motion control sensor
-
MIC hole
Microphone shorthand, which is a microphone, voice input Feature.
- IR hole
Sensor for the card remote commander (For remote control version only)
Note: This window is used with remote control function. Without this function, you should ignore the operation contents about remote control function.
- VOL button
For Volume Control 10, rotate VOL knob clockwise to increase the Sound level and anti-clockwise to decrease the sound level.
- Previous button
To skip to the previous song, or in the radio station search mode can be used to move forward.
- Next button
To skip to the next song, or in the radio station search mode can be used to back.
- MODE button
Press it to select a source in the following order:


- RES
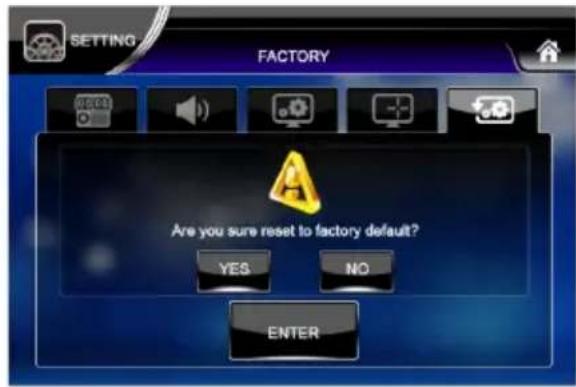
With a fine needle inserted into this hole can restore the factory settings
- MUTE
Press the button to cut off the sound output. Press it again to resume at the precious sound level.
- Eject button
Press it when there is a disc in the unit, the disc will automatically eject.
- USB/SD port
The unit can be connected to a USB device for playing MP3 song through the USB cable from mini size to the normal standard USB size. And can access any supported audio device. The device can be inserted SD card, which can access any supported file.
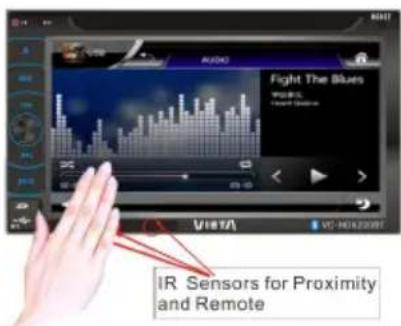
- Hand motion Control Sensor
This sensor senses hand motion. Hand motion can control follow functions:
Activate - Press hold the hand in front of the sensor for 3 seconds.
Pause/Play - Press the hand in front of the sensor once.
Next - Move the hand from left to right in front of the sensor.
Previous - Move the hand from right to left in front of the sensor.
Main menu

Media player
A

B
C
-
Click the source button for example RADIO to select desired mode.
-
Click < or < to change to another page.
-
Show Clock/Year/Month/Date,click enter setup menu to set them.

Click to set TFT brightness OFF/ON.

Click to enter Setup menu.
-
If without the related source function, the related button will not be exist.
-
Mute
Press the button to cut off the sound output, and appears in the LCD. Press it again to cancel the mute function.
- Previous
Press it to select previous track. Press and hold it for more than 3 seconds to fast reverse the track.
- Next
Press it to select next track. Press and hold it for more than 3 seconds to fast forward the track.
-
Press it to pause the playback, and press it again to resume to normal playback.
-
Press the button to suspend the playback and press to continue. Press it again to stop the playback.
-
Press the button to return to main menu.
-
Press the button to display more menu.
-
Parameter display
After selecting the desired mode, you can adjust its level by pressing area 8, and the corresponding parameter will display in this area.
9. Tecla Vol/Sel
This key has SEL function, repeatedly press it to select mode in the following order:
VOL BASS TREB BAL FADE ( )

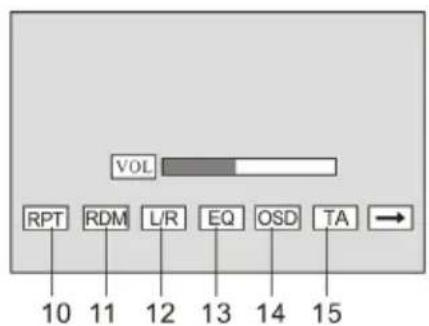
10. Repeat key
Repeat function. Press it to repeat the current track/chapter, press it again to repeat the title, press it the third time to repeat all, press it the fourth time to cancel.
11. Random key
Press it to play the disc in random, press it again to resume normal playback.
12. L/R key
Press it to get switch R+R/L+L/STEREO.
13. EQ key
Press it to select the desired EQ effect in the following order:

flowchart
graph LR
    A["POP"] --> B["ROCK"]
    B --> C["CLASS"]
    C --> D["JAZZ"]
    E["OFF"] --> F
14. OSD key
OSD information display.
15. TA (optional)
For details, please see "RADIO" chapter.
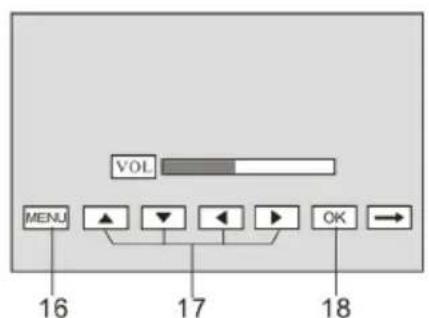
16. MENU
Press it to switch to menu, and DVD will enter title menu and display all titles for DVD disc and you can choose your desired title or track by pressing direction buttons.
17. Direction keys
Press it to confirm.
Bluetooth


-
Home menu button.
-
Dial menu button.
-
Delete button. Press it once delete the last digit, hold Pressing it to delete all digits input.
-
Transfer button.
-
First button.
-
Call & Receive button.
-
Bluetooth music play button.
8.
Track-Down, Play/Pause, Track-up button.
SD/USB Play

Setting menu mode

- Home menu button.
- < Track-Down, >
Play / Pause, Track-up button.
- Repeat button.
- Random button.
- Return button, return to main play mode.
- File 1000000 Song / Movie / Photo


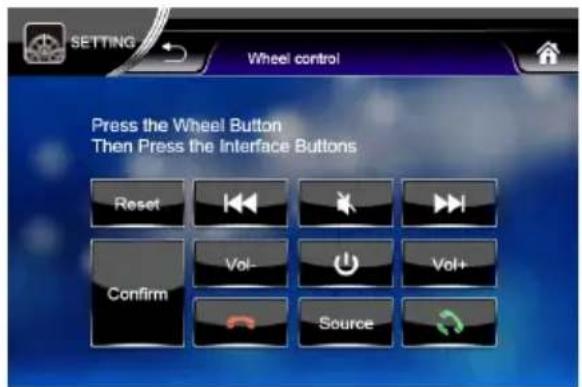

-
Home menu button.
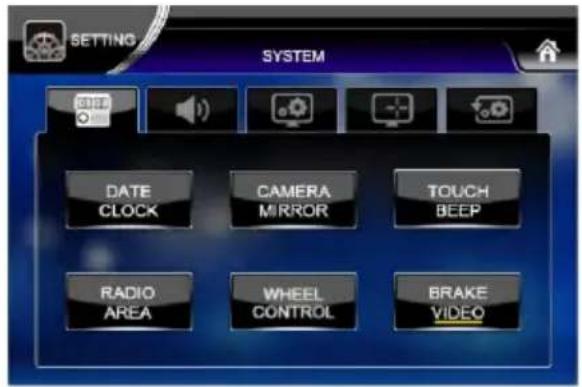
-
System setting menu button.
-
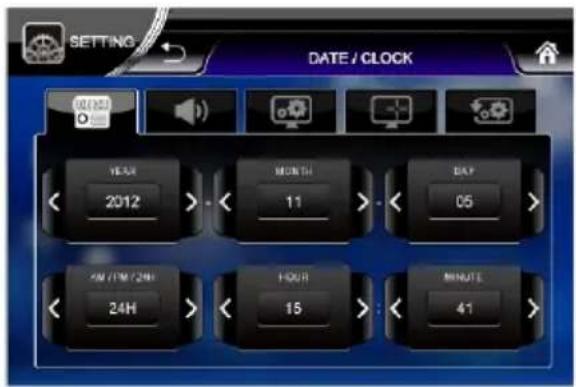
DATE/CLOCK set button.
-
Rear Camera image set ON/OFF CAMERA MIRROR
-
TOUCH BEEP Beep ON/OFF set button.
-
Steering wheel control buttons setting.
-
Set Brake control wire valid/invalid, when set invalid, driver is not allowed to watch the video during driving, could only watch the video when apply brake When set valid, driver could watch the video whether driving or brake.
8.


Press these buttons to select the setting of the steering wheel control functions.
-
Reset to cancel all steering wheel control functions.
-
Determining a control function set.


-
Audio setting menu button.
-
Display video set (Brightness/Contrast/Color) button.


- Calibration button.
- Reset to Factory default button.
Radio (RDS is optional)

- Preset Scan/Auto Store button, short press preset scan, hold pressing auto store.
- AF3DS on/off button. For non RDS model, it will be MONO button, press it to switch Mono/Stereo.
-
ITA on/off button. For non RDS model, it will be LOC button, press it to switch LOC/DX.
-
PTY name select button. After select PTY button press Seek-up/down to search. For non RDS model, there will be a SCAN button, press it to scan station.
5.
Seek-Up/Down button. Short press it to search Up/Down, hold pressing it to manual Up/down.

- Mute on/off button.
DVD/CD mode
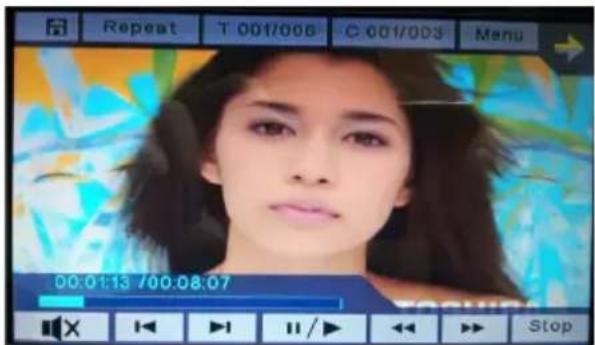

- Home menu button.
- Repeat button
- T 001/006 C 001/003
Title, Chapter select button.
Location of the remote control
- Menu DVD Menu button.
- Next page button.
- Mute button.
- Track Down/Up, Play/Pause button.
- Fast Backward/Forward play
button. - Stop button.
- Setup button, go to DVD Setup menu.
- Audio language button.
- Sub-tile button.
- Single button.

- Power switch
- Pause/Play Button
- Mute Button
- Selecting Menu Button
- Band and RDM button
- Enter Button
- Volume Control
- Tuning/Selecting
- Tracks/F.F/REW
- Loud button
- On-Screen Display Setting the sound
- Scn and RPT button
- Slow and 📞 button
- Number Button
- Audio-Setting
- PBC Menu
- Subtitle-Setting
- MENU button
-
Mode Switch
-
Eject button
- Angle-Setting and button
- ST and MONO button
- Setup Menu
- Menu-Display
- Zoom-Setting and A-B button
- Goto button
Remote control operation
- Replacing the Battery
When the range of the operation of the card remote control becomes short or no function while operating, replace the battery with a new button cell.
- Pull out the Battery Holder while pressing the Stopper.

natural_image
Diagram of a device with a handle and labeled component (no text or symbols present)- Put the button-type battery (+) mark upward into the Battery Holder.
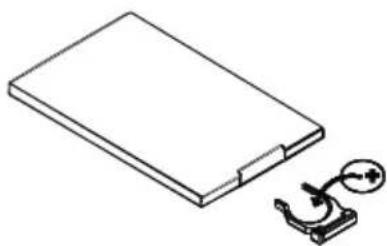
natural_image
Simple line drawing of a rectangular object with a separate curved bracket and a circular symbol (no text or labels)- Insert the Battery Holder into the remote control.

natural_image
Simple line drawing of a rectangular electronic component with a small metallic connector attached (no text or symbols)Note: Some models are not equipped with remote control. You should ignore the contents about remote control.
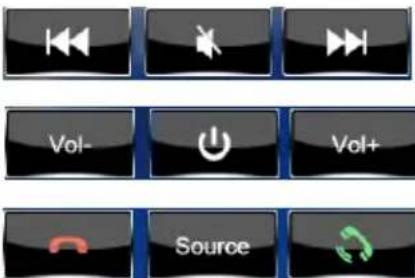
- Power Button
Press 1 button to turn On/Off the power.
- Pause/Play Button
Press 2 button to suspend the playback of CD, MP3, VCD, DVD. Press it again to return to normal playback mode.
- Mute Button
Press 3 button to cut off the sound output. Press it again to resume at the previous sound level.
- Menu selector
Press 4 to select your desired menu. The press 6 or press the play button 2 to confirm.
Note: This function works in main menu mode only.
- Menu selector
During radio mode, press 5 to switch receiving band.
During playback mode, press 5 button to play any track at random.
• Volume Increasing/Decreasing
Press 7 button to increase or decrease the volume level respectively.
- Tuning/Selecting Tracks/Fast Rewind/Forward
During radio mode, continuously press 8 button to manual search a station downward or upward respectively, if press and hold 8 button for more than 3 seconds.
The radio will automatically search a station downward or upward respectively until it finds a station.
During playback mode, press and hold 8 button to fast rewind or fast forward to reach your desired track quickly.
Momentarily pressing 8 button. You can select your desired track downward or upward respectively.
- LOUD button
Sounds at low levels set 100Hz lower.
- On-Screen Display
During CD, VCD, DVD mode, press 10 button. The display shows single track elapsed time, single track remaining or entire disc remaining, and the track being played with the content of the whole disc.
Note: During MP3 mode, only single track elapsed time is displayed in OSD mode.
• VOL/BAS/TRE/BAL/FAD Selector
Repeatedly press 11 button to select the Desired mode in the following order:

flowchart
graph LR
    A["VOL"] --> B["BAS"]
    B --> C["TRE"]
    C --> D["BAL"]
    D --> E["FAD"]
    E --> F["OK"]
    G["RGB"] --> H["Ground Symbol"]
    H --> I["Circle Symbol"]
Note: After selecting your desired mode, you Can adjust the current mode being displayed by using (VOL+or VOL-) buttons.
- Repeat Playing/AMS
During DVD mode, first, press 12 to repeat the current track being played; Press it again to repeat playing all the tracks. Pressing it the third time will cancel the repeating function. (LCD will display different designs).
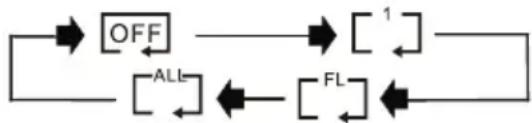
flowchart
graph LR
    A["OFF"] --> B["1"]
    B --> C["ALL"]
    C --> D["FL"]
    D --> E
    E --> F
Note: In radio mode. Press 12 to scan each stored station for 10 seconds.
- Random and slow button
In DVD/CD playback mode, press 13 key once for 1/2 slow, twice for 1/3 slow, thrice for 1/4 slow, and so no. When the key is pressed the seventh time, it will return to normal playback.
Note: Not applicable in MP3 and CD playback.
- Receive or Hand-up phone
In bluetooth connection, if there is incoming call or hand-up a phone call, press button 13.
- Number buttons
During radio mode, you can select one of the 6 stored stations on each band by pressing any one of the number button 14.
During the playing mode, you can select any track directly by using 14 number button (0\~9). For example, if you need the fifteenth track, you can first press button 1 and then press 5 button, the corresponding track (15) will be played.
- Left/Right/Stereo Selector
During playback mode, continuously press 15 can change the sound to left/right speaker or stereo mode.
Note: There are 5 different surrounding effect in surround mode. During VCD mode. You can see the different pictures indicating different effects on the television.
- Playing PBC (menu)
During VCD mode only, when pressing 16 button at the first time, PBC playback starts and the menu of entire disc appears on the screen. And then you can select your desire track by using number 14 button. To cancel PBC playing, press 16 button again.
- Subtitle Selector
During DVD mode, press 17 button to select desire subtitle language.
- MENU button
Press 18 button to display menu screen.
- Mode Switch
Press 19 button to switch to radio mode or playback mode.
- Eject CD/DVD
If there is a CD/DVD inside the unit, press 20 button to eject.
- MULTI-ANGLEKEY
In DVD playback mode, press 21 button to watch the DVD content from different angle.
- ST and MONO button
Press 22 button to switch between stereo and mono play.
- SETUPKEY
-
Press 23 of remote control in the stop mode.
-
The main page of setup menu is dis-played.

-
Select the preferred item by using the 4 Key.
-
Press 6 key.
A. System Setup
This setup page includes all items of TV system, Screen saver, TV type, pass-word, Rating & Default features. For detail please refer to SYSTEM SETUP MENU.
B. Language Setup
This setup page includes all items of OSD language features. For details please refer to LANGUAGE SETUP MENU.
C. Audio Setup
This setup page includes all items for AUDIO. Please refer to AUDIO SETUP MENU.
D. Video Setup
This setup page includes all items for VIDEO. Please refer to VIDEO SETUP MENU.
A. System Setup
(A) TV Type
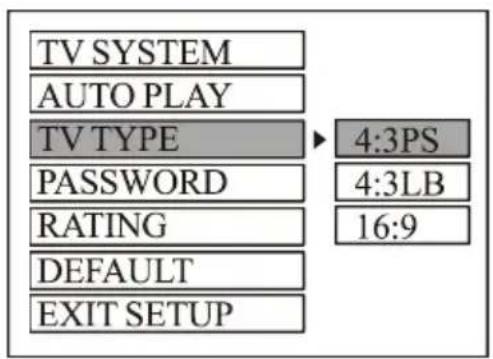
- 4:3 PS
Played back in the PAN & SCAN style. (If connected to wide-screen TV, the left and right edges are cut off).
- 4:3 LB
Played back in LETERBOX style. (If connected to wide-screen TV, black bands appear at top and bottom of the screen).
- 16:9
Select when a wide-screen TV set is connected.
(B) Password

Enter the password and press ENTER button.
Type the old password (The initial factory code is 0000) and key in 4 characters password now you want to use, and type again to confirm.
(C) Rating

Select suitable guidance rating by the cursor button and confirmed by pressing 6 key. Rating 1:[KID SAFE]
Select this when the program are safe for all kids to view.
Rating 2:[G]
Select this that allows admission to all ages.
Rating 3:[PG]
Select this that needs parental guiding.
Rating 4:[PG13]
Select this when children under 13 are forbidden to view.
Rating 5:[PG-R]
Select this when 'PG-R' was printed on the DVD disc.
Rating 6:[R]
Select this when children under 17 must be guided by their parents.
Rating 7:[nc-17]
Select this when children under 17 are forbidden to view.
Rating 8:[ADULT]
Select this only allows admission to all adults.
(D) Default
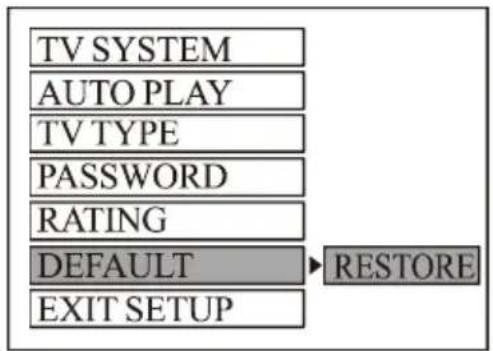
B. Language Setup
Select the preferred OSD Language, Audio Language, Subtitle language and menu language by using button 4.
ARROW keys

- OSD Language
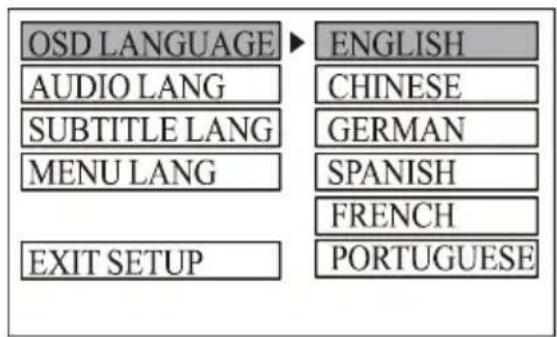
- AUDIO Language
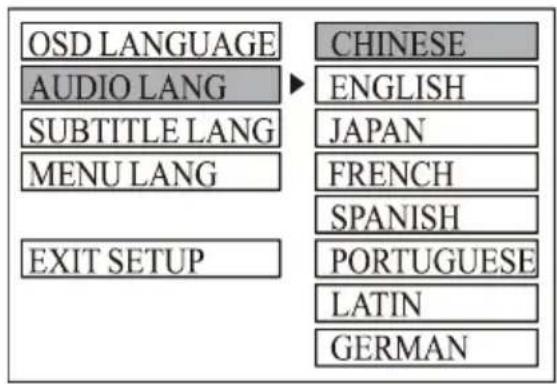
- SUBTITLE Language

flowchart
graph TD
    A["OSD LANGUAGE"] --> B["AUDIO LANG"]
    B --> C["SUBTITLE LANG"]
    C --> D["MENU LANG"]
    D --> E["EXIT SETUP"]
    F["CHINESE"] --> G["ENGLISH"]
    G --> H["JAPAN"]
    H --> I["FRENCH"]
    I --> J["SPANISH"]
    J --> K["PORTUGUESB"]
    K --> L["GERMAN"]
    L --> M["OFF"]
- MENU Language
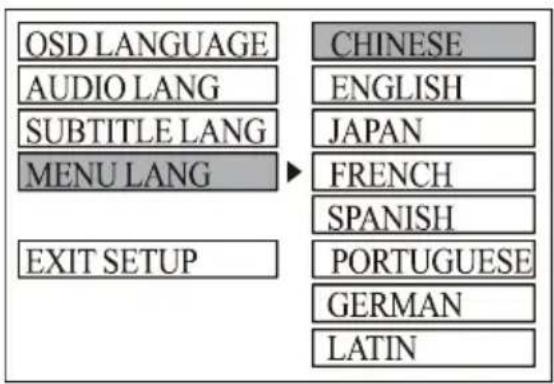
flowchart
graph TD
    A["OSD LANGUAGE"] --> B["AUDIO LANG"]
    B --> C["SUBTITLE LANG"]
    C --> D["MENU LANG"]
    D --> E["EXIT SETUP"]
    F["CHINESE"] --> G["ENGLISH"]
    H["JAPAN"] --> I["FRENCH"]
    I --> J["SPANISH"]
    J --> K["PORTUGUESE"]
    K --> L["GERMAN"]
    L --> M["LATIN"]
C. Audio Setup
SPDIF/OFF:
Analog or optical output port has no output signal at all.
- Audio Out

This is to activate the audio output from SPDIF/OFF mode to SPDIF/RAW mode or SPDIE/PCM mode.
SPDIF/RAW:
When the player is connected with the power amplifier by the analog or optical port, please select this item when the playing disc is recorded in Dolby Digital, DTS or MPEG. The power amplifier you connected must have decode function for Dolby Digital, DTS or MPEG.
SPDIF/PCM:
When the player is connected with the 2 channels, digital stereo amplifier, please select this item when the playing disc is recorded in Dolby Digital or MPEG. The analog or optical output will be modulated to 2 channels output by PCM.
Note: This function is invalid for this model.
- Key
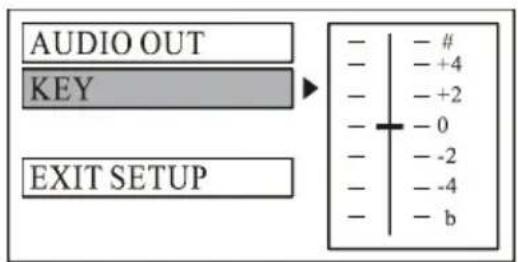
This is to select Treble or Bass according to your needs.
D. Video Setup
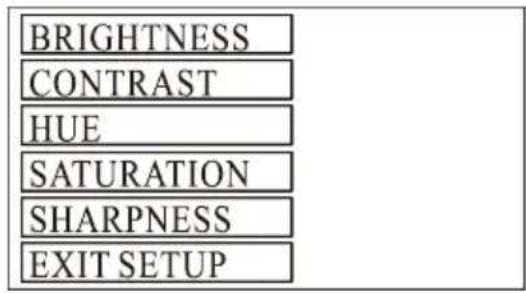
This is for the user to set Brightness, Contrast ,Hue and Saturation of the picture by pressing the arrow left/right button.
- Brightness
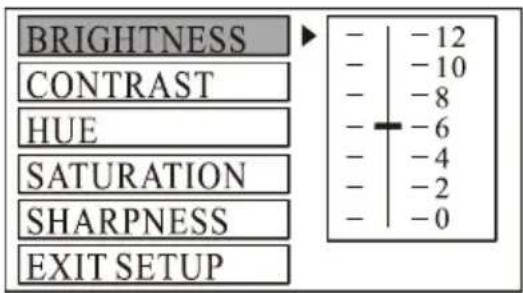
- Contrast
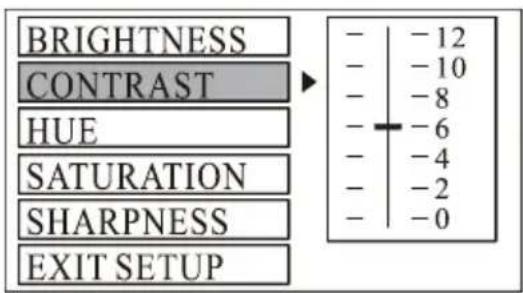
- Hue

4. Saturation

5. Sharpness
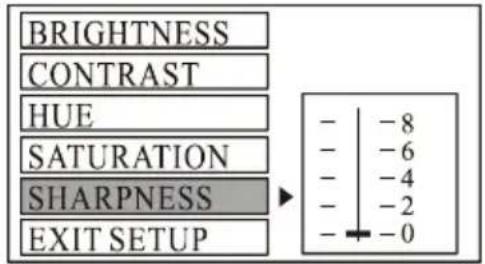
Press 6 key to confirm the change.
NOTE: Only on TV/AV mode, the Video setup is available.
E. Digital Setup

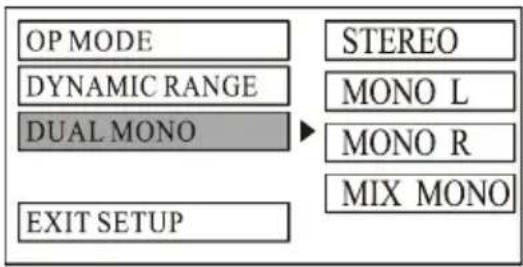
This is for the user to set operation mode, dynamic range compression and stereo mode.
1. OP Mode

To set the operating modes for Dolby Digital decoder.
2. Dynamic Range

To set the dynamic range compression.
3. Dual Mono
flowchart
graph TD
    A["OP MODE"] --> B["DYNAMIC RANGE"]
    B --> C["DUAL MONO"]
    C --> D["EXIT SETUP"]
    E["STEREO"] --> F["MONO L"]
    F --> G["MONO R"]
    G --> H["MIX MONO"]
Title Key
In DVD, VCD playing mode, press 24 key to show all tracks title on TV screen. Press key 4 to choose your desired track number and press 6 key or 6 key to start.
Note: 1. No title display in MP3, CD mode To choose a desired language. Press Title key.
ZOOM Key
In picture playing mode, press 25 key once for 2x Mode, twice for 3x Mode, third time for 4x Mode, forth time to 1/2 Mode, fifth time for 1/3 Mode, sixth time for 1/4 Mode. Seventh time fox zoom OFF.
Note: NO ZOOM function CD/MP3 playing mode.
Video Repeat KEY
In CD/DVD playing mode, press 25 button, the screen shows REPEAT A-. The video will repeat in this starting point. Press the button again to mark end point for this video section, the screen shows REPEAT A-B. Press the button once more to cancel this video repeat section. Screen displays CANCEL A-B.
GOTO Button
In VCD, CD mode, press 26 key and set the track, and the display will show the time --:-- . Enter your desired time by pressing number button 14 (0\~9).
For example, enter: 25:00, and press 6 to confirm. It will automatically start playing the track from the point of twenty-fifth minutes in the disc.
In DVD playing mode, press 26 key once and input a desired track number. Then press 14 key to play the DVD from the position corresponding to the track number selected.
In DVD playback mode, press 26 key once and input a desired time to play the DVD from the position corresponding to the time selected. Fox example, press key ones and the display will show the time
Enter your desired time by pressing number button 14 (0\~10+). And direction button 4, Then press button 6, it will automatically start playing the track from the point of your desired time in the disc.
Note: No time play function for MP3.
Motion sensor
-
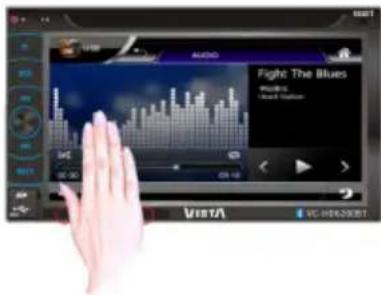
Place hold your hand on the distance of the sensors 10 to 15cm for 3 seconds, there is a 3 bits sound alarm, the motion control has been activated.
-
In the DVD/CD/MP3, USB/SD, Bluetooth mode
a. When your hand movement perpendicular to the panel, you can pause or resume the music.
b. When your hand from left to right movement, next selection.
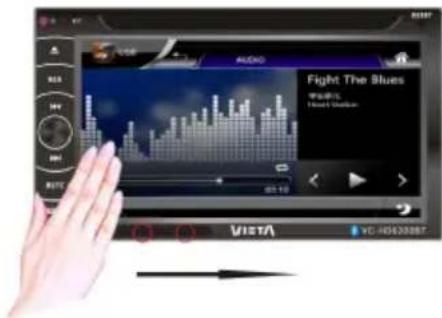
c. When your hand from right to left movement, previous selection.
- In the Radio mode:
a. Move your hand from left to right above the sensors, next station selection.
b. Move your hand from right to left above the sensors, previous station selection.
Note: After 15 seconds idle, if there is no operation, the unit exits hand motion control mode. Go back step 1 if you want to activate this function.
NFC

- Check if the NFC function of your smartphone is displayed ON.

- Please set the NFC function of your smartphone to ON.

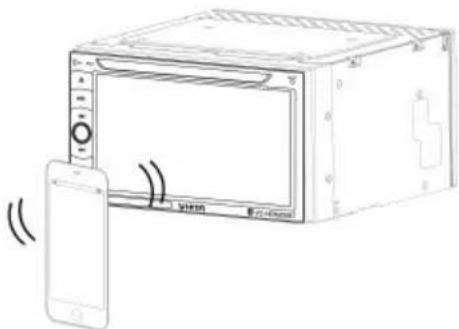
- When your NFC phone has been turned on, put your phone near the volume knob of the CD player.
natural_image
Line drawing of a microwave oven with a smartphone attached, showing no text or symbols on the device itself.-
Maintaining smartphone near CD player volume knob until the smartphone is connected, and the top of the smartphone screen will appear CONN OK. At this moment, the smartphone will emit a short beep to confirm. When the phone prompts for a PIN code, enter the PIN code: 0000.
-
If you want to disconnect, also keep your smartphone close to CD player volume knob until the smartphone is disconnected, and the top of the smartphone screen will appear DISCONN. The smartphone will emit a short beep to confirm.
Note: NFC sensor chip is located in the volume knob, so when you use the NFC feature, keep your smartphone away from the volume knob preferably not more than 5mm.
Installation
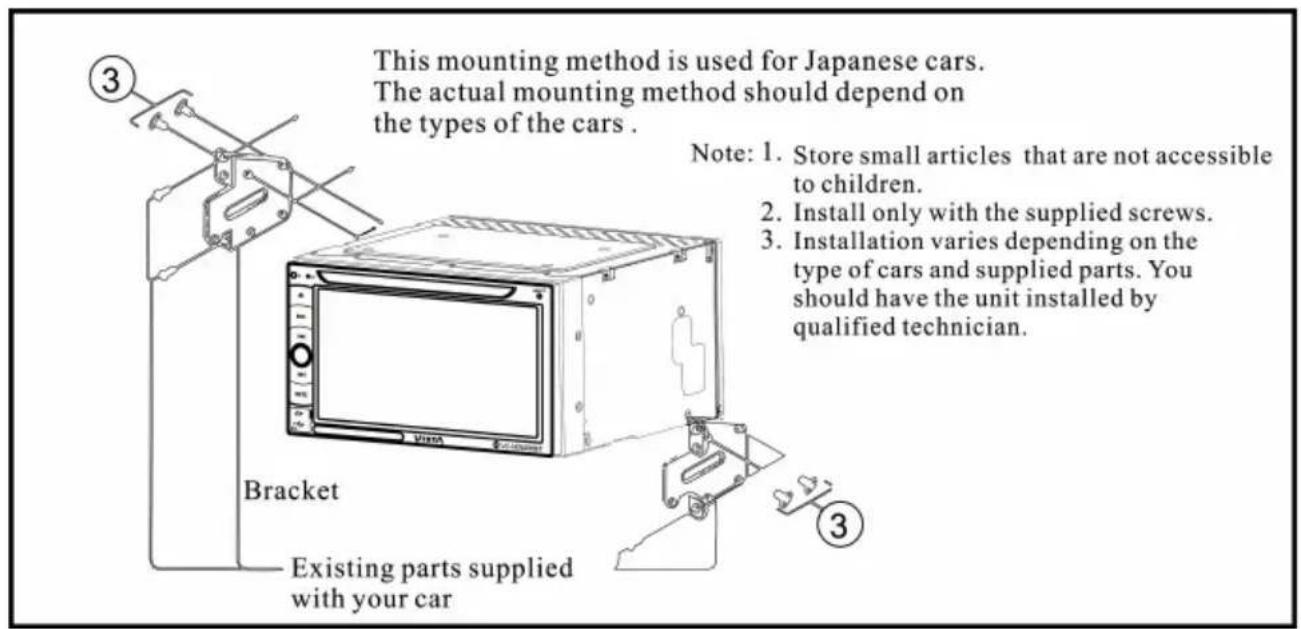
Parts List (The numbers in the list are keyed to those in the instructions.)

Mounting Example

Specification
| General | ||||
| Power | Requirement: | 14.4DC | ||
| Load | Impedance: | 4ohm | ||
| Max | Power | Output: | 40W×4 | |
| Tone Control: | +/-8dB (Bass 100Hz, Treble 10KHz) | |||
| Dimension: | Approx, | 192×188×107mm | (D×W×H) | |
| Mounting Dimension: | Approx, 169×178×97mm (D×W×H) | |||
| Weigh: | Approx. | 1.95kg | ||
| DVD Deck Section | ||||
| Disc | Played: | DVD/VCD/2.0/MP3/MP4(DIVX/CD/Picture-CD) | ||
| Video | System: | PAL/AUTO/NTSC | ||
| Mounting | Angle: | °0to | +/-30 | |
| Video Section | ||||
| Video System: | 16:9 Letter Box and 16:9 Pan Scan | |||
| Video Output level: | 1.0vp-p 75 ohm | |||
| Horizontal | Resolution: | 800x480 | ||
| Audio Section | ||||
| Maximum Output level: | 2Vrms (+/-3dB) | |||
| Frequency Response: | 20 to 20KHz | |||
| Signal-to-noise | Ratio: | 85dB | ||
| Separation: | 80dB | |||
| AM Tuner Section | ||||
| Frequency | Range: | 522-1620 | (Europe/China/Russia); | |
| 530-1710 | (U.S.A);522-1629 | (Japan) | ||
| IF | Range: | 450KHz | ||
| Usable | Sensitivity(-20dB): | 25dB | ||
| FM Tuner Section | ||||
| Tuning | Range: | 87.5-108(Europe/China);87.5-107.9(U.S.A) | ||
| 76-90(Japan);65-108(Russia) | ||||
| IF | Range: | 10.7MHz | ||
| Usable | Sensitivity: | 15dB | ||
| Signal-to-noise | Ratio: | 60dB | ||
| Stereo | Separation: | 30dB | (1KHz) | |
| Frequency | Response: | 30-15KHz | ||
Note: Due to continuous product improvement, specifications and design are subject to change, without notice.
Simple trouble shooting guide
| Problem | Cause/Solution |
| NO power. | - Check the fuse. Replace with the proper value if necessary. |
| Some errors occur in the LCD or no function when pressing the button. | - Press the RESET button. |
| Unable to receive stations. - Check and make sure the antenna is properly connected. | |
| Poor effect on receiving. | - Antenna may not have proper length.Make sure the antenna is fully extended.If broken. Replace the antenna with a new one.- The broadcasting signal is too weak.- The antenna is poorly grounded. Check and make sure the antenna is properly grounded at its mounting location. |
| CDs Cannot bo loaded. - A CD is loaded in the mechanism. | |
| The stereo indicator is flashing. - Tune in the frequency accurately.- The broadcasting signal is too weak. (Set to the MONO mode). | |
| No picture. - The Video line from main unit to the TV is not connected properly. | |
| Picture distortion. - The CD is dirty or damaged. | |
| Wrong region code. | - Under DVD mode, press “on remote control pad twice, Then press arrow on remote control pad, and press. pad 0-6 according to your region.- For example, if disc region is 1, press arrow and 1on the remote control. |
| No memory on radio station. - is tuned at FM88.10. | |
- VC-HD6200BT
- Manual de usuario
- User Manual
- Mute
- Ejemplo de montaje
- Especificación
- INCIDENTS THAT ARE EXEMPT FROM GUARANTEE:
- Contents
- Notes on Installation
- Precaution
- Wiring diagram
- Standard Connect
- Panel illustration
- Main menu
- Media player
- Tecla Vol/Sel
- Repeat key
- Random key
- L/R key
- EQ key
- OSD key
- TA (optional)
- MENU
- Direction keys
- Bluetooth
- *
- Radio (RDS is optional)
- DVD/CD mode
- Location of the remote control
- Remote control operation
- - Replacing the Battery
- - Power Button
- - Pause/Play Button
- - Mute Button
- - Menu selector
- • Volume Increasing/Decreasing
- - Tuning/Selecting Tracks/Fast Rewind/Forward
- - LOUD button
- - On-Screen Display
- • VOL/BAS/TRE/BAL/FAD Selector
- - Repeat Playing/AMS
- - Random and slow button
- - Receive or Hand-up phone
- - Number buttons
- - Left/Right/Stereo Selector
- - Playing PBC (menu)
- - Subtitle Selector
- - MENU button
- - Mode Switch
- - Eject CD/DVD
- - MULTI-ANGLEKEY
- - ST and MONO button
- - SETUPKEY
- Language Setup
- Audio Setup
- SPDIF/RAW:
- SPDIF/PCM:
- Saturation
- Sharpness
- Digital Setup
- OP Mode
- Dynamic Range
- Dual Mono
- Title Key
- ZOOM Key
- Video Repeat KEY
- GOTO Button
- Motion sensor
- NFC
- Installation
- Mounting Example
Brand : VIETA
Model : VC-HD6200BT
Category : Car radio