HRVC-MAI52DSBK - Robot vacuum Heinner - Free user manual and instructions
Find the device manual for free HRVC-MAI52DSBK Heinner in PDF.


| Product Type | Robot Vacuum Cleaner with Self-Emptying Base |
| Brand | Heinner |
| Model | HRVC-MAI52DSBK |
| Battery | Li-ion 14.4 V, 5200 mAh |
| Charging Base | Self-emptying docking station |
| Navigation Technology | Line laser 3D detection |
| Self-Emptying Function | Automatic dust collection into disposable bag |
| Mopping Function | Yes, with auto-lift mop assembly and water tank |
| App Control | Yes, via Wi-Fi (2.4 GHz) and Bluetooth |
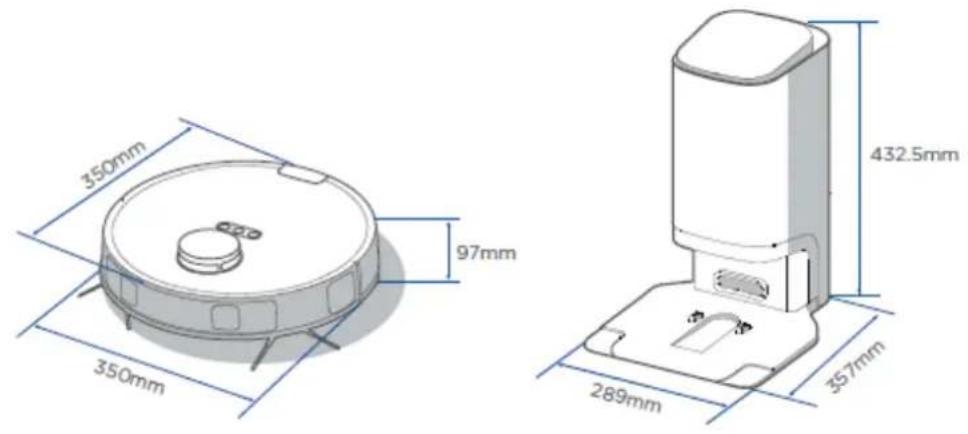
| Dimensions (Approx.) | 330 mm diameter x 76 mm height |
| Weight (Approx.) | 3.5 kg |
| Power Consumption (Approx.) | 40 W |
| Cleaning Modes | Whole house, zone cleaning, scheduled cleaning |
| Side Brushes | 2, color-coded for installation |
| Main Brush | Removable, washable |
| Filter Type | Mesh filter (washable) + disposable dust bag for base |
| Sensors | Anti-drop, cliff, carpet detection, bumper |
| Laser Class | Class 1 (IEC 60825-1:2014) |
| Safety | Child lock (via app?), automatic shutoff, overheat protection |
| Noise Level (Approx.) | 60 dB |
| Battery Replacement | By skilled person only |
| Included Accessories | Robot, self-emptying base, side brushes, main brush, mopping cloth, filter, dust bag, cleaning tool |
Frequently Asked Questions - HRVC-MAI52DSBK Heinner
User questions about HRVC-MAI52DSBK Heinner
0 question about this device. Answer the ones you know or ask your own.
Ask a new question about this device
Download the instructions for your Robot vacuum in PDF format for free! Find your manual HRVC-MAI52DSBK - Heinner and take your electronic device back in hand. On this page are published all the documents necessary for the use of your device. HRVC-MAI52DSBK by Heinner.
USER MANUAL HRVC-MAI52DSBK Heinner
natural_image
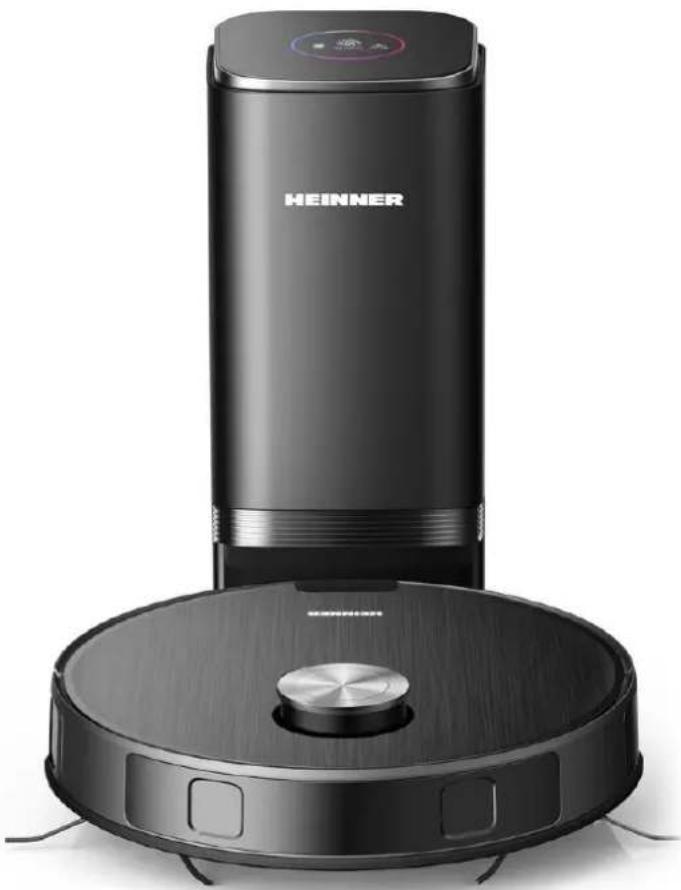
Exterior view of a Heinner vacuum cleaner with circular base and control panel (no visible text or symbols on device body)- Battery: 14.4 V, 5200 mAh
• Line laser 3D detection technology.
• Auto-dust collection system
1. INTRODUCTION
Please read the instructions carefully and keep the manual for future information.
This manual is designed to give all necessary instructions concerning installation, use and maintenance of the unit. In order to operate the unit correctly and safely, please read this instruction manual carefully before installation and use.
2. CONTENT OF YOUR PACKAGE
→ Robot vacuum cleaner
→ User manual
→ Warranty certificate
3. SAFETY INSTRUCTIONS
General
- This appliance can be used by children aged from 8 years and above and persons with reduced physical, sensory or mental capabilities or lack of experience and knowledge if they have been given supervision or instruction concerning use of the appliance in a safe way and understand the hazards involved.
Children shall not play with the appliance.
Cleaning and user maintenance shall not be made by children without supervision.
-
Plug must be removed from the socket-outlet before cleaning or maintaining the appliance. Switch off before cleaning or maintaining the appliance.
-
If the supply cord is damaged, it must be replaced by a special cord or assembly available from the manufacturer or its service agent.
-
WARNING: For the purposes of recharging the battery, only use the detachable docking station provided with this appliance.
-
This appliance contains batteries that are only replaceable by skilled persons.
-
Do not bring the smart robot close to heat source, radiation or burning cigarette butts. It is strictly forbidden to vacuum the following objects:
-All liquids such as water and solvents.
-Lime, cement dust and other construction dust and garbage.
-Heat generating objects, such as unextinguished carbon butts, cigarette butts.
-Sharp fragments, such as glass, etc.
-Flammable and explosive items, such as gasoline and alcohol products.
-
Before using, please remove all fragile items from the ground (such as glasses, lamps, etc.), and items that may be tangled with the side brush, Roller brush and drive wheels (such as wires, curtains and other easily entangled materials).
-
Please pay attention to your hair and avoid entanglement on wheels or roller brushes when using, cleaning, and maintaining the robot.
-
Do not use this product at an altitude of more than 2000m.
-
Wireless network: 2400-2483.5MHz, MAX POWRE: 20dBm, BLUETOOTH MAX POWR: 10dBm
To satisfy RF exposure requirements, a separation distance of 20 cm or more should be maintained between the antenna of this device and persons during device operation. To ensure compliance, operations at closer than this distance is not recommended.
- CLASS 1 LASER PRODUCT
INVISIBLE LASER RADIATION
(Note: Laser classified to Class 1 according to IEC 60825-1:2014)
Warning for docking station
-
"IMPORTANT SAFETY INSTRUCTIONS – SAVE THESE INSTRUCTIONS" and "DANGER – TO REDUCE THE RISK OF FIRE OR ELECTRIC SHOCK, CAREFULLY FOLLOW THESE INSTRUCTIONS".
-
This appliance can be used by children aged from 8 years and above and persons with reduced physical, sensory or mental capabilities or lack of experience and knowledge if they have been given supervision or instruction concerning use of the appliance in a safe way and understand the hazards involved. Children shall not play with the appliance.
Cleaning and user maintenance shall not be made by children without supervision.
-
Plug must be removed from the socket-outlet before cleaning or maintaining the appliance. Switch off before cleaning or maintaining the appliance.
-
If the supply cord is damaged, it must be replaced by a special cord or assembly available from the manufacturer or its service agent.
-
Docking base is only applicable to the product model mentioned on this user manual.
(Battery pack type: Li-ion, DC 14.4 V, 52000 mAh)
The Docking base will automatically start charging after Robot Vacuum Cleaner returned to the base.
- Warning: The battery charger (Docking station) is not intended to charge non-rechargeable batteries.
Warning for battery
-
The product must be powered off before removing the battery.
-
Please note that do not disassemble the battery by yourself.
-
If you need to replace it, please contact the after-sales service center.
-
Please dispose of used battery according to local laws and regulations
-
Do not dismantle, open or shred the battery.
-
Do not expose batteries to heat or fire. Avoid storage in direct sunlight.
-
Do not short-circuit a battery.
-
Do not store batteries haphazardly in a box or drawer where they may short-circuit each other or be short-circuited by other metal objects.
-
Do not subject batteries to mechanical shock.
-
In the event of a leaking, do not allow the liquid to come in contact with the skin or eyes. If contact has been made, wash the affected area with copious amounts of water and seek medical advice.
-
Do not use any charger other than that specifically provided for use with the equipment.
-
Do not use any battery which is not designed for use with the equipment.
-
Do not mix different manufacture, capacity, size or type within a device.
-
Keep batteries out of the reach of children.
-
Seek medical advice immediately if the battery has been swallowed.
-
Keep batteries clean and dry.
-
Do not leave a battery on prolonged charge when not in use.
-
After extended periods of storage, it may be necessary to charge and discharge the batteries several times to obtain maximum performance.
-
The batteries give their best performance when they are operated at normal room temperature (20 °C ± 5 °C).
-
Retain the original product literature for future reference.
- The battery may be irreversibly damaged if the battery is in low power for a long time. It is recommended that the battery retain sufficient power before storage.
4. PRODUCT DESCRIPTION
Zone cleaning button
Start/Pause button
Dustbin release button
Dustbin/Water Tank
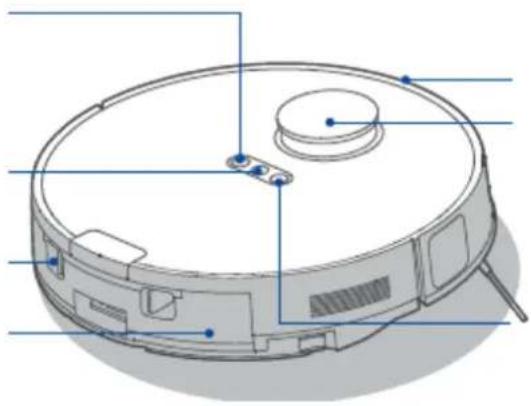
Front bumper
Laser radar
Docking button
Anti-drop sensors
Charging contacts
Auto-lifting mop assembly
Auto-empty outlet
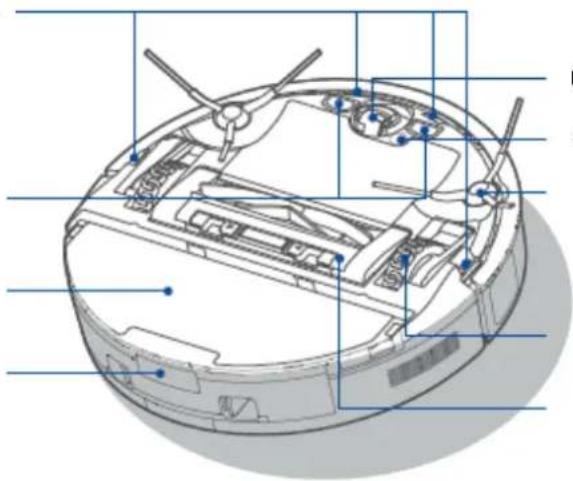
Universal wheel
Carpet detection sensor
Side brush
Driving wheel
Cover plate of main brush
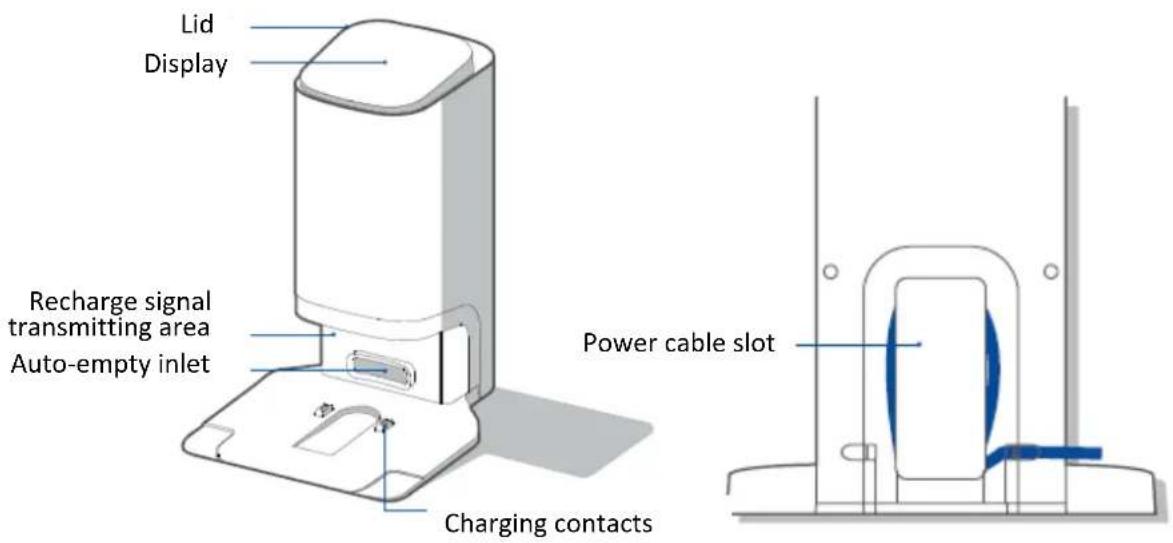
Accessories
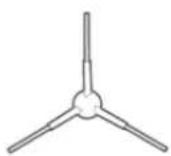
Side brush
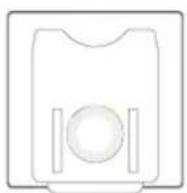
Disposable dust bag
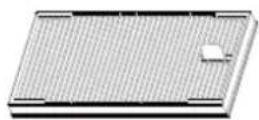
Filter mesh
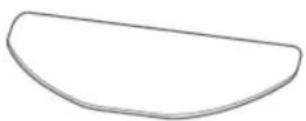
Mopping cloth
5. INSTALLING
Installation of self-emptying base
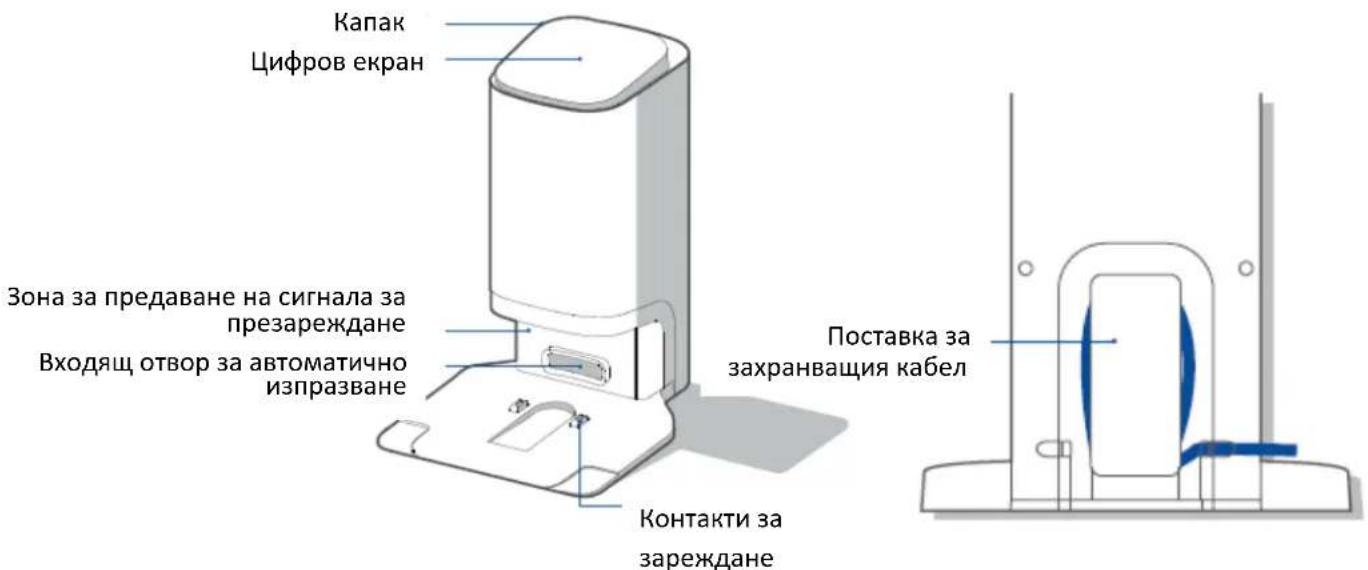
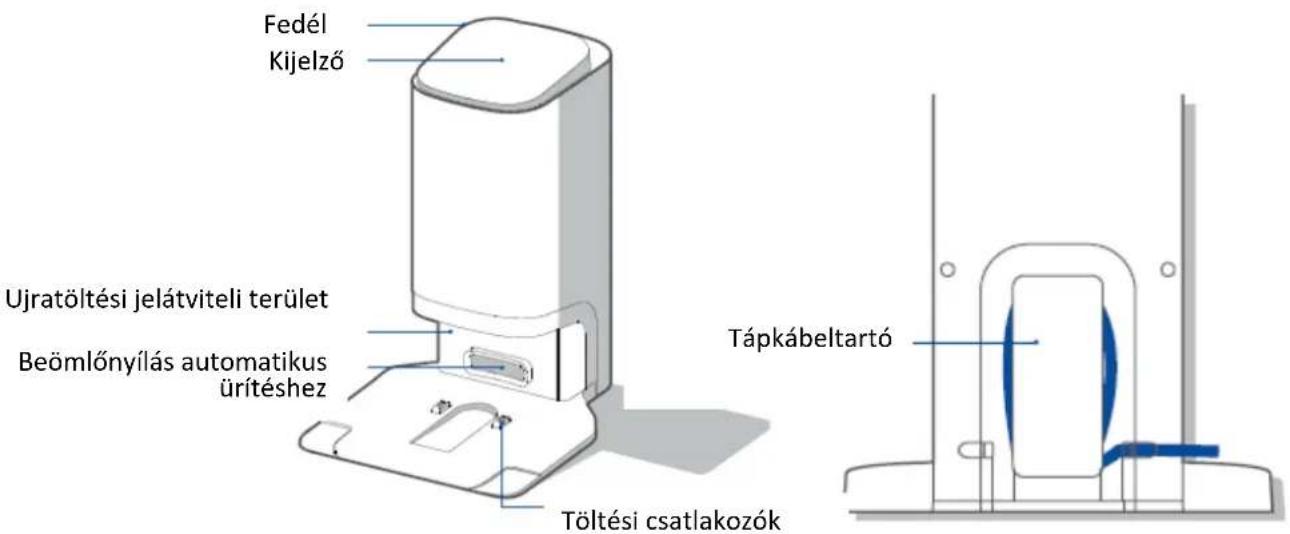
- Place the self-emptying base against the wall on a hard floor. If there is recharge base for other robot vacuum cleaners in the room, please put it away before use of our self-emptying base.
- Place the self-emptying base in an area covered with Wi-Fi signal to ensure stable networking of the robot vacuum and functional experiences of the App.
Store the excess cord into the slot of back of the charging base to avoid affecting the work of the robot vacuum.
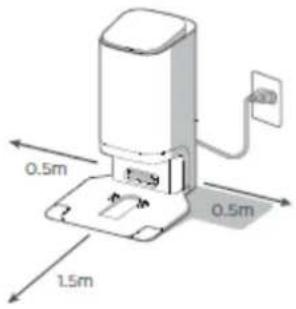
Notes
- Avoid direct sunlight.
- Do not cover the signal transmission area of self-emptying base with stickers or other objects.
- Avoid placing the base on carpet and soft floor.
- Be sure to keep the charging area dry.
Installation of side brush to robot vacuum
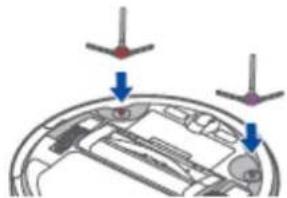
- Ensure that the colour of the side brush installed is the same as that of the slot on the bottom of robot vacuum, and then press the side brush directly into the corresponding slot. When you hear a "click", the installation is complete.
natural_image
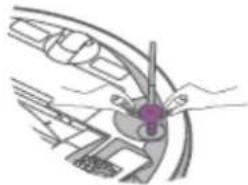
Diagram of a car interior with directional arrows indicating movement or force (no text or symbols)- To remove the side brush, please place the robot vacuum upside down, grab the rubber-coated legs of the side brush with both hands (be careful not to pull the hair bundle vigorously) and pull it out.
natural_image
Diagram of a mechanical or electrical component with no visible text, numbers, or symbols6. USING THE PRODUCT
Power on and recharge
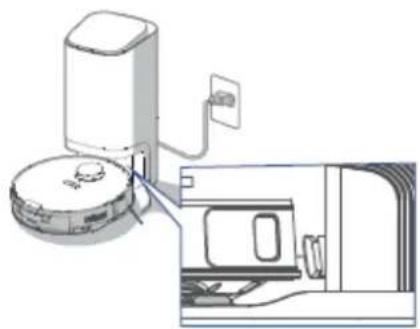
Press and hold " 🔊 " for 3 seconds to power on the robot vacuum. After the power indicator turns on, put the robot vacuum into the self-emptying base for charging, as shown. To ensure that the robot vacuum is always ready for use, keep it in the charging state.
natural_image
Diagram showing a toilet mounted on a wall next to a vehicle, with an inset close-up of the interior (no text or symbols visible)Notes
- If you manually put the robot vacuum into the base, ensure that the side with the charging contacts is placed inside and the charging contacts of both robot and base are connected, at this moment, there is a certain distance between the robot's front bumper and base.
- Ensure that the robot vacuum is fully charged before first use.
- When the robot vacuum is successfully docked, the power indicator on the robot flashes, and a beeping sound is emitted at the same time, indicating that it is in the charging state at this moment.
Tips
After the robot vacuum is manually put into the base, the robot vacuum will automatically power on and pair with the base.
Environmental Requirements
Before using the robot vacuum, please make sure the area to be cleaned is free from items that may be tangled/stuck with the robot vacuum (such as wires, hard objects, iron nails, glasses, and other sharp fragments), and items that may be dragged or knocked down by the robot vacuum (such as valuable objects, fragile objects and dangerous objects likely to fall). This helps ensure that the robot vacuum does not cause personal injury or property damage.
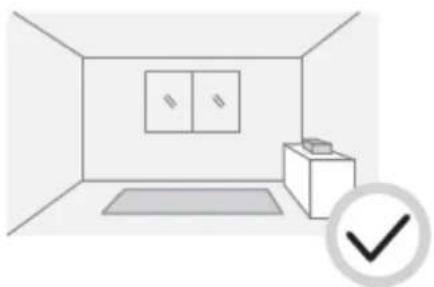
natural_image
Interior view of a room with a rug, cabinet, and wall-mounted fixture (no text or symbols)Preparations of the Water Tank
When using floor mopping function, fill the water into the water tank.
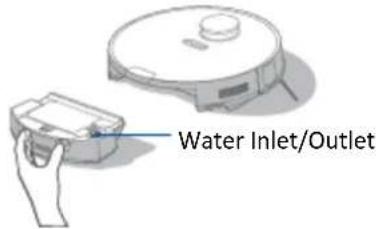
Bluetooth Connection - Robot and Base
When the robot is in the standby status and the base is connected to the power supplies, press the " ⏻" and " " together for 3 seconds to go into the status for Bluetooth connecting, then the base will be connected to the robot automatically.
Manually using the product
Starting
Press " " to start cleaning the whole house.
Pausing
Press " " to pause during cleaning.
Resuming
Press "①" on the robot vacuum briefly to resume cleaning.
Shut Down
Press and hold " " for a while to shut down.
Zone Cleaning
When the robot vacuum is in standby mode, press "1m ^2 " to start zone cleaning
Recharge
-
If the robot vacuum enters recharge state after cleaning, the red light of docking button will stay on; If the robot vacuum enters recharge state because of low battery, the red light of docking button will flash.
-
When the robot vacuum is in standby mode, press "a" and the robot vacuum will start recharging.
When the robot vacuum is in cleaning process, pressing "💡" can stop cleaning, and then pressing "💡" again can start recharging.
- Under special circumstances (such as power depletion, robot vacuum jamming, etc.), the robot vacuum may not be able to recharge automatically. Please manually put the robot vacuum back to the recharge base for charging.
Notes
- When the robot vacuum reports a fault, the power light will flash quickly. Please press " ", or " briefly to clear the fault.
- When the battery is too low, the cleaning process cannot be started. Please charge before operating.
- During the cleaning process, if the battery is too low, the robot vacuum will automatically recharge, and after fully charged, it will return to the place where the cleaning is interrupted to continue the process.
- When the robot vacuum is charging, the power indicator will flash slowly; When the charging is completed, the power indicator will stay on.
- The robot vacuum will enter sleep mode when it is in standby mode for more than 10 minutes. In sleep mode, press any key to wake up the robot vacuum.
- The robot vacuum cannot be shut down when it is on the recharge base. Please remove the robot vacuum from the self-emptying base before shutting down.
- This product is intended for indoor use only. Do not use it outdoors.
- Do not submerge the robot vacuum in water. Doing so may damage the equipment, causing a short circuit or current leakage.
Self-emptying Function
a) Select manual self-emptying function on the App.
b) The robot vacuum automatically returns for self-emptying after cleaning.
c) Press the docking button (the recharge interval between two times should be longer than 5 minutes) to trigger self-emptying
Robot vacuum buttons
| Operation | Button | ||
| Short press | Start/pause/resume | Return to the base | Start zone cleaning |
| Press and hold for 3 sec | Shut down | / | Enter the wi-fi pairing state |
Status Indicators of Robot Vacuum
| Indicator light | Status | Actions |
| The standby light stays on | Standby/Cleaning/Cleaning process has been completed and recharging is in progress. | / |
| The standby light is off | The robot vacuum has been shut down or in sleep mode. | / |
| The standby light flashes quickly | The robot has failed. | Refer to "Common Problems" |
| The standby light flashes slowly | The robot is charging. | / |
| The recharging red light stays on | The battery is not low, and recharging is in progress | / |
| The recharge red light flashes | The battery is not low, and recharging is in progress | / |
| The Wi-Fi light stays on | The robot is in zone cleaning process. | / |
| The Wi-Fi light flashes quickly | The robot vacuum is connecting to the network. | / |
| The Wi-Fi light flashes slowly | The robot vacuum is waiting to be configured with a network. | / |
Status Indicators of self-emptying base
| Indicator light | Status | Actions |
| The outer ring light is on | Self-emptying base is powered on. | / |
| The outer ring light is off | Self-emptying base is powered off. | / |
| Lights illuminate counterclockwise | Self-emptying is in progress. | / |
| The robot in position indicator bar is on | The robot is in the base. | / |
| The robot in position indicator bar is off | The robot is not in the base. | / |
| Stays on | The disposable dust bag is full. | Please replace the disposable dust bag with a new one. |
| Flashes | The dust channel is blocked | Please clear the dust channel. |
| Stays on | Self-emptying is in progress. | / |
| Stays on | The disposable dust bag is installed improperly. | Please reinstall the disposable dust bag. |
| Flashes | The lid is open. | Please close the lid. |
7. CLEANING AND MAINTENANCE
Maintenance of dust bin/Water tank
- Take out the dust bin.
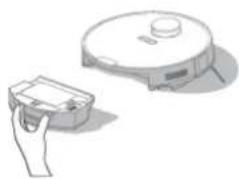
natural_image
Illustration of a hand holding a small electronic device next to a circular device (no text or symbols visible)Press and hold the release button of the dust bin with two fingers and take out the dust bin backwards.
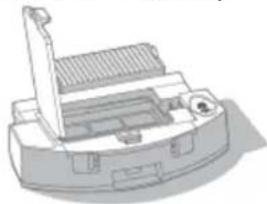
- Open the lid of the dust bin and take out the filter assembly.
natural_image
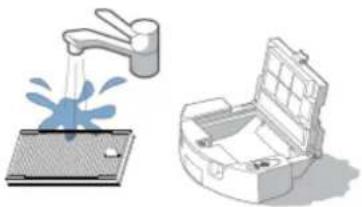
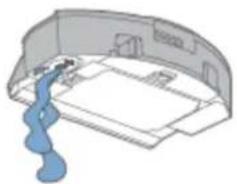
Technical line drawing of a mechanical device with no visible text or symbols- Clean the dust bin, filter assembly and filter cotton. After cleaning and fully drying, install all accessories back in place, close the back cover and check whether the installation is perfect (both dust bin and filter assembly can be washed with water).
natural_image
Illustration of a faucet spraying water onto a surface next to an open storage box (no text or symbols)Tips
- To ensure optimal filtering, it is recommended to clean and replace the filter mesh regularly.
natural_image
3D diagram of a mechanical component with a blue wavy line indicating a flow or movement (no text or symbols)How to use the cleaning brush:
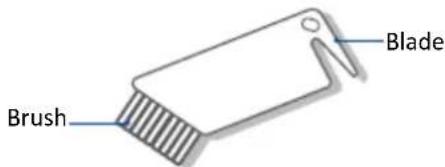
-
Cut the hair entangled on the main brush body with the blade.
-
Brush off the cut hair with the brush.
Maintenance of Main Brush
Weekly cleaning is recommended.
- Place the robot vacuum upside down, put your hand on the notch on the upper part of the cover plate of the main brush, press down to release the cover plate of the main brush and pull it out, and lift the right side of the main brush to take it out.
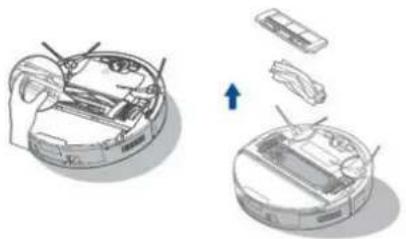
natural_image
Illustration of a robotic vacuum cleaner with internal components and a blue arrow indicating rotation (no text or symbols)- Clean the main brush and its cover plate with the cleaning brush or a soft cloth.
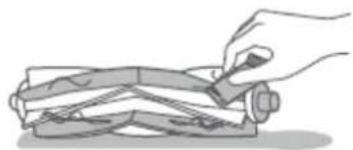
natural_image
Illustration of a hand using a tool to cut or press a piece of paper or metal (no text or symbols visible)- Wash the main brush with water and dry it.
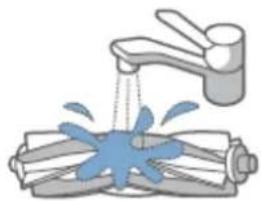
natural_image
Illustration of a faucet spraying water onto a cylindrical object (no text or symbols)- After cleaning, press the end cover back to the main brush body. Install the main brush body into the main brush cavity according to the direction shown in the figure.
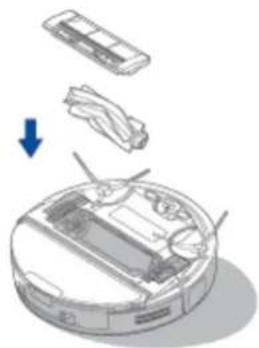
natural_image
Illustration of a robotic vacuum cleaner with internal components and a blue arrow indicating motion (no text or symbols)Cleaning of the side brush
Weekly cleaning is recommended.
- Pull out the side brush.
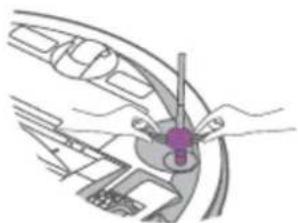
natural_image
Diagram of a car wheel assembly with hand positioning and valve mechanism (no text or labels)- Remove dust on the side brush.
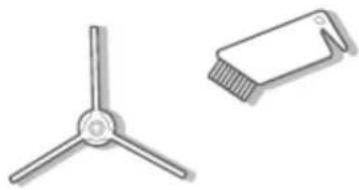
natural_image
Illustration of a three-blade propeller and a plastic clip (no text or symbols)Cleaning of the driving wheel
Weekly cleaning is recommended.
Rotate the driving wheel back and forth to remove foreign matters - remove and take out the hair or foreign matters with the cleaning tool or a soft cloth.
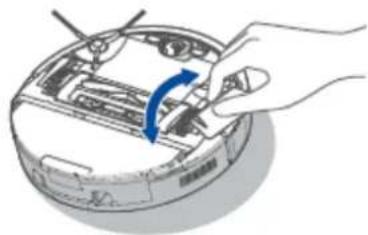
natural_image
Illustration of a hand holding a device with a blue arrow indicating rotation (no text or symbols)Mop assembly cleaning
- Release the mop assembly and clean it.
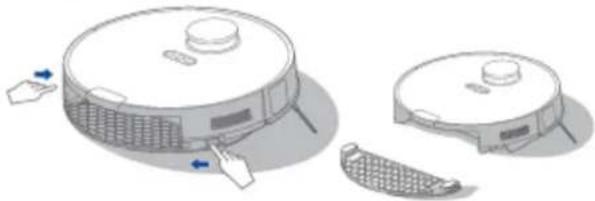
natural_image
Illustration of a robotic vacuum cleaner with attached circuit board and fan (no text or symbols)- Remove the mopping cloth from the mop holder.
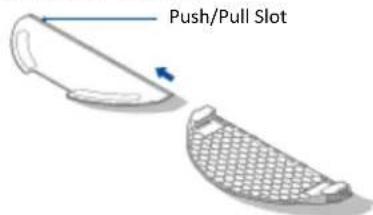
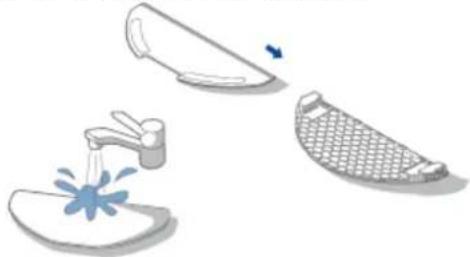
- Wash the mopping cloth with water and dry it; then place the cleaned mopping cloth back to the mop holder and re-install the mop assembly to the robot vacuum.
natural_image
Illustration of three kitchen utensils: a drain with a splash, a pan with a handle, and a mesh-patterned plate (no text or symbols)Cleaning of sensor and spring sheet
Weekly cleaning is recommended.
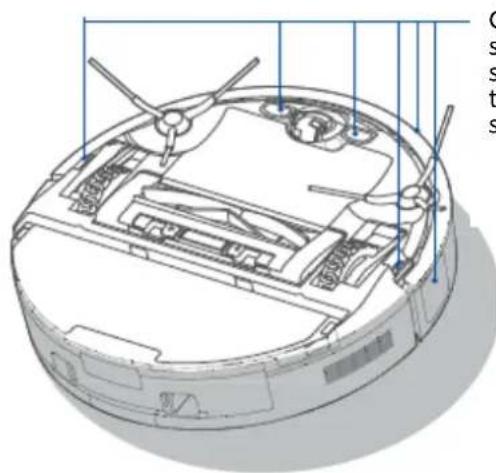
Gently wipe the sensor with a dry soft cloth to remove the dust on the surface.
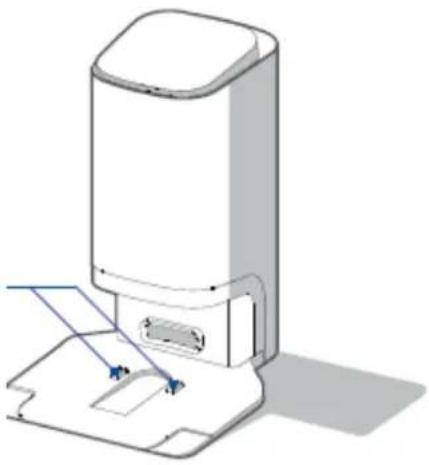
Gently wipe the charging contacts with a dry soft cloth to ensure normal charging.
natural_image
3D rendering of a white cylindrical device with a base and internal components, showing no text or symbols.Replacement of disposable dust bag for self-emptying base
Monthly cleaning is recommended.
- Take out the used disposable dust bag.
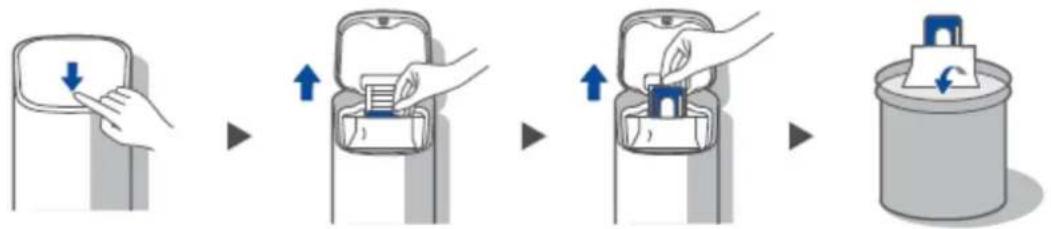
flowchart
graph LR
    A["Input: Down Arrow"] --> B["Insert: Up Arrow"]
    B --> C["Transfer to Battery Box"]
    C --> D["Insert: Up Arrow"]
    D --> E["Recycle to Cover Box"]
    E --> F["Down Arrow"]
- Wipe the filter mesh.
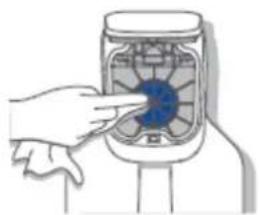
natural_image
Illustration of a hand inserting a blue object into a container (no text or symbols visible)- Install the new disposable dust bag.
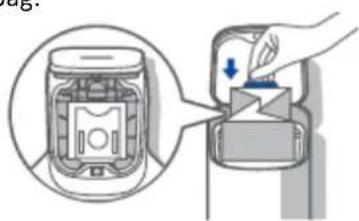
natural_image
Diagram showing a hand inserting a device into a container with a blue arrow indicating the process (no text or symbols present)- Close the lid of self-emptying base.
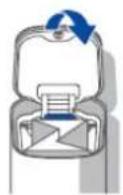
8. TROUBLESHOOTING
Operation of your appliance can lead to errors and malfunctions. The following tables contain possible causes and notes for resolving an error message or malfunction. It is recommended to read the tables carefully below in order to save your time and money that may cost for calling to the service center.
| Problem | Possible reason | Solution |
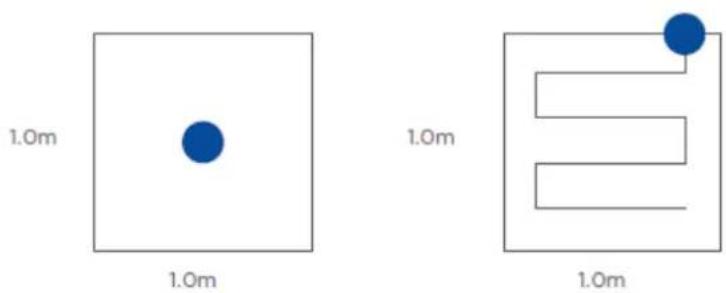
| The robot vacuum cannot be recharged. | The robot vacuum is not in contact with the charging contacts. | Place the robot vacuum 1 m in front of the charging base and press the recharging button. |
| The robot vacuum cannot return for charging. | The charging base is placed improperly. | Place the charging base on a level surface that is free of obstacles |
| The robot vacuum is trapped. | The robot vacuum is entangled/stuck by objects (such as cords) on the floor. | Please put away the scattered cords and objects on the floor. |
| The side brush/main brush is stuck so that the robot vacuum cannot move normally. | Remove the objects that caused the main/side brush to be stuck and place the robot flat on the floor and restart. | |
| The robot vacuum is stuck by obstacles. | Remove the obstacles and proceed with cleaning, or set No-go zones in App. | |
| Cleaning process has not been completed, but the robot vacuum returns for charging | The battery level of the robot vacuum is running low. | Let the robot vacuum return for recharging. |
| Fail to clean as appointment. | Scheduled appointment has been cancelled. | Reset appointment |
| The robot vacuum is in "Do Not Disturb Mode". | Turn off "Do Not Disturb Mode" or adjust the "do not disturb time interval". | |
| The robot vacuum does not work. | Left/right wheel is suspended. | Place the robot vacuum flat on the floor and start the robot vacuum. |
| The robot vacuum moves backward. | The protective cover of navigation module is stuck | Gently tap the protective cover to remove dust. |
| There is obstacle ahead. | Remove the obstacle ahead | |
| The bumper is stuck. | Gently tap the front bumper to remove dust. | |
| There is dust accumulated on the cliff sensors. | Clean the dust accumulated on the surface of cliff sensors. | |
| The robot vacuum has no sound. | The sound is muted. | Turn up the volume. |
| The robot vacuum is in "Do Not Disturb Mode". | Turn off "Do Not Disturb Mode". | |
| The App shows the connection is disconnected. | The phone is not connected to the network normally | Reconnect the phone network. |
| The router is not working properly. | Restart the router. | |
| The robot vacuum is not turned on. | Turn on the robot. | |
| The network is removed. | Add new appliances in the App. | |
| Wireless network password or network has been changed. | Reset the network by pressing and holding the " " button for 3 seconds. Add the device again following the phone's instructions. | |
| App operation response delays. | Wireless network signal is weak. | Restart the router to reduce the number of access users.Check the phone settings. |
| The network bandwidth is insufficient | Increase the network bandwidth. | |
| After the robot vacuum returns to the self-emptying base, the self-emptying process fails to start automatically | The disposable dust bag is full. | The lid of self-emptying base is not closed.The disposable dust bag is not inserted to the bottom |
| Replace with a new disposable dust bag | Close the lid.Insert the disposable dust bag to the bottom. |

Environment friendly disposal
You can help protect the environment!
Please remember to respect the local regulations: hand in the non-working electrical equipment's to an appropriate waste disposal center.

HEINNER is a registered trademark of Network One Distribution SRL. Other brands and product names are trademarks or registered trademarks of their respective holders.
No part of the specifications may be reproduced in any form or by any means or used to make any derivative such as translation, transformation, or adaptation without permission from NETWORK ONE DISTRIBUTION.
Copyright © 2013 Network One Distribution. All rights reserved.
www.heinner.com, http://www.nod.ro

This product is in conformity with norms and standards of European Community

Importer: Network One Distribution
Marcel Iancu Street, 3-5, Bucharest, Romania
Tel: +40 21 211 18 56, www.heinner.com , www.nod.ro
ASPIRATOR ROBOT
Model: HI-RoboX Pro+
HRVC-MAI52DSBK
natural_image
Exterior view of a Heinner vacuum cleaner with black casing and circular base (no visible text or symbols)• Acumulator: 14,4 V, 5200 mAh
- Tehnologie de detectare 3D cu laser linear.
natural_image
Technical line drawing of a circular robotic vacuum cleaner with labeled components (no text or symbols present)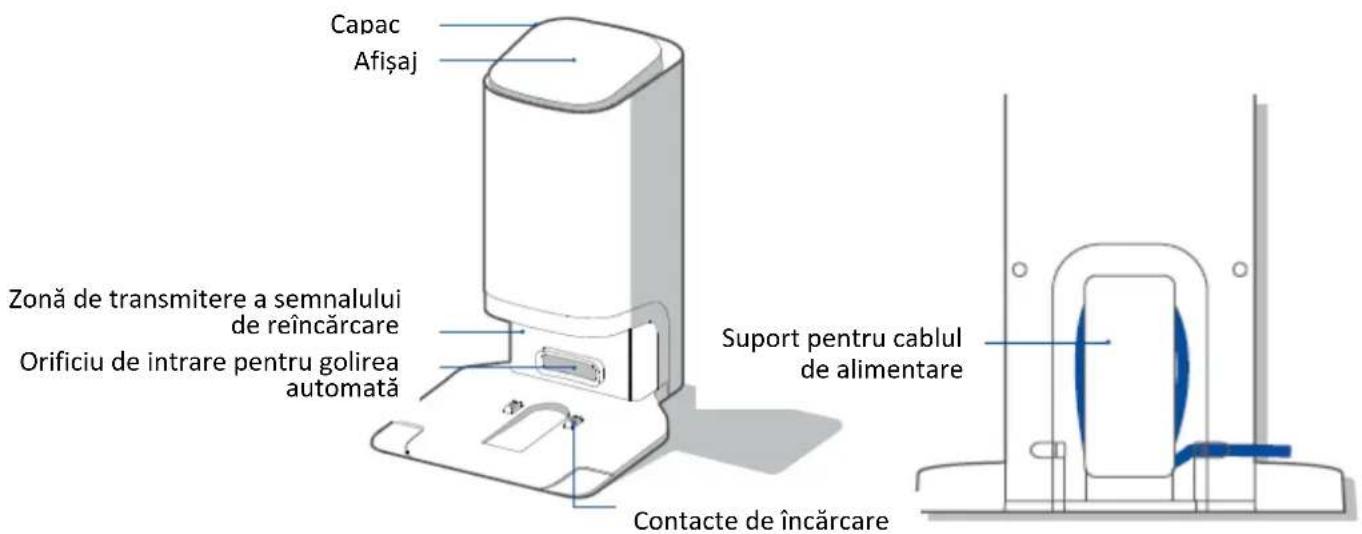
Note
natural_image
Diagram of a car interior showing dashboard and steering wheel (no text or labels)natural_image
Diagram of a car's wheel and wheel assembly (no text or labels)4. UTILIZAREA PRODUSULUI
natural_image
Diagram showing a robotic vacuum cleaner interacting with a device, with an inset close-up of the device (no text or symbols visible)Note
natural_image
Interior view of a room with a rug, cabinet, and wall art (no text or symbols)natural_image
Illustration of a robotic vacuum cleaner and a handheld device (no text or symbols)natural_image
3D technical illustration of a mechanical assembly with no visible text or symbolsnatural_image
Illustration of a faucet spraying water onto a drain while an open storage device is placed on its side (no text or symbols)Sfaturi
natural_image
3D diagram of a car interior with a blue smoke plume inside (no text or symbols)natural_image
Diagram showing a robotic car interior with a blue arrow indicating the change from left to right (no text or symbols present)natural_image
Illustration of a faucet spraying water onto a cylindrical object (no text or symbols)natural_image
Illustration of a robotic vacuum cleaner with internal components and a blue arrow indicating motion (no text or symbols)natural_image
Two mechanical components: a three-blade propeller and a rectangular block with threaded end (no text or symbols)natural_image
Illustration of a hand using a tool to adjust or install electronic components on a device (no text or symbols visible)natural_image
Illustration of a robotic vacuum cleaner with control panel and sensor array (no text or symbols)natural_image
Illustration of three kitchen utensils: a faucet with a blue splash, a bowl with a mesh pattern, and a flat plate (no text or symbols)natural_image
3D rendering of a white cylindrical device with a base and internal components, showing no text or symbols.natural_image
Illustration of a hand inserting a blue circular component into a cylindrical device (no text or symbols visible)natural_image
Illustration of a hand placing a component into a device, showing internal components and a downward arrow (no text or symbols)natural_image
Diagram of a mechanical device with a blue recycling symbol on top (no text or labels)6. DEPANARE
natural_image
Exterior view of a Heinner vacuum cleaner with a circular base and control panel (no visible text or symbols on the device body)• Акумулаторна батерия: 14,4 V, 5200 mAh
natural_image
Technical line drawing of a robotic vacuum cleaner (no text or symbols present)Всепосочно колелце
Забележки
natural_image
Diagram of a car interior showing dashboard and steering wheel (no text or symbols)natural_image
Diagram of a car's wheel and wheel assembly (no text or labels)6. ИЗПОЛЗВАНЕ НА ПРОДУКТА
natural_image
Diagram showing a robotic vacuum cleaner next to a vehicle, with no visible text or symbolsЗабележки
natural_image
Interior view of a room with a wall-mounted cabinet and a checkmark icon (no text or symbols)Подготовка на резервоара за вода
natural_image
Illustration of a robotic vacuum cleaner and a handheld device (no text or symbols)natural_image
Technical line drawing of a mechanical component with no visible text or symbolsnatural_image
Illustration of a faucet spraying water onto a surface next to an open printer case (no text or symbols)Препоръки
natural_image
3D diagram of a mechanical component with a blue wavy line indicating a flow or movement (no text or symbols)natural_image
Diagram showing a robotic vacuum cleaner with internal components and an open lid, no text or symbols presentnatural_image
Illustration of a hand using a tool to cut or press a cylindrical object (no text or symbols visible)natural_image
Illustration of a faucet spraying water onto a cylindrical object (no text or symbols)natural_image
Illustration of a robotic vacuum cleaner with mechanical components and a blue arrow indicating motion (no text or symbols)natural_image
Two types of propeller or fan components: a three-blade propeller and a rectangular clip (no text or symbols)natural_image
Hand holding a computer monitor with a blue circular arrow indicating rotation (no text or symbols)natural_image
Illustration of a robotic vacuum cleaner with control panel and sensor array (no text or symbols)natural_image
Illustration of a faucet with water splashing, alongside a woven basket and a separate plate (no text or symbols)natural_image
3D rendering of a white cylindrical device with a base and internal components, no visible text or symbolsflowchart
graph LR
    A["Device with downward arrow"] --> B["Device with upward arrow"]
    B --> C["Device with upward arrow"]
    C --> D["Device with rightward arrow"]
natural_image
Illustration of a hand placing a small object into a container with a blue arrow indicating direction (no text or symbols present)natural_image
Exterior view of a Heinner vacuum cleaner with black body and circular base (no visible text or symbols)- Akkumulátor: 14,4 V, 5200 mAh
Megjegyzések
natural_image
Diagram of a car interior showing dashboard and steering wheel (no text or symbols)natural_image
Diagram of a mechanical or fluid system with no visible text, numbers, or symbols6. A TERMÉK HASZNÁLATA
natural_image
Diagram showing a vacuum cleaner connected to a door panel, with no visible text or symbolsMegjegyzések
natural_image
Simple line drawing of a room interior with a rug, cabinet, and wall-mounted door (no text or symbols)natural_image
Illustration of a hand holding a small electronic device next to a circular vacuum cleaner (no text or symbols)natural_image
Illustration of a printer or printer with a paper airplane, showing internal components and no visible text or symbols.natural_image
Illustration of a faucet spraying water onto a drain while an open storage box outlines the interior (no text or symbols)Tanácsok
natural_image
Illustration of a robotic vacuum cleaner with internal components and a blue arrow indicating rotation (no text or symbols)natural_image
Illustration of a faucet spraying water onto a cylindrical object (no text or symbols)natural_image
Diagram of a robotic vacuum cleaner with internal components and a blue arrow indicating motion (no text or symbols)natural_image
Two types of propeller icons: a three-blade propeller and a rectangular clip (no text or symbols)natural_image
Illustration of a hand using a tool to adjust or install electronic components on a device (no text or symbols visible)natural_image
Illustration of a robotic vacuum cleaner with a coiled cord and directional arrows indicating motion (no text or symbols)natural_image
Illustration of three kitchen utensils: a faucet with water splash, a flat plate with a blue mark, and a mesh-patterned sink (no text or symbols)natural_image
3D rendering of a white cylindrical device with a base and internal components, showing no text or symbols.flowchart
graph LR
    A["Initial state: Screen with downward arrow"] --> B["Insertion: Top panel, up arrow"]
    B --> C["Add back panel, down arrow"]
    C --> D["Close-up battery holder, upward arrow"]
    D --> E["Order: Top panel, down arrow"]
    E --> F["Recycle into final container with downward arrow"]
natural_image
Illustration of a hand inserting a blue object into a device (no text or symbols visible)natural_image
Diagram showing a hand placing a component into a device, with an inset view of a battery casing (no text or symbols present)natural_image
Diagram of a device with a blue arrow indicating rotation, showing internal components (no text or symbols)8. HIBAELHÁRÍTÁS
- INTRODUCTION
- CONTENT OF YOUR PACKAGE
- SAFETY INSTRUCTIONS
- General
- Warning for docking station
- Warning for battery
- PRODUCT DESCRIPTION
- Accessories
- INSTALLING
- Installation of self-emptying base
- Notes
- Installation of side brush to robot vacuum
- USING THE PRODUCT
- Power on and recharge
- Tips
- Environmental Requirements
- Preparations of the Water Tank
- Bluetooth Connection - Robot and Base
- Manually using the product
- Starting
- Pausing
- Resuming
- Shut Down
- Zone Cleaning
- Recharge
- Self-emptying Function
- Status Indicators of Robot Vacuum
- Status Indicators of self-emptying base
- CLEANING AND MAINTENANCE
- Maintenance of dust bin/Water tank
- How to use the cleaning brush:
- Maintenance of Main Brush
- Cleaning of the side brush
- Cleaning of the driving wheel
- Mop assembly cleaning
- Cleaning of sensor and spring sheet
- Replacement of disposable dust bag for self-emptying base
- TROUBLESHOOTING
- Environment friendly disposal
- ASPIRATOR ROBOT
- Note
- UTILIZAREA PRODUSULUI
- Sfaturi
- DEPANARE
- Забележки
- ИЗПОЛЗВАНЕ НА ПРОДУКТА
- Подготовка на резервоара за вода
- Препоръки
- Megjegyzések
- A TERMÉK HASZNÁLATA
- Tanácsok
- HIBAELHÁRÍTÁS
Brand : Heinner
Model : HRVC-MAI52DSBK
Category : Robot vacuum