
MG5050 WET&DRY - Electric mower BRAUN - Free user manual and instructions
Find the device manual for free MG5050 WET&DRY BRAUN in PDF.
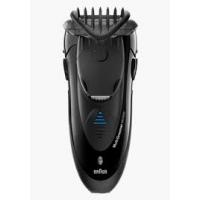



| Product type | Wet&Dry electric shaver |
| Brand / Model | BRAUN MG5050 WET&DRY |
| Power source | Rechargeable, built-in battery, special low-voltage cable |
| Battery life | Approximately 30 minutes of cordless shaving |
| Full charge time | 4 hours (first charge or after prolonged non-use) |
| Quick charge | 5 minutes for one shave |
| Usage | Dry or under running water |
| Shaving head | Flexible foil and cutter block |
| Integrated trimmer | Rotary, wide (28 mm) and narrow (14 mm) |
| Attachments | 3-day beard guard (1b) and adjustable guard (8): 1.2 / 2.8 / 4.4 / 6 mm |
| Cleaning | Rinseable under hot water, brush included, weekly oiling recommended |
| Charge indicator | LED indicator (lights up while charging, turns off when full, blinks if battery low) |
| Replacement parts | Foil and cutter block (ref. 10B) replace every 18 months |
| Warranty | 2 years |
| Weight (approx.) | Approximately 200 g |
| Dimensions (approx.) | Approximately 15 x 5 x 4 cm |
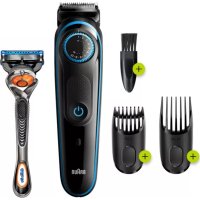
| Included accessories | Protective cap, adjustable guard, 3-day beard guard, cleaning brush, charging cable |
| Safety | Special non-interchangeable cable, do not use with damaged foil |
Frequently Asked Questions - MG5050 WET&DRY BRAUN
User questions about MG5050 WET&DRY BRAUN
0 question about this device. Answer the ones you know or ask your own.
Ask a new question about this device
Download the instructions for your Electric mower in PDF format for free! Find your manual MG5050 WET&DRY - BRAUN and take your electronic device back in hand. On this page are published all the documents necessary for the use of your device. MG5050 WET&DRY by BRAUN.
USER MANUAL MG5050 WET&DRY BRAUN
(Sharecall charged at local rates)
www.service.braun.com
Braun GmbH
Frankfurter Straße 145
61476 Kronberg/Germany
www.braun.com
1a MG5050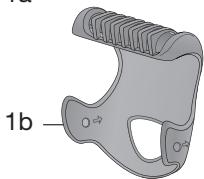
MG5010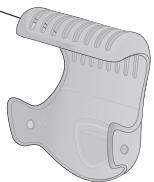
MG5050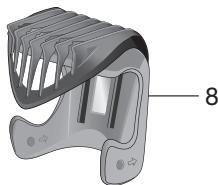
a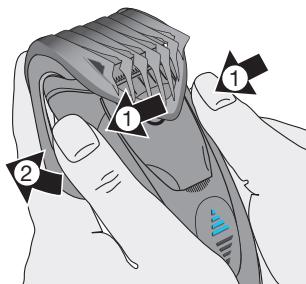
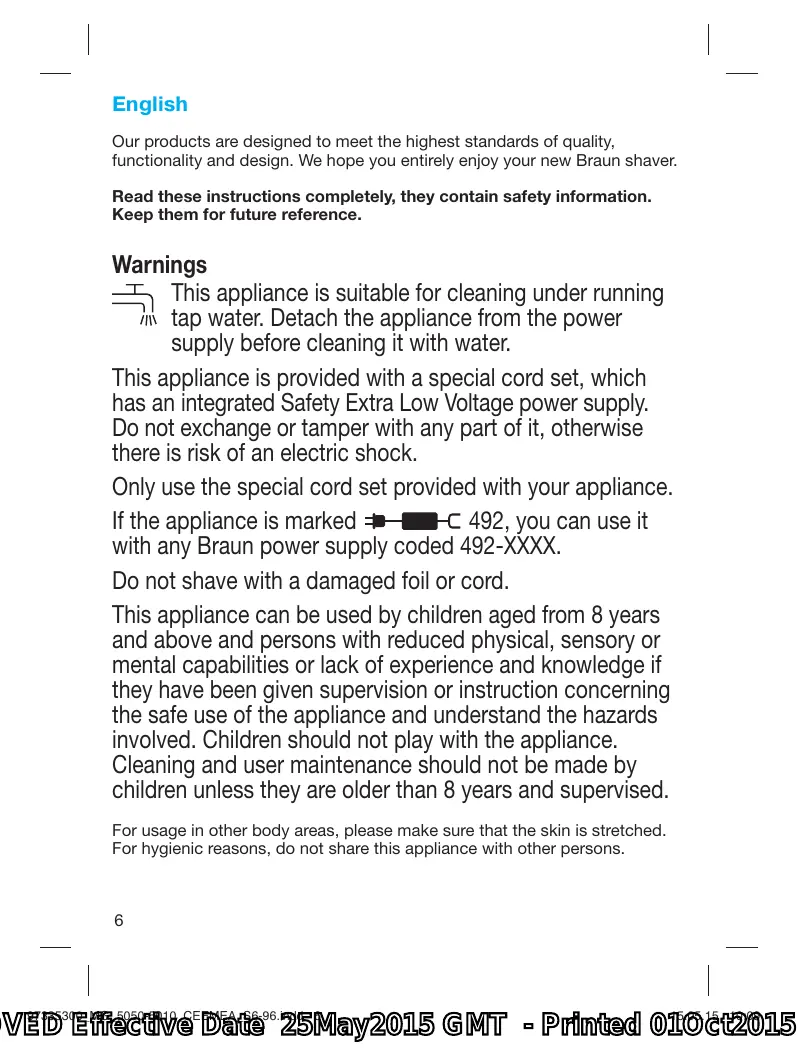
English
Our products are designed to meet the highest standards of quality, functionality and design. We hope you entirely enjoy your new Braun shaver.
Read these instructions completely, they contain safety information. Keep them for future reference.
Warnings

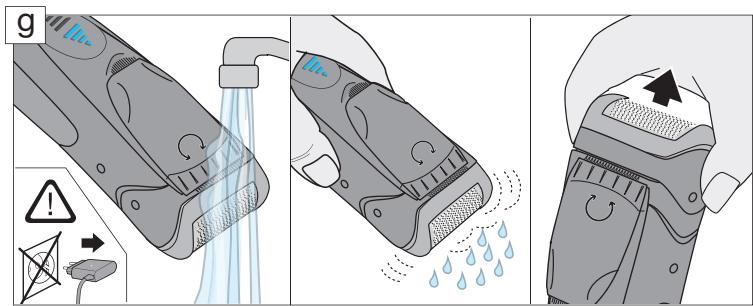
This appliance is suitable for cleaning under running tap water. Detach the appliance from the power supply before cleaning it with water.
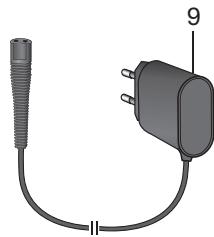
This appliance is provided with a special cord set, which has an integrated Safety Extra Low Voltage power supply. Do not exchange or tamper with any part of it, otherwise there is risk of an electric shock.
Only use the special cord set provided with your appliance.
If the appliance is marked ⇒ C 492, you can use it with any Braun power supply coded 492-XXXX.
Do not shave with a damaged foil or cord.
This appliance can be used by children aged from 8 years and above and persons with reduced physical, sensory or mental capabilities or lack of experience and knowledge if they have been given supervision or instruction concerning the safe use of the appliance and understand the hazards involved. Children should not play with the appliance.
Cleaning and user maintenance should not be made by children unless they are older than 8 years and supervised.
For usage in other body areas, please make sure that the skin is stretched. For hygienic reasons, do not share this appliance with other persons.
Description
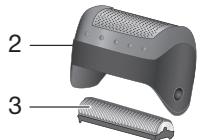
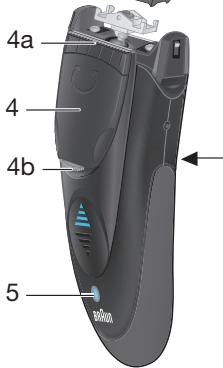
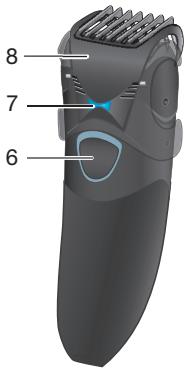
1a Protective cap 1b 3-day beard comb & protective cap 2 Shaver foil 3 Cutter block 4 Twistable trimmer 4a Wide trimmer (28 mm) 4b Narrow trimmer (14 mm) 5 Charging light 6 On/off switch 7 Beard length selector 8 Adjustable comb 9 Special cord set (design can differ)
*not with all models
Charging
Recommended ambient temperature for charging is 5°C to 35°C.
The battery may not charge properly or at all under extreme low or high temperatures. Recommended ambient temperature for shaving is 15°C to 35°C. Do not expose the shaver to temperatures higher than 50°C for extended periods of time.
- Using the special cord set, connect the shaver to an electrical outlet with the motor switched off.
- When charging for the first time or when the shaver is not used for a few months, leave the shaver to charge continuously for 4 hours.
- The charging light (5) shows that the appliance is being charged. When the battery is fully charged, the charging light turns off. Intermittent blinking after a while indicates that the battery maintains its full capacity. This can also happen short term when charging after the battery was completely discharged.
- A full charge provides 30 minutes of cordless shaving time depending on your beard growth.
- Once the shaver is completely charged, discharge the shaver through normal use. Then recharge to full capacity. Subsequent charges will take about 1 hour.
- Maximum battery capacity will only be reached after several charging/discharging cycles.
- 5-minute quick charge is sufficient for a shave.
Shaving
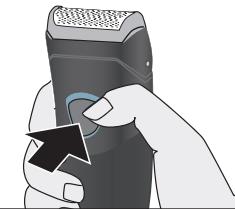
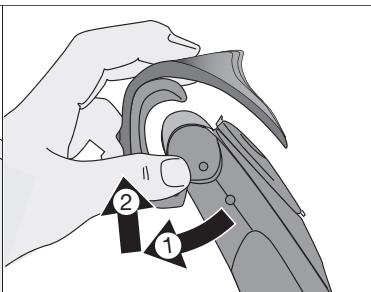
First, remove the protective cap (1a) / adjustable comb (8): Using your thumbs, press against the side clips of the attachment so that they swing off in the direction of the arrows (a). Activate the on/off switch (6). The floating foil frame automatically adapts to your skin surface for a close, smooth shave.
For best results:
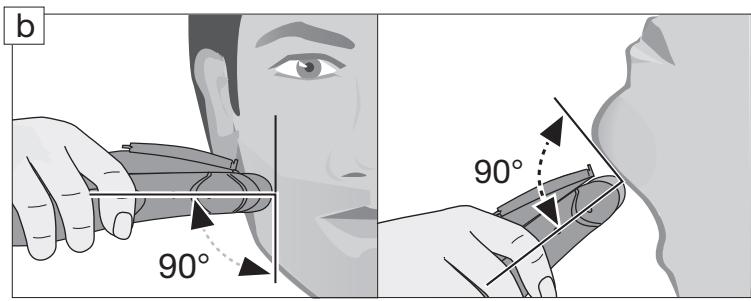
Always shave before washing your face. - At all times, hold the shaver at right angles (90°) to the skin (b). - Stretch the skin and shave against the direction of beard growth. - For pre-shaving after a few days of not having shaved, use the wide trimmer (4a) to pre-cut long hairs. For a close, smooth shave, finish with the foil. - To maintain 100% shaving performance, replace your foil and cutter block at least every 18 months or when worn.
Style
Using the twistable trimmer
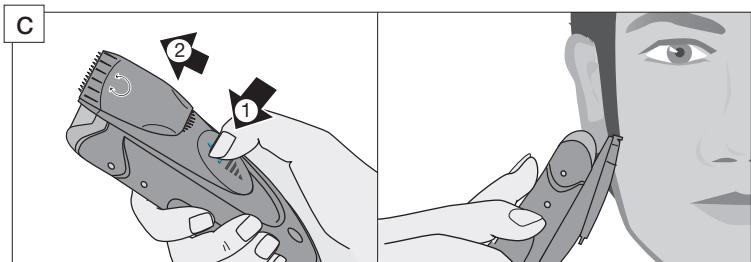
The wide trimmer (4a) evenly cuts and trims large areas (c). It is ideal for shaping sideburns, moustaches and partial short beards. The wide trimmer is provided with safety rips and a gliding strip for less irritation and easy gliding. Press the blue stripes to push up the twistable trimmer (4). While stretching the skin, guide the wide trimmer against the direction of hair growth.
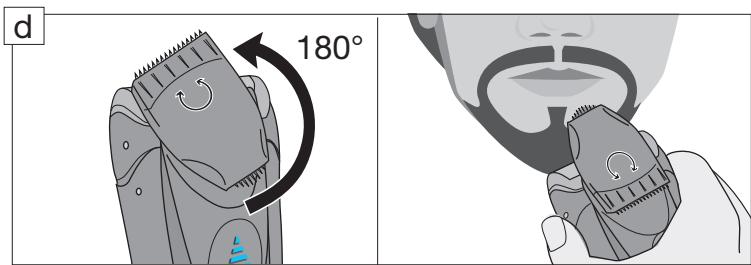
The narrow trimmer (4b) precisely defines lines and edges (d), being ideal for precise contouring.
To use the narrow trimmer, push up the twistable trimmer and turn it 180°.
Frequent use of the twistable trimmer will reduce the battery capacity.
Trim
Using the trimming attachments (1b) and (8)
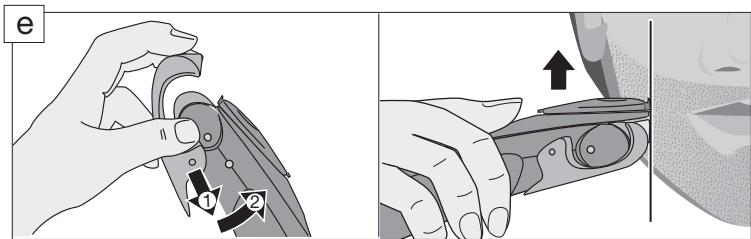
Place the respective trimming attachment onto the shaver foil (2) and press it against the shaver housing until it snaps into place with a click (e).
3-day beard comb & protective cap (1b): This attachment is perfectly suited for creating a stubble look and maintaining it.
- Place the attachment onto the foil (2) and push up the twistable trimmer (4). Turn on the shaver and use the appliance as shown in the illustration (e). The attachment ensures an optimum usage angle.
Adjustable comb (8): This attachment is ideal for beard trimming and keeping it at a constant length.
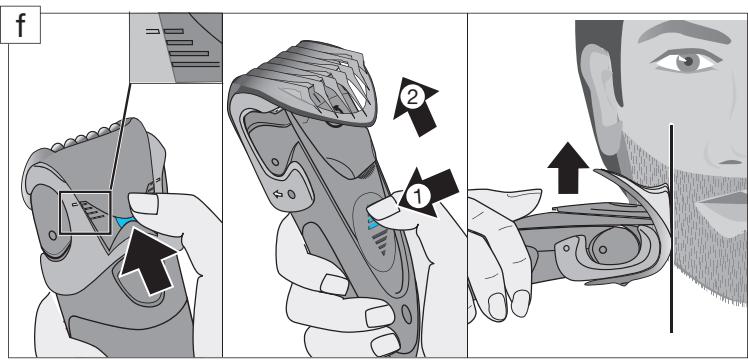
- Place the attachment onto the shaver foil (2) and set desired beard length. Press beard length selector (7) and slide it up (f) (possible length settings from top to bottom: 1.2 mm / 2.8 mm / 4.4 mm / 6 mm). Push up the twistable trimmer (4).
- Press the on/off switch and trim against hair growth by guiding the flat comb part over the skin (f).
Cleaning
Regular cleaning ensures better shaving performance. Rinsing the shaver head after each shave under running water is an easy and fast way to keep it clean:
- Switch on the shaver (cordless) and rinse the shaver head under hot running water until all residues have been removed (g). You may use liquid soap without abrasive substances. Rinse off all foam and let the shaver run for a few more seconds.
- Next, switch off the shaver, remove the shaver foil and the cutter block. Then leave the disassembled shaving parts to dry.
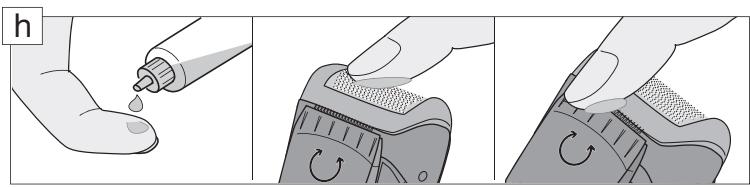
- If you regularly clean the shaver under water, then once a week apply a drop of light machine oil onto the trimmers (4a, 4b) and shaver foil (h).
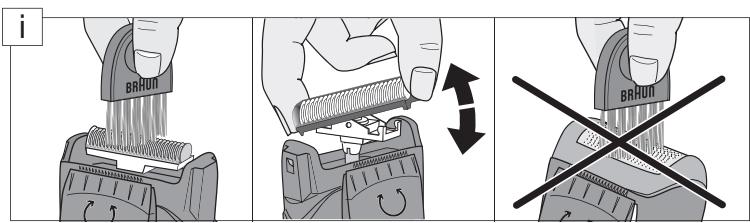
Alternatively, you may clean the shaver using the brush provided (i):
- Switch off the shaver. Remove the shaver foil.
- Using the brush, clean the cutter block and the inner area of the shaver head. However, do not clean the shaver foil with the brush as this may damage the foil.
Keeping your shaver in top shape
Replacing the shaving parts
To maintain 100% shaving performance, replace your foil and cutter block at least every 18 months or when worn. Change both parts at the same time for a closer shave with less skin irritation. (Shaver foil and cutter block: 10B)
Preserving the batteries
In order to maintain the optimum capacity of the rechargeable batteries, the shaver has to be fully discharged (by shaving) every 6 months approximately. Then recharge the shaver to full capacity.
Environmental notice
Product contains batteries and/or recyclable electric waste. For environment protection do not dispose of in household waste, but for recycling take to electric waste collection points provided in your country.
Subject to change without notice.
For electric specifications, see printing on the special cord set.

Guarantee
We grant a 2 year guarantee on the product commencing on the date of purchase. Within the guarantee period we will eliminate any defects in the appliance resulting from faults in materials or workmanship, free of charge either by repairing or replacing the complete appliance at our discretion. This guarantee extends to every country where this appliance is supplied by Braun or its appointed distributor.
This guarantee does not cover: damage due to improper use, normal wear or use as well as defects that have a negligible effect on the value or operation of the appliance.
The guarantee becomes void if repairs are undertaken by unauthorised persons and if original Braun parts are not used.
To obtain service within the guarantee period, hand in or send the complete appliance with your sales receipt to an authorised Braun Customer Service Centre (address information available online at www.service.braun.com).
For UK only:
This guarantee in no way affects your rights under statutory law.
Français
Using the rotary trimmer
The wide side of the trimmer (4a) allows you to evenly trim larger areas of the beard. It is ideal for correcting the beard, mustache, and sideburns. The wide side of the trimmer is supplied with protective combs and a sliding comb to reduce irritation and make shaving more comfortable. Press the release button to remove the rotary trimmer (4). Pulling the skin taut, run the wide side of the trimmer against the direction of hair growth.
The narrow side of the trimmer (4b) allows you to make precise lines and edges (d), making it the ideal tool for outlining contours.
To use the narrow side of the trimmer, pull out the rotary trimmer and turn it 180°.
With frequent use of the rotary trimmer, the battery capacity may decrease.
Using the trimmers
Trimming contours with the trimmers (1b) and (8)
Attach the special trimmer attachment to the shaving head (2) and press it firmly against the base of the shaver until the attachment is fully locked into place with a characteristic click (e).
Attachment for the '3-day beard' effect and protective cap (1b): This attachment is ideal for creating and maintaining the '3-day beard' effect.
- Attach the attachment to the shaving head (2) and pull out the rotary trimmer (4). Switch on the shaver and start shaving as shown in the figure (e). This attachment ensures an optimal shaving angle.
Adjustable trimmer attachment (8): This attachment is ideal for correcting the beard and maintaining it at a constant length.
- Attach the attachment to the shaving head (2) and set the desired beard length. Press the length regulator (7) and slide it upwards (f) (possible lengths: 1.2 mm / 2.8 mm / 4.4 mm / 6 mm). Pull out the rotary trimmer (4).
- Turn on the trimmer and guide it against the direction of hair growth, pressing the trimmer head lightly against the skin (f).
Cleaning the trimmer
Regular cleaning of the device will ensure a better shave.
The trimmer head should be rinsed under running water after each use.
Turn on the trimmer (without the cord) and hold the head under running water (g). You can use liquid soap without abrasive substances. Let the water run through the head and the trimmer for a few seconds. Then turn off the trimmer, remove the foil and the cutter block. Rinse the removed parts until they are completely clean. For regular cleaning of the trimmer with running water, it is necessary to apply a drop of machine oil to the wide and narrow sides of the trimmer (4a, 4b) and the shaving foil (h) once a week.
Alternatively, the trimmer can be cleaned with the brush included in the delivery (i):
- Turn off the trimmer. Remove the foil.
- Using the brush, carefully clean the inner surfaces of the trimmer head. The foil itself should not be cleaned with the brush, as you may damage it.
Maintaining effective operation of the trimmer
Replacing the working parts
To ensure 100% effectiveness of the trimmer, it is recommended to replace the foil and the cutter block at the same time every 18 months or as they wear out. Replace both parts at the same time to ensure a smoother shave and reduce the risk of skin irritation.
(Shaving foil and cutter block: 10B).
Maintaining battery performance
To maintain optimal battery capacity of the trimmer, it is necessary to fully discharge the battery by using the trimmer every 6 months. Then fully charge the battery.
Specifications may be changed without prior notice.
Electrical characteristics are indicated on the cable set.
EAC
Electric shaver Braun Type 5734 with power supply unit 5210
100-240 volts, 50-60 hertz, 7 watts
Made in China for Braun GmbH, Frankfurter Str. 145, 61476 Kronberg, Germany.
RU: Importer/Service for consumers: OOO «Procter & Gamble Distributor Company», Russia, 125171, Moscow, Leningradskoe shosse, 16A, bldg. 2. Tel. 8-800-200-20-20.
BY: Importer: OOO «Deltres and Co», Belarus, 220012, Minsk, Chernyshevsky str., 10A, office 412A3. Service center: OOO «Katrisk», Belarus, 220012, Minsk, Chernyshevsky str., 10A, office 409.
Supplier in the Republic of Belarus: IOOO «ALIN-Vest», 220140, Belarus, Minsk, Dombrovskaya str., 9, office 7.3.1
Please dispose of the used product in accordance with the legislation of the Russian Federation.

For warranty and post-warranty service, as well as in case of any problems with the use of the product, please contact the Braun service information line at 8 800 200 2020.
For the year of manufacture, see the three-digit code on the product housing next to the technical type of the product: the first digit = last digit of the year, the next two digits = serial number of the production week. For example, code «345» means that the product was manufactured in the 45th week of 2013.
Warranty period / service life: 2 years.
Braun warranty obligations.
This product is covered by a warranty for 2 years from the date of purchase.
During the warranty period, we will free of charge repair, replace parts, or replace the entire product for any factory defects caused by poor quality of material or workmanship.
If repair is impossible during the warranty period, the product may be replaced with a new or similar product in accordance with the consumer protection law.
The warranty is valid only if the purchase date is confirmed by the stamp and signature of the dealer (store) on the last page of the original instruction manual, which serves as the warranty card.
Lu Chun Road 475-495, MInghang, Shanghai 200245, P.R. of China.
Use the product only for its intended purpose, in accordance with the operating instructions.
All other claims, together with claims for damages, are excluded unless liability is established by law.
The warranty does not cover the following cases:
- Defects caused by force majeure; - Use for professional purposes or for generating profit; - Violation of the operating instructions; - Incorrect installation of the mains voltage (if applicable); - Unauthorized modifications; - Mechanical damage; - Damage caused by worn-out or defective batteries, any damage resulting from worn-out or defective batteries; - Damage caused by vermin, rodents, and insects (including cases where vermin and insects have entered the device); - Torn or damaged cord.
Attention! The warranty card is issued only upon contacting the service center with a request for warranty repair.
After the repair, the warranty card will be considered fulfilled upon the original receipt of the completed repair with the service center's stamp and the date of receipt of the product from repair. The warranty period is extended for the time the product was in the service center for repair.
In case of disputes regarding the performance of warranty and post-warranty service, please contact the information service of the manufacturer's representative in Ukraine.
Toll-free hotline: 0 800 505 000. Calls from Ukrainian landline numbers are free. Calls from mobile phones are charged according to the tariffs of the respective operator.
You can also get additional information on the manufacturer's service portal on the Internet at www.service.braun.com
Country of origin: China
Year of manufacture
To determine the year of manufacture, refer to the 3-digit production code located near the type plate. The first digit of the production code refers to the last digit of the year of manufacture. The next two digits refer to the calendar week in the year of manufacture. Example: "640" - The product was manufactured in week 40 of 2006.
Therefore, delta = L delta

(4) 2 (2)
(4) δaδbδcδdδeδfδgδh . (p/6/p4.4/p1,2:J
a0
(8)g (1b) 111 111 111 111 111 111 111 111 111 111 111 111 111 111 111 111 111 1
Jg 154
30 30 30 30 30 30 30 30 30 30 30 30 30
A. ai2 = ai2 + ai2 and ai2 = ai2 + ai2
Therefore, A(1,0) and B(-3/4, sqrt(3)/4).
Philips
Epson
Netgear
- ENGLISH
- WARNINGS
- DESCRIPTION
- CHARGING
- SHAVING
- FOR BEST RESULTS
- STYLE
- USING THE TWISTABLE TRIMMER
- TRIM
- USING THE TRIMMING ATTACHMENTS (1B) AND (8)
- CLEANING
- KEEPING YOUR SHAVER IN TOP SHAPE
- REPLACING THE SHAVING PARTS
- PRESERVING THE BATTERIES
- ENVIRONMENTAL NOTICE
- GUARANTEE
- FOR UK ONLY
- FRANÇAIS
- USING THE ROTARY TRIMMER
- USING THE TRIMMERS
- TRIMMING CONTOURS WITH THE TRIMMERS (1B) AND (8)
- CLEANING THE TRIMMER
- MAINTAINING EFFECTIVE OPERATION OF THE TRIMMER
- REPLACING THE WORKING PARTS
- MAINTAINING BATTERY PERFORMANCE
- EAC
- ELECTRIC SHAVER BRAUN TYPE 5734 WITH POWER SUPPLY UNIT
- BRAUN WARRANTY OBLIGATIONS
- COUNTRY OF ORIGIN: CHINA
- YEAR OF MANUFACTURE
Brand : BRAUN
Model : MG5050 WET&DRY
Category : Electric mower