
SWRCR-59 - Car audio accessory CRUX - Free user manual and instructions
Find the device manual for free SWRCR-59 CRUX in PDF.


| Product Type | Vehicle Integration Interface |
| Brand | CRUX |
| Model | SWRCR-59 |
| Compatibility | Select vehicle models with factory amplifier / system |
| Primary Function | Retain steering wheel audio controls when replacing factory radio |
| Input Voltage | 12V DC |
| Dimensions (L x W x H) | 3.0 x 1.5 x 0.5 in |
| Weight | 0.1 lb |
| Wire Harness Length | 12 in |
| Fuse Rating | 3A ATO blade |
| Operating Temperature | -30°C to 85°C |
| Installation Method | Plug-and-play with included harness, no cutting |
| Steering Wheel Controls | Preserves all factory buttons |
| Retained Accessory Power | Maintains radio power until door opened |
| LED Indicator | Power status LED on module |
| Supported Radio Brands | Aftermarket single/DIN, double/DIN from major brands |
| Maintenance | Wipe with dry cloth; keep away from moisture |
| Safety | Fuse protected; reverse polarity protection |
| Warranty | 1 year limited |
| Spare Parts | Replacement fuses (3A) available |
Frequently Asked Questions - SWRCR-59 CRUX
User questions about SWRCR-59 CRUX
0 question about this device. Answer the ones you know or ask your own.
Ask a new question about this device
Download the instructions for your Car audio accessory in PDF format for free! Find your manual SWRCR-59 - CRUX and take your electronic device back in hand. On this page are published all the documents necessary for the use of your device. SWRCR-59 by CRUX.
USER MANUAL SWRCR-59 CRUX
- Retains factory features in select Chrysler, Dodge and Jeep vehicles while functioning with an aftermarket radio.
- Retains Steering Wheel Controls via built-in, pre-programmed interface.
- Supports amplified and non-amplified systems.
- Provides reverse trigger for rear view camera.
- EIA color coded wiring for easy installation.
NOTES:
- The Front and Rear fading are NON-Adjustable on amplified systems.
- Also supports radio replacement in vehicles with 4.3" and 8.4" color screens.
- Does not retain Uconnect.
- If vehicle is not equipped with Steering Wheel Controls use part# SOOCR-26
- If you require a dash kit with SWC interface use part# DKCR-59K
PARTS INCLUDED:
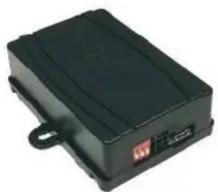
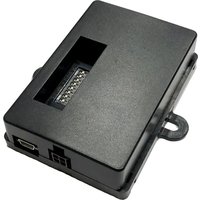
SWRCR-59 MODULE

1st Generation Harness
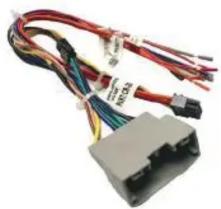
2nd Generation Harness
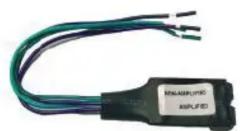
Audio Filter
INSTALLATION DIAGRAM:
The SWRCR-59 includes 2 harnesses for older and new model vehicles. See installation diagrams below for each harness.
1st Generation Harness
![graph TD A["Aftermarket Radio"] --> B["LED Module Feedback"] B --> C["Light"] B --> D["Solid blue"] B --> E["Flashing blue"] B --> F["Solid red"] B --> G["Red off"] B --> H["LED Module Feedback"] I["To Factory Harness"] --> J["First Generation Harness"] J --> K["See page 2 for speaker wire connectio…](/content/2026/05/957846/images/a061506574cbdb80b903859a1ca5df45cd49824cdbf54aefcfaae95e14b36ad3.jpg)
2nd Generation Harness
![graph TD A["LED LIGHT"] --> B["LED MODULE FEEDBACK"] B --> C["Solid blue: CAN recognized"] B --> D["Flashing blue: CAN not recognized"] B --> E["Solid red: Module providing 12V ACC"] B --> F["Red off: 12V ACC OFF"] G["Aftermarket RADIO"] --> H["LED INPUT"] H --> I["LED INPUT"] I --> J["LED INPUT"] J…](/content/2026/05/957846/images/90b244060885bf1144cb181bfff4059e6558102ac995519145ce2255c0c05dc9.jpg)
*Does not supply Reverse Trigger on Manual Transmissions. Reverse trigger wire from the aftermarket radio and/or camera power must be connected to factory reverse light wire instead.
Speaker wire connections:
Wire the audio filter using the connection chart below. Plug the 4 pin Molex plug found on the 1st or 2nd generation harness to the corresponding 4 pin Molex socket on the audio filter. (Amplified or Non-Amplified)
| NON AMPLIFIED SYSTEMS | AMPLIFIED SYSTEMS |
| Plug the 4-pin Molex connector to the NON-AMPLIFIED side of the inline filter. | Plug the 4-pin Molex connector to the AMPLIFIED side of the inline filter. |
| Wire Connections: | Wire Connections: |
| Aftermarket Radio | SWRCR-59 Harness SWRCR-59 Aftermarket Radio | ||
| White | White | White | Green |
| White/Black | White/Black | White/Black | Green/Black |
| GrayarG | PurpleG | ||
| Grey/Black | Purple/Black | ||
| Green | Green | Green | Not Used |
| Green/Black | Green/Black | Green/Black | Not Used |
| Purple | Purple | Purple | Not Used |
| Purple/Black | Purple/Black | Purple/Black | Not Used |
Amplified vehicle troubleshooting: Bluetooth may be inaudible when installing select aftermarket radios. Therefore hook the rear SWRCR-59 speakers to the aftermarket radio front speakers.
DIP SWITCH SETTINGS:
AFTERMARKET RADIO DIP SWITCH SETTINGS:
RADIO BRAND: DIP#: 1 2 3
| Atoto, Dual, Fahrenheit, Jensen, Nakamichi, Pioneer, Power Acoustik, Soundstream | OFF | ON | ON |
| OFF | ON | ON | |
| Blaupunkt, Most off-brand Radio | OFF | ON | ON |
| Alpine | OFF | OFF | OFF |
| Clarion, Stinger | ON | ON | OFF |
| Kenwood | ON | ON | ON |
| JVC | ON | OFF | ON |
| Boss, Old Sony | ON | OFF | OFF |
| New Sony (with CarPlay) | OFF | ON | OFF |
SWC MODULE
DIP SWITCH
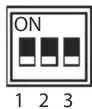
NOTE: For Atoto, Blaupunkt, Dual, Farenheit, Nakamichi, Power Acoustik, Soundstream, and most off-brand radios, check the aftermarket radio's manual to see if the SWC buttons need to be programmed.
SWC Troubleshoot option

Located internally Need to take plastic Casing off module
- If Steering Wheel Controls don't work or work properly please switch internal dip switch from 3v3 to 5v as shown in picture above.
4-PIN SWC CABLE
Use the proper 3.5MM to 4-Pin SWC cable for the aftermarket radio you are using.
OPTION A is used for ALPINE, CLARION, JVC, and KENWOOD units (Blue/Yellow wire is attached) OPTION B is used for ATOTO, BLAUPUNKT, BOSS, DUAL, FARENHEIT, JENSEN, POWER ACOUSTIK, PIONEER, SONY, SOUNDSTREAM and Most Off-Brand Radios.
NOTE: Cap or insulate the 3.5mm plug or Blue/Yellow wire if not being used.
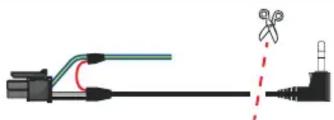
For aftermarket radios that have wires for SWC connections, cut off the 3.5mm plug on the Crux SWC Cable (option B) and connect the SWC wires as follows:
Note that there are some radios that only have SWC1 and SWC2, in this case “shield” does not need to be connected.

RED to SWC Key 1
WHITE to SWC Key 2
SHIELD to SWC Ground
VEHICLE APPLICATIONS:
CHRYSLER
| 2011-2014 | 200 |
| 2005-2010 | 300 |
| 2007-2009 | Aspen |
| 2006-2010 | PT Cruiser |
| 2007-2010 | Sebring |
| 2008-2016 | Town & Country |
DODGE
| 2007-2014 | Avenger |
| 2006-2012 | Caliber |
| 2008-2014 | Challenger |
| 2006-2010 | Charger |
| 2013 | Charger |
| 2006-2011 | Dakota |
| 2004-2013 | Durango |
| 2009-2016 | Grand Caravan |
| 2009-2010 | Journey |
| 2013 | Journey |
| 2005-2008 | Magnum |
| 2007-2011 | Nitro |
| 2006-2012 | RAM |
JEEP
| 2006-2010 | Commander |
| 2007-2016 | Compass |
| 2005-2013 | Grand Cherokee |
| 2008-2012 | Liberty |
| 2007-2017 | Patriot |
| 2007-2017 | Wrangler |
| 2018 | Wrangler (JK only) |
MITSUBISHI
| 2006-2009 | Raider |
VOLKSWAGEN
| 2009-2013 | Routan |
STEERING WHEEL CONTROL SETTINGS:
Note: Identify Alpine SWC learning radios by checking for three SWC cables and a SWC learn menu, instead of a 3.5mm SWC input.
If Interface has one SWR-100 Cable included If Interface has two SWR Cables included
1 - Find the included SWC adapter cable.
1 - Identify appropriate SWC adapter cable.
Do not use cable with Blue / Yellow wire.

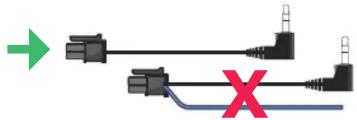
2 - Prepare the SWC Cable: Cut the SWC cable. You will find a red wire, a white wire, and a ground (shield) wire inside.

3 - Adjust the Module Settings: Set the module to the Pioneer dip switch setting. This configures the module to communicate correctly with the Alpine radio.
| DIP: | 1 | 2 | 3 | 4 | |
| On Alpine iLX series radios use Pioneer settings | OFF | OFF | ON | ON | |

4 - Configure the Alpine Radio: On your Alpine radio, select the setting that includes an adapter for SWC. This ensures the radio will recognize the steering wheel controls.


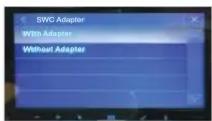
Select the setting "With Adapter" Select "SWC Adapter"
5 - Connect the Wires: Connect both the SWC1 and SWC2 wires from aftermarket radio to the red wire from our SWC cable. Connect the SWC ground wire to the shield (ground) wire of our SWC cable. These steps should enable the steering wheel controls on your Alpine iLX series radio.

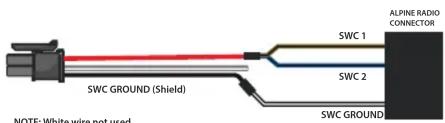
- Program the SWC: Navigate to the SWC settings on your Alpine radio to assign and test each control function.


Brand : CRUX
Model : SWRCR-59
Category : Car audio accessory