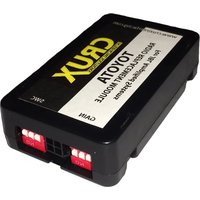
SWRTY-61J - Car audio accessory CRUX - Free user manual and instructions
Find the device manual for free SWRTY-61J CRUX in PDF.


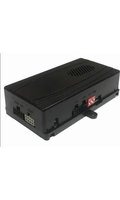
| Product Type | Vehicle Radio Replacement Interface |
| Brand | CRUX |
| Model | SWRTY-61J |
| Dimensions | 2.5 x 4.5 x 1.0 inches |
| Weight | 0.3 lbs |
| Power Input | 12V DC, 1A max |
| Compatible Vehicle | Select Toyota and Lexus models (2006-2015) |
| Function | Retains factory chimes, backup camera, and steering wheel controls |
| Data Bus | Supports CAN bus and analog signals |
| Installation | Plug-and-play with included harnesses |
| Material | High-temperature resistant plastic |
| Operating Temperature | -30°C to +85°C |
| Certifications | CE, RoHS |
| Maintenance | Keep dry and clean, avoid exposure to extreme temperatures |
| Safety | Disconnect vehicle battery before installation |
| Spare Parts | Contact CRUX customer support for replacement harnesses |
| Repairability | Designed as sealed unit; not user-serviceable |
| Warranty | 1 year limited warranty |
Frequently Asked Questions - SWRTY-61J CRUX
User questions about SWRTY-61J CRUX
0 question about this device. Answer the ones you know or ask your own.
Ask a new question about this device
Download the instructions for your Car audio accessory in PDF format for free! Find your manual SWRTY-61J - CRUX and take your electronic device back in hand. On this page are published all the documents necessary for the use of your device. SWRTY-61J by CRUX.
USER MANUAL SWRTY-61J CRUX
- Retains factory features in select Lexus and Toyota vehicles with JBL Harman-Becker Digital-Synthesis Amplifier, including JBL (Pioneer-made) amplifiers while functioning with an aftermarket radio.
- Pre-programmed to retain factory Steering Wheel Controls.
- Retains factory backup camera (if present).
- Retains OEM 3.5mm Auxiliary Audio Input.
- iPhone Voice Recognition (VR) feature from SWC on select Kenwood, Pioneer, Alpine and JVC radios.
- Variable audio gain adjustment to level match the aftermarket radio and factory amplifier.
- Supports BT-HF/A2DP/AVRCP profile on select aftermarket radio models.
- Supports Pick Up/End Call, Pick up and Toggle between 1st and 2nd incoming call, AVRCP Track, Seek.
- EIA color coded wiring for easy installation.
NOTES:
- Left-Right Balance Audio Control is supported. Front-Rear Audio Fading is not supported.
- Please make sure to set the factory radio volume to 70% and balance and fade options are centered before removing the radio.
PARTS INCLUDED:

SWRTY-61J Module TY-A Harness

natural_image
Electrical connector wiring with various colored wires and connectors (no visible text or symbols)(For Newer Models)

natural_image
Close-up of various electronic connectors and cables (no visible text or symbols)TY-B Harness (For Older Models)

natural_image
Coiled black electrical cable with two connectors (no text or symbols visible)3.5MM to 4-pin SWC Cables
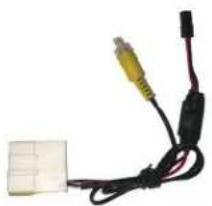
natural_image
Close-up of a white connector with two connected cables and connectors (no visible text or symbols)OEM Camera Retention Harness

natural_image
Two white electronic components with black and red wires, no visible text or symbols16 to 24 Pin Camera Adapter
IMPORTANT INSTALLATION NOTES:
- In some Lexus/Toyota vehicles 2006 and older, the mute circuit is located in the same pin location as the amplifier turn-on on the OEM harness. If no audio is heard after the installation is complete, disconnect the BLUE/WHITE wire on the TY-61J T-Harness from the aftermarket radio AMP Turn-on wire. Insulate with tape to avoid short circuits.
- Before connecting the 3.5mm SWC Cable, thoroughly wipe it clean with the alcohol cleansing pad provided. This will ensure a solid contact with the aftermarket radio SWC circuit.
- To retain the factory AUXILIARY INPUT option in the vehicle, the aftermarket radio must have an "Auxiliary Audio Input" feature. Please check your aftermarket radio manual for details.
INSTALLATION DIAGRAM:

NOTE: Aftermarket radio rear speaker output leads are not used on both harnesses. Insulate with tape.

flowchart
graph TD
    A["From SWRTY-61J Harness"] --> B["12-Pin Black Connector"]
    B --> C["SWRTY-61J MODULE"]
    C --> D["CRUX TOYOTA"]
    D --> E["3.5MM SWC CABLES (Option A or B)"]
    E --> F["Aftermarket RADIO SELECTOR (See Chart)"]
    F --> G["GAIN ADJUSTMENT"]
    C --> H["Blue/YELLOW KENWOOD / JVC SWC WIRED"]
    H --> I["Option A: Alpine, Clarion, JVC and Kenwood units"]
    I --> J["Insulate with tape if not being used"]
    J --> K["Cap or insulate if not being used"]
    K --> L["Option B: Blaupunkt, Boss, Dual, Farenheit, Jensen, Pioneer, Power Acoustik, Sony, Soundstream & Most off-brand Radios"]
SWRTY-61J OEM Camera Retention Harness
The SWRTY-61J includes a camera harness with a 12V to 6V voltage converter to retain the OEM camera (if equipped). Some older models use a16-Pin OEM camera connector. In this case, use the supplied 16 to 24-Pin Camera Adapter.
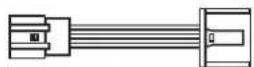
16 to 24 Pin Camera Adapter

DIP SWITCH SETTINGS:
SETTING THE AFTERMARKET RADIO BRAND
This step is done on the SWRTY-61J Module. With the key in the off position, set the DIP switches to the corresponding radio listed below.
| RADIO BRAND: | DIP: | 1 | 2 | 3 |
| Atoto, Dual, Fahrenheit, Jensen, Pioneer | OFF | ON | ON | |
| Power Acoustik, Soundstream | OFF | ON | ON | |
| Blaupunkt, Most off brand Radios | OFF | ON | ON | |
| Alpine | OFF | OFF | OFF | |
| Clarion | ON | ON | OFF | |
| Kenwood | ON | ON | ON | |
| JVC | ON | OFF | ON | |
| Sony, Boss | ON | OFF | OFF | |
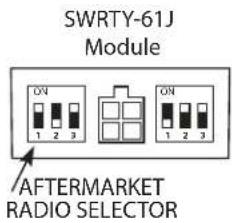
SWC Troubleshoot option

Located internally Need to take plastic Casing off module
- If Steering Wheel Controls don't work or work properly please switch internal dip switch from 3v3 to 5v as shown in picture above.
NOTE: For Atoto, Blaupunkt, Dual, Farenheit, Power Acoustik, Soundstream, and most off-brand radios, check the aftermarket radio's manual to see if the SWC buttons need to be programmed.
- Some Blaupunkt use DIP Switch setting OFF ON OFF
4-PIN SWC CABLE
Use the proper 3.5MM to 4-Pin SWC cable for the aftermarket radio you are using.
OPTION A is used for ALPINE, CLARION. For JVC and KENWOOD use the Blue/Yellow wire.
OPTION B is used for ATOTO, BLAUPUNKT, BOSS, DUAL, FARENHEIT, JENSEN, POWER ACOUSTIK, PIONEER, SONY, SOUNDSTREAM and Most Off-Brand Radios.
NOTE: Cap or insulate the 3.5mm plug or Blue/Yellow wire if not being used.
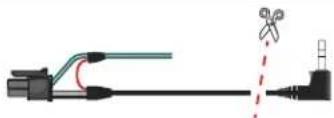
For aftermarket radios that have wires for SWC connections, cut off the 3.5mm plug on the CRUX SWC Cable and connect the SWC wires as follows:

natural_image
Pure electrical circuit lines without any symbolsRED to SWC Key 1
WHITE to SWC Key 2
SHIELD to SWC Ground
Note that there are some radios that only have SWC1 and SWC2, in this case "shield" does not need to be connected.
VEHICLE SETTING AND GAIN ADJUSTMENTS:
SELECTING VEHICLE TYPE
Please set pin 1 to the OFF position for Toyota vehicles
VEHICLE SETTING
SWRTY-61J
MODULE
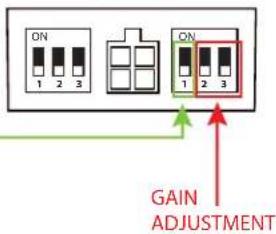
Use the gain adjustment to level match the aftermarket radio audio output with the OE amplifier input.
| DIP SETTING | dB Volts | |
| Position 23 | ||
| OFF OFF | 0 dB | +0mV |
| OFF ON | 3.5 dB | +9mV |
| ON OFF | 9.1 dB | +18mV |
| ON ON | 12.9 dB | +27mV |
STEERING WHEEL CONTROL BUTTON FUNCTIONS:
Note: Identify Alpine SWC learning radios by checking for three SWC cables and a SWC learn menu, instead of a 3.5mm SWC input.
If Interface has one SWR-100 Cable included 1 If Interface has two SWR Cables included
1 - Find the included SWC adapter cable.
1 - Identify appropriate SWC adapter cable. Do not use cable with Blue / Yellow wire.


2 - Prepare the SWC Cable: Cut the SWC cable. You will find a red wire, a white wire, and a ground (shield) wire inside.
natural_image
Pure electrical circuit lines without any symbols
3 - Adjust the Module Settings: Set the module to the Pioneer dip switch setting. This configures the module to communicate correctly with the Alpine radio.
| DIP: | 1 | 2 | 3 | 4 | |
| On Alpine iLX series radios use Pioneer settings | OFF | OFF | ON | ON | |

4 - Configure the Alpine Radio: On your Alpine radio, select the setting that includes an adapter for SWC. This ensures the radio will recognize the steering wheel controls.
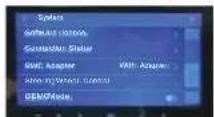


Select the setting "With Adapter" Select "SWC Adapter"
5 - Connect the Wires: Connect both the SWC1 and SWC2 wires from aftermarket radio to the red wire from our SWC cable. Connect the SWC ground wire to the shield (ground) wire of our SWC cable. These steps should enable the steering wheel controls on your Alpine iLX series radio.


- Program the SWC: Navigate to the SWC settings on your Alpine radio to assign and test each control function.
STEERING WHEEL CONTROL BUTTON FUNCTIONS:
| SWC Button | SHORT PRESS LONG PRESS | |
| PIONEERVOL +VOL -Seek UpSeek DownModeOFF HookON HookVoice*NOTE: | Step IncrementStep DecrementPreset UpPreset DownSourcePick Up Call*End CallActivate VR/Deactivate VRBT Mode Active:OFF Hook = Toggle between 1st and 2nd Call | Continuous VOL +Continuous VOL -Seek UpSeek DownPower On/OffNoneNoneNone |
| SWC Button | SHORT PRESS LONG PRESS | |
| ALPINEVOL +VOL -Seek UpSeek DownModeOFF HookON HookVoice*NOTE: | Step IncrementStep DecrementSeek UpSeek DownSourcePick Up CallEnd CallActivate VR*/Deactivate VR*BT Mode Active:OFF Hook = Toggle between 1st and 2nd Call | Continuous VOL +Continuous VOL -NoneNoneNoneNoneNoneN/A |
| SWC Button | SHORT PRESS LONG PRESS | |
| CLARIONVOL +VOL -Seek UpSeek DownModeOFF HookON HookVoiceNOTE: | Step IncrementStep DecrementPreset UpPreset DownSourcePick Up CallEnd CallMuteBT Mode Active:OFF Hook = Toggle between 1st and 2nd Call | Continuous VOL +Continuous VOL -Seek UpSeek DownPower On/OffNoneNoneNone |
| SWC Button | SHORT PRESS LONG PRESS | |
| JVCVOL +VOL -Seek UpSeek DownModeOFF HookON HookVoice*NOTE: | Step IncrementStep DecrementSeek UpSeek DownSourcePick Up Call*End CallActivate VRBT Mode Active:User must End 1st call in order to pick up 2nd incoming call. | Continuous VOL +Continuous VOL -M-Seek UpM-Seek DownPower On/OffNoneNoneNoneDeactivate VR:Say "Cancel" or remain silent until it times out ➔ Auto switch back to previous Source. |
| SWC Button | SHORT PRESS LONG PRESS | ____ |
| KENWOOD | ||
| VOL + | Step Increment | Continuous VOL + |
| VOL - | Step Decrement | Continuous VOL - |
| Seek Up | Seek Up | None |
| Seek Down | Seek Down | None |
| Mode | Source | None |
| OFF Hook | Pick Up Call/Call History On/Off | None |
| ON Hook | End Call / Deactivate VR | None |
| Voice | Activate VR | None |
VEHICLE APPLICATIONS:
LEXUS TOYOTA
| 2004-2006 | ES300 | 2003-2020 | 4 Runner w/ Navigation |
| 2003-2005 | IS300 | 2005-2018 | Avalon |
| 2006 LS430 w/o Navigation | 2007-2017 Camry | ||
| 2012-2017 Camry Hybrid | |
| 2004-2008 | Camry Solara |
| 2009-2018 | Corolla |
| 2007-2014 | FJ Cruiser |
| 2008-2018 | Highlander |
| 2008-2018 | Highlander Hybrid |
| 2005-2012 | Matrix |
| 2004-2015 Prius w/ Navigation | |
| 2004-2015 Prius w/o Navigation | |
| 2012-2017 Prius V | |
| 2004-2018 | Rav4 |
| 2016-2018 | Rav4 Hybrid |
| 2013-2019 | Sequoia w/ Navigation |
| 2014-2019 | Sequoia w/o Navigation |
| 2005-2013 | Sequoia w/ RDS Radio |
| 2004-2017 | Sienna |
| 2005-2021 | Tacoma |
| 2004-2019 | Tundra |
| 2009-2015 | Venza |
| 2008-2011 | Yaris |
NOTE:
- Does not retain Mark Levinson, Pioneer, Nakamichi or Harmon Kardon amplifiers.
- If your vehicle is not equipped SWC, please use the CRUX SOHTL-20


- NOTES:
- PARTS INCLUDED:
- IMPORTANT INSTALLATION NOTES:
- SWRTY-61J OEM Camera Retention Harness
- DIP SWITCH SETTINGS:
- SETTING THE AFTERMARKET RADIO BRAND
- 4-PIN SWC CABLE
- VEHICLE SETTING AND GAIN ADJUSTMENTS:
- STEERING WHEEL CONTROL BUTTON FUNCTIONS:
- If Interface has one SWR-100 Cable included 1 If Interface has two SWR Cables included
- VEHICLE APPLICATIONS:
- NOTE:
Brand : CRUX
Model : SWRTY-61J
Category : Car audio accessory