
HV-100XG - Camera Elmo - Free user manual and instructions
Find the device manual for free HV-100XG Elmo in PDF.


| Product Type | Document Camera |
| Brand | Elmo |
| Model | HV-100XG |
| Resolution | 1920 x 1080 (Full HD) |
| Optical Zoom | 10x |
| Digital Zoom | 8x |
| Sensor | 1/2.8-inch CMOS |
| Frame Rate | 30 fps |
| Video Outputs | HDMI, VGA, USB 2.0 |
| Image Capture | Still image (JPEG) |
| Dimensions (L x W x H) | 300 x 200 x 150 mm |
| Weight | 2.0 kg |
| Power Supply | 12V DC, 2A |
| Power Consumption | 10 W |
| Light Source | Built-in LED |
| Cleaning | Use a soft, dry cloth; avoid solvents |
| Safety Precautions | Do not expose to water or excessive heat |
| Spare Parts | AC adapter, USB cable, HDMI cable |
| Repairability | Contact Elmo service for lamp and sensor replacement |
| Warranty | 1 year limited warranty |
Frequently Asked Questions - HV-100XG Elmo
User questions about HV-100XG Elmo
0 question about this device. Answer the ones you know or ask your own.
Ask a new question about this device
Download the instructions for your Camera in PDF format for free! Find your manual HV-100XG - Elmo and take your electronic device back in hand. On this page are published all the documents necessary for the use of your device. HV-100XG by Elmo.
USER MANUAL HV-100XG Elmo
natural_image
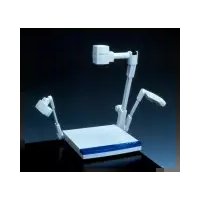
Line drawing of an electronic device with a mounted screen and base panel (no text or symbols)Please read this instruction manual carefully before using this Visual Presenter and keep it for future reference.
IMPORTANT SAFEGUARDS
- Read Instructions – All the safety and operating instructions should be read before the appliance is operated.
■ Retain Instructions – The safety and operating instructions should be retained for future reference.
■ Heed Warnings – All warnings on the product and in the operating instructions should be adhered to.
■ Follow Instructions – All operating and use instructions should be followed. - Cleaning – Unplug this product from the wall outlet before cleaning. Do not use liquid cleaners or aerosol cleaners. Use a damp cloth for cleaning.
■ Attachments – Do not use attachments not recommended by the product manufacturer as they may cause hazards.
■ Water and Moisture – Do not use this product near water - for example, near a bath tub, wash bowl, kitchen sink, or laundry tub, in a wet basement, or near a swimming pool, and the like.
■ Accessories – Do not place this product on an unstable cart, stand, tripod, bracket, or table. The product may fall, causing serious injury to a child or adult, and serious damage to the product. Use only with a cart, stand, tripod, bracket, or table
recommended by the manufacturer, or sold with the product. Any mounting of the product should follow the manufacturer's instructions, and should use a mounting accessory recommended by the manufacturer.
■ Ventilation – Slots and openings in the cabinet are provided for ventilation and to ensure reliable operation of the product and to protect it from overheating, and these openings must not be blocked or covered. The openings should never be blocked by placing the product on a bed, sofa, rug, or other similar surface. This product should not be placed in a built-in installation such as a bookcase or rack unless proper ventilation is provided or the manufacturer's instructions have been adhered to.
■ Power Sources – This product should be operated only from the type of power source indicated on the marking label. If you are not sure of the type of power supply to your home consult your appliance dealer or local power company. For products intended to operate from battery power, or other sources, refer to the operating instructions.
■ Grounding or Polarization – This product may be equipped with either a polarized 2-wire AC line plug (a plug having one blade wider than the other) or a 3-wire grounding type plug, a plug having a third (grounding) pin. The 2-wire polarized plug will fit into the power outlet only one way. This is a safety feature. If you are unable to insert the plug fully into the outlet, try reversing the plug. If the plug still fails to fit, contact your electrician to replace your obsolete outlet. Do not defeat the safety purpose of the polarized plug. The 3-wire grounding type plug will fit into a grounding type power outlet. This is a safety feature. If you are unable to insert the plug into the outlet, contact your electrician to replace your obsolete outlet. Do not defeat the safety purpose of the grounding type plug.
■ Power-Cord Protection – Power-supply cords should be routed so that they are not likely to be walked on or pinched by items placed upon or against them, paying particular attention to cords at plugs, convenience receptacles, and the point where they exit from the product.
■ Lightning – For added protection for this product during a lightning storm, or when it is left unattended and unused for long periods of time, unplug it from the wall outlet and disconnect the antenna or cable system. This will prevent damage to the product due to lightning and power-line surges.
■ Overloading – Do not overload wall outlets, extension cords, or integral convenience receptacles as this can result in a risk of fire or electric shock.
■ A product and cart combination should be moved with care.
Quick stops, excessive force, and uneven surfaces may cause the product and cart combinat

■ Object and Liquid Entry – Never push objects of any kind into this product through openings as they may touch dangerous voltage points or short-out parts that could result in a fire or electric shock. Never spill liquid of any kind on the product.
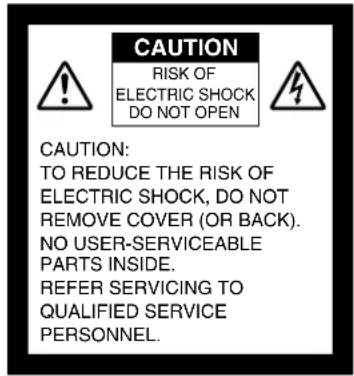
■ Servicing – Do not attempt to service this product yourself as opening or removing covers may expose you to dangerous voltage or other hazards. Refer all servicing to qualified service personnel.
■ Damage Requiring Service – Unplug this product from the wall outlet and refer servicing to qualified service personnel under the following conditions:
- When the power-supply cord or plug is damaged.
- If liquid has been spilled, or objects have fallen into the product.
● If the product has been exposed to rain or water. - If the product does not operate normally by following the operating instructions. Adjust only those controls that are covered by the operating instructions as an improper adjustment of other controls may result in damage and will often require extensive work by a qualified technician to restore the product to its normal operation.
- If the product has been dropped or damaged in any way.
- When the product exhibits a distinct change in performance - this indicates a need for service.
■ Replacement Parts – When replacement parts are required, be sure the service technician has used replacement parts specified by the manufacturer or have the same characteristics as the original part. Unauthorized substitutions may result in fire, electric shock or other hazards.
■ Safety Check – Upon completion of any service or repairs to this product, ask the service technician to perform safety checks to determine that the product is in proper operating condition.
- Heat – The product should be situated away from heat sources such as radiators, heat registers, stoves, or other products (including amplifiers) that produce heat.

SA 1965
The lightning flash with arrowhead symbol, within an equilateral triangle, is intended to alert the user to the presence of uninsulated "dangerous voltage" within the product's enclosure that may be of sufficient magnitude to constitute a risk of electric shock to persons.

SA 1966
The exclamation point within an equilateral triangle is intended to alert the user to the presence of important operating and maintenance (servicing) instructions in the literature accompanying the product.
WARNING: TO REDUCE THE RISK OF FIRE OR ELECTRIC SHOCK, DO NOT EXPOSE THIS PRODUCT TO RAIN OR MOISTURE.
THIS IS A CLASS A PRODUCT. IN A DOMESTIC ENVIRONMENT THIS PRODUCT MAY CAUSE RADIO INTERFERENCE IN WHICH CASE THE USER MAY BE REQUIRED TO TAKE ADEQUATE MEASURES.
INFORMATION
This equipment has been tested and found to comply with the limits for a Class A digital device, pursuant to Part 15 of the FCC Rules. These limits are designed to provide reasonable protection against harmful interference when the equipment is operated in a commercial environment. This equipment generates, uses, and can radiate radio frequency energy and, if not installed and used in accordance with the instruction manual, may cause harmful interference to radio communications. Operation of this equipment in a residential area is likely to cause harmful interference in which case the user will be required to correct the interference at his own expense.
USER-INSTALLER CAUTION:
Your authority to operate this FCC verified equipment could be voided if you make changes or modifications not expressly approved by the party responsible for compliance to Part 15 of the FCC rules.
BEFORE YOU USE
■ Use the Visual Presenter under the rated electrical conditions.
■ Do not leave the Presenter under direct sunlight or by heaters, or the Presenter may be discolored, deformed, or damaged.
■ Do not place the Presenter in any humid, dusty, windy or vibrating location. Use the Presenter in the following environmental conditions:
Temperature: 0°C\~40°C (32°F\~104°F)
Humidity: 30%\~85% (No condensation)
■ Use a soft, dry cloth for cleaning. Do not use any volatile solvent, such as thinner or benzine.
■ Do not directly point the camera lens into the sun, or the camera may be damaged.
CONTENTS
IMPORTANT SAFEGUARDS....1
BEFORE YOU USE....5
- PART NAMES AND FUNCTIONS....7
- SETTING UP AND STORING 11
2-1 SETTING UP 11
2-2 STORING....11
2-3 ZOOMING 12
- TROUBLESHOOTING HINTS....13
- SPECIFICATIONS....14
1. PART NAMES AND FUNCTIONS

![LAMP ON OFF INPUT RGB IN MAIN ⑦ Lamp Switch [LAMP] ⑧ Image Input Selection Switch [INPUT] POWER ON OFF DC IN 12V ⑨ Power Switch [POWER] ⑩ Power Terminal [DC IN 12V]](/content/2026/05/957649/images/d9a81dcfddbfd85c942d003d79371105875f0ca8d16ff0b6771220b260ec2ca8.jpg)

| No. | Name | Function |
| 1 | Camera Head | Moving up/down the camera head can change the size of an object in display on the monitor screen smoothly. |
| 2 | Arm | A link part for moving the camera head horizontally. |
| 3 | Base Unit | A base part of the Presenter. |
| 4 | Main Stage | A stage for placing an object thereon. |
| 5 | Auxiliary Stage | Use this stage, if necessary, according to the object size. |
| 6 | Lamp | To be used when the image is dark. |
| 7 | Lamp Switch [LAMP] | Lamp ON/OFF switch. |
| 8 | Image Input Selection Switch [INPUT] | To switch the image output from the RGB-out terminal [RGB OUT].[RGB IN] . . Image via the RGB-in terminal [RGB INPUT][MAIN] . . . Image via the main camera |
| 9 | Power Switch [POWER] | Power ON/OFF switch. |
| 10 | Power Terminal [DC IN 12V] | The DC jack of the AC adaptor is inserted into this terminal (12VDC). |
| 11 | Accessory Case | A case for housing the AC adaptor and the analog RGB cable exclusively. When the Presenter is stored, house this case inside the stage. |
| 12 | Analog RGB Cable | To connect the Presenter to the monitor/projector. |
| 13 | AC Adapter | To connect the Presenter to an outlet (120VAC). |
![⑮ Zoom Lamp ⑭ Digital Zoom Button [DIGITAL ZOOM] BRIGHTER DARKER UP GAIN DOWN ⑯ Gain Button [GAIN] ⑰ Auto White Balance Switch [AWB] -Normally ON ⑱ Auto Electronic Shutter Switch [AES] -Normally ON ⑲ Gamma Value Selection Switch [ ] -[NORM.] is standard. ⑳ RGB-in Terminal [RGB INPUT] RGB OUTPUT ⑴ RGB-out Terminal [RGB OUTPUT]](/content/2026/05/957649/images/336b4ab08ae83f7cea11293e0792f1245c15034467fa7e7d9014fcbd91756422.jpg)
| No. | Name | Function |
| 14 | Digital Zoom Button [DIGITAL ZOOM] | To operate digital zoom. Use the Digital zoom after moving the camera head to the lowest horizontal position (the minimum shooting area), and the image is expanded even more. The zoom button [TELE]/[WIDE] can change the size of an object in display on the monitor screen. Pressing [TELE] and [WIDE] buttons together resets the digital zoom to the initial state (non-action).Note:- The digital zoom will degrade the image quality.- Turning ON the power supply resets the digital zoom to the initial state (non- action). |
 | ||
| 15 | Zoom Lamp | To indicate the digital zoom operation. When the digital zoom is in operation, this lamp is flickering/lighting. |
| 16 | Gain Button [GAIN] | To adjust the image brightness by manipulating the gain button [UP]/ [DOWN]. Pressing [UP] and [DOWN] buttons together resets the gain to the initial state.Note:- Turning ON the power supply resets [GAIN] to the initial state. |
| 17 | Auto White Balance Switch [AWB] | To turn the auto white balance operation ON/LOCK.Turning this switch LOCK locks the white balance.Note:- If the auto tracking is disabled for some objects or the source of light, shoot a white object to operate the white balance, and then turn LOCK the auto white balance switch [AWB] before using. |
| 18 | Auto Electronic Shutter Switch [AES] | To turn the auto electronic shutter ON/OFF.Note:- If the image flickers, turn the auto electronic shutter switch [AES] OFF. |
| 19 | Gamma Value Selection Switch [ ] | The gamma value selection switch is used for adjusting the brightness tone to that of a unit in connection. In normal use, this switch is set at [NORM]. According to the unit in connection or the object, select the optimum position.[HIGH] . . . To intensify the contrast. This level fits when the object is document etc.[NORM] . . Normal[LOW] . . . To diminish the contrast. This level fits when a CRT monitor is connected. |
| 20 | RGB-in Terminal [RGB INPUT] | To connect other image output unit. The image is output from the RGB-out terminal [RGB OUTPUT] when the image input selection switch [INPUT] is set accordingly. |
| 21 | RGB-out Terminal [RGB OUTPUT] | To output the image to the monitor or protector in connection to this terminal. |
2. SETTING UP AND STORING
2-1 SETTING UP
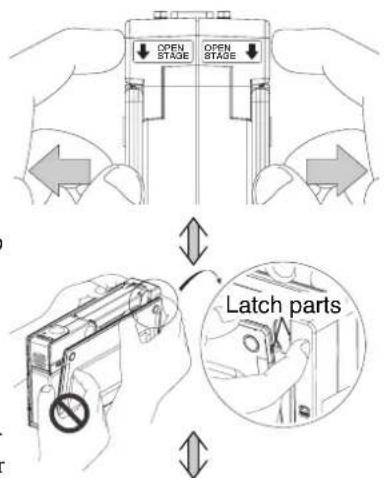
① Gently release the clipped area (as marked with arrow) of the right and left stages as illustrated.
Note:- It may be damaged by unlatching the stages putting hands on other position not shown by arrows.
- When the accessory case is housed inside, be careful not to drop it.
② Connect the RGB-out terminal [RGB OUTPUT] of the Presenter to the monitor/projector with the RGB cable (supplied).
Note: - Before starting connection, turn OFF the power supply to each unit.
③ Connect the AC adaptor, and turn the power switch [POWER] to ON.
Instruction for location:
-Please note that the image may be affected by unsightly shadows caused from other lights in the room or from the outside. This effect can usually be eliminated or reduced by repositioning the HV-100XG being mindful of the ambient lights.
2-2 STORING
① Make sure that the power switch [POWER] is OFF, and then remove all cords connected to the Presenter.
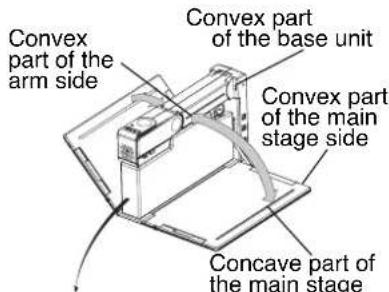
② Move the camera head to be in line with the arm horizontally.
③ House the auxiliary stage inside the main stage, and then fold the main stage. At this time, house the accessory case inside the stage.
Note: - Confirm that the accessory case is closed firmly before housing.
④ Make sure that all movable parts are put back to storing position accordingly.

2-3 ZOOMING
By moving up/down the camera head, the object in display on the monitor screen can be zoomed-in or zoomed-out. And use the Digital zoom after moving the camera head to the lowest horizontal position (minimum shooting area), and the image is expanded even. But the digital zoom will degrade the image quality. In zoom operation by moving up/down the camera head, focus adjustment is not required (FOCUSFREE).

Example of connection
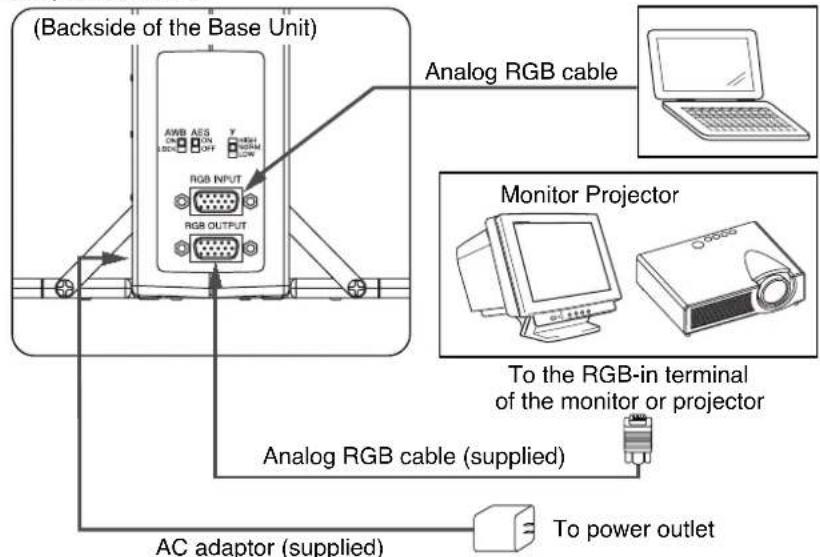
Note: -Analog NTSC or S-Video monitors can not be used.
-A monitor or projector having a resolution of 1024x768 is recommended.
3. TROUBLESHOOTING HINTS
| Symptom | Checkpoint |
| No image is on the monitor or project. | • Is the analog RGB cable connected properly?• Is the AC adapter inserted correctly?• Is the DC jack inserted firmly in the power terminal[DC IN 12V] of the Presenter?• Is the power switch [POWER] ON?• Is the image-in selection switch [INPUT] set at [RGB IN]? |
| Image with digital zoom is blurry. | • The digital zoom feature normally will degrade the image quality somewhat. |
| The image is too dark. | • Is the illumination sufficient? If not, turn ON the lighting unit with the illumination switch [LAMP]. |
| The image of printed matter is striped. | • Is this caused by the interference between the dots of the printed matter and the scanning line of the TV? |
If the trouble still remains after checking the above, consult your dealer or an authorized ELMO service center.
4. SPECIFICATIONS
General
Power voltage 12VDC
Power consumption 9VA
Outside dimensions
(14.2in.(W)x11.1in.(D)x6.3-11.2in.(H))
(2.3in.(W)x11.1in.(D)x6.3in.(H))
Mass 1.5kg (3.3lbs)
■Optical
Lens F: 2.9, f=3mm
Shooting area
Camera
Image pick-up element Progressive square picture element 1/3"size CCD
Image pick-up speed 20 frames/sec
Total picture elements 1077(H)x788(V) . . . 850,000 pixels
Effective picture elements 1024(H)x768(V)
Resolution 600 TV lines or more (Horizontal)
600 TV lines or more (Vertical)
Sync. signal frequency 48.363kHz (Horizontal)
60.004Hz (Vertical)
Output signal Analog RGB, 1024x768 at 60Hz, compliant with VESA
Digitalzoom 4x
White balance Full auto/Lock
Gamma adjustment Provided (3-position selection switch)
Gain adjustment Provided (UP/DOWN pushbutton switch)
Ext. input selection Provided (Main camera / Ext. selection switch)
Ext. input terminal D-sub 15-pin (Analog RGB signal) 1 pc
Output terminal D-sub 15-pin (Analog RGB signal) 1 pc
■Supplied accessories
Accessory case 1pc
Analog RGB cable (Mini DSUB 15P connector) 1pc
AC adaptor 1pc
Instruction manual 1pc
Warranty card 1pc
These specifications are subject to change without prior notice.
Trademark Acknowledgements
ELMO, ELMO are registered trademarks of ELMO CO., Ltd.
VESA is a registered trademark of Video Electronics Standards Association.
FOCUSFREE is a trademark of ELMO CO., Ltd.
WARNING:
■ Unauthorized recording of copyrighted slide films, materials, photographs, etc. may infringe on the rights of copyright owners and be contrary to copyright laws.
ELMO
ELMO CO., LTD.
6-14, Meizen-cho, Mizuho-ku,
Nagoya, 467-8567, Japan
OVERSEAS SUBSIDIARY COMPANIES
U.S.A. ELMO Mfg. Corp.
1478 Old Country Road, Plainview, NY 11803-5034
Tel:(516)501-1400 Fax:(516)501-0429
E-mail:elmo@elmousa.com
web:http://www.elmousa.com/
Canada ELMO Canada Mfg. Corp.
44 West Drive, Brampton, Ontario L6T 3T6
Tel:(905)453-7880 Fax:(905)453-2391
E-mail:info@elmocanada.com
web:http://www.elmocanada.com/
Germany ELMO (Europe) G.m.b.H
Neanderstr. 18, 40233 Düsseldorf
Tel:(0211)376051 Fax:(0211)376630
E-mail:elmoeurope@AOL.com
web:http://www.elmo.de/
Printed in China
6X1VHHA02


- IMPORTANT SAFEGUARDS
- INFORMATION
- USER-INSTALLER CAUTION:
- BEFORE YOU USE
- CONTENTS
- PART NAMES AND FUNCTIONS
- SETTING UP AND STORING
- 2-1 SETTING UP
- Instruction for location:
- 2-2 STORING
- 2-3 ZOOMING
- TROUBLESHOOTING HINTS
- SPECIFICATIONS
- General
- ■Optical
- Camera
- ■Supplied accessories
- WARNING:
- ELMO CO., LTD.
- OVERSEAS SUBSIDIARY COMPANIES
Brand : Elmo
Model : HV-100XG
Category : Camera