
EchoStream EN1235S - Controller Inovonics - Free user manual and instructions
Find the device manual for free EchoStream EN1235S Inovonics in PDF.


| Brand | Inovonics |
| Model | EchoStream EN1235S |
| Product Type | Pendant Transmitter |
| Battery Type | Panasonic CR2 or equivalent |
| Typical Battery Life | 3–5 years |
| Operating Environment | 0 to 60°C (32 to 140°F), noncondensing |
| Frequency Bands | 902–928 MHz (North America), 921–928 MHz (New Zealand), 915–928 MHz (Australia), configurable via jumper |
| Registration | Must be registered with system; unique factory-programmed ID |
| Supervision | Sends check-in message every 3 minutes when supervised |
| Activation | Press button for at least 1 second (dual-button: press both simultaneously) |
| Alarm Signal | Transmits multiple times with blinking LED; releases alarm restoral signal upon button release |
| Belt Clip | Convertible to belt loop using coarse thread screw (EN1233 only) |
| Chain | Use included chain to avoid injury (EN1233 only) |
| Warranty | 36 months from date of manufacture |
| Compliance | CE Declaration of Conformity available upon request |
Frequently Asked Questions - EchoStream EN1235S Inovonics
User questions about EchoStream EN1235S Inovonics
0 question about this device. Answer the ones you know or ask your own.
Ask a new question about this device
Download the instructions for your Controller in PDF format for free! Find your manual EchoStream EN1235S - Inovonics and take your electronic device back in hand. On this page are published all the documents necessary for the use of your device. EchoStream EN1235S by Inovonics.
USER MANUAL EchoStream EN1235S Inovonics
EchoStream® EN1233S/D and EN1235S/D Pendant Transmitter
Installation Instructions - 05596B
1 Overview
1.1 Inovonics Wireless Contact Information
If you have any problems with this procedure, contact Inovonics Wireless technical services:
• E-mail: support@inovonics.com
• Phone: (800) 782-2709
1.2 Pendant Transmitter Components

Figure 1 Pendant Transmitter components
A Reset button B Frequency band selection pins
C Battery
2 Installation and Startup
2.1 Install/Replace the Battery
-
Pry the housing apart at either end and pull the two halves apart.
-
If replacing a battery, remove the old battery.
-
Install the new battery.
- Press the Reset button to initialize the transmitter.
2.2 Select the Frequency Band
EchoStream products are able to use a range of radio frequencies, and must be configured for your geographic area. To configure the transmitter:
1. Pry the housing apart at either end and pull the two halves apart.
2. Place a selection jumper on the appropriate frequency band selection pins.
- Leave the jumper off the pins to set the frequency range to 902-928 MHz for North America.
- Place the jumper on the bottom pins, marked NZ, to set the frequency range to 921-928 MHz for New Zealand.
- Place the jumper on the top two pins, marked AU, to set the frequency range to 915-928 MHz for Australia.
- Press the Reset button to complete configuration.
Caution: When pressing the Reset button, make sure you don't also touch the frequency band selection pins. Touching the frequency band selection pins while pressing the Reset button can inadvertently set the pendant to the wrong frequency band.
2.3 Register the Pendant Transmitter
The pendant transmitter must be registered with the system in order to be monitored and supervised. When supervised, the pendant transmitter will send a check-in message to the serial receiver or network coordinator every three minutes.
Each pendant has a unique factory-programmed identification number. Refer to the control panel's installation instructions for details on registering a transmitter.
-
When prompted by the receiver to reset transmitter, press the Reset button.
-
Replace the cover.
Caution: The pendant should be tested after registration to ensure operation. To test the pendant, activate each of the conditions and ensure an appropriate response.
3 Operation
3.1 Using The EN1233 Pendant Chain
Always use the chain included with the ES1233. Substituting stronger cords or chains may result in injury to the wearer.
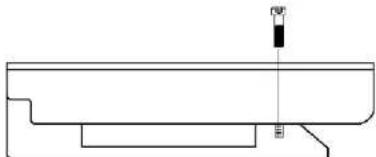
3.2 Converting the Pendant Transmitter Belt Clip
If you'd like to convert the pendant transmitter belt clip to a belt loop, secure the bottom of the belt clip to the housing with a coarse thread screw.
natural_image
Pure technical line drawing of a mechanical component without any text, numbers, or symbolsFigure 2 Use a coarse thread screw to secure the belt clip
3.3 Operate the Pendant Transmitter
To activate single button transmitters, press the button for at least one second. To activate double button transmitters, press both buttons simultaneously. Alarm signals are transmitted multiple times and are indicated by the blinking transmission LED. When the buttons are released, the transmitter sends an alarm restoral signal. To test a transmitter, activate the alarm by pressing the button(s).
4 Specifications
Typical battery life: 3-5 years
Battery type (BAT608): Panasonic CR2 or equivalent
Operating environment: 0 to 60°C (32 to 140°F), noncondensing
Printing Instructions
- Print Duplex
- Align and orient back page to match front page.
- Cut on dashed line
- Fold cutsheet in half along the 8.5" axis.
Note: Specifications and data are subject to change without notice.
5 Warranty and Disclaimer
Note: Changes or modifications to this unit not expressly approved by Inovonics Wireless Corporation may void the installer's authority to operate the equipment as well as the product warranty.
Inovonics Wireless Corporation ("Inovonics") warrants its products ("Product" or "Products") to conform to its own specifications and to be free of defects in materials and workmanship under normal use for a period of thirty-six (36) months from the date of manufacture. Within the warranty period, Inovonics will repair or replace, at its option, all or any part of the warranted Product. Inovonics will not be responsible for dismantling and/or reinstallation charges. To exercise the warranty, the User ("User", "Installer" or "Consumer") must work directly through their authorized distributor who will be given a Return Material Authorization ("RMA") number by Inovonics. Details of shipment will be arranged directly through the authorized distributor.
This warranty is void in cases of improper installation, misuse, failure to follow installation and operating instructions, alteration, accident or tampering, and repair by anyone other than Inovonics. This warranty is exclusive and expressly in lieu of all other warranties, obligations or liabilities, whether written, oral, express, or implied. There is no warranty by Inovonics that Inovonics product will be merchantable or fit for any particular purpose, nor is there any other warranty, expressed or implied, except as such is expressly set forth herein. In no event shall Inovonics be liable for an incidental, consequential, indirect, special, or exemplary damages, including but not limited to loss of profit, revenue, or contract, loss of use, cost of down time, or interruption of business nor any claim made by distributor's customers or any other person or entity.
This warranty will not be modified or extended. Inovonics does not authorize any person to act on its behalf to modify or extend this warranty.
This warranty will apply only to Inovonics Products. Inovonics will not be liable for any direct, incidental, or consequential damage or loss whatsoever, caused by the malfunction of Product due to products, accessories, or attachments of other manufacturers, including batteries, used in conjunction with Inovonics Products.
Note: E-mail support@inovonics.com for a copy of the CE Declaration of Conformity.
- EchoStream® EN1233S/D and EN1235S/D Pendant Transmitter
- Overview
- Inovonics Wireless Contact Information
- Pendant Transmitter Components
- Installation and Startup
- Install/Replace the Battery
- Select the Frequency Band
- Register the Pendant Transmitter
- Operation
- Using The EN1233 Pendant Chain
- Converting the Pendant Transmitter Belt Clip
- Operate the Pendant Transmitter
- Specifications
- Printing Instructions
- Warranty and Disclaimer
Brand : Inovonics
Model : EchoStream EN1235S
Category : Controller