
IPCAMHD61 - Camera SereneLife - Free user manual and instructions
Find the device manual for free IPCAMHD61 SereneLife in PDF.


| Product Type | Indoor/Outdoor Security Camera |
| Brand | SereneLife |
| Model | IPCAMHD61 |
| Video Resolution | 1080p Full HD |
| Field of View | 90° |
| Night Vision | Yes, IR LEDs up to 30 ft |
| Motion Detection | Yes, with alerts |
| Audio | Two-way audio |
| Connectivity | Wi-Fi 802.11 b/g/n, 2.4 GHz |
| Power Supply | 5V DC, 1A (USB power adapter included) |
| Dimensions | 3.5 x 2.5 x 2.5 inches |
| Weight | 0.3 lbs |
| Weather Resistance | IP65 (outdoor rated) |
| Storage | MicroSD card up to 128 GB (not included) |
| Smart Home Compatible | Alexa, Google Assistant |
| Mounting | Wall or ceiling mount included |
| Clean | Wipe with dry cloth |
| Safety | Do not expose to rain or moisture; indoor use only for power adapter |
| Spare Parts & Repairability | Contact SereneLife support; no user-serviceable parts |
Frequently Asked Questions - IPCAMHD61 SereneLife
User questions about IPCAMHD61 SereneLife
0 question about this device. Answer the ones you know or ask your own.
Ask a new question about this device
Download the instructions for your Camera in PDF format for free! Find your manual IPCAMHD61 - SereneLife and take your electronic device back in hand. On this page are published all the documents necessary for the use of your device. IPCAMHD61 by SereneLife.
USER MANUAL IPCAMHD61 SereneLife
natural_image
White SereneLife mobile phone with visible camera and antenna (no text or symbols on device body)IPCAMHD61
User Manual
TABLE OF CONTENTS:
PRODUCT STRUCTURE DIAGRAM 1
SETUP AN ACCOUNT USERNAME 2
ADD CAMERA TO APP 3
CONNECT TO YOUR NETWORK 4
WEB ACCESS 5
PASSWORDS 5
MOBILE APP LAYOUT 6
CAMERA VIEW PAGE 7
CAMERA RECORDINGS 8
DEVICE SETTINGS 9
RECORDING YOUR CAMERA 10
MOTION DETECTION AND NOTIFICATION SETTINGS EXPLAINED ---- 11
HOW TO IMPROVE PLAYBACK PERFORMANCE 12
INCREASE THE GLOBAL BUFFER SETTING 13
HOW TO EVALUATE YOUR HOME WIRELESS NETWORK 14
HOW TO CHECK AND INSTALL FIRMWARE UPDATES 15
TECHNICAL SPECS 19
TROUBLESHOOTING 20
Product Structure Diagram
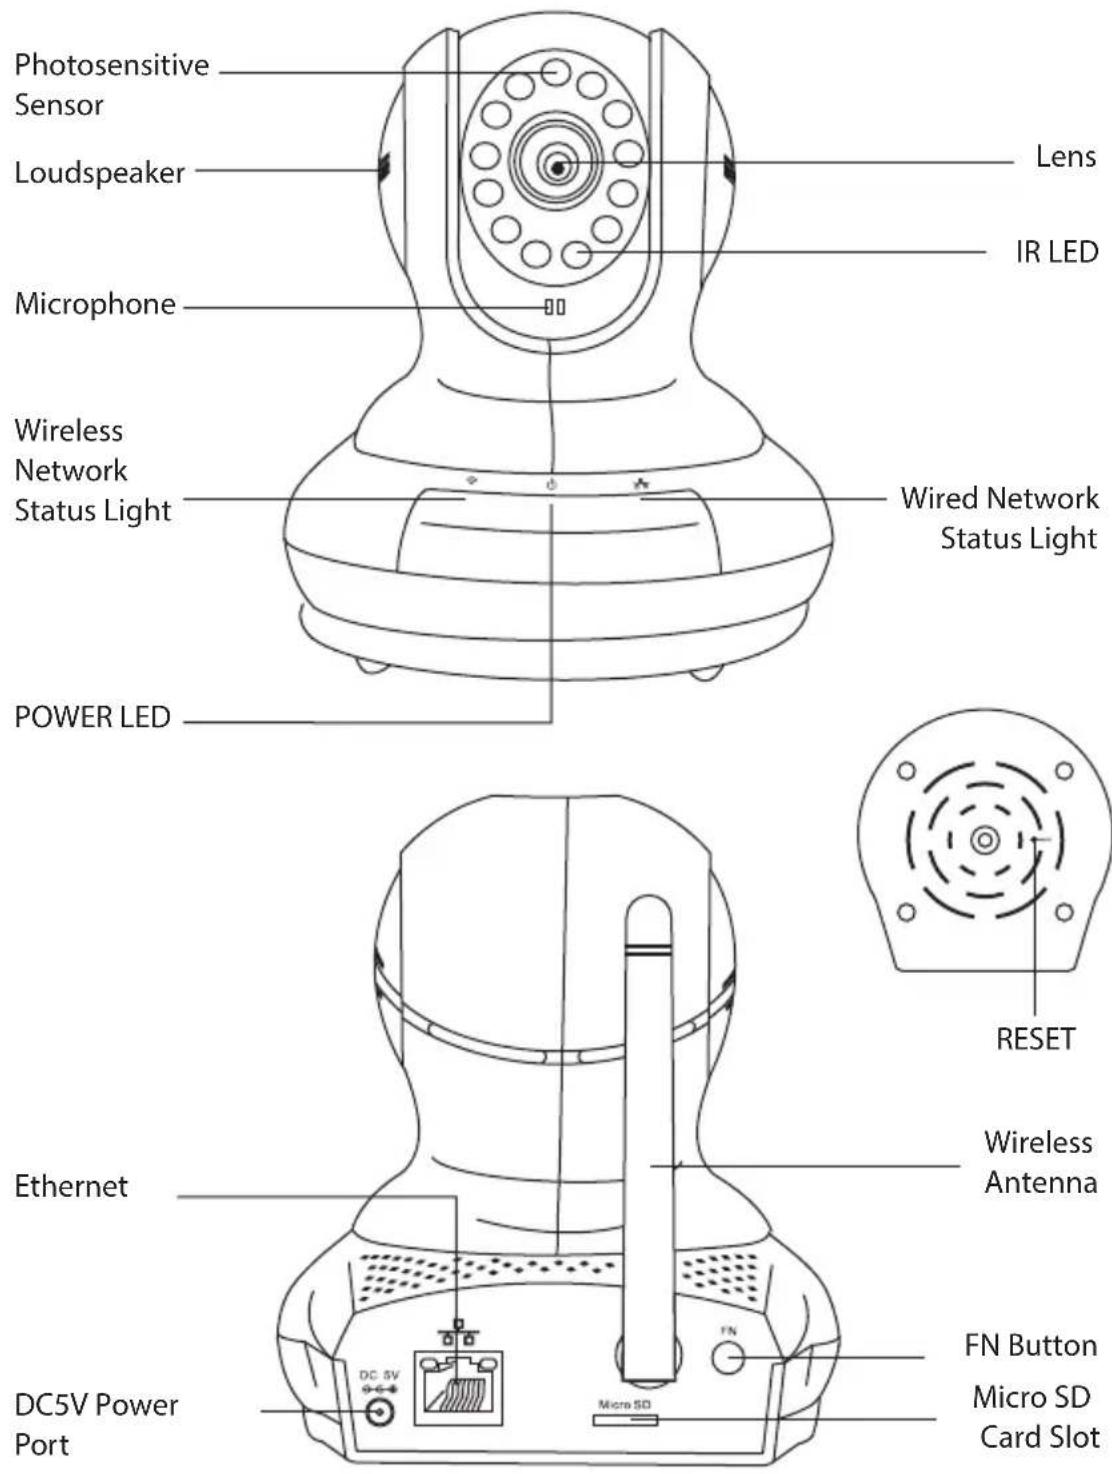
Note: FN button has no function at this time
Don't forget to register your camera with us online to get a free 1 year manufacturer's warranty!
Just go to www.SereneLifeHome.com
'SereneViewer' APP Installation
A. Scan 'SereneViewer' APP QR code or search to download the app.
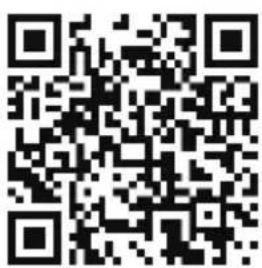
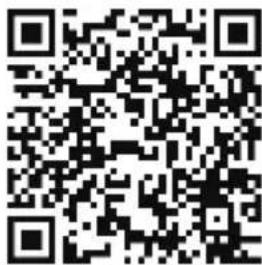
iOS Andriod
Setup an Account Username
Click "Sign Up" Create your camera username
- 6 characters min
- Do not use email address
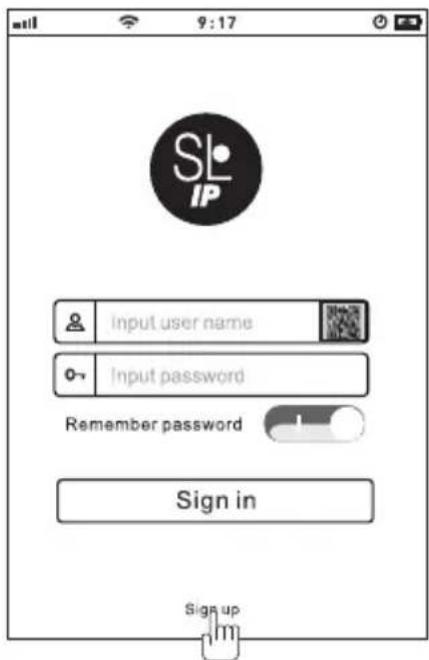
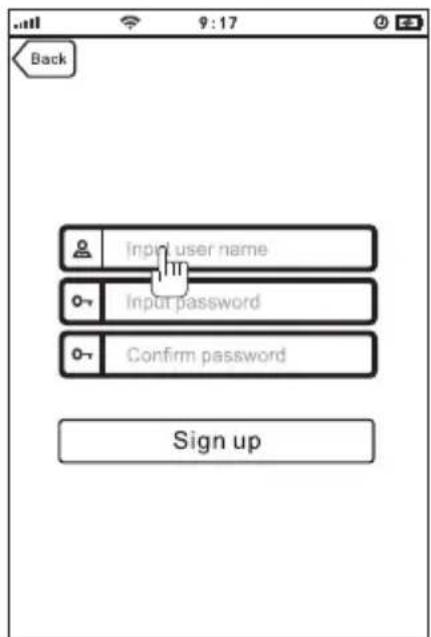
Note: This user name will be used to access all of your cameras from the app or
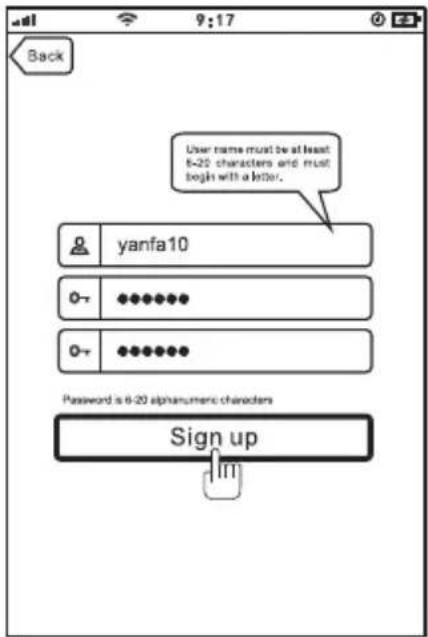
Create an account password - Click "Sign Up"
Note: This will be used to log in to all of the cameras on your account and can be separate from the camera password
Add Camera to APP
- Enter 'Device List' and click '+' icon at the top of left corner. Then scan the device ID QR code.
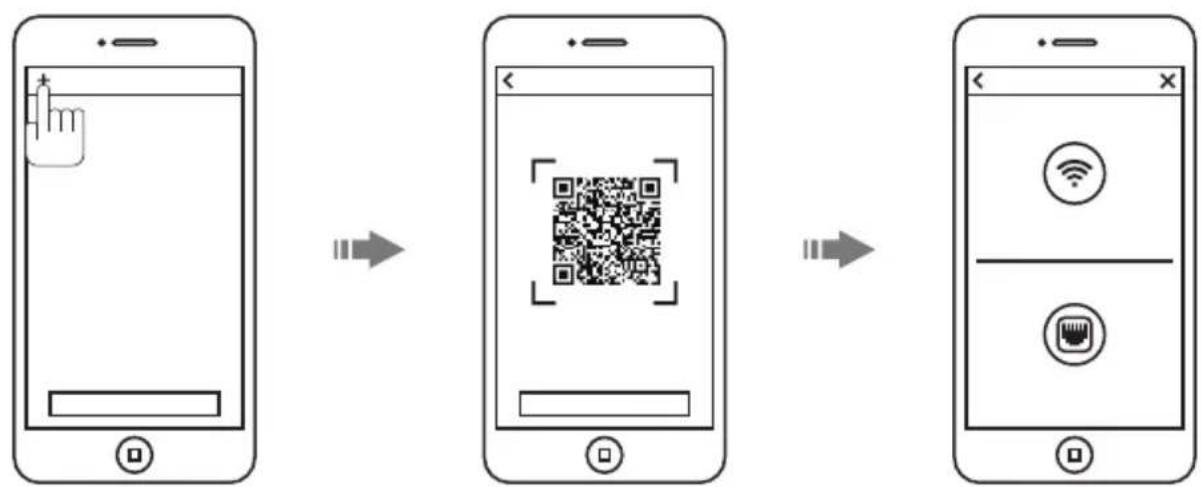
flowchart
graph LR
    A["Hand icon: Click"] --> B["QR code with checkmark"]
    B --> C["Wi-Fi interface with Wi-Fi symbol"]
    C --> D["Network packet with Wi-Fi icon and Ethernet symbol"]
Connect to Your Network
Choose method 1 or 2 for setup
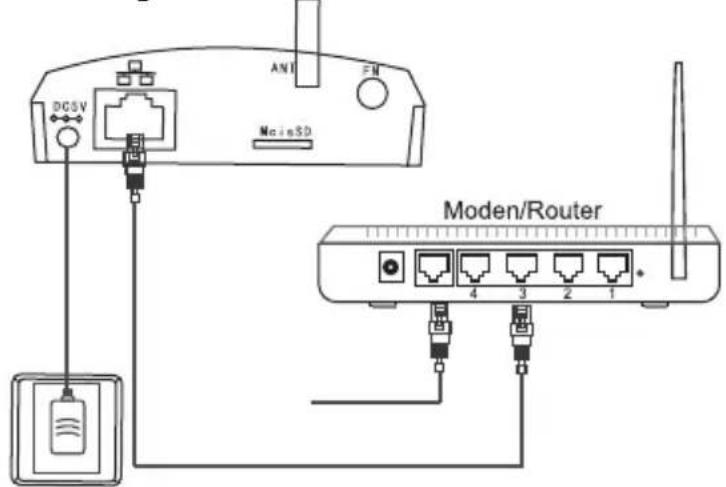
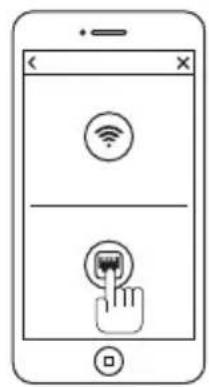
Method 1: Wired Setup
- Connect power, Ethernet cable and the wireless antenna as above.
- Wait 50 seconds for( ) indicator on the camera to flash green
- After scanning QR code - select the "Ethernet Connection" option
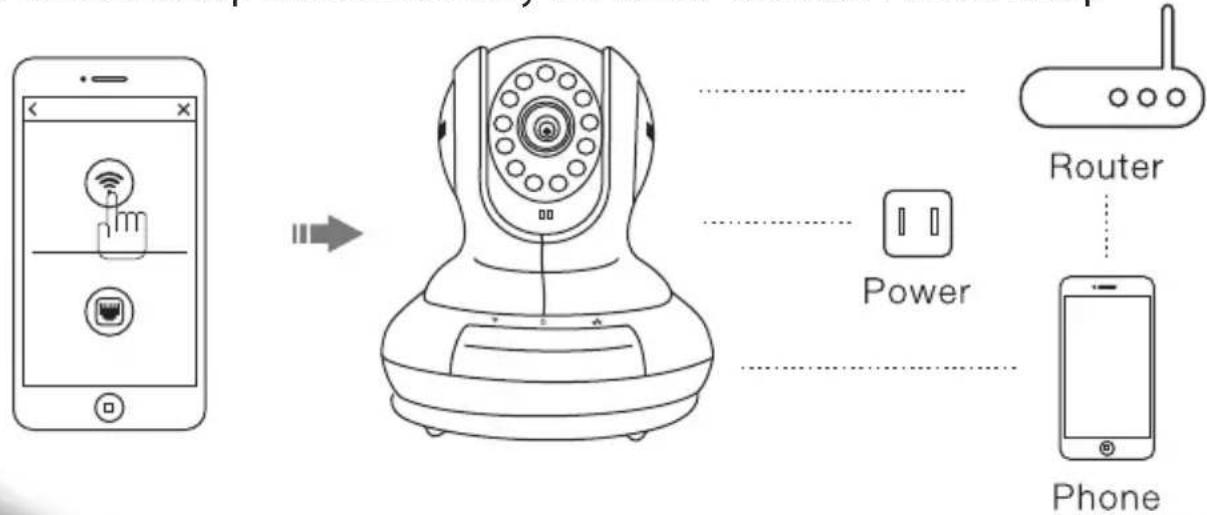
Method 2: Wi-Fi Connection
- Make sure you are in the same room as your wireless router and plug camera into power
- Wait 1-2 min for camera boot up, watch for the WiFi indicator on the front of the camera to flash green and red alternating.
- If WiFi only flashes red - perform a hardware reset to change the camera back to Wireless setup mode. If still only red follow "Method 1 Wired Setup"
flowchart
graph LR
    A["Smart Phone"] -->|Signal| B["Phone"]
    B --> C["Router"]
    B --> D["Power"]
Web Access:
After setting up your camera on the mobile phone - you can use your account username and password to access the cameras from any device with an internet browser
Log on to the website:
http://cloud.serenelifehome.com/
Passwords
Should you happen to forget a camera's individual password you can reset it by performing a hardware reset. Just use a pin to press and hold the reset switch for
12 - 15 seconds. The camera will reboot and run through pan and tilt.
If you forget your account password you will need to register a new account and pair the cameras again.
Accounts are never associated with an email address for password recovery
Mobile App Layout
The main screen is your device list.
You will see a thumbnail preview for all cameras added to your account.
Use this menu to
- Switch between different cameras
- Add new devices
- Access and change app global settings
Add Device
Add your cloud camera to your account through the icon.
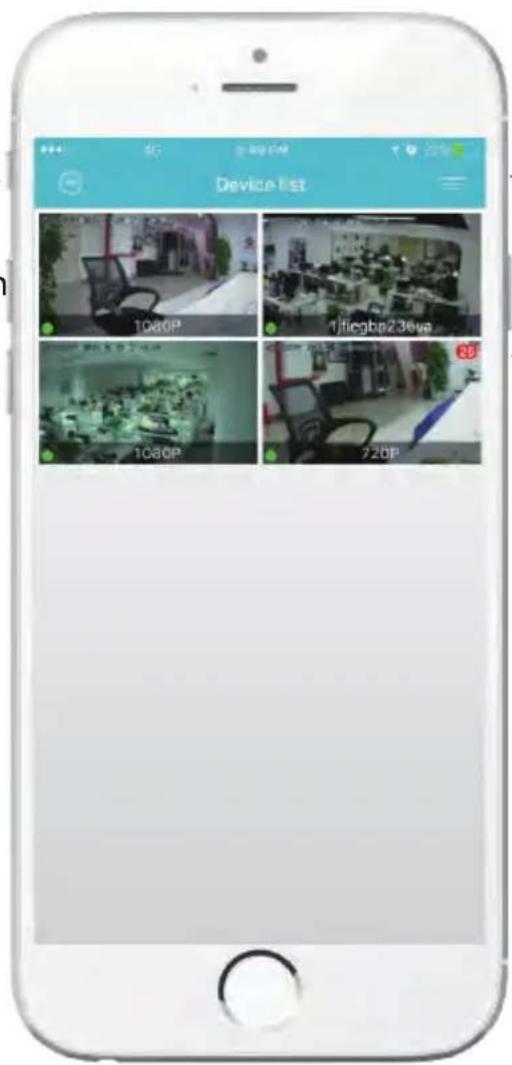
App Settings
You can change your user admin and guest password and check the app software version.
Alarm Messages
Shows which cameras have detected motion.
Camera View Page
This page give you access to all camera specific actions and settings
-Hold the phone ver tically or horizontally to switch between full screen mode
-Swipe left and right on the video to reposition the camera
-Spread two fingers apart to zoom in
Sound
Activate to hear your cameras surroundings
Microphone
Activate to talk through your camera's speaker.
Snap Photo
Saves a photo to your phone's local memory
View the Video Records and alarm messages
Click the icon to view the video recording and alarm message.
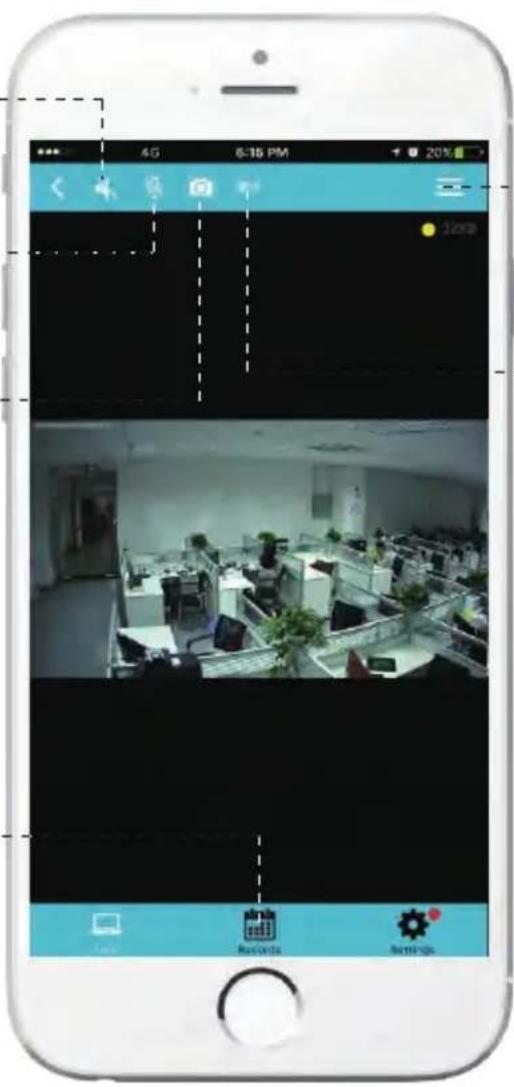
Image Settings
Set color, contrast, image res and more.
Local Video
Records the live video direct to phone memory. This feature only works while app is open.
See "SD recording" for background recording options.
Camera Recordings
Enter into the interface of "information and video viewing" can see the alarm information and video of storage device (Micro SD or cloud box), users can quickly search the information and video by choose the time or category.
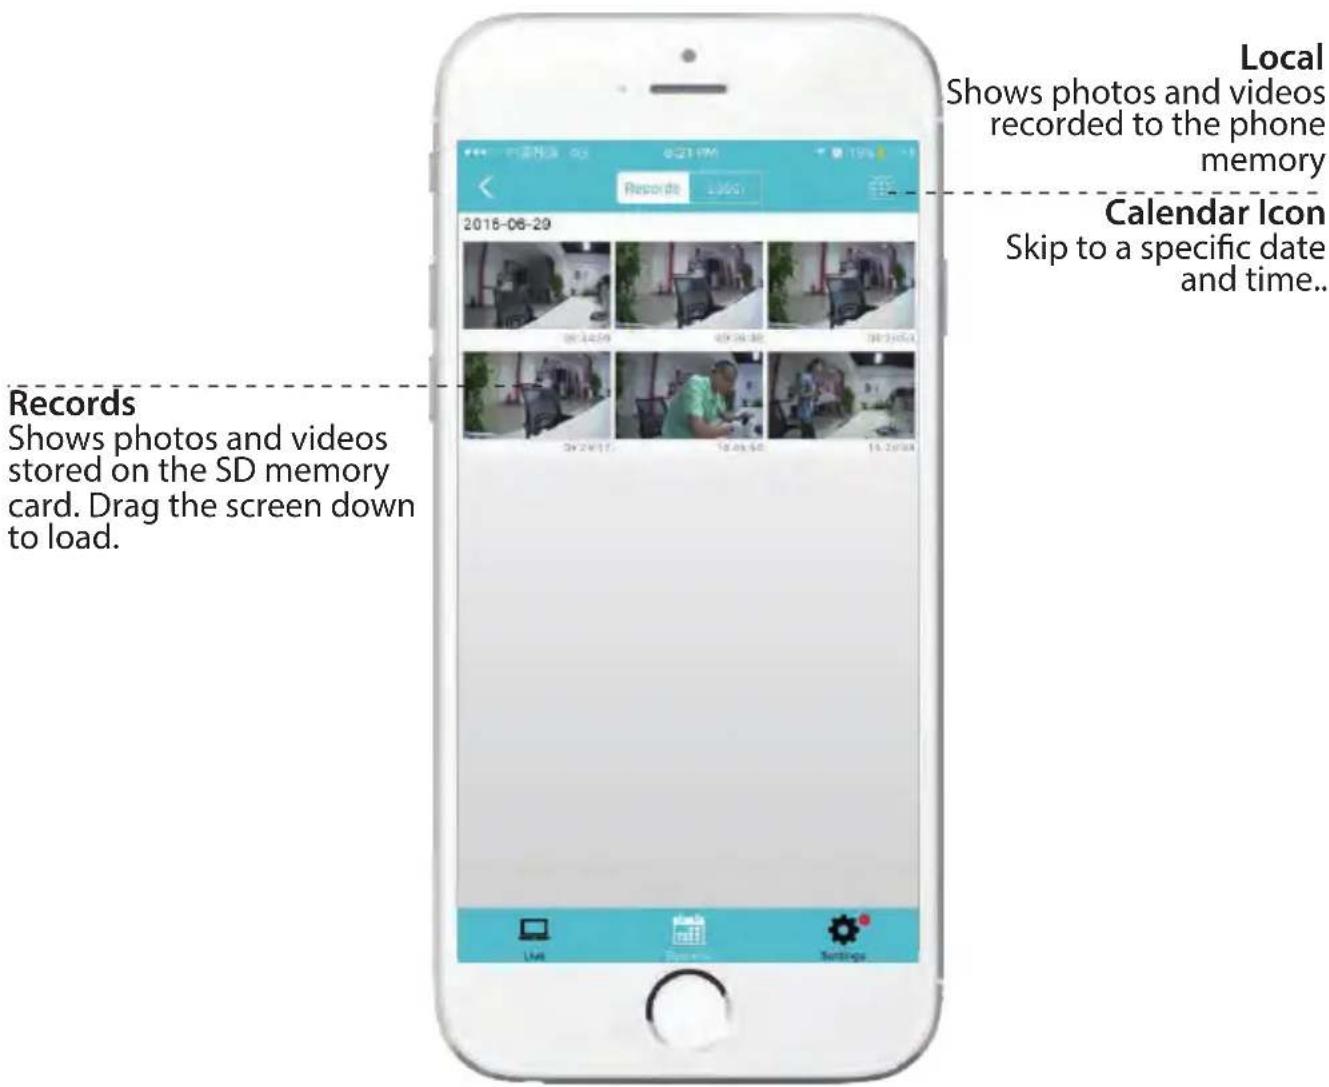
Device Settings
This screen allows you to check and set camera specific settings.
If you see the red dot icon - a firmware update is available. Install available firmware updates to ensure the camera features are working as intended.
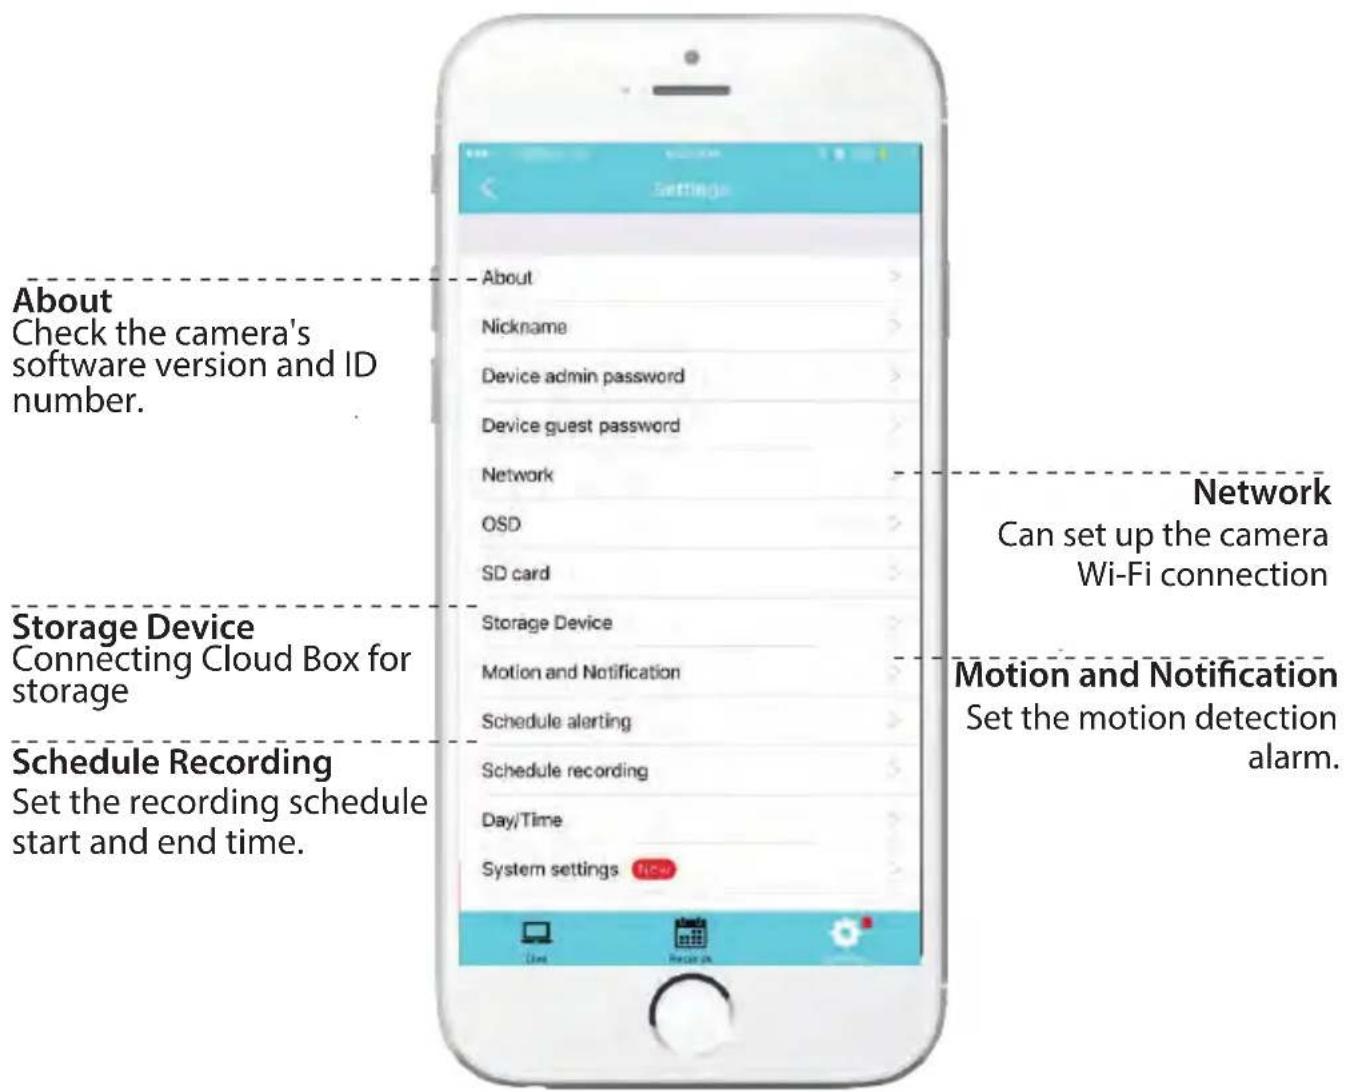
Recording Your Camera
You can choose 3 options for storing recordings for your camera
1) Local storage
This is the most simple method - just point and shoot. This only works while The phone app is open and running and will take up memory on your phone.
2) SD storage
Install an SD card and open up a world of possibilities!
Choose between scheduled recording, motion detection triggered recording or just let it run! The oldest videos will be overwritten to make room for the newest. You can download and save the videos from the mobile or website.
3) CloudBox storage
Sometimes SD storage just doesn't cut it. With a limit of 32g and the fact that the videos are stored directly in the camera - many people prefer the peace of mind the CloudBox can bring. Purchase the cloud box and back up 2TB of video storage from any device on a single network and check the videos from the same login. Find the Clou dBox for sale on Amazon now!
Search "SereneLife CloudBox"
Motion Detection and Notification Settings Explained
You can set notification settings separately for any camera in your account. To access the notification settings, select your camera, and go to the settings tap - then scroll down to "motion detection"
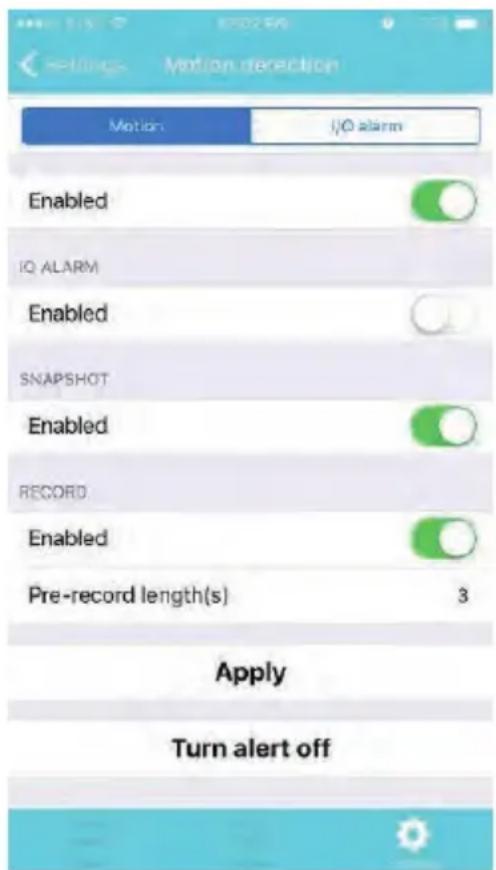
Slide the slider to enable motion detection
You can then choose what actions you would like to occur when your camera detections motion.
I/O alarm will send a signal to any equipment you have attached to the camera
I/O output ports. Snap Shotwill record a still image to the SD card in your
camera. Recordwill record video to the SD card while the camera detects motion.
You can also turn push notifications on and off by selecting "turn alert on" or "turn alert to off".
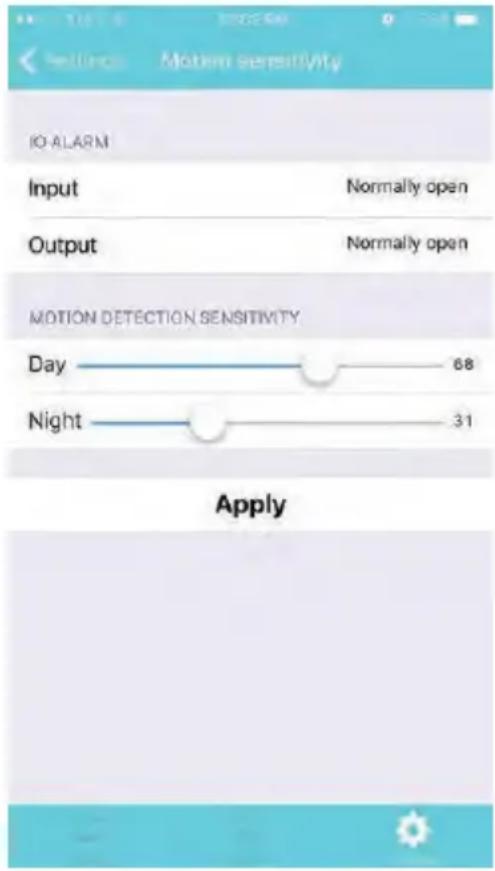
If you are finding your camera is alerting you needlessly or failing to alert you if someone is moving, you can adjust the sensitivity for motion detection for the camera.
Go to "settings" > "Motion Sensitivity" and adjust the sliders for day and night separately
How to Improve Playback Performance
Choppy video?
Try the following to ease up the demands for data on you r camera...
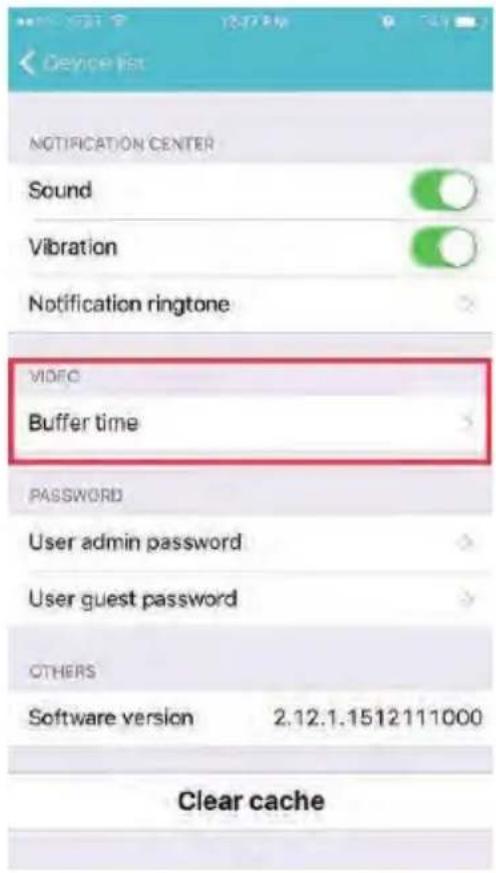
Increase the Global Buffer Setting
The camera buffer time is a setting for the app - not an individual camera. (Access app settings in the camera select window at the top right corner) Try increasing the buffer time so the network isn't as taxed.
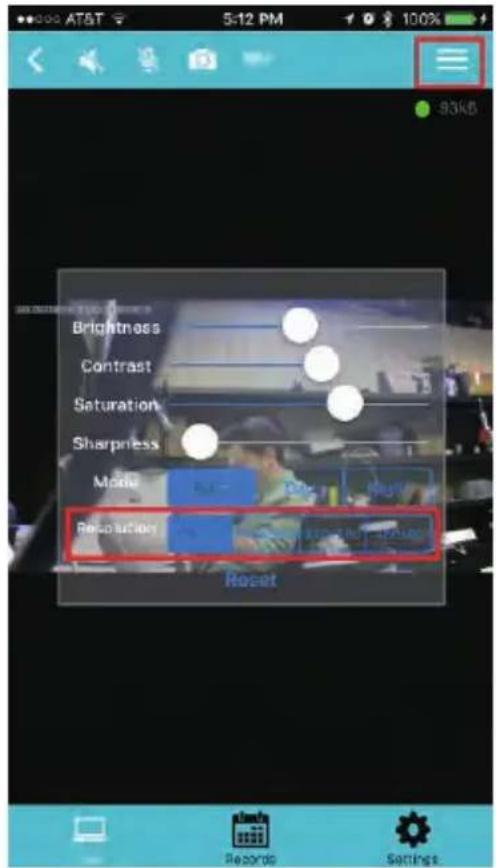
Decrease the Video Stream Quality
You can drop the resolution setting for the camera to make it easier on your home network's bandwidth.
Just open up the setting here and adjust until you get the desired performance level.
Plug your camera into a wired data connection
Do some tests before throwing in the towel for using the camera wirelessly. But the facts remain - wires are still quicker...
How to evaluate your home wireless network
Evaluate your wireless network
Cameras having trouble with wireless? You may want to consider upgrading your wireless network.
Lets do a basic evaluation of your home wireless network.
First, I would recommend comparing your network speed with your wireless speed.
1) Run a speedtest from a laptop of desktop connected to your router with a wired connection.
http://www.speedtest.net/
2) Compare this value to your wireless network apps like "Speed Test" to see if you have enough available data in the area you would like to set the camera.
3) Test your network range
-What is you r download speed in the same room as your wireless router?
-What is the download speed in the location you are trying to install the camera?
-Is there a significant drop?
What to upgrade?
1) If you r wired connection is too slow to reach the bandwidth requirement of the camera you may need to consider upgrading your internet service.
2) If you have a significant drop in data when testing a wireless connection in the same room as your router, you may want to consider upgrading to a router that can provide higher data transmission speeds
3) If you see a significant drop in data when testing in the area you want to install your camera you can either look for an upgraded router that will offer additional range or you can expand your router range with a signal booster.
How to check and install firmware updates
Firmware updates ensure our new features will work 100% for your camera. It is a good idea to install them when you see they are available.
It is recommended that you install updates while on a wired connection to your router.
This will ensure loss of bandwidth is not an issue during updates
To check and install firmware updates
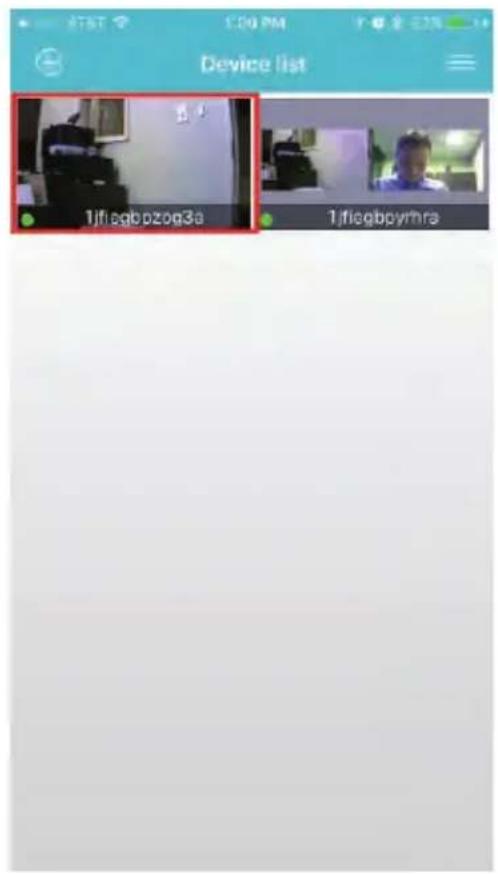
1) Tap the device preview image
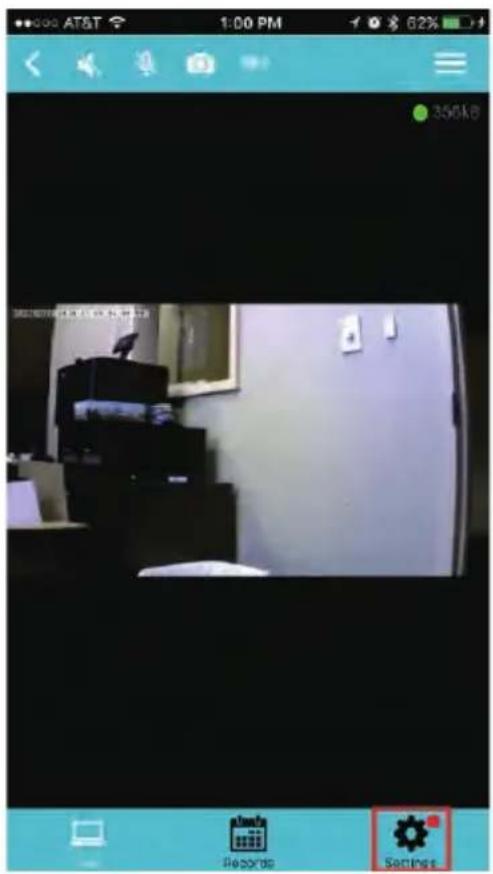
2) Look for red dot indicating firmware update available - then enter settings
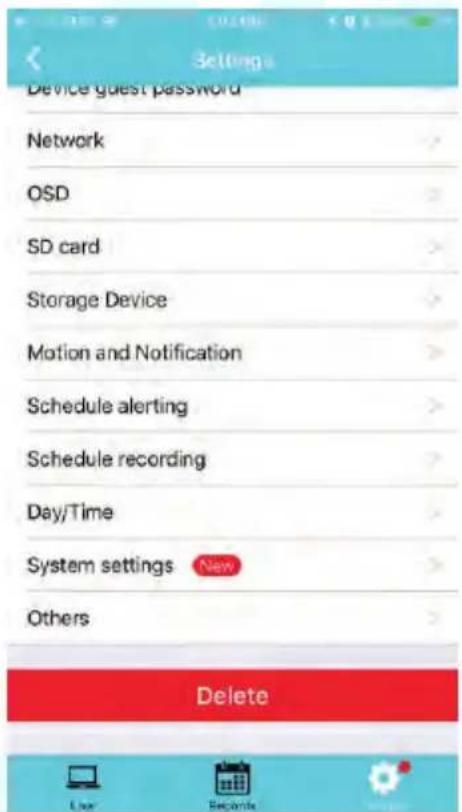
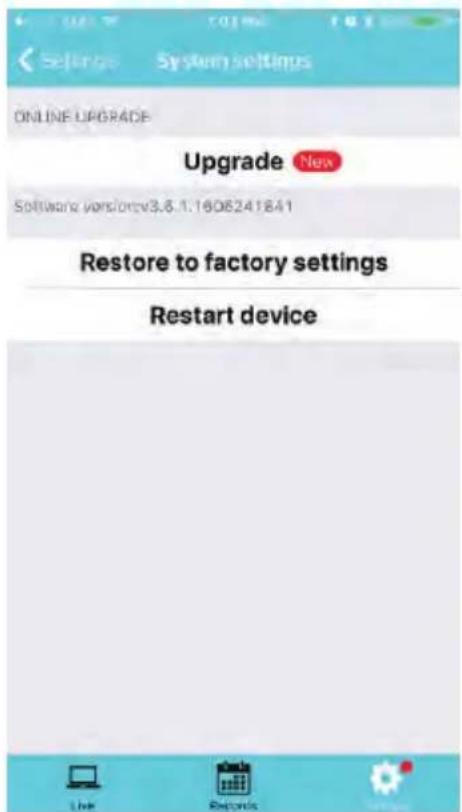
3) Scroll down to "System Settings" 4) Select Upgrade - then confirm
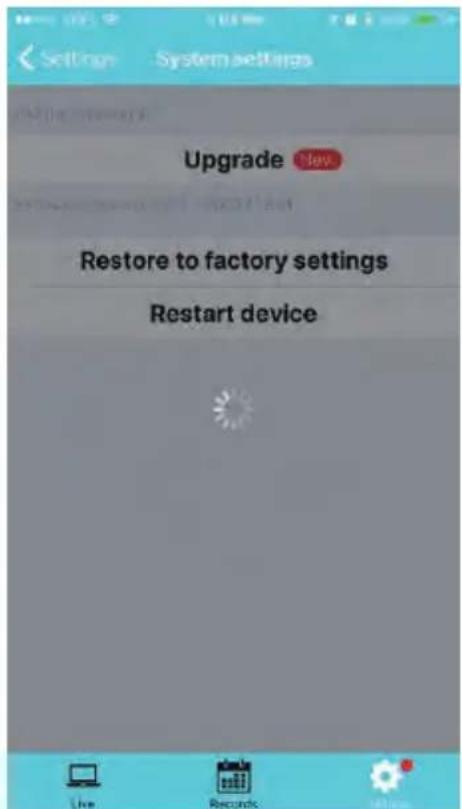
5) Now wait for the upgrade to proceed
- It can take 5 - 10 minutes
- Do not quit the app or modify the camera hardware
6) Once complete - the app will tell you to restart the camera
- However it should automatically restart itself
- Wait 2-3 minutes for the camera to restart before checking the camera feed or settings
7) Check if any additional updates are available
-Sometimes there will be multiple updates available in a row.
Repeat the process until no new updates are available
Desktop access link: http://cloud.serenelifehome.com/
Other issues? Check our FAQ resources and contact support online!
www.SereneLifeHome.com
Compatible Products:
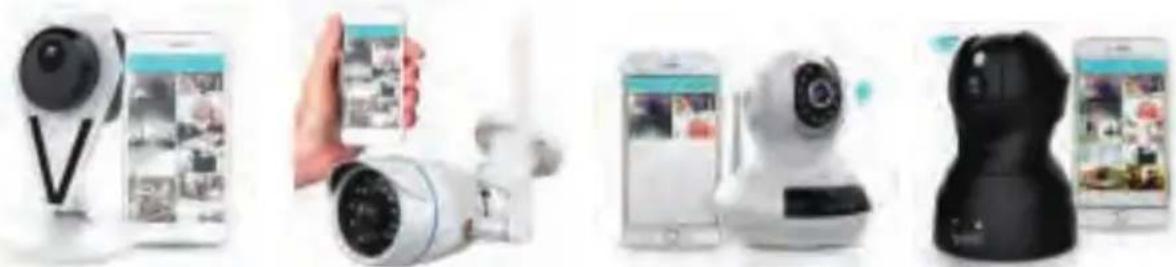
You can add any number of SereneLife cameras to your account with us to monitor multiple locations!
natural_image
Product lineup showing five smart home devices: a V-shaped phone, a hand holding a smartphone, a white remote camera, a white Wi-Fi robot, and a black humanoid device (no visible text or symbols)IPCAMHD82IPCAMHD61
Technical Specs:
- Imagin g Sensor: 1/4" Full Color CMOS
• Video Resolution: Up to 720p (1280 x 720 Pixels) 25FPS - Adjustable Pixel Resolution Settings:
(1280 x 720, 640 x 360, 320 x 180, 160 x 90 Pixels)
• Video File Format MJPEG (H.264)
• Night Vision Distance: 32'+ Feet (12 IR LEDS, 0.5 Lux)
• Wi-Fi Wireless Network: IEEE 802.11 b/g/n - Protocols: TCP/IP, UDP/IP, HTTP, DHCP, RTSP, RTMP, MUTP
• WPS Protection Key Support
• Dynamic IP Address Support - Ethernet Network: 10/100Mbps, RJ-45 Interface
- Browser Support: Chrome, Firefox, Safari, Opera, IE, etc.
• P2P Technology: Plug & Play
• Dynamic Code Rate Filtering, Jitter Buffer
• Maximum Micro SD Card Support Size: 32GB
• Lighting Frequency: 50/60Hz
• Video Compression: H.264
• Audio Compression: AAC (Advanced Audio Coding)
• Maximum Micro SD Card Support: 32GB
• Supports WIFI IEEE802.11b/g/n
• Power Consumption: DC 5V, 2A/7W (Max) - Dimensions (L x W x H): 4.5" x 5.1" x 5.1"
- Weight: 2.38 lbs.
Troubleshooting
Can't connect to WiFi
- Connect the ethernet cable and check connection is working
- Go to "camera settings" > "network" Check the WiFi status is enabled and "List" displays your home network - doublecheck the password.
- In the Ethernet tab - disable the ethernet connection to force the camera to look for available WiFi network
Still having trouble?
- Try deleting the camera entry from your account
- Hardware rest the camera
- Add the camera as a new device
SD Card is not recognized by the camera
- Check the card is class 10 - 32g or less
- Insert the card while the camera is powered down then power up
-Try reformatting the card using your computer using "FAT32" - Test multiple SD cards
App is crashing - a feature is not working
- Check for app updates
- Check for camera firmware updates
- Contact support with app version, mobile device model and OS version so we can update the app and fix the issue
natural_image
Illustration of a laptop with a red checkmark on screen (no text or symbols)VISIT US ONLINE:
Have a question?
Need service or repair?
Want to leave a comment?
PyleUSA.com/ContactUs
- IPCAMHD61
- User Manual
- TABLE OF CONTENTS:
- 'SereneViewer' APP Installation
- Setup an Account Username
- Add Camera to APP
- Connect to Your Network
- Method 1: Wired Setup
- Method 2: Wi-Fi Connection
- Web Access:
- Passwords
- Mobile App Layout
- Use this menu to
- Add Device
- App Settings
- Alarm Messages
- Camera View Page
- Sound
- Microphone
- Snap Photo
- View the Video Records and alarm messages
- Image Settings
- Local Video
- Camera Recordings
- Device Settings
- Recording Your Camera
- 1) Local storage
- 2) SD storage
- 3) CloudBox storage
- Motion Detection and Notification Settings Explained
- Increase the Global Buffer Setting
- Decrease the Video Stream Quality
- What to upgrade?
- How to check and install firmware updates
- To check and install firmware updates
- Compatible Products:
- Technical Specs:
- Troubleshooting
- Can't connect to WiFi
- Still having trouble?
- SD Card is not recognized by the camera
- App is crashing - a feature is not working
- VISIT US ONLINE:
Brand : SereneLife
Model : IPCAMHD61
Category : Camera