
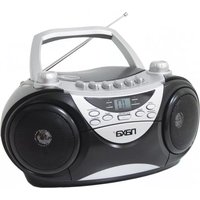
NPC-321 - CD Player Naxa - Free user manual and instructions
Find the device manual for free NPC-321 Naxa in PDF.


| Product Type | Portable CD Player |
| Model | Naxa NPC-321 |
| Power Source | 2 × 1.5V AA batteries or AC adaptor 4.5V DC / 700mA |
| Playback Modes | Normal, Repeat 1, Repeat All, Intro Scan, Random, Program (up to 20 tracks) |
| Display | LCD showing track number, elapsed time, battery low indicator, mode indicators |
| Headphone Output | 3.5mm stereo jack |
| Auto Power Off | Approximately 30 seconds after stop or lid open |
| Supported Discs | Standard 12cm CDs and 8cm singles (no adaptor needed) |
| Laser Class | Class 1 |
| Dimensions (approx) | 150 × 150 × 30 mm |
| Weight (approx) | 0.3 kg (without batteries) |
| Battery Type | AA (UM-3) alkaline, not included |
| Controls | Play/Pause, Stop/Power Off, Next, Previous, Volume +/-, Mode, Program, CD Door Open |
| Cleaning | Wipe cabinet with soft cloth; clean lens with camera lens brush/blower |
| Safety Features | Auto power off, low battery indicator, laser safety caution |
Frequently Asked Questions - NPC-321 Naxa
User questions about NPC-321 Naxa
0 question about this device. Answer the ones you know or ask your own.
Ask a new question about this device
Download the instructions for your CD Player in PDF format for free! Find your manual NPC-321 - Naxa and take your electronic device back in hand. On this page are published all the documents necessary for the use of your device. NPC-321 by Naxa.
USER MANUAL NPC-321 Naxa
Please read this Instruction Manual carefully before using the unit and retain it for future reference
WARNING
CLASS 1 LASER PRODUCT
CLASS 1 LASER PRODUCT APPAREIL LASER DE CLASSE 1 PRODUCTO LASER DE CLASE 1
CAUTION
INVISIBLE LASER RADIATION WHEN OPEN AND INTERLOCKS DEFEATED.
AVOID EXPOSURE TO BEAM
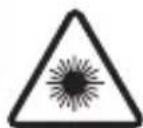
This product contains a low power laser device.
SAFETY PRECAUTIONS
- As the laser beam used in this compact disc player is harmful to the eyes, do not attempt to disassemble the casing.
- Stop operation immediately if any liquid or solid object should fall into the cabinet. Unplug the unit and have it checked by qualified personnel.
- Do not touch the lens or poke at it. If you do, you may damage the lens and the player may not operate properly.
- Do not put anything in the safety slot. If you do, the laser diode will be ON when the lid is still opened.
- If the unit is not to be used for a long period of time, make sure that all power sources are disconnected from the unit. Remove all batteries from the battery compartment, and unplug the AC adaptor from the wall outlet. Make it a practice to remove the AC adaptor by grasping the main body and not by pulling the cord.
- This unit employs a laser. The use of controls or adjustment or performance of procedures other than those specified herein may result in exposure to hazardous radiation.
COMPLIANCE WITH FCC REGULATIONS
This equipment has been tested and found to comply with the limits for a Class B digital device, pursuant to Part 15 of the FCC Rules. These limits are designed to provide reasonable protection against harmful interference in a residential installation. This equipment generates, uses and can radiate radio frequency energy and, if not installed and used in accordance with the instructions, may cause harmful interference to radio communications. However, there is no guarantee that interference will not occur in a particular installation. If this equipment does cause harmful
EN-1
interference to radio or television reception, which can be determined by turning the equipment off and on, the user is encouraged to try to correct the interference by one or more of the following measures:
• Reorient or relocate the receiving antenna.
Increase the separation between the equipment and receiver.
- Connect the equipment into an outlet on a circuit different from that to which the receiver is connected.
- Consult the dealer or an experienced radio technician for help.
WARNING
Changes or modifications to this unit not expressly approved by the party responsible for compliance could void the user's authority to operate the equipment.
IMPORTANT NOTE
- This product does not contain a separate Power On / Off switch. After inserting a disc and installing batteries / AC adaptor, simply press the Play button to switch on and play a disc.
- In order to maximize battery life and provide optimum playing time this product incorporates an Auto Power Off function. The power to the player will automatically switch off approximately 30 seconds after a disc has finished playing or when the CD lid is opened.
LOCATION OF CONTROLS

- LCD Display
- DC Power Jack
- Battery Compartment Cover (bottom)
- Play/Pause Button ▶II
- Volume Control
- CD Door Button
- Headphones Jack
- Stop/Power Off Button ■
- Next Button ▶
- Previous Button
- Mode Button
- Program Button
- CD Door
POWER SOURCE
This CD player operates on two 1.5V DC 'AA' size (UM-3) alkaline batteries (not included) or with an AC adaptor with an output of 4.5VDC/700mA (not included).
To install batteries into the player
- Open the battery compartment cover located on bottom of cabinet.

natural_image
Pure diagram of a circular device with internal components and no text or symbols-
Insert two 1.5V DC 'AA' size (UM-3) alkaline batteries (not included) into the Battery Compartment following the polarity markings as indicated in the compartment.
-
Close the battery door and completely slide it back to its original position.
Battery care
i. Be sure that the batteries are installed correctly. Wrong polarity may damage the unit.
ii. (a) Do not mix old and new batteries.
(b) Do not mix alkaline, standard (carbon-zinc) or rechargeable (nickel-cadmium) batteries.
iii. If the unit is not to be used for an extended period of time, remove the batteries. Old or leaking batteries can cause damage to the unit and may void the warranty.
iv. Never attempt to charge "Non-rechargeable" batteries.
v. Do not dispose of batteries in fire, batteries may explode or leak.
Using an adaptor (not included) to power the player
-
Before connecting the adaptor to the player, make sure that the AC voltage of the adaptor corresponds to your local AC outlet voltage. The polarity of the adaptor must match to the polarity markings next to the DC jack on the player.
-
Plug the 4.5VDC/700mAAC-DC adaptor into an AC outlet.
-
Insert the DC plug into the jack on the player.

NOTE: When the adaptor is connected, the batteries will be automatically disconnected and the player will now operate on the adaptors power. Once the adaptor is unplugged the player will automatically switch to back to battery power.
EN-3
EARBUDS CONNECTION
Connect the plug of the stereo earbuds (included) into the PHONES socket. CAUTION
• AVOID EXCESSIVE VOLUME LEVELS FOR LONG PERIODS OF TIME WHEN USING THE HEADPHONES. PROLONGED USE AT HIGH LEVELS MAY IMPAIR YOUR HEARING.
- Do not use earbuds while operating a motorized vehicle, as it may create a traffic hazard and is illegal in many areas.
BASIC OPERATION
NOTE: This unit can also play 3 inch (8cm) single CDs without an adaptor. Do not use a CD single adaptor for these smaller discs.
-
Press the CD LID OPEN button to release the CD lid.
-
Insert a disc with the label side facing up.
-
Close the CD Lid. A click will be heard when it locks into place.
-
Press the PLAY/PAUSE button once to start playing.
-
The display will show the total number of tracks and playing time. The player will then start playing the first track.
-
Ajust the volume by pressing the Volume Control Button+ - .

natural_image
Hand placing a finger on a circular object with an arrow pointing to it (no text or symbols visible)Locating a Particular Track
| To skip back to the beginning of the current or a previous track | Press ↔ once or repeatedly. |
| To skip to the beginning of following tracks | Press ➤ once or repeatedly. |
Locating a Particular Point in a Track
| To search back at a high speed | Press & hold |
| To search forward at a high speed | Press & hold |
Turning Power On and Off
To turn ON and OFF, press the following buttons after a disc is inserted into the player.
To turn ON: Press PLAY/PAUSE ▶ button ( playback starts)
To turn OFF: Press STOP ■ button once for standby mode.
Press STOP ■ button again to turn off the power.
EN-4
Auto power-off function
When the unit is stopped (Standby mode) for approximately 30 seconds, the power is automatically turned off.
To Remove the Disc
- Press the CD LID OPEN button to open the CD compartment lid.
- Hold the edge and gently press the center pivot as illustrated, then pick up the disc.
Caution: Wait for the disc to stop SPINNING before sliding the OPEN switch AND OPENING THE LID.

natural_image
Hand inserting a CD into a disc (no text or symbols visible)LCD DISPLAY INFORMATION
When the ▶ll is pressed at initial start up
- The display will show "-" and then the total number of tracks and total playing time. The disc will start playing and the display will show the first track number and instant playing time.
- To review the total number of tracks and total playing time of the disc, press the STOP ■ button once.
During PLAY mode
• The track number and the elapsed time are displayed.
During PAUSE mode
- When the track playback is paused, the elapsed time flashes.
Battery Low Indicator
The battery low indicator □ will appear in the display when the batteries need to be changed.
VARIOUS PLAYBACK MODES
NORMAL PLAYBACK
The whole disc is played and the player will stop after the last track is finished.
Every time the MODE button is pressed, the corresponding mode appears in the display window, in the following sequence:
REPEAT 1
In stop or playback mode press the MODE Button once.
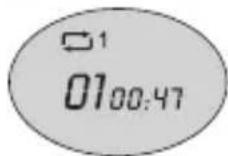
When shown on the LCD display, the current track on the disc will be repeated.
EN-5
REPEAT ALL
In stop or playback mode press the MODE Button twice.

When shown in the LCD display, all tracks on the disc will be repeated.
To cancel the Repeat Function, press the MODE Button repeatedly until "☐1" or "☐ALL" disappears.
INTRODUCTARY SCAN
To play the first 10 seconds of each track on the disc.
- In STOP mode press the MODE button three times, INTRO is displayed.
- Press ▶ button to start INTRO play from track number 01.
-
If INTRO mode is selected during play, INTRO will start flashing in the display.
-
Press ▶ button. INTRO stops flashing and INTRO play starts from track 01.
- Press to start INTRO play from next track.
- Press ◀ to start INTRO play from current track.
- To cancel INTRO play, press ▶ again. Playback continues on current track.

RANDOM
Enables all the tracks on the disc to be played in a Random sequence.
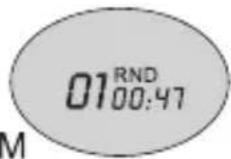
- In STOP mode press the MODE button four times, RANDOM Indicator, "RND", will be displayed.
- Press ▶ button. A track is selected at random and playback begins.
- If RANDOM mode is selected during play, "RND" will appear and flash in the LCD Display.
- Press I◀ or ▶I button once. "RND" stops flashing and RANDOM playback begins.
- Press the MODE Button again to return to normal play mode
PROGRAMMED PLAY
Programs can be set in either the STOP or normal play mode.
- Press the PROG button once, PROG No. 01 appears. PROG and Track No. 00 start flashing in the display.
- Press ◀ or ▶ to select the desired track.
- When the desired track is displayed, press the PROG button to register. The PROG No. changes to 02. Track No. returns to 00 and flashes together with PROG. EN-6

- Repeat steps 2 and 3 to program more tracks.
Up to 20 tracks can be programmed into the memory. - Press ▶ to start the programmed play.
- To erase the program, in STOP mode simply press the ▶ button.
PLAYER MAINTENANCE
Cleaning the Cabinet
Wipe with a soft cloth. If the cabinet is very dirty, dampen the cloth with a weak solution of neutral detergent and water, and then wipe clean.
Cleaning the Lens
A dirty lens will cause sound skipping and, if the lens is very dirty, the CD may not work. Never touch the lens with your finger or press down on the lens assembly. Damage may occur or you may scratch the lens. Open the disc cover and clean the lens as follows:
Dust or Dry Particles
Using a camera lens brush/blower, blow on the lens a couple of times, then wipe it lightly with the brush to remove dust. Then, blow on the lens once more.
DISC CLEANING AND TROUBLESHOOTING GUIDE
Cleaning the Disc
When a disc becomes dirty, clean it with a cleaning cloth. Wipe the disc from the centre out.

natural_image
Illustration of a hand tying a knot with a triangular knot (no text or symbols)Note
Do not use solvents such as benzene petrol, thinner, commercially available cleaners or anti-static spray intended for analogue discs.
TROUBLESHOOTING GUIDE
Should you experience difficulties in the use of this player please refer to the following chart.
EN-7
| Troubleshooting Guide | |
| Problem | Points to Check |
| Player fails to function | Disc may be inserted upside downDisc not mounted correctly on chuckDirty or defective discDirty pick up lensPlayer lid not closedMoisture/Condensation, allow player to warm up to room temperature for 60 minutesAC power to adaptor switched offWeak batteriesAuto switch off has occurred |
| No sound from Headphones | Headphone plug is not firmly inserted into the Phones socket. |
| Intermittent sound | Dirty or defective discDirty pick up lensPlayer is subject to excessive vibration or shockLow battery powerPoor Headphone connection |
EN-8
natural_image
Hand placing a finger on a circular object with a downward arrow, no text or symbols visiblenatural_image
Hand inserting a device into a device casing (no text or symbols visible)SP-5
natural_image
Line drawing of a remote control device with cable and power outlet (no text or symbols)natural_image
Pure diagram of a circular mechanical or electrical component with no text, numbers, or symbolsSP-3


- WARNING
- CLASS 1 LASER PRODUCT
- CAUTION
- SAFETY PRECAUTIONS
- COMPLIANCE WITH FCC REGULATIONS
- IMPORTANT NOTE
- LOCATION OF CONTROLS
- POWER SOURCE
- To install batteries into the player
- Battery care
- Using an adaptor (not included) to power the player
- EARBUDS CONNECTION
- BASIC OPERATION
- Turning Power On and Off
- Auto power-off function
- To Remove the Disc
- LCD DISPLAY INFORMATION
- When the ▶ll is pressed at initial start up
- During PLAY mode
- During PAUSE mode
- Battery Low Indicator
- VARIOUS PLAYBACK MODES
- NORMAL PLAYBACK
- REPEAT ALL
- INTRODUCTARY SCAN
- RANDOM
- PROGRAMMED PLAY
- PLAYER MAINTENANCE
- Cleaning the Cabinet
- Cleaning the Lens
- Dust or Dry Particles
- DISC CLEANING AND TROUBLESHOOTING GUIDE
- Cleaning the Disc
- Note
- TROUBLESHOOTING GUIDE
Brand : Naxa
Model : NPC-321
Category : CD Player