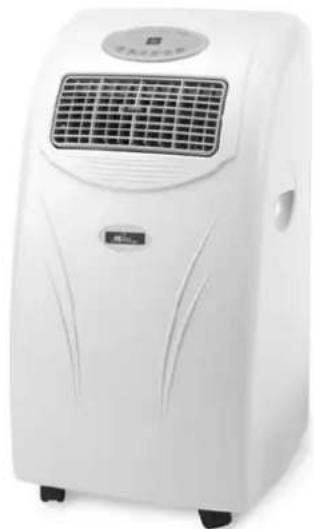
ARP-900E - Air conditioner Royal Sovereign - Free user manual and instructions
Find the device manual for free ARP-900E Royal Sovereign in PDF.


| Type | Portable Air Conditioner |
| Model | ARP-900E |
| Brand | Royal Sovereign |
| Cooling Capacity | 9000 BTU |
| Power Consumption (Cooling) | 680W / 6.8A |
| EER | 11 |
| Max Air Volume | 350 m³/h |
| Humidity Removal | 18 L/day |
| Recommended Room Size | 300 sq ft |
| Power Supply | 115V / 60Hz / 1 Phase |
| Compressor Type | Rotary |
| Refrigerant | R-22, 470g (1lb) |
| Fan Speeds | 2 (Low/High) |
| Timer Range | 1–12 hours |
| Thermostat Range | 64–89°F (18–32°C) |
| Dimensions (WxDxH) | 16 x 15 x 29 in (400 x 377 x 750 mm) |
| Net Weight | 64 lbs (29 kg) |
| Noise Level | 54.1 dB(A) |
| Operating Modes | Cooling, Fan, Auto |
| Drainage | Self-evaporating; manual or continuous drain |
| Filter Cleaning | Vacuum or rinse with water (max 40°C); dry before reinstalling |
| Warranty (Parts & Labor) | 1 year |
| Warranty (Compressor) | 5 years (part only) |
| Safety Features | LCDI breaker plug; auto shut-off on full tank (electronic models) |
| Accessories Included | Exhaust hose, window spacer, remote control, drain tube, water tray |
Frequently Asked Questions - ARP-900E Royal Sovereign
User questions about ARP-900E Royal Sovereign
0 question about this device. Answer the ones you know or ask your own.
Ask a new question about this device
Download the instructions for your Air conditioner in PDF format for free! Find your manual ARP-900E - Royal Sovereign and take your electronic device back in hand. On this page are published all the documents necessary for the use of your device. ARP-900E by Royal Sovereign.
USER MANUAL ARP-900E Royal Sovereign
natural_image
White portable air conditioner unit with solar panel and control panel (no visible text or symbols)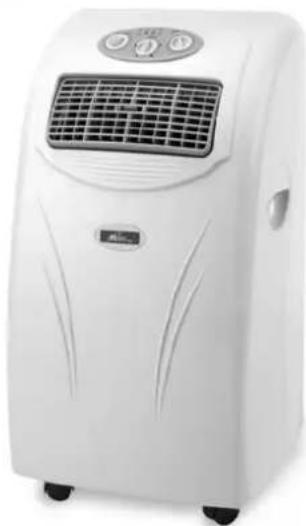
natural_image
White modular air conditioner unit with control panel and ventilation grille (no visible text or symbols)PORTABLE AIR CONDITIONER ACONDICIONADOR DE AIRE PORTÁTIL
Royal Centurian Inc.
PORTABLE AIR CONDITIONER
Model ARP-900M / ARP-900DM / ARP-900€ / ARP-900DE
BEFORE USE
GENERAL SAFETY
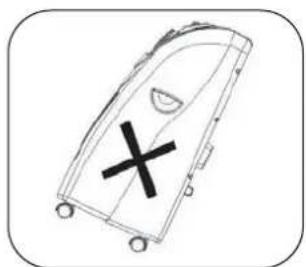
- Only use in the upright position on a flat, level surface at least 20"/50cm from any object (FIG 1 & 4)
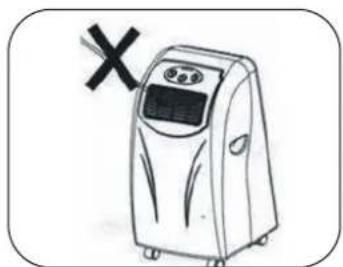
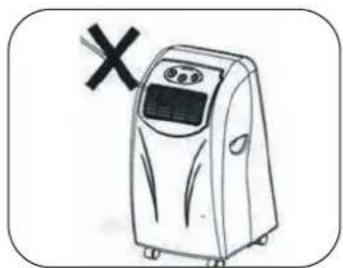
- Do not place objects on the unit or restrict air Inlet / outlet (FIG. 2).
- Closely supervise children and pets while unit is in use.
ELECTRICAL SAFETY
- For indoor use only.
- Turn off and unplug the unit when it is not in use.
- Do not use in wet environments (FIG. 3).
- Do not pull the unit by the cord.
- If the supply cord is damaged, it must be replaced by an electrician or qualified person, to avoid hazard or Injury.
FOR MAXIMUM EFFICENCY
- Do not exceed the recommended room size of 300 sq feet.
- Close doors and windows.
- Keep curtains or blinds closed during the sunniest part of the day.
- Keep filters clean.
- Once room has reached the desired conditions, reduce temperature and ventilation settings.
natural_image
Simple line drawing of a vehicle or container with a cross symbol on the side (no text or labels)FIG.1 FIG.2
natural_image
Simple line drawing of a portable air conditioner with a 'X' mark and no text or symbols on the device itself.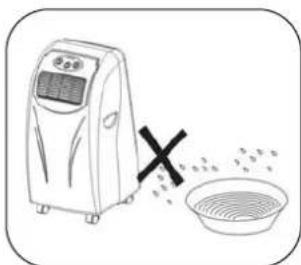
FIG.3
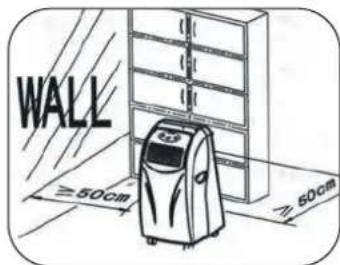
FIG.4
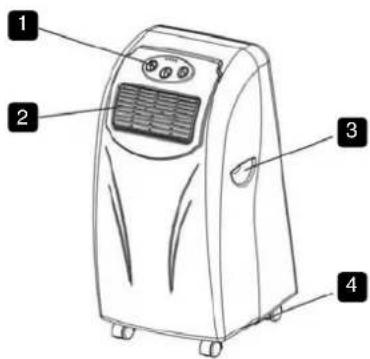
PARTS
Front
- Control Panel
- Air outlet
- Carrying handle
- Caster
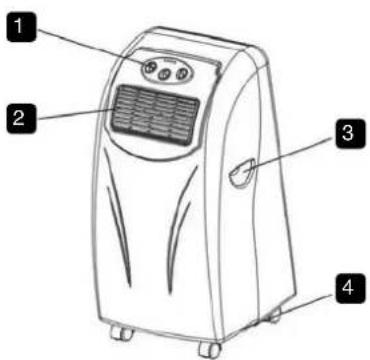
Back
- Air filter
- Air inlet
- Exhaust air outlet
- Power cord with LCDI breaker plug and reset buttons.
- Cord storage
- Water stopper / drainage point
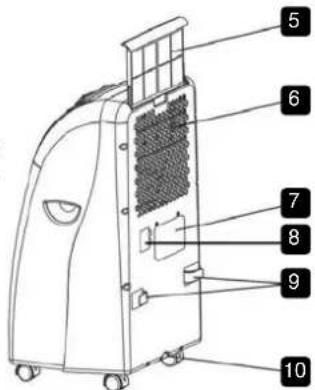
Accessories
- Air Conditioner adaptor - for insertion over hose and into back of the air conditioner.
- Window adaptor adaptor - for insertion over hose and into window spacer.
- Exhaust hose
- Extendable window spacer.
- Drain tube for continuous drainage
- Water tray
- Remote control (for electronic type only)
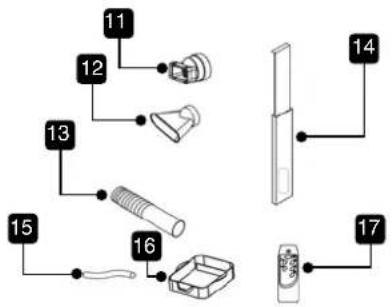
INSTALLATION
Installation of the exhaust pipe
This unit is portable and may be moved from room to room. Please follow the steps for proper installation:
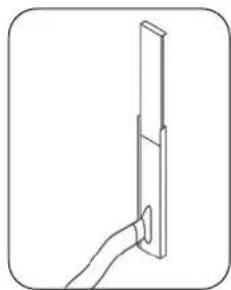
- Feed the outward adapter through the extendable window spacer.
- Screw the exhaust hose into the outward adapter.
- Insert the window spacer into the window gaps as shown. Adjust its length if necessary.
- Slide window across so that the spacer is held securely.
NOTE: Install window vent vertically or horizontally depending on window style. Window Spacer may be cut to fit. If window spacer does not fill opening completely a custom made spacer from your local home improvement store can be made.
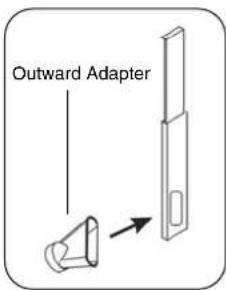
FIG.5
natural_image
Simple line drawing of a hand holding a vertical object (no text or symbols)FIG.6
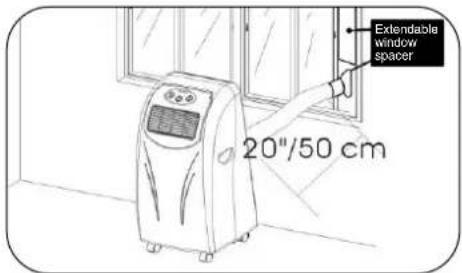
FIG.7
Mounting of the exhaust pipe
• Using only the hose provided, screw unit adapter to exhaust hose then clip the unit adaptor to the back of the air conditioner.
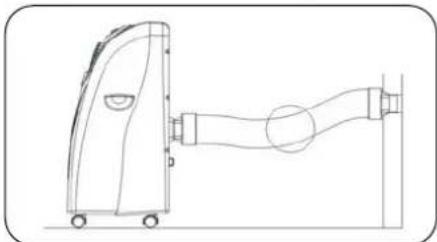
- Avoid kinks and bends in the exhaust hose as this will cause expelled moist air to build up causing the unit to overheat and shut down. (Fig 8 & 9 show correct position).
NOTE: For best results do not exceed a 45° angle.(Fig 10)
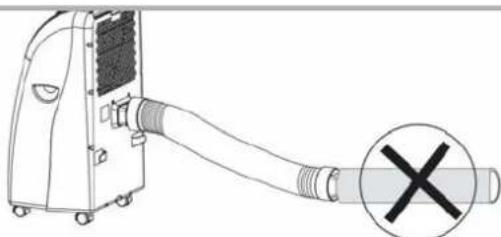
- The hose may be extended from 1-5 ft /300mm -1500mm but for maximum efficiency use the shortest straightest length possible. It is not recommended to exceed 5 feet for this will diminish the efficiency of the unit. See WARNING Figure 11
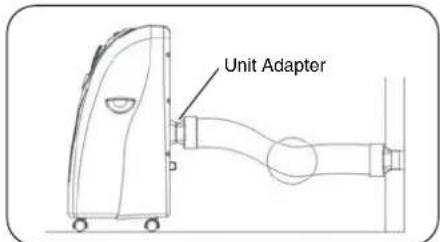
FIG.8 FIG.9 FIG.10
natural_image
Line drawing of a medical or laboratory device with no visible text, numbers, or symbols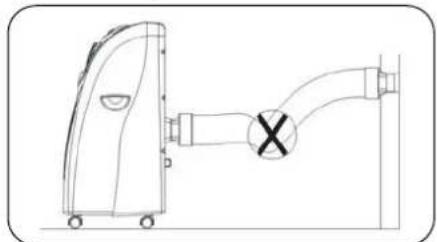
natural_image
Line drawing of a mobile phone connected to a door and valve (no text or symbols)WARNING
natural_image
Diagram of a portable air conditioner unit connected to a cable with a cross symbol (no text or labels)The length of the exhaust pipe is specially designed according to the specification of this product. Do not replace or lengthen it with your own hose as this will cause the unit to malfunction.
FIG.11
Installation of the carbon filter
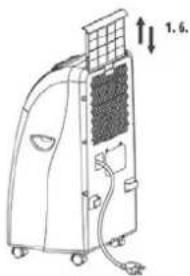
- Remove the filter frame from the unit.
- Separate the filter fixer from the filter frame.
- Remove the active carbon filter from its plastic bag.
- Insert the active carbon filter into the filter frame.
- Fix the filter by reassembling the fixer to the filter frame.
- Re-fit the filter frame inside the unit.
OPERATION for mechanical unit
ARP-900M ARP-900DM
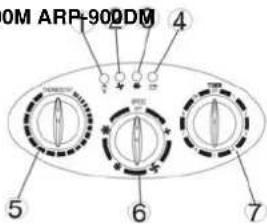
FIG.12 FIG.13
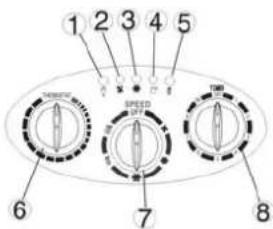
- Power indicator
- Fan operating indicator
- Cooling operating indicator
- 'Full water' indicator
- Thermostat
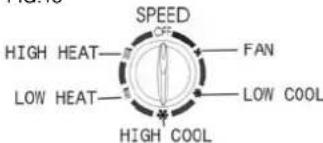
- Speed switch with options for - LOW FAN, HIGH FAN, LOW COOL, HIGH COOL
- Timer (1-8 hours) as well as ON/OFF switch
natural_image
Line drawing of an air conditioner unit with a grid panel and attached circuit board (no text or symbols)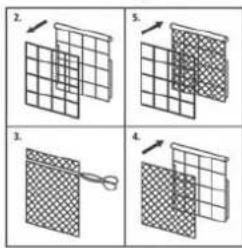
- Power indicator
- Fan operating indicator
- Cooling operating indicator
- 'Full water' indicator
- Heating operating indicator
- Thermostat
- Speed switch with options for - FAN, LOW COOL, HIGH COOL, LOW HEAT, HIGH HEAT.
- Timer (1-8 hours) as well as ON/OFF switch
Turning ON/OFF
Set the TIMER to the ON for continuous operation (the unit will operate as long as it is not turned off).
Power indicator comes on.
To turn off the unit, turn the TIMER to the OFF position.
Setting function / ventilation speed
Cooling only models (ARP-900M and ARP-900E)
Turn the speed switch to select required setting: LOW FAN, HIGH FAN, LOW COOL, HIGH COOL
Cooling & heating models (ARP-900DM and ARP-900DE)
Turn the speed switch to select required setting: FAN, LOW COOL, HIGH COOL, LOW HEAT, HIGH HEAT
Setting temperature
Turn the THERMOSTAT to regulate the temperature desired: The cooling intensity increases clockwise.
FIG.14
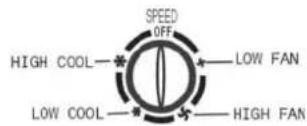
FIG.15
Set timer
Set the TIMER to the desired operating time (1 to 8 hours). When the set time has been reached, the machine will shut off automatically.
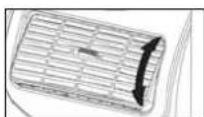
Regulating air flow direction
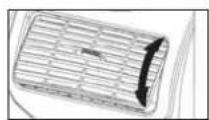
Turn the roller on the air vent to control the air flow direction of the vertical louvers.
Move the air vent directly to adjust the air flow direction of the horizontal louvers.
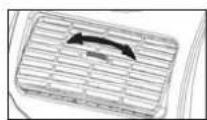
FIG.16 FIG.17
NOTE: 1. To lengthen the compressor's life, when the unit is turned off wait at least 3 minutes before turning it back on.
- The cooling system will turn off if the ambient temperature is lower than the set one. The ventilation, however, keeps working on the set level. If the ambient temperature rises above the selected level, the cooling function will resume.
- On the contrary, the heat will turn off if the ambient temperature is higher than the set one (still, the ventilation keeps working on the set level). As the ambient temperature drops below the selected level, the heating function will resume.
- This machine is equipped with an ANTI-FROST function. While using the heating function in low temperatures, sometimes the heat will stop for a while in order to melt the frost. As this occurs, just wait for the heating function to resume.
OPERATION for electronic unit
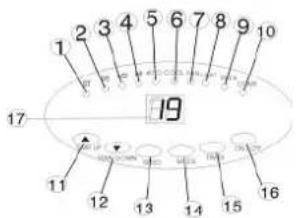
Control panel
-
'Set temperature' indicator
-
'Room temperature' indicator
-
Low ventilation indicator
-
High ventilation indicator
-
Automatic mode indicator
-
Cooling mode indicator
-
Fan mode indicator
-
Heating mode indicator (For ARP-900DE and ARP-900DM models only)
-
Timer operation indicator
-
Compressor operation indicator
FIG.18
-
'Temperature up' button
-
'Temperature down' button
-
Speed (ventilation)button
-
Mode (function) option button
-
Timer button
-
ON/OFF (power) button
-
Display window
Turning ON/OFF
Press ON/OFF button, the unit will start automatically. If the ambient temperature is
- Higher than 75 °F/24 °C, the unit will work in cooling mode.
- Higher than 68 °F / 20 °C, but below or equal to 75 °F / 24 °C, the unit will work in ventilation mode.
- Below 68 °F / 20 °C, the unit will work in heating mode (Only for units ARP-900 DM and ARP-900 DE)
Indicators of the functions in progress will be lit. *NOTE: The COMPRESSOR indicator will only light up when the compressor is in operation.
The display window shows the ambient room temperature.
To turn the unit off, press the ON/OFF button again.
Setting mode/function
Press MODE button to select required working mode: automatic, cooling, fan or heating,
(heating is only available for units ARP-900DE and ARP-900DM). The indicator of your selected mode will be lit.
Auto mode is factory preset at 75 degrees. When in auto mode(auto and cool light illuminated) the temp up and temp down buttons are disabled and you cannot set a desired temperature. If you want a desired temperature above or below 75 run unit in cool mode and set your desired temperature by pressing the temp up or temp down buttons.
Setting temperature
Press the 'Temperature up' or 'Temperature down' button to regulate the temperature desired.
The display window will show the temperature which you have set as you press the 'Temperature up' or 'Temperature down' button.
Otherwise, it will always show the ambient temperature.
The preset temperature of this machine is: 75 °F/24 °C / for cooling, 68 °F / 20 °C for heating.
Setting ventilation speed
- Press the SPEED button to choose the ventilation speed needed, high or low. The indicator of high or low ventilation will light up at the same time.
- If the unit is in AUTO mode, it will choose the ventilation speed automatically according to the ambient temperature (the related indicators will light up: at this time, the speed switch is invalid).
Setting timer
- Press the TIMER button to set the operating hours desired (1 to 12 hours, the timer indicator will light on). When the set time has been reached, the machine will turn off automatically. The display window will show the hour(s) you set as you press the TIMER button. If the timer button is not pressed, the unit will work continuously.
- By pressing the timer but without turning on the other functions, you can PRESET the time for the machine to start. For example, if you press the timer to '2', the unit will start automatically after 2 hours.
All the above functions can also be performed with the supplied remote control. The remote control requires 2 AAA batteries to operate.
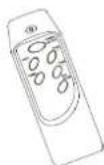
FIG.19
Regulating air flow direction
Turn the roller on the air vent to control the air flow direction of the vertical louvers. Move the air vent directly to adjust the air flow direction of the horizontal louvers.
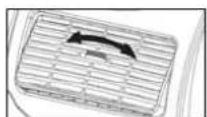
FIG.20 FIG.21
DRAINAGE
Although the unit is self evaporating, during high humidity levels excess water may fill the internal water tray. Depending on how high the humidity and the duration of high humidity levels will depend on how often the unit needs to be drained. When the reservoir full :
a. For the mechanical model, the compressor will stop, only the fan will continue to circulate the air. The 'FULL WATER' indicator will light up. b. For the electronic model, both of the compressor and motor will stop. The COMP. indicator light will flash.
To resume the cooling function, empty the water by the following steps:
- Turn off the air conditioner and avoid moving it when full.
- Position the water tray underneath the drain hole.
- Remove the drain knob & rubber plug from the drain hole and allow the water to drain out.
- When the water tray is almost full, replace the rubber plug in the drain hole and empty the water tray.
- Repeat until the unit is emptied.
- Replace the rubber plug and tighten the drain knob firmly.
- Turn on the unit - the comp light should not be flashing.
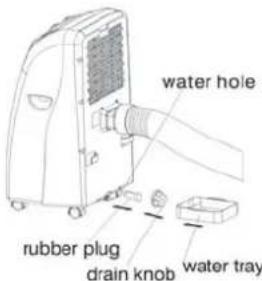
FIG.22
If you wish to operate the unit without the need to empty the water tank, please:
- Remove the drain knob and rubber plug and retain for future use.
- Connect the drain tube supplied to the water outlet as shown and locate the other end into a drain.
- The drain tube may be extended by adding an extension tube and using a suitable connector.
Please note
- The drain must be at or below the outlet level.
- Flashing comp / 'full water' indicator will not function in this mode of drainage.
- If you want to extend the water tube, you can connect it with another tube (OD: .7" / 18mm)
Caution for heating function:
While using the heating function, please note:
- In heat mode the exhaust MUST be exhausted to the outside just as in air conditioning mode. The unit works in reverse of air conditioning mode with the warm air out the front and cold air is exhausted out the back.
- Fix the drainage to be a continuous one (i.e. drain the water by water tube).
- Working range for heating function is 41^ F - 80.6°F ( 5^ - 27 °C) and for the cooling function, it is 64^ F - 89°F ( 18^ C - 32°C).
For temperatures outside of this range, the unit will not work properly.
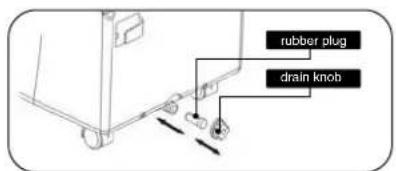
FIG.23
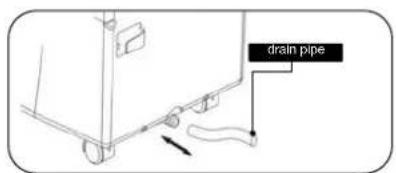
FIG.24
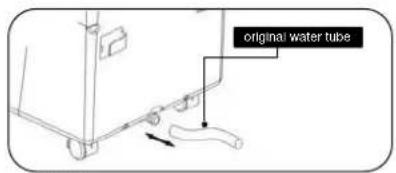
FIG.25
MAINTENANCE
Always unplug the air conditioner from the outlet before cleaning.
To maximize the efficiency of the air conditioner clean regularly.
Cleaning the housing
Use a soft, damp cloth to wipe the body clean.
Never use chemicals, gasoline, detergents, chemically treated cloths, or other cleansing solutions, as such could possible damage the cabinet.
Cleaning the filter
Use a vacuum cleaner or tap the filter lightly to remove loose dust and dirt, then rinse thoroughly under running water (no hotter than 40 °C).
Dry thoroughly before replacing.
NOTE: Never operate the unit without the filters.
End of season storage
- Drain any water from the unit. Operate the unit fan mode only for a few hours to thoroughly dry the inside.
- Clean or change the filter.
- Unplug and store the power cord as shown
- Replace in the original carton or cover for storage.
• Always maintain the unit in an upright position.
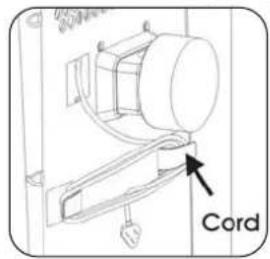
FIG.26
TROUBLE SHOOTING
| The air conditioner does not run: | • Is the air conditioner plugged in?• Reset plug breaker by pressing reset buttons until green light is illuminated on plug.• Is there a power failure?• Is the comp / 'full water' indicator flashing?• Is the room temperature below the set temperature? |
| The machine seems to do little: | • Is there direct light? (Please pull down the curtain.)• Are too many windows or doors open?• Are there too many people in the room?• Is there something in the room producing heat? |
| The machine seems to do nothing: | • Is the filter dusty or contaminated?• Is the air intake or output blocked up?• Is the room temperature below your selected temperature? |
| Too noisy: | • Is the machine positioned unevenly Creating Vibration?• Is the floor underneath the machine uneven? |
| The compressor doesn't run: | • It is possible that the overheat protection of the compressor is on. Just wait for the temperature to drop. |
* Never try to repair or dismantle the unit yourself
SPECIFICATION FOR ARP-900 UNITS
| Model ARP-900M ARP-900DM ARP-900E ARP-900DE | |||
| Cooling capacity 9000 BTU's | |||
| Heating capacity N/A 10000 BTU's N/A 10000 BTU's | |||
| Power/Ampere consumption for cooling 680W / 6.8 A | |||
| Power/Ampere consumption for heating N/A 650W/6.3A N/A 650W/6.3A | |||
| EER 11 | |||
| Air volume (max. speed) 350m3/h | |||
| Humidity removal capacity 18L/day | |||
| Recommended room size 300 sq. ft | |||
| Power supply 115V/60Hz/1phase | |||
| Compressor | Rotary | ||
| Refrigerant | R-22 | ||
| Refrigerant load | 470 g / 1lbs | ||
| Fan speed | 2 | ||
| Timer | 1-8 hours | 1-12 hours | |
| Thermostat | 64 - 89°F / 18 - 32°C | ||
| Net Weight | 64 (lbs) / 29 (kgs) | ||
| Dimension | 16 x 15 x 29 (in) 400 x 377 x 750 (mm) | ||
| Noise Level | 54.1 dB(A) | ||
NOTE: 1. Heating capacity is only for the models with the heating function, i.e. model no. ARP-900DM & ARP-900DE.
2. Measuring condition for above is:
Cooling - RT 80.6 °F (27 °C), RH60%
Heating - RT 68 °F (20 °C), RH60%
FULL ONE YEAR WARRANTY
Royal Sovereign warrants each Portable Air Conditioner to be free from defects in material and workmanship. Our obligation under this warranty is limited to the repair or replacement, free of charge, when delivered to an authorized Royal Sovereign service center, of any defective part(s) thereof, other than parts damaged in transit. This warranty is in effect to the original purchaser, for a period of one year from the date of purchase and is not transferable. This warranty shall apply only if the air conditioner is used on Alternating Current (AC) circuit, in accordance with the factory provided instructions which accompany it.
LIMITED FIVE YEAR WARRANTY (COMPRESSOR)
For a period of five years from the date of purchase, when this Royal Sovereign Portable Air Conditioner is operated and maintained according to the instruction manual provided with the product, Royal Sovereign will supply a replacement compressor (part only), free of charge, if the original compressor is determined to be defective in workmanship or material. If repair becomes necessary, please contact our customer service center. You will be responsible for all freight, insurance, and any other transportation charges to get the unit to our factory or service center. If shipping is required, be sure to pack the unit properly to avoid shipping damages, as we will not be responsible for such damages.
THIS WARRANTY IS VALID THROUGHOUT THE UNITED STATES AND PUERTO RICO ONLY
EXCLUSIONS
This warranty excludes and does not cover defects, malfunctions or failures of your Royal Sovereign Portable Air Conditioner, caused by repairs by unauthorized persons or service centers, mishandling, improper installation, modification or unreasonable use including incorrect voltage, acts of god, or failure to provide reasonable and necessary maintenance.
This warranty is in lieu of any and all expressed warranties. In no event shall Royal Sovereign be liable for consequential or incidental damages. Some states do not allow the exclusion or limitation of incidental or consequential damages, so the above limitation or exclusion may not apply to you. This warranty gives you specific legal rights and you may also have other rights which vary from state to state.
ROYAL SOVEREIGN INTERNATIONAL, INC.
Royal Centurian Inc.
2 Volvo Drive, Rockleigh, NJ 07647 USA
TEL: +1) 201-750-1020, +1) 800-397-1025 FAX: +1) 201-750-1022
RS International Australia PTY. LTD. Royal Sovereign Canada
30 Prime Drive, Seven Hills, NSW 2147, AUSTRALIA 164 Oakdale Road, Toronto, Ontario M3N 2S5 CANADA
TEL : +61) 2-9674-2127 FAX : +61) 2-9674-2027 TEL: +1) 416-741-8400 FAX: +1) 416-741-8185
www.royalsovereign.com / info@royalsovereign.com
MANUAL DEL PROPIETARIO
ARP-900M / ARP-900DM / ARP-900E / ARP-900DE
natural_image
White portable air conditioner unit with solar panel and control panel (no visible text or symbols)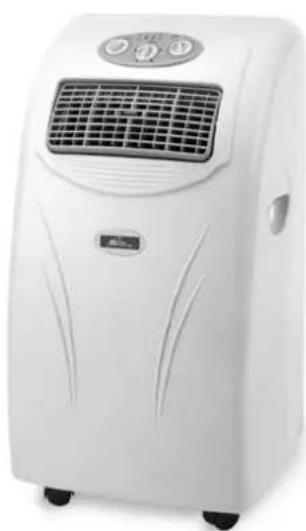
natural_image
White portable air conditioner with control panel and ventilation grille (no visible text or symbols)Royal Centurian Inc.
natural_image
Simple line drawing of a vehicle or container with a cross symbol on the side (no text or labels)FIG.1 FIG.2
natural_image
Simple line drawing of a portable air conditioner with a 'X' mark and no text or symbols on the device itself.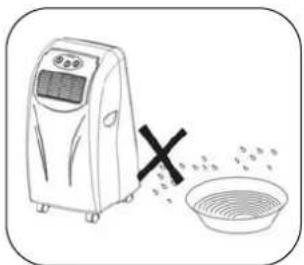
natural_image
Illustration of an air conditioner unit emitting exhaust smoke next to a bowl (no text or symbols)FIG.3
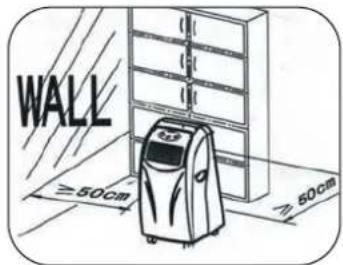
FIG.4
COMPONENTES
Parte delantera
- Panel de Control
- Salida de aire
- Manija para transporte
- Rueda giratoria
Parte posterior
Accesorios
INSTALACIÓN
natural_image
Simple line drawing of a hand holding a vertical object (no text or symbols)FIG.6
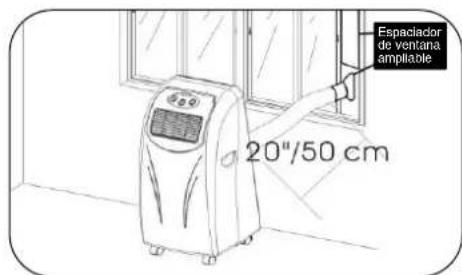
FIG.7
natural_image
Line drawing of a mobile phone with antenna and cable (no text or symbols)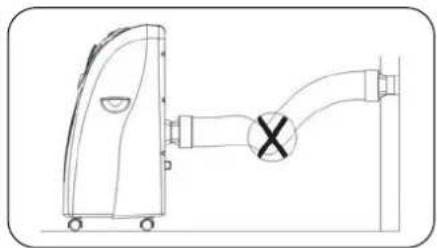
natural_image
Technical line drawing of a mechanical device with a valve and cross symbol (no text or labels)ADVERTENCIA
natural_image
Line drawing of a portable air conditioner unit connected to a cable with a cross symbol (no text or labels)natural_image
Line drawing of an air conditioner unit with a grid panel and ventilation system (no text or symbols)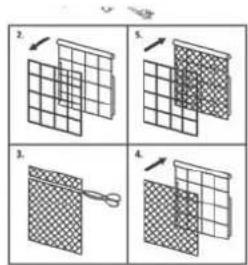
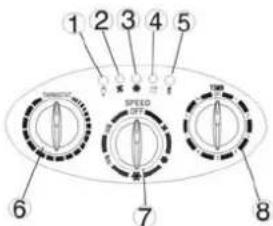
FIG.22
FIG.24
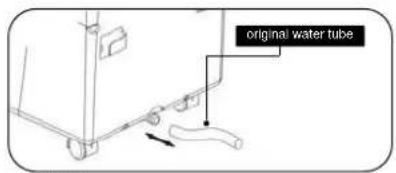
FIG.25
MANTENIMIENTO
Royal Centurian Inc.
2 Volvo Drive Rockleigh, NJ 07647 USA
TEL: +1) 201-750-1020, +1) 800-397-1025 FAX: +1) 201-750-1022
RS International Australia PTY. LTD. Royal Sovereign Canada
30 Prime Drive, Seven Hills, NSW 2147, AUSTRALIA 164 Oakdale Road, Toronto, Ontario M3N 2S5 CANADA
TEL : +61) 2-9674-2127 FAX : +61) 2-9674-2027 TEL: +1) 416-741-8400 FAX: +1) 416-741-8185
www.royalsovereign.com / info@royalsovereign.com

- PORTABLE AIR CONDITIONER
- BEFORE USE
- GENERAL SAFETY
- ELECTRICAL SAFETY
- FOR MAXIMUM EFFICENCY
- PARTS
- Front
- Back
- Accessories
- INSTALLATION
- Installation of the exhaust pipe
- Mounting of the exhaust pipe
- WARNING
- Installation of the carbon filter
- OPERATION for mechanical unit
- Turning ON/OFF
- Setting function / ventilation speed
- Setting temperature
- Set timer
- Regulating air flow direction
- OPERATION for electronic unit
- Control panel
- Setting mode/function
- Setting ventilation speed
- Setting timer
- DRAINAGE
- Please note
- Caution for heating function:
- MAINTENANCE
- Cleaning the housing
- Cleaning the filter
- End of season storage
- TROUBLE SHOOTING
- FULL ONE YEAR WARRANTY
- LIMITED FIVE YEAR WARRANTY (COMPRESSOR)
- THIS WARRANTY IS VALID THROUGHOUT THE UNITED STATES AND PUERTO RICO ONLY
- EXCLUSIONS
- ROYAL SOVEREIGN INTERNATIONAL, INC.
- Royal Centurian Inc.
- RS International Australia PTY. LTD. Royal Sovereign Canada
- MANUAL DEL PROPIETARIO
- COMPONENTES
- Parte delantera
- Parte posterior
- Accesorios
- INSTALACIÓN
- ADVERTENCIA
- MANTENIMIENTO
Brand : Royal Sovereign
Model : ARP-900E
Category : Air conditioner