RAD-501 - Radio Steren - Free user manual and instructions
Find the device manual for free RAD-501 Steren in PDF.


| Type | Portable Radio |
| Brand | Steren |
| Model | RAD-501 |
| Dimensions (approx.) | 200 x 120 x 60 mm (7.9 x 4.7 x 2.4 in) |
| Weight (approx.) | 0.5 kg (1.1 lb) |
| Power Supply | 4 x AA batteries (not included) or AC adapter (not included, 5V DC) |
| Frequency Range | AM: 530-1710 kHz, FM: 88-108 MHz |
| Tuning Method | Analog/Manual dial |
| Speaker | Built-in mono speaker, 3W output |
| Audio Output | 3.5 mm headphone jack |
| Additional Features | Antenna (telescopic for FM), carrying handle, volume and tuning knobs |
| Maintenance | Clean with a soft dry cloth. Do not use liquids or harsh chemicals. |
| Safety Precautions | Do not expose to water or extreme temperatures. Do not disassemble. Keep away from children. |
| Spare Parts / Repairability | Batteries, antenna. Contact Steren service for repairs. |
| General Information | Language support: Manual available in English and Spanish. User rating: 9.0/10. |
Frequently Asked Questions - RAD-501 Steren
User questions about RAD-501 Steren
0 question about this device. Answer the ones you know or ask your own.
Ask a new question about this device
Download the instructions for your Radio in PDF format for free! Find your manual RAD-501 - Steren and take your electronic device back in hand. On this page are published all the documents necessary for the use of your device. RAD-501 by Steren.
USER MANUAL RAD-501 Steren
natural_image
Close-up of a black USB connector with two metallic pins, coiled together (no text or symbols visible)
IMPORTANTE
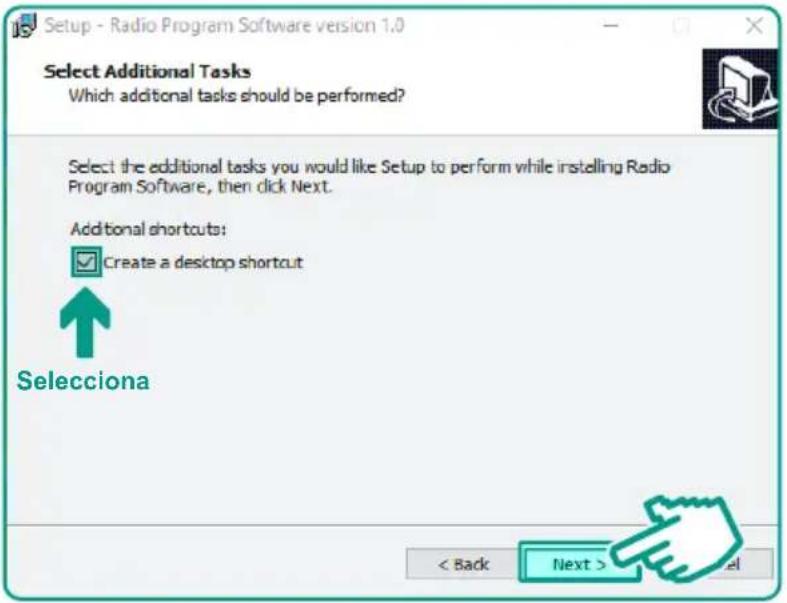
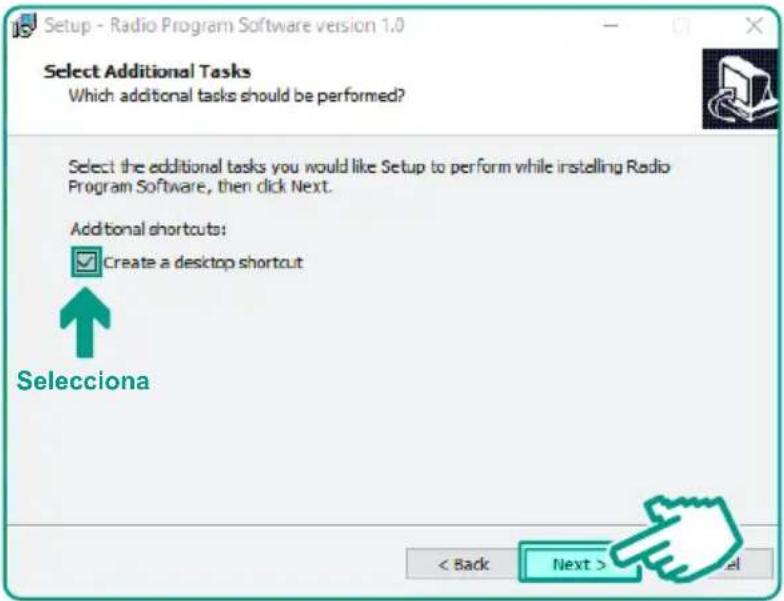
4 Selecciona la casilla Create a desktop shortcut.
5 Da clic en Next.
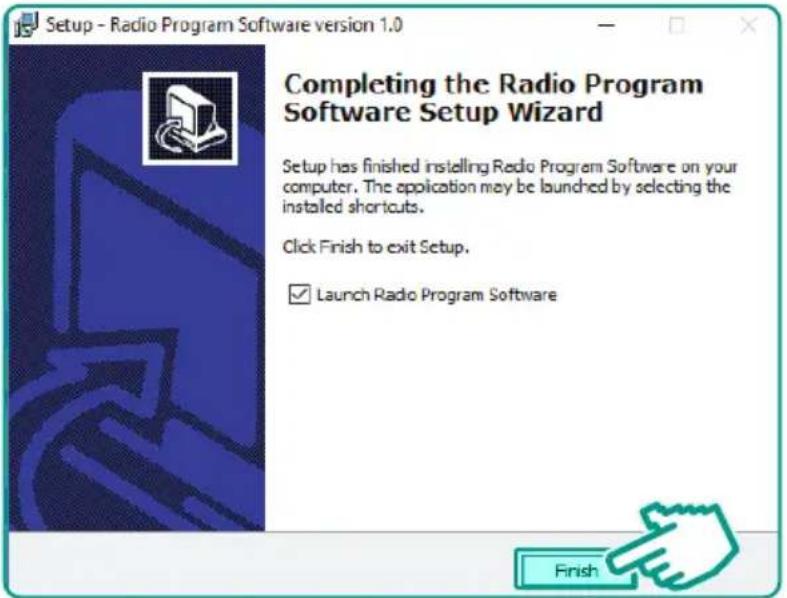
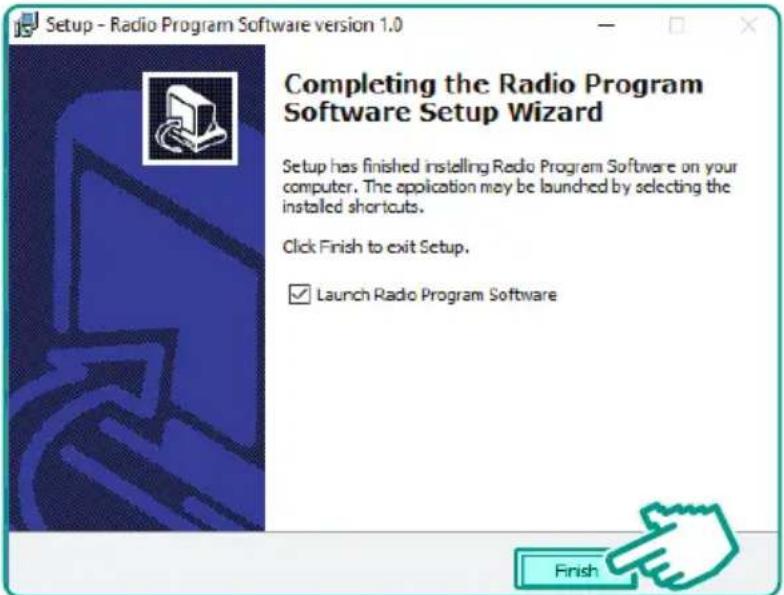
7 Da clic en Finish.
STEREN PRODUCTO EMPACADO S.A. DE C.V.
Autopista México-Querétaro. Km 26.5 Sin número, Nave Industrial 3-A, Col. Lomas de Boulevares, Tlalnepantla de Baz, Estado de México, C.P. 54020, RFC: SPE-941215-H43
natural_image
Solid teal horizontal bar with no text or symbolsInstruction manual
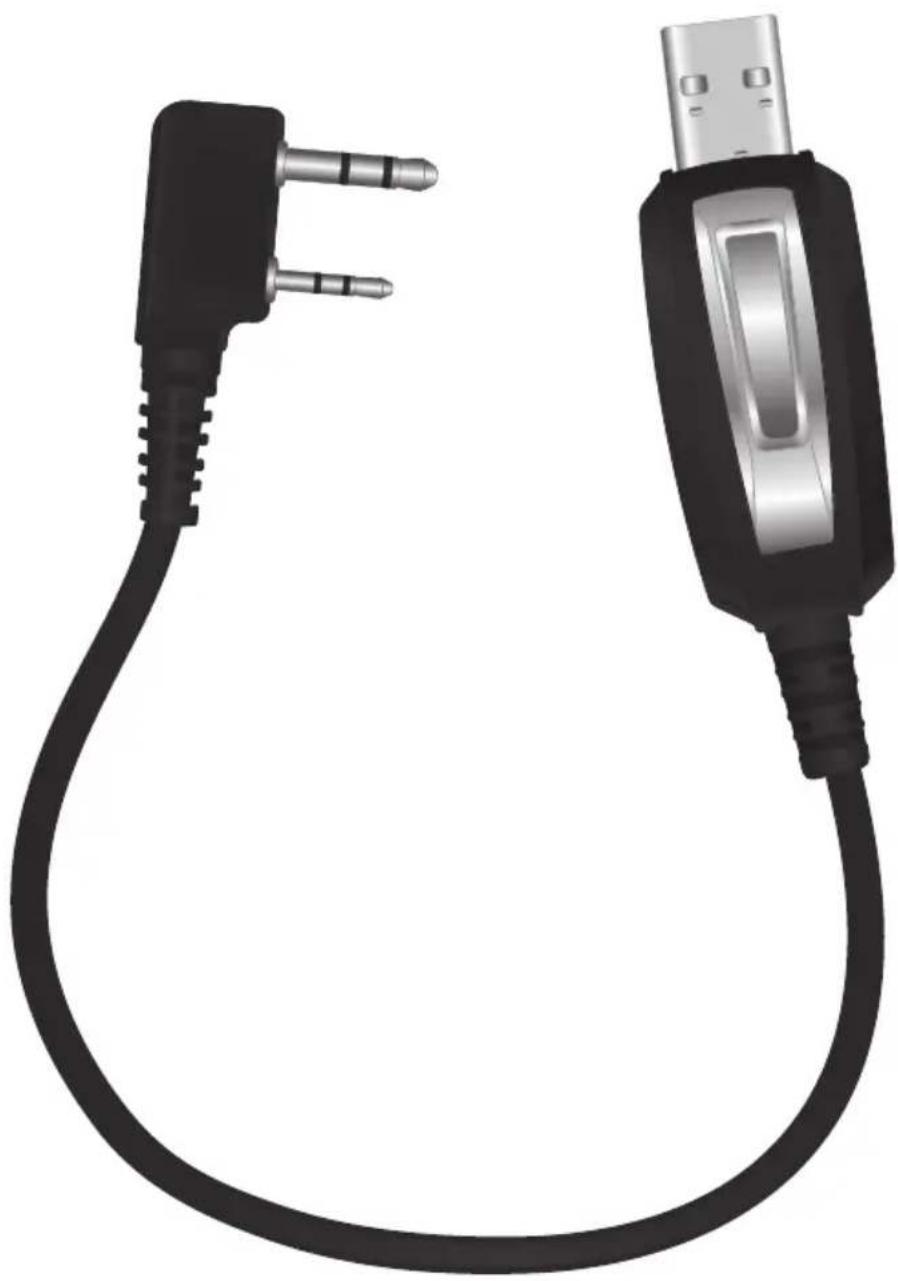
PROGRAMMING CABLE FOR RAD-010
natural_image
Close-up of a black USB connector with two metallic pins, coiled around it (no text or symbols visible)
IMPORTANT
Please read this instruction carefully to avoid any malfunction.
The information is presented only as a reference on the product;
Due to updates there may be differences. Check our website
www.steren.com for the most recent version of this manual.
CAUTIONS
- This device is not intended for use by persons (including children) whose physical, sensory or mental abilities are different or reduced, or who lack experience or knowledge.
• Children should be supervised to make sure they do not use the device as a toy. - Do not place heavy objects on the cable or its terminals.
- Do not use or store the cable in places where there are leaks, humidity or splashes.
- Clean it with a soft, dry cloth.
HOW TO INSTALL THE SOFTWARE
1 Download the software from the Steren page: www.steren.com
2 Run the Setup.exe app
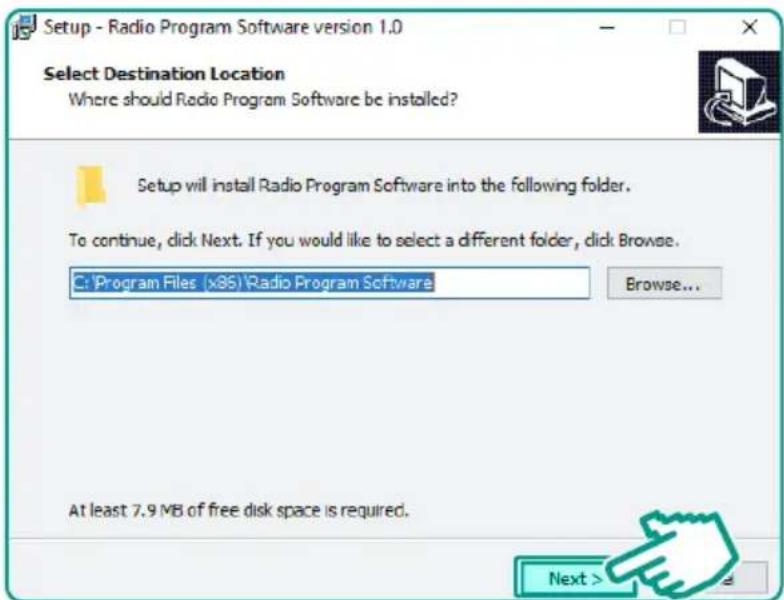
3 Click on Next.
4 Select the Create a desktop shortcut box.
5 Click on Next.
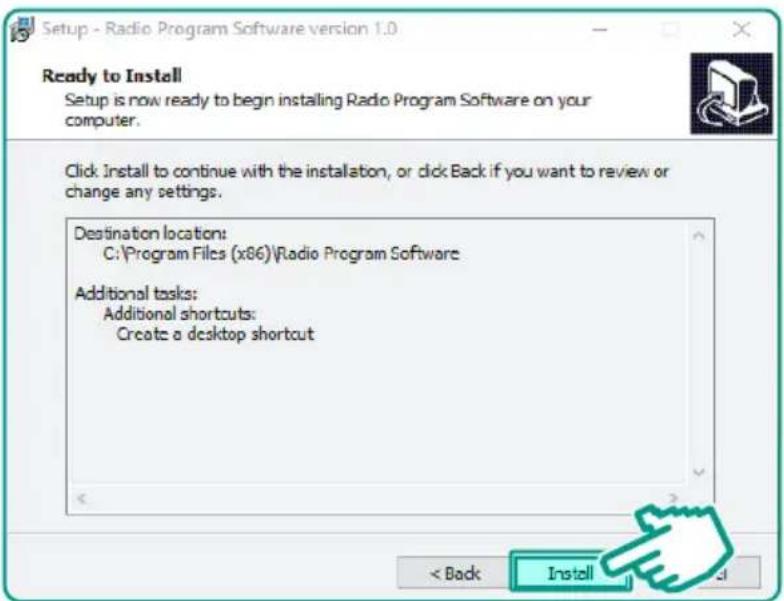
6 Click on Install and wait until the program is installed.
7 Click on Finish.
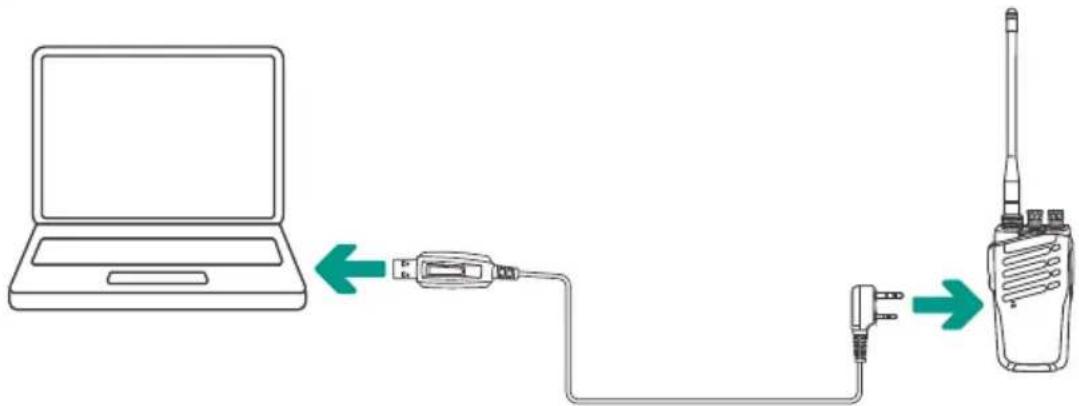
1 With the cable, connect the radio to your computer. Turn on the radio.
2 Find the program's shortcut and double-click to open it.
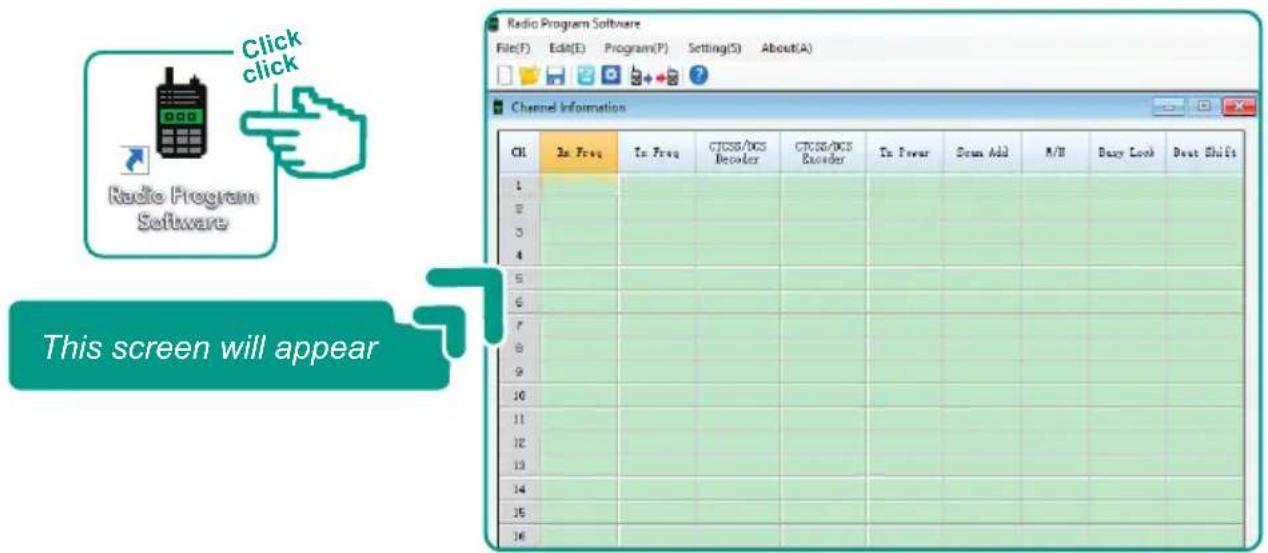
3 In the menu bar select Program (P), and then Read Data From Radio.
| CH. | Rx Freq | Tx Freq | CTCSS/DCS Decoder | CTCSS/DCS Encoder | Tx Power |
| 1 | |||||
| 2 | |||||
| 3 | |||||
| 4 | |||||
| 5 | |||||
| 6 | |||||
| 7 | |||||
| 8 |
4 Click on Start (S).
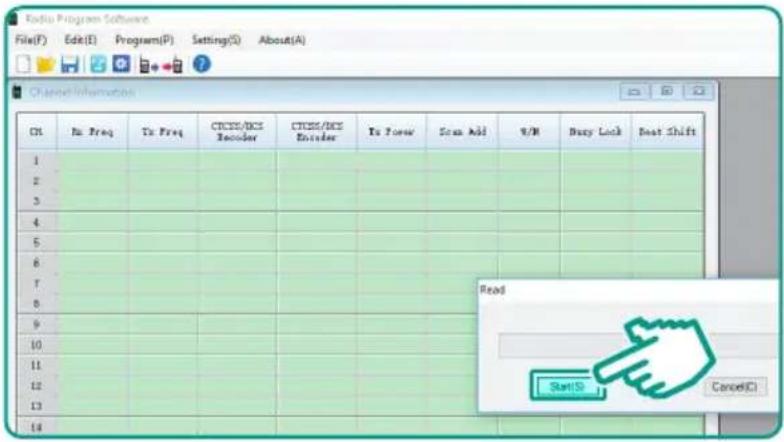
5 Wait until the status bar is full.
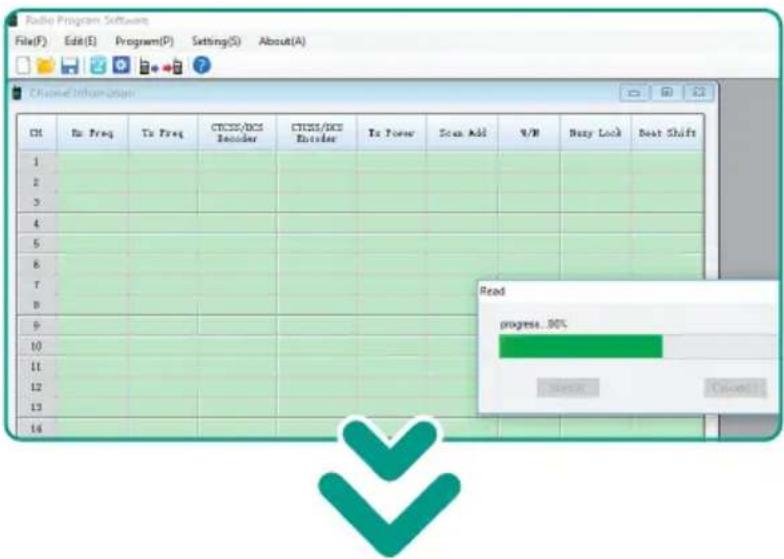
You will see the following screen with the frequencies of each channel
| CE | Tx Freq | Tx Freq | CTCSS/DCS Encoder | CTCSS/DCS Encoder | Tx Power | Scan Add | V/M | Duty Look | Beat Shift |
| 1 | 435.12500 | 435.12500 | OFF | OFF | High | Xo | V | Xo | Yes |
| 2 | 435.22500 | 435.22500 | OFF | OFF | High | Xo | V | Xo | Yes |
| 3 | 435.32500 | 435.32500 | OFF | OFF | High | Xo | V | Xo | Yes |
| 4 | 435.42500 | 435.42500 | 10318 | 10018 | High | Xo | V | Xo | Yes |
| 5 | 435.62500 | 435.62500 | 10238 | 10028 | High | Xo | V | Xo | Yes |
| 6 | 435.62500 | 435.62500 | 10028 | 10028 | High | Xo | V | Xo | Yes |
| 7 | 435.72500 | 435.72500 | 10718 | 10718 | High | Xo | V | Xo | Yes |
| 8 | 435.82500 | 435.82500 | 10728 | 10728 | High | Xo | V | Xo | Yes |
| 9 | 435.92500 | 435.92500 | 10748 | 10748 | High | Xo | V | Xo | Yes |
| 10 | 436.02500 | 436.02500 | 61.0 | 61.0 | High | Xo | V | Xo | Yes |
| 11 | 436.12500 | 436.12500 | 69.3 | 69.3 | High | Xo | V | Xo | Yes |
| 12 | 436.22500 | 436.22500 | 71.9 | 71.9 | High | Xo | V | Xo | Yes |
| 13 | 436.32500 | 436.32500 | 74.4 | 74.4 | High | Xo | V | Xo | Yes |
| 14 | 436.42500 | 436.42500 | 79.7 | 79.7 | High | Xo | V | Xo | Yes |
| 15 | 436.62500 | 436.62500 | 100.0 | 100.0 | High | Xo | V | Xo | Yes |
6 In the Rx Freq, select the frequency of the channel (CH.) That you want to modify. then, write the new frequency. Make sure it is in the range of 400 - 470 MHz and that it does not repeat on any of the other channels.
| CHL | Rx Preq | In Preq | CROSS/DCS Decoder | CROSS/DCS Encoder | Tx Power | Scan Add | R/S |
| 1 | 435.10200 | 135.170 | OPF | OPF | High | No | V |
| 2 | 435.22500 | OPF | OPF | High | No | V | |
| 3 | 435.32500 | OPF | OPF | High | No | V | |
| 4 | 435.42500 | 435. | DO3LR | DO3LR | High | No | V |
| 6 | 435.62500 | 435.62500 | DO2SR | DO2SR | High | No | V |
| 6 | 435.62500 | 435.62500 | DO6SR | DO6SR | High | No | V |
| 7 | 435.72500 | 435.72500 | DO7LR | DO7LR | High | No | V |
| 8 | 435.82500 | 435.82500 | DO7SR | DO7SR | High | No | V |
| 9 | 435.92500 | 435.92500 | DO7AR | DO7AR | High | No | V |
7 In the Tx Freq, select the frequency of the channel (CH.) that you want to modify. Write the same frequency you placed earlier.
| CH. | Bus Freq | Tx Freq | CTCSS/DCS Decoder | CTCSS/DCS Encoder | Tx Power | Scan Add | V/H |
| 1 | 435.10500 | 435.10500 | OFF | High | No | V | |
| 2 | 435.22500 | 435.22500 | OFF | High | No | V | |
| 3 | 435.32500 | 435.32500 | OFF | High | No | V | |
| 4 | 435.42500 | 435.42500 | DOSLA | DOSLR | High | No | V |
| 5 | 435.52500 | 435.52500 | DOSLR | DOSLR | High | No | V |
| 6 | 435.62500 | 435.62500 | DOSLR | DOSLR | High | No | V |
| 7 | 435.72500 | 435.72500 | DO7LR | DO7LR | High | No | V |
| 8 | 435.82500 | 435.82500 | DO7LR | DO7LR | High | No | V |
| 9 | 435.92500 | 435.92500 | DO7LR | DO7LR | High | No | V |
8 In the menu bar select Program (P) and then Write Data To Radio.
| CH | Bit Preq | 7x Preq | CICSS/DCS Decoder | CICSS/DCS Decoder | 7x Power | Scan Add | V/H |
| 1 | 435.10500 | 435.10500 | OFF | OFF | High | No | R |
| 2 | 435.22500 | 435.22500 | OFF | OFF | High | No | R |
| 3 | 435.32500 | 435.32500 | OFF | OFF | High | No | R |
| 4 | 435.42500 | 435.42500 | 1031H | 1031H | High | No | R |
| 5 | 435.62500 | 435.62500 | 1023H | 1023H | High | No | R |
| 6 | 435.62500 | 435.62500 | 1085H | 1085H | High | No | R |
| 7 | 435.72500 | 435.72500 | 1071H | 1071H | High | No | R |
| 8 | 435.62500 | 435.62500 | 1072H | 1072H | High | No | R |
| 9 | 435.92500 | 435.92500 | 1074H | 1074H | High | No | R |
9 Click on Start (S).
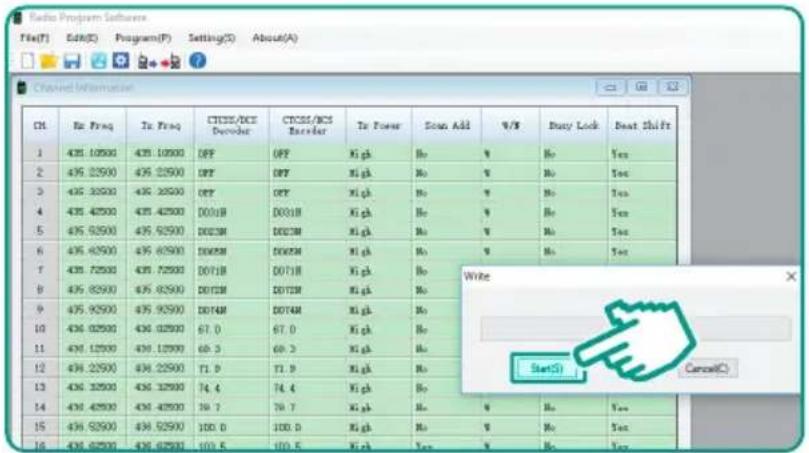
10 Wait until the status bar is full. At the top of the bar the message Success!
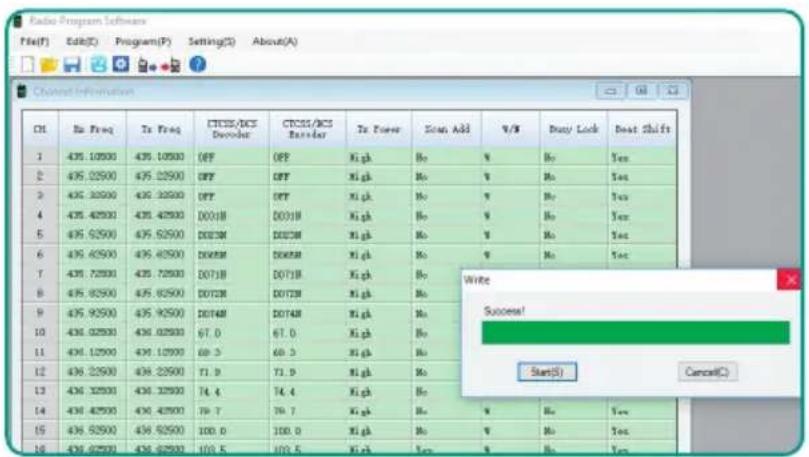
11 Close the program and disconnect the radio.
12 Repeat the programming procedure, in the second radio.
IMPORTED BY:
ELECTRÓNICA STEREN S.A. DE C.V.
STEREN PRODUCTO EMPACADO S.A. DE C.V.
Autopista México-Querétaro. Km 26.5 Sin número, Nave Industrial 3-A, Col. Lomas de Boulevares, Tlalnepantla de Baz, Estado de México, C.P. 54020, RFC: SPE-941215-H43
In case your product fails or have questions, please contact your nearest dealer. If you are in Mexico, please call to our Call Center.
Call Center
01 800 500 9000

www.steren.com

Brand : Steren
Model : RAD-501
Category : Radio