
Hideaway HS8 - Subwoofer KICKER - Free user manual and instructions
Find the device manual for free Hideaway HS8 KICKER in PDF.


| Product Type | Active subwoofer (Amplified subwoofer) |
| Brand | KICKER |
| Model | Hideaway HS8 |
| Speaker diameter | 8 inches (20 cm) |
| Frequency response | 25 Hz – 120 Hz (±1 dB) |
| Low-pass filter | Variable 50–120 Hz, 12 dB/octave |
| High-pass filter | 25 Hz, 24 dB/octave |
| Phase inversion | 0° / 180° (switch) |
| Bass Boost | Variable 0–6 dB at 40 Hz |
| Low-level input sensitivity | 125 mV – 5 V |
| High-level input sensitivity | 250 mV – 10 V |
| Supply voltage | 10 V – 16 V DC |
| Fuse | 10 A (x2) |
| Power-on modes | +12V (remote) or DC Offset (DC offset detection) |
| Remote control | Wired bass level control included |
| Audio inputs | High level (quick-connect terminal) and low level (RCA) |
| Installation | Mounting with supplied straps and brackets; ventilation clearance ≥10 cm |
| Included accessories | Mounting straps, screws, remote control, quick-connect harness |
| Safety | Avoid drilling into fuel tank, brakes, cables; use appropriate fuses |
Frequently Asked Questions - Hideaway HS8 KICKER
User questions about Hideaway HS8 KICKER
0 question about this device. Answer the ones you know or ask your own.
Ask a new question about this device
Download the instructions for your Subwoofer in PDF format for free! Find your manual Hideaway HS8 - KICKER and take your electronic device back in hand. On this page are published all the documents necessary for the use of your device. Hideaway HS8 by KICKER.
USER MANUAL Hideaway HS8 KICKER
Powered Subwoofer Enclosure
Hideaway™
Owner's Manual | English
Hideaway. POWERED SUBWOOFER ENCLOSURE Owner's Manual
MODEL: HS8
Authorized KICKER Dealer:
Purchase Date:
Model Number:
Serial Number:
The ultra-compact KICKER Hideaway™ Enclosure offers the quickest and easiest way to add a subwoofer to your vehicle, providing signature KICKER bass in an unprecedentedly small enclosure. This system has been meticulously fine-tuned by KICKER engineers to deliver astounding performance and sound without the time-consuming setup required for a typical amp-sub upgrade.
Model: HS8
Subwoofer | inches [cm] 8" [20]
RMS power @14.4V | ≤ 1% THD+N [10% THD+N] 125W [150W]
Frequency Response 25Hz–120Hz
Crossover 12dB/octave Lowpass 50–120Hz;
24dB/octave Highpass @ 25Hz
Phase Switch 0° / 180°
Input Sensitivity Low Level: 125mV-5V
High Level: 250mV–10V
KickEQ bass boost Variable to +6dB @ 40Hz
Remote bass Included
Net weight | lbs. [kg] 11.4 [5.2]
Height | inches [mm] 3 1/8" [79]
Width | inches [mm] 9 3/8" [238]
Depth | inches [mm] 13 7/8" [352]
INSTALLATION
Mounting: Choose a structurally sound location to mount your KICKER powered subwoofer enclosure. Carefully check the areas where the mounting straps will be placed. Make sure the mounting screws will not puncture the gas tank/brake lines/wiring or interfere with any mechanical parts on the underside of the mounting surface. Choose a location that allows at least 4" (10cm) of open ventilation for the amplifier. If possible, mount the enclosure in the climate-controlled passenger compartment.
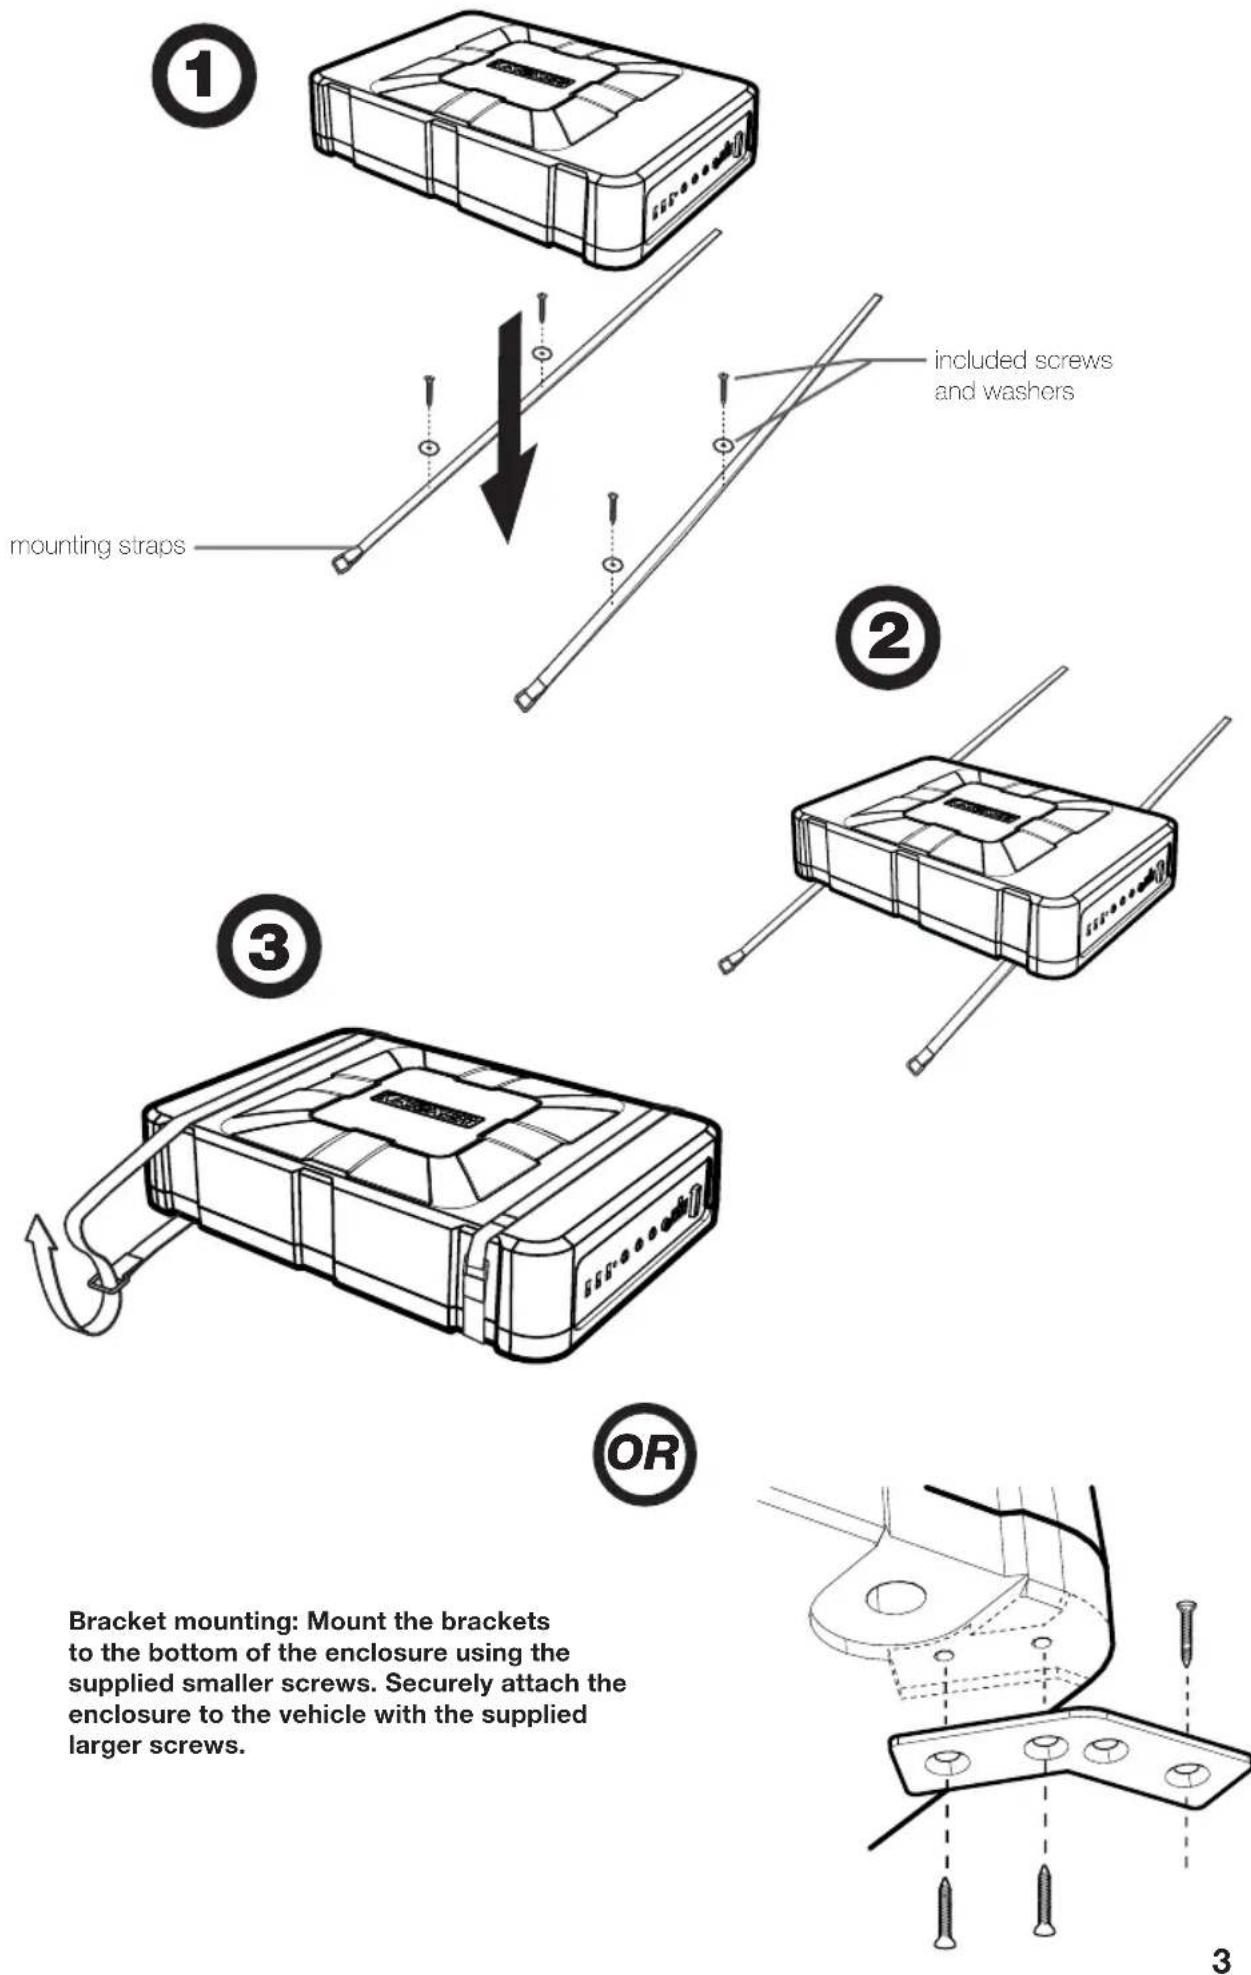
Bracket mounting: Mount the brackets to the bottom of the enclosure using the supplied smaller screws. Securely attach the enclosure to the vehicle with the supplied larger screws.
Wiring:
![Hideaway. AUTO TURN ON INPUT LEVEL PHASE BASSE BOOST X-OVER FREQ DAIN REMOTE BASS 11NS8 10M KICKER. +12V -12P AC L2 R2 R3 A2 B4 C5 D6 E7 F8 G9 H10 ≤ 24" [60cm] quick-connect harness bare metal chassis ground 15A fuse ≤18" [45cm] from positive battery terminal KICKER ZISL (sold separately) remote turn-on see next page battery bare metal chassis ground](/content/2026/05/949627/images/f84e505514002f3791b666842de1c16bb5f6c77a78b94ca78e6a944d739d66a9.jpg)
Observe the polarity of input connections to avoid signal loss.
Use the KICKER ZISL for source units with RCA outputs or splice the quick-connect harness leads directly to your source unit's speaker-level outputs.
quick-connect harness audio inputs:
| White Left + | |
| White/Black Left - | |
| Grey Right + | |
| Grey/Black Right - | |
4
Hideaway™
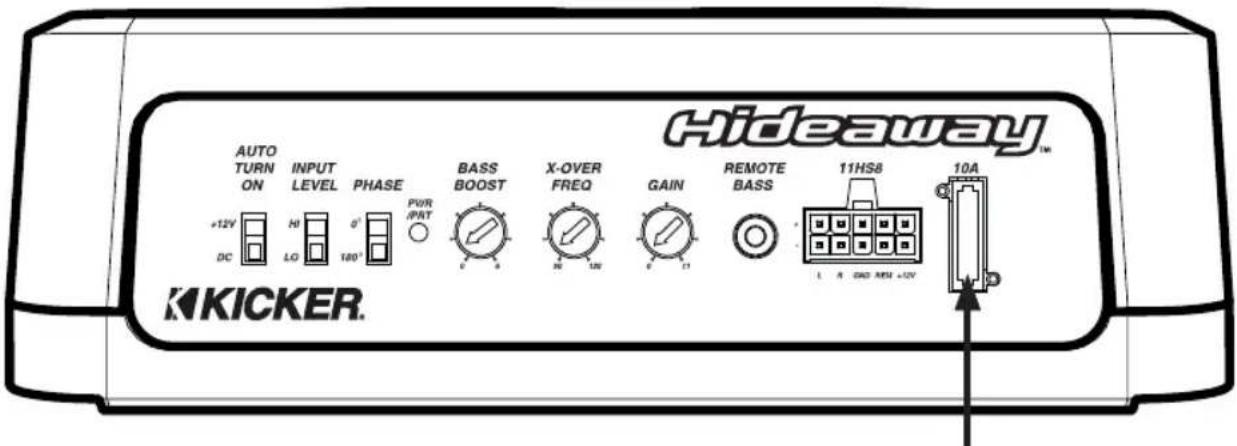
Fuse 10 Amperes
Automatic Turn-On Selection: KICKER powered enclosures offer two different automatic turn-on modes that can be selected on the side panel; +12V and DC Offset. Using the DC Offset mode causes the REM terminal to have +12V out for turning on additional amplifiers.
- Remote Turn-On: Set the switch to +12V to use the remote turn-on lead from your source unit. Run 18 gauge wire from the Remote Turn-On Lead on your source unit to the terminal labeled REM on the quick-connect power harness. This is the preferred automatic turn-on method.
- DC Offset Turn-On: If Remote Turn-On is not an option, the next best setting is DC Offset. The DC Offset mode detects a DC offset from the HI-Level speaker outputs when the source unit has been turned on.
Phase Switch: The phase switch lets you invert the phase of the signal played through your powered subwoofer. This is useful if the speakers in your system are out of phase with the subwoofer. Toggle this switch to find the position that gives you the best bass response.
Input Level: The inputs on KICKER powered enclosures are capable of receiving either Hi (speaker-level) or Low-level (RCA) signals from your source unit. Set the Input Level switch on the side panel to match the outputs of your source unit.
Crossover Control: The variable crossover on the side panel allows you to adjust the crossover frequency from 50–120Hz. The setting for this control is subjective; 80Hz is a good place to start.
Input Gain Control: The input gain control is not a volume control. It matches the output of the source unit to the input level of the powered enclosure's amplifier. Turn the source unit up to about 3/4 volume (if the source unit goes to 30, turn it to 25). Next, slowly turn the gain on the powered enclosure up (clockwise) until you can hear audible distortion, then turn it down a little.
Bass Boost Control: The variable bass boost control on the side panel is designed to give you increased output (0–6dB) at 40 Hz. The setting for this control is subjective. If you turn it up, you must readjust the input gain control to avoid clipping the powered enclosure's amplifier.
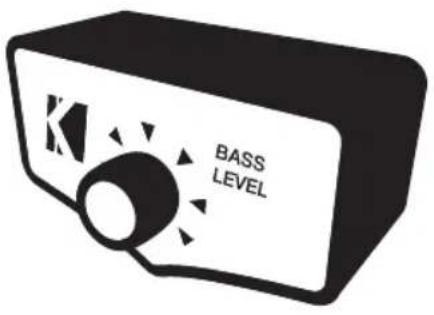
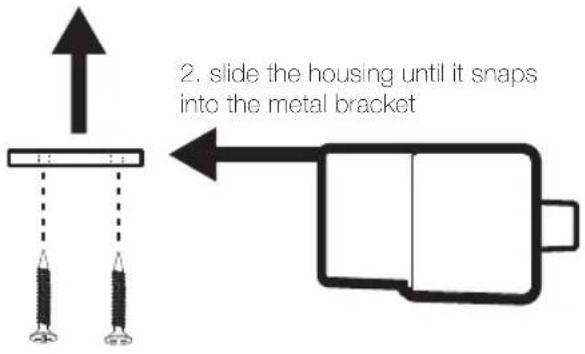
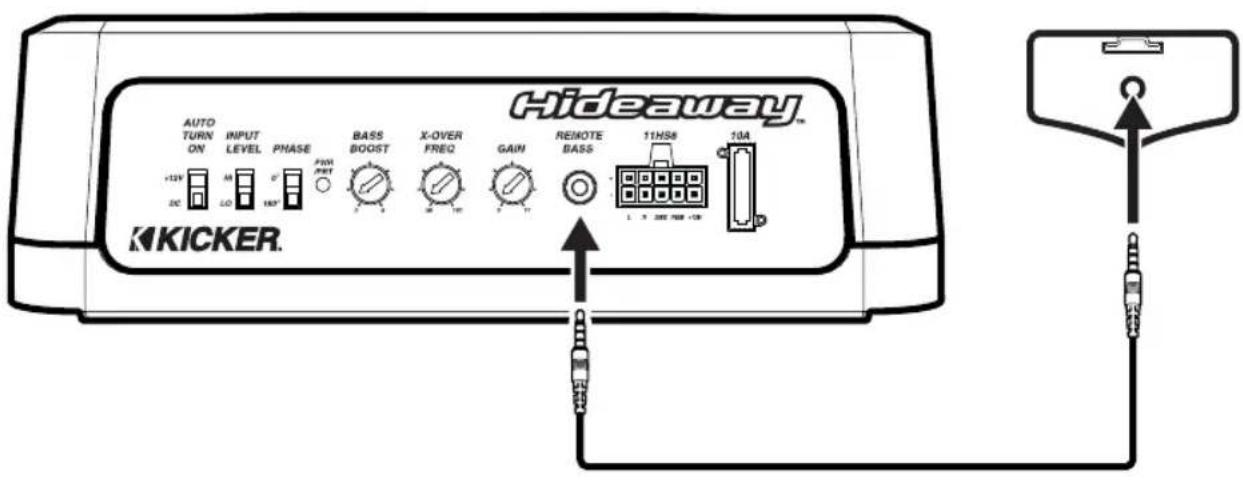
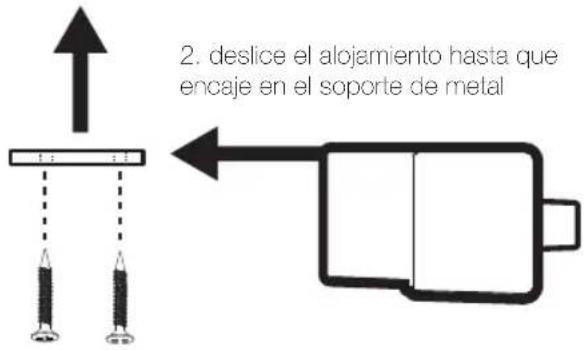
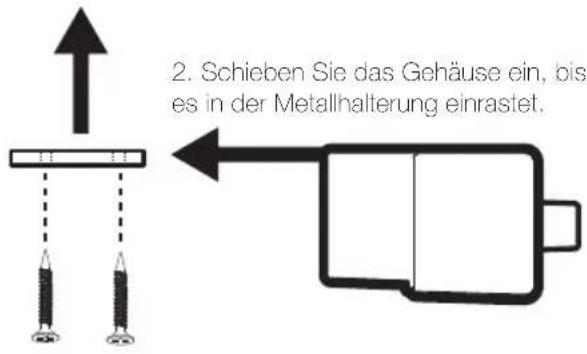
Remote Bass Control: With the included remote bass control, you have the ability to control the output level of your powered enclosure remotely. When plugged into the enclosure, the remote bass control bypasses and takes the place of the gain control on the side panel. To mount the remote bass level control, simply screw the metal bracket to the chosen location, then slide the housing onto the bracket until it snaps into place. Run the cable from the controller to the "Remote Bass" jack on your powered enclosure's side panel.
DO NOT disconnect the remote bass control when the amplifi er is on!
REMOTE BASS CONTROL INSTALLATION
- mount the metal bracket
TROUBLESHOOTING
If your amplifier does not appear to be working, check the obvious things first such as blown fuses, poor or incorrect wiring connections, incorrect setting of crossover and gain controls, etc. There is a dual-stage PWR/PRT LED on side panel of your powered enclosure denoting the power state of the amplifier. When the LED is blue, this indicates the powered enclosure is turned on and its amplifier is functioning properly.
PWR/PRT LED off, no output? With a Volt Ohm Meter (VOM) check the following: ① +12 volt power terminal (should read +12V to +16V) ② Remote turn-on terminal (should read +12V to +16V) ③ Check for reversed power and ground connections. ④ Ground terminal, for proper conductivity. ⑤ Check for blown fuses.
⑥ Check the AUTO TURN-ON switch setting. Check for a DC offset between a speaker lead and ground if using DC-OFFSET mode.
PWR/PRT LED blue, no output? Check the following: ① audio input connections ② Substitute source unit with a "known" good source unit. ③ Check for a signal in the audio cable feeding the powered enclosure with the VOM meter set to measure "AC" voltage.
PWR/PRT LED red, no output? ① Amplifi er shuts down only while vehicle is running = voltage protection circuitry is engaged. Voltage to the amplifi er is not within the 10–16 volt operating range. Have the vehicle's charging and electrical system inspected. ② A red PWR/PRT LED may also indicate low battery voltage. Check all the connections in your vehicle's charging system. It may be necessary to replace or charge your vehicle's battery or replace your vehicle's alternator.
No or low output? ① Check the balance control on source unit ② Check the amplifier input connections. ③ Check the polarity of the input signal connections.
Alternator noise-whining sound with engine's RPM? ① Check for damaged RCA (or speaker input) cable ② Check the routing of RCA (or speaker input) cable through your vehicle—move it away from power cables. ③ Check the source unit for proper grounding ④ Check the gain settings and turn them down if they are set too high ⑤ Check ground wire connections and make sure they are tightly connected.
Reduced bass response? Flip the phase switch to the opposite position; if the bass improves, your speakers were out of phase with the subwoofer.
Ground Noise? KICKER amplifiers are engineered to be fully compatible with all manufacturers' head units. Some head units may require additional grounding to prevent noise from entering the audio signal. If you are experiencing this problem with your head unit, in most cases running a ground wire from the RCA outputs on the head unit to the chassis will remedy this issue. If you still have problems, run your input signal at speaker-level from your source unit to the amplifier.
CAUTION: When jump starting the vehicle, be sure that connections made with jumper cables are correct. Improper connections can result in blown amplifier fuses as well as the failure of other critical systems in the vehicle.
If you have more questions about the installation or operation of your new KICKER product, see the Authorized KICKER Dealer where you made your purchase. For more advice on installation, click on the SUPPORT section on the KICKER homepage, www.kicker.com. Please E-mail support@kicker.com or call Technical Services (405) 624-8583 for unanswered or specific questions.
MODELO: HS8
Subwoofer | zol [cm] 8 [20]
RMS-Leistung @ 14,4V | ≤ 1% THD+N [≤ 10% THD+N] 125W (150W)
Frequenzgang ± 1dB 25Hz–120Hz
Crossover 12dB/oktave Tiefpass 50–120Hz;
24dB/oktave Hochpass @ 25Hz
KickEQ Bass Boost Variabel +6dB @ 40Hz
Remote bass Inbegriffen
Nettogewicht | lbs, [kg] 11,4 [5,2]
Höhe | zoll [mm] 3 1/8" [79]
Breite | zoll [mm]
9 3/8" [238]
Tiefe | zoll [mm]
13 7/8" [352]
INSTALLATION
Puissance Efficace @ 14.4V | ≤ 1% THD+N [≤ 10% THD+N] 125W [150W]
Poids net | lbs. [kg] 11,4 [5,2]
Hauteur | pouces [mm] 3 1/8" [79]
Largeur | pouces [mm] 9 3/8" [238]
Profondeur | pouces [mm] 13 7/8" [352]
INSTALLATION
KICKER warrants this product to be free from defects in material and workmanship under normal use for a period of THREE (3) MONTHS from date of original purchase with receipt. When purchased from an Authorized KICKER Dealer it is warranted for ONE (1) YEAR from date of original purchase with receipt. In all cases you must have the original receipt. Should service be necessary under this warranty for any reason due to manufacturing defect or malfunction during the warranty period, KICKER will repair or replace (at its discretion) the defective merchandise with equivalent merchandise at no charge. Warranty replacements may have cosmetic scratches and blemishes. Discontinued products may be replaced with more current equivalent products. This warranty is valid only for the original purchaser and is not extended to owners of the product subsequent to the original purchaser. Any applicable implied warranties are limited in duration to a period of the express warranty as provided herein beginning with the date of the original purchase at retail, and no warranties, whether express or implied, shall apply to this product thereafter. Some states do not allow limitations on implied warranties; therefore these exclusions may not apply to you. This warranty gives you specific legal rights; however you may have other rights that vary from state to state.
WHAT TO DO IF YOU NEED WARRANTY OR SERVICE:
Defective merchandise should be returned to your local Authorized Stillwater Designs (KICKER) Dealer for warranty service. Assistance in locating an Authorized Dealer can be found at www.kicker.com or by contacting Stillwater Designs directly. You can confirm that a dealer is authorized by asking to see a current authorized dealer window decal.
If it becomes necessary for you to return defective merchandise directly to Stillwater Designs (KICKER), call the KICKER Customer Service Department at (405) 624-8510 for a Return Merchandise Authorization (RMA) number. Package only the defective items in a package that will prevent shipping damage, and return to:
Stillwater Designs, 3100 North Husband St, Stillwater, OK 74075
The RMA number must be clearly marked on the outside of the package. Please return only defective components. The return of functioning items increases your return freight charges. Non-defective items will be returned freightcollect to you. For example, if a subwoofer is defective, only return the defective subwoofer, not the entire enclosure. Include a copy of the original receipt with the purchase date clearly visible, and a "proof-of-purchase" statement listing the Customer's name, Dealer's name and invoice number, and product purchased. Warranty expiration on items without proof-of-purchase will be determined from the type of sale and manufacturing date code. Freight must be prepaid; items sent freight-collect, or COD, will be refused.
WHAT IS NOT COVERED?
This warranty is valid only if the product is used for the purpose for which it was designed. It does not cover:
o Damage due to improper installation
o Subsequent damage to other components
o Damage caused by exposure to moisture, excessive heat, chemical cleaners, and/or UV radiation
o Damage through negligence, misuse, accident or abuse. Repeated returns for the same damage may be considered abuse
o Any cost or expense related to the removal or reinstallation of product
o Speakers damaged due to amplifier clipping or distortion
o Items previously repaired or modified by any unauthorized repair facility
o Return shipping on non-defective items
o Products with tampered or missing barcode labels
o Products returned without a Return Merchandise Authorization (RMA) number
o Freight Damage
o The cost of shipping product to KICKER
o Service performed by anyone other than KICKER
stillwaterdesigns
HOW LONG WILL IT TAKE?
KICKER strives to maintain a goal of one-week service for all acoustics (subwoofers, midrange drivers, tweeters, crossovers, etc) returns. Delays may be incurred if lack of replacement inventory or parts is encountered. Failure to follow these steps may void your warranty. Any questions can be directed to the KICKER Customer Service Department at (405) 624-8510. Contact your International KICKER dealer or distributor concerning specific procedures for your country's warranty policies.
Note: All specifications and performance figures are subject to change. Please visit www.kicker.com for the most current information.
P.O. Box 459 • Stillwater, Oklahoma 74076 • USA • (405) 624–8510
11HS8-M-20110526
INTERNATIONAL WARRANTY
Contact your International KICKER dealer or distributor concerning specific procedures for your country's warranty policies.
WARNING: KICKER products are capable of producing sound levels that can permanently damage your hearing! Turning up a system to a level that has audible distortion is more damaging to your ears than listening to an undistorted system at the same volume level. The threshold of pain is always an indicator that the sound level is too loud and may permanently damage your hearing. Please use common sense when controlling volume.
GARANTÍA INTERNACIONAL
Versión Español
©2010 Stillwater Designs
- Powered Subwoofer Enclosure
- Hideaway™
- Hideaway. POWERED SUBWOOFER ENCLOSURE Owner's Manual
- MODEL: HS8
- INSTALLATION
- Observe the polarity of input connections to avoid signal loss.
- REMOTE BASS CONTROL INSTALLATION
- TROUBLESHOOTING
- MODELO: HS8
- WHAT TO DO IF YOU NEED WARRANTY OR SERVICE:
- Stillwater Designs, 3100 North Husband St, Stillwater, OK 74075
- WHAT IS NOT COVERED?
- stillwaterdesigns
- HOW LONG WILL IT TAKE?
- INTERNATIONAL WARRANTY
- GARANTÍA INTERNACIONAL
- Versión Español
Brand : KICKER
Model : Hideaway HS8
Category : Subwoofer