
DV1230-BL - Radio Furrion - Free user manual and instructions
Find the device manual for free DV1230-BL Furrion in PDF.


| Brand | Furrion |
| Model | DV1230-BL |
| Product Type | Entertainment system with radio, DVD player, Bluetooth |
| Power Supply | 12 V DC |
| Total RMS Power | 4 x 25 W + 2 x 15 W |
| Dimensions (W x H x D) | 249 x 118 x 178 mm |
| Radio Frequency Ranges | FM: 87.5-107.9 MHz (US) / 87.5-108.0 MHz (EU/AUS); AM: 530-1710 kHz (US) / 522-1620 kHz (EU) / 522-1710 kHz (AUS) |
| Supported Disc Formats | DVD, VCD, CD, CD-R/RW, DVD-R/RW, MP3, WMA, JPEG, MP4 |
| Bluetooth | Version 4.0, range 2.4 GHz, profiles A2DP, AVRCP, NFC |
| Audio Inputs | Front AUX (3.5 mm), Rear AUX, HDMI IN, Optical, Coaxial, AV |
| Audio Outputs | HDMI with ARC, RCA audio/video, Subwoofer, Headphone, 3 speaker zones (ZONE 1, ZONE 2, ZONE 3) |
| USB Connectivity | Front USB port for playback and charging |
| Special Functions | Clock, alarm, equalizer settings (CINEMA, ROCK, CLASSIC, FLAT), parental control, automatic prescan (APS) |
| Safety | Class 1 Laser Product, compliant with FCC Part 15, button battery warning |
| Maintenance and Cleaning | Clean the casing with a soft, dry cloth; disc: wipe radially from center outward |
| Warranty | 1 year from the date of purchase by the end user |
| Included Accessories | Remote control, harness (200 mm), RCA audio adapter cable (1.5 m), flying label, printed documents |
Frequently Asked Questions - DV1230-BL Furrion
User questions about DV1230-BL Furrion
0 question about this device. Answer the ones you know or ask your own.
Ask a new question about this device
Download the instructions for your Radio in PDF format for free! Find your manual DV1230-BL - Furrion and take your electronic device back in hand. On this page are published all the documents necessary for the use of your device. DV1230-BL by Furrion.
USER MANUAL DV1230-BL Furrion
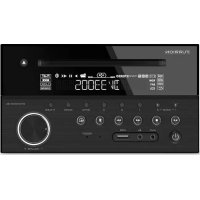
Product picture is for reference only.
Thank you and congratulations for purchasing the Furrion® DV1230 Entertainment System. Before operating your new product, please read these instructions carefully. This instruction manual contains information for safe use, installation and maintenance of the product. Please keep this instruction manual in a safe place for future reference. This will ensure safe use and reduce the risk of injury. Be sure to pass on this manual to new owners of this product.
The manufacturer does not accept responsibility for any damages due to not observing these instructions.
If you have any further questions regarding our products, please contact us at support@furrion.com
Contents
Welcome....1
Contents 2
Safety and Notice 3
Safety....3
Class 1 Laser Product....3
Notice of compliance 4
Introduction....5
What's in the box....5
Precautions 5
Features 5
Supported Format....6
Functional Overview 7
Control Panel 7
Remote Control 8
Before Operation 10
Wiring Diagram....10
View of Wiring Connecting Socket 10
Description of Wiring Connecting Cables....11
Prepare the Remote Control....14
Quick Reference Guide....15
Common Operation....18
Radio Operation 20
Basic Disc / USB Operation 21
Advanced Disc / USB Operation....22
Set up the DVD System Menu 25
Bluetooth Operation....30
App Operation 31
Maintenance 32
Maintenance and Cleaning of Discs 32
Troubleshooting....33
Specifications 35
Warranty....36
Safety and Notice
Safety

CAUTION
RISK OF ELECTRIC SHOCK DO NOT OPEN

WARNING: TO REDUCE THE RISK OF FIRE OR ELECTRIC SHOCK, DO NOT REMOVE COVER (OR BACK). NO USER SERVICEABLE PARTS INSIDE. REFER SERVICING TO QUALIFIED SERVICE PERSONNEL.
WARNING
TO REDUCE THE RISK OF FIRE OR ELECTRIC SHOCK, DO NOT EXPOSE THIS APPLIANCE TO RAIN OR MOISTURE.

The lightning flash with arrowhead symbol within an equilateral triangle is intended to alert the user
to the presence of uninsulated dangerous voltage within the product's enclosure that may be of sufficient magnitude to constitute a risk of electric shock.

The exclamation point within an equilateral triangle is intended to alert the user to the presence of
important operating and maintenance (servicing) instructions in the literature accompanying the appliance.
Class 1 Laser Product
Laser product symbol:
Located on the rear panel of the unit, this symbol indicates this unit is a class 1 laser
product that only uses weak laser and produces no hazardous radiation outside of the unit.

- Read through this instruction manual before installation and use.
-
Do not touch the power plug with wet hands.
-
Switch off the power when the unit is not in use. (Disconnect the power plug from the power outlet when you do not intend to use the unit for a prolonged period of time.) Before moving the unit, remove the disc from the unit/tray first.
- Do not open the cover or touch any of the components inside of the unit. Only a qualified technician should service the unit.
- To avoid damaging the unit, do not expose the unit to direct sunlight or objects that radiate heat.
- Do not place the unit in moist or humid conditions. Moisture will affect normal operation and damage the unit.
- Place the unit on a flat, well-ventilated location. Please ensure the ventilation holes are not covered to avoid overheating and malfunction.
- Clean the panel and case with a soft dry cloth only. Do not apply any kind of thinner, alcohol or sprays.
- The apparatus should not be exposed to dripping or splashing. Do not place objects filled with liquids (such as vases) on the apparatus.
WARNING
- Do not ingest the battery contained within the remote control supplied with the unit as this battery represents a chemical burn hazard.
- This product contains a coin/button cell battery.
- If the coin/button cell battery is swallowed, it can cause severe internal burns in just 2 hours and can lead to death.
- Keep new and used batteries away from children.
- If the battery compartment does not close securely, stop using the product and keep it away from children.
- If you think batteries might have been swallowed or placed inside any part of the body, seek immediate medical attention.
Safety and Notice
CAUTION
- Danger of explosion if battery is incorrectly replaced.
- Replace only with the same or equivalent battery type.
- The battery should not be exposed to excessive heat such as sunshine or fire.
Notice of compliance
The device complies with Part 15 of the FCC Rules. Operation is subject to the following two conditions:
- This device may not cause harmful interference, and
- This device must accept any interference received, including interference that may cause undesired operation.
FCC rules
This equipment has been tested and found to comply with the limits for a Class B digital device, pursuant to part 15 of the FCC Rules. These limits are designed to provide reasonable protection against harmful interference in a residential installation. This equipment generates, uses and can radiate radio frequency energy and, if not installed and used in accordance with the instruction manual, may cause harmful interference to radio communications.
However, there is no guarantee that interference will not occur in a particular installation. If this equipment does cause harmful interference to radio or television reception, which can be determined by turning the equipment off and on, the user is encouraged to try to correct the interference by one or more of the following measures:
- Relocate the receiving antenna.
- Increase the separation between equipment and receiver.
- Connect the equipment into an outlet on a circuit different from that to which the receiver is connected.
- Consult the dealer or an experienced radio/TV technician for help.
FCC Radiation Exposure Statement
This equipment complies with FCC radiation exposure limits set forth for an uncontrolled environment.
This transmitter must not be co-located or operating in conjunction with any other antenna or transmitter.
All registered and unregistered trademarks are property of their respective owners.
Changes or modifications not expressly approved by the party responsible for compliance could void the user's authority to operate the equipment.
Introduction
What's in the box
Thanks for purchasing the Furrion DV1230 Entertainment System. This manual will help you set up and begin using your product. Please read this manual thoroughly and keep this manual in a safe place for future reference.
First, check the contents of your box with the parts checklist below:
- Main set
- Remote control
- Harness (200mm)
• Audio RCA adapter cable (1.5m) - Hang tag
- Printed materials
Precautions
Connect this unit to a 12V DC negative ground battery system which is standard in North American and European vehicles.
Ensure when installing the unit, all wire ends which are not being used are terminated with an insulated end to avoid wires shorting or earthing which can lead to the risk of fire or electrical shock.
Avoid inserting foreign objects into the disc loading slot of the unit as this will cause malfunction.
Do not expose this unit to moisture or wet environments. If condensation is present on the screen, wait for 1 hour or more for the moisture to evaporate.
If the interior of the vehicle is extremely hot, do not use the unit until the vehicle's internal temperature has cooled down.
Do not use cleaning products on the front face of the unit. Only use a slightly damp cloth for cleaning.
Do not attempt to disassemble or adjust this unit. Contact a service center for assistance.
Features
• Digital AM / FM Tuner
• DVD/CD-R/RW/MP3/MP4/WMA Compatible
- Bluetooth with NFC function
• Auxiliary inputs on front and rear
• USB input with charging function
- 3 - zone multiroom independent audio output
• 1 x HDMI output with ARC function
- 1 x HDMI input
• 1 x RCA audio/video output for connecting additional TV
• 1 x RCA audio/video input
• 1 x coaxial audio input
• 1 x optical audio input
• 1 x subwoofer output
• 1 x headphone output
- Clock / alarm clock
Introduction
Supported Format
| Supported Video Format | |||||
| File Extension | Container | Video Codec Audio Codec Resolution Remark | |||
| .avi.divx | AVI | MPEG-4 Visual DivX 4.xx/5.xx/6.xx/3ivX XviD MPEG-1 | Dolby Digital (AC3)WMA/PCM/LPCM AAC-LC (2ch)MPEG-Audio (MP1/MP2/MP3) | 720 x 480 (30fps)720 x 576 (30fps) | |
| .mpg MPG | MPEG-1/MPEG-2 | Dolby Digital (AC3)LPCM MPEG-Audio (MP1/MP2/MP3) | 720 x 480 (30fps)720 x 576 (30fps) | ||
| .dat DAT | MPEG-1/MPEG-2 | Dolby Digital (AC3)LPCM MPEG-Audio (MP1/MP2/MP3) | 720 x 480 (30fps)720 x 576 (30fps) | ||
| .vob VOB | MPEG-1/MPEG-2 Dolby Digital (AC3) | 720 x 480 (30fps)720 x 576 (30fps) | |||
| .mp4 MP4 | MPEG-4 Visual | Dolby Digital (AC3)WMA/PCM/LPCM AAC-LC (2ch)MPEG-Audio (MP1/MP2/MP3) | 720 x 480 (30fps)720 x 576 (30fps) | ||
| Supported Audio Format | ||||
| File Extension Audio | Codec Bit Rate Sampling Rate Remark | |||
| .mp3 | MP3 | 16kbps - 320kbps | 8k - 48kHz | |
| .wma | WMA | 16kbps - 320kbps | 8k - 48kHz | Only WMA7/WMA8/WMA9(CBR/VBR)supported (only 353 format supported) |
Note: Compatibility with the above file formats is not guaranteed.
Functional Overview
Control Panel

①
Turn on the unit or switch to standby mode.
②
Eject the loaded disc.
③ ZONE 1/ZONE 2/ ZONE 3
Turn on or off the audio source in each of the different areas where your speakers are connected.
④ Number buttons (1 - 6)
Select and enter numbers.
1/MENU: Display the title list during DVD/VCD playback.
3/RDM: Select random playback mode.
4/RPT: Select repeat playback mode.
⑤ Disc slot
6 SELEQ
Select various system settings. Select a preset sound effect.
⑦ Source buttons
Select the corresponding sound source: DISC/USB, AM/FM, BT, or AUX.
⑧ NFC detection area
⑨ LCD screen
10 IR sensor for remote control
11 AUX socket
Connect to the 3.5mm audio output socket on an auxiliary device.
12 socket
Connect a headphone.
13 HDMI IN socket
Connect to the HDMI output socket on an AV device.
14
Enter alarm setting mode.
15 USB socket
Connect a USB storage device.
16 RESET
Reset the unit and load its factory default settings.
17 MIC
Built-in microphone.
18 / OK
Adjust brightness of the LCD screen. Confirm your selection.
19
Mute or un-mute the audio output.
20
Stop playback.
Functional Overview
21 VOLUME -/+ knob
Turn the knob clockwise / counterclockwise to increase / decrease volume.

Accept or make a call. (Press and hold) Reject or end a call.

Skip to the previous/next track. Fast backward/forward within a track. Tune to a radio station.

Start (resume) / pause playback.
Remote Control
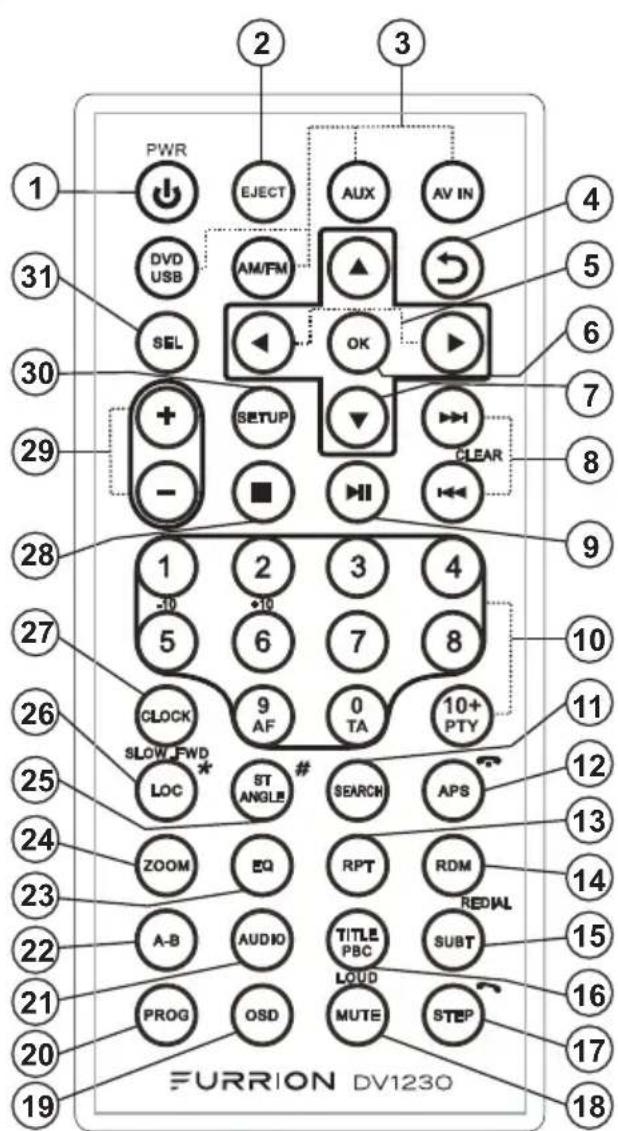
① PWR
Turn on the unit or switch to standby mode.
② EJECT
Eject the loaded disc.
③ Source buttons
Select the corresponding sound source: DVD/USB, AM/FM, AUX (ARC, F AUX, R AUX, AV, HDMI, COAXIAL, or OPTICAL), or AV IN.
④
Return to the previous menu.

Navigate left / right in a menu.
6 OK
Confirm your selection.

Navigate up / down in a menu.

Skip to the previous/next track. Fast backward / forward within a track. Tune to a radio station. ▶▶| (CLEAR): Clear a wrong input.
9
Start (resume) / pause playback.
⑩ Number buttons (0 - 9) and 10+
Select and enter numbers. 0/TA: (For Europe only) Enable / disable TA (Traffic Announcement) mode. 5/-10: Skip 10 tracks backward during MP3/WMA playback. 6/+10: Skip 10 tracks forward during MP3/WMA playback. 9/AF: (For Europe only) Enable / disable AF (Alternative Frequency) mode. 10+ / PTY: Input a number larger than 9. (For Europe only) Select a PTY (Program Type).
Functional Overview
11 SEARCH
Show or hide the search window during disc playback.
12 APS/
Start automatic programming of radio stations.
Scan preset radio stations.
Reject or end a call.
13 RPT
Select repeat playback mode.
14 RDM
Select random playback mode.
15 SUBT/REDIAL
Select the caption language during DVD playback (if available).
Redial the last dialed number.
16 TITLE/PBC
Display the title list during DVD/VCD playback.
Turn on / off PBC (Playback Control) of a disc (if available).
17 STEP/
Play a DVD/VCD frame by frame.
Accept or make a call.
18 MUTE/LOUD
Mute or un-mute the audio output.
Enable or disable the loudness effect.
19 OSD
Display the playback status.
20 PROG
Access or exit program playback.
21 AUDIO
Select a subtitle language (if available) during DVD playback.
Select a sound mode (MONO LEFT, MONO RIGHT, or STEREO) during VCD playback.
22 A-B
Play a specific segment in a chapter / track repeatedly.
23 EQ
Select a preset EQ sound effect.
24 ZOOM
During DVD/VCD playback, zoom in / out on images.
25 ST/ANGLE/#
In FM mode, switch between stereo and mono sound output.
During DVD playback, adjust the viewing angle (if available).
26 LOC/SLOW.FWD/\*
In radio mode, enable or disable local mode.
During disc playback, select a slow forward speed.
27 CLOCK
Enter clock setting mode.
Display the clock.
28
Stop playback.
29 +/-
Increase / decrease volume.
30 SETUP
Access or exit the DVD system menu.
31 SEL
Select various system settings.
Select a preset sound effect.
Before Operation
Wiring Diagram

View of Wiring Connecting Socket

Description of Wiring Connecting Cables
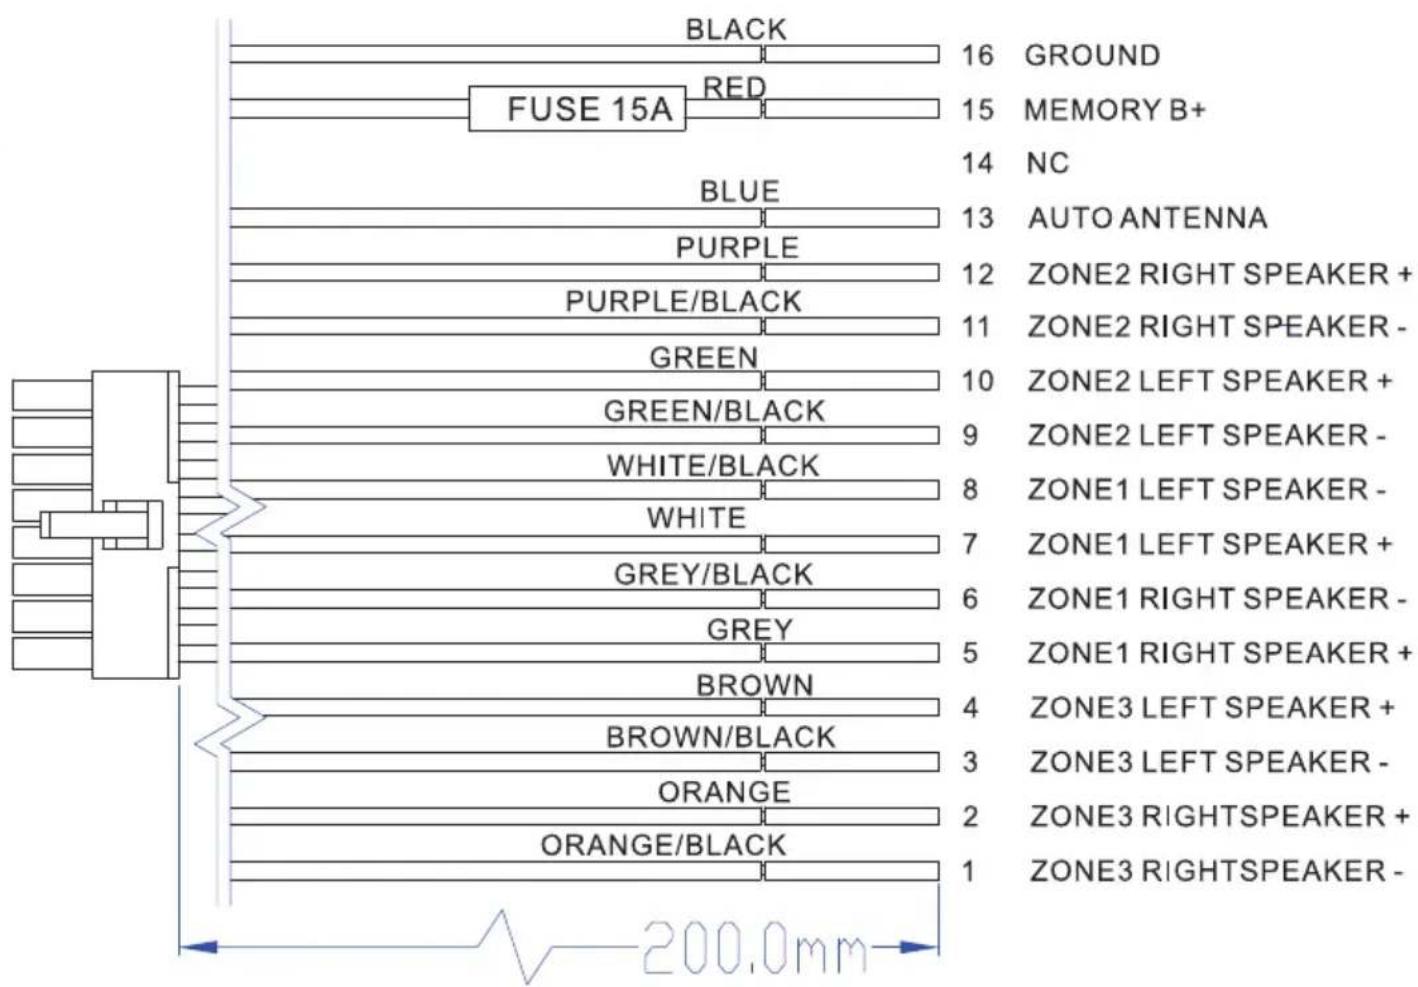
other
| Component | Label | | --------------------- | ---------------------- | | FUSE 15A | BLACK | | RED | RED | | BLUE | BLUE | | PURPLE | PURPLE | | GREEN | GREEN | | GREEN/BLACK | GREEN/BLACK | | WHITE/BLACK | WHITE | | GREY/BLACK | GREY | | BROWN | BROWN | | ORANGE | ORANGE | | ORANGE/BLACK | ORANGE/BLACK | | GROUND | GROUND | | MEMORY B+ | MEMORY B+ | | NC | NC | | AUTO ANTENNA | AUTO ANTENNA | | ZONE2 RIGHT SPEAKER + | ZONE2 RIGHT SPEAKER + | | ZONE2 RIGHT SPEAKER - | ZONE2 RIGHT SPEAKER - | | ZONE2 LEFT SPEAKER + | ZONE2 LEFT SPEAKER + | | ZONE2 LEFT SPEAKER - | ZONE2 LEFT SPEAKER - | | ZONE1 LEFT SPEAKER - | ZONE1 LEFT SPEAKER - | | ZONE1 LEFT SPEAKER + | ZONE1 LEFT SPEAKER + | | ZONE1 RIGHT SPEAKER - | ZONE1 RIGHT SPEAKER - | | ZONE1 RIGHT SPEAKER + | ZONE1 RIGHT SPEAKER + | | ZONE3 LEFT SPEAKER + | ZONE3 LEFT SPEAKER + | | ZONE3 LEFT SPEAKER - | ZONE3 LEFT SPEAKER - | | ZONE3 RIGHTSPEAKER + | ZONE3 RIGHTSPEAKER + | | ZONE3 RIGHTSPEAKER - | ZONE3 RIGHTSPEAKER - |Before Operation
WIRES FROM RV,BOAT OR TRUCK
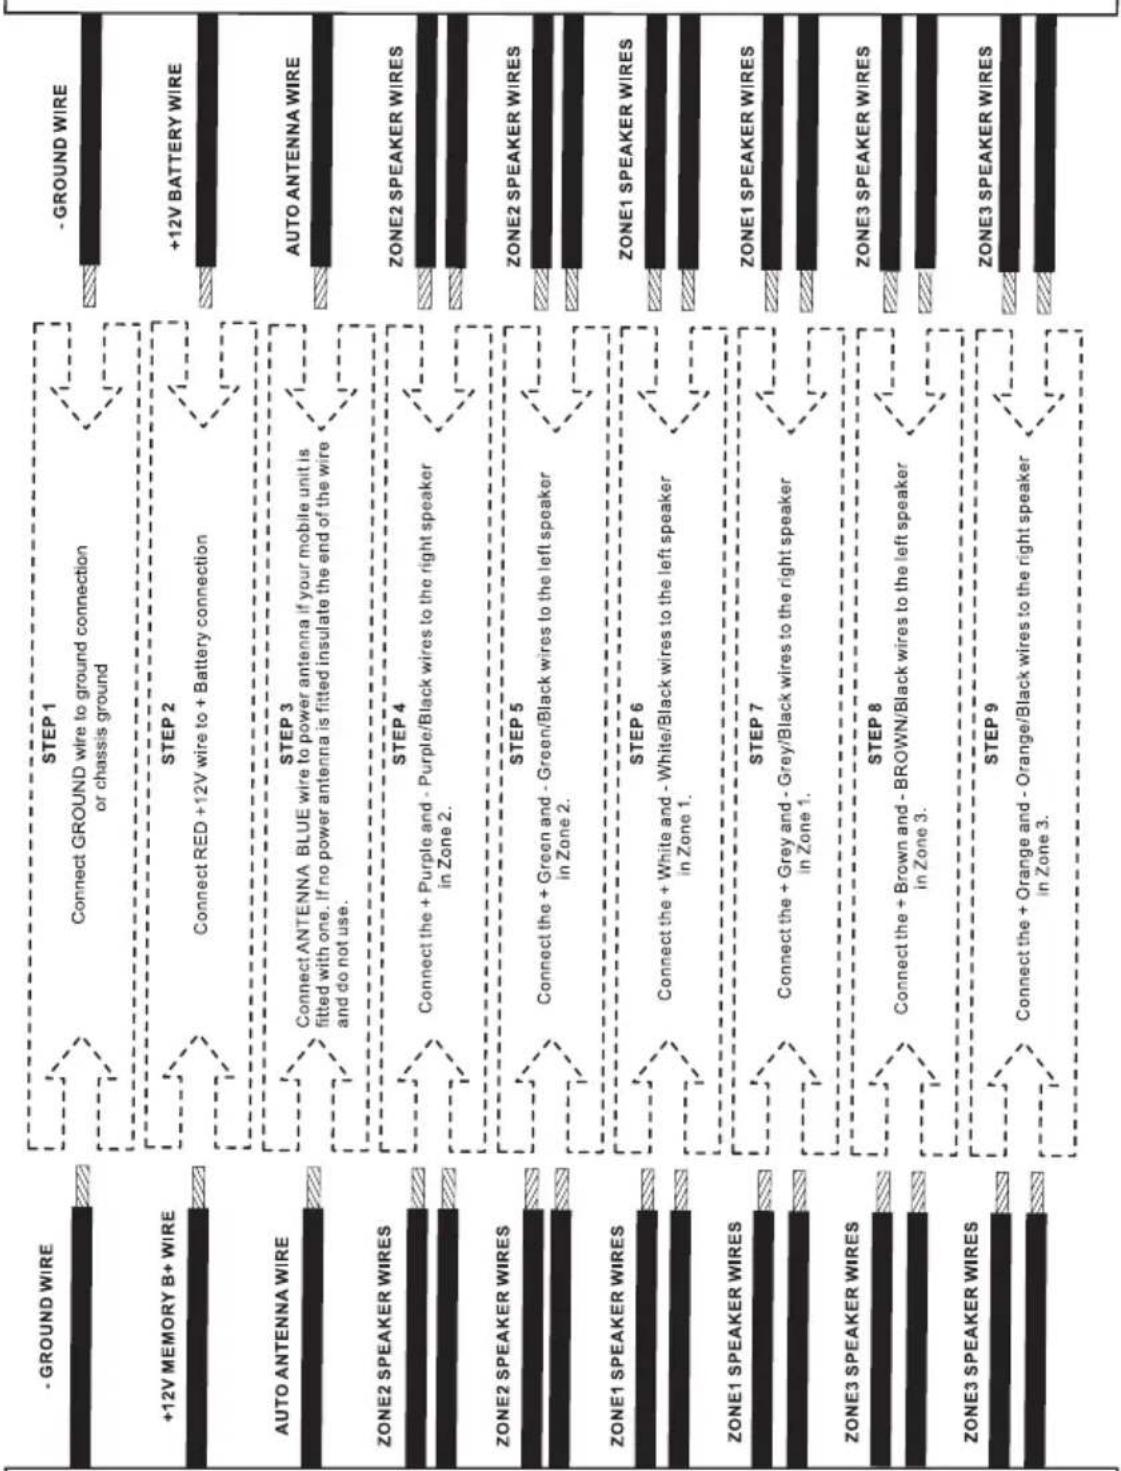
flowchart
graph TD
    A["Ground Wire"] --> B["+12V MEMORY B+ WIRE"]
    B --> C["AUTO ANTENNA WIRE"]
    C --> D["ZONE2 SPEAKER WIRES"]
    D --> E["ZONE2 SPEAKER WIRES"]
    E --> F["ZONE1 SPEAKER WIRES"]
    F --> G["ZONE1 SPEAKER WIRES"]
    G --> H["ZONE3 SPEAKER WIRES"]
    H --> I["ZONE3 SPEAKER WIRES"]

    B --> J["STEP 1: Connect GROUND wire to ground connection or chassis ground"]
    J --> K["STEP 2: Connect RED +12V wire to + Battery connection"]
    K --> L["STEP 3: Connect ANTENNA BLUE wire to power antenna if your mobile unit is fitted with one. If no power antenna is fitted insulate the end of the wire and do not use."]
    L --> M["STEP 4: Connect the + Purple and - Purple/Black wires to the right speaker in Zone 2."]
    M --> N["STEP 5: Connect the + Green and - Green/Black wires to the left speaker in Zone 2."]
    N --> O["STEP 6: Connect the + White and - White/Black wires to the left speaker in Zone 1."]
    O --> P["STEP 7: Connect the + Grey and - Grey/Black wires to the right speaker in Zone 1."]
    P --> Q["STEP 8: Connect the + Brown and - BROWN/Black wires to the left speaker in Zone 3."]
    Q --> R["STEP 9: Connect the + Orange and - Orange/Black wires to the right speaker in Zone 3."]
    R --> S["STEP 1: Connect GROUND wire to ground connection or chassis ground"]
    S --> T["- GROUND WIRE"]
    T --> U["+12V BATTERY WIRE"]
    U --> V["AUTO ANTENNA WIRE"]
    V --> W["ZONE2 SPEAKER WIRES"]
    W --> X["ZONE1 SPEAKER WIRES"]
    X --> Y["ZONE3 SPEAKER WIRES"]
POWER AND SPEAKER WIRES FROM STEREO CONNECTOR
Before Operation
Location
- Choose a mounting location away from humid areas, water sources, appliances or any equipment that can radiate heat.
- Select an area on a wall or cabinet which is free from cables, fuel or brake lines. Ensure the area behind the unit has a vent hole or if it is an enclosed box, it has adequate room around the rear of the unit for cooling.
- Ensure when the unit is mounted the wires at the rear are not pressed against the heat sink.
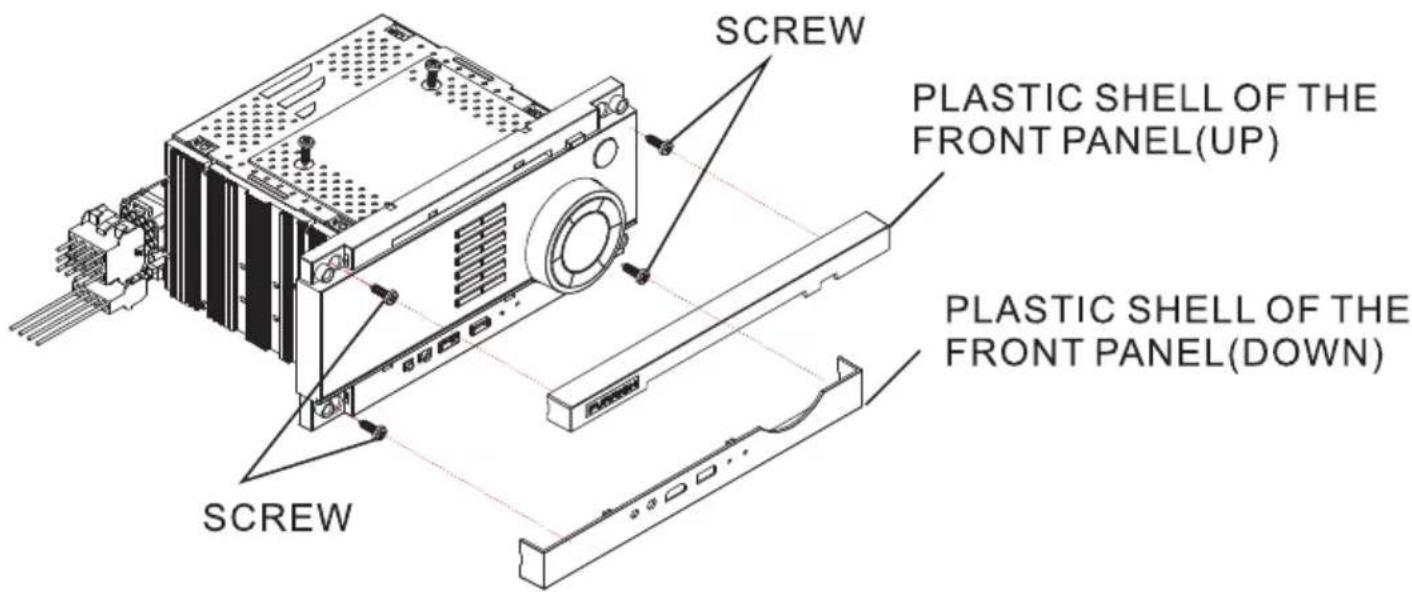
Installing the unit
- Before installing the unit, connect the wiring temporarily and make sure the unit and the system work properly.
-
Fix the unit with screws according to the following diagram.
-
Remove the plastic shell from the front panel on the unit.
- Fix the unit with 4 pieces of #8 pan head self tapping screws.
- Put back the plastic shell on the front panel of the unit.
Before Operation
Prepare the Remote Control
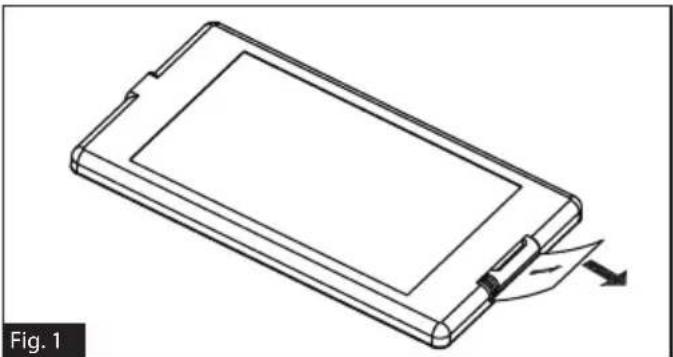
- Before using the remote control for the first time, pull the insulating sheet out of the remote control in the direction indicated by the arrow. (Fig.1)
natural_image
Line drawing of a rectangular electronic device with a scroll wheel and a paper clip, labeled 'Fig. 1' (no text or symbols on the device itself)- Press the movable block hold in the direction indicated by arrow A (Fig.2), then pull the battery holder out of the remote control as the direction indicated by arrow B. (Fig.2)

-
Replace the old battery with a new one, with the (+) polarity side upward. (Fig.3)
-
Insert the battery holder into the original position in the remote control. (Fig.3)

Remote control battery note
- Improper use of a battery may cause overheating or an explosion that could result in injury or fire.
- Battery leakage may cause damage to the remote control. Battery Life: 6 months with normal use in normal room temperature.
- Do not short the battery.
- Do not throw the battery into fire.
- To avoid the risk of accident, keep the battery out of reach of children.
Operation
Quick Reference Guide
| General Operation | |
| Power on/off, switch to standby mode | Pressto turn the unit on or enter standby mode.Press and holdto turn the unit off. |
| Mute | Press MUTE to mute sound. Thecon flashes on the display.Press MUTE again to restore the sound. |
| Select a source | Press DISC/USB, AM/FM, AUX, BT to select Disc (with a disc loaded), USB (with a USB storage device connected), AM/FM, AUX, or BT. |
| Adjust volume | Rotate the VOLUME -/+ knob to adjust volume. |
| Select a feature / setting | 1. Press SELEQ once or more to select VOL, BAS (without EQ preset), TRE (without EQ preset), BAL, LOUD ON/OFF, LOC ON/OFF, ST ON/OFF, BEEP ON/OFF, SUB ON/OFF, or CLOCK.2. Rotate the VOLUME -/+ knob to select a feature / setting. |
| Select a preset EQ | Press and hold SELEQ once or more to select CINEMA, ROCK CLASSIC, FLAT, or EQ OFF. |
| Set clock | 1. Press SELEQ on the front panel once or more (or press and hold CLOCK on the remote control) to enter clock setup mode.2. Rotate the VOLUME -/+ knob to adjust the hour.3. Press◀ to enter minute setting.4. Rotate the VOLUME -/+ knob to adjust the minute.The time on the clock is set automatically after a few seconds of inactivity. |
| Set alarm | Press and hold once or more to enter alarm clock and source settings.Repeat the operations in clock setting to set the alarm.Two alarm sources are available for selection: TUNER and USB. |
| Turn alarm on/off | Press to turn on or off the set alarm.When the alarm is set, theicon will stay on the LCD. |
| Adjust brightness | Press once or more to select a brightness level for the front panel: LOW, MIDDLE or HIGH. |
| Select speakers | Press and hold ZONE 1, ZONE 2 or ZONE 3 to select speaker output. The corresponding zone number will be displayed on the LCD once selected. |
| Reset | Press RESET with a sharp object to reset the unit and load its factory default settings. |
Operation
| Radio Operation | |
| Select radio region | Press and hold AM/FM for 2 seconds to set the AM/FM radio region (USA1/USA2/AUSTRALIA/EUROPE). |
| Manual tuning | Press to move the radio frequency down or up one step at a time. |
| Automatic tuning | Press and hold to search for the next strongest station automatically. |
| Select a band Press AM/FM once or more to select FM1, FM2, FM3, AM1, or AM2. | |
| Store and recall a preset station | Press and hold any one of the six preset buttons (1-6) to store the current frequency. Press the corresponding preset number button to recall the stored frequency. |
| Store stations automatically | Press and hold APS on the remote control (or■on the front panel) to automatically store the six strongest stations on the current band. Up to 18 FM stations and 12 AM stations can be stored. |
| Scan preset stations | Press APS on the remote control (or■on the front panel) to scan presets 1-6 on the current band. |
| LOC | Press LOC on the remote control to turn on / off the LOC (local) function. |
| Stereo/mono In FM mode, press SEL one or more to select stereo or mono sound output. | |
Operation
Disc / USB Operation
| Insert a disc | With the label facing up, insert a disc into the disc slot. The disc will automatically begin playback. |
| Eject the disc Press EJECT to eject the disc. | |
| Select a chapter / track | Press ▶ to skip to the previous or next chapter / track. |
| Fast backward / forward | Press and hold ▶ to fast backward / forward. |
| Pause playback | Press ▶ to temporarily stop playback.Press ▶ again to resume playback. |
| Stop playback | Press ▶ once to pause playback. Then you can press ▶ resume.Press ▶ twice to stop playback. Then press ▶ start playback from the beginning of the first chapter / track. |
| Repeat | Press RPT to select RPT ONE/RPT DIR/RPT ALL/RPT OFF MODE.Press RPT again to resume. |
| Random | Press RDM to play each track in random order.Press RDM again to resume. |
| Title In DVD/VCD mode, | press TITLE on the remote control to display the title list. |
Bluetooth Operation
| Accept or make a call | Press ➕ on the front panel (or on the remote control) to accept an incoming call, or dial or redial a telephone number. |
| Reject or end a call | Press and hold ➕ on the front panel (or press on the remote control) to reject or end a call. |
Operation
Common Operation
Turn the unit on or switch to standby mode
Press to turn the unit on or switch to standby mode.
Select a source
DISC / USB - Once a DVD or USB is inserted into the unit, the unit will automatically switch to the corresponding source. If a disc has already been inserted and the unit is playing from another source, you can press DVD / USB to select DVD.
AM/FM - Press this button to scroll through FM1, FM2, FM3, AM1, and AM2.
Press and hold this button once or more to select the radio region: USA1, USA2, AUSTRALIA, or EUROPE.
BT - Press this button to enable Bluetooth connection.
AUX - Press this button to scroll through the AUX inputs available for the unit.
F AUX - Connection on the front of the unit to connect an external audio source.
R AUX - Connection on the rear of the unit, normally used to connect TV sound input.
AV - Connection on the rear of the unit to connect an external audio source.
HDMI - Connection on the front of the unit.
COAXIAL - Connection on the rear of the unit.
OPTICAL - Connection on the rear of the unit.
HDMI OUT (ARC) - Connection on the rear of the unit, used to connect a TV with Audio Return Channel function. Make sure the ARC function of the TV is on.
- For details on setting and operating your TV, refer to the instruction manual for the TV.
About Audio Return Channel (ARC)
ARC allows audio signals to travel both ways under HDMI Control. If you connect a TV that supports HDMI Control and ARC to the unit with a single HDMI cable, you can output video/audio to the TV or input TV audio to the unit. In case noises are produced from the speakers connected to the unit because TV audio signals input to the unit via ARC are not supported by the unit, use the TV's speakers.
Adjust volume
Rotate the VOLUME -/+ knob clockwise to increase volume, or rotate counterclockwise to decrease volume.
Mute
- Press MUTE to mute sound output in any source mode.
'MUTE' will be displayed on the screen.
- Press MUTE again to resume.
Display and set the clock
- To display the clock on the LCD screen, press CLOCK on the remote control.
In standby mode, the clock time will stay on the LCD.
- To adjust or set the clock, press SEL^EQ on the front panel once or more to enter clock setup mode.
Press ◀ to switch between hour and minute setting.
Rotate the VOLUME -/+ knob to adjust the hour / minute.
The time on the clock is set automatically after a few seconds of inactivity.
Operation
Set the alarm
- Press and hold once or more to enter alarm clock and source settings.
- Repeat the operations in clock setting to set the alarm.
Two alarm sources are available for selection: TUNER and USB. - Press 🔒 to turn on or off the set alarm. When the alarm is set, the 🔒 icon will stay on the LCD.
Select a preset EQ mode
Press and hold SEL ^EQ to select the preset music equalizer curves: CINEMA, ROCK, CLASSIC, FLAT, or EQ OFF.
Turn on / off LOUD mode
Press SEL ^EQ on the front panel once or more to turn on / off LOUD mode.
Adjust the sound equalizer curves
- Press SEL ^EQ on the front panel once or more to select a sound equalizer curve: VOL, BAS (without preset EQ), TRE (without preset EQ), BAL, LOUD ON/OFF, LOC ON/OFF, ST ON/OFF, BEEP ON/OFF, or SUB ON/OFF.
- Rotate the VOLUME -/+ knob on the front panel to select a sound feature.
Select ZONE 1 / ZONE 2 / ZONE 3
Press and hold ZONE 1 / ZONE 2 / ZONE 3 to turn on or off the audio source in each of the different areas where your speakers are connected.
The corresponding zone number will be displayed on the LCD once selected.
Note: ZONE 3 supports independent audio output control.
- Press ZONE 3 to activate independent audio selection mode.
The "ZONE 3" icon will flash on the LCD. - Select the media source (DISC/USB, AM/FM, BT, F AUX/R AUX, AV, HDMI, COAXIAL, OPTICAL), then adjust the audio effect and preset EQ independently.
- After setting ZONE 3 audio output, you can press ZONE 3 again to switch back to ZONE1/ZONE 2 audio output control mode (ZONE 1 and ZONE 2 in the same group). The "ZONE 3" icon will stop flashing.
- If ARC is selected as the media source of ZONE 3 (ZONE 1/ZONE 2), the media source of ZONE 1/ZONE2 (ZONE 3) can be selected as DISC/USB, AM/FM, BT, F AUX, R AUX, AV, or ARC.
- If AM/FM or BT is selected as the media source of ZONE 3 (ZONE 1/ZONE 2), the media source of ZONE 1/ZONE2 (ZONE 3) can be selected as DISC/USB, AM/FM, BT,F AUX, R AUX, AV HDMI, COAXIAL, OPTICAL, or ARC.
- If USB/DISC is selected as the media source of ZONE 3 (ZONE 1/ZONE 2), the media source of ZONE 1/ZONE2 (ZONE 3) can be selected as AM/FM, BT, F AUX, R AUX, or AV.
Reset the unit
In case of incorrect display, button failure, or distorted sound, you can press RESET with a sharp object such as a clip to reset the unit and load its factory default settings.
Operation
Radio Operation
Select a radio region
In radio mode, press and hold AM/FM to select your desired radio region: USA1/USA2/AUSTRALIA/EUROPE.
Select AM/FM band
In radio mode, press AM/FM once or more to select your desired radio band: FM1, FM2, FM3, AM1, or AM2.
The selected band will be displayed on the front panel.
Tune to / search for radio stations
In radio mode:
- Press and hold on the front
panel (or ◀◀◀ on the remote
control) to automatically search down/up for an available station from the current frequency. - Press / on the front panel
(or ◀◀◀ on the remote control)
to manually search up or down for your desired station from the current frequency.
Use the ■APS button
In radio mode:
-
Press and hold ■n the front panel (or APS on the remote control) to search for radio frequencies with sufficient signal strength (starting from the lowest frequency and ending until the search cycle is finished).
Then the 6 strongest stations are preset to the memory bank of the corresponding preset number. The AS operation is implemented in each bank of the selected band. When the AS operation is finished, radio broadcast will resume on M1. (A total of 3x6 stations for FM and 2x6 stations for AM can be stored.) -
Press ■n the front panel (or APS on the remote control) to search for each preset radio station starting from M1. When the field strength level is above the threshold of the stop level, the radio holds at that preset number for a few seconds, and then searches again. The search stops on M1 when the search cycle is finished.
NOTE:
On FM band, FM1, FM2, FM3 is checked once at a time.
On AM band, AM1, AM2 is checked once at a time.
Use the preset number button (1-6)
In radio mode:
- To store the current frequency on the current band, press and hold any one of the six preset number buttons (1-6).
- To recall the preset memory on the current band, press one of the preset buttons (1-6).
Switch between STEREO/MONO
Press SEL ^EQ on the front panel (or ST on the remote control) once or more to select ST ON or ST OFF mode in FM mode.
Use the LOC ON / OFF function
- In radio mode, when the signals of the distant radio stations are very weak and the reception is poor during tuning, press SEL ^EQ on the front panel (or LOC on the remote control) once or more to select LOC OFF mode, and then tune again for the distant radio stations.
- In radio mode, too strong signals from the local radio stations may lead to interference. You can press SEL ^EQ on the front panel (or LOC on the remote control) once or more to select LOC ON mode, and then re-tune to the local stations if required.
Operation
Basic Disc / USB Operation
Start playback
- Press ⏻ to turn on the unit.
-
Turn on the TV set, from which the video output is connected to the video input of the unit. If nothing displays on the TV screen when the unit is turned on, ensure that the TV is set to the right video input (not TV channel). For example, if the TV is connected with the unit via the VIDEO 1 INPUT, then you need to set the TV to VIDEO1.
-
Insert a disc into the disc slot (with the label side facing up).
NOTE:
- Discs that are seriously scratched or of poor manufacturing or recording quality may not play.
- If the unit cannot read a disc in normal conditions, please try to eject and reload the disc.
- In addition to normal CD and DVD, this unit supports CD-R, CD-R/W, DVD-R and DVD-R/W playback as well. However, depending on the conditions of the recording equipment, recording program or the disc itself, some CD-R, CD-R/W, DVD-R or DVD-R/W may not play.
- When dealing with CD-R, CD-R/W, DVD-R or DVD-R/W recording, too high recording speed may result in poor signal quality and therefore, it is recommended to select as low recording speed as possible.
Pause playback
When playing DVD/VCD/CD/MP4/MP3/WMA discs, press ▶to pause playback. You can press ▶again to resume normal playback.
Stop playback
- When playing DVD/VCD/MP3/WMA/CD discs, press ■ once to pause playback, then you can press ▶to resume normal playback.
- During playback, press twice to stop playback, then you can press ▶to start playback from the beginning of the first chapter / track.
Select a chapter/track
Press ◀◀ in the front panel (or /▶ on the remote control) during playback to select the previous / next chapter or track for playback.
Note: You can press and hold ▶ on ▶ the front panel (or ▶ on ▶ remote control) to fast backward / forward within a chapter / track.
Select a chapter / track with the number buttons
- When playing DVD/VCD (PBC OFF)/MP3/WMA/CD discs, use number buttons (0 - 9) to directly select and play a chapter / track numbered 1 to 9.
- To play a chapter / track with the serial number larger than 9, use the 10+ and 0 - 9 buttons. For example, to play the 13th chapter / track, first press the 10+ button once, then press the 3 button; to play the 34th chapter / track, first press the 10+ button 3 times, then press the 4 button.
Note: You can press and hold the 5/-10 or 6/+10 buttons to skip 10 tracks forward / backward (for MP3/WMA only).
Operation
Select a chapter / track from the root/PBC menu (if available)
For DVD:
- Press TITLE on the remote control to display the title list.
- Press the navigation buttons to select your desired title, and then press OK or ▶th open the root menu of the selected title.
- Press the navigation buttons to select your desired chapter, then press OK or ▶II to play the selected chapter.
- During playback, you can press 1/MENU on the front panel (or press and hold TITLE on the remote control) to display the root menu of the current title directly, and then perform the same operation to resume normal playback.
For VCD:
-
When PBC is enabled, the beginning of the disc will play with the PBC menu (if available) displayed on the TV screen.
-
Press the number buttons to select your desired track to play.
For MP3/WMA:
- During playback, the root menu is displayed on the TV screen all the time (TITLE/PBC unavailable).
- Press the navigation buttons to select your desired folder, and then press OK or ▶II to open the folder.
Press the navigation buttons to select your desired file, and then press OK to play the selected file.
For CD:
The TITLE/PBC button is disabled.
Terminate playback
- Press EJECT to eject the disc.
- Press and hold (on the front panel (or press on the remote control) to turn off the unit.
Advanced Disc / USB Operation
Fast backward / forward
During normal playback, press and hold ◀◀/▶▶ the front panel (or / ◀◀ ▶▶▶ on the remote control) once or more to fast backward or forward at the following speed: x2, x4, x8, x20, or normal.
During fast backward / forward, press▶th resume normal playback.
Slow forward
- During playback, press SLOW_FWD on the remote control to slow forward.
- Press SLOW_FWD consecutively to decrease the playback speed as follows: x^1/2 , x^1/3 , x^1/4 , x^1/5 , x^1/6 , x^1/7 , normal.
- During slow forward, press I'll to resume normal playback.
Note: The function is only available for video playback.
Play frame by frame
- During DVD/VCD playback, press STEP on the remote control consecutively to play frame by frame forward.
- Press ▶ resume normal playback.
Play repeatedly
Repeat One / All
- During DVD playback: Press RPT to select REP CHAPTER, REP TITLE, REP ALL, or REP OFF.
- During VCD (PBC OFF)/CD playback: Press RPT to select REP ONE, REP ALL, or OFF. The RPT button is unavailable when PBC is enabled during VCD playback.
- During MP3/WMA playback: Press RPT to select REP ONE, REP DIR, REP ALL, or OFF.
Operation
Repeat A-B
Use this function if you want to repeat a specific segment on a disc that you define:
- Press A-B at a point (A) where you want it to be the start point of the repeat segment.
- Press A-B again at a point (B) where you want it to be the terminal point of the repeat segment.
Then the segment will be played repeatedly.
- To cancel A-B repeat mode and resume normal playback, press A-B for the third time.
Note:
During DVD/VCD/MP3/WMA/CD playback, points A and B must be within the same track.
Play from a specified chapter / track or specified time
During DVD playback:
- Press SEARCH on the remote control to display a search box, with the title field highlighted.
- Use the number buttons to input the serial number of a title.
- Use the navigation buttons to highlight the chapter field, and then use the number buttons to input the serial number of a chapter.
- Press OK or ▶ display the selected chapter.
During VCD/MP3/WMA/CD playback:
- Press SEARCH on the remote control to display a search box, with the track field highlighted.
- Use the number buttons to input the serial number of a track, and then press OK or ▶td play the selected track.
Play randomly
During DVD/VCD (PBC OFF)/MP3/WMA/CD playback, press RDM once or more to switch between RANDOM ON and RANDOM OFF.
In RANDOM ON mode, the chapters / tracks will be played randomly.
Play from different angles
During DVD playback, press ANGLE on the remote control once or more to view from different angles.
Note:
- This function is only available for DVD discs recorded with different camera angles.
- The ANGLE button is unavailable for VCD/MP3/WMA/CD discs.
Zoom in / out during playback
- During DVD/VCD playback, press ZOOM on the remote control once or more to enlarge a certain area of the images on the screen with these multiples: ZOOMx2, ZOOMx3, ZOOMx4, ZOOMx ^1/2 , ZOOMx ^1/3 , ZOOMx ^1/4 , ZOOM OFF.
- Press one of the navigation buttons to select the area you want to enlarge.
Change the caption language
When playing DVDs, press SUBT on the remote control once or more to select the caption language or turn off the caption (if available).
Note: This function is unavailable for VCD/MP3/WMA/CD discs.
Change the audio language
- When playing DVDs, press AUDIO on the remote control once or more to select the desired language type (if available).
- When playing VCD discs, press AUDIO on the remote control once or more to select MONO L, MONO R, AUTO L, AUTO R, or Stereo (no language function).
- For CD/WMA/MP3, the AUDIO button is invalid.
Operation
Check the playback status
When playing DVD/VCD/CD discs, press OSD on the remote control once or more to turn on or off playback status display.
- For DVD discs, this function allows you to check such information as the current title and chapter numbers, and the elapsed and remaining time of both the current title and chapter etc.
- For VCD/CD discs, this function allows you to check such information as the current track number, and the elapsed and remaining time of both the current track and the whole disc.
Program playback
This function allows you to play some titles / chapters / tracks on a DVD/VCD/MP3/WMA/ CD disc in your specified order.
- During playback, press PROG on the remote control to enter a program interface as follows:
For DVDs

-
Use the navigation buttons to move the cursor onto the desired place for inputting the sequence number.
-
Use the number buttons to input the title / chapter / track sequence numbers you want in your desired order.
-
Press directly, or use the navigation buttons to move the cursor onto PLAY, and then press OK on the remote control to play the programmed titles / chapters / tracks in the programmed order.
-
To exit program playback, press followed by ▶dr press PROG twice again.
- To remove all programmed sequence numbers, move the cursor onto CLEAR, and then press OK on the remote control.
- To change the programmed sequence, move the cursor onto the item you want to change, and then input the desired sequence number.
- During VCD playback with PBC enabled, PBC will be disabled when you enter program playback.
Play a JPEG picture CD
In disc mode, the root menu is displayed on the screen with MP3/WMA files being played at the same time. (TITLE / PBC button unavailable).
In the root menu, the left file sort icon is for MP3/WMA files, the middle one is for video files, and the right one is for JPEG files. If one of these 3 sorts of files does not exist, you cannot move the cursor onto the corresponding file sort icon.
-
Press the navigation buttons to select your desired folder, file or file sort icon from the root menu.
-
Press OK or ▶open the selected folder, or play the selected file, or play the selected sort of files only.
- In the root menu, you can also use the number buttons to select a file for playback.
Operation
- After selecting the JPEG file sort icon and entering the folder, you can use the navigation buttons to select your desired JPEG file, and then press OK or ▶td start full-screen playback starting from the selected JPEG picture.
- During JPEG playback, use the navigation buttons to change the angle of the displayed picture as follows:
▶: 90 degrees clockwise
◀: 90 degrees counterclockwise
▲: Up <--> Down
▼: Left <--> Right - During JPEG playback, press PROG on the remote control to change the picture refresh mode.
- During JPEG playback, press to stop playback and return to the root menu.
- During JPEG playback, the following buttons are unavailable: SLOW-FWD, SUBT, TITLE/PBC, ANGLE, STEP, AUDIO, RDM and A-B.
- In JPEG mode, the other operations are the same as those in MP3/WMA mode.
Play MP4
In disc mode, the root menu is displayed on the screen and the first file will be played automatically.
During playback, you can press ■ to stop playback and return to the root menu.
- Press the navigation buttons to select your desired folder or file from the root menu.
- Press OK or ▶ to open the folder, or play the selected file.
- In the root menu, you can also use the number buttons to select a file for playback.
- The ANGLE, PROG, RDM, and TITLE/PBC buttons are invalid.
- The other functions are the same as those in DVD operation, while the repeat function is the same as that in MP3/WMA operation.
ESP and ID3 functions
- The unit supports the ESP (Electrical Shock Protection) function to ensure smooth disc playback on the move.
- During MP3/WMA playback, the current file and folder names as well as the ID3 information (if available in V1.0/2.0 format) will scroll on the LCD screen. The ID3 information includes the song title, and the artist and album name.
USB operation
Power on the unit, then connect a USB storage device to the USB socket.
The screen will display the root menu of the USB storage device.
This unit supports picture (JPEG format), audio (MP3 or WMA format) and video (MP4 format) playback. All the operations are the same as those of the corresponding format.
NOTE:
- Compatibility with all file formats is not guaranteed.
- Not all USB products can be charged from the unit.
Set up the DVD System Menu
- Press SETUP on the remote control to access the DVD System Menu on the TV screen. There are 6 setup pages in total.
- Press ↗ to select a desired setup page.
- Press ▲ to select a setup item on the selected setup page.
- Press ▶ to enter the setup item.
- Press ▲to select an option for the setup item, and then press OK to confirm.
- Press to return to the upper level.
- Press SETUP on the remote control again or use the navigation buttons to highlight EXIT SETUP and then press OK to exit the System Menu.
Operation
The 6 setup pages of the DVD System Menu are as follows:
SYSTEM SETUP
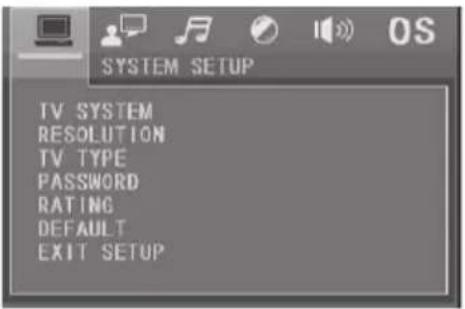
TV SYSTEM
The unit supports output of various TV systems.
If your TV only supports NTSC or PAL system, the screen will blink and become colorless when the wrong TV system is selected. In this case go to TV SYSTEM and select NTSC, PAL or AUTO to match the system of your TV.
RESOLUTION
Select the resolution level.
TV TYPE
Select an option below to match your TV screen size.
4:3 PS: Choose the item when connecting a TV set with 4:3 screen. When playing pictures of 16:9 size, the left and right parts of the video will be cut out, and displayed on full screen.
4:3 LB: Choose the item when connecting a TV set with 4:3 screen. When playing pictures of 16:9 size, the top and bottom parts of the TV screen will be turned into a black square respectively.
16:9: Choose the item when connecting a TV set with 16:9 wide screen.
PASSWORD
Lock or unlock the rating level of Parental Control.
The default state is locked, and the default password is 0000.
You can set a new password that you like:
Select PASSWORD and then press▶to enter the setup item.
Input the original password 0000, and then press OK to unlock it.
Press▶to enter the setup item again, then input a new password that you like and finally press OK to confirm.
RATING
Set a new rating level for Parental Control.
- Select PASSWORD and then press▶ to enter the setup item.
Input the set password, and then press OK to unlock the rating level setting for Parental Control. - Select RATING and then press▶ to enter the setup item.
Use the navigation buttons to select your desired rating level, and then press OK to confirm. - Select PASSWORD again and then press to enter the setup item.
Input the password and then press OK to lock the new rating level setting for Parental Control.
DEFAULT
Reset all settings to their original status.
LANGUAGE SETUP

OSD LANGUAGE
Select the language of the system menu and all interfaces displayed during playback.
AUDIO LANG
Select the audio language.
SUBTITLE LANG
Select the subtitle language.
Operation
MENU LANG
Select the disc menu language.
AUDIO SETUP

AUDIO OUT
Select a digital output method: SPDIF/OFF, SPDIF/RAW, or SPDIF/PCM.
HDMI AUDIO:
AUTO: Selected to output the audio automatically by RAW or PCM type.
VIDEO SETUP
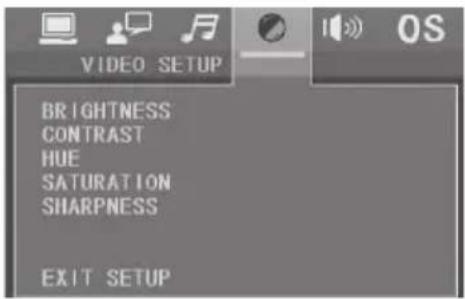
BRIGHTNESS
Adjust the brightness of video output.
CONTRAST
Adjust the contrast of video output.
HUE
Adjust the hue of video output.
SATURATION
Adjust the saturation of video output.
SHARPNESS
Adjust the sharpness of video output.
SPEAKER SETUP
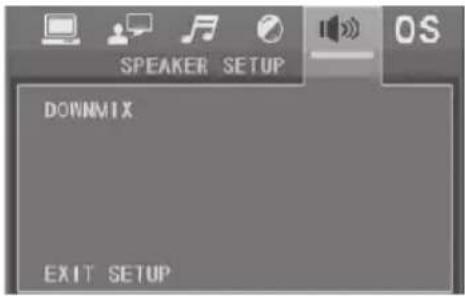
DOWNMIX
Select your desired sound effect when there is no center speaker or subwoofer.
LT/RT: When playing a disc with PRO LOGIC Dolby stereo effect, choose the item to output audio signal with vivid theatre effect.
STEREO: If you choose this item, for audio signal with 5.1 channels, only signal of the left and right channels will be output; for audio signal with 2 channels, the common stereo signal will be output.
VSS: If you choose this item, for a disc recorded with 5.1 channels, the main channel speakers can output audio signal with VSS effect.
DIGITAL SETUP

DYNAMIC RANGE
After selecting the compression mode of LINE OUT, you can set this item to adjust the linear compression ratio.
FULL: Set the Peak-to-Peak value of the audio signal to minimum.
OFF: Set the Peak-to-Peak value to maximum.
Operation
DUAL MONO
Select a desired audio output mode for the left and right channels of signal. It is mainly for Karaoke of Ac3. There are 4 modes in all: STEREO, MONO L, MONO R, MIX MONO
About Parental Control
Q: After insertion of a DVD into the disc slot, a dialogue box appears, asking for a password of 4 digits. Why?
A: This is because the movie you are playing was rated with Parental Control, and the current rating level of the unit is lower than the one of the current disc. You must input the right password and enter it into the Parental Control setup menu and then set an equal or higher rating level than the one of the current disc.
Note:
- If you have not changed the password, the factory preset password for the unit will be empty. You will need to input a desired password and verify it by inputting the password again before entering the Parental Control setup menu.
- For the rating level setup of Parental Control of the unit, please refer to the relative content of the SYSTEM SETUP menu for details.
Accessories: Parental Control
The Parental Control function of a DVD player can be used to control playback of movie scenes on a DVD disc set with a rating level. You can set the DVD player (including the software player on a PC) with a certain rating level via the SETUP MENU on the TV screen. If the rating level set in the disc is higher than the one set in the DVD player, the DVD player cannot play the disc. Sometimes the Parental Control sequences in some discs are different from each other. The rating level setup can be protected with a password. If you select Unlock, the Parental Control function will be invalid, and the whole content of the disc can be played.
A DVD disc can be designed with different rating levels of Parental Control so that the DVD player can play different versions of scenes from the same movie based on the set rating levels. Depending on the DVD feature of seamless switching, the scenes unsuitable for children will be cleared or replaced by other suitable scenes automatically.
All rating levels of Parental Control are as follows:
Unlock
- Kid Safe
- G
- PG
- PG 13
- R
- NC 17
- Adult
Operation
Region Code
Q: No DVD playback. REGION ERROR is displayed after insertion of a disc into the disc slot. Why?
A: Because the DVD player and disc have different region codes. If they do not match, the DVD player cannot play the disc.
Appendix: Region code of DVD
The Motion Picture Association of America (MPAA) divided the world into 6 regions, and allocated every region a code, named the region code. The region codes and the countries or areas represented by the region codes are as follows:
Region I: America, Canada, East-Pacific Islands;
Region 2: Japan, West Europe, North Europe, Egypt, South Africa, Middle East;
Region 3: South-east Asian countries including Taiwan, Hong Kong, South Korea, Thailand, Indonesia, etc.;
Region 4: Australia, New Zealand, Central South America, South Pacific Islands;
Region 5: Russia, Mongolia, Indian Peninsula, Middle Asia, East Europe, North Korea, North Africa, North-west Asia etc.;
Region 6: China mainland.
Operation
Bluetooth Operation
Pair DV1230 with your mobile phone
- Activate Bluetooth mode on your mobile device. Then press BT on the front panel of DV1230 to enter pairing mode.
- When DV1230 is detected by your mobile phone, the device name FURRION DV1230-XXXX (where X can be any character from A-Z or number from 0-9) is shown on your mobile phone.
- Select the device name on your mobile phone, then an input box will pop up, asking you to input a password.
- Input 0000 and confirm. Upon successful pairing and connection, 'LINK OK' will appear on the LCD of DV1230.
Note:
- Some mobile phones support automatic re-connection after first-time pairing with DV1230. Some other mobile phones may need you to select the device name (FURRION DV1230-XXXX) from the list of paired Bluetooth devices to confirm re-connection.
- In case of casual disconnection, select the device name (FURRION DV1230-XXXX) from the list of paired Bluetooth devices to confirm re-connection.
Disconnect / unpair DV1230 from your mobile phone
- To disconnect: On your mobile phone, select the connected device name (FURRION DV1230-XXXX) from the list of paired Bluetooth devices and confirm disconnection.
- To unpair: Press and hold BT on the front panel of DV1230 for about 5 seconds to clear the pairing information.
Operate your mobile phone via Bluetooth
When the Bluetooth connection is ready, the call you make or receive will be transferred from your mobile phone to DV1230.
- When connected: Use controls on your mobile phone to switch sound output between DV1230 and the mobile phone.
- To dial a number with the remote control of DV1230:
- Use number buttons 0-9 to enter a telephone number. * You can press CLEAR to cancel a wrong input if necessary. Press 📋 / 📋 on the front panel (or 📋 on the remote control) to call out.
- To redial a number:
- Press √/○ on the front panel (or ○ on the remote control) to show the last dialed number on the LCD and call out.
- To accept a call:
When there is an incoming call, press ↗ on the front panel (or ↗ on the remote control) to accept the call.
- To reject a call:
When there is an incoming call, press and hold ↗ on the front panel (or press on the remote control) to reject the call.
- To end a call:
During a call, press and hold on the front panel (or press on the remote control) to end the call.
Note: When there is an incoming call, the calling number will be displayed on the screen of DV1230.
Operation
Play an audio file from another Bluetooth device to DV1230
"LINK OK" is displayed when DV1230 is paired and connected with another Bluetooth device.
If the Bluetooth device supports A2DP, you can stream music from the Bluetooth device to DV1230 for playback.
To play audio through Bluetooth, you must activate Bluetooth mode on your mobile device. If the Bluetooth device supports AVRCP, you can use the basic audio playback control functions (such as play/pause) from DV1230.
Note: In other modes (except during a call via Bluetooth), press BT on the front panel to switch between different modes.
Set up Bluetooth connection using NFC (only supporting mobile phones with NFC function)
- Enable the NFC function of your mobile phone and make sure the screen is active and unlocked.
- Move your mobile phone towards DV1230 so that the NFC detection area on your mobile phone touches that on DV1230. You can now connect your mobile phone with or disconnect it from DV1230 conveniently.
Note: For first-time pairing and connection, you will be asked to enter a password. Please enter "0000".
App Operation
- With the Furrion ES control App (either Android or iOS version), you can use your mobile device as a remote control.
- The App uses BT Low Energy (BLE) technology to connect to DV1230 instead of infrared in the physical remote control, thus getting free of line-of-sight connection.
- While the App checks for compatibility, you can cross-check the specifications of your mobile device to see if it supports BLE technology before installation.
- Find and download "Furrion ES Control" from Google Play (Android) or App Store (iOS) on your mobile device. Run the App as instructed.
- The App works with various models in the Furrion DV range entertainment system.
Install and use the App
- Install the ES Control App on your mobile phone.
- Enable Bluetooth on your mobile phone, and run the APP.
- Select the device name "DV1230-4.0-XXXX" (where X can be any character of A-Z or number 0-9) to connect.
- Use the available functions on the App to control DV1230 freely.
Maintenance
Maintenance and Cleaning of Discs
Disc Maintenance
- To keep the disc clean, handle the disc by its edge, and do not touch the disc surface of the play side.
- Do not stick paper or tape on the disc. If there is glue on the disc surface, wipe it off before using.
- Do not expose the disc to direct sunlight, or nearby heat sources such as caliduct, or leave it in a car parked in direct sunlight where there can be a considerable rise in temperature.
- Put the disc inside a disc case after finishing playback.
Disc Cleaning
- Before playing, wipe the disc with a clean cloth, wipe the disc outwards from the disc center.
- Do not use petrol, thinners, commercially available cleaners or anti-static sprays for plastic LPs to wipe discs.

correct

wrong
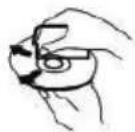
correct

wrong
Troubleshooting
Please read the user manual carefully before using the product. If you have any problems with this product, please refer to the below troubleshooting guide to help you resolve the issue.
| TROUBLE/SYMPTOM SOLUTION | |
| No picture, sound and indication | Ensure that the power switch is on. |
| Ensure that the wall inlet is OK. | |
| Ensure that the power cord is not damaged or the fuse is not blown. | |
| Ensure that the power connection is OK. | |
| No sound but picture OK | Ensure that the audio output of the unit is in good connection with the TV's audio input. |
| Check whether the audio connector is damaged. | |
| Check whether you have turned down the volume. | |
| Ensure that the AUDIO setup of the unit is correct. | |
| Ensure that the audio is not muted. | |
| Black and white picture or screen rolling | Ensure that the TV SYSTEM (e.g. PAL, NTSC) setup is correct. |
| No picture but sound OK | Ensure that the video output of the unit is in good connection with the TV's video input. |
| Ensure that you have turned your TV to the AV input channel connecting to the unit. | |
| Check whether the video connector is damaged. | |
| Ensure that the VIDEO setup of the unit is correct. | |
| Flaws in picture or sound | Check whether AUDIO setup is correct. |
| Check whether the disc is scratched or stained. | |
| Check whether the AV connector and output terminal are stained. | |
| Check whether there is condensation inside the lens. If so, leave the unit off for an hour or so, and then try again. | |
| Check whether the installation angle is less than 30. | |
| No disc or bad disc | Ensure that you have inserted the disc into the disc slot. |
| Check whether the disc has been put in the reverse side. | |
| Check whether the disc is distorted. | |
| Check whether the disc is stained or scratched badly. | |
| Ensure that the disc format is compatible with the unit. | |
| Ensure that the temperature inside the car is not too high. If so, let the unit cool off until the ambient temperature returns to normal. | |
| Insert another disc into the disc slot. | |
Troubleshooting
TROUBLE/SYMPTOM SOLUTION
| Remote control does not work | Check the battery of the remote control and make sure that it is not dead. |
| Direct the remote control to the IR sensor of the unit. | |
| Check whether there are obstacles between the remote control and IR sensor. | |
| Some function buttons do not work | Turn off the power, then turn on again. |
| Reset the unit, then turn on again. | |
| Remove the front panel from the unit, then put it back and turn on again. | |
| The radio does not work | Check whether the antenna cable is connected firmly, or manually tune for a station. |
| Functions locked or no response for Bluetooth function | Press RESET with a sharp object such as a clip to reset the unit and load its factory default settings. |
Specifications
General Specification
| Power supply requirement | DC 12V |
| Total power RMS | (4x25W + 2x15W) |
| Dimensions | 9 ^13/_16 " x 4 ^5/_8 " x 7" (249 x 118 x 178 mm) |
DVD Deck Specification
| Format DVD/VCD/ | JPEG/MP4/WMA/CD |
| Video system | NTSC/PAL/PAL-M/PAL-N/AUTO (optional) |
| Audio system 24 bit/96KHz | |
| Loading system Auto Loading | |
| Mounting angle 0 to +/-30 | |
Video Specification
| Video type | 16:9 and 4:3Load impedance: 75 ohms |
| Horizontal resolution | 600 |
Audio Specification
| Audio output (Analog audio) | 2.0V |
| Frequency response | 20Hz ~ 20KHz (at 1 KHz 0 dB) |
| S/N ratio (Audio) | ≥60dB (at 1 KHz 0 dB) |
| Separation 50dB | |
| Speaker output 4 | Ω |
Radio Specification
| FM section | |
| Frequency range | 87.5MHz - 107.9MHz (US)87.5MHz - 108.0MHz (EU)87.5MHz - 108.0MHz (AUS) |
| Usable sensitivity | 3uV |
| I.F frequency 10.7 MHz | |
| AM section | |
| Frequency range | 530KHz -1710KHz (US)522KHz -1620KHz (EU)522KHz -1710KHz (AUS) |
Bluetooth Specification
| Bluetooth Version | V4.0 |
| Operation Frequency | 2.4GHz ( ISM BAND) |
| Bluetooth Output | 4dBm |
Warranty
FURRION WARRANTS FOR A PERIOD OF 1 YEAR FROM DATE OF RETAIL PURCHASE BY THE ORIGINAL END-USE PURCHASER, THAT THIS PRODUCT, WHEN DELIVERED TO YOU IN NEW CONDITION, IN ORIGINAL PACKAGING, FROM A FURRION AUTHORIZED RESELLER AND USED IN NORMAL CONDITIONS, IS FREE FROM ANY DEFECTS IN MANUFACTURING, MATERIALS, AND WORKMANSHIP. IN CASE OF SUCH DEFECT, FURRION SHALL REPLACE OR REPAIR THE PRODUCT AT NO CHARGE TO YOU. THIS WARRANTY DOES NOT COVER: PRODUCTS WHERE THE ORIGINAL SERIAL NUMBERS HAVE BEEN REMOVED, ALTERED OR CANNOT READILY BE DETERMINED; DAMAGE OR LOSS CAUSED BY ACCIDENT, MISUSE, ABUSE, NEGLECT, PRODUCT MODIFICATION, FAILURE TO FOLLOW INSTRUCTIONS IN INSTRUCTION MANUAL, COMMERCIAL OR INDUSTRIAL USE; DAMAGE OR LOSS CAUSED TO THE DECORATIVE SURFACE OF PRODUCT; TO ANY DATA, SOFTWARE OR INFORMATION; AND NORMAL WEAR AND TEAR. THIS WARRANTY ONLY PROTECTS THE ORIGINAL END-USER ("YOU") AND IS NOT TRANSFERABLE; ANY ATTEMPT TO TRANSFER THIS WARRANTY SHALL MAKE IT IMMEDIATELY VOID. THIS WARRANTY IS ONLY VALID IN THE COUNTRY OF PURCHASE.
THIS WARRANTY AND REMEDIES SET FORTH ABOVE ARE EXCLUSIVE AND IN LIEU OF ALL OTHER WARRANTIES, REMEDIES AND CONDITIONS, WHETHER ORAL OR WRITTEN, EXPRESS OR IMPLIED. FURRION SPECIFICALLY DISCLAIMS ANY AND ALL IMPLIED WARRANTIES, INCLUDING, WITHOUT LIMITATION, WARRANTIES OF MERCHANTABILITY AND FITNESS FOR A PARTICULAR PURPOSE. IF FURRION CANNOT LAWFULLY DISCLAIM IMPLIED WARRANTIES UNDER THIS LIMITED WARRANTY, ALL SUCH WARRANTIES, INCLUDING WARRANTIES OF MERCHANTABILITY AND FITNESS FOR A PARTICULAR PURPOSE ARE LIMITED IN DURATION TO THE DURATION OF THIS WARRANTY.
No Furrion reseller, agent, or employee is authorized to make any modification, extension, or addition to this warranty.
FURRION IS NOT RESPONSIBLE FOR DIRECT, INDIRECT, SPECIAL, INCIDENTAL OR CONSEQUENTIAL DAMAGES RESULTING FROM ANY BREACH OF WARRANTY OR CONDITION, OR UNDER ANY OTHER LEGAL THEORY, INCLUDING BUT NOT LIMITED TO LOST PROFITS, DOWNTIME, GOODWILL, DAMAGE TO OR REPLACEMENT OF ANY EQUIPMENT OR PROPERTY, ANY COSTS OF RECOVERING, REPROGRAMMING, OR REPRODUCING ANY PROGRAM OR DATA STORED IN OR USED WITH FURRION PRODUCTS. FURRION'S TOTAL LIABILITY IS LIMITED TO THE REPAIR OR REPLACEMENT OF THIS PRODUCT PURSUANT TO THE TERMS OF THIS WARRANTY.
SOME STATES DO NOT ALLOW THE EXCLUSION OR LIMITATION OF INCIDENTAL OR CONSEQUENTIAL DAMAGES OR EXCLUSIONS OR LIMITATIONS ON THE DURATION OF IMPLIED WARRANTIES OR CONDITIONS, SO THE ABOVE LIMITATIONS OR EXCLUSIONS MAY NOT APPLY TO YOU. THIS WARRANTY GIVES YOU SPECIFIC LEGAL RIGHTS, AND YOU MAY ALSO HAVE OTHER RIGHTS THAT VARY BY STATE OR (WHERE APPLICABLE IN THE COUNTRIES WHERE FURRION HAS NON-US/CANADIAN AUTHORIZED DEALERS) COUNTRY. NO ACTION OR CLAIM TO ENFORCE THIS WARRANTY SHALL BE COMMENCED AFTER THE EXPIRATION OF THE WARRANTY PERIOD.
Keep your receipt, delivery slip, or other appropriate payment record to establish the warranty period. Service under this warranty must be obtained by contacting Furrion at warranty@furrion.com
Product features or specifications as described or illustrated are subject to change without notice.
Bienvenue
⑪ SEARCH (RECHERCHE)
natural_image
Line drawing of a rectangular electronic device with a scroll wheel and a directional arrow, labeled 'Fig. 1' (no text or symbols on the diagram itself)natural_image
Technical line drawing of a tablet device with labeled components A and B, showing internal components and directional arrows (no text or symbols beyond labels)SYSTÈME TV
natural_image
Line drawing of a tablet device with a scroll wheel and directional arrow, labeled 'Fig. 1' (no text or symbols on the diagram itself)SISTEMA TV
Furrion Innovation Center & Institute of Technology
● 52567 Independence Ct., Elkhart, IN 46514, USA ● Toll free:1-888-354-5792
Email: support@furrion.com
©2007-2018 Furrion Ltd. Furrion® and the Furrion logo are trademarks licensed for use by Furrion Ltd. and registered in the U.S. and other countries.


- Contents
- Welcome....1
- Contents 2
- Safety and Notice 3
- Introduction....5
- Functional Overview 7
- Before Operation 10
- Maintenance 32
- Troubleshooting....33
- Specifications 35
- Warranty....36
- Safety and Notice
- Safety
- CAUTION
- WARNING
- Class 1 Laser Product
- Notice of compliance
- FCC rules
- FCC Radiation Exposure Statement
- Introduction
- What's in the box
- Precautions
- Features
- Supported Format
- Functional Overview
- Control Panel
- ①
- ②
- ③ ZONE 1/ZONE 2/ ZONE 3
- ④ Number buttons (1 - 6)
- ⑤ Disc slot
- SELEQ
- ⑦ Source buttons
- ⑧ NFC detection area
- ⑨ LCD screen
- IR sensor for remote control
- AUX socket
- socket
- HDMI IN socket
- 14
- USB socket
- RESET
- MIC
- / OK
- 19
- 20
- VOLUME -/+ knob
- SEARCH
- ① PWR
- ② EJECT
- ③ Source buttons
- ④
- OK
- 9
- ⑩ Number buttons (0 - 9) and 10+
- SEARCH
- APS/
- RPT
- RDM
- SUBT/REDIAL
- TITLE/PBC
- STEP/
- MUTE/LOUD
- OSD
- PROG
- AUDIO
- A-B
- EQ
- ZOOM
- ST/ANGLE/#
- LOC/SLOW.FWD/\*
- CLOCK
- 28
- +/-
- SETUP
- SEL
- Before Operation
- Wiring Diagram
- View of Wiring Connecting Socket
- Description of Wiring Connecting Cables
- Location
- Installing the unit
- Prepare the Remote Control
- Remote control battery note
- Operation
- Quick Reference Guide
- Common Operation
- Turn the unit on or switch to standby mode
- Select a source
- About Audio Return Channel (ARC)
- Adjust volume
- Mute
- Display and set the clock
- Set the alarm
- Select a preset EQ mode
- Turn on / off LOUD mode
- Adjust the sound equalizer curves
- Select ZONE 1 / ZONE 2 / ZONE 3
- Reset the unit
- Radio Operation
- Select a radio region
- Select AM/FM band
- Tune to / search for radio stations
- Use the ■APS button
- NOTE:
- Use the preset number button (1-6)
- Switch between STEREO/MONO
- Use the LOC ON / OFF function
- Basic Disc / USB Operation
- Start playback
- Pause playback
- Stop playback
- Select a chapter/track
- Select a chapter / track with the number buttons
- Select a chapter / track from the root/PBC menu (if available)
- For DVD:
- For VCD:
- For MP3/WMA:
- For CD:
- Terminate playback
- Advanced Disc / USB Operation
- Fast backward / forward
- Slow forward
- Play frame by frame
- Play repeatedly
- Repeat One / All
- Repeat A-B
- Play from a specified chapter / track or specified time
- During DVD playback:
- During VCD/MP3/WMA/CD playback:
- Play randomly
- Play from different angles
- Zoom in / out during playback
- Change the caption language
- Change the audio language
- Check the playback status
- Program playback
- Play a JPEG picture CD
- Play MP4
- ESP and ID3 functions
- USB operation
- Set up the DVD System Menu
- TV SYSTEM
- RESOLUTION
- TV TYPE
- PASSWORD
- RATING
- DEFAULT
- OSD LANGUAGE
- AUDIO LANG
- SUBTITLE LANG
- MENU LANG
- AUDIO OUT
- HDMI AUDIO:
- BRIGHTNESS
- CONTRAST
- HUE
- SATURATION
- SHARPNESS
- DOWNMIX
- DYNAMIC RANGE
- DUAL MONO
- About Parental Control
- Accessories: Parental Control
- All rating levels of Parental Control are as follows:
- Region Code
- Appendix: Region code of DVD
- Bluetooth Operation
- Pair DV1230 with your mobile phone
- Disconnect / unpair DV1230 from your mobile phone
- Operate your mobile phone via Bluetooth
- Play an audio file from another Bluetooth device to DV1230
- Set up Bluetooth connection using NFC (only supporting mobile phones with NFC function)
- App Operation
- Install and use the App
- Maintenance
- Maintenance and Cleaning of Discs
- Disc Maintenance
- Disc Cleaning
- Troubleshooting
- Specifications
- Warranty
- Bienvenue
- ⑪ SEARCH (RECHERCHE)
- SYSTÈME TV
- SISTEMA TV
- Furrion Innovation Center & Institute of Technology
Brand : Furrion
Model : DV1230-BL
Category : Radio