
DV5700 - Radio Furrion - Free user manual and instructions
Find the device manual for free DV5700 Furrion in PDF.


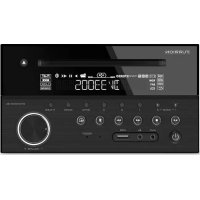
| Product Type | 180W DVD Entertainment System with Bluetooth |
| Brand | Furrion |
| Model | DV5700 |
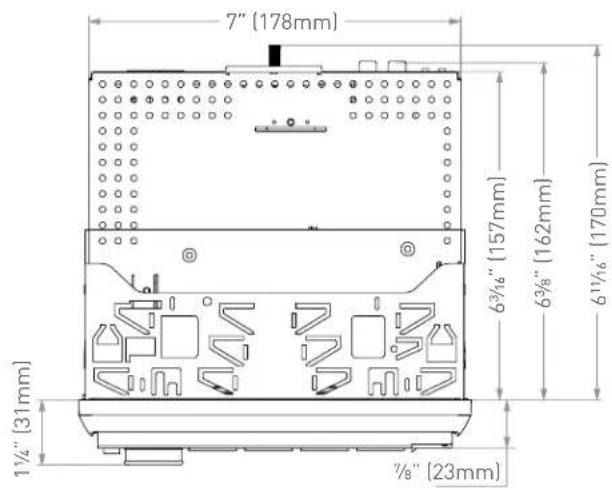
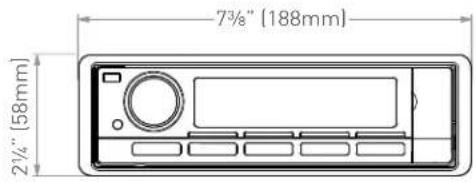
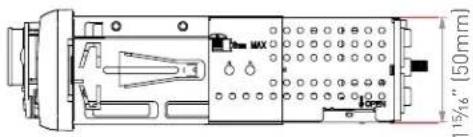
| Dimensions (Unit) | 7 x 6.3 x 6.4 in (178 x 160 x 162 mm) approx. |
| Net Weight | 2.9 lbs (1.32 kg) |
| Power Supply | 12V DC (10.8 - 15.6V allowable) |
| Fuse | 10A |
| Output Power | 45W x 4 channels (MAX) |
| Speaker Impedance | 4 or 8 ohm |
| Supported Disc Formats | DVD, VCD, CD, DVD+/-R, DVD+/-RW, DVD+/-DL, CD-R, CD-RW |
| Supported Media File Formats | MP3, WMA, AVI, DivX, XviD, JPEG |
| Tuner | AM/FM with 30 preset stations |
| Bluetooth | Yes (A2DP audio streaming, hands-free calling) |
| Front Panel | Detachable, 3.7" LCD VA segment display, white backlight |
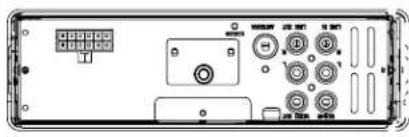
| Inputs/Outputs | USB port, SD/MMC card reader, AUX-IN, Audio L/R input/output, Video output, Subwoofer output, Bluetooth antenna |
| Accessories Included | Remote control with battery, mounting bracket, 12-pin wiring harness, trim ring, rear support strap, screws, quick start guide, warranty card |
| Warranty | 1 year limited warranty |
| Maintenance | Clean front panel connector with cotton swab and contact cleaner; replace fuse with same amperage |
| Safety Certifications | FCC Part 15 Class B, Class 1 Laser Product |
| Country of Origin | Designed in USA, manufactured in China (implied) |
Frequently Asked Questions - DV5700 Furrion
User questions about DV5700 Furrion
0 question about this device. Answer the ones you know or ask your own.
Ask a new question about this device
Download the instructions for your Radio in PDF format for free! Find your manual DV5700 - Furrion and take your electronic device back in hand. On this page are published all the documents necessary for the use of your device. DV5700 by Furrion.
USER MANUAL DV5700 Furrion
Thank you for purchasing this Furrion® DVD Stereo. Before operating your new appliance, please read these instructions carefully. This instruction manual contains information for safe use, installation and maintenance of the appliance.
Please keep this instruction manual in a safe place for future reference. This will ensure safe use and reduce the risk of injury. Be sure to pass on this manual to new owners of this appliance.
The manufacturer does not accept responsibility for any damages due to not observing these instructions.
If you have any further questions regarding our products, please contact us at support@furrion.com
BEFORE YOU BEGIN
PRECAUTIONS:
CAUTION:
USE OF CONTROLS OR ADJUSTMENT OR PERFORMANCE OF PROCEDURES OTHER THAN THOSE SPECIFIED HEREIN MAY RESULT IN HAZARDOUS RADIATION EXPOSURE.
THE USE OF OPTICAL INSTRUMENTS WITH THIS PRODUCT WILL INCREASE EYE HAZARD.
- Keep this manual handy as a reference for operating procedures and precautions.
• Always keep the volume low enough so you can hear sounds outside of the car. - Protect this product from moisture.
- If the battery is disconnected or discharged, the preset memory will be erased and must be reprogrammed.
FEATURES:
DVD
Supported DVD-video, DVD+/-R, DVD+/-RW and DVD+/-DL.
VCD
Supported VCD featuring PBC (playback control).
CD
Supported CD, CD-R and CD-RW.
TV System
This unit is PAL/NTSC system compatible. When connecting other components to this unit, be sure components are compatible with the same video system or else images will not be correctly reproduced.
Aspect Ratio Selection
Switching between wide screen, letter box and panscan display is possible.
Audio Selection
You can switch between multiple audio systems recorded on a DVD as desired.
Subtitle Selection
You can switch between multiple subtitle languages recorded on a DVD as desired.
When an operation is prohibited
When you are watching a DVD and attempt to perform an operation, it may not be supported by the programming on the disc. When this happens, this unit indicates on the screen.
INSTALLATION GUIDE
Location
- Choose a mounting location away from humid areas, water sources, appliances or any equipment that can radiate heat.
- Select an area on a wall or cabinet which is free from cable, fuel or brake lines and ensure that area behind the wall mount stereo has a vent hole or if it is an enclosed box and has adequate room around the rear of the unit for cooling.
- Ensure when the stereo is mounted in the cut out that the wires at the rear of the unit are not pressed against the heat sink.
Installing the unit
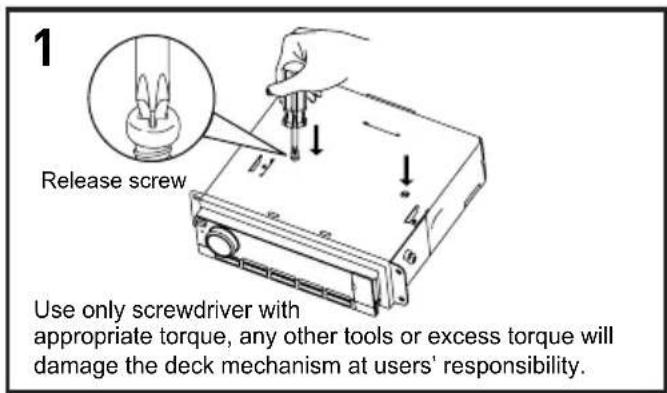
- Before installing the unit, connect the wiring temporarily and make sure the unit and the system work properly.
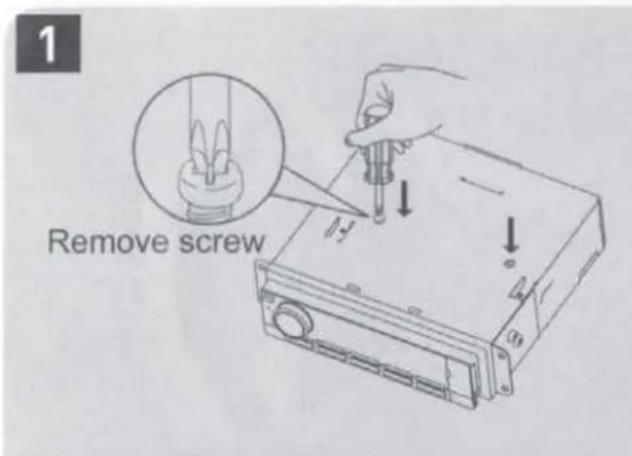
- Fix the unit with screws according to following diagram.


natural_image
Line drawing of a device housing with ports and mounting holes, labeled with number 3 (no text or symbols on the diagram itself)
natural_image
Technical line drawing of a device housing with arrows indicating assembly or movement (no text or symbols)
Detaching and attaching the front panel
The front panel of this unit can be detached in order to prevent the unit from being stolen.
FOLDING DOWN AND DETACHING/ATTACHING THE FRONT PANEL
Before detaching the front panel, be sure to press the button to turn OFF the unit first. Then press the Release button detach the panel by pulling it towards you as illustrated.

Notes:
- Do not press the front panel hard against the unit when attaching it. It can be easily attached by pressing it lightly against the unit.
- Do not press hard or give excessive pressure to the LCD display of the front panel when attaching it to the unit.
CLEANING THE CONNECTOR
The unit may not function properly if the connectors between the unit and the front panel are contaminated with dirt. In order to prevent this from happening, detach the front panel by pressing the 🔊 button and clean the connector from time to time.
Clean the connector with a cotton swab together with contact cleaner(not included.) as illustrated. Be sure to clean them carefully pin by pin and make sure not to damage the connecting points.

WIRE CONNECTION GUIDE
Audio Output:
Left (White) and Right (Red)
Audio Input:
Left (White) and Right (Red)
Subwoofer Output: Green
Video Output: Yellow
Connect to external A/V system to display
Bluetooth Antenna: Black
Note: Red Wire must be connected by car ignition key in order to avoid the car battery being drained when the car will be not used for long period.
Maintenance
FUSE REPLACEMENT
If the fuse blows, check the power connection and replace the fuse. If the fuse blows again after the replacement, there may be an internal malfunction. In this case, consult your nearest repair center.
Warning
Use the specified fuse amperes for each lead. Use of a higher fuse amperes may cause serious damage.

flowchart
graph TD
    A["BLUETOOTH ANTENNA"] --> B["VIDEO OUTPUT (YELLOW)"]
    B --> C["SUBWOOFER OUTPUT (GREEN)"]
    B --> D["L(WHITE)"]
    B --> E["R(RED)"]
    B --> F["ANTENNA CONNECTOR"]
    B --> G["AUDIO OUTPUT AUDIO INPUT"]
    H["FRONT RIGHT SPEAKER"] --> I["GREY/BLACK(-)"]
    H --> J["GREY(+)"]
    K["FRONT LEFT SPEAKER"] --> L["WHITE/BLACK(-)"]
    K --> M["WHITE(+)"]
    N["REAR LEFT SPEAKER"] --> O["GREEN(+)"]
    N --> P["GREEN/BLACK(-)"]
    Q["REAR RIGHT SPEAKER"] --> R["PURPLE(+)"]
    Q --> S["PURPLE/BLACK(-)"]
    T["IGNITION SWITCH"] --> U["RED"]
    V["AUTO ANTENNA"] --> W["BLUE"]
    X["GROUND"] --> Y["BLACK"]
    Z["MEMORY B+"] --> AA["YELLOW"]
    AB["FUSE 10A"] --> AC["Grid"]
    AD["Grid"] --> AE["Grid"]
Locations of Parts (Main unit)
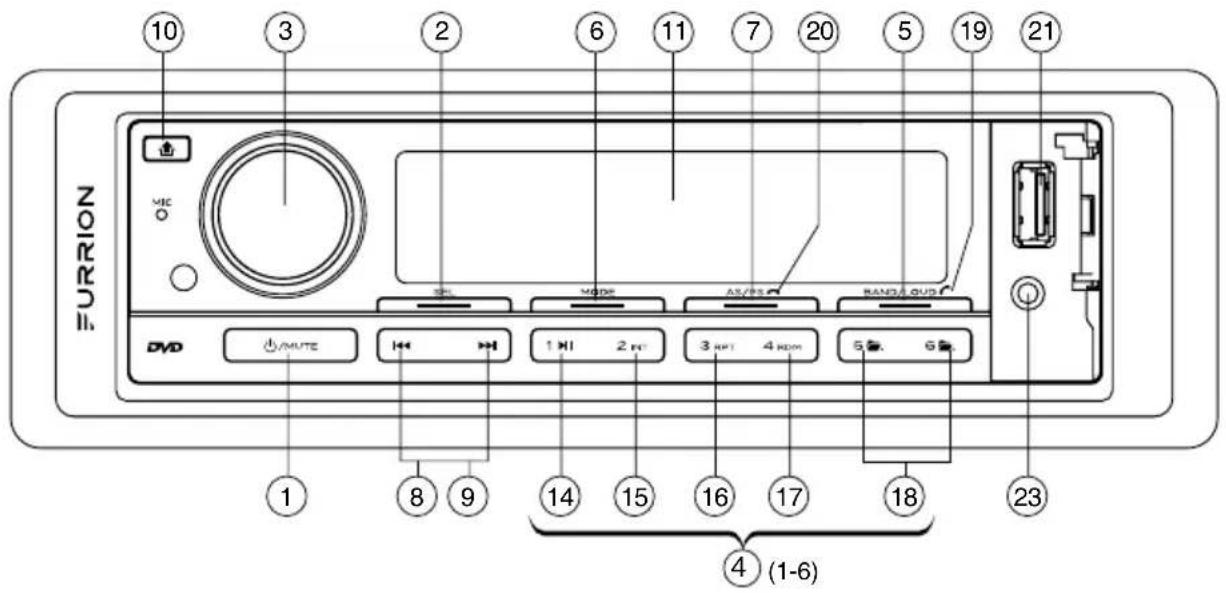
- POWER ON/OFF ⏻) / MUTE BUTTON
- SELECT FUNCTION BUTTON (SEL)
- VOLUME KNOB
- PRESET STATIONS (1,2,3,4,5,6) BUTTON
- BAND / LOUDNESS BUTTON
- MODE / SUBWOOFER BUTTON (MODE)
- AUTO SEEK/PRESET SCAN BUTTON (AS/PS)
- PREVIOUS/NEXT TRACK/CHAPTER BUTTON (◄◄ / ►)
- AUTO SEEK TUNING BUTTON
- FRONT PANEL RELEASE BUTTON (▲)
- LCD DISPLAY
- DISC EJECT BUTTON (▲)
- DISC SLOT
- PLAY/PAUSE BUTTON
- INTRO BUTTON (INT)
- REPEAT BUTTON (RPT)
- RANDOM BUTTON (RDM)
- SEARCH PREVIOUS / NEXT FOLDER BUTTON (☐/☐)
- ANSWER BUTTON ( )
- HANG UP BUTTON (☐)
- USB PORT
- MEMORY CARD SLOT (SD/MMC)
- AUX IN


Locations of Parts (Remote Control)
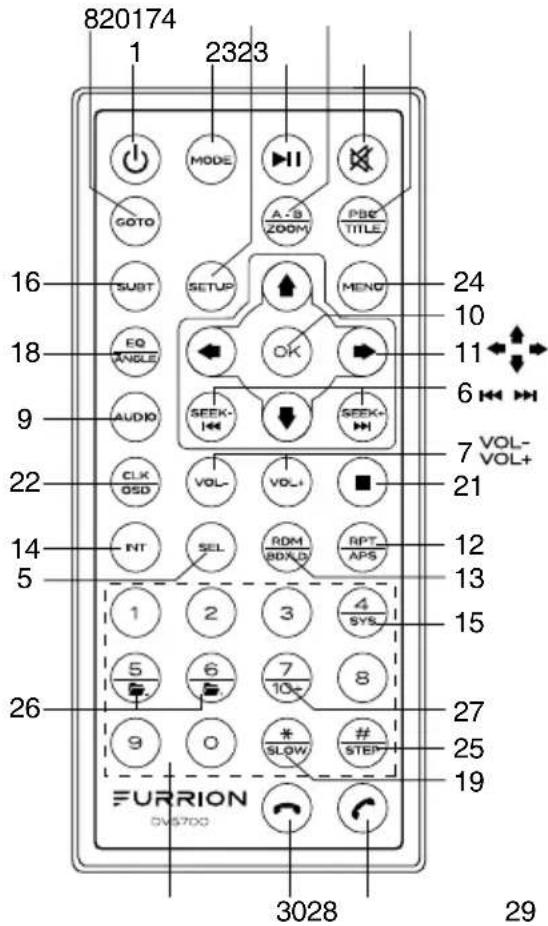
-
POWER ON/OFF
-
MODE
-
PLAY/PAUSE
-
TITLE / PLAYBACK CONTROL (PBC)
-
SELECT (SEL)
-
SEEK+/SEEK-/PREVIOUS/NEXT TRACK/CHAPTER
-
VOL +/VOL-
-
GOTO
-
AUDIO
-
OK
-
UP/DOWN/LEFT/RIGHT
-
REPEAT/AUTO SEEK/PRESET SCAN
-
RANDOM / BAND / LOUDNESS
-
INTRO
-
SYSTEM (PAL/NTSC)
-
SUBTITLE
-
SETUP
-
EQUALIZER / ANGLE
-
SLOW MOTION
-
A-B REPEAT/ZOOM
-
STOP
-
CLOCK / ON SCREEN DISPLAY
-
MUTE
-
MAIN MENU
-
STEP (FRAME BY FRAME PLAYBACK)
-
PREVIOUS/NEXT FOLDER
-
TWO DIGIT TRACKS SEARCHS
-
PHONE NUMBER
-
ANSWER
-
HANG UP
Use and care of the remote control
Installing the battery
Slide the tray out on the back of the remote control and insert the battery with the plus (+) and minus (-) poles pointing in the proper direction.
- When using for the first time, pull out the film protruding from the tray.

CAUTIONS
- Remove the battery if the remote control is not used for a month or longer.
- Do not recharge, disassemble, heat or dispose of the battery in a fire.
• Do not store the battery with metallic materials.
• In the event of battery leakage, wipe the remote control completely clean and install a new battery
- When disposing of used batteries, please comply with government regulations or environ institution's rule that apply in your country/area.
- Always check carefully that you are loading the battery with plus (+) and minus (-) poles facing the proper directions.
Using the remote control
Point the remote control in the direction of the front panel to operate.
IMPORTANT
- Do not store the remote control in high temperatures or direct sunlight.
- Do not let the remote control fall onto the floor, where it may become jammed under the brake or accelerator pedal.
WARNING
Do not ingest the battery, Chemical Burn Hazard
(The remote control supplied with) This product contains a coin/button cell battery. If the coin/button cell battery is swallowed, it can cause severe internal burns in just 2 hours and can lead to death.
Keep new and used batteries away from children.
If the battery compartment does not close securely, stop using the product and keep it away from children. If you think batteries might have been swallowed or placed inside any part of the body, seek immediate medical attention.
GENERAL OPERATIONS
Turning the unit ON/OFF ( )
Press “⏻” button to turn on unit. To turn off, press and hold this button for 2 seconds.
Selecting a source (MODE)
Press MODE repeatedly to switch between TUNER, DISC, USB, SD, Bluetooth and AV IN mode.
Loading a disc
Make sure power is turned ON before inserting a disc.
-
Press ⬆ to open the front panel
-
Insert a disc into the disc slot
Ejecting a disc
Make sure power is turned ON before ejecting a disc. Press ▲ button to eject disc.
Adjusting Volume/Bass/Treble/Balance/Fader
- Unit: Turning the VOL knob Right or Left. Increase or decrease the volume by turning VOL or VOL. Press the SEL button briefly the BASS, TREBLE, BALANCE and FADER function.
- Remote Control: Press VOL+ or VOL- to increase or decrease volume.
Further settings via the Select Function Button (SEL)
Press and hold SEL button to adjust EQ/LOUD/STEREO/LOCAL:
2 sec.

flowchart
graph LR
    A["SEL"] --> B["EQ"]
    B --> C["SEL"]
    C --> D["LOUD"]
    D --> E["SEL"]
    E --> F["STEREO"]
    F --> G["SEL"]
    G --> H["LOC"]
    H --> I["Output"]
EQ CONTROLS
Turn VOL knob to select FLAT/CLASS/ROCK/CINEMA.
LOUDNESS
Turn VOL knob to select LOUD ON/OFF.
STEREO/MONO
Turn VOL knob to select STEREO/MONO. When reception of an FM station is weak, listening quality can be improved by switching to mono sound.
LOCAL/DX
Turn VOL knob to select LOCAL/DX. At LOCAL the LCD Display shows LOC ON, at DX(Distant) the LCD Display shows LOC OFF. "Local" position in areas with strong signals to let radio stop at only strong stations during manual tuning (LOC appears). Press to Distant position in areas with weak signals to listen to all stations.
Mute
- Unit: Press “ ⏻/MUTE” button once to mute the sound, press again to resume.
- Remote Control: Press ✗ button to mute the sound at once. Press again to return to previous volume level.
Loudness
- Unit: Press and hold BAND/LOUD button to turn on/off LOUDNESS feature.
- Remote Control: Press and hold LD button on remote control to turn on/off LOUDNESS feature.
Equalizer
Remote: Press EQ button. Press EQ again or ↕/▶button to select between Flat/Classic/Cinema/Rock/EQ Off equalize modes.
Subwoofer
- Press Unit: and hold MODE button to turn on/off subwoofer.
Clock Setting (only Radio mode)
- Press CLK button on remote control.
- Press and hold CLK button again.
- Turn VOL knob on unit to adjust hours. Press CLK button and Turn VOL button on unit to adjust minutes.
- Press OK button on remote control.
LISTENING TO RADIO
Band
Press BAND button on unit or BD button on remote control repeatedly will toggle cyclically between each band. FM1--FM2--FM3--AM1--AM2.
Automatic or Manual tuning ( ◀◀ / ▶◀ )
MANUAL TUNING: Press and hold ◀◀ / button 2 sec. until MANUAL show on the display.
Press ◀◀ / button to adjust by channel step frequency.
AUTOMATIC TUNING: Press ◀/ button are operated as auto seek tuning.
Auto Seek/Preset scan (AS/PS)
Preset Scan - By pressing AS/PS button shortly, the radio plays each preset station for 5 seconds. Auto Seek - By pressing AS/PS button longer than 1 sec, auto seek is activated. The strong stations are preset and stored in the corresponding preset number. When Auto Seek operation is finished, the radio executes the preset scan.
Storing and Recalling Frequencies
If you press any of the NUMBER (1-6) you can easily store up to six broadcast frequencies for later recall with the touch of a button.
-
Choose a desired BAND.
-
When you find a frequency that you want to store in memory, press a NUMBER(1-6) and hold until the preset number shows and lit in the display.
-
The selected radio station frequency has been stored in memory. The next time you press the same NUMBER (1-6) the radio station frequency is recalled from memory.
Note: Up to 6 stations can be stored in each band.
Switching between USA/AUSTRALIA frequency tuning
How to switch between the two frequencies.
-
In Radio mode, press and hold (BAND/LOUD) button for 2 seconds. Immediately follow by press 3 RPT → 1→ 5 to change USA/Australia frequency.
-
Turn power OFF and ON again.
-
In radio mode, tune to any station using MANUAL tune mode, you will notice that the channel step has change.
Note: Default setting is set to USA frequency.
PHOTO Viewing:
Unit:
Files search for stop mode:
-
Press AS/PS button to stop any playback.
-
Press ◀◀ / button to select "photo" listable
-
Rotate volume knob to select *.JPG file to view or press SEL button to start play from first photo.
-
Press ▶ for next photo.
-
Press ◀◀ for previous photo.
-
Press 3 RPT button repeatedly to select Rep-1/Rep DIR/Rep ALL repeatedly playback until press [A/PS] button.
Remote control:
Files search for stop mode:
- PressSTOP button to stop any playback.
- Press (→) button repeatedly to select "photo" filisted.
- Press (▲,▼) button to select desired folder then press OK button to confirm.
- Press (▲,▼) button to select desired JPG then press OK button to start playback photo.
- Press SEEK+▶ for next photo.
- Press SEEK-◀◀ for previous photo.
- Press RPT button repeatedly to select Rep-1/Rep DIR/Rep ALL repeatedly playback until press STOP button.
CD/MP3/WMA Music listening:
Unit:
Files search for stop mode:
- Press AS/PS button to select media.
- Press ◀◀ / button to select "MUSIC" list file.
- Rotate volume knob to select desired folder.
- Rotate volume knob to select musicfile and press SEL button to playback or press SEL button to start play from first file.
- Press ▶ for next file.
- Press ◀◀ for previous file.
- Press 1 ▶ button for pause, press again for resume playback.
- CD playback only: Press INT button to select INTRO or SEQ play, you can select INTRO to introducing play each file 10sec.
- Press 3 RPT button repeatedly to select Rep-1/Rep DIR(MP3/WMA only)/Rep ALL/Rep OFF to repeatedly playback.
- Press 4 RDM button to select RANDOM ON/OFF to random playback.
Remote control:
Files search for stop mode:
- Press STOP button to stop any playback.
- Press (→) button repeatedly to select "MUSIC" filled.
- Press (▲, ▼button to select desired folder then press OK button to confirm.
- Press (▲, ▼button to select desired then press OK button to start playback music.
- Press SEEK+ ▶▶ for next file.
- Press SEEK-◀◀ for previous file.
- Press ▶ button for pause, press again for resume playback.
- CD playback only: Press INT button to select INTRO or SEQ play, you can select INTRO to play each file for 10 sec.
- Press RPT button repeatedly to select Rep-1/ Rep DIR(MP3/WMA only)/Rep ALL/Rep OFF repeatedly playback.
- Press RDM button to select RANDOM ON/OFF to random playback.
Movie Playback:
Unit
Files search for stop mode:
- Press AS/PS button to stop any playback.
- Press ◀◀ / button to select "Video" listed.
- Rotate volume knob to select movie file to playback or press SEL button to start play from first file.
- Press ▶ for next file.
- Press ◀◀ for previous file.
- Press 3 RPT button repeatedly to select Rep-1/Rep DIR/Rep ALL/Rep OFF repeatedly playback until press AS/PS button.
Remote control:
Files search for stop mode:
- Press Stop button to stop any playback.
- Press (→) button repeatedly to select "Video" filled.
- Press (▲,▼) button to select desired folder then press OK to confirm.
- Press (▲, ↓) button to select desired movie then press OK button to start playback.
- Press SEEK+ ▶▶ for next file.
- Press SEEK-◀◀ for previous file.
- Press RPT button repeatedly to select Rep-1/Rep DIR/Rep ALL/Rep OFF repeatedly playback until the STOP button is pressed.
Stopping Playback
- Press STOP on remote control during playback to stop playback. That position is stored in memory.
- Press ▶ to continue. Playback starts from the track at which it was stopped.
Fast Forward / Fast Reverse
- During playback, press and hold ◀◀ or ▶Unit scans at the speed of x2 - x4 - x8 - x16 - x20.
- To resume normal playback at a desired point, press ▶II.
Note: No sound is come out during fast forward/fast reverse at over x2 high speed search.
Finding the Beginning of Tracks
During playback, press ◀◀ or ▶◀
◀◀ : Press to start playback from the beginning of the previous chapter or track.
▶▶ : Press to start playback from the beginning of the following chapter or track.
Pause Playback
During playback, press ▶. Press again to resume playback.
A-B Repeat Playback
This feature allows you to loop playback a section of the movie/audio starting from Point A to B.
- Press the ▶ button to play the movie/audio.
- Once you have located the section you wish to playback on loop repeat, press and hold Remote's A-B button. You will see "REPEAT A-" on the screen.
- Let the movie/audio play on until you have reached the end of the section you wish to watch on continuous loop. Once you have reached this point, press and hold remote's A-B button again. "REPEAT A-B" will appear on your screen. Playback will now start from Point A –B.
- To stop A-B repeat playback, press and hold remote's A-B button once more until "A-B CANCEL" disappears and normal playback resumes.
Displaying information (OSD) - video files only
During playback, you can see all information and current play settings. Display will show related, elapse time, title number, chapter number and other information.
Press OSD on the remote control once. Unit will display the disc elapse time.
USB / MEMORY CARD (SD/MMC) / AUX-IN PLAYBACK
AUX IN
An external AV source (e.g. portable MP3 player) can be connected to the AUX IN socket to be played back by the vehicle loudspeakers.
- Connect the AUX-IN socket with the AV output of the external device.
USB/Memory Card (SD/MMC)
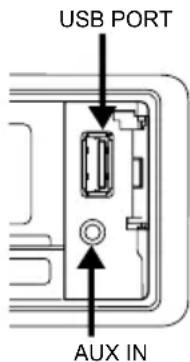
The device is equipped with a USB interface and a memory card reader for SD/MMC cards. MP3/WMA/AVI files stored on these media types can be played.
Note:
- Due to the great variety of devices with USB and SD/MMC card interfaces that sometimes have manufacturer-specific functions, we cannot guarantee that all media will be recognized and that all operational functions will be available with this device.
- You cannot operate USB hard drives on the device.
- It may be necessary to turn the flash memory ON so that it can be read.
- Plug your USB storage medium into the USB port.
- If you use a memory card, insert it into the memory card reader.
- The player automatically switches to the input used and starts playback.
- See the section on operations common for audio / video file on how to control USB or memory card playback.

flowchart
graph LR
    A["Hand pressing down the door panel"] --> B["Arrow pointing to the door panel"]
    B --> C["Arrow pointing to the door panel"]
    C --> D["Arrow pointing to the door panel"]
    D --> E["Arrow pointing to the door panel"]
    E --> F["Arrow pointing to the door panel"]
    F --> G["Arrow pointing to the door panel"]
DVD/VCD PLAYBACK
Playback
- Insert a disc. When the disc offers a menu, the menu is displayed. When a disc is already inserted, press MODE to switch to disc mode.
- On DVD and VCD with playback control (PBC), menu screens may appear automatically. If this happens, perform the operation described below to start playback.
CAUTION: Make sure that the TV system settings is set correctly according to the disc that is playing. If you are not sure, leave it set to "Auto". Improper setup of TV system might cause the video to stop/skip/pause playing although audio might continue to play. You can setup TV settings using the SETUP feature of the remote control. Refer to "SETTING UP THE DVD PLAYER" section.
DVD menu
Press ↑, ↓, to select the desired item, then press OK.
VCD menu
Use the number keys ("0" to "9") to select the desired number. The menu screen does not appear when the PBC function is turned off. In this case, press and hold button to turn on PBC feature.
Turning PBC ON/OFF (VCD only)
PBC (Playback Control) is a feature found on VCD 2.0 and SVCD 1.0. PBC allows control of the playback of play items and the possibility of interaction with the user through the remote control or some other input device available. If it's on, the player won't auto start after inserting the disc because it will take time to select program on disc; if it's off, the player will auto playback the program on disc one by one.
- To turn ON PBC function, press PBC on the remote control. To turn OFF, press the button again.
Note:
• Not all VCD/SVCD disc have PBC functions.
- While playing VCD and PBC function is turned ON, Repeat / Intro / Random function will not work.
Repeat Playback
FOR VCD
- Press RPT on the remote control during playback.
- Every time you press this button, the unit switches to the following settings:
Repeat 1 – Repeat the current playback track.
Repeat Off – Turn OFF repeat function.
Note: PBC feature in VCD disc needs to be STOP in order to use Repeat playback.
FOR DVD
You can choose between repeat playback of a title or chapter.
-
Press RPT on the remote control during playback.
-
Every time you press this button, the unit switches to the following settings:
Repeat Title – Repeat the current playback title.
Repeat Chapter – Repeat the current playback chapter.
Repeat Off – Turn OFF repeat function.
Searching for particular track using GOTO
You can use the GOTO function to search for a desired track number or particular point of a track to play.
-
Press GOTO button on the remote control during playback. Press ◆ or 🔊 button to select Title/ Chapter, Time serach appears.
-
Enter Title/Chapter for currently playback disc. press enter to confirm.
-
If you want to search by time, enter the time, minute and second then press enter to confirm.
Changing audio language during playback (Multi-audio)
Some DVD can provide audio playback with different languages and different systems (Dolby Digital... etc.). With DVD featuring multi-audio recordings, you can switch between languages/audio systems during playback.
VCD can provide different audio languages usually divided into left and right channels.
- To choose different audio, simply press AUDIO button on the remote control repeatedly during playback.
Note:
- With some DVDs, switching between languages/audio systems may only be possible using a menu display.
- You can also switch between languages/audio systems using SET-UP MENU or tap the screen then press Audio
Changing the subtitle language during playback (Multi-subtitle)
With DVDs featuring multi-subtitle recordings, you can switch between subtitle languages during playback.
- Press SUBT button on the remote control during playback. Press repeatedly until the supported desired subtitle appears.
Note:
- With some DVDs, switching between subtitles may only be possible using a menu display.
- You can also switch between subtitles using SET-UP MENU or tap the screen then press Subtitle.
Changing the viewing angle during playback (Multi-angle) – (DVD only)
With DVDs featuring multi-angle (scenes shot from multiple angles) recordings, you can switch among viewing angles during play-back.
- Press and hold ANGLE button on the remote control during playback of a scene. Press ANGLE button repeatedly to select the desired angle to play.
Title (DVD only)
During DVD playback, Press TITLE button on remote control to return to FIRST title.
Return to Root Menu (DVD only)
During DVD playback, press MENU button to return to root menu.
Note: Some DVDs may not contain root menu.
Slow motion playback
This feature lets you slow down playback.
-
Press SLOW button on the remote control during playback.
-
Pressing it repeatedly will switch you to the following steps: 1/2 - 1/3 - 1/4 - 1/5 - 1/6 - 1/7.
Note:
- To resume normal playback, press PLAY/PAUSE (▶II).
• There is no sound during slow motion playback. - With some disc, slow motion may be unclear during slow motion playback.
Zooming in During Playback
You can zoom in into the picture during playback.
- Press ZOOM button on the remote control during playback.
- Every time you press this button, the unit will zoom 2 - 3 - 4 - 1/2 - 1/3 - 1/4 times and OFF.
STEP (Frame by frame playback)
This lets you move ahead one frame at a time during playback.
Each time you press step button on remote control, you move ahead on frame. To return to normal playback, press ▶ button.
PAL / NTSC
Press and hold SYS button to switch between PAL, NTSC system.
Return / Go Back
Press MENU button on remote control to go back one level or return to previous menu.
CUSTOMIZING SOUND SETTINGS
- Press SEL button to enter AUDIO setup. Selected item will be highlighted. You can set BASS, TREBLE, BALANCE, FADER.
- Rotate VOL knob to make adjustments.
- Press SEL button to select BASS, TREBLE, BALANCE, FADER and exit settings.
SETTING THE DVD PLAYER
You can fleximize the unit to suit your preference. You can set the language and other video and audio settings so when playback starts it will always use your preferred settings.
Important:
- Play any video file before you can access the setup.
- Press SETUP button on the remote control.
- Used , , to select DVD to return/enter setup category.
| Settings | Category | Options |
| SYSTEM SETUP | TV SYSTEM | NTSC, PAL, AUTO |
| AUTO PLAY | ON/OFF | |
| TV TYPE | 4:3PS, 4:3LB, 16:9 | |
| PASSWORD | Setup password | |
| RATING | Setup rating level | |
| DEFAULT | Restore to factory settings | |
| LANGUAGE SETUP | OSD Language | Select preferred options on screen |
| AUDIO Language | ||
| SUBTITLE Language | ||
| MENU Language | ||
| MPEG4 Language | ||
| VIDEO SETUP | BRIGHTNESS | Select preferred options on screen |
| CONTRAST | ||
| HUE | ||
| SATURATION | ||
| SHARPNESS |
Setting Rating Password
- Press SETUP button on the remote control.
- Using Navigation keys select System Setup > Password and press OK button.
- Enter the default password '0000' and press OK button to unlock first and then enter new 4 digit password and press OK button. The unlock logo will switch to lock indicating password has been set.
Note:
- The default password is '0000'.
| Supported Video Format | |||||
| File Extension | Container | Video Codec | Audio Codec | Resolution | Remark |
| .avi.divx | AVI | DivX 3.xxDivX 4.xxDivX 5.xxDivX 6.xxXviDMPEG-1 | Dolby Digital (AC3)WMA/PCM/LPCM MPEG-Audio (MP1/MP2/MP3) | 720 x 480 (30fps) | |
| .mpg | MPG | MPEG-1MPEG-2 | LPCM MPEG-Audio (MP1/MP2/MP3) | 720 x 576 (30fps) | |
| .dat | DAT | MPEG-1MPEG-2 | LPCM MPEG-Audio (MP1/MP2/MP3) | 352 x 240 (30fps) | |
| .vob | VOB | MPEG-1MPEG-2 | Dolby Digital (AC3) | 720 x 480 (30fps) | |
| Supported Audio Format | |||||
| File Extension | Audio Codec | Bit Rate | Sampling Rate | Remark | |
| .mp3 | MP3 | 16kbps - 320kbps | 8k - 48kHz | ||
| .wma | WMA | 16kbps - 320kbps | 8k - 48kHz | WMA only support WMA7/WMA8/WMA9 (CBR/VBR)(Only support 353 format) | |
Note: Reading the above file formats is not guaranteed.
HOW TO USE BLUETOOTH IN YOUR STEREO
Pairing
Before your mobile phone can communicate with the stereo, you must first complete the pairing procedure to connect them together.
- Press MODE button on main unit/remote control until "BT" or "BT AUDIO" is shown on LCD Display.
- Turn on Bluetooth function of your mobile phone, then select "add Bluetooth device" from your mobile phone; the mobile phone will search any activated Bluetooth devices nearby, select "Furrion DV5700" and enter Passkey "0000" to connect (refer to manual of your mobile phone for detail if needed).
- After this pairing process is successfully completed, connect your mobile phone with the stereo, a Bluetooth logo will appear on mobile phone's notification bar.
Note: "Furrion DV5700" is the Bluetooth device name of this stereo.
Audio Streaming
If your mobile phone supports A2DP profile, the music playback can be streamed to the stereo.
- Make sure your mobile phone and stereo are properly paired and connected.
- Play music on your mobile phone.
- "BT AUDIO" will be shown on LCD Display of stereo, music is streamed to the stereo.
- You can press or button on main unit to select previous or next in track/fee phone.
Making Call
Important: Before you make a call, make sure your mobile phone and stereo are properly paired and connected.
- Press MODE button on main unit/remote control until BT or BT AUDIO is shown on LCD Display.
- Press and hold INT button on main unit/remote control to go to previous menu, then "BT" will be shown on LCD Display.
- Press ◀ button on main unit to select "DIAL", press and hold SEL button on main unit/remote control to enter "KEYPAD".
- To make a call via remote control, tap number buttons and press " 🔍" button on main unit/remote control to dial.
- Press "☐" button on main unit/remote control to hang up.
Answering/Rejecting/Hanging Up Call
- To answer an incoming call, press " 🔍" button on main unit/remote control. To reject an incoming call, just press " 🔍" button on main unit/remote control.
- After you have finished the conversation, press " 🔍" button on main unit/remote control to hang up.
History
History contains the lists of dialed, received and missed calls.
- Press MODE button on main unit/remote control until "BT" or "BT AUDIO" is shown on LCD Display.
- Press and hold INT button on main unit/remote control to go to previous menu, then "BT" will be shown on LCD Display.
- Press ◀ button on main unit to select "HISTORY", press and hold SEL button on main unit/remote control to enter "CALL LOG".
- Press ◀◀ or button on main unit to select the number, then press “ ” button on main unit/remote control to dial.
TECHNICAL SPECIFICATIONS
DVD PLAYER SYSTEM
Signal to Noise Ratio > 60 dB
Channel Separation > 50 dB (1kHz)
Frequency Response 20 Hz - 20 kHz
FM RADIO
Frequency Range 87.5-107.9 MHz (USA)
87.5-108 MHz (AUSTRALIA)
Channel Step 200 kHz (USA)
100 kHz (AUSTRALIA)
Sensitivity 2.8 μV
Stereo Separation 30 dB
Signal to Noise Ratio 50 dB
AM RADIO
Frequency Range 530-1710 kHz (USA)
522-1710 kHz (AUSTRALIA)
Channel Step 10 kHz (USA)
9 kHz (AUSTRALIA)
Usable Sensitivity 32 dB
AUDIO/VIDEO OUTPUT
Output 750 mV
Impedance 10k Ohm
GENERAL
Power Supply 12V DC (10.8-15.6V allowable)
Speaker Impedance 4 or 8 ohm
Output power 45W x 4CH
Fuse 10A
Note: Specification and the design are subject to possible modification without notice due to improvements.
FCC ID: 2ABH3-DV5XXX
Note: This equipment has been tested and found to comply with the limits for a Class B digital device, pursuant to part 15 of the FCC Rules. These limits are designed to provide reasonable protection against harmful interference in a residential installation. This equipment generates uses and can radiate radio frequency energy and, if not installed and used in accordance with the instructions, may cause harmful interference to radio communications. However, there is no guarantee that interference will not occur in a particular installation. If this equipment does cause harmful interference to radio or television reception, which can be determined by turning the equipment off and on, the user is encouraged to try to correct the interference by one or more of the following measures:
- Reorient or relocate the receiving antenna.
- Increase the separation between the equipment and receiver.
-Connect the equipment into an outlet on a circuit different from that to which the receiver is connected.
-Consult the dealer or an experienced radio/TV technician for help.
Changes or modifications not expressly approved by the party responsible for compliance could void the user's authority to operate the equipment. This device complies with Part 15 of the FCC Rules. Operation is subject to the following two conditions:
(1) this device may not cause harmful interference, and
(2) this device must accept any interference received, including interference that may cause undesired operation.


Correct Disposal of this product. This marking indicates that this product should not be disposed with other household wastes throughout the EU. To prevent possible harm to the environment or human health from uncontrolled waste disposal, recycle it responsibly to promote the sustainable reuse of material resources. To return your used device, please use the return and collection systems or contact the retailer where the product was purchased. They can take this product for environmental safe recycling.

FURRION
Furrion Innovation Center & Institute of Technology
• 52567 Independence Ct., Elkhart, IN 46514, USA • Toll free: 1-888-354-5792
©2007-2018 Furrion Ltd. Furrion® and the Furrion logo are trademarks licensed for use by Furrion Ltd. and registered in the U.S. and other countries.
FURRION.COM
FURRION
Entertainment System Système de divertissement Sistema de entretenimiento

This quick start guide will help you install and use the device properly. For further support and to download the complete user manual please visit www.furrion.com/support.
WHAT'S IN THE BOX
DV5700 main unit
- Mounting screws
- Trim ring
- Harness
- Remote Control
- Hang Tag
- Warning Card
- Quick Start Guide
- Warranty Card
NOTE: Product design and packaging may change without notice.
SETUP
STEP 1: CONNECT YOUR DEVICE
Please connect according to following diagram for proper functionality.

flowchart
graph TD
    A["AUDIO IN"] --> B["Antenna Connector"]
    B --> C["WIRING HARNESS"]
    C --> D["WIRING SOCKET"]
    E["SUBWOOFER OUT"] --> B
    F["VIDEO OUT"] --> B
    G["BLUETOOTH ANTENNA"] --> B
    H["1 3 5 7 9 11"] --> I["10"]
    J["2 4 6 8 12"] --> I
    K["10"] -.-> I
| PIN NO. | COLOR | FUNCTION |
| 1 | GRAY | FRONT RIGHT SPEAKER (+) |
| 2 | GRAY/BLACK | FRONT RIGHT SPEAKER (-) |
| 3 | WHITE | FRONT LEFT SPEAKER (+) |
| 4 | WHITE/BLACK | FRONT LEFT SPEAKER (-) |
| 5 | GREEN/BLACK | REAR LEFT SPEAKER (-) |
| 6 | GREEN | REAR LEFT SPEAKER (+) |
| 7 | PURPLE/BLACK | REAR RIGHT SPEAKER (-) |
| 8 | PURPLE | REAR RIGHT SPEAKER (+) |
| 9 | BLUE | AUTO ANTENNA |
| 10 | RED | +12VDC IGNITION SWITCH |
| 11 | YELLOW | MEMORY +12VDC |
| 12 | BLACK | GROUND |
STEP 2: INSTALL YOUR DEVICE
IMPORTANT: Before final installation, check by powering the stereo on to make sure unit operates properly.
Fix the unit with screws according to the following diagram.


natural_image
Line drawing of a device casing with mounting holes and directional arrows indicating assembly (no text or symbols)
natural_image
Technical line drawing of a device with internal components and directional arrows indicating movement (no text or symbols)STEP 3: PREPARE THE REMOTE CONTROL

natural_image
Line drawing of a rectangular electronic device with a scroll and arrow indicating direction (no text or symbols)Before use, remove the insulating sheet from the remote control as indicated.
BASIC OPERATION
TURN ON/OFF
Press ⏻ on the front panel to turn on the unit.
Press and hold ⏻ for 2 seconds to turn off the unit.
SELECT A SOURCE
Press MODE on the front panel once or more to select TUNER, DISC (with a disc loaded), USB (with a USB storage device connected), SD, Bluetooth, or AUX.
INSERT A DISC
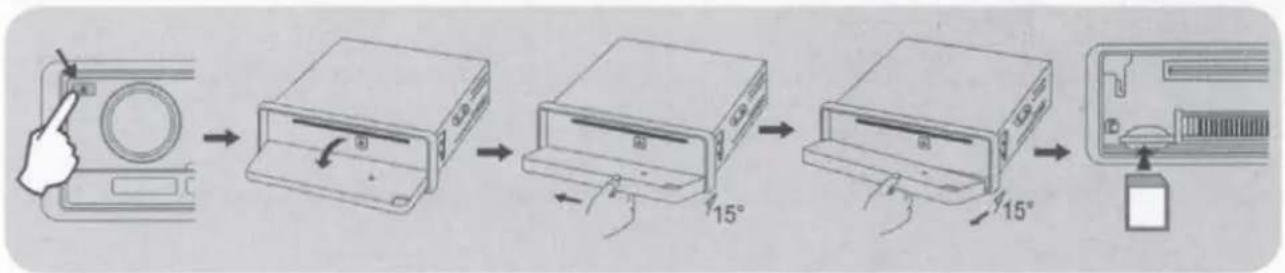
Press ↑ on the front panel to unlock and release the front panel. With the label facing up, insert a disc into the disc slot. Lift up to fix and lock the front panel.
INSERT SD (MMC) CARD
flowchart
graph LR
    A["Device with scroll icon"] --> B["Device with CD inside"]
    B --> C["Device with 15° foldable"]
    C --> D["Device with 15° foldable"]
    D --> E["Final packaging or storage unit"]
Detach the front panel to expose the SD (MMC) card slot, and insert a supported card.
ADJUST VOLUME
Rotate the volume knob on the front panel to adjust volume.
MUTE
Press MUTE on the front panel to mute sound output.
Press MUTE again to resume.
SET CLOCK
Press CLK on the remote control to display the clock on the LCD. Press and hold CLK till the hour digits flash on the LCD. Then press ▲/▼ on the remote control (or rotate the volume knob on the front panel) to adjust the hour.
Press CLK on the remote control to switch to minute setup and the minute digits will flash on the LCD. Press ♠/▼ on the remote control (or rotate the volume knob on the front panel) to adjust the minute. Press OK on the remote control to confirm the setting.
SELECT A PRESET EQ
Press EQ on the remote control once or more (or press and hold SEL on the front panel once or more to select EQ and then rotate the volume knob on the front panel) to select Flat, Classic, Cinema, Rock, or EQ Off.
TURN ON / OFF LOUDNESS EFFECT
Press and hold LOUD on the front panel (or LD on the remote control) to turn on or off the loudness sound effect.
SELECT A FEATURE/SETTING
Press SEL on the front panel once or more to select BASS (without EQ preset), TRE (without EQ preset), BAL or FAD.
Then rotate the volume knob on the front panel to select a feature / setting.

natural_image
Simple question mark inside a speech bubble outline (no text or symbols)
natural_image
Abstract geometric pattern with three parallel horizontal lines and a curved segment (no text or symbols)
www.furrion.com/support

1-888-354-5792

support@furrion.com
FURRION
Furrion Innovation Center & Institute of Technology
● 52567 Independence Ct., Elkhart, IN 46514, USA
©2007-2018 Furrion Ltd. Furrion® and the Furrion logo are trademarks licensed for use by Furrion Ltd. and registered in the U.S. and other countries.
180W DVD Entertainment System with Bluetooth


Bluetooth®
Main Features


VIBRATIONSMART™CLIMATESMART™ SIGNALSMADIXILIARY IN
USB INTERFACE
MEMORY CARD READER
SUBWOOFER OUT

Specifications
| Din Type | 1-din |
| Front Panel Type | Detachable |
| Supported Disc Format | CD & DVD |
| Supported Media Format | MP3/WMA/AVI |
| Tuner Type | AM & FM |
| Number of Preset Stations | 30 |
| RDS | • |
| USB | √ |
| USB Charge (500mA) | √ |
| Card Reader | √ |
| Memory Card Support | SD/MMC |
| AUX-IN | √ |
| AUX-IN Video Support | √ |
| HDMI-IN | • |
| Bluetooth | 21 |
| Display Type | LCD (VA Segment) |
| Display Size (inch) | 3.7" |
| Display Backlight Color | White |
| Key Illumination Color | White |
| Rotary Volume Control | √ |
| Accessories Included | Remote Control with BatteriesMounting Bracket12-pin Connecting WiresManualWarranty Card |
| Power Output (Watt) | 4 x 45W (MAX) |
| Power Connector Type | 12-pin |
Inputs & Outputs
| # of RCA (Audio LR) Inputs, Rear Panel | 1 |
| # of RCA (Audio LR) Outputs, Rear Panel | 1 |
| # of Video Inputs, Rear Panel | • |
| # of Video Outputs, Rear Panel | 1 |
| # of Subwoofer Outputs, Rear Panel | 1 |
| # of HDMI Outputs, Rear Panel | • |
| # of Optical Audio Inputs, Rear Panel | • |
| # of Coaxial Audio Inputs, Rear Panel | • |
| # of Camera Inputs, Rear Panel | • |
Dimensions & Weight
| Individual Packaging Dimensions(W x H x D) | 8.46 x 9.25 x 3.35"(215 x 235 x 85mm) |
| Net Weight (lbs/kg) | 2.9/1.32 |
| Gross Weight (lbs/kg) | 3.5/1.58 |
Master Carton
| Quantity Per Box (pcs) | 5 |
| Master Carton Dimensions(W x H x D) | 17.44 x 10.04 x 9.06"(443 x 255 x 230mm) |
| Master Carton Gross Weight (lbs/kg) | 17.4/7.9 |
FURRION
Important Safety Instructions Consignes importantes sur la sécurité Instrucciones de seguridad importantes

Important Safety Instructions >>>>>>
CAUTION
Risk of electric shock. Do not open.
! WARNING
To reduce the risk of fire or electric shock, do not expose this appliance to rain or moisture.
CAUTION: To reduce the risk of electric shock, do not remove cover (or back). No user serviceable parts inside. Refer servicing to qualified service personnel.
The lightning flash with arrowhead symbol, within an equilateral triangle, is intended to alert the user to the presence of uninsulated dangerous voltage within the products enclosure that may be of sufficient magnitude to constitute a risk of electric shock to persons.
The exclamation point within an equilateral triangle is intended to alert user to the presence of important operating and maintenance (servicing) instructions in the literature accompanying the appliance.
CLASS1 LASER PRODUCT
Laser product symbol: located on the rear panel of the unit, indicate this player is a class laser product, only use weak laser and no hazardous radiation outside of the unit.
- Read through this instruction manual before installation and use.
-
Do not touch the power plug with wet hands.
-
Switch off the power when the unit is not in use. (Disconnect the power plug from the power outlet when you do not intend to use the unit for a prolonged period of time.) Before moving the unit, remove the disc from the unit/tray first.
- Do not open the cover or touch any of the components inside of the unit. Only a qualified technician should service the unit.
- To avoid damaging the unit, do not expose the unit to direct sunlight or objects that radiate heat.
- Do not place the unit in moist or humid conditions. Moisture will affect normal operation and damage the unit.
- Place the unit on a flat, well-ventilated location. Please ensure the ventilation holes are not covered to avoid overheating
- and malfunction.
- Clean the panel and case with a soft dry cloth only. Do not apply any kind of thinner, alcohol or sprays.
- The apparatus should not be exposed to dripping or splashing. Do not place objects filled with liquids (such as vases) on the apparatus.
WARNING
- Do not ingest the battery contained within the remote control supplied with the unit as this battery represents a chemical burn hazard.
- This product contains a coin / button cell battery.
- If the coin / button cell battery is swallowed, it can cause severe internal burns in just 2 hours and can lead to death.
- Keep new and used batteries away from children.
- If the battery compartment does not close securely, stop using the produce and keep it away from children.
- If you think batteries might have been swallowed or placed inside any part of the body, seek, immediate medical attention.
CAUTION
- Danger of explosion if battery is incorrectly replaced.
- Replace only with the same or equivalent type.
- The battery shall not be exposed to excessive heat such as sunshine, fire or the like.
NOTICE OF COMPLIANCE
The device complies with Part 15 of the FCC Rules. Operation is subject to the following two conditions:
- This device may not cause harmful interference, and
- This device must accept any interference received, including interference that may cause undesired operation.
FCC rules
This equipment has been tested and found to comply with the limits for a Class B digital device, pursuant to part 15 of the FCC Rules. These limits are designed to provide reasonable protection against harmful interference in a residential installation. This equipment generates, uses and can radiate radio frequency energy and, if not installed and used in accordance with the instruction manual, may cause harmful interference to radio communications.
However, there is no guarantee that interference will not occur in a particular installation. If this equipment does cause harmful interference to radio or television reception, which can be determined by turning the equipment off and on, the user is encouraged to try to correct the interference by one or more of the following measures:
- Relocate the receiving antenna.
- Increase the separation between equipment and receiver.
EN
- Connect the equipment into an outlet on a circuit different from that to which the receiver is connected.
- Consult the dealer or an experienced radio/TV technician for help.
FCC RADIATION EXPOSURE STATEMENT
This equipment complies with FCC radiation exposure limits set forth for an uncontrolled environment.
This transmitter must not be co-located or operating in conjunction with any other antenna or transmitter.
All registered and unregistered trademarks are property of their respective owners.
Changes or modifications not expressly approved by the party responsible for compliance could void the user's authority to operate the equipment.

natural_image
Abstract geometric pattern with three parallel dark gray shapes on white background (no text or symbols)FURRION
WARRANTY CARD / CERTIFICAT DE GARANTIE
TARJETA DE GARANTÍA / GARANTIEKARTE CARTÃO DE GARANTIA / CERTIFICATO DI GARANZIA

Congratulations on purchasing your new Furrion product. All Furrion products are made to strict quality standards. If used properly for its intended purpose, your product should provide many years of use.
We are pleased to provide you with a 1 year warranty on your Furrion product. The details of this warranty are set out in the terms and conditions (see reverse) which supplement the authorised dealer's Terms and Conditions of Sale.
This warranty is given in addition to your other rights under the laws of the country where you purchased this product.
Please visit www.furrion.com/productregistration to register your product.
LIMITED WARRANTY TERMS AND CONDITIONS
-
Furrion warrants that this product will be free from defects in workmanship and materials for a period of 1 year from date of retail purchase by the original end-use purchaser ("you") when delivered to you in new condition, in original packaging, from a Furrion authorised reseller and used in normal conditions. If a valid claim is made under warranty then you will only be entitled to claim in accordance with paragraph 6 below.
-
The warranty only applies to Furrion products: with a valid serial number; used for consumer, private use and not for commercial or industrial use; and where you have validated the warranty in accordance with paragraph 4 below.
-
The warranty does not cover damage or loss: caused by poor, faulty or incorrect use, installation or maintenance; caused by accident (including force majeure or natural forces), misuse, negligence, abrasion, improper storage following delivery, rot and/or infestation following delivery, leaks (or similar incidents); occurring during shipment (even when Furrion arranged or paid for shipping); caused by failure to follow instructions in the owner's guide, damaged; caused by normal wear and tear; caused by maintenance, repairs or modifications other than those carried out by an authorised dealer; caused to the decorative surface of the product; caused to any data, software or information. This warranty also excludes claims based on any misrepresentations by the seller; or if this product's serial number has been altered, defaced, removed or rendered unidentifiable.
-
To validate the warranty you must: (a) fill in the registration card provided with this product; and (b) register the warranty covering this product within 6 months of the date of the bill of sale by following the instructions on the registration card; and (c) have the original bill of sale to validate warranty of this product.
-
If you require warranty service on this product, please cease using the product when a fault arises and contact us directly. You will have to present your original bill of sale to establish warranty coverage. Furrion's customer service can be reached at:
(i) For USA customers: Email: support@furrion.com Address: Furrion LLC, 52567 Independence Court Elkhart, IN 46514 USA
(ii) For Australia customers: Email: warranty.au@furrion.com Address: Furrion Ltd, Unit 614-615, Core D, Cyberport 3, 100 Cyberport Road, Hong Kong Toll-free Number: 1-(800)-985-957
- Following the filing of a claim, Furrion will investigate the claim. If we believe there is a defect covered by the warranty, we will at our option either repair or replace the defective product (or part).
- Please note in the event that no defect can be found, it is your responsibility to pay for the re-delivery of the replacement items. If a defect is found, Furrion will pay for the re-delivery of the replacement items.
- Installation of any repaired or replaced product will not be Furrion's responsibility.
- If you do not allow the authorised dealer to inspect the product which is the subject of the warranty claim, you will invalidate the warranty in respect of that claim.
- Any repaired or replaced Furrion product parts shall be guaranteed on the terms of this warranty for the unexpired portion of the warranty period only.
- This warranty is non-transferrable and is personal to the original end-use purchaser as shown on the original dated bill of sale. Any attempt to transfer this warranty shall immediately render it void.
- This warranty is subject to the jurisdiction of the courts of the State where you purchased this product, and any dispute or claim arising out of, or in connection with it or its subject matter, shall be governed by, and construed in accordance with the laws of that State.
- In the event of any difference between this warranty and the provisions in any owner's manuals, warranty leaflets, or packaging cartons, the terms of this warranty shall prevail to the fullest extent allowed by law.
THIS WARRANTY AND REMEDIES SET FORTH ABOVE ARE EXCLUSIVE AND IN LIEU OF ALL OTHER WARRANTIES, REMEDIES AND CONDITIONS, WHETHER ORAL OR WRITTEN, EXPRESS OR IMPLIED. FURRION SPECIFICALLY DISCLAIMS ANY AND ALL IMPLIED WARRANTIES, INCLUDING, WITHOUT LIMITATION, WARRANTIES OF MERCHANTABILITY AND FITNESS FOR A PARTICULAR PURPOSE. IF FURRION CANNOT LAWFULLY DISCLAIM IMPLIED WARRANTIES UNDER THIS LIMITED WARRANTY, ALL SUCH WARRANTIES, INCLUDING WARRANTIES OF MERCHANTABILITY AND FITNESS FOR A PARTICULAR PURPOSE ARE LIMITED IN DURATION TO THE DURATION OF THIS WARRANTY.
NO FURRION RESELLER, AGENT, OR EMPLOYEE IS AUTHORIZED TO MAKE ANY MODIFICATION, EXTENSION, OR ADDITION TO THIS WARRANTY.
FURRION IS NOT RESPONSIBLE FOR DIRECT, INDIRECT, SPECIAL, INCIDENTAL OR CONSEQUENTIAL DAMAGES RESULTING FROM ANY BREACH OF WARRANTY OR CONDITION, OR UNDER ANY OTHER LEGAL THEORY, INCLUDING BUT NOT LIMITED TO LOST PROFITS, DOWNTIME, GOODWILL, DAMAGE TO OR REPLACEMENT OF ANY EQUIPMENT OR PROPERTY, ANY COSTS OF RECOVERING, REPROGRAMMING, OR REPRODUCING ANY PROGRAM OR DATA STORED IN OR USED WITH FURRION PRODUCTS. FURRION'S TOTAL LIABILITY IS LIMITED TO THE REPAIR OR REPLACEMENT OF THIS PRODUCT PURSUANT TO THE TERMS OF THIS WARRANTY.
SOME STATES DO NOT ALLOW THE EXCLUSION OR LIMITATION OF INCIDENTAL OR CONSEQUENTIAL DAMAGES OR EXCLUSIONS OR LIMITATIONS ON THE DURATION OF IMPLIED WARRANTIES OR CONDITIONS, SO THE ABOVE LIMITATIONS OR EXCLUSIONS MAY NOT APPLY TO YOU. THIS WARRANTY GIVES YOU SPECIFIC LEGAL RIGHTS, AND YOU MAY ALSO HAVE OTHER RIGHTS THAT VARY BY STATE OR (WHERE APPLICABLE IN THE COUNTRIES WHERE FURRIION HAS NON-US/CANADIAN AUTHORIZED DEALERS) COUNTRY. NO ACTION OR CLAIM TO ENFORCE THIS WARRANTY SHALL BE COMMENCED AFTER THE EXPIRATION OF THE WARRANTY PERIOD.

natural_image
Abstract geometric pattern with three parallel gray shapes on white background (no text or symbols)


- BEFORE YOU BEGIN
- CAUTION:
- FEATURES:
- DVD
- VCD
- CD
- TV System
- Aspect Ratio Selection
- Audio Selection
- Subtitle Selection
- When an operation is prohibited
- INSTALLATION GUIDE
- Location
- Installing the unit
- Detaching and attaching the front panel
- FOLDING DOWN AND DETACHING/ATTACHING THE FRONT PANEL
- Notes:
- CLEANING THE CONNECTOR
- WIRE CONNECTION GUIDE
- Audio Output:
- Audio Input:
- Subwoofer Output: Green
- Video Output: Yellow
- Bluetooth Antenna: Black
- Maintenance
- FUSE REPLACEMENT
- Warning
- Locations of Parts (Main unit)
- Locations of Parts (Remote Control)
- Use and care of the remote control
- Installing the battery
- CAUTIONS
- Using the remote control
- IMPORTANT
- GENERAL OPERATIONS
- Turning the unit ON/OFF ( )
- Selecting a source (MODE)
- Loading a disc
- Ejecting a disc
- Adjusting Volume/Bass/Treble/Balance/Fader
- Further settings via the Select Function Button (SEL)
- EQ CONTROLS
- LOUDNESS
- STEREO/MONO
- LOCAL/DX
- Mute
- Equalizer
- Subwoofer
- Clock Setting (only Radio mode)
- LISTENING TO RADIO
- Band
- Automatic or Manual tuning ( ◀◀ / ▶◀ )
- Auto Seek/Preset scan (AS/PS)
- Storing and Recalling Frequencies
- Switching between USA/AUSTRALIA frequency tuning
- PHOTO Viewing:
- Unit:
- Remote control:
- CD/MP3/WMA Music listening:
- Movie Playback:
- Unit
- Stopping Playback
- Fast Forward / Fast Reverse
- Finding the Beginning of Tracks
- Pause Playback
- A-B Repeat Playback
- Displaying information (OSD) - video files only
- USB / MEMORY CARD (SD/MMC) / AUX-IN PLAYBACK
- AUX IN
- USB/Memory Card (SD/MMC)
- Note:
- DVD/VCD PLAYBACK
- Playback
- DVD menu
- VCD menu
- Turning PBC ON/OFF (VCD only)
- Repeat Playback
- FOR VCD
- FOR DVD
- Searching for particular track using GOTO
- Changing audio language during playback (Multi-audio)
- Changing the subtitle language during playback (Multi-subtitle)
- Changing the viewing angle during playback (Multi-angle) – (DVD only)
- Title (DVD only)
- Return to Root Menu (DVD only)
- Slow motion playback
- Zooming in During Playback
- STEP (Frame by frame playback)
- PAL / NTSC
- Return / Go Back
- CUSTOMIZING SOUND SETTINGS
- SETTING THE DVD PLAYER
- Important:
- Setting Rating Password
- HOW TO USE BLUETOOTH IN YOUR STEREO
- Pairing
- Audio Streaming
- Making Call
- Answering/Rejecting/Hanging Up Call
- History
- TECHNICAL SPECIFICATIONS
- DVD PLAYER SYSTEM
- FM RADIO
- AM RADIO
- AUDIO/VIDEO OUTPUT
- GENERAL
- FCC ID: 2ABH3-DV5XXX
- FURRION
- Entertainment System Système de divertissement Sistema de entretenimiento
- WHAT'S IN THE BOX
- SETUP
- STEP 1: CONNECT YOUR DEVICE
- STEP 2: INSTALL YOUR DEVICE
- STEP 3: PREPARE THE REMOTE CONTROL
- BASIC OPERATION
- TURN ON/OFF
- SELECT A SOURCE
- INSERT A DISC
- INSERT SD (MMC) CARD
- ADJUST VOLUME
- SET CLOCK
- SELECT A PRESET EQ
- TURN ON / OFF LOUDNESS EFFECT
- SELECT A FEATURE/SETTING
- 180W DVD Entertainment System with Bluetooth
- Main Features
- Important Safety Instructions >>>>>>
- CAUTION
- ! WARNING
- CLASS1 LASER PRODUCT
- NOTICE OF COMPLIANCE
- FCC rules
- EN
- FCC RADIATION EXPOSURE STATEMENT
- LIMITED WARRANTY TERMS AND CONDITIONS
Brand : Furrion
Model : DV5700
Category : Radio