
PD20GE - Dehumidifier Philco - Free user manual and instructions
Find the device manual for free PD20GE Philco in PDF.


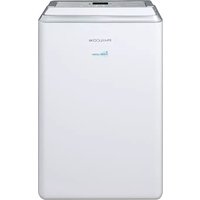
| Product Type | Dehumidifier |
| Brand | Philco |
| Model | PD20GE |
| Rated Voltage | 220V ~ |
| Rated Frequency | 50 Hz |
| Power Input | 380 W |
| Moisture Removal Capacity | 20 L/day |
| Operating Temperature Range | 5°C to 35°C |
| Net Weight | 13 kg |
| Water Tank Capacity | 4 L (automatic stop at ~3.6 L) |
| Timer | 2 or 4 hours delay on/off |
| Humidity Setting Range | 35% to 80% RH or Continuous |
| Fan Speeds | High and Low |
| Auto Defrost | Yes |
| Auto Shut Off | Yes (when bucket full) |
| Bucket Full Indicator | Yes |
| Filter Cleaning Reminder | Yes (after 250 hours) |
| Continuous Operation | Yes (when drain hose connected) |
| Air Filter Type | Washable |
| Drain Hose Connection | 14 mm inner diameter (hose not included) |
| Recommended Clearance | At least 12-18 inches on all sides |
| Power Cord Extension | Do not use extension cord |
Frequently Asked Questions - PD20GE Philco
User questions about PD20GE Philco
0 question about this device. Answer the ones you know or ask your own.
Ask a new question about this device
Download the instructions for your Dehumidifier in PDF format for free! Find your manual PD20GE - Philco and take your electronic device back in hand. On this page are published all the documents necessary for the use of your device. PD20GE by Philco.
USER MANUAL PD20GE Philco
Please read this manual carefully before operating the unit and keep it for futrue reference.
Owner's Manual

natural_image
Line drawing of a multi-tiered industrial refrigerator with ventilation grilles and control panel (no text or symbols)Model:
PD20GE
PD24GE
CONTENTS
Safety Instructions....2
Operating Instructions
About the controls on the dehumidifier....3
Choosing a Location....4
Removing Collected Water....5
Care and cleaning of the dehumidifier
Water Bucket....6
Air Filter....6
Troubleshooting....7
Long term storage....8
Specifications....8
IMPORTANT INSTRUCTIONS
Do not install and use your dehumidifier before completely reading these instruction.
This will help you optimize the operation of your dehumidifier.
The following advice and instructions should be followed closely:
-
Your unit must always be used in an upright position because it contains cooling agent.
-
After unpacking Your unit, place the unit upright to allow the cooling agent to stabilize, and wait 2 hours before use.
-
This product must not be disposed together with the domestic waste. This product has to be disposed at an authorized place for recycling of electrical and electronic appliances.
-
The appliance shall not be installed in the laundry.
-
If the power cord is damaged, it must be replaced by the manufacturer, service agent or qualified person in order not to get any dangers.
-
Please check before the first operation: Check if the floater on bucket is at right position. If the position is not correct, move it by hand to the right position.
Failure to comply with these instructions may damage the unit and will invalidate the warranty.

WARNING!
For your safety, the information in this manual must be followed to minimize the risk of fire, electric shock or personal injury.
SAFETY PRECAUTIONS
When using this dehumidifier, always follow basic safety precautions, including the following:
■ Always operate the product from a power source of the same voltage, frequency and rating as indicated on the product identification plate.
■ Close supervision is necessary when any product is used by or near children or invalids. Do not allow children to use it as a toy.
- Do not operate any product with a damaged cord or plug, or after the product malfunctions, or is dropped or appears damaged in any way. Return the complete product to the place of purchase for inspection, repair or replacement.
■ Never connect the unit to a defective socket.
■ To avoid tripping the circuit, DO NOT USE AN EXTENSION CORD FOR THIS UNIT.
■ Make sure that the unit is correctly connected before turning on the unit's power. Never lay down the unit while it is working.
■ Always keep it in an upright position to avoid any damage to the unit.
■ Switch off and unplug from outlet when not in use or before cleaning.
■ Do not place the power cord under a carpet.
■ Never install the unit in direct sunshine.
■ Prevent children from climbing on the unit.
■ Never unplug the dehumidifier while it is working, This could damage the electronic circuits.
■ Never place anything on top of the unit and do not cover it with any kind of cloth while it is plugged in or in-use.
■ Do not place objects on the product or allow objects to obstruct the inlet or outlet openings, or operate in close proximity to walls or curtains, etc.
■ This product is intended for normal domestic /household use only.
■ Repairs should only be carried out by competent service department.

NOTE: When the bucket is full or removed, the controls cannot be set.

ON/OFF Pad
Press to turn the dehumidifier on and off.

FILTER Pad
After 250 hours of operation, the Clean the Filter indicator light will glow to remind you to clean the filter. Remove the filter and clean it. Press to turn off the Clean the Filter light. See the Care and Cleaning section.

Humidity Set Control Pads
The humidity level can be set within a range of 80% RH (Relative Humidity) to 35% RH (Relative Humidity) in 5% reduce or at CO for continuous operation.
NOTE: If CO (Continuous) is selected, the dehumidifier will operate continuously at its maximum dehumidification settings if attached to a hose to drain or until the bucket is full.
For drier air, press the - pad and set to a lower percent value (%).
For damper air, press the + pad and set to a higher percent value (%).

Display
Shows the set \% humidity level while setting, then shows the actual (+/- 5\% accuracy) room \% humidity level.

FAN SPEED Pad
Controls the fan speed.
Press to select either High or Low fan speed.
Set the fan control to High for maximum moisture removal. When the humidity has been reduced and quiet operation is preferred, set the fan control to Low.

TIMER Pad
If unit is turned on and running in timer mode for 2hr or 4hr, can turn off the unit. When unit stand by and running in timer mode for 2hr or 4hr can turn on the unit.
Other Features
BUCKET FULL Light
Glows when the bucket is ready to be emptied, or when the bucket is removed or not replaced in the proper position.
Alarm
If the bucket is full or missing for more than three minutes, an alarm will sound for about 10 seconds to remind you to empty and replace the bucket.
Auto Shut Off
The Water Level Control Switch shuts off the dehumidifier when the bucket is full, or when
the bucket is removed or not replaced in the proper position.
Auto Defrost
When frost builds up on the evaporator coils, the compressor will cycle off and the fan will continue to run until the frost disappears.
Choosing a Location
■ Do not use outdoors.
This dehumidifier is intended for indoor residential applications only. This dehumidifier should not be used for commercial or industrial applications.
■ Place the dehumidifier on a smooth, level floor strong enough to support the unit with a full bucket of water.
- Allow at least 12–18 inches of air space on all sides of the dehumidifier.
Place the dehumidifier in an area where the temperature will not below 5^ C. Or the coils can become covered with frost, which may reduce performance.
■ Close all doors, windows and other outside openings of the room.
It is normal that the surrounding air to become slightly warmer as the dehumidifier operates.
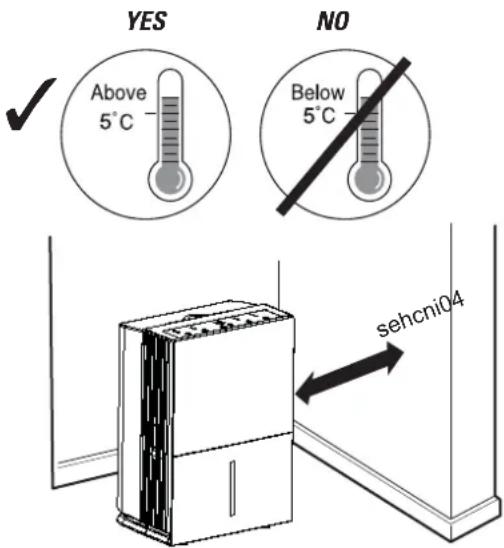
Always make sure the water bucket is locked into place on the dehumidifier.
Removing Collected Water
There are 2 ways to remove collected water:
Use the bucket. When the bucket is removed, the unit will shut off. Empty and replace the bucket.

NOTES:
■ Do not remove the bucket while the unit is in operation or it has just stopped.
■ The bucket must be in place and securely seated for the dehumidifier to operate.
2 Use a hose. Water will automatically flow into a floor drain by attaching a 14mm inner diameter hose (not included).
-
Open the drain cover on the side of the unit.
-
Thread the drain tie-in (supplied) onto the nozzle.
-
Connect the hose to the drain tie-in.and lead it to the floor drain.
natural_image
Line drawing of a hand inserting a component into a rectangular device (no text or symbols)
natural_image
Line drawing of a refrigerator with a hand inserting a small component (no text or symbols)
natural_image
Simple line drawing of a refrigerator with a water pipe inserted into the side (no text or symbols)Turn the dehumidifier off and remove the plug from the wall outlet before cleaning.
Water Bucket
To clean:
Every few weeks, clean the bucket to prevent growth of mold, mildew and bacteria. Partially fill the bucket with clean water and add a little mild detergent. Swish it around in the bucket, empty and rinse.
NOTE: Do not use a dishwasher to clean the water bucket.

Air Filter
The air filter should be checked and cleaned at least every 250 hours of operation or more often if necessary.
※ After 250 hours of operation, the Clean the Filter indicator light will glow to remind you to clean the filter. Remove the filter and clean it. Replace the filter and press the Filter RESET pad to turn off the Clean the Filter light.
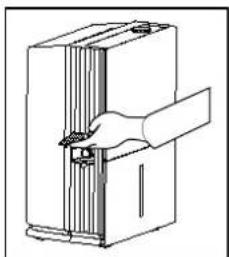
■ Press the two buttons, then pull out the filter.
■ Clean the filter with warm, soapy water. Rinse and let the filter dry before replacing it.
■ Put the filter back into the dehumidifier.

Caution: Do not operate the dehumidifier
without a filter because dirt will gather and affect the unit's performance.
Buttons

natural_image
Line drawing of a portable air conditioner unit with ventilation grilles (no text or symbols)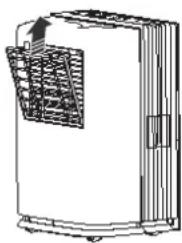
natural_image
Line drawing of a portable air conditioner unit with ventilation grilles and control panel (no text or symbols)NOTE: Avoid using a dishwasher to clean the filter.
Troubleshooting.
| Symptoms Possible Causes | |
| The Machine does not operate when you turn it on | Is the water bucket in proper positionHave you plugged in the electric power sourceDoes the dehumidifier reach its present levelIs there power supply shortage |
| The machine is inefficient | Is the filter too dirtyAre the temperature and humidity too lowAre the air inlet and outlet blocked |
| The machine runs continuously without turning off | Are the doors and windows openIs there any other appliances producing steam in the roomIs the room too big |
| Machine noisy | Is the surface where you place the dehumidifier stable and flat |
When you do not use the unit for a long period, we suggest you to take following steps to store the unit in a good condition:
● Make sure there is no water left in the water tank and take off the draining hose
● Take off the power cord and plug and warp them well.
● Clean the unit and packed it well to keep it from dust.
Specifications.
| Model | PD20GE PD24GE | |
| Rated Voltage | 220V~ | |
| Rated Frequency | 50Hz | |
| Power Input | 380W | 420W |
| Power Input | 480W 600W | |
| Moisture Removal | 20L/DAY 24L/DAY | |
| Operating Temperature | °C5°C-35 | |
| Net Weight | 13kg | 14kg |
| Tank capacity | 4 L(Automatic stop at about 3.6L) | |
natural_image
Line drawing of a rectangular electronic device with ventilation grilles and control panel (no text or symbols)型號:
PD20GE
PD24GE
目錄
安全守則……2
操作守則
控制版面……3 放
抽濕機的擺位置……4
清除水箱的水……5
清潔與保養
水箱……6
隔塵網……6
排除故障……7
規格……8
重要指示
清除水箱的水
natural_image
Illustration of a battery pack being processed into a circuit board, showing internal components and wiring (no text or symbols)注意:
natural_image
Simple line drawing of a hand inserting a component into a rectangular device (no text or symbols)
natural_image
Line drawing of a refrigerator with a hand inserting a small object into the door (no text or symbols)
natural_image
Simple line drawing of a rectangular device with a coiled tube and a base, no text or symbols present.清潔與保養
隔塵網
- Owner's Manual
- CONTENTS
- Operating Instructions
- Care and cleaning of the dehumidifier
- IMPORTANT INSTRUCTIONS
- The following advice and instructions should be followed closely:
- WARNING!
- SAFETY PRECAUTIONS
- ON/OFF Pad
- FILTER Pad
- Humidity Set Control Pads
- Display
- FAN SPEED Pad
- TIMER Pad
- Other Features
- BUCKET FULL Light
- Alarm
- Auto Shut Off
- Auto Defrost
- Choosing a Location
- Removing Collected Water
- NOTES:
- Water Bucket
- To clean:
- Air Filter
- 目錄
- 操作守則
- 清潔與保養
- 重要指示
- 清除水箱的水
Brand : Philco
Model : PD20GE
Category : Dehumidifier