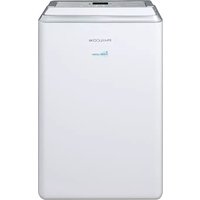
PDH250AP - Dehumidifier Philco - Free user manual and instructions
Find the device manual for free PDH250AP Philco in PDF.


| Product Type | Dehumidifier |
| Brand | Philco |
| Model | PDH250AP |
| Dehumidification Capacity | 25 pints per day (at 80°F, 60% RH) |
| Coverage Area | Up to 500 sq ft |
| Water Tank Capacity | 4.5 liters |
| Dimensions (W x D x H) | 15.4 x 11.2 x 20.5 inches |
| Weight | 28.7 lbs |
| Power Supply | 115V, 60Hz |
| Power Consumption | 480W (max) |
| Energy Efficiency | ENERGY STAR rated |
| Adjustable Humidity | Yes, from 30% to 80% HR |
| Fan Speed Settings | 2 speeds: High and Low |
| Continuous Drain Option | Yes, with included hose adapter |
| Auto Shut-Off | Yes, when bucket is full |
| Auto Defrost | Yes, to prevent ice buildup at low temperatures |
| Filter Type | Washable mesh filter |
| Filter Maintenance | Clean every 2 weeks; replace if damaged |
| Noise Level | 48 dB (low speed), 52 dB (high speed) |
| Operating Temperature Range | 41°F to 90°F |
| Safety Features | Overflow sensor, auto shut-off, tip-over switch |
| Warranty | 1 year limited warranty |
Frequently Asked Questions - PDH250AP Philco
User questions about PDH250AP Philco
0 question about this device. Answer the ones you know or ask your own.
Ask a new question about this device
Download the instructions for your Dehumidifier in PDF format for free! Find your manual PDH250AP - Philco and take your electronic device back in hand. On this page are published all the documents necessary for the use of your device. PDH250AP by Philco.
USER MANUAL PDH250AP Philco
natural_image
Line drawing of a rectangular electronic device with a lid and side ports (no text or symbols)Please read this user manual carefully before using and retain it for reference.
If have queries, please contact the service center for support.
如有疑問請與服務中心或經銷商聯繫。
| >100% |
- Safety Instruction
- Please be sure your electricity is correct (The voltage is matching with rating label).
- Do not place the machine near the appliance produced high temperature. Since the high temperature might damage the plastic and caused fire. Do not expose the machine under the sunshine, to avoid the damage of casing
- Do not operate and place the machine with lots of dust or corrosive gas or flammable or explosive gas, to avoid danger.
● Always guide if children operate. Never disassemble the unit, and never try to carry out repair or replace the unit's spare parts by yourself. Please coordinate with qualified personal to repair the machine.
- Place the machine in the flat and stable surface to prevent vibration and noise.
- Please unplug the power plug once the machine is dumped.
- Never cover the machine when it's running to prevent damage.
• Make sure the inlet and outlet ventilation are not blocked at all times.
- Do not spray water on the unit, spraying water may cause malfunctioning and electric shock.
- Never pull the socket by using damp hands.
● Always switch off before unplugging to avoid electric shock.
- If you do not use for a long time, shutdown and unplug the power plug, then pour out the water from the tank and wipe it clean.
- Do not pull out power wire by force because it will damage the power wire and cause damage.
- When the machine is operating, it is forbidden to insert hand or other small shaft in the air inlet or outlet, to prevent contact any parts inside or the rotating blower. It will damage the machine and cause danger.
- Pour out the water in the tank before moving the machine.
- In the low temperature and high humidity winter, please set the unit operating in dry clothes mode. (Under the dry clothes mode, the machine could operate continuously)
- Note: When dry clothes, please do not hang the clothes above the outlet. To prevent the water drops into the machine from outlet and cause malfunction. When the machine is running, please make sure the minimum distance between the unit and the wall or other obstacles from all sides.
• Operation Environment
- Working temperature: 5°C-32°C · 30% RH \~ 90% RH
This machine is suitable for indoors, e.g. Living room, office, bedroom. - Make sure the door and window are closed before turning on the unit to get the best result.
- Ensure that the unit is placed on a stable and flat floor surface. If the floor's surface is not even, there is a risk that the unit may be unstable and topple over. Also, it will cause excessive vibration and noise.
DESCRIPTION

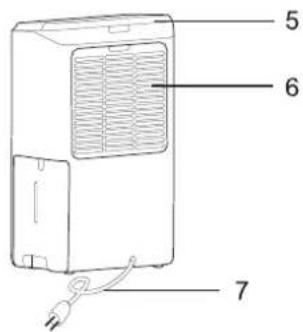
- Component Description
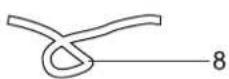
| 1. Control panel2. Air outlet3. Bucket4. Water level view window | 5. Handle6. Air intake grille7. Power cord8. Drainpipe |
Note: All the illustrations in this manual are for explanatory purposes only, your appliance may be slightly different.
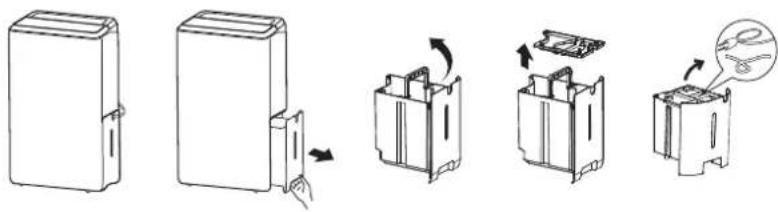
- Please remove the accessory from the bucket before use
- Remove the bucket from appliance.
- Rotate handle to vertical position.
- Take out the cover of bucket.
- Take out of the plug, and other accessories.
- Correctly put back the cover into bucket.
- Correctly put back the bucket into the appliance.
• The accessories are included:
| Chip of bucket | |
| Drainpipe |
- All the illustrations in this manual are for explanatory purposes only, your appliance may be slightly different.
- Be sure all accessories are removed from the packing and bucket before use.
Installation
Take out the power cord from bucket, remove the power cord and other accessories from it. Install the chip on the bucket.

• Control Panel and Buttons
![5 ———Timer ⚙ 88 6 ———Tank Pull ⚙ 7 ———Ionizer ⚙ ■ Dehu ——— 1 ■ 6g Turbo Dehu ——— 2 ■ ▼ Laundry ——— 3 ■ [+] Continue ——— 4 TIMER | SWING | FAN | HUMIDITY | MODE | ON/OFF [+] 0 sec A B C D E F](/content/2026/05/1042505/images/54d9fe39df71f86b4ca7b578677fb13e4d187e8393a1a9824535ab008207c552.jpg)
| 1、Dehumidifying symbol2、Turbo Dehumidifying symbol3、Laundry symbol4、Continuous symbol5、Timer symbol6、Tank full symbol7、lonizer symbol | A、Timer buttonB、Swing buttonC、Fan buttonD、Humidity buttonE、Mode buttonF、On / Off button |
• " ON/OFF " button
On / off power supply used to control the start-up or shut down the appliance.
• Humidity Selection:
Press * HUMIDITY * to select the indoor humidity level you expect to achieve, adjustable range is 40%-50%-60%-70% RH.
- Mode Selection: Under power on status, press" Mode" button for choosing different modes.
- Dehumidifying mode
Press the "MODE" button until the "Dehu" symbol is lights. Press the "HUMIDITY" to choose the humidity desired. The screen will display the setting humidity, and after few seconds, turn to display the ambient humidity.
- Press the " FAN " to choose the fan speed, High / Low.
• Turbo Dehumidifying mode
Press the" "button until the " Turbo Dehumidifying " symbol is lights. The setting humidity is 30% RH, and the fan speed is high and cannot be adjusted.
- Laundry mode
Press the "MODE" button until the "Laundry" symbol is lights. The setting humidity is 15% RH, and the fan speed is high and cannot be adjusted.
After runs 24 hours, the appliance is quit laundry mode, turn to Dehumidifying mode and set humidity 60%RH, fan speed is Low.
Continuous mode
Press the * MODE " button until the *Continuous * symbol is lights. The setting humidity is 15%RH and
press the "FAN" to choose the fan speed, High / Low.
• N SWING * button
Press the "SWING" button to swing up and down.
Press the "SWING" button again to stop swing.
- Ionizer Function
When the appliance is running, hold the "TIMER" button 3 seconds until the "lonizer" symbol is lights.
Hold the "TIMER" button 3 seconds again to close the ionizer function.
- " L " button TIMER
This timer can be used to delay the appliance start-up or shutdown, this avoids wasting electricity by optimizing operating periods.
- Programming start up
Turn on the appliance, choose the mode you want, for example Dehumidifying mode. Turn off the appliance.
- Press the "L" button, the" Timer "symbol starts to flash, press the " % HUMIDITY " to adjust the set time from 1-24 hours. Each press for 1-hour adjustment. In 5 seconds without the operation, the timer start function. Press the " L" button again to cancel the Timer.
- Programming shut down
When the appliance is running, press the 📊 button. the " 📊 " symbol starts to flash, press the "

* to adjust the set time from 1-24 hours. Each press for 1-hour adjustment. In 5 seconds
without the operation, the timer start function. Press the "TIMER" button again to cancel the Timer.
- Alarm of bucket full
When bucket is full, " [icon] " symbol is flashing. The compressor and fan will shut off, and 3 min later make a beeping noise, the unit will not run again until the bucket is emptied and properly placed back inside the unit.
The bucket should be cleaned every week to prevent the growth of mold, mildew and bacteria. Use a mild detergent to clean. Once clean, completely dry the bucket and place it back inside unit.

Note: Hold the bucket with both hands when emptying.
Note: When the bucket is full or removed from the unit, the compressor will turn off, but the fan will continue to run for a few minutes. This is completely normal. The unit will not be removing moisture from the air at this time.
Note: Do not place the bucket on the floor when it is full as it is uneven on the bottom and water may spill.
Note: During operation, it is normal for the unit to exhaust warm air from the top of the unit.
• Continuous drainage
Connect the drainpipe on the hole of unit, then the unit can continuously run without clean the bucket.
1) Put the unit on level floor, take out the bucket, remove the chip of bucket.
2) Install the pipe on drain nozzle.
3) Put back the bucket correctly and make the drainpipe on gap of bucket, don't press the pipe.
4) Press " ON/OFF " button to run the unit.
Note: If no need the function of continuous drain, please remove the drainpipe and put back the bucket in unit correctly, then the water will flow into bucket.

Note: Please install the drainpipe follow as shown picture.
Please install the drainpipe correctly, or the water cannot drain from the pipe.
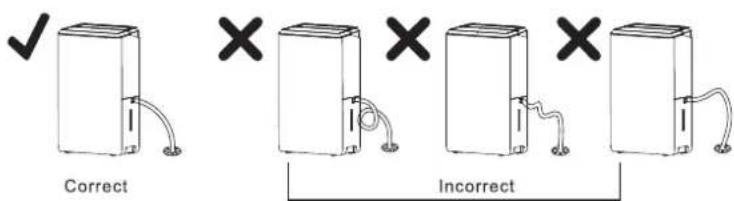
Notice:
If the unit put on the unlevel ground or not correctly install the drainpipe, the water will splash out from the bucket and stop running.
If that happened, please check the ground is whether horizon, and the drainpipe is correctly installed.
At the same time, the bucket needs to be installed correctly.
AUTOMATIC DEFROST
When frost builds up on the evaporator coils, the compressor will cycle off and the fan will continue to run until the frost disappears. When the coils are completely defrosted, the compressor or fan will automatically restart and resume the dehumidifying.
Location requirements:
The unit operating in a basement will have little no effect in drying out an adjacent enclosed storage area, such as a closet, unless there is adequate circulation of air in and out of the area.
- Do not use at outdoors area.
- This appliance is intended for indoor use only. Place the appliance on a smooth, level floor surface that is strong enough to support the unit with a full bucket of water.
- Allow at least 45cm of around and above space away from the wall for efficient working.
- Place the appliance in an area where the temperature will not below 5°C
- Use the dehumidifier in cooking, laundry, bathing and dish - washing areas that have excessive moisture.
- Place the dehumidifier away from a clothes dryer.
- Use the dehumidifier in a basement to help prevent moisture damage.
- The dehumidifier must be operated in an enclosed area for more efficiency,
- Close all doors, windows and other outside openings to the room.
- Do not block the air inlet or outlet of the appliance.
- Reduced air flow will result in poor performance and could damage the unit.

• CLEAN AND MAINTENANCE
Before cleaning or maintenance, turn the appliance off by pressing the "POWER" button on the control panel wait for a few minutes then unplug from the mains socket.
• CLEANING THE CABINET
You should clean the appliance with a slightly damp cloth then dry with a dry cloth.
Never wash the appliance with water, it could be dangerous.
Never use petrol, alcohol or solvents to clean the appliance.
Never spray insecticide liquids or similar.
● CLEANING THE FILTER
To keep your appliance working efficiently · you should clean the filter at least one a week.
The filter can take out as shown.
To avoid hurt, avoid contacting the metal parts of the appliance when removing or re-installing the filter.
It can result in the risk of personal injury.
Use a vacuum cleaner to remove dust from the filter. If it is very dirty, immerse in warm water and rinse number of times. The water should never be hotter than 40irc C. After washing, leave the filter to dry then attach the intake grille to the appliance:
| Filter Integrated with grid | Remove filter from grid |
 |  |
END OF SEASON OPERATIONS
- To unplug from the mains socket, empty the bucket, remove the cap.
- Pour out all water left inside the appliance. When all the water has been drained, put the cap back in place.
- Clean the filter and dry thoroughly before putting back.
- Cover the appliance prevent from dust.
- Store the appliance upright in a dry location.
START OF SEASON CHECKS
Make sure the power cable and plug are undamaged and the earth system is efficient. Follow the installation instructions precisely.
- TROUBLESHOOTING
| Problem | Possible Causes | Solutions |
| Dehumidifier does not start | The dehumidifier is unplugged. | Make sure the dehumidifier's plug is pushed completely into the outlet. |
| The fuse is blown/circuit breaker is tripped. | Check the house fuse/circuit breaker box and replace fuse or reset breaker. | |
| Dehumidifier has reached its present level or the bucket is full. | The dehumidifier automatically turns off when either condition occurs. Change to a lower setting or empty the water bucket and replace properly. | |
| Bucket is not in the proper position. | The bucket must be in place and securely seated for the dehumidifier to operate. | |
| Power Failure. | There is a protective time delay (up to 3 min.) to prevent trip — ping of the compressor overload. For this reason, the unit may not start normal dehumidify for 3 min after it is powered back on. | |
| Dehumidifier does not dry the air as it should | Not enough time allowed for unit to remove moisture. | When first installed · allow at least 24 hours to maintain the desired dryness. |
| Airflow is restricted. | Make sure there are no curtains, blinds, or furniture blocking the front or back of the dehumidifier. See the CHOOSING A LOCATION section. | |
| Dirty filter. | See the CLEAN FILTER section. | |
| The Humidity Control may not be set low enough. | For drier air, press the 🔒 button to lower the percent humidity desired in the room · or set the dehumidifier to ☐ for maximum dehumidify. | |
| Doors and windows may not be closed tightly. | Check that all doors, windows, and other openings are securely closed. | |
| Clothes dryer may be blowing moist air into the room. | Install the dehumidifier away from the dryer. The dryer should be vented outside. | |
| Room temperature is too low. | Moisture removal is best at higher room temperatures. Lower room temperatures will reduce the moisture removal rate. This model is designed to operate at temperatures above 5°C(41°F). | |
| Appliance runs too long | The area is too large | The capacity of the appliance cannot meet the area of the room |
| Doors and windows are open | Close the door and window | |
| Frost appears on heat-exchanger | Appliance run recently or the room temperature is too low | It is normal, frost usually disappear in 60 min |
| Fan noise | The air is passing through the appliance | This is normal |
| Water on the floor | The drain connection may be aging or loose | Check the drain connection and the appliance is placed level |
| The drainpipe is connected, but the water is not drained. | If use the bucket, remove the drainpipe and put back the drain cover; or install the drainpipe correctly |
If the following error code appears, contact the after-sales service department for inspection and repair.
| CODE | DESCRIPTION |
| EH | Humidity sensor failure |
| E1 | Temperature sensor failure |
| E2 |
- 安全注意事項
flowchart
graph LR
    A["Initial Storage"] --> B["Add Battery Packet"]
    B --> C["Transfer to Cover Block"]
    C --> D["Assembly to Cover Block"]
    D --> E["Final Packaging"]
- 附件:
| 水箱蓋片 | |
| 排水管 |
- 按鍵和顯示面板

- 清潔過濾網
購買日期 Date of Purchase:
單據編號 Invoice No.:
The product specifications may be changed without prior notice.
Please contact customer service for details if necessary.
說明書內容以英文版本為準
If there is any inconsistency or ambiguity
between the English version and the Chinese version,
the English version shall prevail.

保養登記
Warranty Registration
於網上登記新產品保養 Register your product online
www.dchtoolbox.com

Gilman
since 1841

DCHToolBox
大昌行電器維修中心
4/F, DCH Building, 20 Kai Cheung Road, Kowloon Bay, Hong Kong
客戶服務無線 Customer Service Hotline: (852) 8210 8210

- • Operation Environment
- DESCRIPTION
- - Component Description
- - Please remove the accessory from the bucket before use
- • Continuous drainage
- AUTOMATIC DEFROST
- Location requirements:
- • CLEAN AND MAINTENANCE
- • CLEANING THE CABINET
- ● CLEANING THE FILTER
- END OF SEASON OPERATIONS
- START OF SEASON CHECKS
- - 安全注意事項
- - 清潔過濾網
Brand : Philco
Model : PDH250AP
Category : Dehumidifier