
PDP4273M - Television AKAI - Free user manual and instructions
Find the device manual for free PDP4273M AKAI in PDF.


| Brand | AKAI |
| Model | PDP4273M |
| Type | Plasma television |
| Screen Size (diagonal) | 42 inches (107 cm) |
| Resolution | 1366 x 768 pixels (HD Ready) |
| Dimensions (W x H x D) | 1020 x 680 x 95 mm (without stand) |
| Weight | 28.5 kg (with stand) |
| Power Consumption | 280 W (max), <1 W standby |
| Power Supply | AC 100-240V, 50/60 Hz |
| Video Inputs | HDMI (2), Component, Composite, VGA, SCART |
| Audio Output | 3.5 mm headphone jack, optical digital |
| Tuner | Analog and DVB-T digital |
| Remote Control | Included (batteries not included) |
| Features | Picture-in-picture, sleep timer, parental lock |
| Cleaning Instructions | Wipe with soft dry cloth; do not use liquids or abrasives |
| Safety Precautions | Place on stable surface; ensure ventilation; unplug during storms |
| Spare Parts Availability | Contact AKAI service center for remote, stand, or power board |
| Repairability Index | 5.5 / 10 (estimated) |
| Warranty | 1 year (check local regulations) |
Frequently Asked Questions - PDP4273M AKAI
User questions about PDP4273M AKAI
0 question about this device. Answer the ones you know or ask your own.
Ask a new question about this device
Download the instructions for your Television in PDF format for free! Find your manual PDP4273M - AKAI and take your electronic device back in hand. On this page are published all the documents necessary for the use of your device. PDP4273M by AKAI.
USER MANUAL PDP4273M AKAI
natural_image
Front view of a modern flat-screen TV with a black logo and grid-patterned base (no visible text or symbols on screen)1. Safety Guidelines
Caution: Always use a power cable is properly grounded. Please use the AC cords listed below for each area:
USA UL
Canada ...... CSA/cUL
FCC Information
This equipment has been tested and found to comply with the limits for a Class B digital device, pursuant to part 15 of the FCC Rules. These limits are designed to provide reasonable protection against harmful interference in a residential installation. This equipment generates, uses, and can radiate radio frequency energy, and if not installed and used in accordance with the instructions, may cause harmful interference will not occur in a particular installation. If this equipment does cause by turning the equipment off and on, the user is encouraged to try to correct the interference by one or more of the following measures:
- Reorient or relocate the receiving antenna.
- Increase the separation between the equipment and receiver.
- Connect the equipment into an outlet on a circuit different from that to which the receiver is connected.
- Consult the dealer or an experienced radio technician for help.
FCC Warning
To assure continued FCC compliance, the user must the provided grounded power supply cord and the provided shielded video interface cables to connect to this equipment. Also, any unauthorized changes or modifications to this equipment would void the user's authority to operate this device.

BBE is trademark of BBE Sound, Inc.
Manufactured under license from BBE Sound, Inc.
Licensed by BBE Sound, Inc. under USP4638258, 5510752 and 5736897.
BBE and BBE symbol are registered trademarks of BBE Sound, Inc.
BBE High Definition Sound restores clarity and presence for better speech intelligibility and musical realism.

HIGH-DEFINITION MULTIMEDIA INTERFACE
HDMI, the HDMI logo and High-Definition Multimedia Interface are trademarks or registered trademarks of HDMI Licensing LLC.
2. Important Safeguards
Safety of operators has been taken into consideration at the design and manufacture phase, but inappropriate operation may cause electric shock or fire. To prevent the product from being damaged, the following rules should be observed for the installation, use and maintenance of the product. Read the following safety instructions before starting the operation.
The User Manual uses the following symbols to ensure a safe operation and prevent any damage to operators or properties:

WARNING---- Ignorance or inappropriate use may cause damage to the product.

ATTENTION---Ignorance or inappropriate use may cause injury to the user.
Examples:

Prohibition

Warning (Attention) symbol (indicating "Electric Shock").

WARNING
Do not install the product on sloping or unstable surface: The product may drop or tip over.

Only the marked power source can be used for the product: Any power source other than the specified one may cause fire or electric shock.

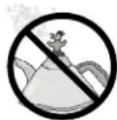
Keep the product away from moisture:
- Do not expose this appliance to rain or moisture.
- If water penetrates into the product, stop the operation; unplug the connector and contact with your dealer. Continuous use in this case may result in fire or electric shock.


WARNING
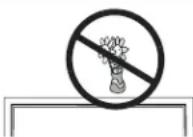
Do not place any objects on the top of the product:
Spilled water or metal objects may cause short circuit, fire or electric shock if they penetrate into the housing of the product.
| Never use a damaged power cord:Heavy objects, heat or tensile force may damage the power cord and cause fire or electric shock. |  |
| Do not change or open the back cover:Removing the back cover of the product may cause fire or electric shock.Contact the manufacturer when inspection or adjustment is required. |  |
| Do not use the product if any abnormality occurs:If any smoke or odor becomes apparent, unplug the connector and contact the manufacturer immediately. Do not try to repair the product by yourself. |  |

WARNING
Avoid using dropped or damaged appliances:
If the product is dropped and the housing is damaged, the internal components may function abnormally. Unplug the connector immediately and contact the manufacturer for repair. Continuous use of the product may cause fire or electric shock.


WARNING
Do not touch the power cord during lightening:
To avoid electric shock, avoid handling the power cord during electrical storms.


ATTENTION
Do not install the product close to smoke or moisture:
Fire or electric shock may be caused when the product is installed close to smoke or moisture.
Do not installed the product in an area with heavy dust or high humidity:
Fire or electric shock may be caused when the product is installed in a place with heavy dust or high humidity.
Instructions for moving the product:
Ensure that the power connector and any other leads are unplugged before moving the product.

The power cable should be kept away from heat sources:
The heat produced by any heat source may melt the covering of the power cable.

Unplug the connectorHold the power connector when removing the power cable: Pulling the power cable itself may damage the wires inside the cable and cause fire or electric shock.   |
Do not touch the connector with wet hands: To avoid risk of electric shock.  |
 ATTENTION ATTENTION |
Insert batteries in accordance with instructions: Insert the batteries with correct polarities (positive and negative). Incorrect polarities may cause breakage and leakage of the batteries, hurt operators and contaminate the remote controller.  |
Do not block or cover the vents: Blocking the vents may cause overheating and fire. Do not install the product in a place with little or no ventilation. Never cover the vents with towels, blankets or dusters. 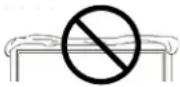 |
Unplug the connector: Unplug the power connector when the product will not be used for a long time.   Unplug the connector Unplug the connector |
| Image Sticking: The plasma monitor illuminates phosphor to display images. The phosphor has a finite illumination life. After extended periods of illumination, the brightness of the phosphor will be degraded to such extent that stationary images would burn-in that part of the screen as grayed-out images. Tips to prevent such image sticking are: - Do not display static images of high contrast and high brightness for long periods. Use of video games and computers on this product may promote burn in of images on the screen. Many portions of video game play and computer desktops do not refresh and will contribute to this problem. - Do not leave stationary images appearing for long, but try to refresh them at appropriate intervals of time, or try to move them using screen saver function. - Turn down the contrast and brightness control. Note: Such “Image Sticking” constitute misuse are NOT COVERED by the manufacturer's warranty. |
| Others: This product is designed for indoor use only and is not suitable for out door use. The operation temperature is 5°C ~ 33°C. |
- Read all safety instructions and the User Manual before using the product.
- The safety instructions and User Manual should be maintained in good condition for future reference.
- Unplug the power connector before cleaning the product. A wet cloth is sufficient for the cleaning of the product, never use liquid or spray cleaner for cleaning the product.
- Always use the accessories recommended by the manufacturer to avoid any risk.
- When moving the product from an area of low temperature to an area of high temperature, drops of water may condense on the housing. Do not turn on the display immediately after moving so as not to cause fire, electric shock or component damage.
- Do not install the product on unstable fixtures or stands. The installation of the product should be conducted in accordance with the instructions and using the support recommended by the manufacturer.
- Do not remove the earthing pin on the power plug. The product is supplied with a three-pin earthing-type power plug, this plug will only fit an earthing-type power outlet. This is a safety feature, if you are unable to insert the plug into the outlet, contact an electrician.
- Avoid overloading the power cord. Using extension cables or the cords of other appliances may cause fire or electric shock.
- If any of the following occurs please contact the retailer:
- The power supply or connector fails.
- Liquid sprays or any object drops into the Display.
- The Display is exposed to rain or other moisture.
- The Display is dropped or damaged in any way.
-
The performance of the Display changes substantially.
-
A distance of at least 1 meter should be maintained between the product and any heat source, i.e. radiator, heater, oven, amplifier etc.
-
To avoid the risk of electric shock or component damage, switch off the power before connecting the PDP to other devices, such as VCR, DVD or PC.
-
The power cable must be replaced when using different voltage from that specified in the User Manual. For more information, contact your dealer.
-
Operating environment:
Temperature: 5°C\~33°C
Humidity: 20% to 85% non-condensing
Atmospheric pressure: 800 to 1100hPa
Contents
- Before use .... 7
1.1 Open the Package ....7
1.2 Installation ....7
- Product Features .... 8
- Accessories 8
- Names and Functions of Parts 9
4.1 Side View ....9
4.2 Front View ....10
4.3 Rear View 11
4.4 Remote Control 12
- Connection to External Equipment 15
- Basic Operation .... 18
6.1 Power ON/OFF 18
6.2 Selection of Input Mode ......18
6.3 Other Function ......19
6.4 OSD Option Adjustment ....20
6.5 OSD Functions .....20
1 Picture Page....20
2 Window Page 22
3 Audio Page 24
4 Options Page....25
5 Layout Page ....30
- Technical Specification ...... 32
- Support the Signal Mode 33
- Cleaning and Simple Troubleshooting 34
1. Before use
The product is a 42" WXGA (WXGA resolution) Plasma Display. It has passed the Class-B EMC test and the UL and cUL safety certifications, and is ideal for both consumer and commercial use. The product is a precise electronic product. Users should read the following instructions carefully to maximise the performance of the product:
1.1 Open the Package
- The product is packaged in a carton together with other standard accessories. Any optional accessories shall be packed separately in another carton.
- Due to the size & weight of the product, it is recommended that it should be moved by a minimum of two people.
- The protective glass and the glass substrate are installed on the front of the product. Since both glasses can be broken and scraped easily, move the product gently. Never place the unit with the glass facing downwards unless it is protected with soft pads.
- When opening the carton, check that the product is in good condition and that all standard accessories and items are included.
- Whenever possible, use the handles on the back of the Display for transport.
1.2 Installation
- Please use caution if wall mounting this product. Follow all directions from the manufacturer of the wall mount and be sure to securely fasten the product to the mount. While the TV can be wall mounted, improper wall installation may void the warranty.
- Due to the higher power consumption, always use the jack exclusively designed for this product. If an extended line is required, please consult with your service agent.
- The product should be installed on a flat surface to avoid tipping. The distance between the back of the product and the wall should be maintained for proper ventilation.
- Avoid installing the product in the kitchen, bathroom or any other places with higher humidity so as not to shorten the service life of the electronic components.
- Please ensure the product be installed horizontally, any 90 degree clockwise or counterclockwise installation may induce poor ventilation and subsequent component damage.
- To protect the screen and avoid screen burn, do not hold on a static picture for a long time.
2. Product Features
The 42" PDP provides quality image displays and is suitable for a variety of multimedia applications:
1. Available input signals
- The standard PC module provides VGA (D-SUB 15 PIN) and HDMI input connectors.
The product supports PC image resolutions up to (1024 x 768@60Hz) with a vertical frequency of 60 Hz. - The Video module provides composite video (RCA), S-Video (DIN 5 PIN) and component video (RCA) input connectors. It supports the quality input images of DVD and HDTV (480p/720p/1080i). The Video module also provides six sets of stereo audio input connectors, one set of audio output connector (RCA) and one set of video output connector (RCA).
2. Power Management Function
The machine provides an automatic power control function.
3. Fan-free Design
The unit does not require any fans for ventilation, eliminating any bothersome noise that may be generated. It also lowers the power consumption of the unit.
4. BBE Sound system
This unit adopts technologies of BBE which can enhance the overall sound effect and performance of the music program.
5. Others
- PIP Function: The user can watch two programs at the same time in multiwindow. (Refer to P31.)
- The product includes a set 15W + 15W loudspeakers.
- The Plasma unit provides warm, normal and cool color temperature options. The user may customize their favorite color temperature.
3. Accessories
1 Stand x 1 (pre-assembled)
2 User Manual x 1
3 AC Cable x 1
4 Remote Control x 1
5 Battery (UM-4/R03P/AAA) x 2
6 Warranty Card x 1
7 Insertion Card x 1
4. Names and Functions of Parts
4.1 Side View
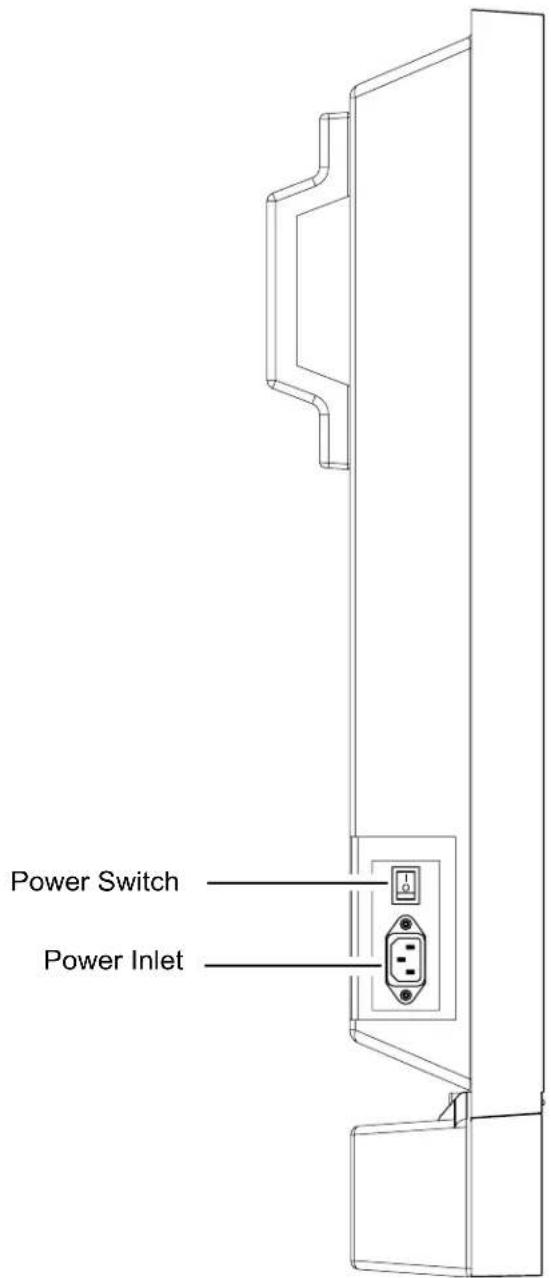
- Connect the power cable to the product then connect the main plug to the wall outlet.
- Push the power switch (O: Off, I: On). The power indicator on the front of the panel should now display red, indicating that the plasma is in standby mode.
Note: Shut down the power switch, turn on it again after the power indicator is extinguished entirely.
4.2 Front View
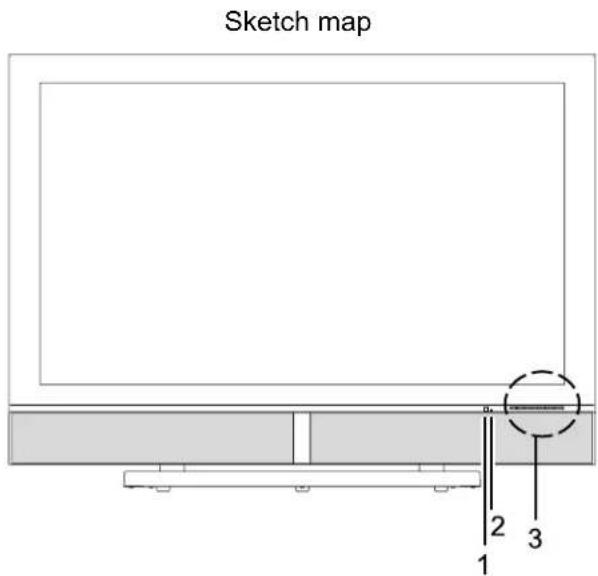
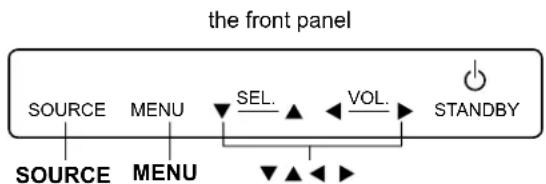
1 Remote control window: The receiving of Remote control signals window.
2 Power indicator:
Indicator ON (red)
Standby mode.
Indicator ON (green)
The unit power ON mode.
3 Buttons: The functions of the buttons are described as follows:

SOURCE: Press to display the source menu, Use ▲ or ▼ button to select AV, S-Video, YPbPr 1, YPbPr 2, VGA or HDMI, then press ▶ button to confirm.
MENU: Press to display the menu. Press again to exit the Sub Menu or the Main Menu.
SEL. ▲: They are used as ▲ / ▼ button in the OSD Menu screen.
A. They are used as ◀ / ▶ button in the OSD Menu screen.
B. The ▶ button has the function of Enter in the OSD Menu screen.
C. They can be used for the adjustment of volume when the OSD Menu is not shown on the screen. Press Left button to reduce the volume, while press Right button to increase the volume.
STANDBY: Press this button to turn off to standby and turn on from standby.
4.3 Rear View


1 Speaker Terminals: Can be used to connect external speakers with 8 Ohm impedance to the product.
2 Wall Mount fixing holes (six holes): Use the standard screws to fix the wall mount.
3 Signal input and other terminals:
A. RS-232: The D-SUB 9 Pins terminal is used as a control port for serial communication between PC and Panel. (Only for after-sales service)
B. HDMI INPUT: For high quality picture display purposes. Connects to HDMI or DVI (with DVI to HDMI couple) digital output connector of the DVD or HDTV Set-top box.
C. OPTICAL OUTPUT: Connect the optical output to the optical input connector of the Amplifier. (Only for HDMI)
D. DVI AUDIO INPUT: Connect the audio input terminal to the audio output terminal of DVD or HDTV Set-top box with DVI output terminal.
E. D-Sub (VGA) INPUT: For PC display purposes. Connects to the Mini D-Sub 15 Pins analog output connector of the PC display card.
PC Audio INPUT: Connect the audio input terminal to the audio output terminal of the PC output device.
F. YPbPr (COMP1) INPUT: Connect the Component video input terminal to the Component output terminal of the video output device.
YPbPr (COMP1) Audio INPUT: Connect the audio input terminal to the audio output terminal of the video output device.
G. YPbPr (COMP2) INPUT: Connect the Component video input terminal to the Component output terminal of the video output device.
YPbPr (COMP2) Audio INPUT: Connect the audio input terminal to the audio output terminal of the video output device.
H. Video Output: Connect the video output terminal to the video input terminal of the video input device. (Only for AV)
Audio Output: Connect audio amplifier or other TV set that with audio input.
(Continued on next page)
I. Video Input: Connect the video input terminal to the video output terminal of the video output device.
Video Audio Input: Connect the audio input terminal to the audio output terminal of the video output device.
J. S-Video INPUT: Connect the Y/C S-Video input terminal to the S-Video output terminal of the video output device.
S-Video Audio INPUT: Connect the audio input terminal to the audio output terminal of the video output device.
4.4 Remote Control
1 Standby(4): Press this button to turn off to standby and turn on from standby.
2 Mute(1): Press this button to quiet the sound system. Press again to reactivate the sound system.
3 Number buttons: Use these buttons to enter the password.
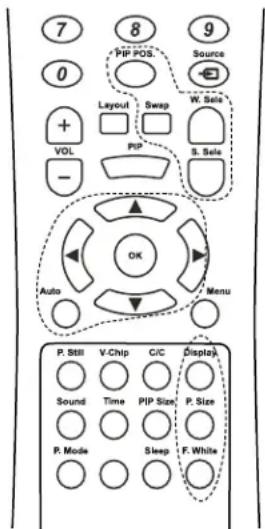
4 PIP POS. : Press the button to select different Image Position in PIP Mode.
5 Source: Press this button and use ▲ / ▼ button to select the signal sources. AV, S-Video, YPbPr 1, YPbPr 2, VGA or HDMI.
6 Layout: Press this button to pop up Layout menu.
7 Swap: Press this button to switch the Main window or Sub window pictures in PIP and Split Screen.
8 VOL +/- : Press these buttons to increase or decrease the volume.
9 W. Sele: Press this button to select the Main Window or Sub Window.
10 S. Sele: Press this button to select the sound output from Main Window or Sub Window.
11 PIP: Press this button to change different Picture Mode.
12 OK : Press to enter or confirm.
◀ / ▶ : They are used as ◀ / ▶ buttons in the OSD Menu screen.
▲ / ▼ : They are used as ▲ / ▼ buttons in the OSD Menu screen.
They also can be used for the selection of the program when the OSD Menu is not shown on the screen, but only for the Model with Tuner.
(Continued on next page)
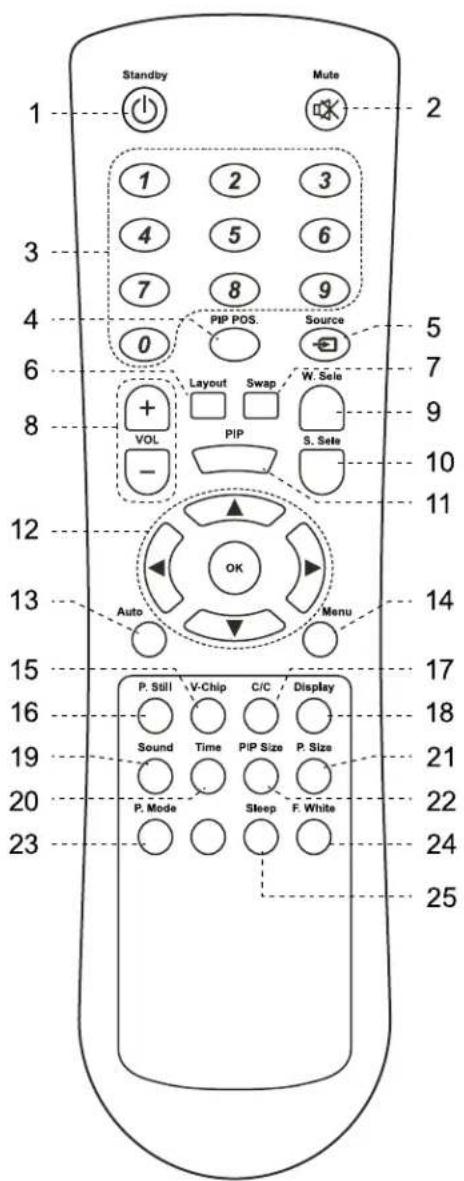
13 Auto: The Display automatically adjusts the phase, vertical / horizontal position when pressing this button in VGA mode.
14 Menu: Press this button to pop up the OSD Menu and press it again to exit the OSD Menu.
15 V-Chip: Press this button to enter the V-Chip Function. (Only for AV or S-Video)
16 P. Still: Press this button to hold on the screen. Press again to normal.
17 C/C: Press this button to enter the Closed Caption Function. (Only for AV or S-Video)
18 Display: Press the button to display the source information.
19 Sound: Press the button to select different sound effect.
20 Time: Press this button to pop up the "Clock Set" menu.
21 P. Size: When the input source is YPbPr 1, YPbPr 2, VGA or HDMI, press this button, the picture will change according to Fill All, Force 4:3, Letter Box, Wide or Anamorphic. When the input source is AV or S-Video, press this button, the picture will change according to Fill All, 4:3, Letter Box, Wide or Anamorphic.
22 PIP Size : Press the button to select different Image Size in PIP Mode.
23 P. Mode : Press the button to select different picture effect.
24 F. White: Press this button to show a full white picture.
25 Sleep: Press this button to select the sleep time.

Insertion of Batteries:
- Turn the remote control upside down, press and slide off the battery cover.
- Insert two 1.5V (AAA) batteries into the compartment, take care to observe the and markings indicated inside.
- Replace the cover and slide in reverse until the lock snaps.
Range of Remote Control
Sketch map
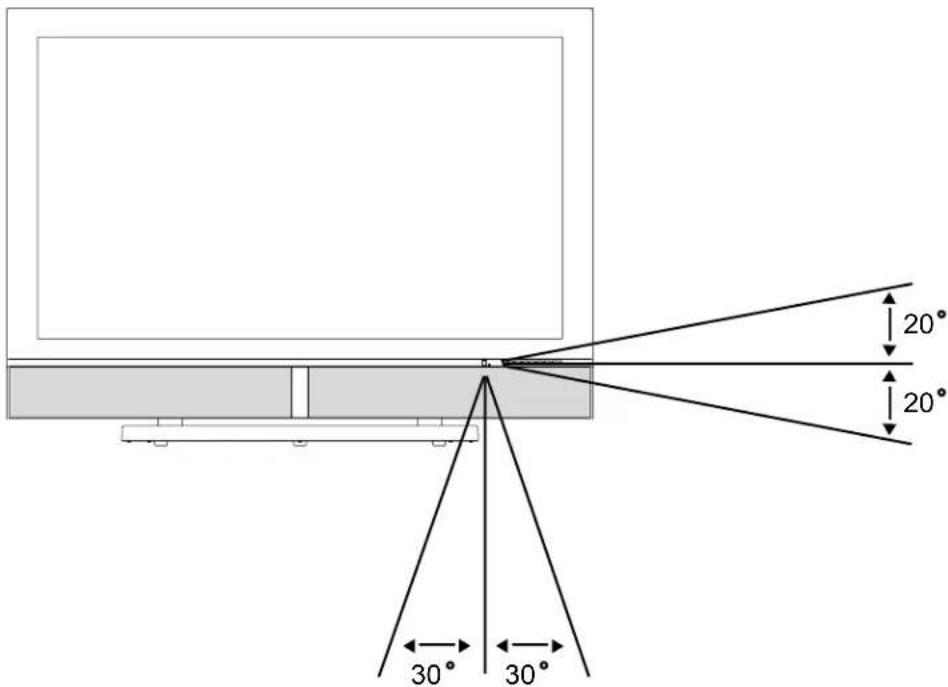
- Ensure the remote control is pointed towards the remote control window on the display unit.
- No obstacles should be placed between the remote control and the remote control window.
- The effective receiving range for the signal is within 5-8 meters from the front of the remote control window, and 30^ to the left or right side and 20^ above or below the control window.
Care For Remote Control
- Avoid spilling liquids on the remote.
- Avoid dropping or otherwise jarring the remote.
- Always store the remote control at dry and normal room temperature place.
- If the remote is nor performing satisfactorily, replace the batteries. The batteries should be replaced after one year.
- If the remote control will be idled for a long time (above 1 month) take out the batteries to avoid leakage from the batteries.
- Clean up the entire remote control especially the battery compartment if any leakage found.
- Do not mix using different kind of new and used batteries together to avoid leakage.
5. Connection to External Equipment

Connecting the Computer
- Connect the PDP to the computer with the D-Sub (VGA) cable.
- Connect the audio output of the computer to the audio input on the PDP.
- Please ensure the Power Cord is connected and turned on the STANDBY button before it is operated.
- Press STANDBY button on the remote control or on the PDP.
- The PDP and Computer are working at the same time. Press SOURCE button to select VGA on the remote control.

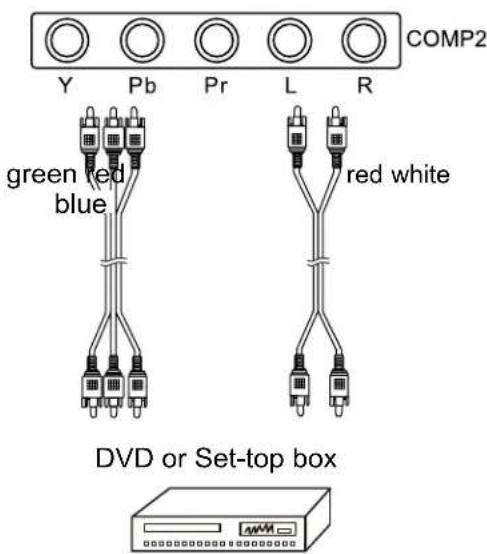
Connecting the DVD player or HDTV Set-top box using Component input
- Connect the YPbPr output of the DVD player or HDTV Set-top box to the YPbPr input of the PDP.
- Connect the audio output of the DVD player or HDTV Set-top box to the audio input of the PDP.
- Please ensure the Power Cord is connected and turned on the STANDBY button before it is operated.
- Press STANDBY button on the remote control or on the PDP.
- Press SOURCE button again to select YPbPr 1 or YPbPr 2.

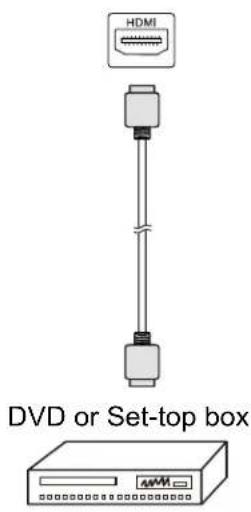
Connecting the DVD player or HDTV Set-top box using HDMI input
- Connect the PDP to the DVD player or HDTV Set-top box with the HDMI cable.
- Connect the DVI AUDIO input terminal to the audio output terminal of HDTV Set-top box with DVI output terminal, and a DVI to HDMI conversion cable should be adopted.
- Please ensure the Power Cord is connected and turned on the STANDBY button before it is operated.
- Press STANDBY button on the remote control or on the PDP.
- The PDP and Computer are working at the same time. Press SOURCE button to select HDMI on the remote control.
Note:
- The second step is used, if you connect DVI output to the HDMI input of the PDP. The second step isn't used, if you connect HDMI output to the HDMI input of the PDP.
- HDMI don't support PC.

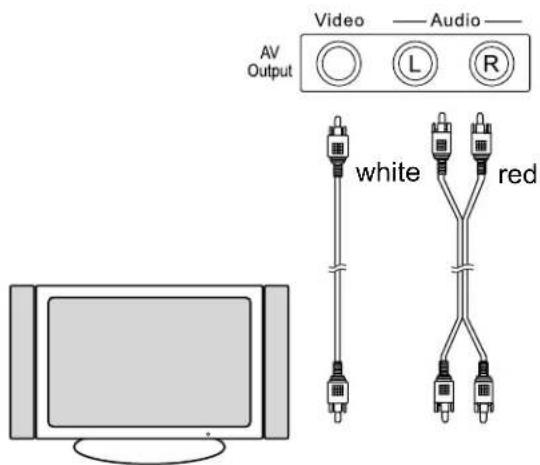
Connect audio amplifier or other TV set (Only for AV)
- Connect audio amplifier apparatus or other TV set that with audio input.
- Connect the composite video output terminal to the video output terminal of the video input device.
Connecting the DVD, VCR or other video apparatus
- With an S-VIDEO cable connect the PDP to the VCR or other device. S-VIDEO will connect only the video portion (image only) of the signal. With an AUDIO cable (RCA type) connect the AUDIO OUT from the device to the AUDIO IN on the PDP.
- With an AV cable connect to the Video plug of the PDP and the VCR or other video apparatus. With an AUDIO cable connect the audio output of the VIDEO of the VCR or other video apparatus to the audio input of the VIDEO of the PDP.
- Please ensure the Power Cord is connected and turn on Power Switch button before it is operated.
- Press STANDBY button to turn on the PDP.
- To watch the VCR or other video apparatus, please press SOURCE button to select S-VIDEO or AV.


6. Basic Operation
6.1 Power ON/OFF: The Display is in Standby mode
- Press Standby ( ⏻) button on the remote control or on the front panel to turn on the unit. The power indicator changes from red to green.
- Press Standby ( ⏻ button on the remote control or on the front panel again to return the display to standby mode. The power indicator changes from green to red.
Note: For protecting your PDP product, the interval time between turn on the PDP product and shut down it should be kept at least one minute.
6.2 Selection of Input Mode
- Press Source button on the remote control or on the front panel. A menu of input signal sources shall appear.
Press ▲ or ▼ to select the signal source you desired and press OK / ▶ to confirm the selection. The signal sources are displayed in the following sequence:


When select the input source, the screen will display the direction.

flowchart
graph LR
    A["AV\nSearching"] --> B["Fill All\nAV\nNTSC 60Hz/3.58 MHz"]
When there is no signal from the selected source (see illustration), either change the channel or press Source button to change sources. If there is no signal on your selected source for 15 minutes the television will power down.

flowchart
graph LR
    A["S-Video Searching"] --> B["Warning Icon"]
    B --> C["S-Video No Input Power Off In 15 Minutes"]
6.3 Other Function
Swap:
- Press this button on remote control to switch the Main window or Sub window picture in PIP or Split Screen.
S. Sele:
- Press this button to select the sound output from Main Window or Sub Window.
W. Sele:
- Press this button to select the Main Window or Sub Window.
- When you want to select the signal source from the Main Window or Sub Window, you can press Source button to pop up "Source Select" menu, then use ▲ or ▼ button to select the signal source and press OK or ▶ to confirm.
Display:
- Press this button to show the source's information as follow:
AV
Mode


VGA Mode
PIP
Mode

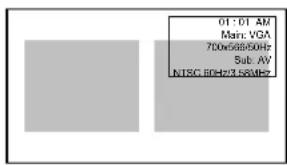
Split Screen Mode
Auto:
- Press this button to adjust the phase, vertical / horizontal position in VGA Mode only.
PIP POS.:
- Press this button to pop up the "PIP Position" item, then press ◀ / ▶ button to select different PIP position in PIP Mode.

PIP Size:
- Press this button to pop up the "PIP Size." item, then press ◀ / ▶ button to select different PIP Size in PIP Mode.

F. White:
- Press this button to show a full white picture, press it again to return to the normal picture.
Note: Some data will be update in five seconds if you change them.
6.4 OSD Option Adjustment
Learning about the menu system
- The buttons for OSD option adjustment include: Menu, ▲, ▼, ◀, ▶ and OK buttons.
- Press Menu button to open the OSD Menu then press ◀, ▶ button to select the pages. The pages are displayed in the following sequence (circular display):

flowchart
graph LR
    A["Picture Window Audio LayoutOptions"] --> B["Output"]
- Press Menu button on the remote control or on the front panel, it will change in the following sequence:

flowchart
graph LR
    A["Main Menu"] --> B["Exit"]
    C["Sub Menu"] --> D["Main Menu"] --> E["Exit"]
- Press Menu button to open the OSD Menu.
- Use ◀, ▶ buttons to select the pages.
- Use ▲, ▼ buttons to select the items.
- Press OK or ▶ button to enter.
- Use ◀, ▶ buttons to select or adjust.
- Press Menu button to exit the Sub Menu or Main Menu.

flowchart
graph TD
    A["VOL"] --> B["OK"]
    C["PIP"] --> B["OK"]
    D["S. Sele"] --> B["OK"]
    E["Auto"] --> B["OK"]
    F["Menu"] --> B["OK"]
    B --> G["OK"]
    style B fill:#f9f,stroke:#333,stroke-width:2px
    style G fill:#ccf,stroke:#333,stroke-width:2px
6.5 OSD Functions
1 Picture Page
[Input source is YPbPr 1, YPbPr 2, VGA or HDMI signal]
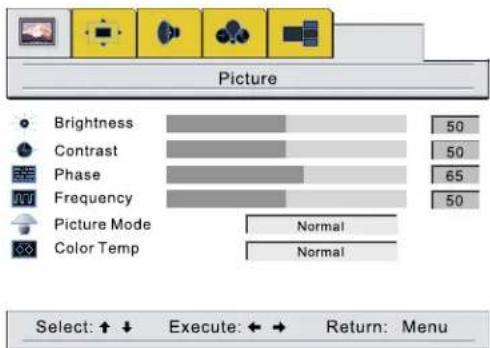
- Press Menu button, then press ◀ or ▶ button to choose the "Picture" item.
- Press ▲ or ▼ button to select "Brightness", "Contrast", "Saturation (only for YPbPr 1 and YPbPr 2)", "Phase (only for VGA)", "Peaking (only for YPbPr 1, YPbPr 2 and HDMI)", "Frequency", "Picture Mode" or "Color Temp", then press OK or ▶ button to enter.
- Press ◀ or ▶ button to adjust;
- Press Menu button to exit Sub Menu or Main Menu.
Note: When the signal source is HDMI, you can't adjust "Phase" and "Frequency".
| Items (press ▲/▼ button) | Adjust (press ◀/► button) | Adjust Effects |
| Brightness | Decrease / Increase | Darken / Brighten |
| Contrast | Decrease / Increase | Reduce / Enhance |
| Saturation | Decrease / Increase | Only for YPbPr 1 and YPbPr 2 |
| Phase | Decrease / Increase | Only for VGA |
| Peaking | Choose Normal, Sharp or Sharpest | Only for YPbPr 1, YPbPr 2 and HDMI |
| Frequency | Decrease / Increase | Reduce to left / Widen to right |
| Picture Mode | Choose | Choose Normal, Bright, Cinema or User |
| Color Temp | Choose | Choose Warm, Normal or Cool |
For VGA
bar
Picture | Attribute | Value | | :--- | :--- | | Brightness | 50 | | Contrast | 50 | | Saturation | 65 | | Peaking | Normal | | Frequency | 50 | | Picture Mode | Normal | | Color Temp | Normal | Select: ↑ ↓ Execute: ← → Return: Menu[Input Source is AV or S-Video signal]
- Press Menu button, then press ◀ or ▶ button to choose the "Picture" item.
- Press ▲ or ▼ button to select "Brightness", "Contrast", "Saturation", "Tint (only for NTSC)", "Sharpness", "Picture Mode" or "Color Temp", then press OK or ▶ button to enter.
- Press ◀ or ▶ button to adjust;
- Press Menu button to exit Sub Menu or Main Menu.
| Items (press ▲/▼ button) | Adjust (press ◀/► button) | Adjust Effects |
| Brightness Decrease / Increase | ase Darken / Brighten | |
| Contrast Decrease / Increase | ase Reduce / Enhance | |
| Saturation Decrease / Increase | ase Decrease / Increase | |
| Tint Decrease / Incre | ase | Picture Color Bias Green / Bias Red |
| Sharpness Decrease / Increase | ase Picture Gentleness / Sharpness | |
| Picture Mode Choose | Choose Normal, Bright, Cinema or User | |
| Color Temp | Choose | Choose Warm, Normal or Cool |

bar
| Attribute | Value | | :--- | :--- | | Brightness | 50 | | Contrast | 50 | | Saturation | 65 | | Tint | 50 | | Sharpness | 33 | | Picture Mode | Normal | | Color Temp | Normal | Select: ↑ ↓ Execute: ← → Return: MenuHot keys:
- Press P. Mode button to pop up the menu, then press ◀/▶ or P. Mode button to select Normal, Bright, Cinema or User.

2 Window Page
[Input source is YPbPr 1, YPbPr 2, VGA or HDMI signal]
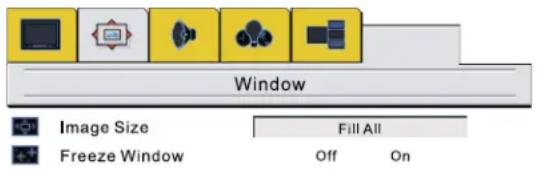
- Press Menu button, then press ◀ or ▶ button to choose the "Window" item.
- Press ▲ or ▼ button to select "Image Size", "H Position", "V Position", "H Resolution" or "Freeze Window", then press OK or ▶ button to enter.
- Press ◀ or ▶ button to adjust;
- Press Menu button to exit Sub Menu or Main Menu.
Note: 1. When the signal source is HDMI, you can't adjust "H Resolution".
- In VGA, YPbPr 1 or YPbPr 2 signal source, when select "Fill All" in "Image Size" item, you can adjust "H Resolution".
| Items (press ▲/▼ button) Adjust (press ◀/► button) Adjust Effects | ||
| Image Size | Choose | Choose Fill All, Force 4:3, Letter Box, Wide or Anamorphic |
| H Position Decrease / Increase Picture Left / Right Move | ||
| V Position Decrease / Increase Picture Down / Up Move | ||
| H Resolution Decrease / Increase | Picture Left and Right Shrink / Broaden | |
| Freeze Window | Choose | Choose Off or On |

[Input Source is AV or S-Video signal]
- Press Menu button, then press ◀ or ▶ button to choose the "Window" item.
- Press ▲ or ▼ button to select "Image Size" or "Freeze Window", then press OK or ◀ button to enter.
- Press ◀ or ▶ button to adjust;
- Press Menu button to exit Sub Menu or Main Menu.
| Items (press ▲/▼ button) Adjust (press ◀/► button) Adjust Effects | ||
| Image Size | Choose | Choose Fill All, 4:3, Letter Box, Wide or Anamorphic |
| Freeze Window | Choose Choose Off or On | |

Hot keys:
Image Size
- When the input signal source is YPbPr 1, YPbPr 2, VGA or HDMI, press P. Size button to pop up the menu, then press ◀/▶ or P. Size button to select "Fill All, Force 4:3, Letter Box, Wide or Anamorphic".
- When the input signal source is AV or S-Video, press P. Size button to pop up the menu, then press ◀/▶ or P. Size button to select "Fill All, 4:3, Letter Box, Wide or Anamorphic".

Freeze Window
- When the program information you want to capture is displayed, press P. Still button on the remote control. The picture freezes. Press P. Still button again, and the frozen picture is released, and the picture begins to move again.

3 Audio Page
3.1 Adjust Sound Effects
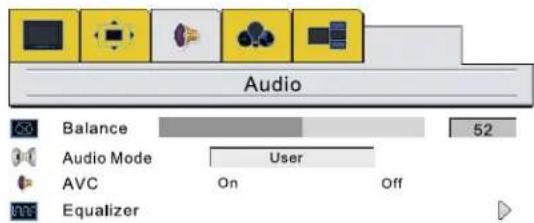
- Press Menu button, then press ◀ or ▶ button to choose the "Audio" item.
- Press ▲ or ▼ button to select "Balance", "Audio Mode", "AVC" or "Equalizer", then press OK or ▶ button to enter.
- Press ◀ or ▶ button to adjust;
- Press Menu button to exit Sub Menu or Main Menu.
- When you adjust "Equalizer", press ▲ or ▼ button to select "120Hz, 500Hz, 1.5kHz, 5kHz or 10kHz", then press ◀ or ▶ button to adjust the items needing.
Note: When select "User" in "Audio Mode" item, you can adjust "Equalizer".
| Items (press ▲/▼ button) Adjust (press ◀/► button) Adjust Effects | ||
| Balance Decrease / Increase | Left / Right Channel Gradual Decrease / Increase | |
| Audio Mode | Choose | Choose BBE, Cinema, Music, News or User |
| AVC | Choose Off or On | AVC (Automatic Volume Correction) Off or On |
| Equalizer Press OK /► button to confirm Adjust Equalizer | ||
| Equalizer | |
| 120Hz | 12 |
| 500Hz | 12 |
| 1.5kHz | 12 |
| 5kHz | 12 |
| 10kHz | 12 |

| Select: ↑ ↓ | Execute: ← → | Return: Menu |
Hot keys:
Audio Mode
- Press Sound button, it will pop up the "Audio Mode" item, then press ◀/▶ or Sound button to select "BBE, Cinema, Music, News or User".

3.2 Selecting "MUTE" on / off
- Press Mute button, the icon will appear on the screen and the system is mute;
- Press Mute button again, sound continues.

3.3 Adjust Volume
- Pressing ◀VOL. on the front panel or ◀/▶ on the remote control, a bar showed on the screen to adjust volume which the number scales and volume gradually increase or decrease.
- Press . on the control panel or / buttons on remote control once, volume increases or decreases a scale correspondingly.

4 Options Page
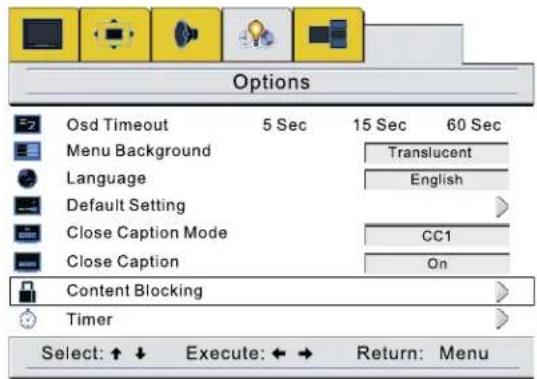
- Press Menu button, then press ◀ or ▶ button to choose the "Options" item.
- Press ▲ or ▼ button to select "Osd Timeout, Menu Background, Language, Default Setting, Close Caption Mode, Close Caption, Content Blocking or Timer", then press OK or ▶ button to enter.
- Press ◀ or ▶ button to adjust;
- When you select "Default Setting", press OK or ▶ button to enter and show "Default Setting".
- Press Menu button to exit Sub Menu or Main Menu.
Note: When the signal source is YPbPr 1, YPbPr 2, VGA or HDMI, you can't adjust "Close Caption Mode, Close Caption or Content Blocking".
| Items (press ▲/▼ button) | Adjust (press ◀/► button) Adjust | Effects |
| Osd Timeout | Choose 5 Sec, 15 Sec or 60 Sec | Adjust show time of OSD on the screen. |
| Menu Background Choose | Opaque / Translucent | Adjust OSD menu background. |
| Language Choose | Choose English, French or Spanish. | |
| Default Setting | Press OK /► button to confirm | Some adjusted items go back to original factory settings. |
| Close Caption Mode | Choose | Choose CC1, CC2, T1, T2 or Xds. |
| Close Caption | Choose Choose Off, On or On | Mute. |
| Content Blocking | Press OK /► button to confirm | |
| Timer | Press OK /► button to confirm | Pop up the Clock Set menu. |
- When you select "Timer", press OK or ▶ button to enter.
- Press ◀ or ▶ button to move the bit, press ▲ or ▼ button to adjust.
You can set the timer three ways:
a. Set the "Wake Up Time" only
b. Set the "Sleep Time" only
c. Set the "Sleep Time" and "Wake Up Time"
Note: 1. After you set the timer, you must press Standby button to put the PDP in the standby mode.
- The setting is valid, you must set "On" in "Timer".


Hot keys:
- Press Time button to show the Timer menu, then you can set "Clock Set, Timer, Wake Up Time or Sleep Time". The operation is as same as a bove.
Sleep Time function
- Press Sleep button to select "15 Minutes, 30 Minutes, 45 Minutes, 60 Minutes, 75 Minutes, 90 Minutes, 105 Minutes, 120 Minutes or Off".
Note: With these functions, the PDP will be turned on or off at the set time automatically.
- Before you use these functions, please set the time of "Clock Set" to the current time. The Wake Up Time and Sleep Time base on the Clock Set you set.
- Turn off the PDP by Power Switch will cancel the "Clock Set, Timer, Wake Up Time or Sleep Time" settings.
- Turn off the PDP by Power Switch or set "Off" by Sleep button will cancel the "Sleep Time" settings.
[Input Source is AV or S-Video]
● You can set "CC (Close Caption)" as the following operation:
- Press Menu button, then press ◀ or ▶ button to choose the "Options" item.
- Press ▲ or ▼ button to select "Close Caption Mode" or "Close Caption", then press OK or ▶ button to enter.
- Press ◀ or ▶ button to adjust;
- Press Menu button to exit Sub Menu or Main Menu.
(Continued on next page)

Hot keys:
- Press C/C button to pop up "Close Caption Mode" item, then press ◀ or ▶ button to choose "CC1", "CC2", "T1", "T2" or "Xds".

● You can set "Content Blocking" as the following operation:
- Press Menu button, then press ◀ or ▶ button to choose the "Options" item.
- Press ▲ or ▼ button to select "Content Blocking", then press OK or ▶ button to enter and show "Enter Password" (Initial Password is 0000).
- Use 0\~9 buttons to enter the password, then press OK button to enter "Content Blocking" setting.
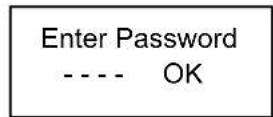
Note: Before setting for "Change", "Movie Block" and "TV Block", the correct block password is required to input. If the input is invalid, the "Password Error" menu will pop up, as the following illustration;

flowchart
graph LR
    A["Enter Password\n---- OK"] --> B["Password Error"]
    B --> C["Enter Password\n---- OK"]
(Continued on next page)
Note: The initial password for the system is 0000.
Please operate "Change" at the first time.
If you had forgotten the password, please contact with service centre.
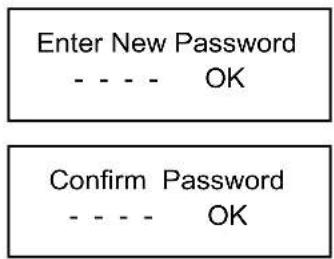
Change Blocking Password
- Press ▲ or ▼ button to select "Change" in Sub Menu, then press OK or ▶ button to pop up "Enter New Password".
- Use 0\~9 buttons to enter your new password.
- Press OK button to confirm and pop up "Confirm Password".
- Use 0\~9 buttons to enter your new password again.
- Press OK button to confirm.
- Press Menu button to exit Sub Menu or Main Menu.
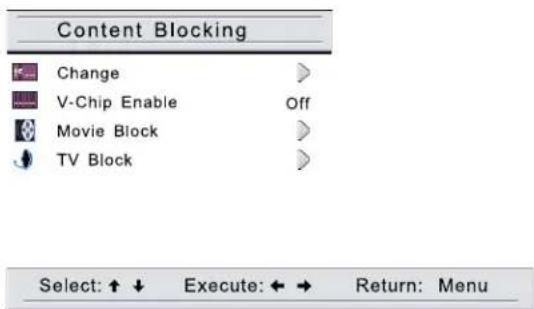
V-Chip Enable
- Press ▲ or ▼ button to select "V-Chip Enable" in Sub Menu, then press ◀ / ▶ button to select "On" or "Off".
- "Movie Block" and "TV Block", these functions are activate, while "V-Chip" select "On".
- "Movie Block" and "TV Block", these functions are inactivate, while "V-Chip" select "Off".
- Press Menu button to exit Sub Menu or Main Menu.
Movie Block
- Press ▲ or ▼ button to select "Movie Block" in Sub Menu, then press OK or ▶ button to pop up "Movie Content Blocking" Menu.
- Press ▲ or ▼ button to select "G", "PG", "PG 13", etc.
- Press OK button to lock (display " ") or unlock (doesn't display " ")
- When display “ ☐”, you can not watch the programs.
- When doesn't display " ☐", you can watch the programs.
- Press Menu button to exit Sub Menu or Main Menu.
(Continued on next page)


| Items D | Description and Content themes |
| G General Audience (Appropriate for all ages). | |
| PG Parental Guidance Suggested (Some material may not be suitable for children). | |
| PG 13 | Parents Strongly Cautioned (Some material may be inappropriate for children under 13). |
| R | Restricted (Under 17 requires accompanying parent or adult guardian). |
| NC 17 Not intended for anyone 17 and under. | |
| X X-rated (For adults only). | |
| NR No rating (Blocks all viewing). | |
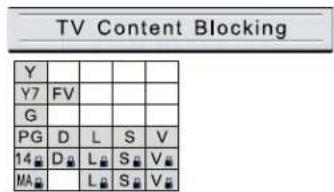
TV Block
- Press ▲ or ▼ button to select "TV Block" in Sub Menu, then press OK or ▶ button to pop up "TV Content Blocking" Menu.
- Press ▲ , ▼ , ◀ or ▶ button to select "Y", "Y7", "G", etc.
- Press OK button to lock (display " ") or unlock (doesn't display " ")
- When display “ ☐”, you can not watch the programs.
- When doesn't display " ☐", you can watch the programs.
- Press Menu button to exit Sub Menu or Main Menu.

(Continued on next page)
| Items Description and Content themes | |
| Y All Children (This program is designed to be appropriate for all children). | |
| Y7 | Directed to Older Children (This program is designed for children age 7 and above).Note: Programs in which fantasy violence may be more intense or more combative than other programs in this category are designed TV-Y7. |
| G | General Audience (Most parents would find this program suitable for all ages). |
| PG | Parental Guidance Suggested (This program contains material that parents may find unsuitable for younger children).D Some suggestive dialog L Infrequent coarse languageS Some sexual situations V Moderate violence |
| 14 | Parents Strongly Cautioned (This program contains some material that may parents would find unsuitable for children under 14 years of age).D Intensely suggestive dialog L Strong, coarse languageS Intensely sexual situations V Intense violence |
| MA | Mature Audience Only (This program is specifically designed to be viewed by adults and therefore may be unsuitable for children under 17).L Crude or indecent language S Explicit sexual activityV Graphic violence |
Temporary cancel "V-Chip" function
- If you want to watch the "lock" programs, you can enter the password and temporary cancel "V-Chip" function only for current program.
- In the current program source, after the temporary cancel "V-Chip" function, can't operate from "On" to "Off" function of the "V-Chip Enable" in the OSD menu.
Hot Key:
- Press V-Chip button to enter the V-Chip menu directly, and the operation is as same as above.
5 Layout Page
- Press Menu button, then press ◀ or ▶ button to choose the "Layout" item.
- Press ▲ or ▼ button to select "Full Screen", "PIP" or "Split Screen", then press OK or ▶ button to enter.
- Press Menu button to exit Sub Menu or Main Menu.
| Items (press ▲/▼ button) Adjust (press ◀ / ► button) Adjust Effects | ||
| Full Screen | Press OK or ► button to enter | Full Screen Mode |
| PIP | Press OK or ► button to enter | PIP Mode |
| Split Screen | Press OK or ► button to enter | Split Screen Mode |
(Continued on next page)

* You can view program in a variety of picture layout: Full Screen, PIP, Split Screen picture, and them showed as following:
Hot keys:
- Press PIP button to display in the following sequence (circular display).
Full screen picture PIP picture Split Screen picture

flowchart
graph LR
    A[" "] --> B[" "]
    B --> C[" "]
    C --> D[" "]
    D --> E[" "]
    E --> F[" "]
Hot keys:
- Press Layout button, then press ◀ or ▶ button to select "Full Screen", "PIP" or "Split Screen", press OK button to change.

| Items P | P/Split Screen | |
| Signal | Main Sub | |
| AV/S-Video | YPbPr 1/YPbPr 2/VGA/HDMI | |
| YPbPr 1/YPbPr 2/VGA/HDMI | AV/S-Video | |
- Technical Specification
| Product Model PDP4273 | M |
| VIDEO System NTSC / PAL M | |
| Screen Size 42" Wide screen | |
| Display Area 920.1mm (W) x 518.4mm (H) | |
| Aspect Radio | 16:9 |
| Dimension | 1039.8mm (W) x 719.9mm (H) x 109.5mm (D) (w/o stand and handles) |
| 1039.8mm (W) x 757mm (H) x 286mm (D) (with stand and handles) | |
| Net Weight 41 kg | (with stand, speaker and handles) |
| Display Resolution 1024(H) x 1024(V) Pixels (Each pixel has R/G/B 3 color cells) | |
| Pixel Dot Pitch 0.900 (H) x 0.510 (V) mm | |
| Color 16.7 millions of colors (R/G/B each 256 scales) | |
| Gray Scale 256 (R/G/B each 8-bit) | |
| Brightness(Peak Value) Typical 1400cd/m ^2 (Panel Only) | |
| Contrast Ratio Typical 3000:1, In a dark room (Panel only) | |
| Sound Effect BBE System | |
| Power Supply | AC 100~120V, 60 Hz |
| Power Consumption | 330W Typical |
| Input Terminal | VGA (D-Sub 15 Pin Type) x 1 |
| RS-232 (D-Sub 9 Pin Type) x 1 | |
| HDMI (Ver. 1.1) connector x 1 | |
| S-Video (Mini Din 4 Pin) x 1 | |
| Video (RCA Type) x 1 | |
| YPbPr 1 x 1 | |
| YPbPr 2 x 1 | |
| Stereo, Audio x 6 | |
| Output Terminal | Audio (L + R) x 1, Video (RCA Type) x 1, SPDIF (Optical) x1 |
| Agent System | UL/cUL/FCC |
NOTE:
The specifications shown above may be changed without notice for quality improvement.
8. Support the Signal Mode
A. VGA Mode, HDMI Mode or HDTV Mode (YPbPr 1 or YPbPr 2)
| Mode | Resolution | Horizontal Frequency (kHz) | Vertical Frequency (Hz) | Dot Clock Frequency (MHz) |
| VGA Mode | 640 x 480 31.50 | 60.00 | 25.18 | |
| 800 x 600 | 37.90 | 60.32 | 40.00 | |
| 1024 x 768 | 48.40 | 60.00 | 65.00 | |
| HDMI Mode | 480p | 31.468 | 59.94 | 27.00 |
| 720p | 45.00 | 60.00 | 74.25 | |
| 1080i | 33.75 | 60.00 | 74.25 | |
| HDTV Mode (YPbPr1/YPbPr2) | 480i | 15.734 | 59.94 | 13.50 |
| 480p | 31.468 | 59.94 | 27.00 | |
| 720p | 45.00 | 60.00 | 74.25 | |
| 1080i | 33.75 | 60.00 | 74.25 |
B.PIP/PBP Screen Mode
| Items VGA | HDMI/YPbPr1/YPbPr2 | |||||
| 480p | 720p 1030i | |||||
| PIP | Main 1024 x | 768 OK OK OK | ||||
| Sub | Large 1024 x 768 OK OK OK | |||||
| Middle 1024 x 768 OK OK | X | |||||
| Small 1024 x 768 OK OK | X | |||||
| PBP | Main 1024 x | 768 OK OK OK | ||||
| Sub 1024 x | 768 OK OK OK | |||||
Note:
- "X" means out of range (can not show).
- When the signal received by the Display exceeds the allowed range, a warning message shall appear on the screen.
- You can confirm the input signal format from the on-screen.
9. Cleaning and Simple Troubleshooting
1 Important:
- Make sure that the power cable is removed from the AC outlet before cleaning the product.
- Do not use volatile solvent (such as toluene, rosin and alcohol) to clean the Display. Such chemicals may damage the housing, screen glass and remote control, and cause the paint to peel.
2 Cleaning of Housing and Remote Control:
- Use a soft cotton cloth for cleaning.
- If the housing or remote control are seriously contaminated, use a soft cloth moistened with diluted neutral clean the Display. Wring water out of the cloth before cleaning to prevent water from penetrating into the housing. Wipe the Display with a dry cloth after cleaning.
3 Cleaning of Screen:
- Use a soft cotton cloth to clean the screen gently.
- The screen glass is very fragile; so do not scrape it with any sharp object. Do not press or tap the screen to avoid cracking. When the screen is seriously contaminated, use a soft cloth moistened with diluted neutral cleaner to clean the Display. Wring water out of the cloth before cleaning to prevent water from penetrating into the housing. Wipe the display with a dry cloth after cleaning.
4 Simple Troubleshooting:
If the display fails or the performance changes dramatically, check the Display in accordance with the following instructions. Remember to check the peripherals to pinpoint the source of the failure. If the Display still fails to perform as expected, contact the dealer for assistance.
(Continued on next page)
| The trouble status The way of shooting | |
| Power cannot be turned on. (Power indicator does not light) | - Check that both ends of the power cable are plugged into the socket appropriately. |
| No Input Signal message appears. | - Check that the signal line is connected properly.- Check that the power of the relevant peripherals is turned on.- Check that the Input option that has been selected matches with the input signal. |
| The remote control does not function properly. | - Check that the polarity of the batteries are correct.- Check that the batteries are not drained. (Use new batteries.)- Check that the Remote Control is within the operating range.- Check that the Remote Control is pointed to the Remote Control Window on the Display.- Check that there are no obstacles between the Remote Control and the Remote Control Window.- For more information about the Remote Control, refer to Chapter 6. |
| Flashing spots or stripes appear on the screen. | - Check that there is no emitter sources (Car, HV cable or Neon lamp) or other possible interference sources. |
| Image color or quality deteriorates. | - Check that all the video settings are adjusted appropriately, such as brightness, contrast, color etc.- For more information about video settings, refer to OSD Functions in Chapter 6. |
| Screen position and size are incorrect. | - Check that the screen position and size is adjusted appropriately. |
| Image or color is incorrect. | - Check that the signal line is connected properly.- When connecting to PC, you can change the resolution of PC to acquire correct image. The discrepancy of the PC output signal may affect the display of the image. |
| The external speaker has no sound. | - Check that the speaker (audio) cables are connected appropriately.- Check that the Display is not in the Mute mode.- Check that the audio signal lines from the peripherals are connected properly. |
| Check that the input signal line is properly fixed, or display warning message. | - Select the correct input signal.- For more information, refer to Support the Signal Mode in Chapter 8. |
- Safety Guidelines
- FCC Information
- FCC Warning
- Important Safeguards
- Keep the product away from moisture:
- Do not place any objects on the top of the product:
- WARNING
- Avoid using dropped or damaged appliances:
- Do not touch the power cord during lightening:
- ATTENTION
- Do not install the product close to smoke or moisture:
- Do not installed the product in an area with heavy dust or high humidity:
- Instructions for moving the product:
- The power cable should be kept away from heat sources:
- Contents
- Before use
- Open the Package
- Installation
- Product Features
- Available input signals
- Power Management Function
- Fan-free Design
- BBE Sound system
- Others
- Accessories
- Names and Functions of Parts
- Side View
- Front View
- Rear View
- Remote Control
- Insertion of Batteries:
- Range of Remote Control
- Care For Remote Control
- Connection to External Equipment
- Connecting the Computer
- Connecting the DVD player or HDTV Set-top box using Component input
- Connecting the DVD player or HDTV Set-top box using HDMI input
- Note:
- Connect audio amplifier or other TV set (Only for AV)
- Connecting the DVD, VCR or other video apparatus
- Basic Operation
- Power ON/OFF: The Display is in Standby mode
- Selection of Input Mode
- Other Function
- Swap:
- Sele:
- Sele:
- Display:
- Auto:
- PIP POS.:
- PIP Size:
- White:
- OSD Option Adjustment
- Learning about the menu system
- OSD Functions
- Picture Page
- Hot keys:
- Window Page
- Audio Page
- Adjust Sound Effects
- Selecting "MUTE" on / off
- Adjust Volume
- Options Page
- You can set the timer three ways:
- Sleep Time function
- [Input Source is AV or S-Video]
- ● You can set "Content Blocking" as the following operation:
- Change Blocking Password
- V-Chip Enable
- Movie Block
- TV Block
- Temporary cancel "V-Chip" function
- Hot Key:
- Layout Page
- Support the Signal Mode
- Cleaning and Simple Troubleshooting
- Important:
- Cleaning of Housing and Remote Control:
- Cleaning of Screen:
- Simple Troubleshooting:
Brand : AKAI
Model : PDP4273M
Category : Television