
PT4250A - Television AKAI - Free user manual and instructions
Find the device manual for free PT4250A AKAI in PDF.


| Product Type | Rear Projection Television |
| Model | PT4250A |
| Screen Size | 42 inches (diagonal) |
| Dimensions (W x D x H) | 1004 x 500 x 967 mm (39.5 x 19.7 x 38.1 inches) |
| Weight | 40.4 kg (89.1 lbs) |
| Power Requirements | AC 120V, 60Hz |
| Power Consumption | 240 watts |
| Video Inputs | Component (Y, Pb, Pr), S-Video, Composite (AV1/AV2/AV3), DVI |
| Audio Inputs | L/R audio for each video input; DVI audio |
| Digital Audio Output | Coaxial and Optical |
| TV Tuner | Analog and Digital (ATSC) with NTSC |
| Channel Memory | Auto program for Air and Cable; up to 181 channels |
| Picture Modes | Dynamic, Standard, Movie, Custom |
| Sound Modes | Standard, Music, Movie, Speech, Custom |
| Special Features | Self Focus (automatic convergence), BBE sound, Auto Volume, V-Chip parental controls, Closed Captioning (Analog/Digital), Sleep Timer, On/Off Timer, Electronic Program Guide |
| Remote Control | Universal remote (controls TV, VCR, Cable box, DVD); range up to 23 ft |
| Antenna Inputs | Two: ANT 1 IN (Air) and ANT 2 IN (Cable) |
| Convergence Adjustment | Automatic (Self Focus) and manual (Red/Blue) |
| Safety Compliance | FCC Part 15, CSA, UL (implied) |
| Cleaning Instructions | Unplug before cleaning; use dry cloth; do not use liquids |
| Spare Parts / Reparability | Refer servicing to qualified personnel; use manufacturer-specified replacement parts |
| Warranty | Limited warranty (details not provided; contact Akai) |
Frequently Asked Questions - PT4250A AKAI
User questions about PT4250A AKAI
0 question about this device. Answer the ones you know or ask your own.
Ask a new question about this device
Download the instructions for your Television in PDF format for free! Find your manual PT4250A - AKAI and take your electronic device back in hand. On this page are published all the documents necessary for the use of your device. PT4250A by AKAI.
USER MANUAL PT4250A AKAI
Owner's Instructions



Warning! Important Safety Instructions
CAUTION
RISK OF ELECTRIC SHOCK DO NOT OPEN
CAUTION: TO REDUCE THE RISK OF ELECTRIC SHOCK, DO NOT REMOVE COVER (OR BACK). NO USER SERVICEABLE PARTS INSIDE. REFER SERVICING TO QUALIFIED SERVICE PERSONNEL.

This symbol indicates high voltage is present inside. It is dangerous to make any kind of contact with any inside part of this product.

This symbol alerts you that important literature concerning operation and maintenance has been included with this product.
Note to CATV system installer: This reminder is provided to call CATV system installer's attention to Article 820-40 of the National Electrical Code (Section 54 of Canadian Electrical Code, Part I), that provides guidelines for proper grounding and, in particular, specifies that the cable ground shall be connected to the grounding system of the building as close to the point of cable entry as practical.
Caution: FCC/CSA regulations state that any unauthorized changes or modifications to this equipment may void the user's authority to operate it.
Caution: To prevent electric shock, match the wide blade of plug to the wide slot, and fully insert the plug.
Important: One Federal Court has held that unauthorized recording of copyrighted TV programs is an infringement of U.S. copyright laws. Certain Canadian programs may also be copyrighted and any unauthorized recording in whole or in part may be in violation of these rights.
To prevent damage which may result in fire or electric shock hazard, do not expose this appliance to rain or moisture.
Thank You for Choosing Akai
Thank you for choosing Akai! Your new Akai Projection TV represents the latest in television technology. We designed it with easy-to-use on-screen menus and closed captioning capabilities, making it one of the best products in its class. We are proud to offer you a product that will provide convenient, dependable service and enjoyment for years to come.
Important Safety Information
Always be careful when using your TV receiver. To reduce the risk of fire, electrical shock, and other injuries, keep these safety precautions in mind when installing, using, and maintaining your machine.
- Read all safety and operating instructions before operating your TV.
- Keep the safety and operating instructions for future reference.
- Heed all warnings on the TV receiver and in the operating instructions.
- Follow all operating and use instructions.
- Unplug the TV receiver from the wall outlet before cleaning. Use a damp cloth; do not use liquid or aerosol cleaners.
- Never add any attachments and/or equipment without approval of the manufacturer. Such additions can increase the risk of fire, electric shock, or other personal injury.
- Do not use the TV receiver where contact with or immersion in water is a possibility, such as near bath tubs, sinks, washing machines, swimming pools, etc.
- Do not place the TV on an unstable cart, stand, tripod, bracket, or table where it can fall. A falling TV can cause serious injury to a child or adult, and serious damage to the appliance. Use only with a cart, stand, tripod, bracket, or table recommended by the manufacturer or sold with the TV. Follow the manufacturer's instructions when mounting the unit, and use a mounting accessory recommended by the manufacturer. Move the TV and cart with care. Quick stops, excessive force, and uneven surfaces can make the unit and cart unsteady and likely to overturn.

natural_image
Silhouette of a person pushing a ladder inside a circular frame (no text or symbols)- P r ovide ventilation for the TV receiver. The unit is designed with slots in the cabinet for ventilation to protect it from overheating. Do not block these openings with any object, and do not place the TV receiver on a bed, sofa, rug, or other similar surface. Do not place it near a radiator or heat register. If you place the TV receiver on a rack or bookcase, ensure that there is adequate ventilation and that you've followed the manufacturer's instructions for mounting.
- Operate your TV receiver only from the type of power source indicated on the marking label. If you are not sure of the type of power supplied to your home, consult your appliance dealer or local power company.
- Use only a grounded or polarized outlet. For your safety, this TV is equipped with a polarized alternating current line plug having one blade wider than the other. This plug will fit into the power outlet only one way. If you are unable to insert the plug fully into the outlet, try reversing the plug. If the plug still does not fit, contact your electrician to replace your outlet.
- Protect the power cord. Power supply cords should be routed so that they won't be walked on or pinched by objects placed on or against them. Pay particular attention to cords at plugs, convenience receptacles, and the point where they exit from the unit.
- Unplug the TV from the wall outlet and disconnect the antenna or cable system during a lightning storm or when left unattended and unused for long periods of time. This will prevent damage to the unit due to lightning and power-line surges.
- A void overhead power lines. An outside antenna system should not be placed in the vicinity of overhead power lines or other electric light or power circuits or where it can fall into such power lines or circuits. When installing an outside antenna system, be extremely careful to keep from touching the power lines or circuits. Contact with such lines can be fatal.
- Do not overload the wall outlet or extension cords. Overloading can result in fire or electric shock.
- Do not insert anything through the openings in the unit, where they can touch dangerous voltage points or damage parts. Never spill liquid of any kind on the TV.
- Ground outdoor antennas. If an outside antenna or cable system is connected to the TV, be sure the antenna or cable system is grounded so as to provide some protection against voltage surges and built-up static charges. Section 810 of the National Electrical Code, ANSI/NFPA No.70-1984, provides information about proper grounding of the mast and supporting structure, grounding of the lead-in wire to an antenna discharge unit, size of grounding conductors, location of antenna discharge unit, connection to grounding electrodes, and requirements for the grounding electrode.

- Do not attempt to service the TV yourself. Refer all servicing to qualified service personnel. Unplug the unit from the wall outlet and refer servicing to qualified service personnel under the following conditions:
- when the power-supply cord or plug is damaged
- if liquid has been spilled on the unit or if objects have fallen into the unit
- if the TV has been exposed to rain or water
- if the TV does not operate normally by following the operating instructions
- if the TV has been dropped or the cabinet has been damaged
- when the TV exhibits a distinct change in performance
- If you make adjustments yourself, adjust only those controls that are covered by the operating instructions. Adjusting other controls may result in damage and will often require extensive work by a qualified technician to restore the TV to normal.
- When replacement parts are required, be sure the service technician uses replacement parts specified by the manufacturer or those that have the same characteristics as the original part. Unauthorized substitutions may result in additional damage to the unit.
- Upon completion of any service or repairs to this TV, ask the service technician to perform safety checks to determine that the TV is in a safe operating condition.
This device complies with part 15 of the FCC Rules. Operation is subject to the following two conditions:
(1) This device may not cause harmful interference, and
(2) This device must accept any interference that may cause undesired operation.
This television receiver provides display of television closed captioning in accordance with §15.119 of the FCC rules.
Important Warranty Information Regarding Television Format Viewing
Standard screen format televisions (4:3, the aspect ratio of the screen width to height) are primarily designed to view standard format full-motion video. The images displayed on them should primarily be in the standard 4:3 ratio format and constantly moving. Displaying stationary graphics and images on screen, such as the dark top and bottom letterbox bars (wide screen pictures), should be limited to no more than 15% of the total television viewing per week.
Wide screen format televisions (16:9, the aspect ratio of the screen width to height) are primarily designed to view wide screen format full-motion video. The images displayed on them should primarily be in the wide screen 16:9 ratio format, or expanded to fill the screen if your model offers this feature, and constantly moving. Displaying stationary graphics and images on screen, such as the dark side-bars on non-expanded standard format television video and programming, should be limited to no more than 15% of the total television viewing per week.
Additionally, viewing other stationary images and text such as stock market reports, video game displays, station logos, web sites or computer graphics and patterns, should be limited as described above for all televisions. Displaying any stationary images that exceed the above guidelines can cause uneven aging of picture tubes (CRTs) that leave subtle, but permanent burned-in ghost images in the television picture. To avoid this, vary the programming and images, and primarily display full screen moving images, not stationary patterns or dark bars. On television models that offer picture sizing features, use these controls to view the different formats as a full screen picture.
Be careful in the selection and duration of television formats used for viewing. Uneven CRT aging as a result of format selection and use, as well as other burned-in images, is not covered by your Akai limited warranty.
A Guide to Digital TV
What is Digital Television?
Digital television (DTV) is a new way of transmitting high quality video and audio to your TV set. Using DTV, broadcasters can transmit high definition TV (HDTV) images, Dolby digital surround audio, and new services such as multicasting (transmitting more than one program on the same TV channel) and datacasting (providing electronic program guides and interactive television). Several of these services can be combined into a single digital broadcast.
Digital Television Services
Digital Picture Quality
DTV programs are transmitted in two different formats. The first is Standard Definition Television (SDTV) and the second is High Definition Television (HDTV).
SDTV program formats include 480-line interlaced (480i) and 480-line progressive (480p) video. 480i programs are essentially a digital version of our current analog TV programs, while the 480p format offers improved image detail over 480i. Some 480p programs are broadcast in widescreen and are comparable to progressive-scan DVD movies in image quality.
HDTV program formats include 1080-line interlaced (1080i) and 720-line progressive (720p). Both HDTV formats are always broadcast in widescreen, and offer much higher picture quality than SDTV.
Dolby Surround Sound
With DTV, you can listen to a variety of Dolby digital audio formats from Dolby Surround 2.0 to Dolby Digital 5.1 surround, using your home audio system. Many HDTV programs are now broadcast with DD 5.1 soundtracks.
Interactive Communications and Datacasting
DTV will allow you to interact with your television; choosing programs from a detailed program guide, ordering products on-line while watching TV, and accessing ancillary data about a program.
How to View Digital Television
There are three ways to watch DTV. The first is to use an integrated digital TV; one with a built-in digital television tuner. The second is to connect an external DTV set-top receiver to a DTV-ready television or monitor. This type of TV or monitor will have wideband component video and stereo audio inputs. You can also watch DTV signals with personal computer (PC) tuner cards and computer monitors.
Integrated TVs versus DTV-ready TVs and monitors
The advantage of an integrated DTV set is that it can tune both analog and digital TV channels at the same time. All you'll need to do is add an external antenna and you are ready to watch DTV.
However, integrated DTV sets are not as common as DTV-ready TVs and monitors. If you already own a DTV-ready TV with component video inputs, you can enjoy DTV broadcasts by simply adding a low-cost DTV set-top receiver and antenna.
NOTE
This television receiver supports the copy protection system regulated by DTLA (Digital Transmission Licensing Administrator). It should be noted that copy protected content may not be viewable depending on your particular connections.
Q&A
1. Is the antenna I use for existing TV reception good enough for DTV?
Over-the-air (OTA) digital TV broadcasting uses the same channels as analog TV and works well with many existing TV antennas. However, DTV broadcast channel assignments are different than analog channels. You should find out whether your local DTV broadcasts are on VHF (channels 2-13) or UHF (channels 14-69) to see if you need a different antenna.
If your DTV channels are on UHF and you already get good UHF reception, your present antenna may work fine. The same holds true for VHF DTV reception. Note that in some markets, both VHF and UHF channels are used for DTV broadcasts.
You can find out the latest DTV channel assignments for your area by browsing selected Internet web sites such as www.titantv.com, and www.fcc.gov.
2. How difficult is it to receive DTV signals indoors?
This depends on whether your local DTV stations are running full power or not and how close your location is to the transmission tower. DTV receivers do not require as much signal as analog TV receivers to produce high-quality images and sound.
Once the DTV signal level exceeds a certain threshold at the receiver, the digital video and audio data is decoded at the same quality it was originally encoded for broadcast. This is a big advantage for DTV over analog TV - there is no noise, ghosting, static, or scratchy audio.
3. How can I connect an antenna in my townhouse, co-operative apartment, condominium, or apartment?
The Federal Communications Commission's OTARD Rule (part of the Telecommunications Act of 1996) allows residents of condominiums, townhouse, or members of neighborhood associations to put up outside antennas for reception of broadcast TV signals as long as those antennas are not located in common areas and are no more than 12' in height.
Residents of rental units (apartments, etc) are not covered by the OTARD rules and will have to use indoor antennas to receive DTV broadcasts. It is possible that the landlord of an apartment complex can provide broadcast DTV signals via a master TV antenna system to each apartment.
4. Can I connect my DTV set-top receiver to my cable TV service?
Cable TV systems use a different method for transmitting digital TV programs that is currently incompatible with broadcast DTV set-top receivers. So you will still need to use an outdoor or indoor antenna to receive OTA broadcast DTV programs.
The good news is that you won't have to pay a monthly or per-program charge to watch OTA DTV and HDTV programs. They're free, unlike subscription satellite TV or premium cable TV. All you need is an antenna and a DTV set-top receiver to enjoy clear, sharp widescreen images and high-quality audio.
CONTENTS
Chapter 1: Your New TV
List of Features.... 12
Accessories.... 12
Familiarizing Yourself with Your New TV 13
Control Buttons 13
Connection Jacks (Side) 14
Connection Jacks (Rear) 15
Remote Control 16
Chapter 2: Installation
Connecting VHF and UHF Antennas 18
Antennas with 300-ohm Flat Twin Leads 18
Antennas with 75-ohm Round Leads 19
Separate VHF and UHF Antennas.... 19
Connecting Cable TV 20
Cable without a Cable Box 20
Cable with a Cable Box that Descrambles All Channels 20
Connecting to a Cable Box that Descrambles Some Channels.... 21
Connecting a VCR 22
Connecting a Second VCR to Record from the TV 23
Connecting a Camcorder 23
Connecting a DVD Player or DTV Set-Top Box (480i, 480p, 720p, 1080i)....24
Connecting to Y, P3, P8 24
Connecting to Regular Audio and Video Jacks 24
Connecting a Digital TV Set-Top Box 25
Connecting to DVI (Digital Visual Interface) 25
Connecting a Digital Audio System 26
Connecting to an Analog Amplifier 26
Installing Batteries in the Remote Control 27
Chapter 3: Operation
Turning the TV On and Off 28
Plug & Play Feature 28
Adjusting the Screen Automatically (Self Focus)....30
Deactivating the Automatic Execution of the Self Focus 31
Removing the "Self Focus" Message from the Display 31
Adjusting Convergence Manually 32
Viewing the Menus and On-Screen Displays 34
Viewing the Menus.... 34
Viewing the Display 34
Selecting a Menu Language 35
Selecting the Antenna Input 35
Memorizing the Channels 36
Selecting the Video Signal Source 36
Storing Channels in Memory 37
Adding and Erasing Channels 38
Changing Channels 39
Using the Channel Buttons.... 39
Using the Number Buttons.... 39
Using the "−" Button 39
Using the Previous Channel 39
Selecting Your Favorite Channels 40
To Store Your Favorite Channels 40
To View Your Favorite Channels 40
Labeling the Channels 41
Viewing the Channel Lists 42
Editing the Channel Lists 43
Picture Control 44
Using Automatic Picture Settings 44
Customizing the Picture 45
Resetting the Picture Settings to the Factory Defaults 46
CONTENTS
Chapter 3: Operation (continued)
Sound Control 47
Adjusting the Volume 48
Using the MUTE Button 48
Customizing the Sound 48
Using Automatic Sound Settings....49
Setting the Clock 49
Option 1: Setting the Clock Manually....49
Option 2: Setting the Clock Automatically 50
Viewing an External Signal Source 51
Setting the Signal Source 51
Assigning Names to External input mode 52
Chapter 4: Special Features
Fine Tuning Analog Channels 53
Checking the Digital-Signal Strength 54
Changing the Screen Size 55
BBE 56
Auto Volume 57
Choosing a Multi-Channel Sound (MTS) track - Digital 58
Choosing a Multi-Channel Sound (MTS) track - Analog 59
Choosing a Digital Sound Format 60
Setting the On/Off Melody 61
Setting the On/Off Timer 62
Setting the Sleep Timer 63
Using the V-Chip (USA) 64
How to Change Your Password....64
How to Enable/Disable the Rating Controls 65
How to Set up Restrictions Using the "TV Parental Guidelines" 66
How to Set up Restrictions using the Movie Ratings:
G, PG, PG-13, R, NC-17, X 67
Important Notes About Parental Locks 68
Viewing Closed Captions (On-Screen Text Messages) - Analog....69
Viewing Closed Captions (On-Screen Text Messages) - Digital 70
Menu Translucency Level 72
Setting the Function Help 73
Electronic Program Guide 74
Viewing the Electronic Program Guide 74
Using the Electronic Program Guide....75
Viewing Information about a Single Channel 76
Viewing Information about Channels 77
Reminder List....78
Reminded Viewing List....78
To view the Reminder List 79
To remove the scheduled programs 79
Customizing Your Remote Control 79
Setting Up Your Remote Control to Operate Your VCR
(Cable box or DVD player) 80
Remote Control Codes 81
Chapter 5: Troubleshooting
Identifying Problems 82
Appendix
Cleaning and Maintaining Your TV 83
Using Your TV in Another Country 83
Specifications 83
Chapter One
YOUR NEW TV
List of Features
Your TV was designed with the latest technology. This TV is a high-performance unit that includes the following special features:
- Easy-to-use remote control
- Easy-to-use on-screen menu system
- A utomatic timer to turn the TV on and off
- Adjustable picture and sound settings that can be stored in the TV's memory
• A special filter to reduce or eliminate reception problems
- Fine tuning control for the sharpest picture possible
• A built-in multi-channel sound decoder for stereo and bilingual listening
• Built-in, dual channel speakers
• A special sleep timer
- Component Video Input jacks to obtain a sharper image from external sources
- Adjusting the Screen Automatically (Self Focus)
• Digital Input (Digital Visual Interface) jack
• D igital Audio Output (COAXIAL/OPTICAL) jacks
Accessories
Once you have unpacked your TV, check to make sure that you have all the parts shown here. If any piece is missing or broken, call your dealer.

Remote Control (BP59-00089A)/ AA Batteries
Owner's Instructions/
Safety Guide Manual

Warranty Cards

Holder-Caster (PT5240A)
YOUR NEW TV
Familiarizing Yourself with Your New TV
Control Buttons
You can control your TV's basic features, including the on-screen menu. To use the more advanced features, you must use the remote control.

① POWER
Press to turn the TV on and off.
② Stand-By Indicator
Lights up when you turn the power off.
- Power Off; Red
- Power On ; Off
- Timer On; Green
③ Remote Control Sensor
Aim the remote control towards this spot on the TV.
④ SOURCE
Press to switch between viewing TV programs and signals from connected components.
⑤ MENU
Press to see an on-screen menu of your TV's features.
⑥ + VOL -
Press to lower or raise the volume and to select items when using the on-screen menu.
⑦ ^ CH ∨
Press to change channels and move between items on the on-screen menu.
8 (Enter)
While using the on-screen menus, press to activate (or change) a particular item.
YOUR NEW TV
Connection Jacks (Side)
You can connect an A/V component that is used only occasionally, such as a camcorder or video game. For information on connecting equipment, see page 23.
PT4250A PT5250A
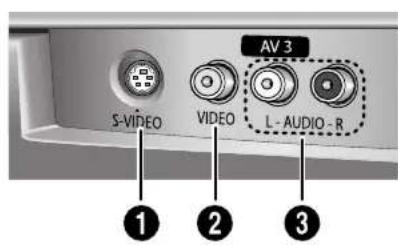

① S-VIDEO Input
Connect an S-Video signal from a camcorder or video game.
② VIDEO Input
Connect the video signal from a camcorder or video game.
③ AUDIO Input
Connect the audio signals from a camcorder or video game.
YOUR NEW TV
Connection Jacks (Rear)
Use the rear panel jacks to connect an A/V component that will be connected continuously, such as a VCR or a DVD player. For more information on connecting equipment, see pages 18\~26.

① ANTENNA terminals
Two independent cables or antennas can be connected to these terminals. Use "ANT 1 IN (Air)" and "ANT 2 IN (Cable)" terminals to receive a signal from VHF/UHF antennas or your cable system.
② DVI Video Input jack
(Digital Visual Interface) Connect the DVI jack to a device with DVI output.
③ SERVICE Port
For service only.
④ OPTICAL Output jack
Connect to a Digital Audio component.
⑤ COAXIAL Output jack
Connect to a Digital Audio component.
⑥ Audio/Video Output jacks
Connect to the audio/video input jacks of a recording VCR.
⑦ Video Input jacks
Connect to the video output jacks of VCRs, DVD players and similar devices.
⑧ Audio Input jacks
Connect to the audio output jacks of VCRs, DVD players and similar devices.
⑨ DVI Audio Input jacks
Connect to the audio output jacks of a device with DVI.
⑩ COMPONENT Input jacks (Y, PB, PR, AUDIO-L/R)
Connect to the Component audio and video outputs of DVD or DTV Set-Top Box. 480i/480p/720p/1080i Y, Pb and Pr video signal inputs are available.
YOUR NEW TV
Remote Control
You can use the remote control up to about 23 feet from the TV. When using the remote, always point it directly at the TV.
You can also use your remote control to operate your VCR, DVD, Cable box. See pages 80\~81 for details.
① POWER
Turns the TV on and off.
② Number buttons
Press to select channels directly on the TV.
③ -
Press to select additional channels (digital and analog) being broadcast by the same station. For example, to select channel "54-3", press "54", then press "-" and "3".
4 ANTENNA
Press to select "Cable" or "Air".
⑤ FAV. CH (Favorite Channel) Press to switch to your favorite channels.
6 MUTE
Press to temporarily cut off the sound.
⑦ MENU
Displays the main on-screen menu.
⑧ VOL-, VOL+
Press to decrease or increase the volume.
9 INFO
Press to display information on the TV screen.

⑩ Mode
Selects a target device to be controlled by the Akai remote control (i.e., TV, VCR, Cable box or DVD).
11 SET
Used during set up of this remote control, so that it will work compatibly with other devices (VCR, Cable box, DVD, etc.)
⑫ PRE-CH
Tunes to the previous channel.
⑬ SLEEP
Press to select a preset time interval for automatic shut off.
⑭ CH. LIST
Displays the channel list.
15 SOURCE
Each time the button is pressed, all the inputs connected to the external component jacks will be shown in regular sequence.
16 GUIDE
Press to display the on-screen Electronic Program Guide (EPG).
⑰ CH,CH
Press to change channels.
18
Controls the cursor in the menu.
⑲ ENTER
While using the on-screen menus, press ENTER to activate (or change) a particular item.
20 EXIT
Press to exit the menu.
YOUR NEW TV
Remote Control (continued)

② S.MODE
Adjust the TV sound by selecting one of the preset factory settings (or select your personal, customized sound settings).
② P.MODE
Adjust the TV picture by selecting one of the preset factory settings (or select your personal, customized picture settings).
23 P.SIZE
Press to change the picture size.
24 CAPTION
Press to view closed caption information.
25 MTS (Multichannel Television Sound) Press to choose "Stereo", "Mono" or "SAP (Secondary Audio Program)".
26 BBE
BBE is a built-in effect that adds clarity, punch and dynamics to the sound.
27 SELF FOCUS
Press to adjust for the optimum picture set in the factory.
28 ADD/DEL
Press to add or erase channels in the TV's memory. Use to memorize or erase the channel fine tuning.
⑲ VCR/DVD Controls
Controls VCR/DVD functions: Rewind, Stop, Play/Pause, Fast Forward.
Chapter Two
INSTALLATION
Connecting VHF and UHF Antennas
If your antenna has a set of leads that look like this, see "Antennas with 300-ohm Flat Twin Leads," below.
If your antenna has one lead that looks like this, see "Antennas with 75-ohm Round Leads," on page 19.


If you have two antennas, see "Separate VHF and UHF Antennas," on page 19.
Antennas with 300-ohm Flat Twin Leads
If you are using an off-air antenna (such as a roof antenna or "rabbit ears") that has 300-ohm twin flat leads, follow the directions below.
1
Place the wires from the twin leads under the screws on the 300-75 ohm adaptor (not supplied). Use a screwdriver to tighten the screws.

2
Plug the adaptor into the "ANT 1 IN (Air)" terminal on the rear panel.

INSTALLATION
Antennas with 75-ohm Round Leads
Plug the antenna lead into the "ANT 1 IN (Air)" terminal on the rear panel.

Separate VHF and UHF Antennas
If you have two separate antennas for your TV (one VHF and one UHF), you must combine the two antenna signals before connecting the antennas to the TV. This procedure requires an optional combiner-adaptor (available at most electronics shops).
1
Connect both antenna leads to the combiner.

2
Plug the combiner into the "ANT 1 IN (Air)" terminal on the rear panel.

INSTALLATION
Connecting Cable TV
You can connect different cable systems to your TV, including cable without a cable box, and cable with a cable box that descrambles some or all channels.
Cable without a Cable Box
If you want to connect cable, and you do not need to use a cable box:
Plug the incoming cable into the "ANT 2 IN (Cable)" terminal on the rear panel.
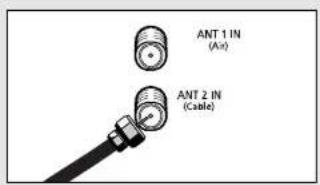
Cable with a Cable Box that Descrambles All Channels
1
Find the cable that is connected to the ANTENNA OUT terminal on your cable box.

This terminal might be labeled "ANT OUT", "VHF OUT", or simply "OUT".
2
Connect the other end of this cable to the "ANT 2 IN (Cable)" terminal on the rear panel.

INSTALLATION
Connecting to a Cable Box that Descrambles Some Channels
If your cable box descrambles only some channels (such as premium channels), follow the instructions below. You will need a two-way splitter, an RF (A/B) switch, and four lengths of coaxial cable. (These items are available at most electronics stores.)
1
Find and disconnect the cable that is connected to the ANTENNA IN terminal on your cable box.

This terminal might be labeled "ANT IN," "VHF IN," or simply, "IN."
2
Connect this cable to a two-way splitter. Connect a coaxial cable between an OUTPUT terminal on the splitter and the IN terminal on the cable box.
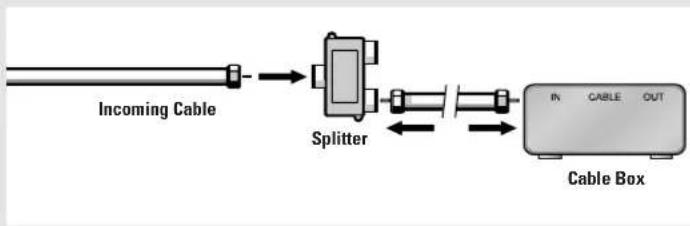
flowchart
graph LR
    A["Incoming Cable"] --> B["Splitter"]
    B --> C["Cable Box"]
    style A fill:#f9f,stroke:#333
    style B fill:#ccf,stroke:#333
    style C fill:#cfc,stroke:#333
3
Connect a coaxial cable between the ANTENNA OUT terminal on the cable box and the B-IN terminal on the A/B switch.

flowchart
graph LR
    A["Power Supply"] --> B["In Cable"]
    B --> C["Switch"]
    C --> D["RF (A/B) Switch"]
    style A fill:#f9f,stroke:#333
    style D fill:#bbf,stroke:#333
4
Connect another cable between the other OUT terminal on the splitter and the A–IN terminal on the RF (A/B) switch.
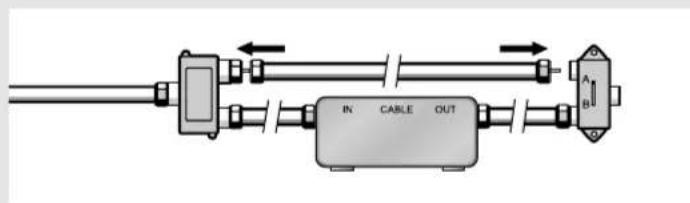
flowchart
graph LR
    A["Input"] --> B["Cable"]
    B --> C["Output"]
    style A fill:#f9f,stroke:#333
    style C fill:#bbf,stroke:#333
5
Connect the last coaxial cable between the OUT terminal on the RF (A/B) switch and the VHF/UHF terminal on the rear of the TV.

flowchart
graph LR
    A["Component 1"] --> B["Switch"]
    B --> C["Component 2"]
    C --> D["Output"]
    E["Ant 1 (Air)"] --> C
    F["Ant 2 (Cable)"] --> C
    G["CABLE OUT"] --> C
    H["Ground"] --> C
After you've made this connection, set the A/B switch to the "A" position for normal viewing. Set the A/B switch to the "B" position to view scrambled channels. (When you set the A/B switch to "B," you will need to tune your TV to the cable box's output channel, which is usually channel 3 or 4.)
INSTALLATION
Connecting a VCR
These instructions assume that you have already connected your TV to an antenna or a cable TV system (according to the instructions on pages 18\~21). Skip step 1 if you have not yet connected to an antenna or a cable system.
1
Connect a coaxial cable between the "ANT 1 IN (Air)" (or "ANT 2 IN (Cable)") terminal on the TV and the antenna out terminal on the VCR.
A coaxial cable is usually included with a VCR. (If not, check your local electronics store).
2
Connect a set of audio cables between the "AV IN 1 (L, R)" (or "AV IN 2 (L, R)") jacks on the TV and AUDIO OUT jacks on the VCR.
If you have a mono VCR, connect L(mono) to VCR audio out using only one audio cable.
3
Connect a video cable between the "AV IN 1 (VIDEO)" (or "AV IN 2 (VIDEO)") jack on the TV and the VIDEO OUT jack on the VCR.
Follow the instructions in "Viewing a VCR or Camcorder Tape" to view your VCR tape.
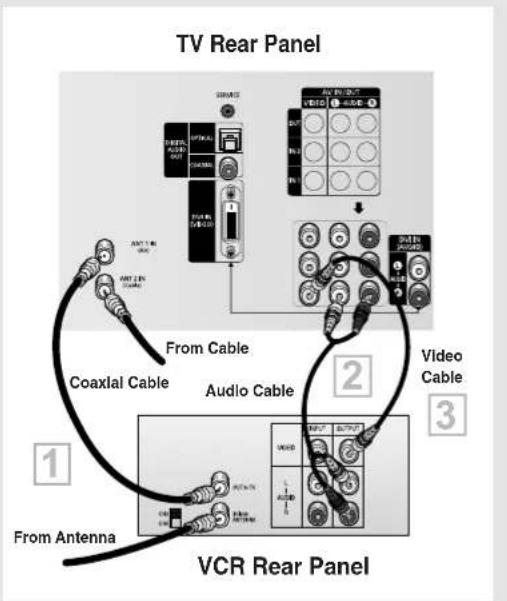
flowchart
graph TD
    A["From Antenna"] --> B["Coaxial Cable"]
    B --> C["Audio Cable"]
    C --> D["VCR Rear Panel"]
    D --> E["Video Cable"]
    E --> F["Analog Cable"]
    F --> G["TV Rear Panel"]
    style A fill:#f9f,stroke:#333
    style D fill:#ccf,stroke:#333
    style E fill:#cfc,stroke:#333
- Also, you can connect to "AV 3" on the side panel of TV.
INSTALLATION
Connecting a Second VCR to Record from the TV
Your TV can send out signals of its picture and sound to be recorded by a second VCR. To do this, connect your second VCR as follows:
1
Connect a set of audio cables between the "AV OUT (L, R)" jacks on the TV and the AUDIO IN jacks on the VCR.
(The VCR input jacks might be either on the front or rear of the VCR.)
2
Connect a video cable between the "AV OUT (VIDEO)" jack on the TV and the VIDEO IN jack on the VCR.
Refer to your VCR's instructions for more information about how to record using this kind of connection.

Connecting a Camcorder
The side panel jacks on your TV make it easy to connect a camcorder to your TV. They allow you to view the camcorder tapes without using a VCR. (Also see "Viewing an External Signal Source" on page 51.)
1
Locate the A/V output jacks on the camcorder. They are usually found on the side or rear of the camcorder.
2
Connect a set of audio cables between the "AV 3 (L, R)" jacks on the TV and the AUDIO OUT jacks on the camcorder. If you have mono camcorder, connect L(mono) to camcorder audio out using only one audio cable.
3
Connect a video cable between the "AV 3 (VIDEO)" (or "S-VIDEO") jack on the TV and the VIDEO OUT jacks on the camcorder.
The audio-video cables shown here are usually included with a Camcorder. (If not, check your local electronics store.) If your camcorder is stereo, you need to connect a set of two cables.
TV Side Panel (PT4250A)
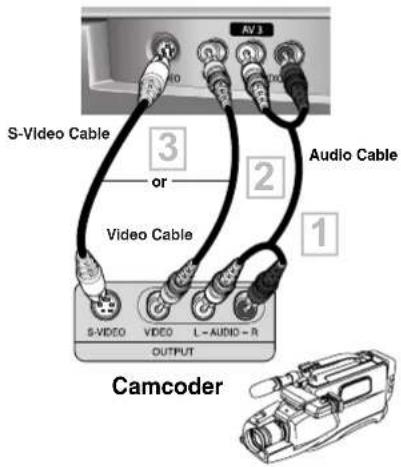
- This figure shows the Standard connector-jack panel. The actual configuration for your TV may be different.
INSTALLATION
Connecting a DVD Player or DTV Set-Top Box (480i, 480p, 720p, 1080i)
The rear panel jacks on your TV make it easy to connect a DVD player or DTV Set-Top Box to your TV.
Connecting to Y, PB, PR
1
Connect a set of audio cables between the "COMPONENT IN 1 (L, R)" (or "COMPONENT IN 2 (L, R)") jacks on the TV and the AUDIO OUT jacks on the DVD player (or DTV Set-Top Box).
2
Connect a set of video cables between the "COMPONENT IN 1 (Y, Ps, Pr)" (or "COMPONENT IN 2 (Y, Ps, Pr)") jacks on the TV and the VIDEO OUT (Y, Ps, Pr) jacks on the DVD player (or DTV Set-Top Box).
For an explanation of Component video, see your DVD player's (or DTV Set-Top Box) owner's instruction.

Connecting to Regular Audio and Video Jacks
1
Connect a set of audio cables between the "AV IN 1 (L, R)" (or "AV IN 2 (L, R)") jacks on the TV and the AUDIO OUT jacks on the DVD player (or DTV Set-Top Box).
2
Connect a video cable between the "AV IN 1 (VIDEO)" (or "AV IN 2 (VIDEO)") jack on the TV and the VIDEO OUT jack on the DVD player (or DTV Set-Top Box).

- Also, you can connect to "AV 3" on the side panel of TV.
INSTALLATION
Connecting a Digital TV Set-Top Box
Connecting to DVI (Digital Visual Interface)
By inputting a high-bandwidth Digital Content Protection high-definition picture source to the DVI INPUT jack on the TV, high-definition pictures can be displayed on the screen in their digital form.
1
Connect a set of audio cables between the "DVI IN (AUDIO) (L, R)" jacks on the TV and the AUDIO OUT jacks on the Set-Top Box.
2
Connect a video cable between the "DVI IN (VIDEO)" jack on the TV and the VIDEO OUT jack on the Set-Top Box.
TV Rear Panel

DTV Set-Top Box
Notes
- The DVI INPUT jack is not compatible with the picture signal of a personal computer.
- Use a DVI 25-pin cable (commercially available) in order to digitally connect the TV with a DTV decoder.
INSTALLATION
Connecting a Digital Audio System
There are many types of digital audio systems on the market today.
A simplified illustration of an audio system is shown below. For more information, see your audio system owner's manual.
1
If your audio system has a coaxial digital audio input, connect to the "COAXIAL OUT" jack on the TV.
2
If your audio system has a optical digital audio input, connect to the "OPTICAL OUT" jack on the TV.
Be certain to remove the black cover from the optical output before inserting the cable.
3
If your system has both coaxial and optical digital audio inputs, AKAI recommends you use the optical digital output on the TV. Do not connect both optical and coaxial cables. This may damage your audio system.
TV Rear Panel

flowchart
graph TD
    A["Service"] --> B["Digital Audio Input"]
    B --> C["Output"]
    B --> D["Control Panel"]
    style A fill:#f9f,stroke:#333
    style B fill:#ccf,stroke:#333
    style C fill:#cfc,stroke:#333
    style D fill:#fcc,stroke:#333
    subgraph Digital Audio Input
        E["OPTICAL"]
        F["CAMK"]
        G["L AUDIO IN R"]
        H["AUDIO OUT"]
    end
    I["OR"] --> B
    J["AV INPUT"] --> K["VIDEO 1-AUDI 2"]
- OPTICAL: Converts the electric signal into an optical light signal, and transmits it through glass fibers. A transmission system of digital audio in the form of a light wave, S/PDIF format using a glass conductor.
• COAXIAL: The digital audio signal is received through a coaxial copper cable.
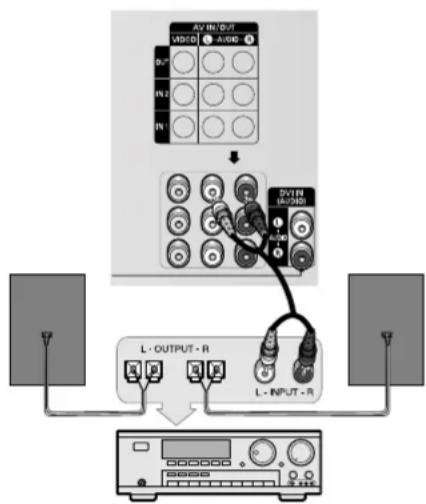
Connecting to an Analog Amplifier
1
The "AUDIO OUT" terminals cannot be used for external speakers. You must hook them up to an amplifier.
When an audio amplifier is connected to the "AUDIO OUT" terminals: Decrease the gain (volume) of the audio amplifier, and adjust the volume level with the volume control on the TV.
TV Rear Panel
flowchart
graph TD
    A["AV IN OUT"] --> B["Video"]
    A --> C["Audio"]
    B --> D["DAV"]
    C --> E["DAV"]
    D --> F["L·OUTPUT·R"]
    E --> G["L·INPUT·R"]
    F --> H["Digital Display Unit"]
    G --> H
    style A fill:#f9f,stroke:#333
    style B fill:#ccf,stroke:#333
    style C fill:#ccf,stroke:#333
    style D fill:#cfc,stroke:#333
    style E fill:#cfc,stroke:#333
    style F fill:#fcc,stroke:#333
    style G fill:#fcc,stroke:#333
    style H fill:#ffc,stroke:#333
INSTALLATION
Installing Batteries in the Remote Control
1
Slide the back cover all the way out to open the battery compartment of the remote control.

natural_image
3D illustration of a rectangular electronic component with a black arrow indicating a specific area (no text or symbols)2
Install two AA size batteries.

natural_image
Cross-sectional diagram of a mechanical component with internal structure (no text or symbols)3
Replace the cover.

natural_image
3D rendering of a mechanical component with internal channels and a black arrow indicating a feature (no text or symbols)Make sure to match the “+” and “-” ends of the batteries with the diagram inside the compartment.
Do not mix battery types, i.e. alkaline and manganese.
Remove the batteries and store them in a cool, dry place if you won't be using the remote control for a long time. (Assuming typical TV usage, the batteries last for about one year.)
The remote control can be used up to about 23 feet from the TV.
Chapter Three
OPERATION
Turning the TV On and Off
Press the POWER button.
You can also use the POWER button on the front panel.
Plug & Play Feature
When the TV is initially powered On, basic customer settings proceed automatically and subsequently: Setting the language, Antenna input check, Channel Memorize and Time Setting.
Note : The Plug & Play function operates after plugging in the TV for the first time.
1
Press the POWER button on the remote control.
The message "Menu language, channels and Time will be set." is displayed.
Press the ENTER button, then "Select the language of the OSD" is automatically displayed.

◀ Plug & Play feature doesn't work when in the AV mode.
2
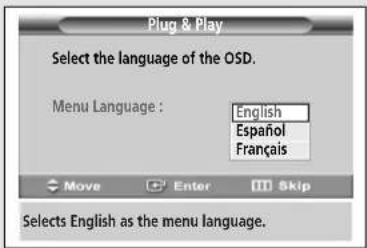
Press the ENTER button to enter the language.
Press the ▲ or ▼ button to select language, then the ENTER button.
"Select the antennas to memorize." is automatically displayed.
3
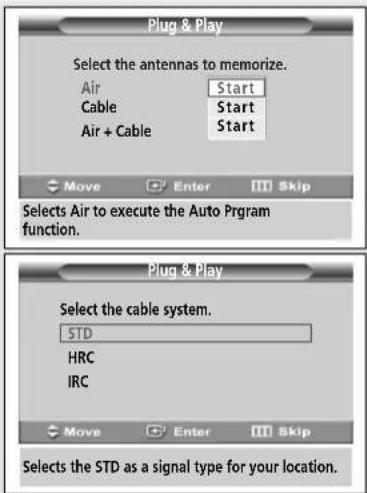
Press the ▲ or ▼ button to memorize the channels of the selected connection.
Press the ENTER button to select "Start".
When selecting Cable TV :
Press the ▲ or ▼ button to select "Cable", then press the ENTER button. Press the ▲ or ▼ button to select "STD", "HRC", or "IRC", then press the ENTER button.
continued...
OPERATION
4
The TV will begin memorizing all of the available channels.
After all the available channels are stored, the "Auto Program" menu reappears. Press the MENU button when channel memorization is complete.
"Set to daylight savings time." is automatically displayed.


5
Press the ENTER button. Press the ▲ or ▼ button to select "Off" or "On", then the ENTER button.
"Select the time zone in which you live." is automatically displayed.

6
Press the ▲ or ▼ button to highlight the time zone for your local area (and to move the highlight to the appropriate time zone on the map of the United States). Press the ENTER button.
That's it. If you have received a digital signal, the time will be set automatically. If not, see page 46 to set the clock.

7
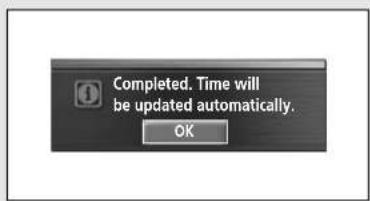
The message "Completed. Time will be updated automatically." is displayed. When you have finished, press the ENTER button.
1...
OPERATION
Adjusting the Screen Automatically (Self Focus)
The "Self Focus" feature automatically sets the optimum picture quality when blurring, overlapping colors or incorrect focus occurs. These conditions may be caused by moving your TV.
1
Press the MENU button.
Press the ▲ or ▼ button to select "Picture", then press the ENTER button.

2
Press the ▲ or ▼ button to select "Self Focus", then press the ENTER button. "Self Focus" is selected.
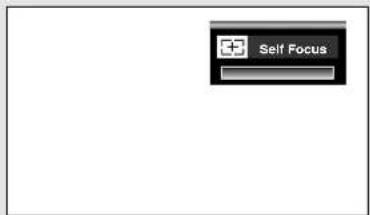
Press the ENTER button again.
The self focus process begins with the message "Self Focus" and horizontal bar displayed.
When it is finished, the displays will disappear and the optimum picture quality can be enjoyed.
Press the EXIT button to exit.
Alternate method:
Simply press the SELF
FOCUS button on the remote control to enjoy the optimum picture quality.

During the process, minor distortions of the picture may occur. At this time, the colors may diffuse and a searching pattern will appear on the edges of the screen. This is a normal part of the adjustment.
- Changing channels and any other signal changes will pause the self focus until a stable signal has returned. It resumes after the signal has been stabilized. This feature will not work without a signal.
- Ambient light that is too bright may affect the self focus. If this occurs, darken the environment and try again.
OPERATION
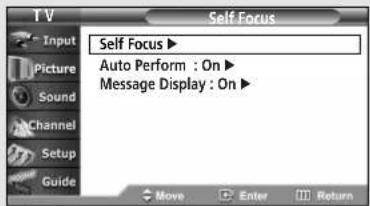
Deactivating the Automatic Execution of the Self Focus
Once set, the "Self Focus" feature starts on default. It will automatically begin 10 minutes after switching on the power and the appearance of the screen image. To set the optimum picture quality, the "Self Focus" will automatically begin again after another 30 minutes, as the screen image is then fully stabilized.
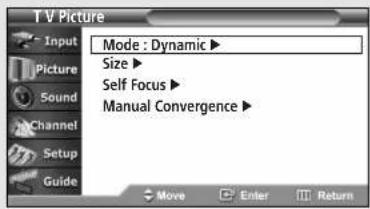
1
Press the MENU button.
Press the ▲ or ▼ button to select "Picture", then press the ENTER button.
2
Press the ▲ or ▼ button to select "Self Focus", then press the ENTER button.
Press the ▲ or ▼ button to select "Auto Perform", then press the ENTER button.
To turn off the automatic execution of the self focus feature, select "Off" by pressing the ▲ or ▼ button, then press the ENTER button.

Removing the "Self Focus" Message from the Display
3
Press the ▲ or ▼ button to select "Message Display", then press the ENTER button.
To remove the message "Self Focus" and
horizontal bar on the screen during the self focus process, select
"Off" by pressing the ▲ or ▼ button, then press the ENTER button.


OPERATION
Adjusting Convergence Manually
If the color appears spread out or "smeared" on the screen, the convergence probably needs alignment. Be sure to use the remote control for the convergence adjustments.
First steps:
1
Press the MENU button.
Press the ▲ or ▼ button to select "Picture", then press the ENTER button.

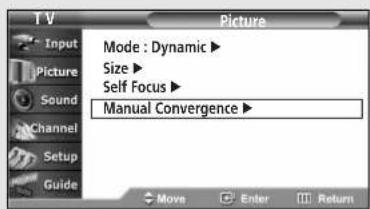
2
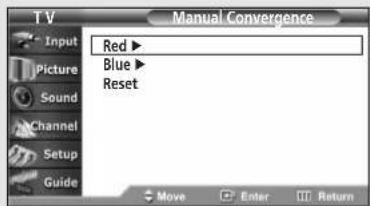
Press the ▲ or ▼ button to select "Manual Convergence", then press the ENTER button.
Press the ▲ or ▼ button to select "Red" or "Blue".
continued...
OPERATION
3
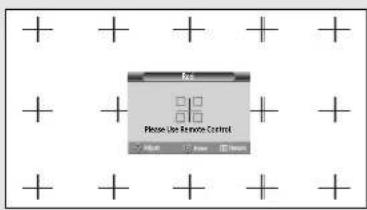
Press the ENTER button. A crosshatch pattern will appear on the screen. Move the cursor to the position you want to adjust by pressing the ▲/▼/◄/► buttons, then press the ENTER button.
Adjust the convergence by pressing the ▲/▼/◄/► buttons, then press the ENTER button.

4
If a horizontal line is visible, use the ▲ or ▼ button to move the line so that it is superimposed on the horizontal center-line (i.e., make a single horizontal line that is as white as possible.).

5
If a vertical line is visible, use the ◀ or ▶ button to move the line so that it is superimposed on the vertical-center line (i.e., make a single vertical line that is as white as possible.)
After the convergence is correctly adjusted, press the MENU button to exit.

6
To return to the factory defaults, select "Reset" by pressing the ▲ or ▼ button, then press the ENTER button.
The previously adjusted convergence will be reset to the factory defaults.

OPERATION
Viewing the Menus and On-Screen Displays
Viewing the Menus
1
With the power on, press the MENU button.
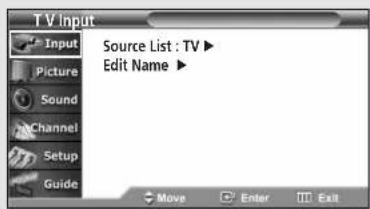
The "Input" menu appears on the screen. Its left side has six icons: Input, Picture, Sound, Channel, Setup and Guide.
2
Press the ▲ or ▼ button to move to items in the menu (The icon is selected).
Press the ◀ or ▶ button to display, change or use the selected items. Press the
ENTER button to enter items in the menu.

3
Press the EXIT button to exit.
◀ You can also use the MENU, CHA VOL, and (ENTER) buttons on the control panel of the TV to make selections.
Viewing the Display
The display identifies the current channel and the status of certain audio-video settings.
Press the INFO button on the remote control. The TV displays the current channel, the status of certain picture and sound settings and the current time.

OPERATION
Selecting a Menu Language
1
Press the MENU button.
Press the ▲ or ▼ button to select "Setup", then press the ENTER button.

2
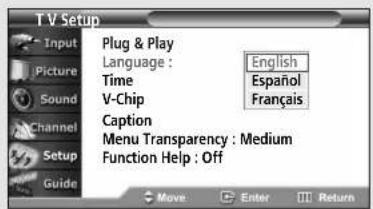
Press the ▲ or ▼ button to select "Language", then press the ENTER button.
Press the ▲ or ▼ button to select "English", "Spanish" or "French", then press the ENTER button.
Press the EXIT button to exit.
Selecting the Antenna Input
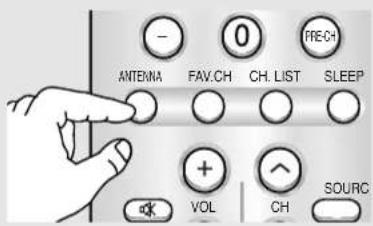
You can connect to two different signal sources by choosing the antenna input (Air or Cable).
Press the ANTENNA
button repeatedly to select "Air" or "Cable".
OPERATION
Memorizing the Channels
Your TV can memorize and store all of the available channels for both "off-air" (antenna) and cable channels. After the available channels are memorized, use the CH^ and CHV buttons to scan through the channels. This eliminates the need to change channels by entering the channel digits. There are three steps for memorizing channels: selecting a broadcast source, memorizing the channels (automatic) and adding and deleting channels (manual).
Selecting the Video Signal Source
Before your television can begin memorizing the available channels, you must specify the type of signal source that is connected to the TV (i.e., an antenna or a cable system).
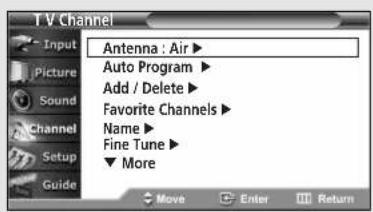
1
Press the MENU button.
Press the ▲ or ▼ button to select "Channel", then press the ENTER button.
2
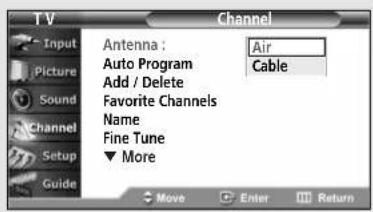
Press the ENTER button to select "Antenna".
Press the ▲ or ▼ button to select "Air" or "Cable", then press the ENTER button.
3
Press the ▲ or ▼ button to select "Auto Program", then press the ENTER button.

continued...
OPERATION
4
Press the ▲ or ▼ button to select the antenna connection, then press the ENTER button.
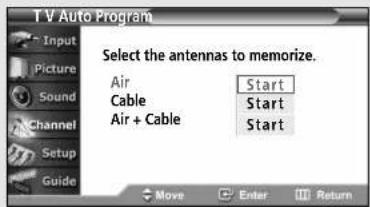
When selecting Cable TV system: Press the ▲ or ▼ button to select "Cable", then press the ENTER button. Press the ▲ or ▼ button to select "STD", "HRC" or "IRC", then press the ENTER button.
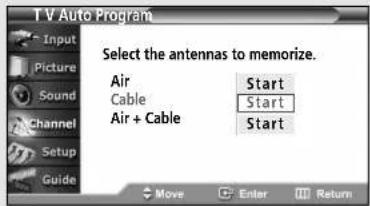

Air : "Air" antenna signal Cable : "Cable" antenna signal Air+Cable : "Air" and "Cable" antenna signals
STD, HRC and IRC identify various types of cable TV systems. Contact your local cable company to identify the type of cable system that exists in your particular area. At this point the signal source has been selected. Proceed to "Storing Channels in Memory".
Storing Channels in Memory
5
Press the ▲ or ▼ button to select the antennas to memorize. Press the ENTER button to select "Start".

6
Press the ENTER button to start the auto program. The TV begins memorizing all available channels. Press the ENTER button at any time to interrupt the memorization process.
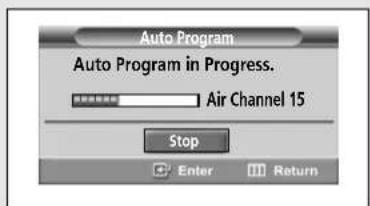
Press the EXIT button to exit.
The TV must be connected to an antenna in order to receive digital TV signals. Even if a particular channel is deleted from memory, you can always tune to that channel directly by using the number buttons on the remote control.
- A ll available DTV and analog channels are automatically stored in memory when channels are selected by the direct tuning function.
OPERATION
Adding and Erasing Channels
To add channels that were not memorized (or to delete unwanted channels from memory):
1
Press the MENU button.
Press the ▲ or ▼ button to select "Channel", then press the ENTER button.

2
Press the ▲ or ▼ button to select "Add/Delete", then press the ENTER button.

3
Repeatedly pressing the ENTER button will alternate between add channel and delete channel.
Press the CH or CH button to switch to the appropriate channel, then repeat above.
Press the EXIT button to exit.
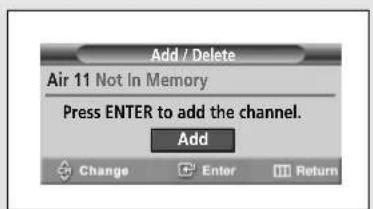

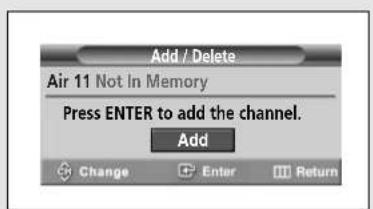
Alternate method:
Simply press the ADD/DEL and ENTER buttons on the remote control to add channels that were not memorized or to delete unwanted channels from memory.
OPERATION
Changing Channels
Using the Channel Buttons
Press the CH^ or CH∨ button to change channels.
When you press the CH∧ or CH∨ button, the TV changes channels in sequence. You will see all the channels that the TV has memorized. (The TV must have memorized at least three channels.) You will not see channels that were either erased or not memorized.
Using the Number Buttons
Use the number buttons to quickly tune to any channel.
Press the number buttons to go directly to a channel.
For example, to select channel 27, press "2," then "7."
The TV will change channels when you press the second number.
Using the “—” Button
The “-” button is used to select channels that broadcast both a digital and analog signal.
For example, for Channel 7 (digital), press "7", then "-", then "1" and you will see as left.
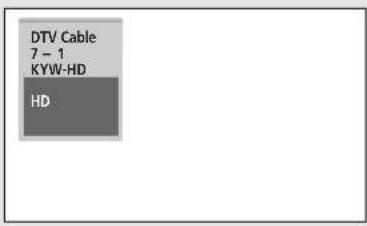
For channel 7-2 (analog), press "7", then "-", then "2" and you will see as left.
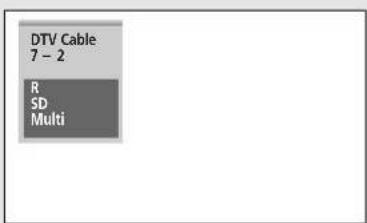
Note
- HD indicates the TV is receiving a digital High Definition signal. SD indicates the TV is receiving a analog Standard Definition signal.
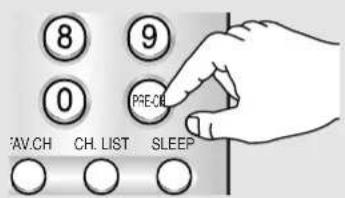
Using the Previous Channel
Press the PRE-CH button. The TV changes to the last channel you were watching.
English - 39
OPERATION
Selecting Your Favorite Channels
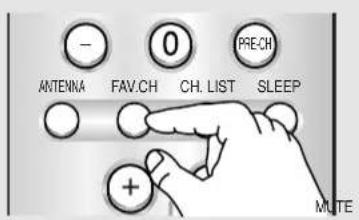
You can store of your favorite channels for each available input source (such as TV and CATV). Then, when you press the FAV.CH button on the remote control, the TV displays only the favorite channels you previously stored, allowing you to quickly and easily find frequently watched channels.
To Store Your Favorite Channels:
1
Press the MENU button.
Press the ▲ or ▼ button to select "Channel", then press the ENTER button.

2
Press the ▲ or ▼ button to select "Favorite Channels", then press the ENTER button.
Press the ▲ or ▼ button to select a channel as a favorite channel, then press the ENTER button.
Press the ENTER button again to deselect the selected channel.
Press the EXIT button to exit.

Only memorized channels can be set as Favorite channels.
Select All : Press to select all channels. Clear All : Press to clear all channels.
To View Your Favorite Channels:
Press the FAV.CH button on the remote control repeatedly to jump from one favorite channel to another.
OPERATION
Labeling the Channels
Use this feature to assign an easy-to-remember label to any channel (i.e., "CBS", "ESPN", "PBS2", CNN1", etc.) A label consists of five fields, where each field is a letter, a number or a blank. When the INFO button is pressed, the channel label will appear next to the channel number.
1
Press the MENU button.
Press the ▲ or ▼ button to select "Channel", then press the ENTER button.
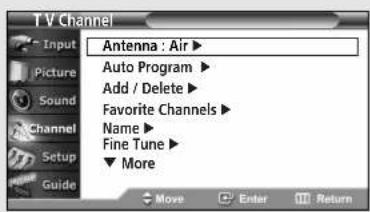
2
Press the ▲ or ▼ button to select "Name", then press the ENTER button.
Press the ▲ or ▼ button to select the channel to be assigned to a new name, then press the ENTER button.
Press the ▲ or ▼ button to select a letter, a number or a blank. (Results in this sequence: A...Z, 0...9, +, -, *, /, blank).
Press the ▶ button to switch to the next field, which will be selected. Select a second letter or digit by pressing the ▲ or ▼ button, as above.
Repeat the process to select the last three digits. When you have finished, select "OK", then press the ENTER button to assign the new name.
Press the EXIT button to exit.


If you add or delete the TV channel, the corresponding label information will also be added or deleted.
OPERATION
Viewing the Channel Lists
You can display a list of all channels or your favorite channels.
1
Press the MENU button.
Press the ▲ or ▼ button to select "Channel", then press the ENTER button.

2
Press the ▲ or ▼ button to select "Channel List", then press the ENTER button.

3
Press the ▲ or ▼ button to select "All" or "Favorite", then press the ENTER button.
To toggle between your favorite channels or all channels, use the yellow button.
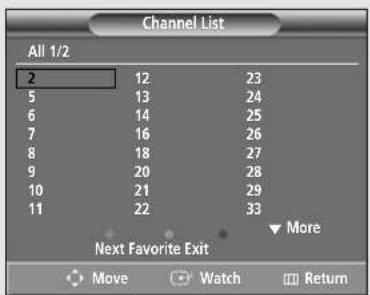
Alternate method:
Press the CH.LIST button on the remote control to display a list of channels.
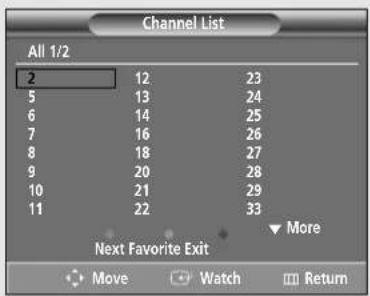

Red button:
Press to display the previous channel list page.
Green button:
Press to display the next channel list page.
Yellow button:
Press to toggle between your favorite channels or all channels
Blue or EXIT button:
Press to exit.
OPERATION
Editing the Channel Lists
You can edit a list of your channels.
1
Press the MENU button.
Press the ▲ or ▼ button to select "Channel", then press the ENTER button.
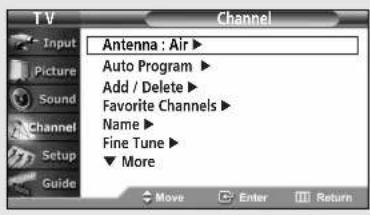
2
Press the ▲ or ▼ button to select "Channel List", then press the ENTER button.

3
Press the ▲ or ▼ button to select "Edit", then press the ENTER button.
Press the ▲/▼/◄/► buttons to select a channel to be deleted or added, then press the ENTER button.

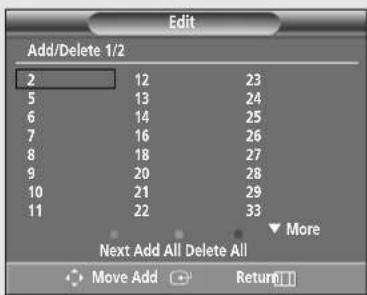
◀ Red button:
Press to display the previous channel list page.
Green button: Press to display the next channel list page.
Yellow button: Press to add all deleted channels back into the channel list.
Blue button:
Press to delete all channels.
OPERATION
Picture Control
You can select the type of picture which best corresponds to your viewing requirements.
Using Automatic Picture Settings
Your TV has automatic picture settings ("Dynamic", "Standard", and "Movie") that are preset at the factory. You can activate either Dynamic, Standard, or Movie by making a selection from the menu. Or, you can select "Custom" which automatically recalls your personalized picture settings.
1
Press the MENU button.
Press the ▲ or ▼ button to select "Picture", then press the ENTER button.
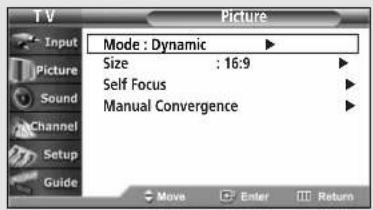
2
Press the ENTER button to select "Mode". Press the ENTER button again.
Press the ▲ or ▼ button to select a particular item, then press the ENTER button.
Press the EXIT button to exit.

Alternate method:
Simply press the P.MODE button on the remote control repeatedly to select one of the standard picture settings.

- Choose "Dynamic" for viewing the TV during the day or when there is bright light in the room.
- Choose "Standard" for the standard factory settings.
• C choose "Movie" when viewing the movie. - Choose "Custom" if you want to adjust the settings according to personal preference.
OPERATION
Customizing the Picture
You can use the on-screen menus to change the "Contrast", "Brightness", "Sharpness", "Color", "Tint", and "Color Tone" according to personal preference.
1
Press the MENU button.
Press the ▲ or ▼ button to select "Picture", then press the ENTER button.

2
Press the ENTER button to select "Mode". Press the ENTER button again.
Press the ▲ or ▼ button to select a particular item ("Dynamic", "Standard", "Movie, or "Custom"), then press the ENTER button.

3
Press the ▲ or ▼ button to select a particular item ("Contrast", "Brightness", "Sharpness", "Color", or "Tint"), then press the ENTER button.

4
Press the ENTER button.
Press the ◀ or ▶ button to increase or decrease the value of a particular item.
Press the ▲ or ▼ button to select other items.
When you have finished, press the ENTER button.

continued...
OPERATION
5
Press the ▲ or ▼ button to select "Color Tone", then press the ENTER button.
Press the ◀ or ▶ button to increase or decrease the value of the color tone ("Warm 10\~1", "Normal", and "Cool 1\~10").

Resetting the Picture Settings to the Factory Defaults
6
Press the ▲ or ▼ button to select "Reset", then press the ENTER button.
The reset function is set for each mode ("Dynamic", "Standard", "Movie", or "Custom").
The previously adjusted settings will be reset to the factory defaults.

OPERATION
Sound Control
Adjusting the Volume
Press the VOL + or VOL - buttons to increase or decrease the volume.
Using the MUTE Button
At any time, you can temporarily cut off the sound using the MUTE button.
1
Press the MUTE button and the sound cuts off. "Mute" is displayed.
2
To turn mute off, press the MUTE button again, or press either the VOL- or VOL+ button.

Customizing the Sound
The sound settings can be adjusted to suit your personal preferences. (Alternatively, you can use one of the "automatic" settings. See next page.)
1
Press the MENU button.
Press the ▲ or ▼ button to select "Sound", then press the ENTER button.

2
Press the ▲ or ▼ button to select "Equalizer", then press the ENTER button.
Press the ◀ or ▶ button to select a particular frequency to adjust. Press the ▲ or ▼ button to increase or decrease the level of the particular frequency.
Press the EXIT button to exit.

OPERATION
Using Automatic Sound Settings
Your TV has automatic sound settings ("Standard", "Music", "Movie", and "Speech") that are preset at the factory. You can activate either Standard, Music, Movie or Speech by making a selection from the menu. Or, you can select "Custom," which automatically recalls your personalized sound settings.
1
Press the MENU button.
Press the ▲ or ▼ button to select "Sound", then press the ENTER button.

2
Press the ENTER button to select "Mode".
Press the ▲ or ▼ button to select a particular item, then press the ENTER button.
Press the EXIT button to exit.

Alternate method:
Press the S.MODE button on the remote control repeatedly to select one of the standard sound settings.
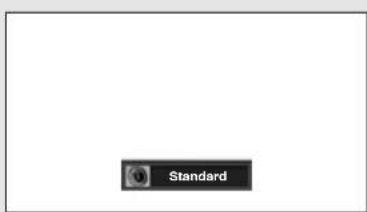
- Choose "Standard" for the standard factory settings.
- Choose "Music" when watching music videos or concerts.
• C choose "Movie" when watching movies. - Choose "Speech" when watching a show that is mostly dialog (i.e., news).
- Choose "Custom" to recall your personalized settings.
OPERATION
Setting the Clock
Setting the clock is necessary in order to use the various timer features of the TV. Also, you can check the time while watching the TV. (Just press the INFO button.)
Option 1: Setting the Clock Manually
1
Press the MENU button.
Press the ▲ or ▼ button to select "Setup", then press the ENTER button.

2
Press the ▲ or ▼ button to select "Time", then press the ENTER button.
Press the ENTER button to select "Clock".

3
Press the ENTER button to select "Clock Mode". Press the ▲ or ▼ button to select "Manual", then press the ENTER button.
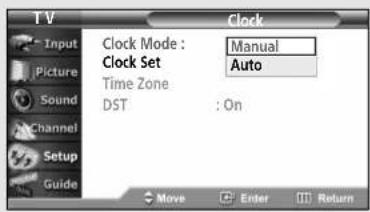
4
Press the ▲ or ▼ button to select "Clock Set", then press the ENTER button.
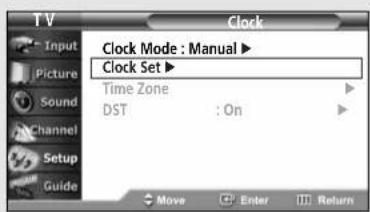
5
Press the ◀ or ▶ button to move to "Month", "Day", "Year", "Hour", "Minute", or "am/pm".
Set the date and time you want by pressing the ▲ or ▼ button, then press the ENTER button.
Press the EXIT button to exit.
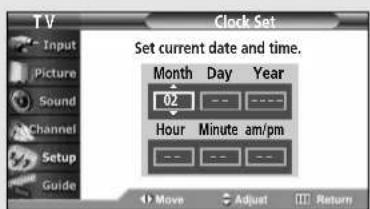
The current time will appear every time you press the INFO button.
◀ You can set the Month, Day, Year, Hour, and Minute directly by pressing the number buttons on the remote control.
OPERATION
Option 2: Setting the Clock Automatically
The Clock can be set automatically if you are receiving a digital signal.
1
Press the MENU button.
Press the ▲ or ▼ button to select "Setup", then press the ENTER button.

2
Press the ▲ or ▼ button to select "Time", then press the ENTER button.
Press the ENTER button to select "Clock".
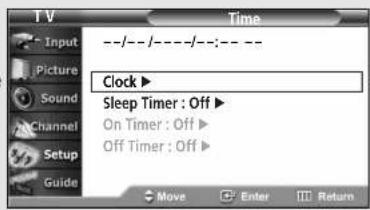
3
Press the ENTER button to select "Clock Mode". Press the ▲ or ▼ button to select "Auto", then press the ENTER button.

4
Press the ▲ or ▼ button to select "Time Zone", then press the ENTER button.
Press the ▲ or ▼ button to highlight the time zone for your local area (and to move the highlight to the appropriate time zone on the map of the United States), then press the ENTER button.
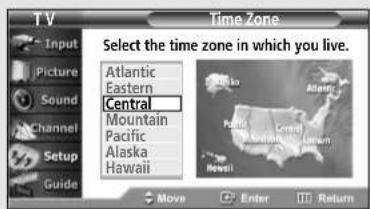
5
Press the ▲ or ▼ button to select "DST" (Daylight Saving Time), then press the ENTER button. Press the ▲ or ▼ button to select "Off" or "On", then press the ENTER button.
Press the EXIT button to exit.

The set time can be changed according to the broadcasting station and signal when you set up Auto Time. If there is a difference between the real time and set time, please set up manual time.
OPERATION
Viewing an External Signal Source
Use the remote control to switch between viewing signals from connected equipment, such as VCRs, DVD, Set-Top box, and the TV source (broadcast or cable).
Setting the Signal Source
1
Press the MENU button.
Press the ENTER button to select "Input".

2
Press the ENTER button to select "Source List".
Press the ▲ or ▼ button to select signal source, then press the ENTER button

Alternate method:
Press the SOURCE button on the remote control repeatedly to select an external signal source.
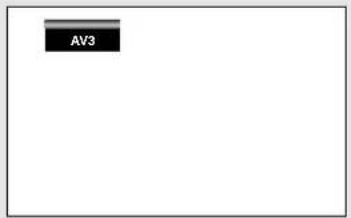
When you connect equipment to the TV, you can choose between the following sets of jacks: AV1, AV2, Component1, Component2, or DVI on the TV's rear panel, and AV3 or S-Video on the TV's side panel.
OPERATION
Assigning Names to External input mode
1
Press the MENU button.
Press the ENTER button to select "Input".

2
Press the ▲ or ▼ button to select "Edit Name", then press the ENTER button.

3
Press the ▲ or ▼ button to select the signal source to edit, then press the ENTER button.
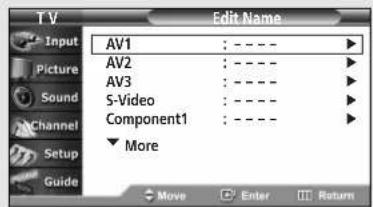
4
Press the ▲ or ▼ button to select the external device (VCR, DVD, D-VHS, Cable STB, HD STB, Satellite STB, PVR STB, AV Receiver, DVD Receiver, Game, Camcorder, DVD Combo, PC, VOD STB, TV). Press the ENTER button.
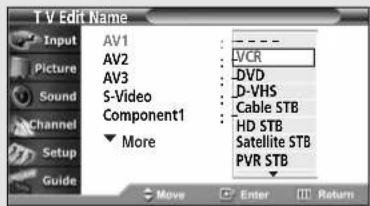
Set other signal sources (AV2, AV3, S-Video, Component1, Component2, DVI) using the same method as listed above.
Press the EXIT button to exit.
Chapter Four
SPECIAL FEATURES
Analog
Fine Tuning Analog Channels
The Fine Tuning function lets you manually adjust the TV's tuner if you have difficulty tuning analog channels.
1
Press the MENU button.
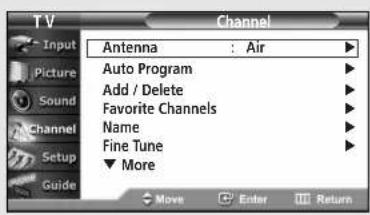
Press the ▲ or ▼ button to select "Channel", then press the ENTER button.
2
Press the ▲ or ▼ button to select "Fine Tune", then press the ENTER button.
Press the ◀ or ▶ button to adjust the fine tuning. To store the fine tuning setting in the TV's memory, press the ENTER button.
To reset the fine tuning to "0", press the ▲ or ▼ button to select "Reset", then press the ENTER button.
Press the EXIT button to exit.


Note
- Only analog TV channels can be fine tuned.
SPECIAL FEATURES
Digital
Checking the Digital-Signal Strength
Unlike analog channels, which can vary in reception quality from "snowy" to clear, digital (HDTV) channels have either perfect reception quality or you will not receive them at all. So, unlike analog channels, you cannot fine tune a digital channel. You can, however, adjust your antenna to improve the reception of available digital channels.
1
Press the MENU button.
Press the ▲ or ▼ button to select "Channel", then press the ENTER button.

2
Press the ▲ or ▼ button to select "Signal Strength", then press the ENTER button.
If the signal strength meter indicates that the signal is weak, physically adjust your antenna to increase the signal strength. Continue to adjust the antenna until you find the best position with the strongest signal.


Press the EXIT button to exit.
SPECIAL FEATURES
Changing the Screen Size
1
Press the MENU button.
Press the ▲ or ▼ button to select "Picture", then press the ENTER button.

2
Press the ▲ or ▼ button to select "Size", then press the ENTER button.
Press the ◀ or ▶ button to select the screen format you want.
Press the EXIT button to exit.
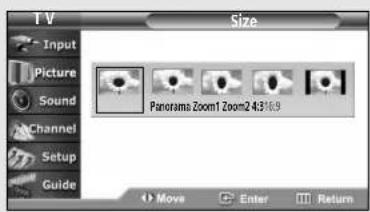
In the "Zoom1" and "Zoom2" modes, lifting is available by pressing the ▲ o ▼ button.
Changing the Screen Format feature availability depends on the current broadcasting signal format.
The "16:9" and "4:3" modes are available in DTV mode.
Alternate method:
Press the P.SIZE button on the remote control repeatedly to select one of the screen format you want.
Viewing with a 4:3 signal (When a 4:3 signal is received)

flowchart
graph TD
    A["Sunflower at 16:9"] --> B["Panorama"]
    B --> C["Zoom1 ±Move"]
    C --> D["Zoom2 ±Move"]
    D --> E["4:3"]
Viewing with a 16:9 signal (When a 16:9 signal is received)
The illustrations below show the change of picture while viewing a DVD title.

flowchart
graph TD
    A["16:9"] --> B["Panorama"]
    B --> C["Zoom1 #Move"]
    C --> D["Zoom2 #Move"]
    D --> E["4:3"]
SPECIAL FEATURES
BBE
BBE is a built-in effect that adds clarity, punch and dynamics to the sound.
1
Press the MENU button.
Press the ▲ or ▼ button to select "Sound", then press the ENTER button.

2
Press the ▲ or ▼ button to select "BBE", then press the ENTER button.
Press the ▲ or ▼ button to select "On" or "Off", then press the ENTER button.
Press the EXIT button to exit.

Alternate method:
Press the BBE button on the remote control repeatedly to select "On" or "Off".
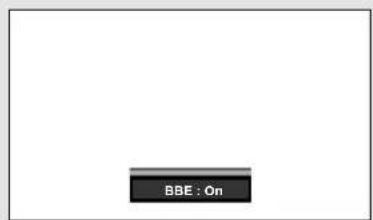
SPECIAL FEATURES
Auto Volume
Each broadcasting station has its own signal conditions, and it is inconvenient to adjust the volume every time the channel is changed. "Auto Volume" automatically adjusts the volume of the desired channel by lowering the sound output when the modulation signal is high or by raising the sound output when the modulation signal is low.
1
Press the MENU button.
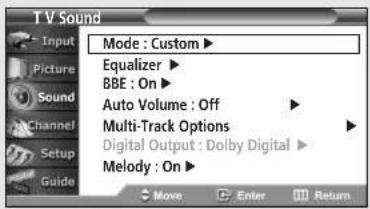
Press the ▲ or ▼ button to select "Sound", then press the ENTER button.
2
Press the ▲ or ▼ button to select "Auto Volume", then press the ENTER button.
Press the ▲ or ▼ button to select "On" or "Off", then press the ENTER button.

Press the EXIT button to exit.
SPECIAL FEATURES
Digital
Choosing a Multi-Channel Sound (MTS) track
The digital-TV transmission system is capable of simultaneous transmission of many audio tracks (for example, simultaneous translations of the program into foreign languages). The availability of these additional “multitracks” depends upon the program.
1
Press the MENU button.
Press the ▲ or ▼ button to select "Sound", then press the ENTER button.
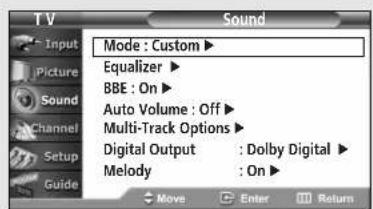
Quick way to access the MTS menu: Just press the "MTS" button on the remote control. You can listen in a language other than the favorite language by pressing the MTS button.
2
Press the ▲ or ▼ button to select "Multi-Track Options", then press the ENTER button.
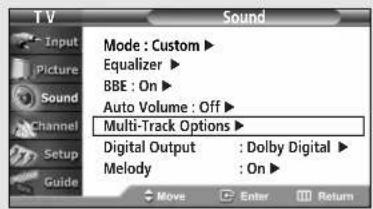
The text at the bottom of the menu tells you if the incoming audio is Español, Français, or English.
3
Press the ENTER button to select "Preferred Language". Press the ▲ or ▼ button to select the language you want, then press the ENTER button.
Press the EXIT button to exit.

SPECIAL FEATURES
Analog
Choosing a Multi-Channel Sound (MTS) track
Depending on the particular program being broadcast, you can listen to Mono, Stereo, or a SAP.
1
Press the MENU button.
Press the ▲ or ▼ button to select "Sound", then press the ENTER button.

2
Press the ▲ or ▼ button to select "Multi-Track Options", then press the ENTER button.

3
Press the ▲ or ▼ button to select "Multi-Track Sound", then press the ENTER button.
Press the ▲ or ▼ button to select a setting you want, then press the ENTER button.
Press the EXIT button to exit.

Alternate method:
Press the MTS button on the remote control repeatedly to select one of the settings.
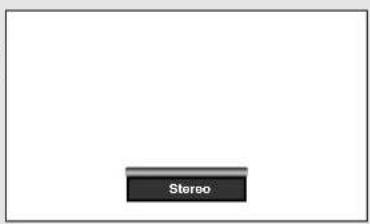
- Choose "Mono" for channels that are broadcasting in mono, or if you are having difficulty receiving a stereo signal.
- Choose "Stereo" for channels that are broadcasting in stereo.
- Choose "SAP" to listen to the Separate Audio Program, which is usually a foreign-language translation.


SPECIAL FEATURES
Digital
Choosing a Digital Sound Format
Digital sound can be output from the rear-panel connectors on your TV. The digital sound is output from connectors labeled "Optical" and "Coaxial". After connecting a digital-audio component, you must specify the transmission format (Dolby or PCM, as appropriate to your digital audio component. See your component's owner's manual for further details).
1
Press the MENU button.
Press the ▲ or ▼ button to select "Sound", then press the ENTER button.

2
Press the ▲ or ▼ button to select "Digital Output", then press the ENTER button.
Press the ▲ or ▼ button to select "Dolby Digital" or "PCM", then press the ENTER button.
Press the EXIT button to exit.

DOLBY DIGITAL
Manufactured under license from Dolby Laboratories. "Dolby" and the double D-symbol are trademarks of Dolby Laboratories.
SPECIAL FEATURES
Setting the On/Off Melody
A melody sound can be set to come on when the TV is powered On or Off.
1
Press the MENU button.
Press the ▲ or ▼ button to select "Sound", then press the ENTER button.

2
Press the ▲ or ▼ button to select "Melody", then press the ENTER button.
Press the ▲ or ▼ button to select "On" or "Off", then press the ENTER button.
Press the EXIT button to exit.

SPECIAL FEATURES
Setting the On/Off Timer
1
Press the MENU button.
Press the ▲ or ▼ button to select "Setup", then press the ENTER button.

2
Press the ▲ or ▼ button to select "Time", then press the ENTER button.
Press the ▲ or ▼ button to select "On Timer", then press the ENTER button.
Press the ▲ or ▼ button to adjust "Hour", then press the ▶ button to move to the next step.
Set other items using the same method as above.
When finished, press the MENU button to return.
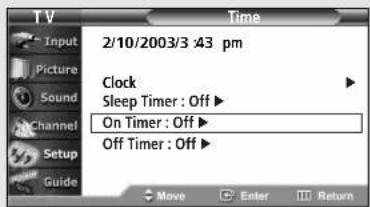

3
Press the ▲ or ▼ button to select "Off Timer", then press the ENTER button.
Press the ▲ or ▼ button to adjust "Hour", then press the ▶ button to move to the next step.
Set other items using the same method as above.
When finished, press the ENTER button.
Press the EXIT button to exit.

The current time will appear every time you press the INFO button.
◀ You can set the Hour, Minute, Channel, and Volume directly by pressing the number buttons on the remote control.
Auto Power Off When you set the timer "On", the television will eventually turn off, if no controls are operated for 3 hours after the TV was turned on by timer. This function is only available in timer "On" mode and prevents overheating or leakages, which may occur if a TV is on for too long (on holiday, for example).
SPECIAL FEATURES
Setting the Sleep Timer
The sleep timer automatically shuts off the TV after a preset time (from 30 to 180 minutes).
1
Press the MENU button.
Press the ▲ or ▼ button to select "Setup", then press the ENTER button.

2
Press the ▲ or ▼ button to select "Time", then press the ENTER button.
Press the ▲ or ▼ button to select "Sleep Timer", then press the ENTER button.

3
Press the ▲ or ▼ button to adjust "Minute".
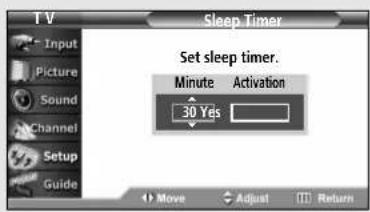
4
To cancel the set sleep timer;
Press the ▶ button to select "Activation".
Press the ▲ or ▼ button to select "No", then press the ENTER button.
Press the EXIT button to exit.
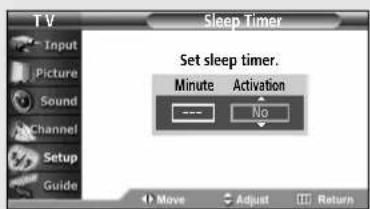
Alternate method:
Press the SLEEP button on the remote control repeatedly until the appropriate time interval appears (any of the preset values from "30 min" to "180 min").

SPECIAL FEATURES
Using the V-Chip (USA)
Access to channels and programs is controlled by a password (i.e., a 4-digit secret code that is defined by the user). The on-screen menu will instruct you to assign a password (and you can change it later, if necessary).
How to Change Your Password
1
Press the MENU button.
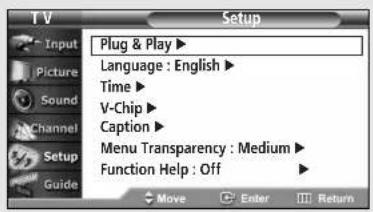
Press the ▲ or ▼ button to select "Setup", then press the ENTER button.
2
Press the ▲ or ▼ button to select "V-Chip", then press the ENTER button.
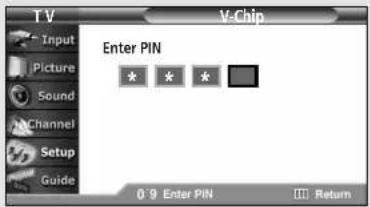
Press the number buttons to enter your current 4-digit pin number.

3
The "V-Chip" menu is displayed.
Press the ▲ or ▼ button to select "Change PIN", then press the ENTER button.

4
Press the number buttons (0 \~ 9) on the remote control to enter your current password.
Press the number buttons (0 \~ 9) to enter a new password.
Re-enter the new password to confirm.


The default pin number for a new TV set is "0 0 0 0".
If you forget the pin number, press the remote control buttons in the following sequence, which resets the pin to 0-0-0-0: POWER (Off), MUTE, 8, 2, 4, POWER (On).
SPECIAL FEATURES
How to Enable/Disable the Rating Controls
1
Press the MENU button.
Press the ▲ or ▼ button to select "Setup", then press the ENTER button.

2
Press the ▲ or ▼ button to select "V-Chip", then press the ENTER button.
Press the number buttons to enter your current 4-digit pin number.
3
The "V-Chip" menu is displayed.
Press the ENTER button to select "V-Chip Lock". Press the ▲ or ▼ button to select "On" or "Off", then press the ENTER button.
Press the EXIT button to exit.


SPECIAL FEATURES
How to Set up Restrictions Using the "TV Parental Guidelines"
The parental restrictions can be set up using either of two methods: The "TV Parental Guidelines" or "MPAA Rating".
1
Press the MENU button.
Press the ▲ or ▼ button to select "Setup", then press the ENTER button.

2
Press the ▲ or ▼ button to select "V-Chip", then press the ENTER button.
Press the number buttons to enter your current 4-digit pin number.
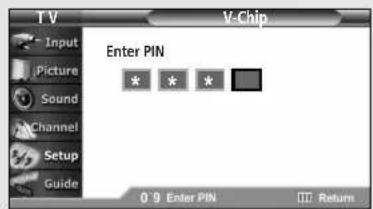
3
The "V-Chip" menu is displayed.
Press the ▲ or ▼ button to select "TV Parental Guidelines", then press the ENTER button.

4
You can independently lock the TV ratings. The locked TV (FCC) ratings are indicated by the symbol " 🔊".

Press the ▲/▼/◄/► buttons and the ENTER button to activate the appropriate restrictions for TV (FCC) rating system.
Press the EXIT button to exit.
Allow All :
Press to unlock all TV ratings.
Block All :
Press to lock all TV ratings.
TV-Y :
Young
children
TV-Y7 : Children 7 and over
TV-G : General audience
TV-PG : Parent Guidance
TV-14 : Viewers 14 and over
TV-MA : Mature Audience
- These categories consist of two separate groups: "TV-Y" and "TV-Y7" (young children through age 7), and "TV-G" through "TV-MA" (everybody else).
- The restrictions for these two groups work independently: If a household includes very young children as well as young adults, the TV parental guidelines must be set up separately for each age group. (See page 68)
SPECIAL FEATURES
How to Set up Restrictions using the Movie Ratings:
G, PG, PG-13, R, NC-17, X
The Movie rating system uses the Motion Picture Association of America (MPAA) system, and its main application is for movies.
When the Rating Control is on, the TV will automatically block any programs that are coded with objectionable ratings (either MPAA or TV-Ratings).
1
Press the MENU button.
Press the ▲ or ▼ button to select "Setup", then press the ENTER button.

2
Press the ▲ or ▼ button to select "V-Chip", then press the ENTER button.
Press the number buttons to enter your current 4-digit pin number.
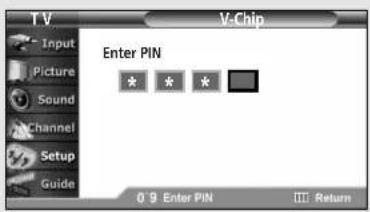
3
The "V-Chip" menu is displayed.
Press the ▲ or ▼ button to select "MPAA Rating", then press the ENTER button.
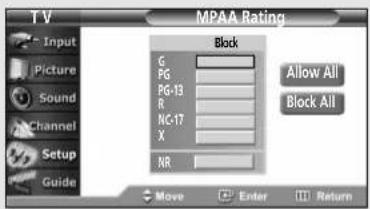
4
You can independently lock the movie ratings. The locked movie ratings are indicated by the symbol " 🔊".
Press the ▲/▼/◄/►
buttons and the ENTER button to activate the appropriate restrictions for movie rating system.
Press the EXIT button to exit.


Allow All :
Press to unlock all movie ratings.
Block All :
Press to lock all movie ratings.
SPECIAL FEATURES
Important Notes About Parental Locks
Explanation of the MPAA and TV (FCC) Rating Systems:
TV (FCC) Age-Based Ratings
TV-MA
Mature audiences only. This program may contain mature themes, profane language, graphic violence and explicit sexual content.
TV-14
Parents strongly cautioned. This program may contain sophisticated themes, sexual content, strong language and more intense violence.
TV-PG
Parental guidance suggested. The program may contain infrequent coarse language, limited violence, some suggestive sexual dialog and situations.
TV-G
General audience. It contains little or no violence, no strong language, and little or no sexual dialog or situations.
TV-Y7
Directed to older children. Themes and elements in this program may include mild physical or comedic violence, or may frighten children under the age of seven.
TV-Y
All children. The themes and elements in this program are specifically designed for a very young audience, including children from ages two – six.
TV (FCC) Content Category MPAA Rating System (Movies)
V Violence.
S Sexual content.
L Offensive language.
D Dialog...sexual innuendo.
FV Fantasy or cartoon violence.
G General audience. No restriction.
PG Children under 13 should be accompanied by an adult.
PG-13 Parental guidance suggested. Children under 13 should be accompanied by an adult.
R Restricted. Viewers should be 17 or older.
NC-17 Not classified. Viewers should be 17 or older.
X Adults only.
- TV (FCC) ratings: The particular rating that you have selected will be locked (and indicated as a red “L” on a blue background). Also, all of the age-based ratings will be locked within the particular group (i.e., “group 1” or “group 2”).
Suppose that the TV-G rating and all of its contents (V, S, L, and D) are locked. In that case, more restrictive ratings (TV-PG, TV-14, and TV-MA) and all of their contents (V, S, L, and D) are automatically locked as well. - MPAA ratings: The particular rating that you have selected will be locked. In addition, more restrictive ratings will be locked as well.
- Neither TV (FCC) ratings nor MPAA ratings apply to news programs.
SPECIAL FEATURES
Analog
Viewing Closed Captions (On-Screen Text Messages)
The Analog Caption function operates in either analog RF channel mode or external signal mode. (Depending on the broadcasting signal, the Analog Caption function may operate on digital channels.)
1
Press the MENU button.
Press the ▲ or ▼ button to select "Setup", then press the ENTER button.

2
Press the ▲ or ▼ button to select "Caption", then press the ENTER button.

3
Press the ENTER button to select "Caption".
Press the ▲ or ▼ button to select "On", then press the ENTER button.

4
Press the ▲ or ▼ button to select "Caption Mode", then press the ENTER button.
Press the ▲ or ▼ button to select submenu (CC1\~CC4 or Text1 \~ Text4) you want, then press the ENTER button.
Press the EXIT button to exit.
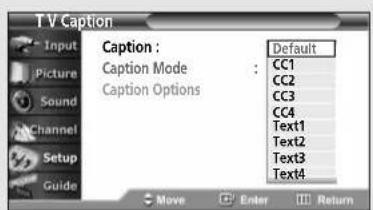
Notes:
- The Caption feature doesn't work in DVI mode.
- The availability of captions depends on the program being broadcast.
The default is "CC1".
CC1 : The Primary Synchronous Caption Service. These are captions in the primary language that must be in sync with the sound, preferably matched to a specific frame.
CC2: The Special Non-Synchronous Use Captions. This channel carries data that is intended to augment information carried in the program.
CC3 : Secondary Synchronous Caption Service. Alternate program-related caption data, typically second language captions.
CC4 : Special Non-Synchronous Use Captions. Similar to CC2.
SPECIAL FEATURES
Digital
Viewing Closed Captions (On-Screen Text Messages)
The Digital Captions function operates on digital channels.
1
Press the MENU button.
Press the ▲ or ▼ button to select "Setup", then press the ENTER button.
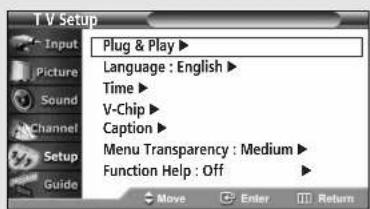
2
Press the ▲ or ▼ button to select "Caption", then press the ENTER button.

3
Press the ENTER button to select "Caption".
Press the ▲ or ▼ button to select "On", then press the ENTER button.

4
Press the ▲ or ▼ button to select "Caption Mode", then press the ENTER button.
Press the ▲ or ▼ button to select submenu (Service1\~Service6, CC1\~CC4 or Text1 \~ Text4) you want, then press the ENTER button.

5
Press the ▲ or ▼ button to select "Caption Options", then press the ENTER button.

continued...
◀ "Caption Options" are available only when "Service1\~ Service6" can be selected in "Caption Mode".
SPECIAL FEATURES
6
Press the ▲ or ▼ button to select "Size", then press the ENTER button.
Press the ▲ or ▼ button to select one you want, the press the ENTER button.
Set other listed options below using the same method as above.
Press the EXIT button to exit.
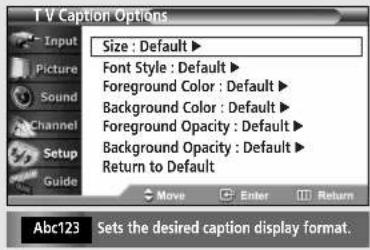
Size
This option consists of "Default", "Small", "Standard" and "Large". The default is "Standard".
Font Style
This option consists of "Default", "Style0 \~ Style 7". You can change the font you want. The default is "Style 0".
Foreground Color
This option consists of "Default", "White", "Black", "Red", "Green", "Blue", "Yellow", "Magenta" and "Cyan". You can change the color of the letter. The default is "White".
Background Color
This option consists of "Default", "White", "Black", "Red", "Green", "Blue", "Yellow", "Magenta" and "Cyan". You can change the background color of the caption. The default is "Black".
Foreground Opacity
This option consists of "Default", "Transparent", "Translucent", "Solid" and "Flashing". You can change the opacity of the letter.
Background Opacity
This option consists of "Default", "Transparent", "Translucent", "Solid" and "Flashing". You can change the background opacity of the caption.
Return to Default
This option sets each of "Size", "Font Style", "Foreground Color", "Background Color", "Foreground Opacity", and "Background Opacity" to its factory default.
Alternate method:
Press the CAPTION button on the remote control repeatedly to select "On" or "Off".
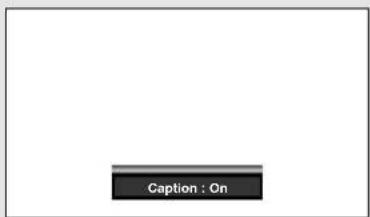
Notes:
• The availability of captions depends on the program being broadcast.
- The "default" means to follow the rule of broadcasting.
◀Foreground Color and Background Color cannot be set to same color. Foreground Opacity and Background Opacity cannot be set to the same transparency value.
SPECIAL FEATURES
Menu Translucency Level
Adjusts the transparency of the menu screen.
1
Press the MENU button.
Press the ▲ or ▼ button to select "Setup", then press the ENTER button.
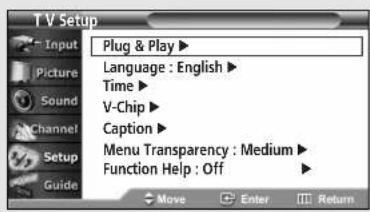
2
Press the ▲ or ▼ button to select "Menu
Transparency", then press the ENTER button.
Press the ▲ or ▼ button to select level, then press the ENTER button.
Press the EXIT button to exit.
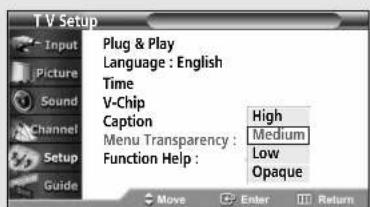
SPECIAL FEATURES
Setting the Function Help
Displays help on the menu functions.
1
Press the MENU button.
Press the ▲ or ▼ button to select "Setup", then press the ENTER button.

2
Press the ▲ or ▼ button to select "Function Help", then press the ENTER button.

3
Press the ▲ or ▼ button to select "Off" or "On", then press the ENTER button.
Press the EXIT button to exit.
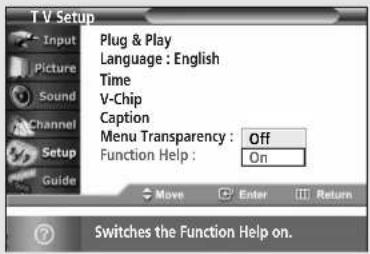
SPECIAL FEATURES
Electronic Program Guide
Your TV has an "Electronic Program Guide" to help you navigate through all the possible viewing options. The EPG supplies information, such as program lists, start and end times of all available channels.
In addition, detailed information about the program is often available in the EPG. (The availability and the amount of program details will vary depending on the broadcaster.)
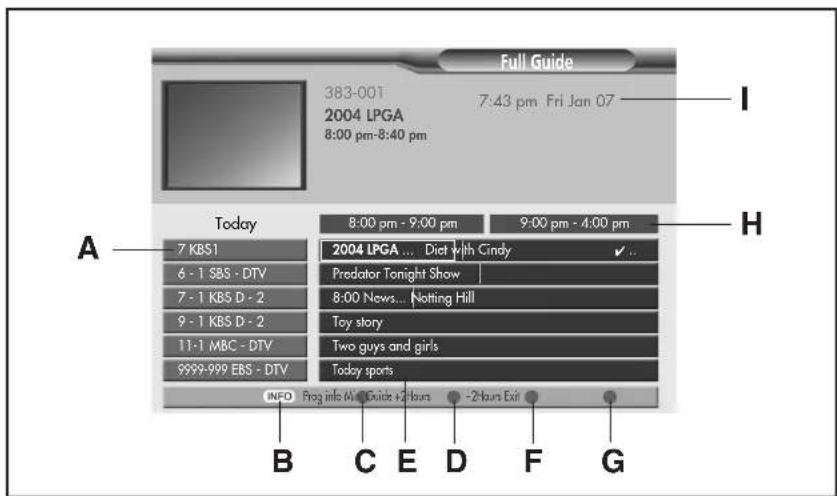
Viewing the Electronic Program Guide
A Displays which channel is currently selected to show program information in the Channel Guide.
B Press to view detailed information for the selected digital program.
C Switches to the mini program guide. The mini guide shows the titles of the available programs of one channel. Press the Red button on the remote control. The set default guide is Mini Guide.
D Scrolls backwards quickly (2 hours). Press the Green button on the remote control.
E Displays titles and other details about upcoming programs of particular channels. Highlight the program and press the INFO button
to see additional and detailed information. (The availability of additional details depends on the broadcaster.) Use the ▲/▼/◄/► buttons to search information about another channel.
F Scrolls forward quickly (2 hours). Press the Yellow button on the remote control and repeatedly press the ENTER button the appropriate time is displayed.
G Exits from the Program Guide and returns to normal viewing mode. Press the Blue button on the remote control.
H Displays the program times (arranged in 1 hour time blocks)
I Displays the current time and date.
Note:
You can use the GUIDE button on the remote control to display the Electronic Program Guide. The EPG begins its list with the channel that is currently active. The EPG will only work when you are receiving digital channels.
SPECIAL FEATURES
Using the Electronic Program Guide
1
Press the MENU button.
Press the ▲ or ▼ button to select "Guide", then press the ENTER button.

2
Press the ▲ or ▼ button to select "Default Guide", then press the ENTER button.

3
Press the ▲ or ▼ button to select "Mini Guide" or "Full Guide", then press the ENTER button.
Press the EXIT button to exit.
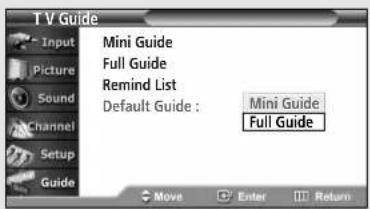
◀ Mini Guide:
Displays the guide for one channel.
Full Guide:
Displays the guide for all channels.
SPECIAL FEATURES
Viewing Information about a Single Channel
1
Press the MENU button.
Press the ▲ or ▼ button to select "Guide", then press the ENTER button.

2
Press the ENTER button to select "Mini Guide".
Press the ▲ or ▼ buttons to view information about one channel by time.
You can switch between Full Guide mode and Mini Guide mode by pressing the Red button repeatedly.
Select the program you want by pressing the ▲ or ▼ buttons and press the INFO button on the remote control.

3
Press the Blue button or EXIT button to exit.
◀ ENTER button:
Press to watch the selected channel.
Red button:
Press to switch to the program guide for all channels.
Press again to switch to the program information for the selected channel.
Blue button:
Press to exit.
INFO button:
Press to view detailed information for the selected digital program.
Notes:
- You can also view information about a single channel by pressing the GUIDE button on the remote control. (The EPG should be pre-set in Mini Guide mode.)
- Press the INFO button on the remote control to view the program information for the current channel.
- However, this function is available only when the default program guide setting has been set to "Current Program Guide".
SPECIAL FEATURES
Viewing Information about Channels
Displays the program time and content for all channels. This function is available only when the program is digital.
1
Press the MENU button.
Press the ▲ or ▼ button to select "Guide", then press the ENTER button.
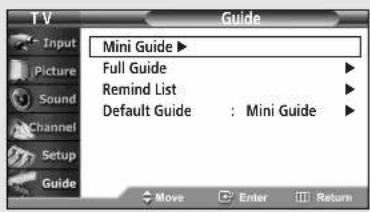
2
Press the ▲ or ▼ button to select "Full Guide", then press the ENTER button.
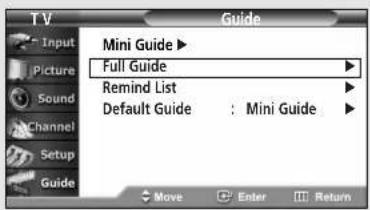
3
Press the green button to activate "-2 Hours" and the yellow button to activate "+2 Hours".

4
You may now:
- Jump to a channel directly: Use the ▲ or ▼ buttons to highlight the program in the column and press the ENTER button.
- Obtain additional program details: Highlight the title of a program using the ▲, ▼, ◀ or ▶ button and press the INFO button.
- Exit from the Program Guide and return to normal viewing mode: Press the blue button or the EXIT button.
Notes:
• Displays the program times in two hour segments.
• Displays the current date and time on the top right of the screen.
- The current time displayed on the program information is subject to the time information sent from the broadcasting station, so it may differ from the actual time.
- Press the GUIDE button on the remote control to view the program information for all channels. However, this function is available only when the default program guide setting is set to "All Program Guide".
INFO button:
Displays detailed information for the selected digital program.
▲/▼/◄/► buttons: Displays program information for each channel, based on the time. Select your desired program using the ▲/▼/◄/► buttons, and then press the ENTER button to view the program information for the selected program.
Red button: Each press switches between program information for one channel and all channels.
Green button: Press to view the program information from two hours ago.
Yellow button: Press to view the program information for two hours from now.
Blue button: Press to exit.
SPECIAL FEATURES
Remind List
Reminded Viewing List
If you have made a scheduled viewing list of programs you would like to see, the channel will be automatically switched to the scheduled program at the scheduled time even if you are watching another program.
1
Press the MENU button.
Press the ▲ or ▼ button to select "Guide", then press the ENTER button.

2
Press the ENTER button to select "Mini Guide".
Press the ▲ or ▼ button to select programs you would like to see, then press the ENTER button. The symbol "√" will be displayed. Each press of the ENTER button will switch between "Remind" and "Del Remind".
Press the EXIT button to exit.

SPECIAL FEATURES
To view the Remind List
1
Press the MENU button.
Press the ▲ or ▼ button to select "Guide", then press the ENTER button.
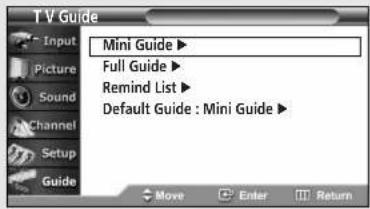
2
Press the ▲ or ▼ button to select "Remind List", then press the ENTER button.
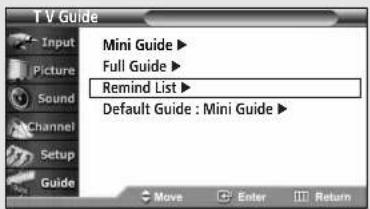
To remove the scheduled programs
Press the ▲ or ▼ button to select a program to be removed, then press the ENTER button.
To remove all programs, press the ▶ button to select "Cancel All", then press the ENTER button.
Press the EXIT button to exit.
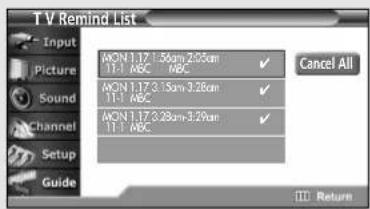

SPECIAL FEATURES
Customizing Your Remote Control
Your TV comes equipped with a universal remote control. In addition to controlling the TV, the universal remote control can also operate a VCR, Cable box and DVD (even if your VCR, Cable box and DVD are made by manufacturers other than Samsung).
- The remote control might not be compatible with all DVD Players, VCRs and Cable boxes.
Setting Up Your Remote Control to Operate Your VCR (Cable box or DVD player)
1
Turn off your VCR (Cable box or DVD player).
2
Press the MODE button to switch the remote control to the VCR (CABLE or DVD) mode.
The remote control has four modes: TV, VCR, CABLE and DVD.
3
On your Akai remote control, press the SET button.
4
Enter 3 digits of the VCR (Cable box or DVD player) code listed on next page for your brand of VCR (Cable box or DVD player).
Make sure you enter 3 digits of the code, even if the first digit is a "0". (If more than one code listed, try the first one.)
5
Press the POWER button on the remote control. Your VCR (Cable box or DVD player) should turn on. If your VCR (Cable box or DVD player) turns on, your remote control is now set correctly.
If your VCR (Cable box or DVD player) does not turn on, repeat steps 2, 3, and 4, but try one of the other codes listed for the brand of your particular VCR (Cable box or DVD player).
6
Once your remote control is set up, press the MODE button any time you want to use the remote to operate your VCR (Cable box or DVD player).
- When your remote is in the TV mode, the VCR (or DVD player) control buttons (REW, STOP, PLAY/PAUSE and FF) will still operate your VCR (or DVD player).
- When your remote control is in the VCR, CABLE or DVD mode, the volume buttons still control your TV's volume.
SPECIAL FEATURES
Remote Control Codes
VCR Codes
| Admiral | 015,088 | Hitachi | 014,024,044,045 | Quasar | 017,053 |
| Aiwa | 024 | Instant Replay | 017 | Radio Shack | 011,015,017,018,021,024,028,036,052,062 |
| Akai | 026,031,032 | JC Penny | 011,014,016,017,023,025,039,044,060,062 | ||
| Audio Dynamics | 022,025 | RCA | 009,014,016,017,037,044,046,063,078 | ||
| Bell & Howell | 011 | JCL | 011,017,023,025,039,055 | ||
| Broksonic | 019 | Kenwood | 011,023,025,039,055 | Realistic | 011,015,017,018,021,024,028,036,052,062 |
| Candle | 016,018,022,054,055,061 | KLH | 082 | ||
| Canon | 017,062 | LG(Goldstar) | 001,002,007,018,023,055,069 | Samsung | 000,016,022,031,041,051 |
| Citizen | 016,018,022,054,055,061 | Sansui | 025 | ||
| Colortyme | 023 | Lloyd | 024 | Sanyo | 011,021 |
| Craig | 016,021 | Logik | 040 | Scott | 022,050,058,077 |
| Curtis Mathes | 009,016,017,023,024,055,062,073,076 | LXI | 024 | Sears | 011,014,018,021,027,028,044,052,057 |
| Magnavox | 017,038,062,065 | ||||
| Daewoo | 003,004,005,006,007,008,022,054,085 | Marantz | 011,017,023,025,038,039,055,070 | Sharp | 015,036,048,054 |
| Shintom | 026,035,040,064 | ||||
| DB | 023,025 | MTC | 016,024 | Signature | 024 |
| Dimensia | 009 | Multitech | 016,024,040,041 | Sony | 026,035,047 |
| Dynatech | 024 | NEC | 011,023,025,039,055,070,073 | Sylvania | 017,024,038,062,065 |
| Electrohome | 036 | Symphonic | 024 | ||
| Emerson | 017,018,019,022,024,029,032,036,043,050,051,056,058,066,071,074,076,077,079 | Optimus | 015 | Tandy | 011,024 |
| Panasonic | 017,062,084,086 | Tatung | 039 | ||
| Pentax | 014,044 | Teac | 024,039,078 | ||
| Pentex Research+ | 055 | Technics | 017 | ||
| Fisher | 011,021,027,028,052,057,067 | Philco | 017,038,062,065 | Teknika | 017,018,024,030 |
| Philips | 017,038 | TMK | 076 | ||
| Funai | 024 | Pioneer | 014,025,042,059 | Toshiba | 014,022,028,057,058 |
| General Electric | 009,016,017,041,062 | Portland | 053,054,061 | Toshiko | 018 |
| Go Video | 016 | PROSCAN | 009 | Totevision | 016,018 |
| Harman Kardon | 023 | Quartz | 011 |
Cable Box Codes
| Anvision | 015,016 | Magnavox | 015,016,027,029,034,036,037,040,041,048,049 | Signature | 054 |
| Cable Star | 015,016 | Sprucer | 035 | ||
| DaeHan | 005 | Nawoo | 001 | Starcom | 054 |
| DeaRyung | 003 | NSC | 017 | Stargate2000 | 066 |
| DongKuk | 004 | Oak | 024,046 | Sylvania | 019,067 |
| Eagle | 015,016 | Osk Sigma | 024 | TaePyungYang | 002 |
| Eastern International | 020 | Panasonic | 011,035,047,069 | Texscan | 019,067 |
| General Instrument | 054 | Philips | 015,016,027,029,034,036,037,040,041,048,049 | Tocam | 025,029,057,058,063 |
| GI | 012,013,023,031,032,033,038,044,075,076,077 | Unika | 039,040,049 | ||
| Pioneer | 026,028,052 | Universal | 059,060 | ||
| Hamlin | 011,012,020,021,042,056 | Randtek | 015,016 | Viewstar | 015,016,027,029,034,036,037,040,041,048,049 |
| Hitachi | 045,051,054 | RCA | 008,035,074 | ||
| Jerrold | 012,013,023,031,032,033,038,044,054,070,073 | Regal | 011,020,021 | Warner Amex | 052 |
| Regency | 010,041 | Zenith | 022,050,065,069 | ||
| LG(Goldstar) | 006 | Saewoo | 007 | ||
| Macom | 045,051 | Samsung | 000,011,030,052,071,072 | ||
DVD Codes
| Curtis Mathes | 009 | Philips | 007 | Sharp | 005 |
| JVC | 003 | PROSCAN | 008 | Sony | 004 |
| LG(Goldstar) | 001 | RCA | 008 | Toshiba | 002 |
| Panasonic | 006 | Samsung | 000 |
Chapter Five
TROUBLESHOOTING
If the TV seems to have a problem, first try this list of possible problems and solutions. If none of these troubleshooting tips apply, then call your nearest service center.
Identifying Problems
| Problem Possible Solution | |
| Poor picture. Try another channel. | Adjust the antenna.Check all wire connections. |
| Poor sound quality. Try another channel. | Adjust the antenna.Make sure the MUTE button is off. |
| No picture or sound. Try another channel. | Press the SOURCE button.Make sure the TV is plugged in.Check the antenna connections. |
| No color, wrong colors or tints. Make sure the program is broadcast in color.Adjust the picture settings. | |
| Picture rolls vertically. Adjust the antenna. | Check all wire connections.If you are using a VCR, check the tracking. |
| The TV operates erratically. | Unplug the TV for 30 seconds, then try operating it again. |
| Your remote control does not Press the operate your TV. in the “TV” mode. | MODE button to put your remote controlMake sure the remote has batteries. |
| The TV won’t turn on. Make sure the wall outlet is working. | Make sure the TV is plugged in.Make sure the remote has batteries. |
| Digital broadcasting screen Please check the digital signal strength and input problem | antenna. |
| Color smudge on screen. | Please operate the Self Focus function. |
| The visual qualities of digital channels vary. | The visual qualities of digital channels may vary depending on the original production method (analog or digital).→ Classification by the information displayed when switching channels.→ If the original production method is digital:High visual quality program.→ If the original production method is analog:The digital program displayed on the screen is originally an analog program which has been converted. The visual quality is of an SD grade visual quality. |
| Although the TV caption shows HD,the visual quality is not satisfactory. | The HD caption that appears when switching channels or when pressing the Information button on the remote control means the selected channel is simply a digital channel. If the broadcasting station converts an analog signal into digital and transmits the signal, the visual quality may not be perfect. (Applied to Set Top Box built-in model only.) |
Note
If you watch a still image or the screen in the Normal (4:3) aspect ratio format for a long time, images may be burned onto the screen.
APPENDIX
Cleaning and Maintaining Your TV
With proper care, your TV unit will give you many years of service. Please follow these guidelines to get the maximum performance from your TV.
Placement
- Do not place the TV near extremely hot, cold, humid or dusty places.
- Do not place the TV near appliances with electric motors that create magnetic fields, such as vacuum cleaners.
- Keep the ventilation openings clear; do not place the TV on a soft surface, such as cloth or paper.
- Place the TV in a vertical position only.
Liquids
- Do not handle liquids near or on the TV. Liquids that spill into it can cause serious damage.
Cabinet
- Never open the cabinet or touch the parts inside.
- Wipe your TV with a clean, dry cloth. Never use water, cleaning fluids, wax, or chemicals.
- Do not put heavy objects on top of the cabinet.
Temperature
- If your TV is suddenly moved from a cold to a warm place, unplug the power cord, and allow at least two hours for moisture that may have formed inside the unit to dry completely.
Using Your TV in Another Country
If you plan to take your TV with you to a foreign country, please be aware of the different television systems that are in use around the world. A TV designed for one system may not work properly with another system due to differences in the TV channel frequencies.
Specifications
| Model | PT4250A | PT5250A |
| Voltage | AC 120V | AC 120V |
| Frequency of Operation | 60Hz | 60Hz |
| Power Consumption | 240 watts | 240 watts |
| Dimension (W x D x H) | 1004 x 500 x 967 mm39.5 x 19.7 x 38.1 inches | 1226 x 598 x 1276 mm48.3 x 23.5 x 50.2 inches |
| Weight | 40.4 Kg / 89.1 lbs | 61.0 Kg / 134.4 lbs |
AKAI
- Owner's Instructions
- Warning! Important Safety Instructions
- Thank You for Choosing Akai
- Important Safety Information
- Important Warranty Information Regarding Television Format Viewing
- A Guide to Digital TV
- What is Digital Television?
- Digital Television Services
- Digital Picture Quality
- Dolby Surround Sound
- Interactive Communications and Datacasting
- How to View Digital Television
- Integrated TVs versus DTV-ready TVs and monitors
- NOTE
- Q&A
- Is the antenna I use for existing TV reception good enough for DTV?
- How difficult is it to receive DTV signals indoors?
- How can I connect an antenna in my townhouse, co-operative apartment, condominium, or apartment?
- Can I connect my DTV set-top receiver to my cable TV service?
- CONTENTS
- Chapter 1: Your New TV
- Chapter 2: Installation
- Chapter 3: Operation
- Chapter 3: Operation (continued)
- Chapter 4: Special Features
- Chapter 5: Troubleshooting
- Appendix
- Chapter One
- List of Features
- Accessories
- YOUR NEW TV
- Familiarizing Yourself with Your New TV
- Control Buttons
- ① POWER
- ② Stand-By Indicator
- ③ Remote Control Sensor
- ④ SOURCE
- ⑤ MENU
- ⑥ + VOL -
- ⑦ ^ CH ∨
- (Enter)
- Connection Jacks (Side)
- Connection Jacks (Rear)
- ① ANTENNA terminals
- ② DVI Video Input jack
- ③ SERVICE Port
- ④ OPTICAL Output jack
- ⑤ COAXIAL Output jack
- ⑥ Audio/Video Output jacks
- ⑦ Video Input jacks
- ⑧ Audio Input jacks
- ⑨ DVI Audio Input jacks
- ⑩ COMPONENT Input jacks (Y, PB, PR, AUDIO-L/R)
- Remote Control
- ② Number buttons
- ③ -
- ANTENNA
- ⑤ FAV. CH (Favorite Channel) Press to switch to your favorite channels.
- MUTE
- ⑦ MENU
- ⑧ VOL-, VOL+
- INFO
- ⑩ Mode
- SET
- ⑫ PRE-CH
- ⑬ SLEEP
- ⑭ CH. LIST
- SOURCE
- GUIDE
- ⑰ CH,CH
- 18
- ⑲ ENTER
- EXIT
- Remote Control (continued)
- ② S.MODE
- ② P.MODE
- P.SIZE
- CAPTION
- BBE
- SELF FOCUS
- ADD/DEL
- ⑲ VCR/DVD Controls
- Chapter Two
- Connecting VHF and UHF Antennas
- Antennas with 300-ohm Flat Twin Leads
- 1
- 2
- INSTALLATION
- Antennas with 75-ohm Round Leads
- Separate VHF and UHF Antennas
- Connecting Cable TV
- Cable without a Cable Box
- Cable with a Cable Box that Descrambles All Channels
- Connecting to a Cable Box that Descrambles Some Channels
- 3
- 4
- 5
- Connecting a VCR
- Connecting a Second VCR to Record from the TV
- Connecting a Camcorder
- Connecting a DVD Player or DTV Set-Top Box (480i, 480p, 720p, 1080i)
- Connecting to Y, PB, PR
- Connecting to Regular Audio and Video Jacks
- Connecting a Digital TV Set-Top Box
- Connecting to DVI (Digital Visual Interface)
- Notes
- Connecting a Digital Audio System
- Connecting to an Analog Amplifier
- Installing Batteries in the Remote Control
- Chapter Three
- OPERATION
- Turning the TV On and Off
- Plug & Play Feature
- When selecting Cable TV :
- 6
- 7
- Adjusting the Screen Automatically (Self Focus)
- Alternate method:
- Deactivating the Automatic Execution of the Self Focus
- Removing the "Self Focus" Message from the Display
- Adjusting Convergence Manually
- Viewing the Menus and On-Screen Displays
- Viewing the Menus
- Viewing the Display
- Selecting a Menu Language
- Selecting the Antenna Input
- Memorizing the Channels
- Selecting the Video Signal Source
- Storing Channels in Memory
- Adding and Erasing Channels
- Changing Channels
- Using the Channel Buttons
- Using the Number Buttons
- Using the “—” Button
- Using the Previous Channel
- Selecting Your Favorite Channels
- To Store Your Favorite Channels:
- To View Your Favorite Channels:
- Labeling the Channels
- Viewing the Channel Lists
- Editing the Channel Lists
- ◀ Red button:
- Picture Control
- Using Automatic Picture Settings
- Customizing the Picture
- Resetting the Picture Settings to the Factory Defaults
- Sound Control
- Adjusting the Volume
- Using the MUTE Button
- Customizing the Sound
- Using Automatic Sound Settings
- Setting the Clock
- Option 1: Setting the Clock Manually
- Option 2: Setting the Clock Automatically
- Viewing an External Signal Source
- Setting the Signal Source
- Assigning Names to External input mode
- Chapter Four
- Analog
- Fine Tuning Analog Channels
- SPECIAL FEATURES
- Digital
- Checking the Digital-Signal Strength
- Changing the Screen Size
- BBE
- Auto Volume
- Choosing a Multi-Channel Sound (MTS) track
- Choosing a Digital Sound Format
- DOLBY DIGITAL
- Setting the On/Off Melody
- Setting the On/Off Timer
- Setting the Sleep Timer
- Using the V-Chip (USA)
- How to Change Your Password
- How to Enable/Disable the Rating Controls
- How to Set up Restrictions Using the "TV Parental Guidelines"
- How to Set up Restrictions using the Movie Ratings:
- G, PG, PG-13, R, NC-17, X
- Important Notes About Parental Locks
- TV (FCC) Age-Based Ratings
- TV-MA
- TV-14
- TV-PG
- TV-G
- TV-Y7
- TV-Y
- TV (FCC) Content Category MPAA Rating System (Movies)
- Viewing Closed Captions (On-Screen Text Messages)
- Notes:
- The default is "CC1".
- Size
- Font Style
- Foreground Color
- Background Color
- Foreground Opacity
- Background Opacity
- Return to Default
- Menu Translucency Level
- Setting the Function Help
- Electronic Program Guide
- Viewing the Electronic Program Guide
- Using the Electronic Program Guide
- ◀ Mini Guide:
- Viewing Information about a Single Channel
- ◀ ENTER button:
- Red button:
- Blue button:
- INFO button:
- Viewing Information about Channels
- Remind List
- Reminded Viewing List
- To view the Remind List
- To remove the scheduled programs
- Customizing Your Remote Control
- Setting Up Your Remote Control to Operate Your VCR (Cable box or DVD player)
- Remote Control Codes
- Chapter Five
- TROUBLESHOOTING
- Cleaning and Maintaining Your TV
- Placement
- Liquids
- Cabinet
- Temperature
- Using Your TV in Another Country
- AKAI
Brand : AKAI
Model : PT4250A
Category : Television