
FEFS50K9A - Television Furrion - Free user manual and instructions
Find the device manual for free FEFS50K9A Furrion in PDF.


| Product Type | LED Television |
| Model | FEFS50K9A |
| Screen Size | 50 inches (127 cm) |
| Display Resolution | 1920 x 1080 (Full HD) |
| Refresh Rate | 60 Hz |
| Dimensions (W x H x D) without stand | 44.3 x 25.7 x 3.5 inches (112.5 x 65.3 x 8.9 cm) |
| Weight without stand | 28.7 lbs (13.0 kg) |
| Power Supply | AC 100-240V, 50/60 Hz |
| Power Consumption (Typical) | 100 W |
| Smart TV Platform | Not available (standard LED TV) |
| Inputs | HDMI x 2, USB x 1, Composite AV, RF Antenna |
| Outputs | Optical Audio, Headphone Jack |
| VESA Mount Pattern | 200 x 200 mm |
| Built-in Speakers | 2 x 10W |
| Remote Control | Included (IR) |
| Wall Mountable | Yes |
| Energy Rating | Class A+ |
| Operating Temperature | 32°F to 104°F (0°C to 40°C) |
| Recommended Use | Indoor / RV / Marine |
| Warranty | 1 Year Limited |
Frequently Asked Questions - FEFS50K9A Furrion
User questions about FEFS50K9A Furrion
0 question about this device. Answer the ones you know or ask your own.
Ask a new question about this device
Download the instructions for your Television in PDF format for free! Find your manual FEFS50K9A - Furrion and take your electronic device back in hand. On this page are published all the documents necessary for the use of your device. FEFS50K9A by Furrion.
USER MANUAL FEFS50K9A Furrion
50" FHD LED TV FEFS50K9A

natural_image
Line drawing of a flat-screen monitor with a stand at the bottom (no text or symbols)Contents
●Introduction
●Warning
●Caution
●Main Unit Description
●Remote Control
- OSD Basic Adjustment
- Specifications
- Troubleshooting
Introduction
Thank you very much for purchasing your LED TV. It serves as a normal colour TV and a PC monitor. To enjoy your set fully from the very beginning, read this manual carefully and keep it handy for future reference.
INSTALLATION
① Locate the receiver in the room where direct light does not strike the screen. Total darkness or a reflection on the picture screen can cause eyestrain. Soft and indirect lighting is recommended for comfortable viewing.
② Allow enough space between the receiver and the wall to permit ventilation.
③ Avoid excessively warm locations to prevent possible damage to the cabinet or premature component failure.
④ This TV can be connected to AC 100-240V\~50/60HZ.
⑤ Do not install the TV in a location near heat sources such as radiators, air ducts, direct sunlight, or in closed compartments and closed areas. Do not cover the ventilation openings when using the TV.
⑥ The indicator light will last for about 30 seconds after the power has been turned off. Wait until the indicator light goes out before repowering the TV.
⑦ Manufactured under license from Dolby Laboratories. Dolby and the double-D symbol are trademarks of Dolby Laboratories.
Warning

CAUTION RISK OF ELECTRIC SHOCK DO NOT OPEN

CAUTION: TO AVOID THE RISK OF ELECTRIC SHOCK. DO NOT REMOVE COVER (OR BACK). NO USER- SERVICEABLE PARTS INSIDE. REFER SERVICING TO QUALIFIED SERVICE PERSONNEL

This symbol is intended to alert the user to avoid the risk of electric shock. This equipment may only be disassembled by qualified service personnel.

This symbol is intended to alert the user to the presence of important operation and maintenance instructions in the literature accompanying the equipment.

Class I structures of equipment should be connected to the grid power output with a protective earth connection on the socket. Power plug as a broken appliance, broken installations should be easy to operate.

This equipment is a Class II or double insulated electrical appliance. It has been designed in such a way that it does not require a safety connection to electrical earth.
Caution

natural_image
Illustration of a computer monitor with a crossed-out screw and lightning bolts, symbolizing electrical hazard (no text or symbols present)
High voltages are used in the operation of this product. Do not open the product's casing. Refer servicing to qualified service personnel.

natural_image
Simple line drawing of a computer monitor with a blue X mark and hanging fabric (no text or symbols)
To prevent fire or electrical shock hazard, do not expose the main unit trainormoisture, do not place objects filled with liquids, such as waves, on the apparatus.

natural_image
Illustration of a computer monitor with a blue X symbol and decorative stars above it (no text or symbols present)
Do not drop or push objects into the television cabinet slots or openings. Never spill any kind of liquid on the television receiver.

natural_image
Simple line drawing of a box with steam rising, marked with a blue 'X' and a small icon on the base (no text or symbols)
Avoid exposing the main unit to direct sunlight and other sources of heat. Do not stand the television receiver directly on other products which give off heat: e. g. video cassette players and audio amplifiers. Do not block the ventilation holes in the back cover. Ventilation is essential to prevent failure of electrical components. Do not squash the power supply cord under the main unit or other heavy objects.
Caution
natural_image
Cartoon illustration of a person using a computer monitor with a blue X symbol (no text or symbols present)
Caution
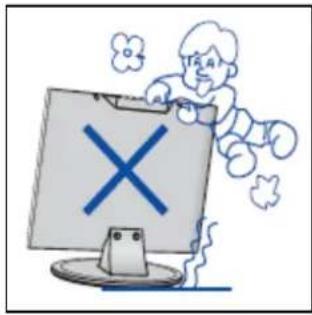
Never stand on, lean on or suddenly push the product or its stand. You should pay special attention to children.

natural_image
Illustration of a computer monitor with a blue X mark and a blue lightning bolt, positioned above a table (no text or symbols)
Caution
Do not place the main unit on an unstable cart stand, shelf or table. Serious injury to an individual and damage to the television may result if it should fall.
natural_image
Illustration of a person standing next to a computer monitor and a bug symbol (no text or symbols present)
Caution
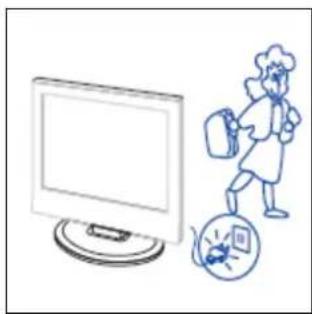
When the product is not used for an extended period of time, it is advisable to disconnect the AC power from the AC outlet.

natural_image
Simple line drawing of a hammer striking a block on a computer monitor with radiating lines (no text or symbols)
Caution
The LED panel used in this product is made of glass and is therefore breakable. This product must not be dropped or banged. If the LED Panel breaks be careful of being injured by broken glass.
Main unit description
Control Panel Button Function
VOL+ : Volume up.
VOL- : Volume down.
CH+: TV channel up.
CH- : TV channel down.
MENU : Press to select the main menu.
SOURCE : Select the input signal.
POWER : Switch on when at standby mode or enter the standby mode.
TV Terminal Connections


- EARPHONE OUT terminal
- COAXIAL OUT terminal
- AUDIO IN (L & R) terminal
- VIDEO IN terminal
- COMPONENT IN (Y Pb Pr) terminal
- HDMI 1 IN terminal
- HDMI 2 IN terminal
- HDMI 3 IN (ARC) terminal
- VGA IN terminal of simulation signal of PC
- PC AUDIO IN terminal
- RF IN terminal (antenna)
- USB INPUT terminal (for SERVICE only)
- AUDIO OUT (L & R) terminal
Remote control
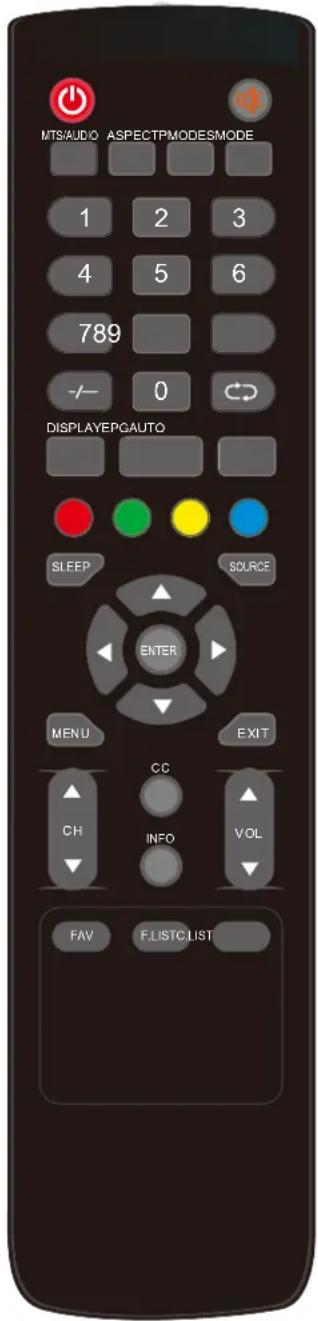
POWER: Power on/off button, press once to turn the TV on and press again to turn the TV off.
MUTE: Press this button to mute or restore sound.
MTS/AUDIO: When stereo program is received, press this key to switch sound system between mono and stereo.
When SAP program is received, press this button to switch sound system between mono and SAP
When stereo and SAP program is received, press this key to switch among mono, stereo and SAP.
Press this key to show the list of audio languages available for the current channel in ATSC.
ASPECT: Press to adjust picture ratio.
PMODE: Select picture mode.
SMODE: Select sound mode.
0-9: Select and switch to a channel using 0 - 9.
-/-: Switch the program digit.
: Switch back and front between the current and previous channels.
DISPLAY: Display TV information.
EPG: Enter electronic program guide
AUTO: Adjust the picture automatically in pc mode.
RED, GREEN, YELLOW, CYAN: This button is not available.
SLEEP: Set the sleep timer.
SOURCE: Press to change signal source.
ENTER: Enter the selected option or perform the selected operation.
MENU: Press this button to enter the main menu.
EXIT: Exit the OSD (On-screen display).
CH+/CH-: Change the channel.
CC: Press this key to select the CC ,ON or OFF mode and CC on Mute .
INFO: Display some information of current program in TV mode.
VOL+/VOL-: Adjust the volume.
FAV: Switch between custom set "Favorite List".
F.LIST: Press this key to display the Favorite List mode.
C.LIST: Press this key to display the Channel List mode.
OSD basic adjustment
InstallationGuide
Press MENU button to display the MAIN OSD MENU; Press ◀ / ▶ button to select the MENU you want; Press ENTER button to enter the sub menu; Press ▼ / ▲ button to select the option and then press ◀ / ▶ to adjust the value in the sub menu; You can press MENU button to go back to the upper menu or EXIT button to close the OSD.
PICTURE
You can select the type of picture, which best corresponds to your viewing. Press the "MENU" button to enter the OSD
menu .Then press “◀/▶” button to select the “PICTURE” menu.
- Press “▼” button to select “Picture Mode”, press “◀/▶” button to select.
- Press “▲/▼ button to select “Brightness” and press the “◀/▼ button to enter brightness adjustment menu to adjust brightness.
- Press “▲/▼” button to select “Contrast” and press the “◀/▶” button to enter
contrast adjustment menu to adjust contrast.
- Press “▲/▼” button to select “Color” and press the “◀/▶” button to enter color adjustment menu to adjust color.
- Press “▲/▼” button to select “Tint” and press the “◀/▶” button to enter hue adjustment menu to adjust tint.
Note: The'Tint'itemisusedinNTSCmodeonly.
- Press “▲/▼” button to select “Sharpness” and press the “◀/▶” button to enter sharpness adjustment menu to adjust sharpness.
- Press “▲/▼” button to select “Color Temperature” and press the “◀/▶” button to select.
- Press “▲/▼” button to select “Advanced Settings” and press the “ENTER/▶” button to enter sub-menu.
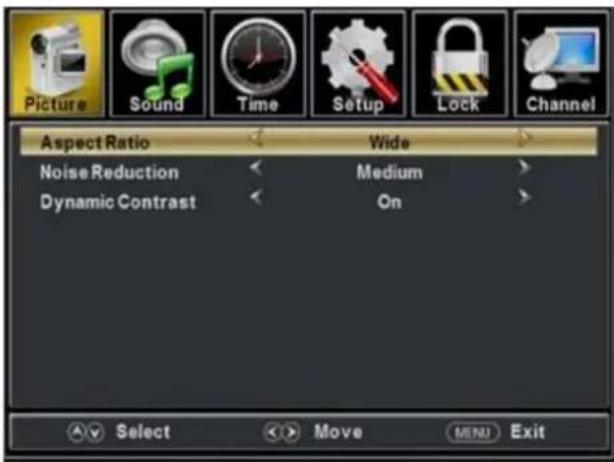
a. Press “▲/▼” button to select “Aspect Ratio” and press the “◀/▶” button to select.

b. Press “▲/▼” button to select “Noise Reduction” and press the “◀/▶” button to select.
c. Press “▲/▼ button to select “Dynamic Contrast” and press the “◀/▶ button to select “On” or “Off”.
SOUND
Youcanselectthetypeofsound, whichbestcorrespondstoyour listening.
Press the "MENU" button to enter the
OSD menu .Then press “◀/▶” button to select the “SOUND” menu.
- Press “▼” button to select “Equalizer Settings” and press the “ENTER/▶” button to enter
sub-menu.
a. Press “▲/▼button to select “Equalizer Mode”. Press “◀/▶” button to select.
b. Press “▲/▼button to select “150Hz”. Press “◀/▶button to select.
c. Press “▲/▼button to select “500 Hz”. Press “◀/▶button to select.
d. Press “▲/▼button to select “1K Hz”. Press “◀/▶button to select.
e. Press “▲/▼” button to select “5K Hz”. Press “◀/▶” button to select.
f. Press “▲/▼” button to select “10K Hz”. Press “◀/▶” button to select.
g. Press “▲/▼” button to select “Balance”. Press “◀/▶” button to select.
Note: The b、c、d e f g function it is only available in USER mode.
- Press “▲/▼ button to select “MTS” and press the “◀/▶” button to adjust.
Note: It is only available in ATV.
- Press “▲/▼ button to select “Audio Language” and press the “◀/▶” button to adjust.
Note: It is only available in DTV.
- Press “▲/▼ button to select “Digital Audio Output” and press the “◀/▶” button to adjust.


- Press “▲/▼” button to select “AVL” and press the “◀/▶” button to select “On” or “Off”.
TIME
Press the "MENU" button to enter the OSD menu. Then press "◀/▶" button to select the "TIME" menu.
- Press “▼” button to select “Sleep Timer” and press the “◀/▶” button to enter sleep timer adjustment menu to adjust sleep timer.

- Press “▲/▼” button to select “Time Zone” and press the “◀/▶” button to enter time zone adjustment menu to select the local time zone.
- Press “▲/▼” button to select “Daylight Saving Time” and press the “◀/▶” button to select “On” or “Off”.
- Press “▲/▼” button to select “Time Format” and press the “◀/▶” button to select “12-hour” or “24-hour”.
- Press “▲/▼” button to select “Auto Clock” and press the “◀/▶” button to select “On” or “Off”.
- Press “▲/▼” button to select “Clock” and press the “ENTER/▶” button to adjust.
SETUP
Press the “MENU” button to enter the OSD menu. Then press “/” button to select the “Setup” menu.
-
Press “ ” button to select “Menu language” and press the “◀/▶” button to select the Menu language which you desire.
-
Press “▲/♥ button to select “Transparent” and press the “◀/▼” button to select.
-
Press “▲/▼button to select “OSD Timeout” and press the “◀/▶button to adjust OSD timeout.
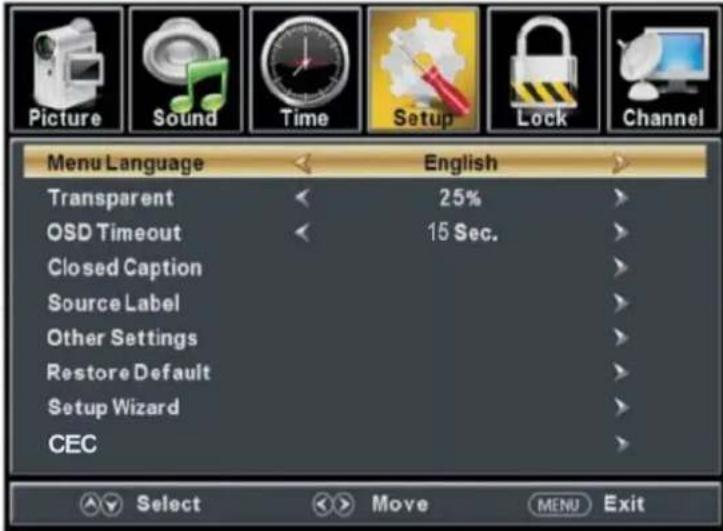
- Press “▲/▼button to select “Closed Caption” and press the “ENTER/ ” button to enter sub-menu.

a. Press “ ▲/▼button to select “CC Mode” and press the “ /▼button to adjust.
b. Press “ ▲/▼button to select “Analog CC ” and press the “ / ” button to adjust.
c. Press “ ▲/▼button to select “Digital CC” and press the “ / ”button to adjust.
d. Press “ ▲/▼button to select “Option” and press the “ENTER/ ” button to enter sub-menu.
Note: The c、d function it is only available in DTV.
Note: The option is adjust the digital closed captioning setting.
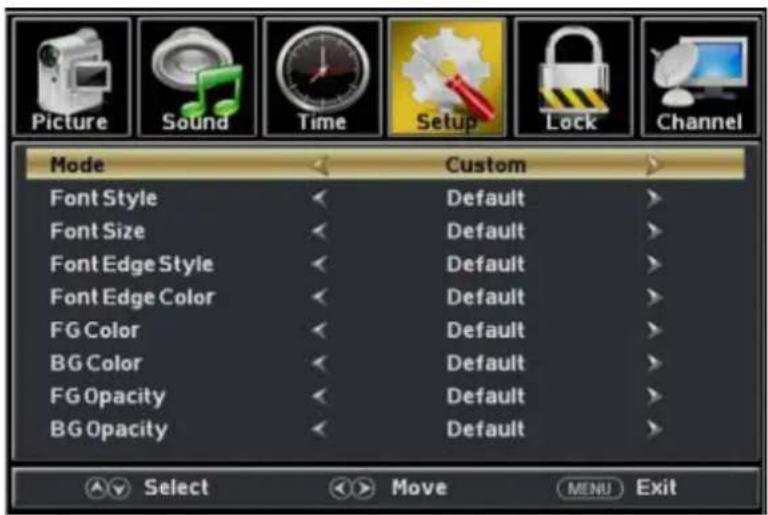
(a). Press “▲/▼” button to select “Mode” and press the “◀/▶” button to adjust.
(b). Press “▲/▼button to select “Font Style” and press the “/” button to adjust.
(c). Press “▲/▼button to select “Font Size” and press the “/▼button to adjust.
(d). Press “▲/▼” button to select “Font Edge Style” and press the “◀/▶” button to adjust.
(e). Press “▲/▼button to select “Font Edge Color” and press the “/” button to adjust.
(f). Press “▲/▼ button to select “FG Color” and press the “/” button to adjust.
(g). Press “▲/▼button to select “BG Color” and press the “/” button to adjust.
(h). Press “▲/▼button to select “FG Opacity” and press the “/” button to adjust.
(i). Press “▲/▼” button to select “BG Opacity” and press the “/” button to adjust.
Note: All the option it is not available in Custom.
- Press “ ▲/♥ button to select “Source Label” and press the “ENTER/ ” button to enter sub-menu.

Note: The source label is Create labels for the devices connected to your TV.
- Press "/▲button to select "Other Settings" and press the "ENTER/" button to enter sub-menu.

a. Press “▲/▼” button to select “Audio Only” and press the “◀/▶” button to select “On” or “Off”.
b. Press “▲/▼” button to select “Blue Screen” and press the “◀/▶” button to select “On” or “Off”.
7. Press “▲/▼” button to select “Restore Default” and press the “ENTER/▶”, Press “◀/▶”
button selecting "Yes" to restore all setting to default setting default.
- Press “▲/▼” button to select “Setup Wizard” and press the “ENTER” button to enter sub-menu.
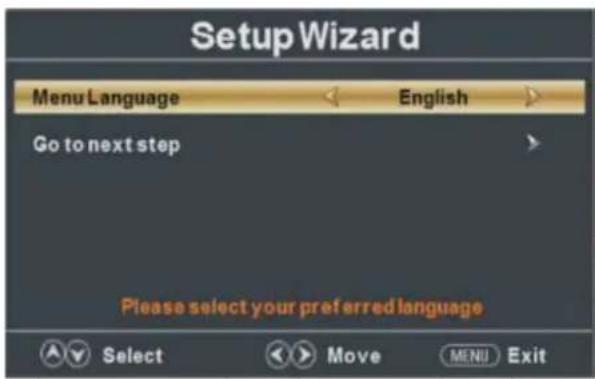

a. Press “/▲▼” button to select “Menu Language” and press the “◀/▶” button to select language.
b. Press “▲/▼” button to select “Go to next step” and press the “ENTER/▶” button to enter next step.

c. Press “▲/♥ button to select “Time Zone” and press the “/▼ button to select time zone.
d. Press “▲/▼ button to select “Daylight Saving Time” and press the “/▼ button to select “On” or “Off”.
e. Press “▲/▼” button to select “Time Format” and press the “◀/▶” button to select “12-hour” or “24-hour”.
f. Press “▲/♥ button to select “Go to next step” and press the “ENTER/ ” button to enter next step.

g. Press “▲/▼ button to select “Air/Cable” and press the “/▼ button to select “Air” or “Cable”.
h. Press “▲/♥ button to select “Go to next step” and press the “ENTER/ ” button to start auto scan.
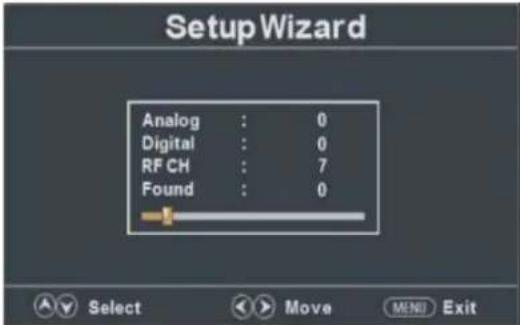
Note: Searching platform will take a long time. Please be patient!
- Press “▲/▼” button to select “CEC” and press the “ENTER” button to enter sub-menu.
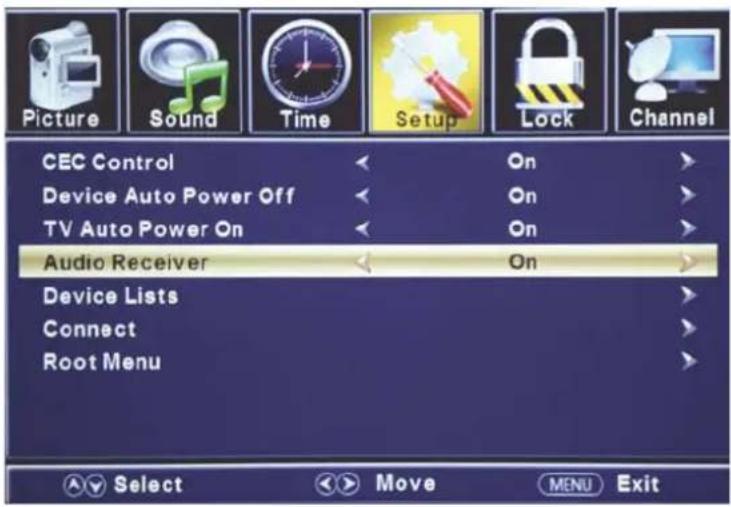
CEC Control
Press ▲ /▼ button to select CEC Control, then press ◀ /▶ button to select ON to show the following 6 options.
Device Auto Power Off
When connect to DVD players which support CEC function via HDMI cable, DVD player will turn off automatically while turn off TV.
TV Auto Power On
When connect to DVD players which support CEC function via HDMI cable, TV will turn on automatically while turn on DVD player.
Audio Receiver
Press ▲ /▼ button to select Audio Receiver, then press ◀ /button to select ON.
HDMI's ARC (Audio Return Channel) feature enables the audio signal of the TV to be sent to the ARC compatible audio receiver via HDMI 1.4 cable that is multi-directional connected at HDMI 3 port.
Device Lists
Press ▲ Button to select Device List, then press ENTER button to enter submenu. This menu shows all the CEC devices that's connected with the TV. Users can refresh the CEC device list by access this menu, or choose a CEC device from the list.
Connect
User can use ▲ /▼ , ◀/▶ and ENTER buttons on TV remote to control DVD players.
Root Menu
Press ▲/▼ button to select Root Menu, then press ◀/► button to show the Root Menu of connected CEC equipment.
LOCK
Press the "MENU" button to enter the OSD menu. Then press "/◄" button to select the "Lock" menu.
- Press “▼” button to select “Enter Password” and press select digital button to enter.
Note: The default password is "0000"

- Press ▼ / ▲ button to select "Change Password", then press "ENTER/▶" button to adjust the value.
If the password is changed, all of the passwords in the menu will be changed at the same time.

Note: If you forget your password, you can use "8899" to enter any menu locked.
- Press “▲/▼” button to select “System Lock” and press the “◀/▶” button to select “On” or “Off”.
- Press ▼ / ▲ button to select "Input Lock", then press "ENTER/▶" button to enter sub-menu.
a. Press “▲” button to select “TV” and press the “◀/▶” button to select “Block” or “UnBlock”.
b. Press “▲”▼ button to select “AV” and press the “◀/▶” button to select “Block” or “UnBlock”.
c. Press “▲”▼ button to select “Component” and press the “◀/▶” button to select “Block” or “UnBlock”.

d. Press “▲/▼” button to select “HDMI1/HDMI2/HDMI3” and press the “◀/▶” button to select “Block” or “UnBlock”.
e. Press “▲/▼” button to select “PC” and press the “◀/▶” button to select “Block” or “UnBlock”.
5. Press “▲/▼” button to select “US Rating” and press “ENTER/▶” button to enter sub-menu.
a. Press “▲/▼” button to select “TV” and press “ENTER/▶” button to enter sub-menu.

Press “▲/♥” button to select and press ENTER to block or UnBlock.
b. Press “▲/♥ button to select “MPAA” and press the “/♥ button to select “Off/G/PG/PG-13/R/NC-17/X”.
- Press “▲/▼button to select “Canada Rating” and press “ENTER/ ” button to enter sub-menu.
a. Press “▲/▼ button to select “Canada English” and press the “/▼button to select “Off/C/C8+/G/PG/14+/18+”.
b. Press “▲/♥ button to select “Canada French” and press the “/▼button to select “Off/G/8ans+/13ans+/16ans+/18ans+”.
7. Press “▲/▼” button to select “RRT Setting” and press “ENTER/▶” button to enter sub-menu.
Note: The item is available only when current stream has downloadable rating data. 8. Press “▲/▼” button to select “Reset RRT” and press “ENTER/▶” button to reset
Channel
Press the "MENU" button to enter the OSD menu. Then press "/ " button to select the "Channel" menu.
-
Press “▼” button to select “Air/Cable” and press the “◀/▶button to select Cable or Air.
-
Press “/” button to select “Auto Scan” and press the “ENTER/▶button enter, then press
“◀”button to select “YES” and press “ENTER” to do auto scan.
- Press “▲/♥ button to select “Favorite” and press the “ENTER/▶button to enter.
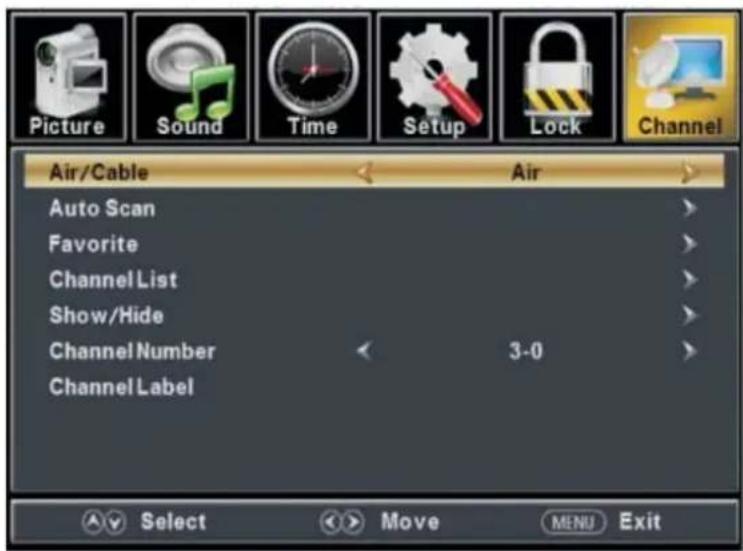
- Press “▲/▼ button to select “Channel List” and press the “ENTER/▶ button to enter.
- Press “▲/▼” button to select “Show/Hide” and press the “ENTER/▶” button to enter.
- Press “▲/▼ button to select “Channel Number” and press the “◀/▶ button to adjust.
- Press “▲/▼” button to select “Channel Label” and press the “ENTER/▶” button to enter.
PC Setting
Press the "MENU" button to enter the OSD menu. Then press "◀" button to select the "Setup" menu. And then press "▼" button to select "PC Setting" and press the "ENTER/▶" button to enter sub-menu.


- Press “▲/▼” button to select “H-Pos” and press the “◀/▶” button to adjust.
- Press “▲/▼” button to select “V-Pos” and press the “◀/▶” button to adjust.
- Press “▲/▼ button to select “Clock” and press the “◀/▶ button to adjust.
- Press “▲/▼” button to select “Phase” and press the “◀/▶” button to adjust.
- Press “▲/♥ button to select “Auto” and press the “ENTER/▶” button to do auto adjust.
Note: The pictures in regard to function are provided for reference purposes only.
SPECIFICATIONS
RGB INPUT
| ModelResolution | HorizontalFrequency(KHz) | VerticalFrequency(HZ) | |
| 075.13004x027SOD | |||
| 065.13084x046AGV | |||
| 069.73006x008AGVS | |||
| AGX867x4201 | 064.84 | ||
| AWX67x0631 | 067.74 | ||
| WXGA | 1920x1080 | 67.5 | 60 |
HDMI INPUT
| Mode | Resolution | HorizontalFrequency (KHz) | VerticalFrequency (HZ) |
| 480i | 720 x480i | 15.73 | 59.94/60 |
| 480p | 720 x480p | 31.47 | 59.94/60 |
| 720p | 1280 x 720p | 37.50 44.96 | 50 59.94/60 |
| 1080i | 1920 x 1080i | 28.13 33.75 | 50 59.94/60 |
| 1080p | 1920 x 1080p | 56.2567.5 | 5059.94/60 |
COMPONENT INPUT
| Model | Resolution | HorizontalFrequency (KHz) | VerticalFrequency (HZ) |
| 480i | 720 x480i | 15.73 | 59.94/60 |
| 480p | 720 x480p | 31.47 | 59.94/60 |
| 720p | 1280 x 720p | 37.50 44.96 | 50 59.94/60 |
| 1080i | 1920 x 1080i | 28.13 33.75 | 50 59.94/60 |
| 1080p | 1920 x 1080p | 56.25 67.5 | 50 59.94/60 |
Trouble Shooting
Before you contact our service, perform the following simple checks. If problem still persists, disconnect the TV and contact the service.
| PROBLEM POSSIBLE SOLUTION | |
| No sound and picture | - Check whether the power cord is inserted the power outlet.- Check whether you have pressed the POWER button on the front panel of TV set.- Check the setting of brightness and contrast. |
| Normal picture, but no sound | - Check the volume.- Sound muted? Press MUTE button.- Try another channel, problem can be with broadcasting.- Are audio cable installed correctly? |
| The remote control does not work | - Check whether there is no object between the TV and the remote control.- Are batteries inserted correctly?- Correct operating mode set: TV, VCR etc.?- Insert new batteries. |
| TV is suddenly turned off - Is sleep timer set? | - Check the power supply. Power has been interrupted.- Auto turn off function has been activated and tuned channel broadcasts no signal, or the remote control has not been used for a long time. |
| Picture appears slowly after switching on | - It is normal; the picture is muted during the startup process. If the picture does not appear after 5 minutes, please contact the service center. |
| No or poor color or poor picture - Adjust the color in menu. | - Keep a sufficient distance between the TV and the VCR.- Try another channel, problem can be with broadcasting.- Are the video cables installed correctly?- Activate any function to restore the picture brightness. |
| Horizontal/vertical bars or picture shaking | - Check for local interference such as an electrical appliance. |
| Poor reception of some channels - Channel or cable TV problems. Tune other station or frequency of the same channel.- Channel signal is poor or disturbed. Rcorient the antenna or have the antenna checked. (Bad antenna is usually the most common cause of reception problems.)- Check for the source of possible interference. | |
| Lines or streaks in picture | - Check the antenna (change the direction of the antenna). |
| No output from one of the speaker | - Adjust the balance in the menu. |
Trouble Shooting
NOTE: Problem in VGA mode (only for VGA mode).
| PROBLEM POSSIBLE SOLUTION | |
| The signal is out of range - Adjust resolution | horizontal frequency or vertical frequency.- Check whether the signal cable is not loose.- Check the input source. |
| Vertical bar or stripe on the background and horizontal noise and incorrect position | - Start up the automatic setting or adjust timing, phase or H/V position. |
| Unstable colors or single color picture | - Check the signal cable.- Reinstall the PC video card. |
Maintenance
Suitable maintenance can prevent from untimely aging of the device. Regular and careful cleaning can prolong the lifetime of your TV set. Always turn off and unplug the device from the power outlet before cleaning.
Cleaning the screen
- Wet the soft cloth in a mixture of lukewarm water and fabric softener or dish washing detergent. Wring the cloth until it is almost dry and then wipe the screen.
- Be sure no water remains on the screen. Before turning on the device make sure the device is absolutely dry.
Cleaning the cabinet
To remove the dirt and dust use a dry and soft cloth. Do not use wet cloth.
Extended absence

If you do not use the TV for a long time (e.g. holiday), unplug the power cord to protect the device from possible damage from lightning or power surges.
NOTE:
The TFT LED panel uses a panel consisting of sub pixels which requires sophisticated technology to produce. However, there may be a small number of bright or dark pixels on the screen. These pixels will have no impact on the performance of the product.
After-sale Service
In case any problem mostly like a fault occurs while your using LED TV, please contact the store where you purchased this unit or the service agency.
- Contents
- Introduction
- INSTALLATION
- Warning
- Caution
- Main unit description
- Control Panel Button Function
- TV Terminal Connections
- Remote control
- OSD basic adjustment
- InstallationGuide
- PICTURE
- SOUND
- Youcanselectthetypeofsound, whichbestcorrespondstoyour listening.
- TIME
- SETUP
- CEC Control
- Device Auto Power Off
- TV Auto Power On
- Audio Receiver
- Device Lists
- Connect
- Root Menu
- LOCK
- Channel
- PC Setting
- SPECIFICATIONS
- Trouble Shooting
- Maintenance
- Cleaning the screen
- Cleaning the cabinet
- Extended absence
- NOTE:
- After-sale Service
Brand : Furrion
Model : FEFS50K9A
Category : Television