
CT-2130AUS - Television AKAI - Free user manual and instructions
Find the device manual for free CT-2130AUS AKAI in PDF.


User questions about CT-2130AUS AKAI
0 question about this device. Answer the ones you know or ask your own.
Ask a new question about this device
Download the instructions for your Television in PDF format for free! Find your manual CT-2130AUS - AKAI and take your electronic device back in hand. On this page are published all the documents necessary for the use of your device. CT-2130AUS by AKAI.
USER MANUAL CT-2130AUS AKAI
natural_image
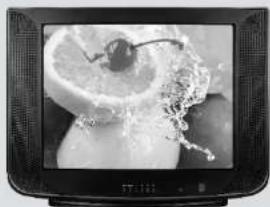
Black-and-white photo of a flat-screen television displaying a slice of citrus fruit with water splashing (no visible text or symbols)COLOUR TELEVISION
OPERATION MANUAL
MODEL:CT-2130AUS
Location & function of control panel ----3
Location & function of remote control ———— 4
Preparation 5-7
Step1: Connect to the antenna 5
Step2: Connect to the audio/video equipment-- -5
Step3: Connect to the power ----6
Step4: Battery installation(remote control)----6
Step5: Turn on the TV 6
Step6: Automatic channel preset----7
Step7: Now it's ready for watching----7
Step8: Useful tips to you ———— 7
Operation of main menu 8\~10
Picture menu----8
Sound menu----8
Timer menu----9
Setting menu 9
Search menu 10
Calendar 10
Lock 11
Game 11
TELETEXT operation----12
Trouble shooting----13
Thank you for purchasing our Color Television Receiver
Thank you very much for purchasing this product.
Read this manual carefully and keep it handy for reference.
Now, let's start the tour of the TV world.
CAUTION
High voltage, danger!
Do not open the back cover by yourself.
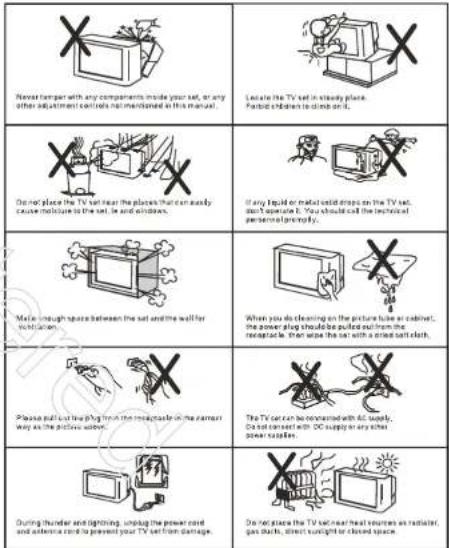
NON-RESPONSIBLE STATEMENT
We tried our best to make the manual correct and complete, however, it might not perfect. The design & specifications could be changed without prior notice.
LOCATION & FUNCTION OF CONTROL PANEL
Power switch
② Remote control sensor
③ Power/standby indica
④ AV terminals
⑤ AV/TV switch button
⑥ Menu button
⑦ Volume buttons
Channel buttons
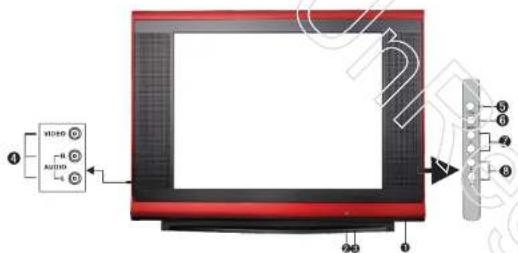

(2)
LOCATION & FUNCTION OF REMOTE CONTROL

| 8 Picture effect buttonBy repeatedly pushing this button, picture effects will change as follows STANDARD—DYNAMIC→PERSONAL→MILD | 10. Lock buttonpress this button, enter the password "000" to enter the LOCK menu. Refer to page 12 |
| 11. Channel and Volume buttonPress this button, you can choose the channel ardently and adjust the volume through the menu. During the menu adjustment, these button equal ▲ and ▼ ▲ and ▶ | 12. Zoom buttonPress this button, the scale of the screen will become as follows: 4.3 —— □ —— 16.9* 16.5—picture height is rounded. ● picture height is expanded. |
| 13. Screen buttonPress this button, I can press the unit with definite time (in 240 minutes). After that the unit can be automatically switched to standby, The sleep timer can be set in steps at 15 seconds with a minimum at 240 minutes. | 14. Game button(Non telfttest mode)Press this button, you can enter the game menu. Refer to page 12 |
| SOUND15. Environment sound button(Non telfttest mode)Press this button, you can enter the sound menu. | PICTURE16. Picture button(Non telfttest mode)Press this button, the picture effects will change as follows: Brightness—Control—Code—Sharpness—Tint* Tint setting is not included user is the last setting mode by you. |
| VIS17. Calendar button(Non telfttest mode)Press this button, you can enter the calendar menu. Refer to page 11 | systcote18. Sound Sys button(Non telfttest mode)Press this button, the sound system will change as follows: J-M-B0-2K |
| VISUAL19. Program preview button(Non telfttest mode)Press this button, Channels will change automatically. Each channel will be presented for 3 seconds, and stop at original channel.* Spiked channels will not be previewed. | 12.13.14.15.16.17.18.19.20.21.22.23. TELETEXT buttonAll these buttons are that of TELETEXT use, refer to page 12 |
Note: According to different conditions and type of other models may only have Av1 in them,
PREPARATION
Step 1 Connect to the antenna
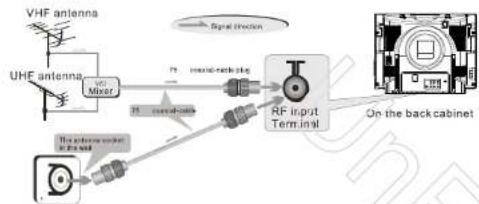
flowchart
graph TD
    A["VHF antenna"] --> B[" Mixer "]
    C["UHF antenna"] --> B
    B --> D[" Signal Direction "]
    D --> E[" RF input Terminal "]
    E --> F[" On the back cabinet "]
    G[" The antenna outlet is in front panel "] --> H[" RF input Terminal "]
    H --> I[" Signal Direction "]
    I --> J[" RF input Terminal "]
    J --> K[" On the back cabinet "]
Step 2 Connect to the Audio/Video equipment
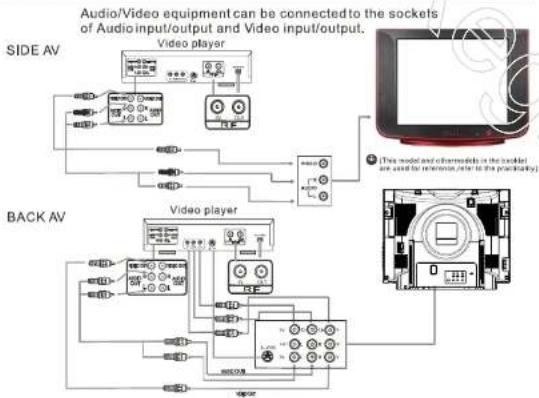

- If your TVset's sound system isMONO, then while you connect the video players from AV input.
the back AI input is disable. - these models have TOV input, S-ADCD or G-CAV1. Though they are inherent shape,
- Scarl socket isn't displayed here, but the connection way is similar
- The set comes with various styles, this figure is a sketch for reference only.
Step 3 Connect to the Power

NOTES: Because of different countries or territories, the types of power cord plugs may be different.
Step 4 Battery installation(remote control unit)
- Remove the battery cover
- Insert 2-AA1.5V batteries. Make sure the polarity(+or-)of the batteries matches the polarity marks
inside the unit. - Replace the battery
Replace the batteries when the TV begins to show the following symptoms: operation is unsteady or erratic.
sometimes the TV set doesn't function by remote control.
NOTES:
1)Recommended alkaline batteries.
2) Remove the batteries if they are exhausted or not used by remote-controlled for alarm time.
3) Do not use the new batteries with used ones.
4) Different types of remote controllers have different battery sizes, so please check the battery size of your remote control before buying new ones.

Step 5 Turn on the TV
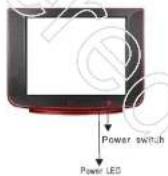
Press the POWER switch on the front channel, the power LED is turned on. When the power switch is pressed again, the power LED is off.
When TV is on the standby mode, it cannot be switched on by pressing the POWER switch. That means you can't see any picture or hear any sound during standby mode even if you press the POWER switch on the front control panel. However, it can be switched on or off by pressing the POWER switch on the remote control or the channel buttons on the front panel.
NOTES: 1. When the TV is turned ON, the powerLED is orange.
- When the TV is on standby mode, the power LED is red.
Step 6
Automatic channel preset
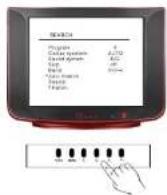
- Press the MENU button repeatedly until the SEARCH
menu is displayed. -
Press P+ or P- button and let the arrow point to
AUTO-SEARCH -
Press V++ V pullon in start searching the channels
automatically
- After finishing the search-and memory, the channel number
^20 will be displayed at the upper right of the screen, and then
you can enjoy the TV program.
© NOTES
When the AUTO-SEARCH is done all the available
channels can be automatically memorized
Step 7
Ready for watching
Are you ready now.....
To enjoy the features of your TV and operate it skillfully. Please read this manual carefully. Following is some useful tips and you can find more in the future.

natural_image
Line drawing of people watching TV on a couch, no text or symbols presentStep 8
Useful tips
This TV set can memorize up to 200 channels from 0 to 199.
② This TV has the function that displays the blue background with no noise.
This TV can be switched off automatically (after the signal is disabled for
10 minutes, the TV will switch off automatically to enter the stage of standby;
Please switch off the power if the electricity is cut off when watching TV
- Please switch off the power line for supply is cut off what or after finishing your watching program. (Ref. picture 1)
If the TV is not used or you plan to have a business trip for a long time.
please pull off the plug. (Ref. picture 2)
To protect your eyes, you must keep the TV-watching distance 3 times.
than the diagonal length of the screen. (Ref. picture 3)
3 times


(6)
Press the Menu button on the front panel or on the remote control, and then enter the picture of operating the main menu, press the MENU button repeatedly, and the TV displays the following menus in turn:

flowchart
graph TD
    A["Enter"] --> B["(PICTURE menu)"]
    B --> C["(SOUND menu)"]
    C --> D["(TIMER menu)"]
    D --> E["(SETTINGS menu)"]
    E --> F["EXIT"]
    F --> G["SEARCH"]
    G --> H["(SEARCH menu)"]

Picture menu
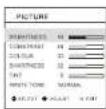
- Press the MENU button repeatedly to select the PICTURE menu,
- Press P—or P+ button to select the BRIGHTNESS option, when the
option is selected, the color is different from other options. - Press V- or V+ button to change the value of bright
Press MENU button again to exit
Note: 1) In the same way, the values of other options can be changed.
") Under the case of AV input, NTSC, the TINT option will appear
2) On the side of AV input, V130, the INT option will appear

Sound menu
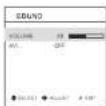
- Press the MENU button repeatedly to select the SOUND menu.
- Press P- or P+ button to select the VOLUME option, when the option
is selected, the color is different from other options. - Press V- or V+ button to change the value.
Press MENU button again to exit. - AVL (Automatic Volume Control): This option can be transformed
between ON or OFF
8

Timer menu
-
Press the MENU button repeatedly to select the TIMER menu.
-
press P- or P+ button to select the CLOCK option, when the option is selected, the order is different from other options.
selected, the color is different from other options.
- Press V= of V+ button to set time using V= button to adjust "HOOR", using V+ button to adjust "MINUTE". Press MENU button to exit.
In the same way, you can set the "On time" and "Off time".
a. Timer: This option can be transformed between ON or OFF
b. Off time: The TV set will be turned on automatically at the 1 ms you set.
c. On time; The TV set will be turned off automatically at the time you set.
d. On program: Press P+/P- button to select ON PROGRAM item, press V+/V- or Numeric keys to select On program numbers
* For example, the Clock is 14:00, the position is at channel 5 at present. * On time is preset at 16:45 and
On program is preset to channel 10. Make sure the TV set is under stand-by mode. The position will
charge to channel 10 automatically while the CLOCK is 16:45
| TIME | |
| TIME | OUT |
| CLOCK | -> |
| OFF TIME | -- |
| ON TIME | -- |
| ON PROGRAM | ? |
| ♦ INSERT • START | √ OFF |

Settings menu
-
Press the MENU button repeatedly to select the Settings menu.
-
Press P- or P+ button to select the item, using V+/V- button change the item
When the option is selected, the color is different from other options.
a. Language: Press P+/P- button to select the LANGUAGE option, Press V- or V+ button to change the languages.
b. TEXT language: Press P+IP- button to select the TEXT LANGUAGE option, using the
V+/V- button to change the item.
TEXT language will change as follows: PAN EURO-CYRILLIC-ARABIC
c. TEXT E/W: Press P+/P-button to select the TEXT E/W option, using the V+/V-button to change the item.
TEXT E/W will change as follows: WEST-EAST
d. Blue screen: Press P+/P- button to select the this option, using the V+/V- button to select DN or OFF
e. Picture enhance: Press P+/P= button to select the this option, using the V+/V= button to select ON or OFF.
- Exchange: Press P+/P- button to select the EXCHANGE option, press Numeric buttons to select the targeted
channel number, using the V+/V- button, exchange is over.
g. In EURO AV mode, "EURO AV" item will appear in settings menu.
Press P+/P- button to select the EURO AV option, using the V+/V- button to change
the item, EURO will change as follow; VIDEO-SVHS-RGB
h. Color system: Press P+/P- button to select the COLOR SYSTEM option, using the
V+/V- button to change the item.
COLOR SYSTEM will change as follows. AUTO-PAL-NTSC3.58-NTSC4.43-SECAM
| S. 217009 | |
| TEXT NAME | S. 217009 |
| TEXT NAME | FRAVORS |
| TEXT NAME | HEDD |
| BLUE COLOR | ON |
| AUDIO PERFORMANCE | ON |
| EXCHANGE | L=5 |
| SETTINGS | |
| LANGUAGE | GREEN RED |
| TEXT LANGUAGE | PAKING |
| TEXT RAW | MOST |
| BLUE SCREEN | ON |
| FIGURE CHANGE | ON |
| EUROV | FIRE |
| COLOR STEM | AMICE |

Search menu
- Auto Search: The TV set can search the whole wave band of VHF and UHF automatically after finish searching, the best wave Band will be memorized for every program automatically.
a. Press the MENU button repeatedly to select the Search menu.
b. Press P+/P= button to select AUTO SEARCH option, press V+/V= button to start
Auto Search. (Press P+/P- button to select, press
color system to AUTO, and sound system to B/G)
c. Wait until function has finished, the number of program memorized can be up to 200(program list 0-199)
- SEARCH. Manual Search is also available in this machine. If you like setting program by yourself, this
function is a good way.
a. Press the MENU button repeatedly to select the Search menu,
b. Press P=P+ button to select the PROGRAM option, press V+/V- button to select the program needed.
t. Press P+/P—button to select: BAND option, press the V+/V—button to set the value of wave band,
c. Press P+/P= button to select SEARCH option, press V+/V= button to start start/make color system
to AD-1C, make sound system to (5/3). Press 94 button to search program fronted.
-
Heperd the operation above if you want to set more programs by yourself.
-
Fine Tune: Fine tuning can improve the effect of picture and sound, under the condition of receiving not good
a. Press the MENU button repeatedly to select the Search menu.
b. Press the P-/P+ button to select FINE TUNE option, press V+/V- button to change the program number to the
one, which you want to do Fine tuning for best (make color system to AUTO, and make sound system to BIG)
-
SHIP: After the state of SHIP is set to ON, the current channel will not express increasing channel effects.
-
SKIP: After the state of SKIP is set to ON, the current channel will not appear by pressing channel button.
Fig. The selected programs are 1-3, after the size of skip is set to N(2,2) , press F(4,F) button, the program will come forth as the order ^21 -3-4-5? (If you use the number call, you too still select the program number [2])
come toll as the order 1-3-4-5 (if you use the number key). Press the MENU button repeatedly to select the Preset menu.
b. Press the P-P+ button to select SKIP option, and press V-V+ button to set the state between On and Off
The skip function can effect at the state of "on"
Color system: The conversion of this system as follows (AUTO-PAL-NTSC3.58-NTSC4.43-SECAM)
Sound system: The conversion of this system as follows(DK-B/G-I)
Band: The conversion of this system as follows [UHF-(VHF-L)-(VHF-H)]
√

Calendar (Non teletext mode)
-
Press the remote control "MIX" button, enter the CALENDAR menu.
-
Press P= or P+ button to adjust the "YEAR". Press V= or V+ button to adjust the "MONTH"
-
Press "7" button or the "MIX" button to return to normal TV viewing.
| SEARCH | |
| PROGRAM | B |
| COLOR SYSTEM | AUTO |
| DRAWN SYSTEM | M/Q |
| SAP | OFF |
| BASE | UNIT |
| AUTO SEARCH | |
| SEARCH | |
| FIND TUNE | |
| ● | ● |
| CALENDAR | ||||||
| 2005 | F | |||||
| Sun | Mon | Tue | Wed | Thu | Fri | Sat |
| 1 | 2 | 3 | 4 | 5 | ||
| 8 | 7 | 8 | 9 | 10 | 11 | 12 |
| 13 | 14 | 15 | 16 | 17 | 18 | 19 |
| 20 | 21 | 22 | 23 | 24 | 25 | 26 |
| 27 | 28 | 29 | ||||

Lock
-
By pushing the remote control * A button to enter Lock menu.
-
"Will Appears on the screen, pressing the password the digits that you defined
correctly, the lock menu may be effective(ONG/Rat password:
- Press the Button on "Button lock" which will disappear. Only when Lock is on, "Parental lock" and "hotel mode" can be available.
a. Parental lock: to select the "Parental lock" option, it can be changed between on and off by pressing the V+/V- button (if one program has been selected to child lock): 1). First to select the program you want to lock, then open the lock, press the lock button on the remote control to exit.
2). Using P+/P- button or number key to select the program you want to lock, then the picture of this program will disappear, and the screen will turn to blue; at the same time, there will be "sign on the screen.
3). When the child lock is on, all program's preset menu will not appear.
b. Hotel Mode: Select the Hotel model option, it can be changed between on and off by pressing the V+/V- button. 1). When Hotel mode is on, the volume will be limited to "volume limit", 2). When Hotel mode is on, all program's preset menu will not appear.
c. Change Pin: press V+ button to enter the "change pin" option 1). Input your new password for the "password" option (password:----) 2). Input your new password again for the "confirm" option (password:----) Then the password for "lock menu" is the new one you input.


Game (Non teletext mode)
In the TV mode, press the remote control "HOLD" button, game will change as follows:
-
Press the key once, to start game; press again, quit game.
-
Pressing V+/V- keys to play the game;
-
Pressing MENU key to replay, pressing "7" key to quit game.

TELETEXT OPERATION
- Select teletext mode
a: Select the Program which is broadcasting the TELETEXT you want to watch.
b. Press TEXT key on the remote control and enter to TELETEXT made. By this key,
mode will be changed as TV-TELETEXT
c. The overview station page or the last page viewed
(in case you already watched: ELE TEXT at this channel previously) appears
-
If you need to return to TV mode, press again the TEXT key on the remote control
-
Page selection
a. You can enter directly desired page number with the remote control numeric keys 0...9 buttons. b. You can sequentially select page by pressing P+/P-key.
- Hold
Some TELETEXT information is contained on more than one page, the pages automatically changing
a. Press HOLD key to spin the page, changing (the 35 symbol will appear on the page heading).
b. Press HOLD key again to allow the page to change (the 三码 symbol will disappear).
- Revea
Some TELETEXT pages contain quiz or game questions with hidden answers.
a. Press the REVEAL key to see the answers. b. Press the REVEAL key again to hide the answers.
- Zoom (T/B/F Top/Bottom/Full)
To enable easier reading (larger display).
a. Press the + + key to display the TOP HALF of the page
b. Press again to display the BOTTOM HALF of the page
c. Press again to return to a FULL PAGE display
Note: changing pages reverts to a FULL PAGE display.
- Cancel
a. When a page is selected in TELETEXT mode it may take some time before it becomes available.
pressing the CANCEL key will switch to the TV mode.
b. When the required page is found the page number will appear at the top of the TV picture, press
the CANCEL key to return to the selected TELETEXT page
Note: You cannot change TV program while in this mode.
7 Time
When current received channel is with TELETEXT, pressing [5]GREEN key.
the real time from TIETEXT will appear on the screen,
Note: To cancel! Press ⑨ key.
- Fast Text (for possible future reference)
The RED, GREEN YELLOW & CYAN buttons are used for quick access to colour coded pages.
transmitted by FAS TEXT broadcast
example: RED selects CITY INFORMATION
CYAN SHINE TRAVEL INFORMATION GREEN, color: WEATHER INFORMATION
GREEN subjects WETHER INFORMATION YELLOW selects TV EROBRAH
- SUB CODE
a. Periodically revised NEWS FLASHES can be obtained from TELETEXT broadcast.
b. Select the NEWS FLASH page in TELETEXT mode then press the SUBCODE key.
c. You can now watch the TV program and every time the News Flash page is updated it will be automatically
displayed in the TV picture
d. Press the SUBCODE key to cause the news flash to disappear,
* Teletext function is option.
TROUBLE SHOOTING
Don't worry about that if there's error while you are watching TV. Try to handle this problem by
yourself as follows. If you still have troubles please call our sales service department for help!
| SYMPTOM | POSSIBLE REASON | SOLUTION |
| Antenna plug is pulled out or the antenna is malfunction. | Check the connection of the antenna plug or the condition of the antenna, or replace if damage. | |
| The signal is blocked by the mountain and hill nearby. | Check the position or direction of the antenna. | |
| The TV set is influenced by the surrounding motors, neon lights or hair dryers. | Do not use the hair dryer or other analogous electric appliances. | |
| The volume is too low or the volume is turned off. | Check the volume to see whether it is low or the mute function is turned on. | |
| The color level is too low or the preset of color system and sound system is wrong! | Press the P.P button on remote controller for checking, adjust the color again. Preset the color system and audio system. | |
| The switch of main power supply is turned off, or the power and antenna are not connected. | Press the main power button check the power supply and antenna to see whether they are connected properly; check the socket whether it is electrified. | |
| The contact of antenna is bad or the adjusting of preset channel is bad. | Check the connection of antenna or reset the channel. | |
| The TV is affected by the exterior loudspeaker or other magnetic fields; it will be affected by geomagneticism while you move the TV at the state of "SWITCH ON". | Keep the TV away from any exterior loudhairs or other electric appliances that can produce magnetic field; Switch off the power supply for two minutes, and then switch it again. DO NOT MOVE THE TV AT WORKING STATE. | |
| Color speckle Normal | ||
| Equally sound form the cover | Normal | Normal |
编号:KM-JS-E-090623-01-0
AKAI
natural_image
Black-and-white photo of a vintage television displaying a slice of juice with a cherry on top (no visible text or symbols)COLOUR TELEVISION
MANUAL DE UTILIZARE
MODEL:CT-2130AUS
PASUL 4 INSTALAREA BATERHILOR IN TELECOMANDA
CALENDAR (Nu in modul teletext)
JOC (Nu in modul teletext)
- COLOUR TELEVISION
- OPERATION MANUAL
- Thank you for purchasing our Color Television Receiver
- CAUTION
- LOCATION & FUNCTION OF CONTROL PANEL
- LOCATION & FUNCTION OF REMOTE CONTROL
- PREPARATION
- Step 4 Battery installation(remote control unit)
- NOTES:
- Are you ready now.....
- Picture menu
- Sound menu
- Timer menu
- Settings menu
- Search menu
- Calendar (Non teletext mode)
- Lock
- Game (Non teletext mode)
- TELETEXT OPERATION
- TROUBLE SHOOTING
- AKAI
- PASUL 4 INSTALAREA BATERHILOR IN TELECOMANDA
- CALENDAR (Nu in modul teletext)
- JOC (Nu in modul teletext)
Brand : AKAI
Model : CT-2130AUS
Category : Television