
HAIRCLIPPER Series 1000 HC1055 - Beard trimmer PHILIPS - Free user manual and instructions
Find the device manual for free HAIRCLIPPER Series 1000 HC1055 PHILIPS in PDF.


| Product Type | Beard Trimmer |
| Brand | Philips |
| Model | HAIRCLIPPER Series 1000 HC1055 |
| Series | 1000 |
| Dimensions | Approximately 15 cm (length) x 4 cm (width) |
| Weight | Approximately 150 g |
| Power Source | Rechargeable Ni-MH battery |
| Charging Time | 8 hours |
| Run Time | 45 minutes |
| Length Settings | Adjustable from 1 mm to 18 mm with comb |
| Blade Material | Self-sharpening stainless steel |
| Washable | Yes, removable head can be rinsed under water |
| Indicators | LED charging indicator |
| Included Accessories | 1 comb, 1 cleaning brush, 1 travel pouch |
| Spare Parts Available | Replacement blades and combs |
| Reparability | User-replaceable blade unit |
| Safety Features | Self-sharpening blades, ergonomic handle |
| Usage | Beard, mustache, sideburns |
| Warranty | 2 years |
Frequently Asked Questions - HAIRCLIPPER Series 1000 HC1055 PHILIPS
User questions about HAIRCLIPPER Series 1000 HC1055 PHILIPS
0 question about this device. Answer the ones you know or ask your own.
Ask a new question about this device
Download the instructions for your Beard trimmer in PDF format for free! Find your manual HAIRCLIPPER Series 1000 HC1055 - PHILIPS and take your electronic device back in hand. On this page are published all the documents necessary for the use of your device. HAIRCLIPPER Series 1000 HC1055 by PHILIPS.
USER MANUAL HAIRCLIPPER Series 1000 HC1055 PHILIPS
75% recycled paper 75% papier recycle
1
English
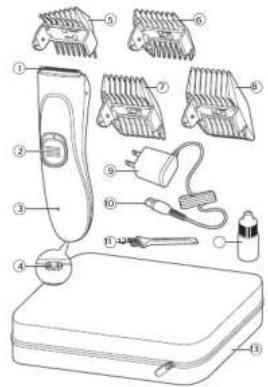
General description (Fig. 1)
1 Cutting unit
2 On/off button
3 Charging indicator
4 Socket for small plug
5 Ear contouring comb (1 mm/1-9 mm)
6 Hair comb (3 mm/6 mm)
7 Hair comb (9 mm/12 mm)
8 Hair comb (15 mm/18 mm)(HC1099 only)
9 Supply unit
10 Small plug
11 Cleaning brush
12 Bottle of oil
13 Pouch (HC1099 only)
Introduction
Congratulations on your purchase and welcome to
Philips! To fully benefit from the support that
Philips offers, register your product at
www.philips.com/welcome
Your new Philips kid hair clipper allows you to give your child a professional haircut in the comfort of your own home. The ultra-silent motor and child-safe, lightweight and waterproof design makes cutting hair a pain-free, easy experience for you and your child. The professional blade with the specially designed rounded tips combined with multiple-length combs, helps you to safely create a smooth, even cut, every time.
Important safety information
Read this important information carefully before you use the appliance and its accessories and save it for future reference. The accessories supplied may vary for different products.
Danger
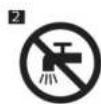
- Keep the supply unit dry (Fig. 2).
Warning
- The supply unit contains a transformer. Do not cut off the supply unit to replace it with another plug, as this causes a hazardous situation.
- This appliance can be used by children aged from 8 years and above and persons with reduced physical, sensory or mental capabilities or lack of experience and knowledge if they have been given supervision or instruction concerning use of the appliance in a safe way and understand the hazards involved. Children shall not play with the appliance. Cleaning and user maintenance shall not be made by children without supervision.
- Detach the hand-held part from the supply
cord before cleaning it in water
- Always check the appliance before you use it. Do not use the appliance if it is damaged, as this may cause injury. Always replace a damaged part with one of the original type.
Caution
- Never immerse the appliance in water. Do not use the appliance in the bath or shower.
- Never use water hotter than 60 °C to rinse the appliance.
- If you use the appliance to clip the hair of more than one child, clean the appliance before you use it on another child.
- Never use compressed air, scouring pads, abrasive cleaning agents or aggressive liquids such as petrol or acetone to clean the appliance.
- Do not use the supply unit in or near wall sockets that contain an electric air freshener to prevent irreparable damage to the supply unit.
Battery safety instructions
- Only use this product for its intended purpose and follow the general and battery safety instructions as described in this user manual. Any misuse can cause electric shock, burns, fire and other hazards or injuries.
- To charge the battery, only use the detachable supply unit (HQ8507) provided with the product. Do not use an extension cord.
- Charge, use and store the product at a
temperature between 5 °C and 35 °C. - Always unplug the product when it is fully charged.
- Do not burn products and their batteries and do not expose them to direct sunlight or to high temperatures (e.g. in hot cars or near hot stoves). Batteries may explode if overheated.
- If the product becomes abnormally hot, gives off an abnormal smell, changes color or if charging takes much longer than usual, stop using and charging the product and contact your local Philips dealer.
- Do not place products and their batteries in microwave ovens or on induction cookers.
- This product contains a rechargeable battery that is non-replaceable. Do not open the product to replace the rechargeable battery.
- When you handle batteries, make sure that your hands, the product and the batteries are dry.
- To prevent batteries from heating up or releasing toxic or hazardous substances, do not modify, pierce or damage products and batteries and do not disassemble, short-circuit, overcharge or reverse charge batteries.
- To avoid accidental short-circuiting of batteries after removal, do not let battery terminals come into contact with metal objects (e.g. coins, hairpins, rings). Do not wrap batteries in aluminum foil. Tape battery terminals or put batteries in a plastic bag before you discard them.
- If batteries are damaged or leaking, avoid contact with the skin or eyes. If this occurs, immediately rinse well with water and seek medical care.
Electromagnetic fields (EMF)
This Philips appliance complies with all applicable standards and regulations regarding exposure to electromagnetic fields.
General
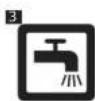
- This appliance can be safely cleaned under the tap (Fig. 3).
- The supply unit is suitable for mains voltages ranging from 100 to 240 volts.
- The supply unit transforms 100–240 volts to a safe low voltage of less than 24 volts.
Preparing for use
Note: For optimal performance, apply a drop of oil to the teeth of the cutting unit. For best results, we advise you to clean and lubricate the cutting unit regularly.
Charging
Charge the appliance for at least 8 hours before you use it for the first time, after a long period of non-use or when the motor starts to run more slowly during hair clipping.
When the appliance is fully charged, the appliance has a cordless operating time of up to 45 minutes.
Note: Do not leave the appliance connected to the wall socket for more than 24 hours
1 Switch off the appliance.
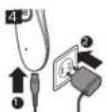
2 Insert the small plug into the appliance and put the supply unit in the wall socket (Fig. 4).
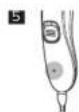
- After a few seconds, the charging indicator lights up green continuously to indicate that the appliance is charging (Fig. 5).
3 After charging (approx. 8 hours), remove the supply unit from the wall socket and pull the small plug out of the appliance.
Charge indications
Battery low
The battery status is indicated by the performance of the appliance. When the appliance starts working more slowly, the battery is almost empty and needs to be charged for optimal performance.
Charging
When you charge the appliance, the charging indicator lights up green continuously to indicate that the appliance is charging (Fig. 5).
Using the appliance
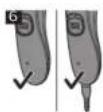
Note: This appliance can be used without cord or when it is connected to the wall socket (Fig. 6).
Switching the appliance on and off
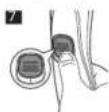
- To switch on the appliance, push the on/off slide upwards (Fig. 7).
- To switch off the appliance, push the on/off slide downwards.
Removing or attaching combs
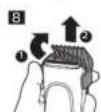
1 To remove the comb, push one lug backwards off the appliance until the comb detaches from the appliance (Fig. 8).
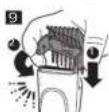
2 To attach the comb, make sure the side with the desired hair length points upwards. Fit one of the projections on the inside of the lug into the small hole on the side of the appliance. Push the other lug of the comb into place ('click') (Fig. 9).
Note: Please make sure that the lugs of the comb have been properly inserted into the holes on both sides of the appliance.
Before use
- For optimal performance, apply a drop of oil to the teeth of the cutting unit. For best results, we advise you to clean and lubricate the cutting unit regularly.
- For optimal safety, we advise you to always use the appliance with a comb.
- This appliance is only intended for clipping human scalp hair. Do not use it for another purpose.
- When you clip hair for the first time, start with the comb with the highest length to familiarize yourself with the appliance.
- Make sure the hair is clean and dry. Do not use the appliance on wet hair.
- Make sure the head of the person whose hair you are cutting is at the same level as your chest. This ensures that all parts of the head are clearly visible and within easy reach.
Hair clipping with comb
The appliance comes with different hair combs. Each side of each comb cuts to a different fixed hair length. The indication on the inside of each comb corresponds to the remaining hair length after clipping.
| Ear contouring comb | 1 mm/1-9 mm |
Hair comb 3 mm/6 mm
Hair comb 9 mm/12 mm
Hair comb (HC1099, 15 mm/18 mm HC1091)
1 Comb the hair in the direction of hair growth.
2 Attach the desired comb onto the appliance (see 'Removing or attaching combs').
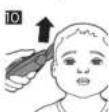
3 To clip the hair move the appliance through the hair slowly. Make sure that the flat part of the comb is in full contact with the scalp to obtain an even cutting result (Fig. 10).
Hair clipping tips
- To clip most effectively, move the appliance against the hair growth direction.
- Move the appliance in different directions (upward, downward or across), because hair doesn't all grow in the same direction.
- Make overlapping passes over the head to ensure that the appliance catches all the hairs that need to be cut.
- Write down which comb(s) you use to create a certain hairstyle as a reminder for future clipping sessions.
- Regularly remove cut hair from the comb. If a lot of hair has accumulated in the comb, remove it from the appliance and blow and/or shake out the hairs (see 'Cleaning').
Cleaning
Never dry the cutting unit with a towel or tissue, as this may damage the trimming teeth.
Clean the appliance every time you have used it. Only clean the appliance with the cleaning brush supplied.
Never use scouring pads, abrasive cleaning agents or aggressive liquids such as alcohol, petrol or acetone to clean the appliance.
1 Switch off the appliance and disconnect it from the wall socket.
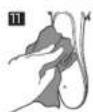
2 Wipe the housing of the appliance with a dry cloth (Fig. 11).
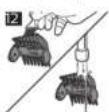
3 Remove the comb and clean it with the cleaning brush and/or rinse it under the tap (Fig. 12).
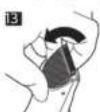
4 Push the teeth of the cutting unit upwards to remove it from the appliance (Fig. 13).
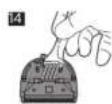
5 Clean the cutting unit with the cleaning brush and/or rinse it under the tap (Fig. 14).
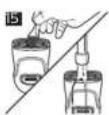
6 Clean the inside of the appliance with the brush and/or rinse it under the tap (Fig. 15).
7 Carefully shake off excess water and let all parts dry.
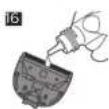
8 For optimal performance, lubricate the teeth of the cutting unit with the oil supplied with the product regularly (Fig. 16).
9 Insert the lug of the cutting unit into the guiding slot and push the cutting unit back onto the appliance.
Note: If the appliance does not perform as well as it used to or if the operating time has decreased, the cutting unit might not be properly lubricated.
Replacement
Replace damaged parts immediately. Always replace the cutting unit with the original Philips cutting unit.
1 Push the teeth of cutting unit upwards and pull the cutting unit off the appliance (Fig. 13).
2 Remove the used cutting unit.
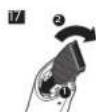
3 Insert the lug of the new cutting unit into the guiding slot and push the cutting unit onto the appliance ('click') (Fig. 17).
Recycling
- Do not throw away the product with the normal household waste at the end of its life, but hand it in at an official collection point for recycling. By doing this, you help to preserve the environment.
- This product contains a built-in rechargeable battery which shall not be disposed of with normal household waste. Please take your product to an official collection point or a Philips service center to have a professional remove the rechargeable battery.
- Follow your country's rules for the separate collection of electrical and electronic products and rechargeable batteries. Correct disposal helps prevent negative consequences for the environment and human health.
Removing the rechargeable battery
The battery must be removed from the appliance before it is scrapped.
The appliance must be disconnected from the supply mains when removing the battery.
The battery is to be disposed of safely.
1 Check if there are screws in the back or front of the appliance. If so, remove them.
2 Remove the back and/or front panel of the appliance with a screwdriver. If necessary, also remove additional screws and/or parts until you see the printed circuit board with the rechargeable battery.
3 Remove the rechargeable battery.
Warranty and support
If you need information or support, please visit www.philips.com/support or read the international warranty leaflet.
Troubleshooting
This chapter summarizes the most common problems you could encounter with the product. If you are unable to solve the problem with the information below, visit www.philips.com/support for a list of frequently asked questions or contact the Consumer Care Center in your country.
| Problem | Possible cause | Solution |
| The appliance is not working or performing well. | Some hair particles or dust have accumulated inside the appliance. This can cause the appliance to stop working, or to give a poor cutting performance. | Clean the appliance regularly (see ‘Cleaning’). Remember to take off the attachments and clean them separately. Also clean the inner part of the appliance, where usually a lot of hair accumulates. Apply a drop of oil to the teeth of the cutting unit of your hair clipper. For best results, we advise you to clean and lubricate the teeth of the cutting unit regularly. You can use the oil provided in the packaging or alternatively sewing machine oil. |
| The appliance produces an uneven cutting result. | The comb does not touch the scalp when you move the appliance through the hair. | Make sure that the flat part of the comb is always fully in contact with the scalp when you move the appliance through the hair. |
| You used the appliance on wet hair. | Make sure the hair is clean and dry. Do not use the appliance on wet hair. | |
| You only move the appliance in one direction. | Move the appliance in different directions (upward, downward or across), because hair doesn't all grow in the same direction. | |
| The comb is not correctly attached to the cutting unit. | Remove the comb and reattach it. Put the comb into the slots on both sides of the appliance ('click'). | |
| The cutting unit and/or the comb are dirty. | Clean the cutting unit and/or the comb (see 'Cleaning'). | |
| The cutting performance decreases when the battery runs low. | Charge the battery or connect the appliance to the wall socket and use the appliance with cord. | |
| The appliance does not work when I press the on/off button. | The rechargeable battery is empty. | Charge the battery (see 'Preparing for use'). |
| The appliance is not connected to the wall socket. | Insert the small plug into the appliance and put the supply unit in the wall socket. You can also use the appliance when it is connected to the wall socket. | |
| The charging indicator does not light up green to indicate that the appliance is charging when I connect the appliance to the wall socket. | There is a power failure or the wall socket is not live. | Check if the power supply is working. If it is, check whether the socket is live by plugging in another appliance. |
Bahasa Indonesia
Keterangan umum (Gbr. 1)
1 Unit pemotong
2 Tombol on/off
3 Indikator pengisian daya
rein losses will be a result of the return of the results.
ขอควรระวัง
www.philips.com/support
15.10.26.0173 (IN DEBTIES
- English
- General description (Fig. 1)
- Introduction
- Important safety information
- Danger
- Warning
- Caution
- Battery safety instructions
- Electromagnetic fields (EMF)
- General
- Preparing for use
- Charging
- Charge indications
- Battery low
- Using the appliance
- Switching the appliance on and off
- Removing or attaching combs
- Before use
- Hair clipping with comb
- Hair clipping tips
- Cleaning
- Replacement
- Recycling
- Removing the rechargeable battery
- Warranty and support
- Troubleshooting
- Bahasa Indonesia
- Keterangan umum (Gbr. 1)
- ขอควรระวัง
Brand : PHILIPS
Model : HAIRCLIPPER Series 1000 HC1055
Category : Beard trimmer