
RAC-WK1211ESCWU - Air conditioner TOSHIBA - Free user manual and instructions
Find the device manual for free RAC-WK1211ESCWU TOSHIBA in PDF.


| Product Type | Window Room Air Conditioner |
| Model | RAC-WK1211ESCWU |
| Cooling Capacity | 12,000 BTU/h |
| Power Supply | 115V, 60Hz, 1-phase |
| Current Draw | Approximately 12A (verify on serial plate) |
| Plug Type | 3-prong grounding plug with GFCI (TEST/RESET buttons) |
| Window Opening Requirements | Width: 23" to 36" (584 mm to 914 mm); Height: at least 15-1/2" (394 mm) for 12K models |
| Dimensions (Unit) | Approximately 19" x 26" x 15" (W x D x H) - verify with product |
| Weight | Approximately 60 lbs (27 kg) |
| Refrigerant | R32 (flammable) |
| Operating Modes | Cool, Fan Only, Dry, Auto |
| Fan Speeds | Auto, Low, Med, High |
| Remote Control | Included, battery CR2025 |
| WiFi Connectivity | Yes, 2.4 GHz, compatible with iOS 7+ and Android 4+ using Toshiba NA AC app |
| Special Features | Energy Saver (ECO), Sleep Mode, 24-hour Timer, Auto Start/Stop, Fresh Air Vent (on models RAC-WK10/12), Check Filter indicator |
| Air Filter | Washable, clean every 2 weeks |
| Installation Type | Double hung window; includes accordion side panels, top rail, and mounting hardware |
| Safety Certifications | UL listed, complies with FCC Part 15 for WiFi module |
| Warranty | See product warranty card; improper installation voids warranty |
| Customer Support | 1-855-204-5313 (USA) |
Frequently Asked Questions - RAC-WK1211ESCWU TOSHIBA
User questions about RAC-WK1211ESCWU TOSHIBA
0 question about this device. Answer the ones you know or ask your own.
Ask a new question about this device
Download the instructions for your Air conditioner in PDF format for free! Find your manual RAC-WK1211ESCWU - TOSHIBA and take your electronic device back in hand. On this page are published all the documents necessary for the use of your device. RAC-WK1211ESCWU by TOSHIBA.
USER MANUAL RAC-WK1211ESCWU TOSHIBA
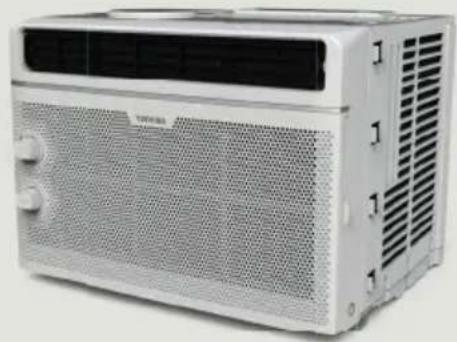
natural_image
Exterior view of a white portable air conditioner unit with ventilation grilles and control buttons (no visible text or symbols)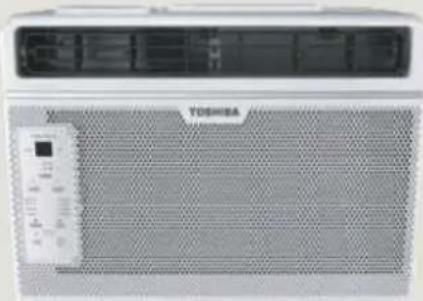
natural_image
Front view of a TOSHUA air conditioner unit with mesh grille and control panel (no visible text or symbols)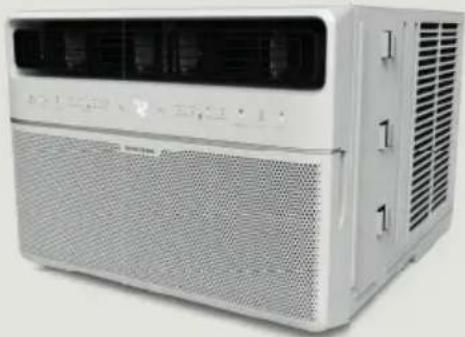
natural_image
Exterior view of a white portable air conditioner unit with ventilation grilles and control panel (no visible text or symbols)Safety Precautions
Operating Instructions
Installation Instructions
Care and Cleaning
Troubleshooting Tips
Remote Control and App Instructions
USER MANUAL
Window Type
Room Air Conditioner
RAC-WK0512CMRU (5,000 BTU)
RAC-WK0612CRRU (6,000 BTU)
RAC-WK0812ESCWRU (8,000 BTU)
RAC-WK1012ESCWRU (10,000 BTU)
RAC-WK1212ESCWRU (12,000 BTU)
Warning notices: Before using this product, please read this manual carefully and keep it for future reference.
The design and specifications are subject to change without prior notice for product improvement. Consult with your dealer or the manufacturer for details.
Owner's Manual
Safety Precautions 3
Operating Instructions 8
Installation Instructions 15
Care and Cleaning 21
Troubleshooting Tips 22
Remote Control and App Instructions 24
Read This Manual
Inside you'll find many helpful hints on how to use and maintain your air conditioner properly. Just a little preventive care on your part can save you a great deal of time and money over the life of your air conditioner. You'll find many answers to common problems in the troubleshooting tips - you should be able to fix most of them quickly before calling service. These instructions may not cover every possible condition of use, so common sense and attention to safety is required when installing, operating and maintaining this product.

CAUTION
- For support, please call the Service Center at 1-855-204-5313.
- This appliance is not intended for use by persons (including children) with reduced physical, sensory or mental capabilities or lack of experience and knowledge, unless they have been given supervision or instruction concerning use of the appliance by a person responsible for their safety.
- Children should be supervised to ensure that they do not play with the air conditioner.
- The appliance shall be installed in accordance with national wiring regulations.
- Do not operate your air conditioner in a humid room such as a bathroom or laundry room.
SAFETY PRECAUTIONS
To prevent injury to the user or other people and property damage, the instructions shown here must be followed. Incorrect operation due to ignoring of instructions may cause harm or damage. The level of risk is shown by the following indications.
WARNING
This symbol indicates a hazardous situation which, if not avoided, could result in death or serious injury.
CAUTION
This symbol indicates a hazardous situation, which, if not avoided, could result in minor or moderate injury.
NOTICE
This symbol addresses practices not related to physical injury.

WARNING
- Be sure the air conditioner has been securely and correctly installed according to the installation instructions in this manual. Save this manual for possible future use in removing or installing this unit.
- Plug in power cord plug properly. Otherwise, it may cause electric shock or fire due to excess heat generation.
- Do not modify power cord length or share the outlet with other appliances as it may cause electric shock or fire due to overheating.
• Always ensure effective grounding. Incorrect grounding may cause electric shock. - Unplug the unit if you notice unusual sounds or smells or smoke coming from it. A damaged product may cause fire and electric shock.
- Ventilate room before operating the air conditioner if there is a gas leakage from another appliance.
- Do not operate or stop the unit by inserting or pulling out the power cord plug.
- Do not operate with wet hands or in very humid environments. It may cause electric shock.
- Do not allow water to come into contact with any electric parts. It may cause failure or electric shock.
- Do not use the socket if it is loose or damaged. It may cause fire and electric shock.
- Do not use or keep the power cord close to heating appliances. It may cause fire and electric shock.
- Do not use any devices or materials for installation that are not recommended in this manual.
- Do not disassemble or modify unit. It may cause failure and electric shock.

WARNING
- Do not damage or use an alternate power cord.
It may cause fire and electric shock.
If the power cord is damaged, it must be replaced by the manufacturer or an authorized service center or a similarly qualified person in order to avoid a hazard. - Do not direct airflow straight into persons to avoid possible health hazard.
- Do not open the unit during operation.
It may cause electric shock. - Do not use the power cord near fl ammable gas or combustibles, such as gasoline, benzene, thinner, etc.
It may cause an explosion or fire. - Do not let children hang on the air conditioner or bracket.
A serious injury may occur. - Avoid fire hazard or electric shock. Do not use an extension cord or an adaptor plug. Do not remove any prongs from the power cord.
- Be sure the air conditioner is properly grounded. To minimize shock and fire hazards, proper grounding is important. The power cord is equipped with a three-prong grounding plug for protection against shock hazards.
- Your air conditioner must be used in a properly grounded wall receptacle. If the wall receptacle you intend to use is not adequately grounded or protected by a time delay fuse or circuit breaker, have a qualified electrician install the proper receptacle. Ensure the receptacle is accessible after the unit installation.
- Be sure the electrical service is adequate for the model you have chosen. This information can be found on the serial plate, which is located on the side of the cabinet and behind the grille.
- Do not drink the drain water. It may contain mold and bacteria that can lead to death if ingested.

CAUTION
- When the air filter is to be removed, do not touch the metal parts of the unit. It may cause injury.
- When the unit needs cleaning, switch off, and turn off the circuit breaker. Do not clean unit when power is on as it may cause fire, electric shock or injury.
- Do not place obstacles around air inlets or inside of air outlet. It may cause failure or accident.
- Clean with a soft cloth only. Do not use strong detergents that contain wax or thinners as it may damage the product.
- Use caution when unpacking and installing. Sharp edges could cause injury.
- Do not clean the air conditioner with water. Water may enter the unit and degrade the insulation which could lead to electric shock.

CAUTION
- Do not put a pet or house plant where it will be exposed to direct air flow. This could injure the pet or harm the plant.
- Hold the plug by the head of the power plug when taking it out. Otherwise, it may cause electric shock and damage.
- Ensure that the installation is properly secured to prevent the product from potentially falling.
- Do not place heavy objects on the power cord and ensure that the cord is not compressed. Otherwise, there is danger of fire or electric shock.
- If water is spilled on the unit, turn off the unit and switch off the circuit breaker. Isolate supply by taking the power-plug out and contact a qualified service technician.
- Do not use near gas stove or other gas burning appliances, as air flow may affect gas combustion.
- Do not use for any purpose other than room comfort. Do not use this air conditioner to preserve precision devices, food, pets, plants, and art objects. It may cause deterioration.
- Turn off the main power switch if the unit is not to be used for an extended time.
- Always insert the fi Iters securely. Clean fi Iter once every two weeks. Operation without fi Iters may cause failure.
EXPLANATION OF SYMBOLS DISPLAYED ON THE UNIT
 | WARNING | This symbol shows that this appliance used a fl ammable refrigerant. If the refrigerant is leaked and exposed to an external ignition source, there is a risk of fi re. |
 | CAUTION | This symbol shows that the operation manual should be read carefully. |
 | CAUTION | This symbol shows that a service personnel should be handling this equipment with reference to the installation manual. |
 | CAUTION | This symbol shows that information is available such as the operating manual or installation manual. |

WARNING
- Do not try to accelerate the defrosting process or methods of cleaning that are not recommended by the manufacturer.
- The appliance shall be stored in a room without a continuously operating ignition source (for example, open flames or an operating gas appliance) or an ignition source (for example, an operating electric heater) close to the appliance. The appliance shall also be stored in a room without ignition sources.
- Do not pierce or burn.
- Be aware that the refrigerants may not contain an odor.
- Keep ventilation openings clear of obstruction.
- Unit is only to be serviced by a Toshiba authorized servicer, please call Customer Service at 1-855-204-5313 for support.
- Flammable refrigerant R32 is used within air conditioner. Please follow the instructions carefully to handle, install, clean, and service the air conditioner to avoid damage or hazard. Do not dispose of air conditioner in regular trash. Contact qualified agency for proper disposal.
- No open fire or devices that generate spark/arcing shall be around the air conditioner to avoid causing ignition of the flammable refrigerant used. Please follow the instructions carefully to store or maintain the air conditioner to prevent mechanical damage from occurring.
Operation of Current Device
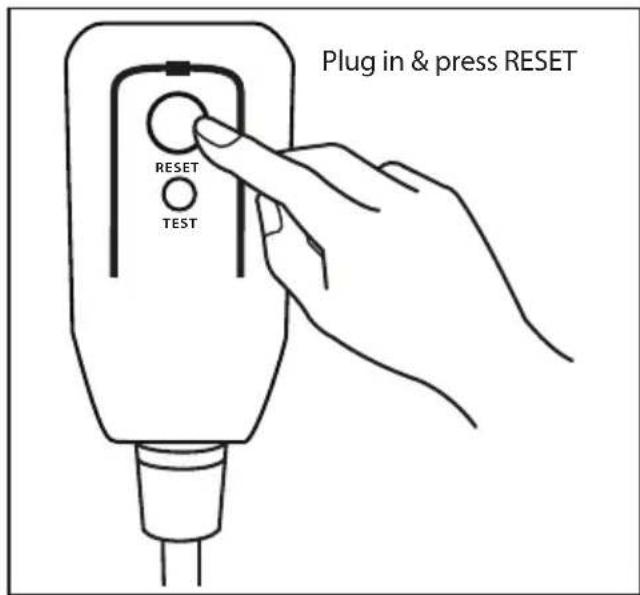
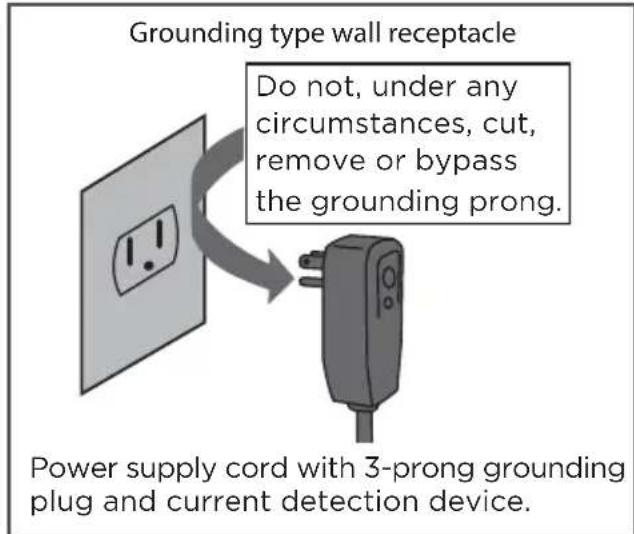
The power supply cord contains a current measuring device that detects damage to the power cord. Test your power supply cord as follows:
- Plug in the air conditioner.
- The power supply cord will have TWO buttons on the plug head. Press the TEST button. You will notice a click as the RESET button pops out.
- Press the RESET Button. You will notice a click as the button engages.
- The power supply cord is now supplying electricity to the unit. (On some products this is also indicated by a light on the plug head.)
NOTICE
The power supply cord with this air conditioner contains a current detection device designed to reduce the risk of fi re.
In the event that the power supply cord is damaged, it can not be repaired. It must be replaced with a cord from the manufacturer.
NOTICE
- Do not use this device to turn the unit on or off.
• Always make sure the RESET button is pushed in for correct operation. - The power supply cord must be replaced if it fails to reset when either the TEST button is pushed, or it can not be reset. Please contact Customer Service.
OPERATING INSTRUCTIONS
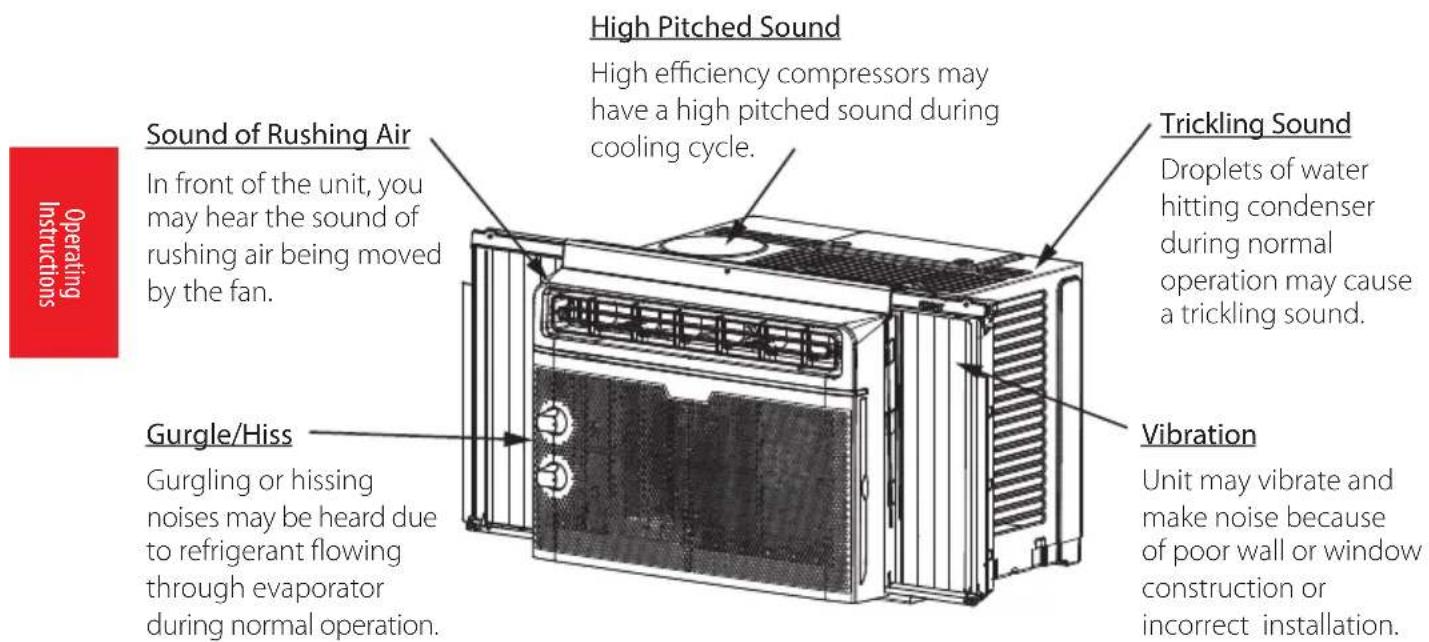
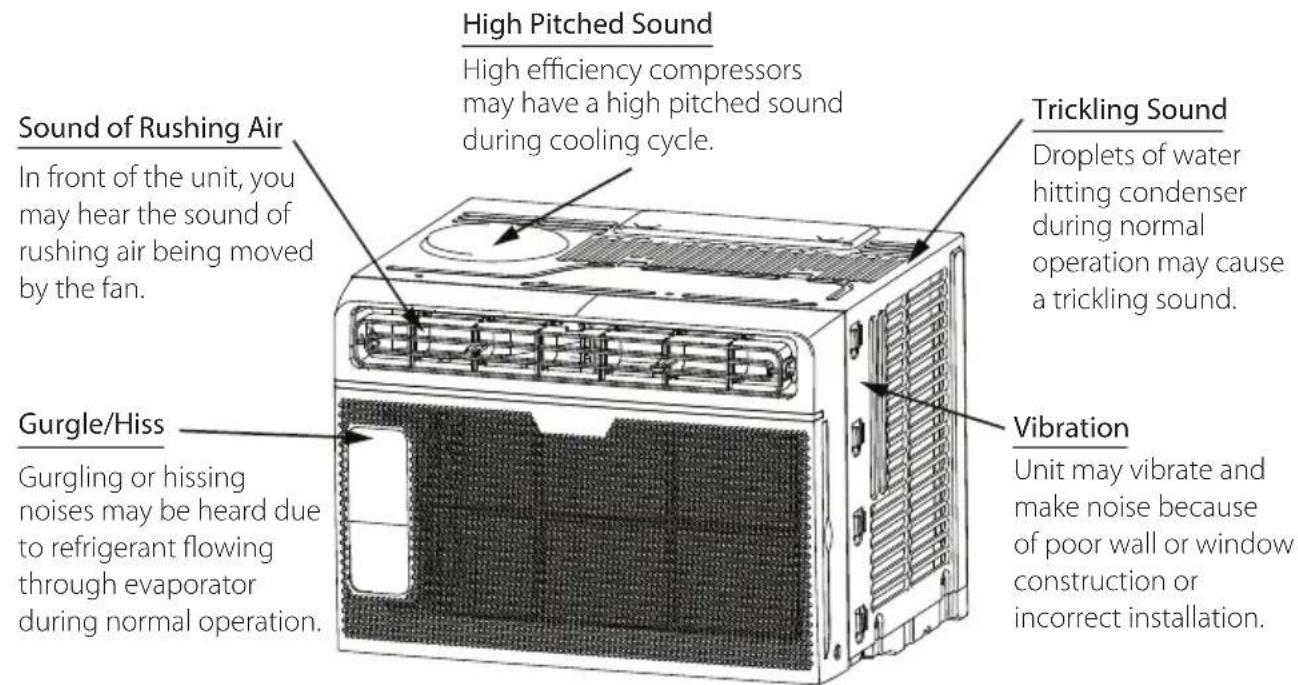
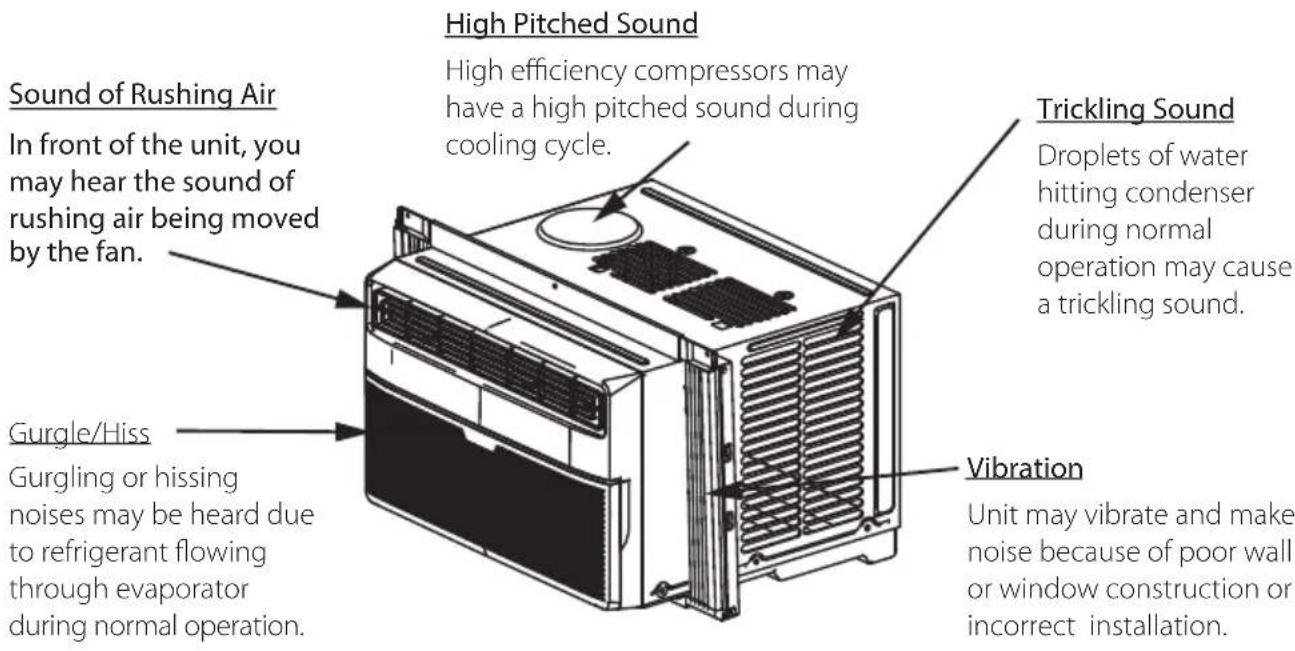
Normal Sounds
RAC-WK05 Model
RAC-WK06 Model
RAC-WK08 / RAC-WK10 / RAC-WK12 Models
NOTICE
All the pictures in this manual are for illustrative purposes only. The actual appearance of the air conditioner you purchased may vary slightly, but its operation and functions will be similar.
Air Conditioner Features (general)

WARNING
To reduce the risk of fire, electrical shock, or injury to people or property, read the SAFETY PRECAUTIONS before operating this appliance.
This air conditioner is designed to be operated under the following conditions:
| Cooling Operation | Outdoor temp.: 64 | ~109°F / 18 ~ 43°C |
| Indoor temp.: 62 ~ | 90°F / 17 ~ 32°C |
NOTICE
- The relative humidity of room should be less than 80%. If the unit is used in a condition with a relative humidity over 80%, there will be condensed water on the surface of the unit.
• Performance may be reduced outside of these operating temperatures.
NOTICE
Always wait 3 minutes when turning the unit off and then on again, or when changing from cool to fan and back to cool. This prevents damage from occurring to the compressor.
To begin operating the air conditioner, follow these steps:
- Set the temperature to the coldest setting.
- Set the control to HIGH COOL.
- Adjust the louver for comfortable air flow (see Air Directional Louvers).
- Once the room feels cool, adjust to the temperature you find most comfortable.
- Make sure that the air flow inside and outside are not obstructed.
Air Directional Louvers
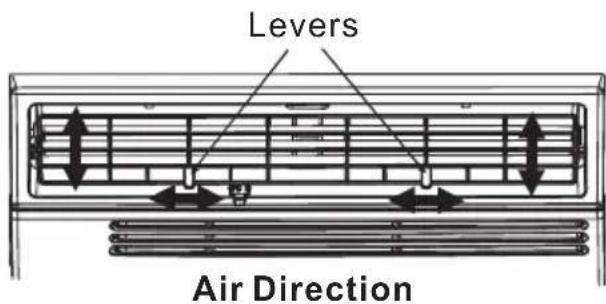
The louvers will allow you to direct the air flow Left or Right, or Up and Down (optional on some models) throughout the room as needed.
Move the Levers from side to side until the desired LEFT/RIGHT direction is obtained.
You can also move the LEFT lever to adjust air flow UP/DOWN as needed (RAC-WK08/10/12K only).
FRESH AIR VENT CONTROL (RAC-WK10/12 Models)
natural_image
Pure technical line drawing of a mechanical assembly without any text, numbers, or symbolsFig. A (VENT CLOSED)
natural_image
Pure architectural or structural line drawing with horizontal and vertical lines, no text or symbols presentFig. B (VENT OPEN)
natural_image
Pure technical line drawing of a mechanical assembly without any text, numbers, or symbolsFig. C (VENT & EXHAUST OPEN)
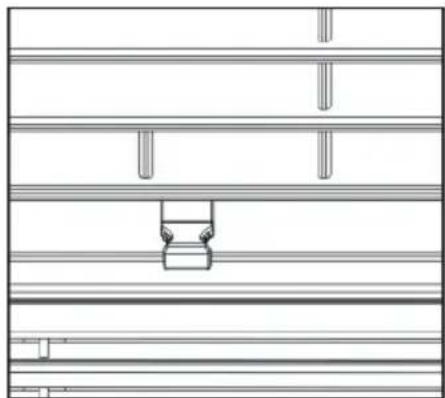
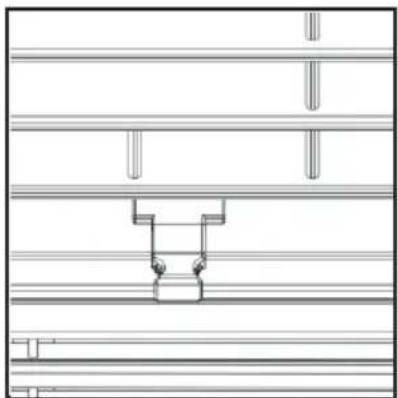
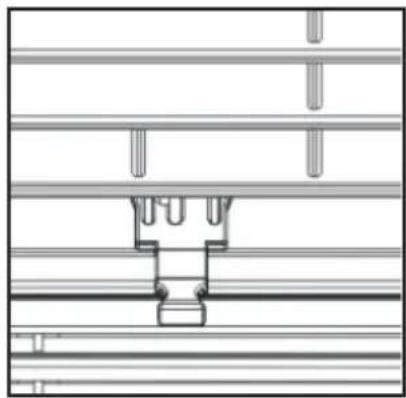
The Fresh Air Vent allows the air conditioner to:
- Recirculate inside air – Vent Closed (See Fig. A)
- Draw fresh air into the room - Vent Open (See Fig. B)
- Exchange air from the room and draw fresh air into the room - Vent and Exhaust Open (See Fig. C).
Air Conditioner Features (RAC-WK05 only)
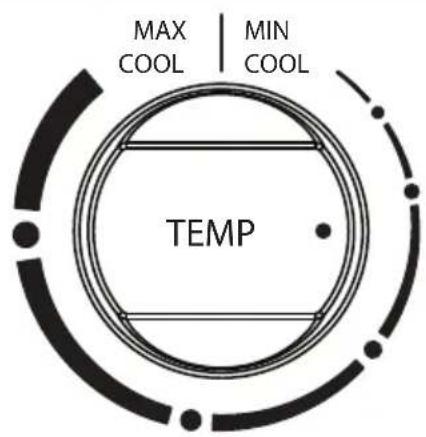
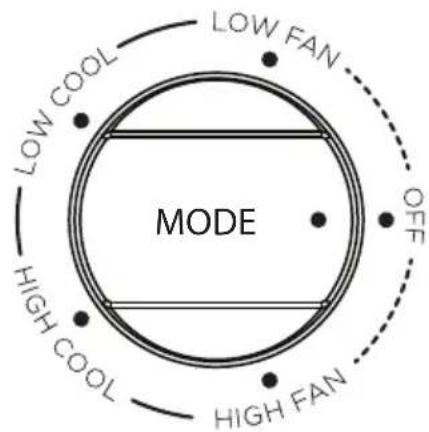
THERMOSTAT
The thermostat is used to set the desired room temperature when the unit is being operated in the COOL MODE.
To set the desired room temperature, rotate the thermostat switch to the desired setting. After the set temperature is achieved the thermostat will automatically start and stop the compressor in order to maintain the desired set temperature.
Rotate the thermostat selector clockwise for higher cool settings. Higher cool settings will provide lower room temperature. Rotate the thermostat selector counter clockwise for lower cool settings. Lower cool settings will provide higher room temperature.
COOL MODE
The desired cool setting is selected by rotating the knob clockwise to the desired position.
HIGH COOL has maximum cooling effect and airflow.
LOW COOL has minimum cooling effect and airflow.
FAN MODE
Rotate the knob counter clockwise to select your choice of fan speeds for air circulation.
NOTE: When selecting a low fan or high fan, the compressor will not run.
NOTICE
The controls featured in this manual are representative of many available models. Your model may offer slightly different features.
Air Conditioner Features (Models RAC-WK06 / 08 / 10 / 12)
Electronic Control Operating Instructions
Before you begin, thoroughly familiarize yourself with the control panel as shown below and all its functions, then follow the symbol for the functions you desire. The unit can be controlled by the unit control alone, with the remote, or with the app (some models).
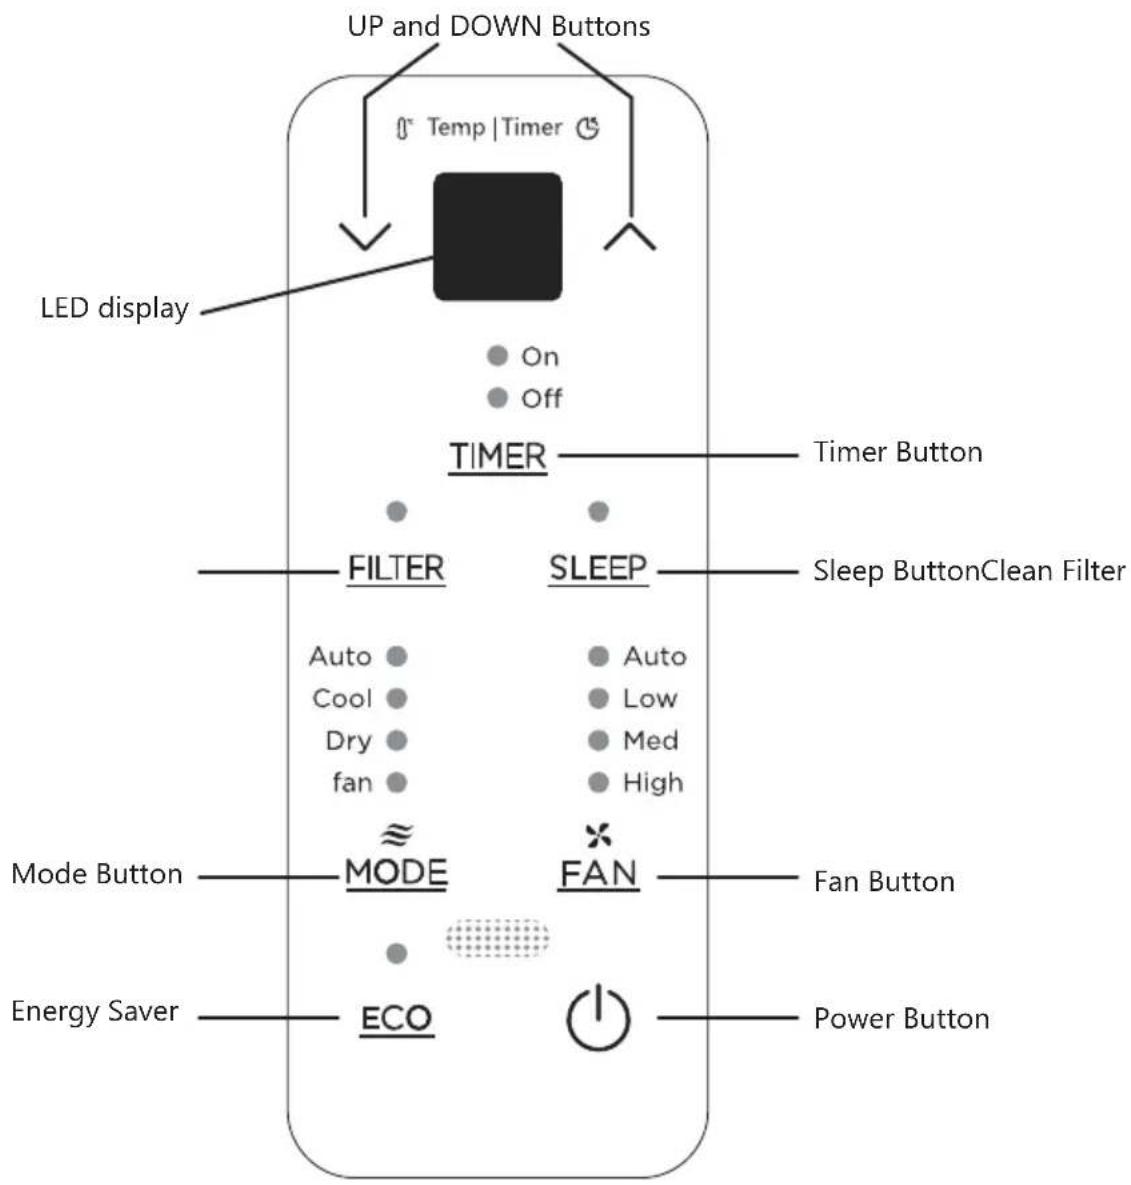
Key Pad Features (Model RAC-WK06)
Key Pad Features (Models RAC-WK08 / 10 / 12)
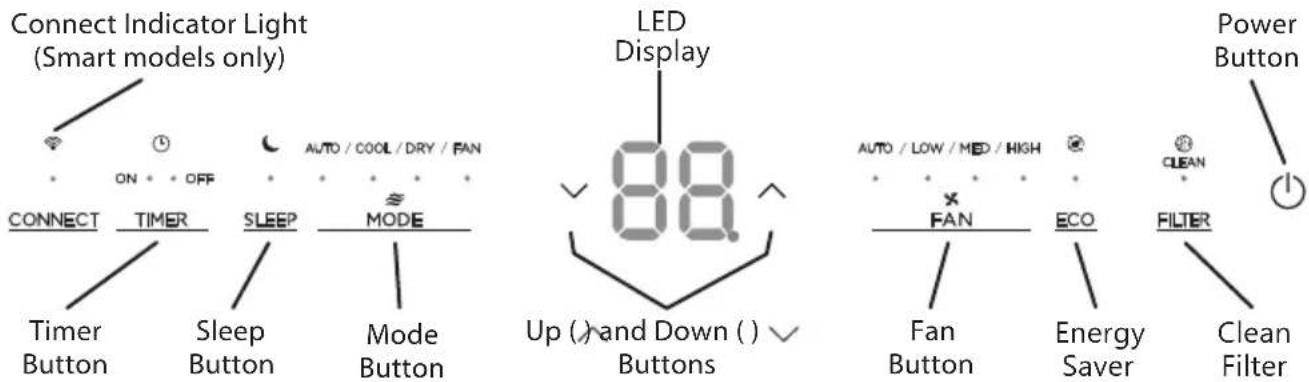
TO TURN UNIT ON OR OFF:
Press Power button to turn unit on or off.
NOTE: The unit will automatically initiate the Energy Saver function under Cool, Dry, Auto modes.
TO CHANGE TEMPERATURE SETTING:
Press UP/DOWN button to change temperature setting.
NOTE: Press or hold either UP (✗) or DOWN ( ) √ button until the desired temperature is seen on the display.
This temperature will be automatically maintained anywhere between 62°F (17°C) and 86°F (30°C). If you want to display the actual room temperature, see To Operate on Fan Only section.
TO ADJUST FAN SPEEDS:
Press the Fan Button to change the fan speed between four settings – Auto, Low, Med, or High. The fan will operate on Low Speed automatically when set to Dry Mode.
On Auto mode, the fan operates on Auto fan speed automatically and cannot be changed.
SLEEP FEATURE:
Press Sleep button to initiate the sleep mode. In this mode the selected temperature will increase by 2^ F ( 1^ C) 30 minutes after the mode is selected.
The temperature will then increase by another 2^ F ( 1^ C) after an additional 30 minutes. This new temperature will be maintained for 7 hours before it returns to the originally selected temperature.
The Sleep mode program can be cancelled at any time during operation by pressing the Sleep button again.
CHECK FILTER FEATURE:
The Check Filter feature is a reminder to clean the air filter for a more efficient operation. The light will illuminate after 250 hours of operation. After cleaning the filter, press the Filter button to reset the Check Filter function turning the light off.
ENERGY SAVER FEATURE (ECO):
Press Energy Saver button to initiate this function. This function is available on COOL, DRY, AUTO (only AUTO-COOLING and AUTO-FAN) modes. The fan will continue to run for 3 minutes after the compressor shuts off. The fan then cycles on for 2 minutes at 10 minute intervals until the room temperature is above the set temperature, at which time the compressor turns back on and Cooling resumes.
To choose the operating mode, press the Mode button. Each time you press the button, a mode is selected in a sequence that goes from Auto, Cool, Dry and Fan. The indicator light adjacent will be illuminated and remain on once the mode is selected. When the unit is turned off and back on via the power button, the unit will automatically switch on the Energy Saver function for the following modes: Cool, Dry, Auto.
When operating on Auto mode:
- When you set the air conditioner to AUTO mode, it will automatically select cooling or fan only operation depending on what temperature you have selected and the current room temperature.
- The air conditioner will control room temperature automatically according to temperature you've set.
- The fan speed is automatically controlled based on the temperature setting and room temperature and cannot be adjusted.
When operating on Fan Only:
- Use this function when cooling is not desired, such as for room air circulation or to exhaust stale air (on some models, remember to open the vent during this function, but keep it closed during cooling for maximum cooling efficiency.) You can choose any fan speed you prefer.
- During this function, the display will show the actual room temperature, not the set temperature as in the cooling mode.
- In Fan Only mode, the temperature is not adjusted.
When operating on Dry mode:
- In this mode, the air conditioner will generally function as a dehumidifier. Since the conditioned space is a closed or sealed area, some degree of cooling will occur.
TIMER: AUTO START/STOP FEATURE:
- When the unit is on, press the Timer button. The "Timer off" LED indicator light will illuminate indicating the Auto stop feature has been activated.
- When the unit is off, press the Timer button. The "Timer on" LED indicator light will illuminate indicating the Auto start feature has been activated.
- When the time of TIMER ON is displayed, press the Timer button again. The TIMER OFF indicator light illuminates. It indicates the Auto Stop program has initiated.
-
Press or hold the UP ( ^ ) or DOWN ( √ ) button to change the Auto time by 0.5 hour increments, up to 10 hours, then at 1 hour increments up to 24 hours. The control will count down the time remaining until start.
-
The selected time will register in 5 seconds, and the system will automatically revert back to display the previous temperature setting or room temperature when the unit is on. (when the unit is off, there is no display.)
- Turning the unit ON or OFF at any time or adjusting the timer setting to 0.0 will cancel the Auto Start/Stop timed program.
NOTICE
To cancel timer operation, press and hold the timer button for 2 seconds until the beep/buzzer is heard.
Displays
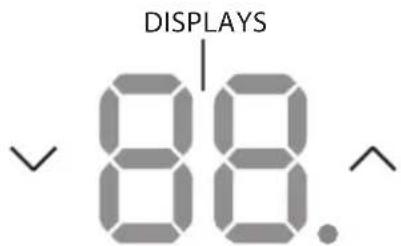
DISPLAYS:
Shows the set temperature in "°C" or "°F" and the Auto-timer settings. While on Fan Only mode, it shows the room temperature. If the room temperature is too high or low, it will display "HI" or "LO".
Error codes:
AS - Room temperature sensor error - Unplug the unit and plug it back in. If error repeats, call for service.
ES - Evaporator temperature sensor error - Unplug the unit and plug it back in. If error repeats, call for service.
NOTICE
• To change the AC between Celsius and Fahrenheit scales, press the temperature control arrows at the same time for 5 seconds.
- If the unit shuts off unexpectedly due to the power outage, it will restart with the previous function setting automatically when the power resumes.
INSTALLATION INSTRUCTIONS

WARNING Before You Begin
Read these instructions completely and carefully.
• IMPORTANT - Save these instructions.
• IMPORTANT - Observe all governing codes and ordinances.
We recommend that two people install this product.
Proper installation is the responsibility of the installer.
Product failure due to improper installation is not covered under the Warranty.
You MUST use all supplied parts and use proper installation procedures as described in these instructions when installing this air conditioner.
Do not, under any circumstances, cut or remove the third (ground) prong from the power cord.
Do not change the plug on the power cord of the air conditioner.
Aluminum house wiring may present special problems - consult a qualified electrician.
When handling the unit, be careful to avoid cuts from sharp metal edges and aluminum fins on front and rear coils.
NOTICE
Save carton and these Installation Instructions for future reference. The carton is the best way to store the unit when not in use.
Window Requirements
Your air conditioner is designed to install in standard double hung windows with opening widths of 23" to 36" (584mm to 914mm).
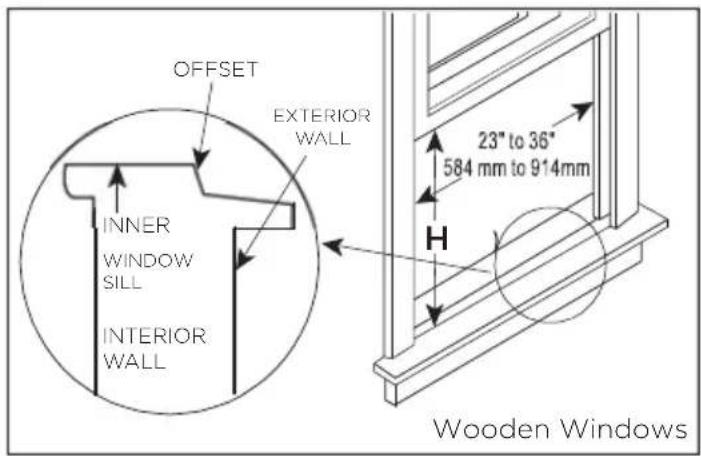
Table 1
| ModelH | 5000~6000BTU/h | 8000BTU/h | 10000~12000BTU/h |
| 13"(330mm) | 14"(356mm) | 15-1/2"(394mm) |
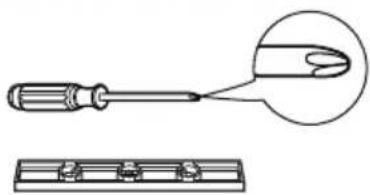
Tools You Will Need
natural_image
Technical illustration of a screwdriver with a magnified view of its tip (no text or symbols present)Phillips Screwdriver
Level
Tools You May Use

Flathead Screwdriver
Pencil
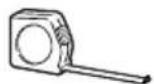
Ruler or tape measure
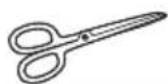
Scissors or knife
1. Prepare the Window
Lower sash must open sufficiently to allow a clear vertical opening (see dimension H in Table 1). Side louvers and the rear of the AC must have clear air space to allow enough airflow through the condenser for heat removal. The rear of the unit must be outdoors, not inside a building or garage.
Mounting Hardware
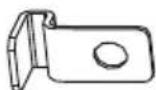
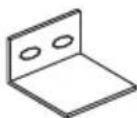
Lock Frame
(For Wooden windows)
(2)
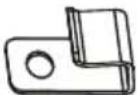
Lock Frame
(For Vinyl-Clad windows)
(2)
Sash Lock
(1)
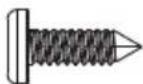
3/4" (or 1/2")
Screws
(7)
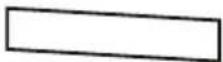
Weather stripping
10"*3/4"*1/12"
(5)
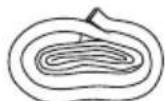
Window sash
seal foam
(1)
NOTICE
Weather stripping is only for ENERGY STAR models only.
2. Prepare the Air Conditioner
Before installing the unit, the top rail must be assembled on the unit for some models.
A: Remove the air conditioner from the carton and place on a fl at surface.
B: Remove top rail. from the packaging material as shown in Fig. D.
Top Rail Hardware

3/8" Screws
(4)
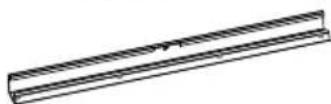
Top Rail (1)
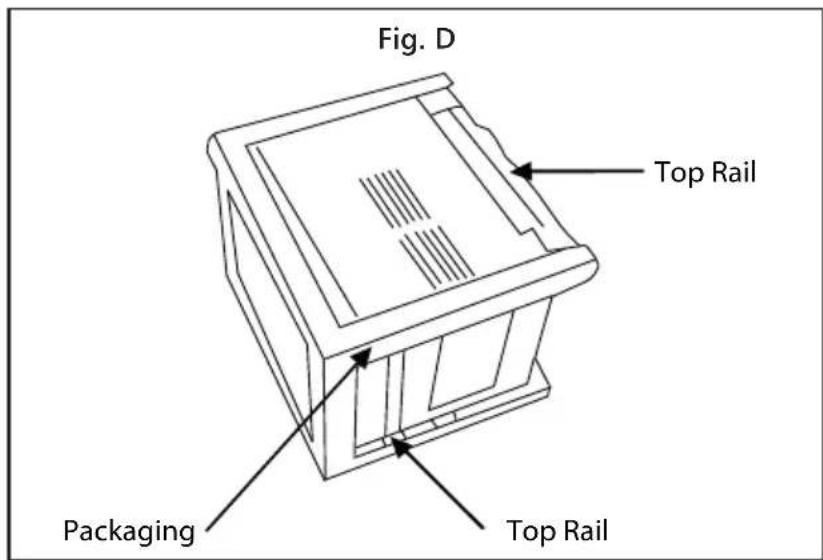
RAC-WK05/06 Models RAC-WK08 Model
natural_image
Technical line drawing of a roof-mounted air conditioner unit (no text or symbols)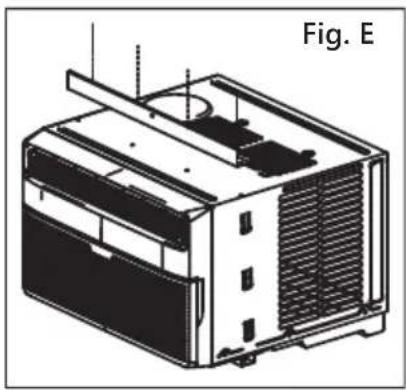
natural_image
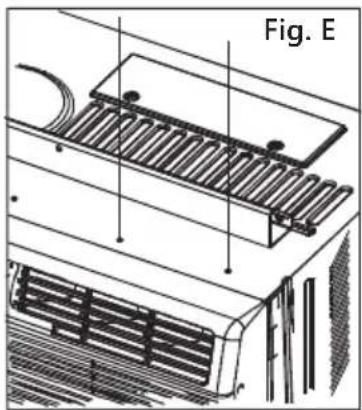
Technical line drawing of a mechanical device with heat exchangers and cooling fins (no text or symbols)C. Align the hole in the top rail with those in the top of the unit as shown in Fig. E.
natural_image
Diagram of a device with four screws inserted, labeled Fig. F (no text or symbols on the diagram itself)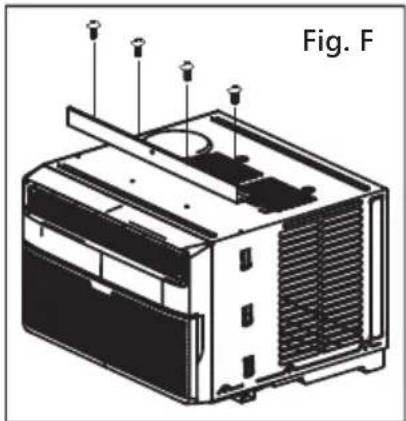
natural_image
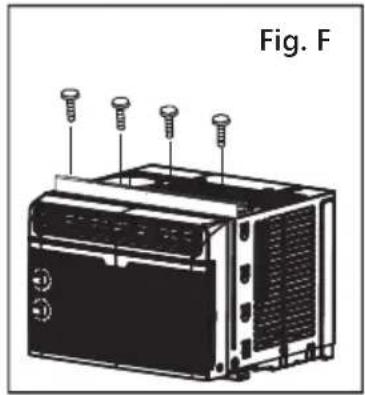
Technical line drawing of an industrial air conditioner unit with mounting points and ventilation slots (no text or symbols)D. Secure the top rail to the unit with the 3/8" Screws as shown in Fig. F.

CAUTION
For safety reasons, all four (4) screws MUST be securely fastened.
3. Install Accordion Panels on Air Conditioner
NOTICE
The Top rail and Sliding Panels on each side are offset to provide the proper pitch to the rear of the unit (5/16"). This is necessary for proper condensate management and drainage. If you are not using the Side Panels for any reason, this pitch to the rear must be maintained.
natural_image
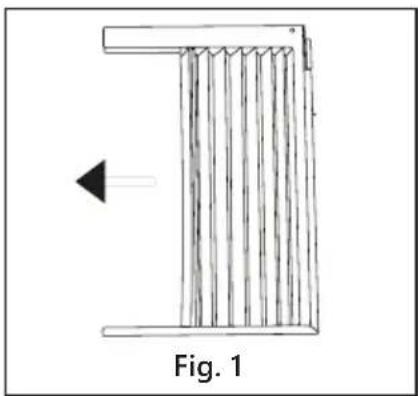
Diagram of a vertical corrugated structure with an arrow indicating leftward motion, labeled Fig. 1 (no text or symbols on the diagram itself)A. Place unit on the floor, a bench or a table. Hold the Accordion Panel in one hand and gently pull back the center to free the open end. See Fig. 1.
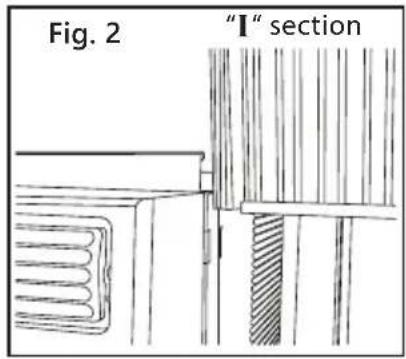
B. Slide the free end "I" section of the panel directly into the cabinet as shown in Fig. 2. Slide the panel down. Be sure to leave enough space to slip the top and bottom of the frame into the rails on the cabinet.
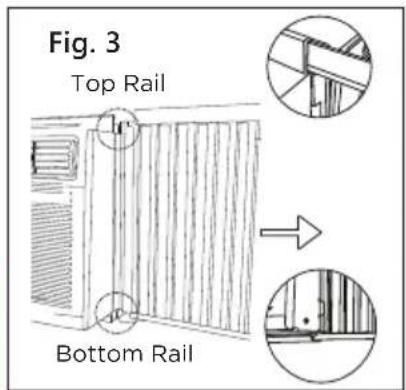
C. Once the panel has been installed on the side of the cabinet, make sure it sits securely inside the frame channel by making slight adjustments.
Slide the top and bottom ends of the frame into the top and bottom rails of the cabinet. Fig. 3.
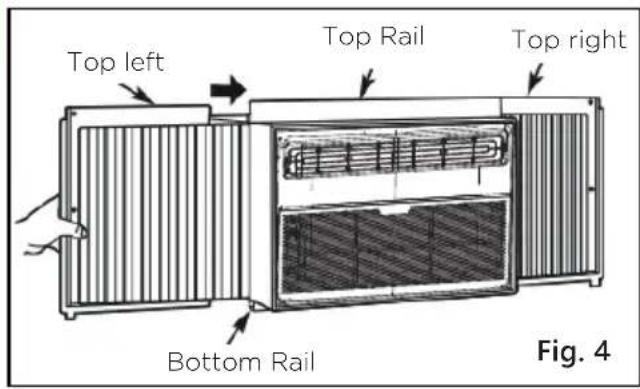
D. Slide the panel all the way in and repeat on the other side.
4. Install Air Conditioner
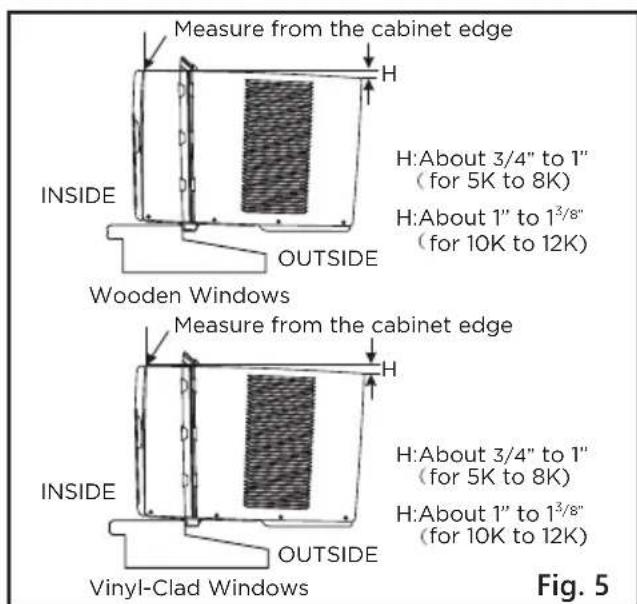
A. Keep a fi rm grip on the air conditioner, carefully place the unit into the window opening so the bottom of the air conditioner frame is against the window sill (Fig. 5). Carefully close the window behind the top rail of the unit.
NOTICE
Check that air conditioner is tilted back per dimension H (Fig. 5) (tilted about 3^ to 4^ downward to the outside). After proper installation, condensate should not drain from the overflow drain hole during normal use. Adjust the slope if otherwise.
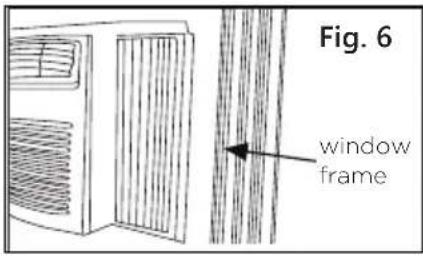
B. Extend the side panels out against the window frame (Fig. 6).
5. Secure Air Conditioner
natural_image
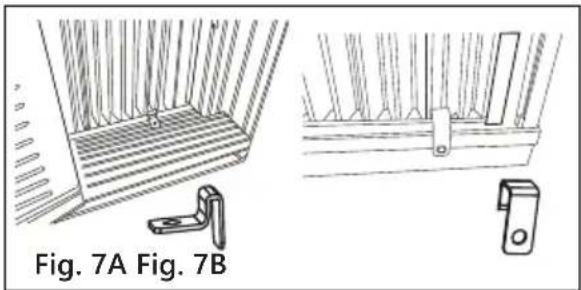
Technical line drawing of a window frame structure with two views (Fig. 7A and Fig. 7B), no text or symbols present.A. Place the frame lock between the frame extensions and the window sill as shown (Fig. 7A for Wooden windows), (Fig. 7B for Vinyl-Clad windows). Drive 3/4'' (19 mm) or 1/2'' (12.7 mm) locking screws through the frame lock and into the sill.
natural_image
Illustration of a hand using a pen to adjust or install a car air vent (no text or symbols visible)B1: For wooden windows:
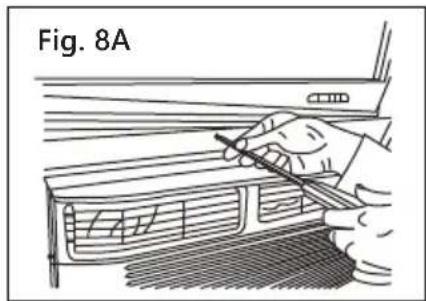
Drive 1/2" (12.7 mm) locking screws through the top rail and into the window sash (Fig. 8A).
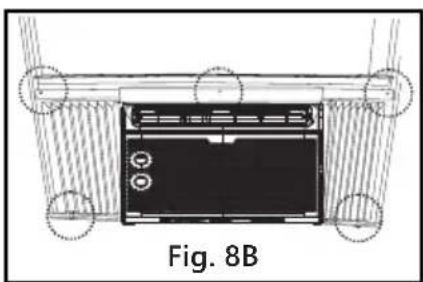
NOTE: To prevent window sill from splitting, drill 1/8" (3mm) pilot holes before driving screws. Drive 1/2" (12.7mm) locking screws through frame holes into window sash (Fig. 8B/8C).
RAC-WK05/06 only Models RAC-WK08/10/12
natural_image
Diagram of a device labeled Fig. 8B showing front panel and side-mounted screen (no text or symbols on the diagram itself)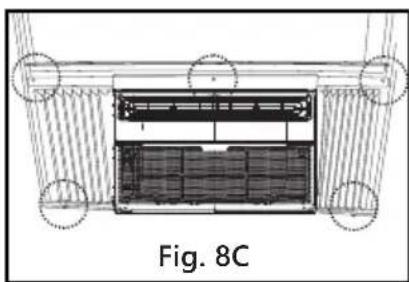
natural_image
Architectural cross-section diagram of a building facade with structural elements and circular annotations (no text or symbols)B2: For Vinyl-Clad windows:
Drive 1/2" (12.7 mm) locking screws through the top rail and into the window sash (Fig. 8B/8C).
NOTE: Before driving the screws, drill 5 holes into the window through the holes of the top rail and side panel frames as shown (Fig. 8B/8C).
natural_image
Line drawing of hands installing or adjusting a metal bracket (no text or symbols)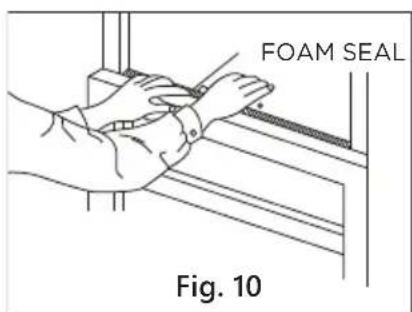
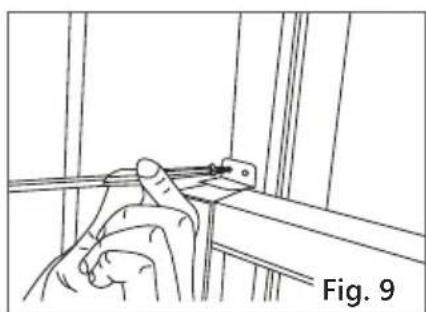
C. Secure lower sash in place by attaching the sash lock with the 3/4" (19 mm) or 1/2" (12.7 mm) screw as shown (Fig. 9).
D. Cut Window sash seal foam and insert it in the space between the upper and lower sashes (Fig. 10).
6. Install Weather Stripping (ENERGY STAR models only)
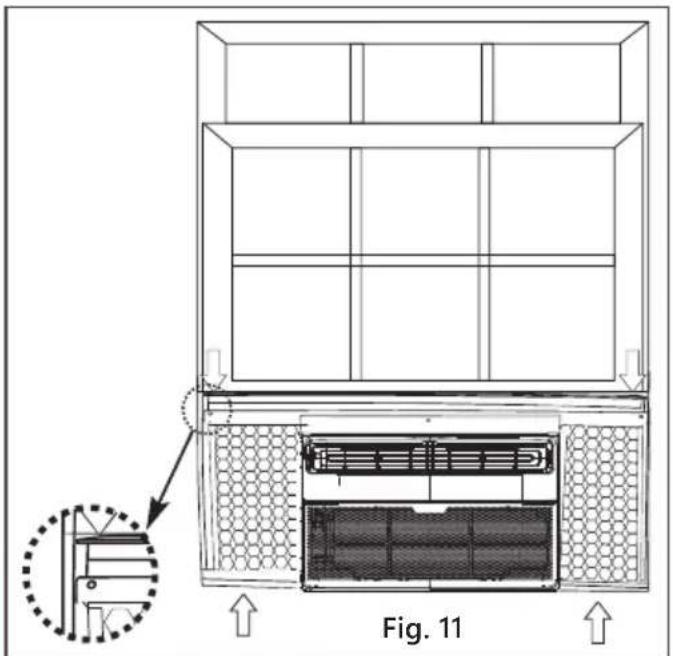
In order to minimize air leaks between the room air conditioner and the window opening, trim the weather stripping to the proper length, peel off the protective backing and plug any gaps if needed (Fig. 11).
If AC is Blocked by Storm Window
Models RAC-WK05/06/08/10/12
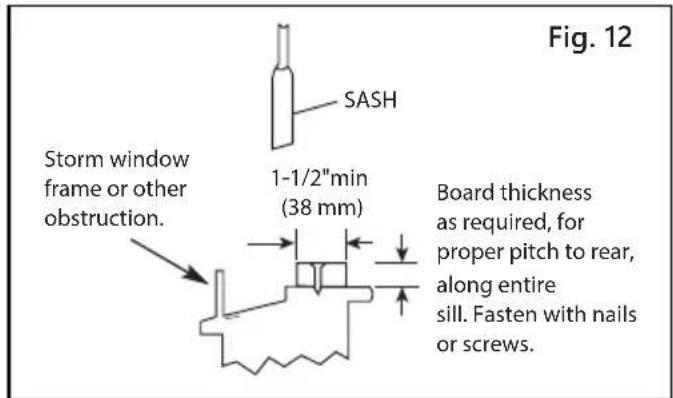
Add wood as shown in Fig. 12, or remove storm window before air conditioner is installed.
If storm window frame must remain, be sure the drain holes or slots are not caulked or painted shut. Accumulated rain water or condensation must be allowed to drain out.
Removing AC From Window
- Turn AC off, and disconnect power cord.
- Remove sash seal from between windows, and unscrew sash lock.
- Remove screws installed through top rail and side panel frames.
- Slide the accordion panels into the rails to close.
- Keeping a firm grip on the air conditioner, raise the sash and carefully remove.
- Be careful not to spill any condensate while lifting unit from window. Store parts WITH air conditioner.
CARE AND CLEANING

CAUTION
Clean your air conditioner occasionally to keep it looking new. Be sure to unplug the unit before cleaning to prevent shock or fire hazards.
Air Filter Cleaning
RAC-WK05 only
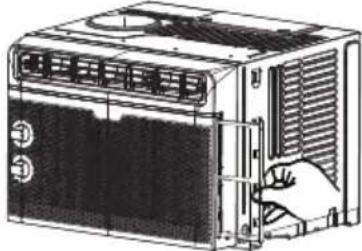
natural_image
Line drawing of an air conditioner unit with a hand inserting a component (no text or symbols)RAC-WK06 only
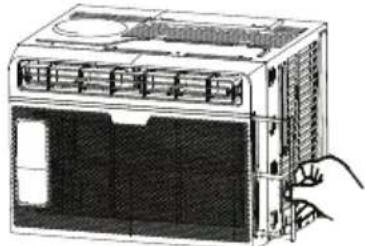
natural_image
Illustration of a portable air conditioner unit with cooling fins and ventilation slots (no text or symbols)Models RAC-WK08 / 10 / 12
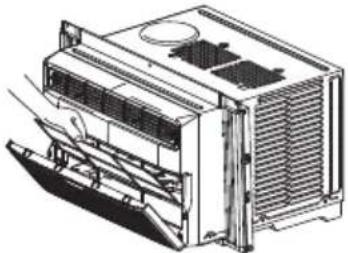
natural_image
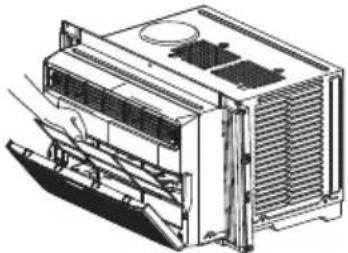
Technical line drawing of a multi-chamber HVAC unit with ventilation grilles and fan base (no text or symbols)The air fi liter should be checked at least once a month to see if cleaning is necessary. Trapped particles in the fi liter can build up and cause an accumulation of frost on the cooling coils.
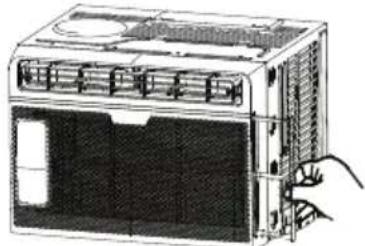
- Remove the fi Iter by sliding it out from the right-hand side. (RAC-WK05 only)
- Push the vent handle to the Vent Closed position (where applicable).
- Open the front panel.
- Grasp the filter by the center and pull up and out.
- Wash the fi Iter using liquid dishwashing detergent and warm water. Rinse fi Iter thoroughly.
- Gently shake excess water from the fi Iter. Be sure the fi Iter is thoroughly dry before replacing.
- You may also vacuum the filter clean rather than washing.
NOTICE
Never use hot water over 104^ F ( 40^ C) to clean the air fi liter. Never attempt to operate the unit without the air fi liter.
Cabinet Cleaning
- Be sure to unplug the air conditioner to prevent shock or fire hazard. The cabinet and front may be dusted with an oil-free cloth or washed with a cloth dampened in a solution of warm water and mild liquid dishwashing detergent. Rinse thoroughly and wipe dry.
- Never use harsh cleansers, wax or polish on the cabinet front.
- Be sure to wring excess water from the cloth before wiping around the controls. Excess water in or around the controls may cause damage to the air conditioner.
- Plug in air conditioner.
Winter Storage
If you plan to store the air conditioner during the winter, remove it carefully from the window according to the installation instructions. Cover it with plastic or return it to the original carton.
TROUBLESHOOTING TIPS
Before calling for service, review this list. It may save you time and expense. This list includes common occurrences that are not the result of defective workmanship or materials in this appliance.
Problem Solution
| Air conditioner does not start. | Wall plug disconnected. Push plug firmly into wall outlet. |
| Circuit breaker tripped. Reset circuit breaker. | |
| Check if the light on the plug is on. If it is off, press the RESET button. | |
| Power is OFF. Turn power ON. | |
| Unit turned off and then on quickly. Turn unit off and wait 3 minutes before restarting. | |
| Air from unit does not feel cold enough. | Room temperature below 62°F (17°C). Cooling may not occur until room temperature rises above 62°F (17°C). |
| Temperature sensor behind the air filter is touching the cold coil. Try to move it so it does not contact the cold coil. | |
| Reset to a lower temperature. | |
| Compressor shut-off by changing modes. Wait approximately 3 minutes and listen for compressor to restart when set in the COOL mode. | |
| Check for potential obstructions blocking the outdoor intake/exhaust. Clear any obstructions. | |
| Air conditioner cooling, but room is too warm - ice forming on cooling coil behind air filter. | Outdoor temperature below 64°F (18°C). To defrost the coil, set to FAN ONLY mode. |
| Air filter may be dirty. Clean filter. Refer to Care and Cleaning section. To defrost, set to FAN ONLY mode. | |
| Thermostat set too cold for night-time cooling. To defrost the coil, set to FAN ONLY mode. Then, set temperature to a higher setting. | |
| Air conditioner cooling, but room is too warm - NO ice forming on cooling coil behind air filter. | Dirty or restricted air filter. Clean filter. Refer to Care and Cleaning section. To defrost, set to FAN ONLY mode. |
| Temperature is set too high, set temperature to a lower setting. | |
| Air directional louvers positioned improperly. Position louvers for better air distribution. | |
| Front of unit is blocked by drapes, blinds, furniture, etc. - restricts air distribution. Clear obstruction in front of unit. | |
| Any open doors, windows, or registers may allow cold air to escape. Close any doors, windows, or registers. | |
| The room may be too warm. Allow additional time to remove "stored heat" from walls, ceiling, floor and furniture. | |
| Problem Solution | |
| Air conditioner turns on and off rapidly. | Dirty air fi Iter- air restricted. Clean air fi Iter. |
| Outside temperature extremely hot. Set FAN speed to a higher setting to bring air past cooling coils more frequently. | |
| Check for potential obstructions blocking the outdoor intake/exhaust. Clear any obstructions. | |
| Noise when unit is cooling. | Air movement sound. This is normal. If too loud, set to a slower FAN setting. |
| Window vibration - poor installation. Refer to installation instructions or check with installer. | |
| Water dripping INSIDE when unit is cooling. | Improper installation. Tilt air conditioner slightly to the outside to allow water drainage.Refer to installation instructions - check with installer. |
| Water dripping OUTSIDE when unit is cooling. | Unit removing large quantity of moisture from humid room. This is normal during excessively humid days. |
| Remote sensing deactivating prematurely (some models). | Remote control not located within range. Place remote control within 16.4 feet & 180^ , radius of the front of the unit, and pointed in the general direction of the air conditioner unit. |
| Remote control signal obstructed. Remove obstruction. | |
| Room too cold. Temperature setting too low. Increase temperature setting. | |
| Noise when unit starts. | A “da-da” sound may occur for thirty seconds when the unit is turned on due to the compressor starting. It is normal. |
| Unit will not connect to WiFi or App does not work (some models). | For additional support and troubleshooting tips, follow the link in this QR code: |
REMOTE CONTROL AND APP INSTRUCTIONS
Handling the Remote Control
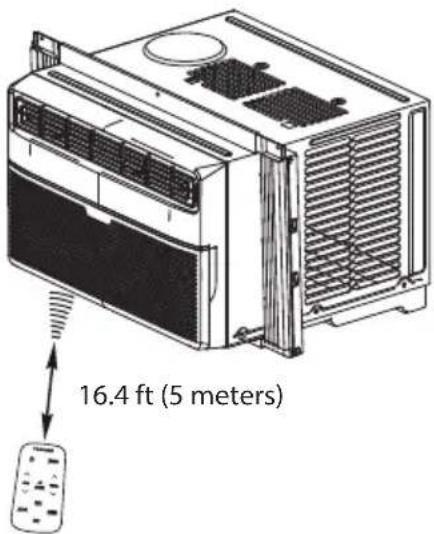
Location of the remote control
Use the remote control within a distance of 16.4 ft (5 meters) from the air conditioner, pointing it towards the receiver. Reception is confirmed by a beep.

CAUTION
- The air conditioner will not operate if curtains, doors or other materials block the signals from the remote control to the unit.
- Prevent any liquid from spilling onto the remote control. Do not expose the remote control to direct sunlight or heat.
- If the infrared signal receiver on the indoor unit is exposed to direct sunlight, the air conditioner may not function properly. Use curtains to prevent the sunlight from falling on the receiver.
- If other electrical appliances react to the remote control, either move these appliances or consult your local dealer.
Replacing the Battery
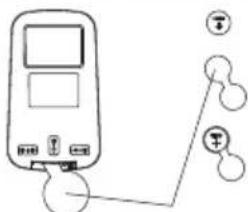
Insulation piece
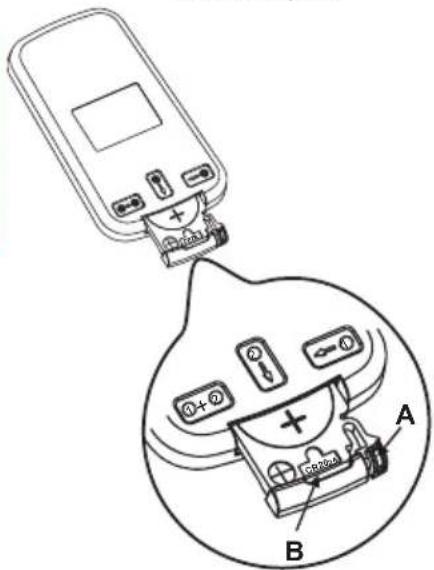
NOTICE
First remove the insulation piece (if available) and then install the battery according to the following steps.
Complete the following steps simultaneously:
- Slightly press tab "A" in the direction of arrow 1.
- Pull "B" in the direction of arrow 2.
NOTICE
- Only use a CR2025 battery.
- Do not leave the battery in the remote control if it is not going to be used for 2 or 3 months.
- Dispose of used batteries properly.
Remote Control Specifications
| Model RG15C/E | |
| Rated Voltage 3.0V (Lithium battery CR2025) | |
| Lowest Voltage of CPU Emitting Signal 2.4 V | |
| Signal Receiving Range 16.4 ft (5 m) | |
| Environment -5 °C ~ 60 °C (23°F ~ 140°F) | |
Function Buttons
ON/OFF button
Operation starts when this button is pressed and stops when the button is pressed again.
NOTE: If the unit has ENERGY SAVER function, it will initiate automatically the Energy Saver function under Cool, Dry, and Auto (only Auto-Cooling and Auto-Fan) modes.
MODE button
Press this button to select the desired operation mode.
FAN UP button
Press this button to increase the desired fan speed.
FAN DOWN button
Press this button to decrease the desired fan speed.
AUTO button
Press this button to set fan speed to auto.
LED button
Press this button to turn off the unit display lights. Pressing this button again will turn the display lights back on. Pressing any button on the unit or remote while the display is off will activate the lights for three seconds and then turn back off.
TOSHIBA

TIMER

FAN


TEMP.
ECO
AUTO
LED
TIMER button
Press this button to activate the "Auto Start" or "Auto Stop" program.
TEMP UP button
Press this button to increase the indoor temperature setting.
TEMP DOWN button
Press this button to decrease the indoor temperature setting.
ECO button
Press this button to activate the Energy saving mode. Press it again to stop the function (on some models).
SLEEP button
Press this button to activate the Sleep mode. This function is available on COOL or AUTO mode only and will maintain the most comfortable temperature for you while saving energy. For more details, see "sleep operation" in "USER'S MANUAL."
How to Use the Buttons
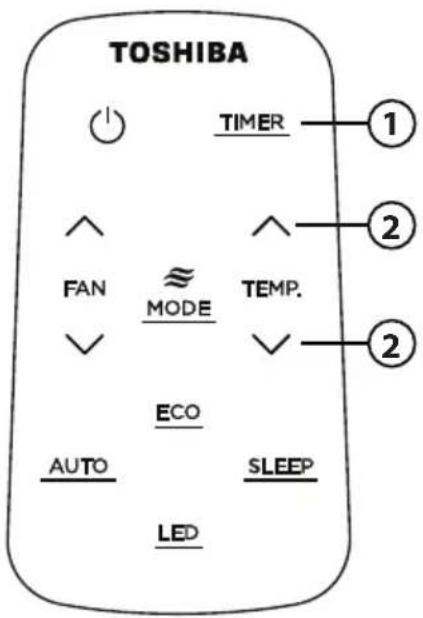
Timer operation
Press the TIMER button to initiate the Auto-start and Auto-stop setting program of the unit.
To set the Auto-start/stop time.
- Press the TIMER button. When the TIMER ON indicator is displayed on the LED window of the air conditioner, it indicates the Auto Start setting program is initiated. When the TIMER OFF indicator is displayed on the LED window of the air conditioner, it indicates the Auto Stop setting program is initiated.
- Press or hold the TEMP UP/DOWN to change the Auto time. The control will count down the time remaining until start/stop.
- The selected time will register in 5 seconds and the air conditioner will automatically revert back to display the previous temperature setting.
- Turning the unit ON or OFF at any time will cancel the Auto Start/stop function.
NOTICE
To cancel the TIMER setting, push the TIMER button and press or hold the TEMP UP/DOWN until 0 hour is displayed on the LCD window of the air conditioner.
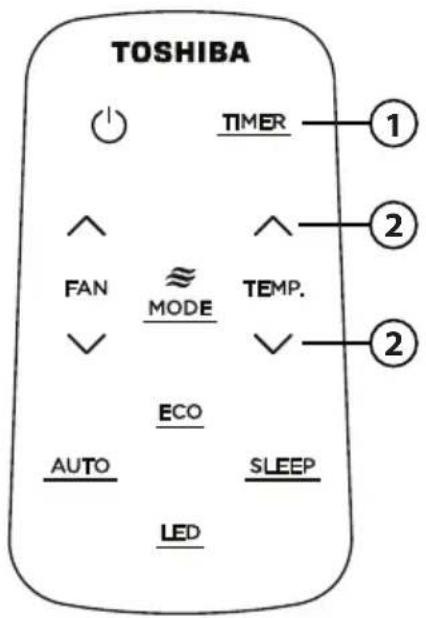
COMBINED TIMER
(Setting both ON and OFF timers simultaneously)
AUTO STOP >AUTO START
(On > Stop > Start operation)
This feature is useful when you want to stop the air conditioner after you go to bed, and start it again in the morning when you wake up or when you return home.
Example:
To stop the air conditioner 2 hours after setting and start it again 10 hours after setting.
- Press the TIMER button until the TIMER OFF indicator is displayed on the LED display of the air conditioner.
- Use the TEMP UP/DOWN button to display "2.0" on the LED display of the air conditioner.
- Press the TIMER button again to display the TIMER OFF on the LED display of the unit.
- Use the TEMP UP/DOWN button to display "10" on the LED display of the unit.
- Wait for 5 seconds until the previous display appears in LED window.
AUTO START > AUTO STOP
(Off > Start > Stop operation)
This feature is useful when you want to start the air conditioner before you wake up and stop it after you leave the house.
Example:
To start the air conditioner 5 hours after setting, and stop it 8 hours after setting.
- Press the TIMER button until the TIMER ON indicator is displayed on the LED display of the air conditioner.
- Use the TEMP UP/DOWN button to display "5.0" on the LED display of the air conditioner.
- Press the TIMER button again to display the TIMER OFF on the LED display of the unit.
- Use the TEMP UP/DOWN button to display "8.0" on the LED display of the unit.
- Wait for 5 seconds until the previous display appears in LED window.
NOTICE
Changes or modifications not approved by the party responsible for compliance could void users authority to operate the equipment.
DECLARATION OF CONFORMITY
We hereby declare that this AC is in compliance with the essential requirements and other relevant provisions of Directive 1999/5/EC.
SPECIFICATION OF WIRELESS MODULE
| Model: US-OSK103 | Dimensions: 41 x 24 x 5 (mm) |
| Standard: IEEE 802.11 b/g/n | Operation Temperature: 0°C ~ 45°C / 32°F ~ 113°F. |
| Antenna Type: External omnidirectional Antenna | Operation Humidity: 10% ~ 85% |
| Frequency: 2.4 GHz (wireless) Power Input: DC 5V/300 mA | |
| Maximum Transmitted Power: 15 dBm Max | |
PRECAUTIONS
- Supports operating systems: iOS 7+ or Android 4+.
- In the event of a OS update, there may be a delay between the update of the OS and a related software update during which your OS may or may not be supported until a new version is released. Your specific mobile phone or problems in your network may prevent the system from working and Toshiba will not be responsible for any problems that could be caused by incompatibility or network issues.
- This Smart AC only supports WPA-PSK/WPA2-PSK (recommended) encryption.
Please check the Toshiba Lifestyle website, us.toshiba-lifestyle.com, for updated information. - To ensure proper scanning of the QR code, your smart phone must have at least a 5-megapixel camera.
- Due to unstable network connectivity, requests may time out. If this happens, re-run the network configuration.
- Due to unstable network connectivity, commands may time out. If this happens, the smartphone app and the actual product may display conflicting information. The information displayed on the actual product is always the most accurate available. Refresh the app to re-sync.
NOTICE
Toshiba will not be responsible for any problems that could be caused by incompatibility or network issues, your wireless router and mobile phone.
SYSTEM OVERVIEW
Devices required to use the Smart AC:
- Smart Phone with compatible iOS or Android system.
- Wireless Router
- Smart Air Conditioner
DOWNLOAD AND INSTALL THE APP
Android QR code Apple QR code




Scan to download app.
- You can also go to Google Play or App Store and search for Toshiba NA AC. For more information, please refer to Toshiba Lifestyle website: us.toshiba-lifestyle.com.
NOTICE
All the images in this manual are for reference only, your product and app may look slightly different. The actual product and app instructions have to be considered.
CREATE YOUR ACCOUNT
- Make sure your smartphone is connected to your wireless router and your wireless router has a working 2.4GHz internet connection.
- It is recommended to activate your account immediately to be able to recover your password by email.
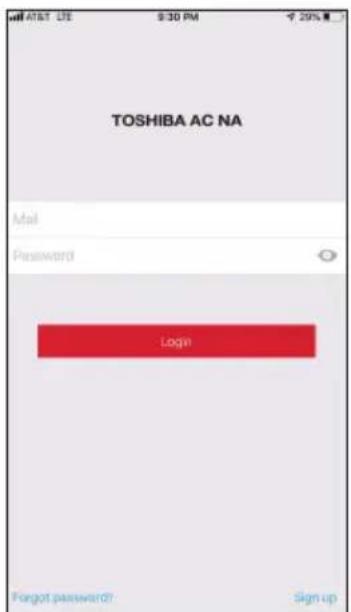
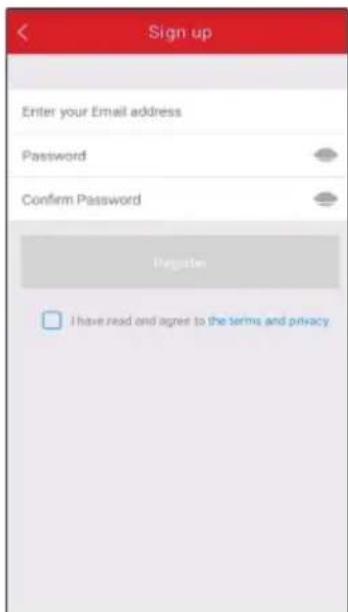
6.1 Press "Sign Up". 6.2 Enter your email address and password.
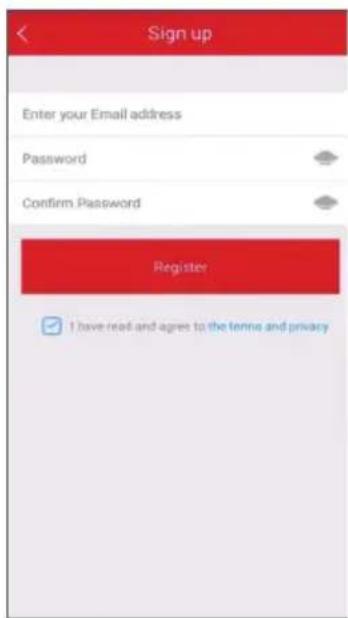
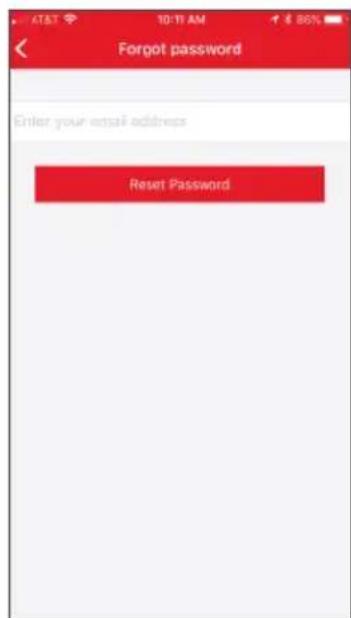
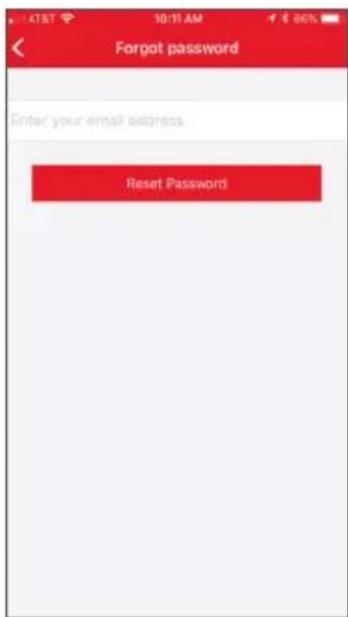
6.3 Press "Registration". 6.4 If you forget your password, press "Forgot password?" on the main menu and enter your email address. Then press "Reset Password".
NOTICE
- Make sure your smartphone is able to connect to the wireless network which will be used.
- Make sure also that the device is not connecting to other networks in range.
ADDITIONAL APP AND SMART HOME FUNCTIONS
For additional instructions regarding the features of the app and Smart Home skill capabilities, scan the QR code below.

Operating instructions (with Remote)
TOSHIBA
natural_image
Front view of a white portable air conditioner unit with ventilation grilles and control buttons (no visible text or symbols)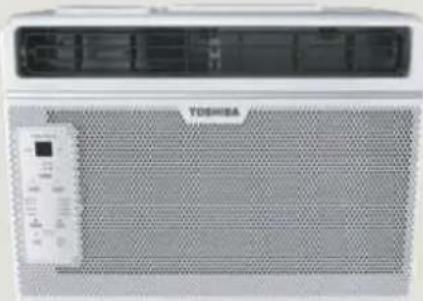
natural_image
Front view of a TOSHUA air conditioner unit with mesh grille and control panel (no visible text or symbols)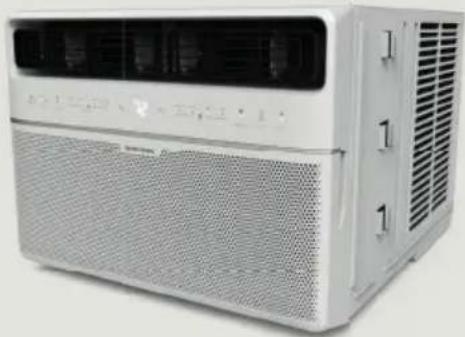
natural_image
Exterior view of a white portable air conditioner unit with ventilation grilles and control panel (no visible text or symbols)MANUAL DEL USUARIO
Tipo de Ventana/Pared
RAC-WK0812ESCWRU (8,000 BTU)
RAC-WK1012ESCWRU (10,000 BTU)
RAC-WK1212ESCWRU (12,000 BTU)
natural_image
Pure technical line drawing of a mechanical assembly without any text, numbers, or symbolsnatural_image
Pure architectural or structural line drawing with horizontal and vertical lines, no text or symbols presentnatural_image
Pure technical line drawing of a mechanical assembly without any text, numbers, or symbolsFig. C (VENT Y SALIDA ABIERTAS)
natural_image
Illustration of a screwdriver with a magnified inset showing the tip (no text or symbols)Destornillador

Rango
natural_image
Technical line drawing of a roof-mounted air conditioner unit (no text or symbols)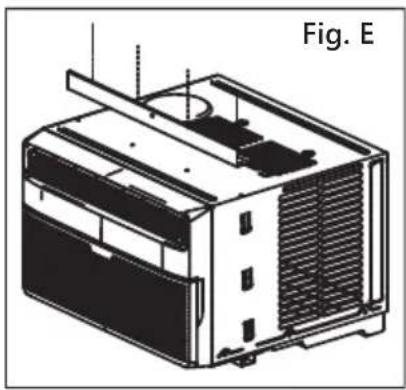
natural_image
Technical line drawing of a mechanical device with heat exchangers and cooling fins (no text or symbols)natural_image
Diagram of a device with four screws inserted, labeled Fig. F (no text or symbols on the diagram itself)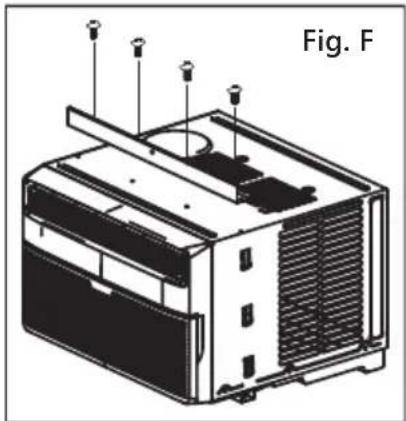
natural_image
Technical line drawing of an industrial air conditioner unit with mounting points and ventilation slots (no text or symbols)natural_image
Diagram of a vertical corrugated structure with a left-pointing arrow, labeled Fig. 1 (no text or symbols on the diagram itself)natural_image
Technical line drawing of a window frame structure with two views (Fig. 7A and Fig. 7B), no text or symbols present.natural_image
Diagram of a device mounted on a chair, labeled Fig. 8B (no text or symbols on the diagram itself)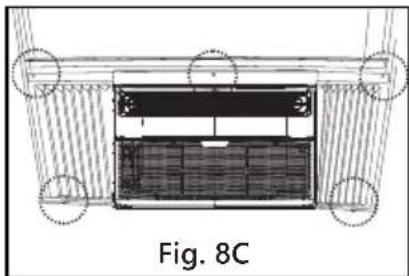
natural_image
Architectural cross-section diagram of a building facade with window and doorways (no text or symbols)natural_image
Line drawing of a hand using a tool to install or install a mechanical component, labeled 'Fig. 9' (no other text or symbols)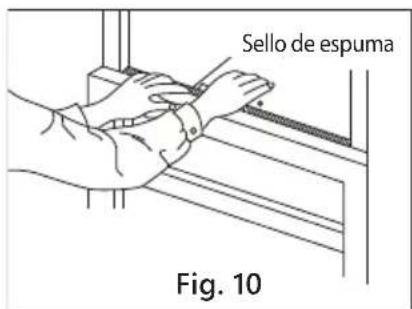
natural_image
Line drawing of an air conditioner unit with a hand inserting a fan (no text or symbols)RAC-WK06 solamente
natural_image
Illustration of a portable air conditioner unit with cooling fans and ventilation grilles (no text or symbols)Modelos RAC-WK08/10/12
natural_image
Technical line drawing of a multi-chamber electric heater unit with cooling fins and ventilation grilles (no text or labels)AVISO



6.3 Pulse "Registro".
- USER MANUAL
- Owner's Manual
- Read This Manual
- CAUTION
- SAFETY PRECAUTIONS
- WARNING
- NOTICE
- EXPLANATION OF SYMBOLS DISPLAYED ON THE UNIT
- Operation of Current Device
- OPERATING INSTRUCTIONS
- Normal Sounds
- RAC-WK05 Model
- RAC-WK06 Model
- RAC-WK08 / RAC-WK10 / RAC-WK12 Models
- Air Conditioner Features (general)
- Air Directional Louvers
- Air Conditioner Features (RAC-WK05 only)
- THERMOSTAT
- COOL MODE
- FAN MODE
- Air Conditioner Features (Models RAC-WK06 / 08 / 10 / 12)
- Electronic Control Operating Instructions
- Key Pad Features (Model RAC-WK06)
- Key Pad Features (Models RAC-WK08 / 10 / 12)
- TO TURN UNIT ON OR OFF:
- TO CHANGE TEMPERATURE SETTING:
- TO ADJUST FAN SPEEDS:
- SLEEP FEATURE:
- CHECK FILTER FEATURE:
- ENERGY SAVER FEATURE (ECO):
- TIMER: AUTO START/STOP FEATURE:
- Displays
- DISPLAYS:
- Error codes:
- INSTALLATION INSTRUCTIONS
- WARNING Before You Begin
- Window Requirements
- Tools You Will Need
- Tools You May Use
- Prepare the Window
- Prepare the Air Conditioner
- RAC-WK05/06 Models RAC-WK08 Model
- Install Accordion Panels on Air Conditioner
- Install Air Conditioner
- Secure Air Conditioner
- RAC-WK05/06 only Models RAC-WK08/10/12
- Install Weather Stripping (ENERGY STAR models only)
- If AC is Blocked by Storm Window
- Models RAC-WK05/06/08/10/12
- Removing AC From Window
- CARE AND CLEANING
- Air Filter Cleaning
- Cabinet Cleaning
- Winter Storage
- TROUBLESHOOTING TIPS
- REMOTE CONTROL AND APP INSTRUCTIONS
- Handling the Remote Control
- Location of the remote control
- Replacing the Battery
- Function Buttons
- ON/OFF button
- MODE button
- FAN UP button
- FAN DOWN button
- AUTO button
- LED button
- TOSHIBA
- TIMER button
- TEMP UP button
- TEMP DOWN button
- ECO button
- SLEEP button
- How to Use the Buttons
- Timer operation
- To set the Auto-start/stop time.
- COMBINED TIMER
- AUTO STOP >AUTO START
- Example:
- AUTO START > AUTO STOP
- DECLARATION OF CONFORMITY
- PRECAUTIONS
- SYSTEM OVERVIEW
- Devices required to use the Smart AC:
- DOWNLOAD AND INSTALL THE APP
- CREATE YOUR ACCOUNT
- ADDITIONAL APP AND SMART HOME FUNCTIONS
- MANUAL DEL USUARIO
- AVISO
Brand : TOSHIBA
Model : RAC-WK1211ESCWU
Category : Air conditioner