HB902G - Cooker Khind - Free user manual and instructions
Find the device manual for free HB902G Khind in PDF.


| Product Type | Gas Cooker (Hob) |
| Model | HB902G |
| Brand | Khind |
| Gas Type | LPG (Propane/Butane) |
| Gas Pressure | 28–30 mbar |
| Number of Burners | 2 |
| Burner Size | 120 mm each |
| Heat Input per Burner | 3.8 kW (277 g/h) |
| Total Heat Input | 7.6 kW (554 g/h) |
| Ignition System | Electronic (Battery D type 1.5V) |
| Glass Top Dimensions | 780 x 450 x 8 mm |
| Built-in Cutout Dimensions | 630 x 350 mm (R50) |
| Net Weight | 13 kg |
| Material | Tempered glass top, cast iron burners & stands |
| Safety Features | Safety valve, sparker, anti-spillage tray |
| Flame Adjustment | 3 levels (max, medium, min) |
| Rubber Hose Diameter | 10 mm |
| Max Hose Length | 2 m |
| Battery Lifespan | Approx. 3 months |
| Cleanability | Warm soapy water; avoid abrasives |
| Installation | Must be installed by qualified technician |
| Ventilation Clearance | Min 40 cm under hob, min 150 mm from walls |
| Intended Use | Household indoor use only |
Frequently Asked Questions - HB902G Khind
User questions about HB902G Khind
0 question about this device. Answer the ones you know or ask your own.
Ask a new question about this device
Download the instructions for your Cooker in PDF format for free! Find your manual HB902G - Khind and take your electronic device back in hand. On this page are published all the documents necessary for the use of your device. HB902G by Khind.
USER MANUAL HB902G Khind
Please read this manual carefully before operating this product. Keep this manual handy for future reference.
Parts identification
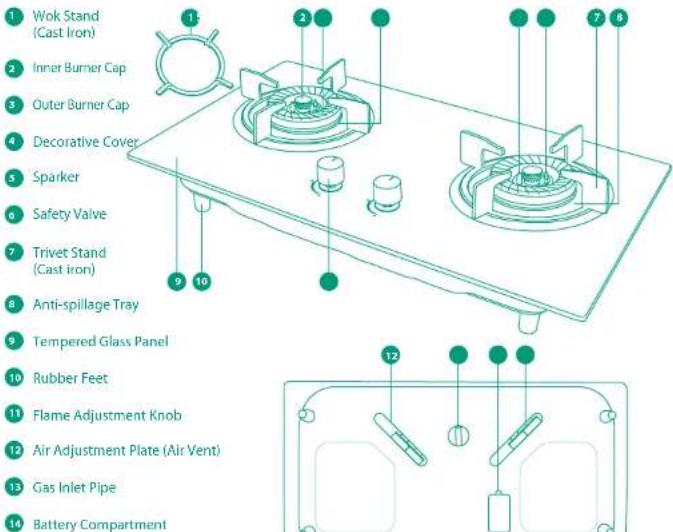
1 Wok Stand (Cast Iron)
2 Inner Burner Cap
3 Outer Burner Cap
4 Decorative Cover
5 Sparker
Safety Valve
7 Trivet Stand (Cast iron)
a Anti-spillage Tray
9 Tempered Glass Panel
10 Rubber Feet
11 Flame Adjustment Knob
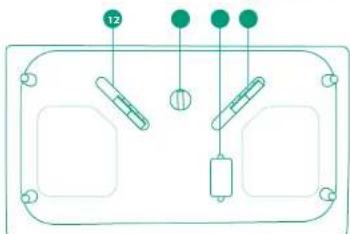
12 Air Adjustment Plate (Air Vent)
13 Gas Inlet Pipe
14 Battery Compartment
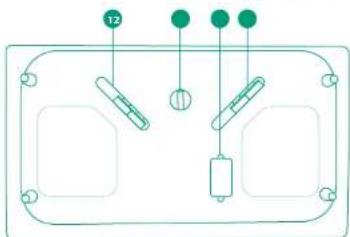
natural_image
Pure electrical circuit lines without any symbolsBack View
Specifications
Model : HB902G
Double Burner Size : 120mm
Gas Power Consumption : 2x3.8kW (2x277g/h)
Total Heat Input : 7.6kW (554g/h)
Ignition System : Battery D Type 1.5V
Product Category : I3B/P(30)
Gas : LPG
Gas Pressure : 28-30mbar
Rubber Hose Diameter : 10mm
Net Weight : 13kg
Built in Dimension : 630 x 350mm (R50)
Glass Top Dimension : 780 x 450 x 8mm
*Specifications are subject to change without prior notice.
Caution
- The battery lifespan is approximately 3 months when operating the appliance. Change the battery when the ignition of the spark is weak.
-
Gas used is LPG.
-
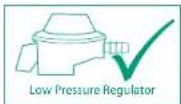

Use only approved Low Pressure Regulator.
- Use only hose specially made for Liquefled Petroleum Gas supplies and the hose must not crack due to aging. The hose must not come into contact with any part of the gas cooker body.
- Before using, check to ensure that the burners, caps, wok stand and trivet stand are placed correctly.
- Do not use this appliance for drying clothes, etc.
- Always maintain proper ventilation in cooking area at all times.
- If a gas leak is found, stop the gas supply by turning the regulator control lever upward. Open all windows for ventilation. Do not light matches or use a lighter and refrain from turning electrical switches on and off during this period. Contact a qualified technician immediately.
- This appliance is not intended for use by persons (including children) with reduced physical, sensory or mental capabilities, or lack of experience and knowledge, unless they have been given supervision or instruction concerning use of the appliance by a person responsible for their safety. Children should be supervised to ensure that they do not play with the appliance.
- Turn off the appliance whenever not in use. Do not leave the appliance unattended during operation.
- Do not put flammable items on top of this appliance. Do not store flammable materials or corrosive chemicals in drawers or cupboards below or near to this appliance.
- Do not touch metal parts of the appliance and the middle area of the top surface during and after cooking as these areas reach high temperature.
- Do not spray aerosols in the vicinity of the hob while it is in operation. Some propellant gas may produce corrosive vapor when heated.
- This appliance is intended for household use only, not for outdoor or commercial use. Commercial use will void warranty.
Cleaning & Maintenance
- Allow glass hob to cool before cleaning. The glass plate is best cleaned with cloth and warm soapy water. Use of abrasive powders and pastes should be avoided. When necessary, use only mild abrasive. To remove hardened grease, please use very fine steel wool.
- Caustics solutions, washing soda, aerosol spray cleaners, bleach and some biological cleaners are detrimental to some finishing. Care must be taken not to apply them onto burners and caps.
- Do not wash burner caps in a dishwasher. Do not attempt to clean burner surface when still hot.
- For cleaning, remove spillage from the anti-spillage tray as soon as possible. Control knobs may be pulled off for cleaning. But take care not to allow water to enter through the holes into the glass plate.
- When re-assembling the anti-spillage tray, always ensure that it is correctly located over the spark electrode. Care should be taken to keep the electrode clean and avoid damage to the porcelain insulator when removing the tray during cleaning.
Installation guide
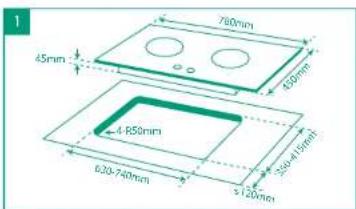
- This appliance should be installed by a qualified person to avoid hazards.
• Install the hob in the cut-out the glass top plate should fit the top of bench properly. If fitting is not proper, please use plaster to seal any gap.
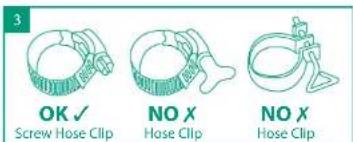
- Use new hose and new hose clip (screw type) for installation of your hob unit.
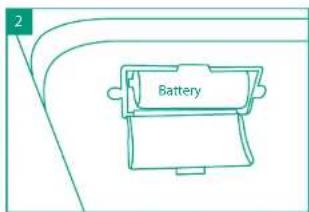
- Insert the battery to its compartment beneath the hob.
• After installation, test with soapy water to unsure no gas leakage.
Installation guide
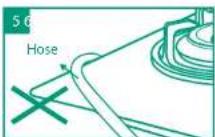
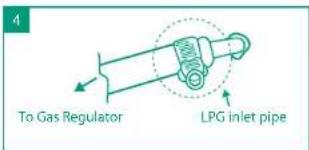
• Make sure the hose does not pass over or come in contact with the body of the appliance.
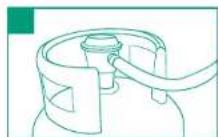
- Insert regulator onto outlet valve of LPG cylinder.
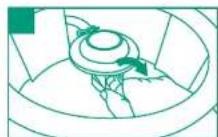
- Turn regulator control lever downward to release LPG into the appliance.
• After installation, test with soapy water for gas leaks. - Do not use connecting hose that is longer than 2 metres.
* Note: Warranty void if hole measurement for installation of hob unit is not followed.
Hob with electronic ignition
- Insert the battery into the battery box. (The battery box is located at the left underside of the hob).
- Turn on the gas supply.
- Depress the knob and turn it anti-clockwise 90° to maximum flame position. A continuous clicking sound will be heard to ignite the hob. Release the knob when the burner has been lit.
- Turning the knob will produce 3 different level of flames.
- When turning the knob clockwise to "OFF" position, a click sound will be heard. The gas supply is shut off and the flame will extinguish.
General knowledge on installation
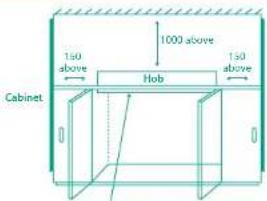
- The underside if the hob must have a clearance of minimum 40cm. Do not seal completely. The door of the cabinet should have ventilation blinds with ventilation area of not less than 0.02m ^2 .
- Please use specified rubber hose.
- Do not place gas cyclinder underneath the hob. The rubber hose must not exceed 2m in length.
- Observe minimum clearance surrounding the hob (more than 150mm from the wall and more than 1000mm for vertical distance). (Refer above diagram)
Bottom Plate/Base Please do not seal/block anything underneath the bottom plate to allow proper heat ventilation.
Precaution logo

Do not place anything in between pan and trivet stand that may seriously damage the hob.

Do not use large or heavy pots which can bend on the trivet stand and deflect the flame onto the hotplate.

Position pan centrally over burner so that it is stable. Do not let pan in overhang position.

Do not remove the trivet stand and enclose the burner. This will concentrate the flame and deflect the heat onto the hotplate.

Use only wok stand supplied or recommended by the hob manufacturer.
How to use
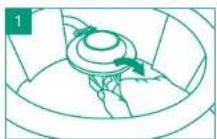
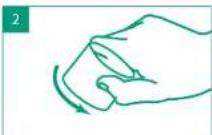
- Turn on the gas supply from the LPG cylinder by turning the regulator control lever downwards. Make sure the knob of the appliance is at off position.
- Press the ignitor knob and turn it anti-clockwise. Continue to press the knob for 5-8 seconds, let go after the burner is on.
• Air may be accumulated in the gas hose during installation. You may have to repeat above procedure several times initially.
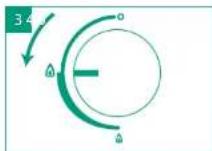
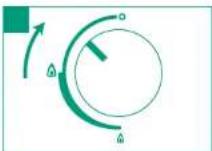
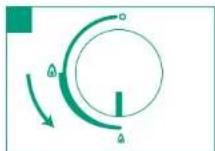
- For maximum cooking heat, turn ignition knob to " position.
- For medium cooking heat, turn ignition knob to the position.
- For minimum cooking heat, turn ignition knob to " 4" position.
Trouble shooting
Fault Types Reasons Solutions
| Failed ignition | The regulator valve is not open. | Turn off the hob and open the regulator valve. |
| Battery not installed or wrong position. | Install the battery in correct position. | |
| Battery weak. | Change new battery. | |
| Air exist in the pipe. | Repeat the ignition to let out the air in the pipe. | |
| The rubber hose is bent. | Straighten it or replace it with a new hose. | |
| Sparker is dirty. | Clean the sparker. | |
| Distance between sparker and burner cap not correct. | Adjust the distance between 4 - 6mm. | |
| Burner cap and sparker wet. | Dry the burner cap and sparker with cloth. | |
| Safety valve position not correct. | Adjust the position until the flame is heating it. | |
| Safety valve dirty. | Clean safety valve. | |
| Sparker support position not correct. | Adjust position of the sparker support. | |
| The combustion is not in a normal condition | The air inlet valve abnormal. | Check the air inlet valve. |
| Burner cap is not in a normal position. | Set the burner at an optimal position. | |
| The burner is blocked. | Clean the burner. | |
| The gas pressure is not correct. | Adjust or change the gas regulator. | |
| The nozzle is blocked. | Must be handled by qualified technician. | |
| Smelling of gas | The rubber hose is broken. Connection of rubber hose not proper. | Replace the rubber hose. Connect the rubber hose properly. |
| Gas cooker problem. | Consult trained technician. | |
| The burner does not ignite. | Ignite again after gas is cleared. | |
| Burner backfire to injector | Excessive lint found in the burner mixing tube. | Remove and clean burner. |
| Excessive gas pressure. | Check gas regulator pressure. Adjust if necessary. | |
| Burner has explosive | Excessive gas pressure. | Check gas regulator pressure. Adjust if necessary. |
Note: Please contact the authorized agent or the gas supply authority service department immediately for any problem that cannot be rectified.
零件名称
natural_image
Pure electrical circuit lines without any symbols后视图
规格
型号 : HB902G
双炉头尺寸 120毫米
natural_image
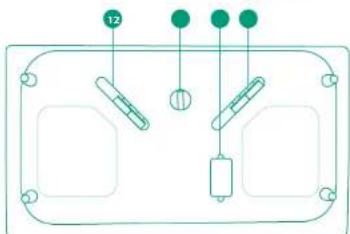
Pure electrical circuit lines without any symbolsPandangan belakang
Specifikasi
Model : HB902G
Brand : Khind
Model : HB902G
Category : Cooker