WM100A - Washing machine Khind - Free user manual and instructions
Find the device manual for free WM100A Khind in PDF.


| Product Type | Top-load washing machine |
| Brand | Khind |
| Model | WM100A |
| Wash Capacity | 10 kg |
| Spin Speed | 1000 rpm |
| Dimensions (W x D x H) | 800 x 600 x 900 mm |
| Net Weight | 50 kg |
| Power Supply | 220-240 V, 50 Hz, 10 A |
| Energy Class | A++ |
| Water Consumption (per cycle) | 100 L |
| Noise Level (wash/spin) | 58 dB / 75 dB |
| Number of Programs | 15 |
| Key Functions | Delay start, child lock, quick wash, intensive wash, pre-wash |
| Maintenance | Clean lint filter, drain pump filter, drum cleaning cycle |
| Safety Features | Overheat protection, water leakage protection, unbalanced load detection |
| Spare Parts Available | Drum, motor, control board, door seal, belts, filters |
| Manual Languages | English, Indonesian, Chinese |
| Manual Pages | 29 |
Frequently Asked Questions - WM100A Khind
User questions about WM100A Khind
0 question about this device. Answer the ones you know or ask your own.
Ask a new question about this device
Download the instructions for your Washing machine in PDF format for free! Find your manual WM100A - Khind and take your electronic device back in hand. On this page are published all the documents necessary for the use of your device. WM100A by Khind.
USER MANUAL WM100A Khind
natural_image
Abstract grayscale illustration of Earth and a globe with connecting lines, no text or symbols present- •• • Fully Auto Washing Machine / 全自动洗衣机 /
Please read this manual carefully before operating this product. Keep this manual handy for further reference. 请在使用此产品前,详读此说明书。并将之收藏以作日后参考。
Please read the notice carefully in order to prevent hazard and extend the lifespan.
☑ DENOTING IT SHOULD BE PROHIBITED ① DENOTING IT SHOULD BE PAID ATTENTION
• Do not expose the washing machine under direct sunlight or rain. | • Do not put the washing machine at a damp humid place.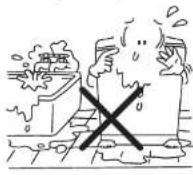 | • Do not sprinkle water directly onto the unit around control panel. |
• Please use a separate electrical outlet with right voltage.• The unit must be earthed properly to prevent electric shock. When it is not used, unplug the plug top.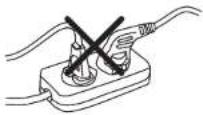 | • Please do not haul the cord while cut off electrical power.• Please do not insert and pull out of the plug with wet hands.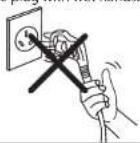 | • Keep children away from the washing machine. |
• Keep the washing machine away from fire or heat source. Do not put flammable materials or clothes stained with such things attached in the tub. | • Do not wipe the washer with volatile material, gasoline etc.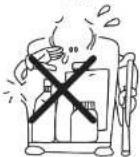 | • Do not pour over 50°C water into the tub.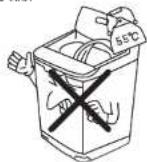 |
• Do not open the cover while washing. | • Do not touch the clothes in the tub when the tub does not stop washing.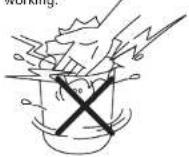 | • Do not switch on when the water pressure isn't within 0.03MPa-0.85Mpa, so as to protect the inlet valve.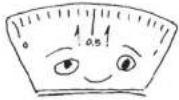 |
!
- This appliance is not intended for use by persons (including children) with reduced physical, sensory or mental capabilities, or lack of experience and knowledge, unless they have been given supervision or instruction concerning use of the appliance by a person responsible for their safety. Children should be supervised to ensure that they do not play with the appliance.
- If the supply cord is damaged, it must be replaced by the manufacturer, its service agent or similarly qualified persons in order to avoid a hazard.
- This appliance is for indoor household use only, do not use at outdoor. Commercial use will void warranty.
- Do not obstruct the ventilation in the base of the washing machine with carpets etc.
- Please do not overload the appliance.
- If the tub does not stop within 15 seconds when the lid is opened during spinning process, switch off the appliance immediately and call a service technician.
- Must let the outer drain hose down before washing clothes.
- Please do not dismantle the unit. Installation and maintenance can only be done by a qualified technician. Refer "Installation" on page 8-11 for guideline.
- Do not climb or put heavy objects on top of the appliance.
- Do not insert your hands or feet under the main unit.
- Do not wash, rinse or spin waterproof sheets or clothes.
Care & Maintenance
Filter Box
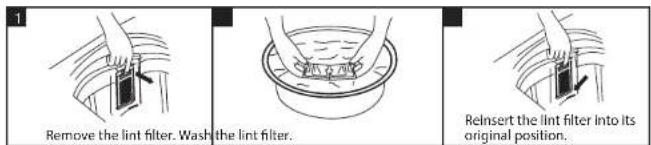
The Unit
- Please make sure that all the water is drained from the tub after being used.
- Switch off the power at the wall socket and remove the plug.
- Wipe off any moisture or liquid on the unit with a dry or wet cloth.
- Do not spray water direct onto the unit.
- Do no use any flammable liquid cleaner to clean the unit, as this will spoil the appearance.
- Allow the cover to be opened to keep the internal area dry after cleaning.

Safety Precaution Information
Water Inlet Filter Net
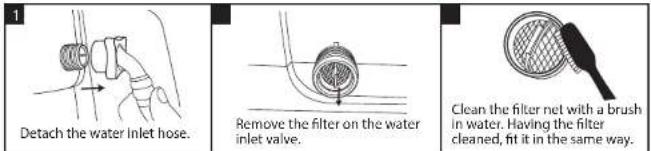
Step to detach the water inlet hose
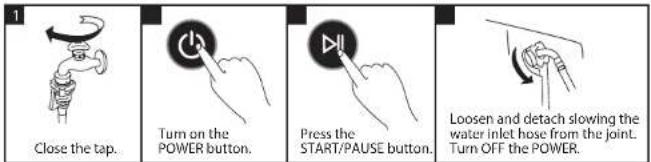
Attention:
It is recommended that you to follow the Step 1 - Step 4 to prevent the water remained in the machine from flowing on the ground. If no water inside the machine, follow step 1 and then step 4.
Parts Identification
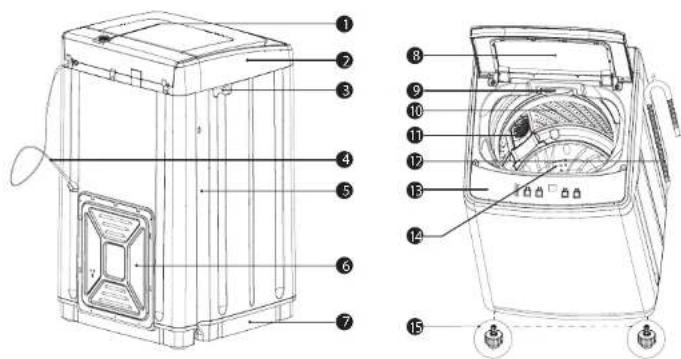
- Water inlet valve
- Frame
- Handle
- Power cord
-
Cabinet
-
Back plate
- Base
- Wash lid
- Detergent box
-
Inner tub
-
Filter
- Drain pipe
- Control panel
- Pulsator
- Adjustable foot (location varies depending on model)
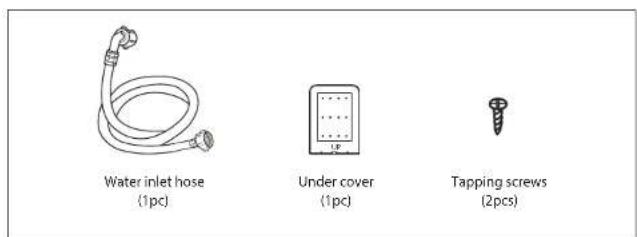
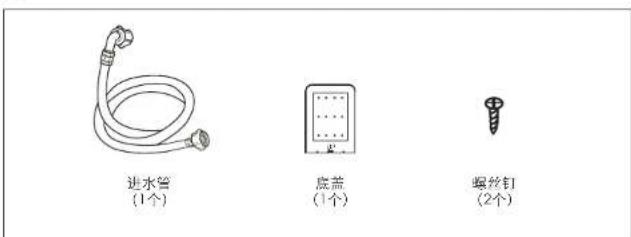
Accessories
Parts Identification
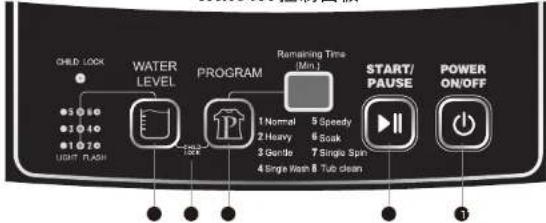
Control Panel
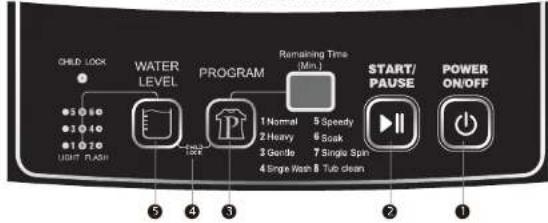
WM80A Control Panel
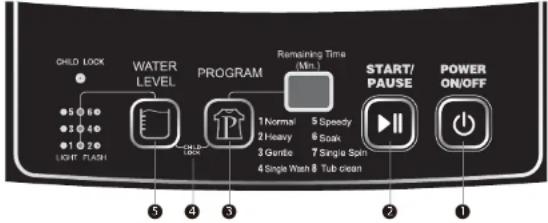
1. Power On/Off button
Use this button to turn the washing machine on and off. If a set program is not start within 5 minutes of turning the machine on, it will switch off automatically.
2. Start/pause button
Press this button to begin a wash program, or to pause/resume a program that is currently in progress.
3. Program selection
Press this button repeatedly to set the desired wash program. You can choose from the following options. Normal: to wash according to the weight of clothes adjusting the water level.
Heavy: to wash the coverlet, jeans and other big clothes.
Gentle: for washing of wool or underwear.
Single wash: to wash the clothes.
Speedy: to wash the slight dirty clothes.
Soak: soak for some time before washing.
Single Spin: to spin the clothes.
Tub clean: clean the inner tub automatically.
4. Child lock function
Press and hold the two buttons (Water level & Program) simultaneously for 1.5 second to activate and deactivate the safety lock.
5. Water level selection
Use this button to select the appropriate water level according to the volume of laundry. • Under Intelligent, Heavy, Gentle, Soak programs, the water level is adjustable.
Its default washing water level is 3; rising water level is 4.
• Under Speedy program, the user can not adjust water level.
Its default washing water level is 2; rising water level is 3.
• Under Spin program, water level button is not workable and no display.
- Under the wash process, a long pressing on Water Level will re-supply water until the water level reaches warning level.
Note: As the picture shows, there are 6 water level for this washing machine, the indicator keeping lighting means odd number water level, and keeping twinkling means even number water level.

Parts Identification
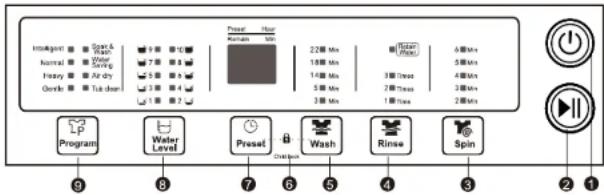
WM100A Control Panel
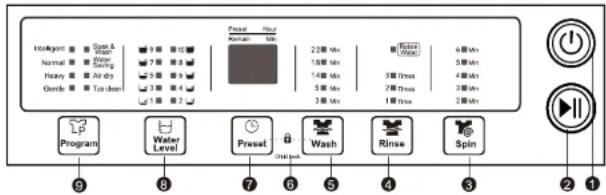
1. Power On/Off button
Press power button to turn on or turn off the washing machine. If it is turned on beyond 5 minutes, and does not start the washing machine, or not to turn off, the power On/Off switch will be auto turned off.
2. Start/pause button
Press this button to start program, however press the button when machine running, the program will be paused.
3. Spin
Press this button to single spin. You can set the spin time.
4. Rinse
Press this button to rinse. You can set the times.
5. Wash
Press this button to wash. You can set the washing time.
6. Child Lock
Press this Wash and Preset button and hold on 1.5 seconds to enter Child Lock with beep sounds. Repeat it will unlock.
7. Preset
Press this button preset the washing time.
8. Water level
Press this button to choose right water level according to the weight of clothing, so as to avoid the water waste. In intelligent program, the machine will estimate the weight of clothes and choose the water level automatically.
9. Program
Press this button to choose the desired program.
Intelligent: to wash according to the weight of clothes adjusting the water level.
Normal: to wash normal quality clothes, can set water level from 1 to 10 according to the loading.
Heavy: to wash the coverlet, jeans and other big clothes.
Gentle: to wash all kinds of woolens, silks and fine quality clothes.
Soak & wash: to soak and wash.
Water Saving: to wash the clothes quickly.
Air dry: to dry the tub or clothes.
Tub clean: to clean the tub itself.
Parts Identification
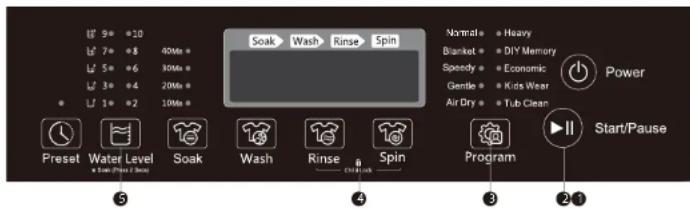
WM120A Control Panel
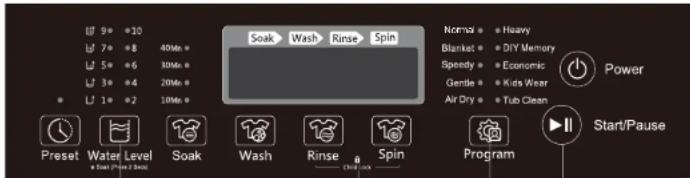
5
1. Power On/Off button
Press the Power button to turn on the power. After power-on, press the Power button to turn off the power. After the power is turned on, after 5 minutes, if the washing machine is started without pressing the Power button, the unit will automatically power off.
2. Start/pause button
After turning on the power, press the Start/Pause button to start. Press the Start/Pause button while running to pause. Press the Start/Pause button while paused and start again.
3. Program
Press this button to choose the desired program.
Normal: standard washing procedure that automatically adjusts the appropriate water level according to the amount of clothing.
Blanket: washing of large fabrics such as blankets.
Speedy: to wash the slight dirty clothes.
Gentle: to wash wool or underwear.
Air dry: to dry the tub and clothes to some extend
Heavy: to wash the big clothes.
DIY Memory: memorizing the last set of procedures.
Economic: to wash clothes by saving water and electricity.
Kids Wear: to wash baby clothes
Tub clean: to clean the tub when it is idled.
-
Preset: Press the 【Preset】 button to set the preset time.
-
Wash: The washing time can be adjusted and set.
-
Soak: Select time of soak by pressing this button.
-
Rinse: The rinsing times can be set.
-
Spin: The spinning times can be set.
-
Child Lock combination Button
After the program starts, press the buttons of 【Rinse】 and 【Spin】 for 1.5 seconds. After one buzzing, the washing machine enters the "Child Lock" state, repeated operation can cancel the "child lock".
10. Water level button
According to the loading of clothing to press "Water level" button to choose the right water level. The washing machine determines the weight of the clothes and automatically sets the water level according to the results of the fuzzy program. Some programs have no water level buttons that are invalid or not adjustable.
Specifications
| Model | WM80A | WM100A | WM120A |
| Voltage | 220-240V~50Hz | 220-240V~50Hz | 220-240V~50Hz |
| Wash/Spin Power | 420W | 600W | 600W |
| Wash/Spin Capacity | 8kg | 10kg | 12kg |
| Water Level Volume | |||
| High (Litres) | 62L | 78L | 88L |
| Low (Litres) | 20L | 33L | 25L |
| Spin Speed | 720rpm | 670rpm | 660rpm |
| Net Weight (kg) | 33.5kg | 37kg | 45kg |
| Gross Weight (kg) | 38kg | 42kg | 51.5kg |
| Product Dimension (LxWxH)mm | 600 x 595 x 955 mm | 630 x 640 x 1015 mm | 610 x 630 x 1010 mm |
| Box Dimension (LxWxH)mm | 650 x 650 x 1015 mm | 680 x 680 x 1050 mm | 685 x 705 x 1075 mm |
Installation
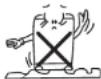
Place the washing machine on the flat and solid ground
- Please do not put the package base (plastic support) under the washing machine, because it will produce noise and damage the washing machine.
- Place the washing machine on the flat and solid ground.
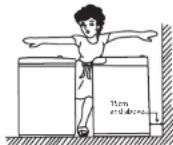
- Please keep the distance of more than 15cm from surroundings wall, for proper ventilation avoid noise during spin function.
Do not obstruct the openings of the bottom face with carpet etc.

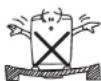
Horizontal adjustment
Shake the washing machine, make sure it is fastened.
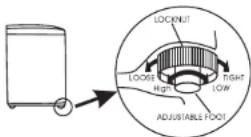
- Loosen the locknut and turn the adjustor to avoid shaking.
• If there is no shaking, please turn the locknut into tight.
• The inclination angle of the washing machine should not be more than 2 degrees.
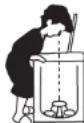


- Confirming horizontal level as the picture showing.
Installation Installation
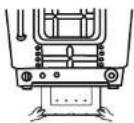
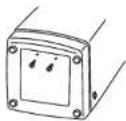
Anti-rat bottom board installation
- After installing the washing machine, take out the anti-rat bottom board. Turn upwards the board showing "up" and insert it from the back side of washing machine. (If the anti-rat bottom board does not insert completely, it will produce noise when spinning.
• Install the fixed screw in the screw intake.
Outer drain hose installation

- Insert the outer drain hose into the intake on side of washing machine.
- Push the outer drain hose into the washing machine, and then fix it by spring ring. Insert the outer drain hose properly to avoid water leakage.
- When the washing machine is running, please lay down the outer drain hose and make sure it does not entangle. The height of drain hose should be lower than 6cm, in order for the washing machine to spin properly.
Outlet

natural_image
Three identical line drawings of a faucet and a valve, each with no text or symbols- Select the appropriate type of outlet as shown in the figure.
- End of outlet spout should be more than 10mm, or the connector cannot be assembled.
- Water leakage is possible from here.
The installation of water inlet hose
1
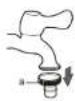

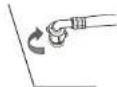
- Unscrewing the part "a" from the water faucet.
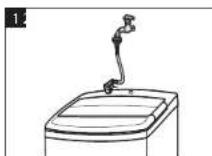
- Respectively attach the water inlet hose to the water faucet. Note: Do not over tighten. Damage to the valve can result.
- Run water through both faucet and inlet hose, into a bucket or laundry tub, to get rid of particles in the water line that might clog the inlet valve screen.
- Attach the hose connected with the water faucet to the water inlet valve. Note: Do not overlighten.Damage to the valve can result.
- Check for leak
- Swing the water inlet hose gently to confirm if it's suitable.
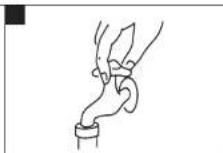
- Turn on the water faucet and check for leak. A small amount of water might enter the washer. You will drain this later.
Installation How To Use
Connection of the power cord
natural_image
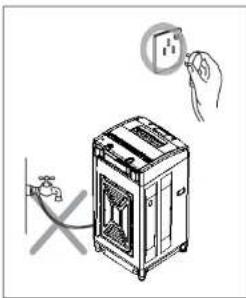
Illustration of a washing machine with a hand inserting a power outlet into it, no text or symbols present- The earthing which is indicated by yellow and green colour must be firmly connected to a special Earthing. Please call the technician to assemble.
- The socket should have assembled the 3A fuse.
Note:
- Never try to connect the earthing of the washing machine together with that of gas pipe or water pipe, telephone cord or lightening rod.
- Do not use the damaged cord because it could cause electricity leakage and fire.
• In case cord is damaged, please contact the local service company, because it is removed and replaced with special tools.
natural_image
Line drawing of a hand holding a wall-mounted electrical socket (no text or symbols)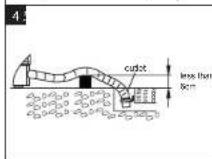
natural_image
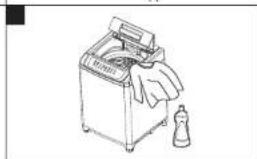
Line drawing of a washing machine with a hand and a bottle beside it (no text or symbols)- Install the water inlet hose.
- Turn on the tap.
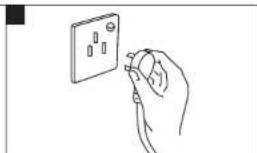
- Plug in the power cord.
- Insert the end of the drain hose into the hook shelf, and hang the drain hose over a drain outlet.
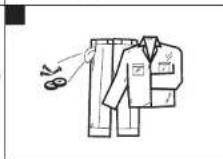
- Before washing, please take out coins or other hard goods, and pull to close the zip fastener to prevent clothes and barrel from damage.
- Put suitable detergent and wash load into the tub.
WM80A

Power Switch
Press the power switch to turn on the washing machine. The default indicator will light on.

Washing Program Selector
The model has 8 programs to fit for different clothes quality. The default program is "Normal". If other program is needed, you can press Program button to choose.

Start/Pause Button
• After pressing START/PAUSE button, the washing machine start to work.
- If it is needed to change PROGRAM or WATER LEVEL, please press START/PAUSE button to pause the washing machine and reset the model. After the setting, press this button again, the washing machine will start according to the new setting.
• To avoid danger, do not open the wash lid during the running of washing machine, especially in spinning process.
Wash Over
• The Buzzer will alarm finish, and it will power off automatically.
- Unplug the power cord.
WM100A

Power Switch
Press the power switch to turn on the washing machine. The default indicator will light on.

Washing Program Selector
The model has 8 programs for different clothes quality. You can select the desired program according to the need.
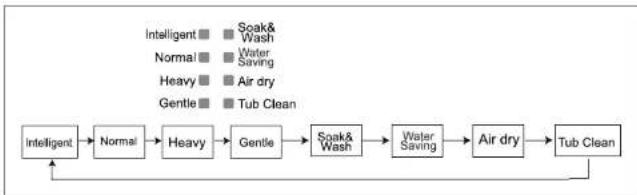
flowchart
graph LR
    A["Intelligent"] --> B["Normal"]
    B --> C["Heavy"]
    C --> D["Gentle"]
    D --> E["Soak& Wash"]
    E --> F["Water Saving"]
    F --> G["Air dry"]
    G --> H["Tub Clean"]
    I["Intelligent ▪ Soak& Wash ▪ Normal ▪ Water Saving ▪ Heavy ▪ Air dry ▪ Gentle ▪ Tub Clean"] --> A

Water Level Switch
Choose the water level according to the wash loading.
Diy Switch To Choose Suitable Wash Way
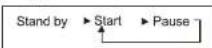
• After power on, press Program to choose a suitable program.
• After setting the program, you can press Wash, Rinse, Spin, Water Level or Preset button to set the washing time, rinsing frequency, spinning time, or if select water recycles and preset function according to the user's need.
• Press the Start button to start.
- Close the door lid.
How To Use

Preset Selector
- Select an automatic process or edit process by yourself.
- If the preset selector is needed, you can press the Preset button until the indicator of the preset is light up. The indicating window indicates the needs of time for washing (hour).
- Please close the wash lid completely. (otherwise, the machine will give an alarm)
• The washing machine works as a program you have set and shows the left time as you preset. - During the process of counting down to preset time, all buttons except power switch cannot be pressed.
Saving water function to save water
- Unless the user sets the water to recycle function, the machine will not carry out that function. If need that function, press the Rinse button before the last water draining with the Saving water light on, if no need, press it to let light off.
- When it is on, the machine will not drain at the last wash. It will remind the user to keep the water until the Rinse button is pressed.
- During keeping water, pressing the Rinse button is available to stop or start draining.
Start/Pause Button
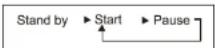
• After pressing the Start/Pause button, the washing machine starts to work.
- If it is needed to change Program, Water level, Process, please press the Start/Pause button to pause the washing machine and the preset mode. After the setting, the washing machine will start according to the new setting.
- When the machine at the preset mode, the Start/Pause button cannot be pressed.
Wash Over
- Do not open the lid during the operation of the machine, especially in spinning, to avoid danger.
- The Buzzer will alarm after the program finish, and it will power off automatically.
• Unplug the power cord. - Maintenance as shown page 2 at "maintenance".
Fuzzy function
- If there is no water in the tub, the press power switch and the Start/Pause button, it will start the function, and the machine will set the water level according to the wash loading. If some water in the tub, the fuzzy function cannot be started up.
- Before starting the fuzzy, pressing Program, the Adjust or Water level button will result in canceling the fuzzy function.
- Before starting the fuzzy function, putting the laundry into the tub in advance is necessary, or the water level may be improper.
Child lock
- The washing machine should only be used by adults. The children should not be allowed in the area of the machine unsupervised. To keep children from touching the controls or playing with the appliance, the child lock function is a perfect design.
- Press and hold the two buttons (Preset & Wash) simultaneously for 1.5 seconds to set the child lock. If needs to deactivate this function, just press and hold the same two buttons for 1.5 seconds.
How To Use
WM120A

Power Switch
Press the "Power" button to turn on the power.

Washing Program Selector
Press the "Program" button to select the appropriate full-automatic program. When the power is turned on, the washing machine is automatically set to a "Normal" program. If you need to select other fully automatic programs, you can press the "program" button to turn on the corresponding program lights.

Water Level Switch
Press "Water level" button to choose the right water level.
a. After the power is turned on, the washing machine is automatically set to a fuzzy function without water level display. If you need to choose other water level, you can press the "water level" button to choose it.
b. When the power is turned on, if there is water in the laundry barrel, the washing machine cannot enter the fuzzy function, and the default program is "Normal".
If self-programming is needed, press the buttons of "washing", "rinsing" and "spinning" separately to switch the different washing processes and adjust the time.

Start/Pause Button
a. After the system starts, if you need to change the settling program, you can first press the "Start/Pause" button to pause the system operation, then press other buttons to set, and finally press the "Start/Pause" button, the system will run according to the newly set program. Close the top cover and the washing machine is in operation.
b. Do not open the upper cover at will during the operation of the washing machine, especially in the process of spinning, to avoid accidents.
c. When the washing is finished, it buzzes automatically and power off.
Troubleshooting
| ReasonMalfunction Phenomenon | |
| Start the washing machine from Rinse Process, the washing machine does not input the water | The washing machine will start from the spin process in order to spin out the water and detergent from the clothes, then input the water (if there is water in the tub it will drain out the water first) |
| The wash process changes from Spin to Rinse | When the clothes are not even or are on a single side of the tub, the washing machine will input the water and make the clothes balance and even |
| The control button is useless to touch | If want to change the PROCESS after the washing machine started, please touch the Start/Pause button to reset the process |
| Spin delay The washing machine will delay 15 to 60 seconds to enter spin process after drain or after select spin process only | |
Before maintenance
| ChecklistProblem | |
| Does not work • Is electricity present? | • Is the tap opened?• Is the plug loose, or fuse broken?• Turn on the power or start button? |
| Fail to fill water | • Is the tap opened?• Is the drain hose frozen?• Is the water supply cut?• Is the water inlet valve blocked? |
For some troubles, the machine buzzer will ring and alarm, and the indicator will flash.
WM80A
| ChecklistTroubles Display | Solution | ||
| Breakdown | No display | The plug is badly connected to the socket or the switch is not activated. | Connect the plug properly activate the switch. |
| No display | The socket is dead or the fuse is broken. | Contact the authorized technician. | |
| No display | The current process is lost for power failure. | Reuse only when power failure is eliminated. | |
| No display | The voltage is too low or too high. | Remove the plug and reuse it when the voltage comes to normality. | |
| Standing drain | E1 | The drain hose is hung up over 90cm or is blocked. | Check the drain hose, open the lid and then close it to continue drain process. |
Troubleshooting
| ChecklistTroubles Display | Solution | ||
| Spin malfunction | E2 | The lid is opened during spinning (stop working and alarm), or used under glaring sunlight. | Close the lid or use it indoors. |
| A conflict between the tub and the cabinet during spinning | E3 | The clothes are not laid evenly in the tub. The machine will try to make an automatic check and adjustment for 2 times, or if nothing available, an alarm will be given. | Open the lid, distribute the clothes evenly in the tub and then cover it. |
| Insufficient water supply | E4 | The tap is closed, water supply is cut off or water pressure is too low, so the water fails to reach to the desired level for quite a long time. | Open the tap or use the machine after the water pressure comes to normal.Open the wash lid, close it and restart to input water. |
| Abnormal water level sensor | E6 | The sensor fails for short or open current, etc. and an alarm will be given. | Contact the authorized technician. |
| Unstoppable inlet or automatic drain | E7 | Abnormalities occur in computer sequencer, inlet valve or water level sensor. | Cut off the power after draining, and try to contact the authorized technician. |
| Fail to power off or power on | No display | Computer sequencer is broken. Contact | the authorized technician. |
WM100A
| ChecklistTroubles Indicator Light | Solution | ||
| Breakdown | No indicator | The plug is badly connected to the socket or the switch is not activated. | Connect the plug properly or activate the switch. |
| No indicator | The socket is dead or the fuse is broken. | Contact the authorized technician. | |
| No indicator | The current process is lost for power failure. | Reuse only when power failure is eliminated. | |
| No indicator | The voltage is too low or too high. | Remove the plug and reuse it when the voltage comes to normality. | |
| Standing drain | E1 | • The drain hose is blocked;• The drain hose is hung up over 90cm | Check the drain hose, open the lid and then close it to continue the draining process. |
Troubleshooting
| ChecklistTroubles Indicator Light | Solution | ||
| Spin malfunction | E2 | The lid is unclosed during the spin,or use under glaring sunlight. | Close the lid or use it indoor. |
| A conflict between the tub and the cabinet during the spinning | E3 | The clothes are not laid evenly in the tub. The machine will try to make an automatic check and adjustment for 2 times, or if nothing available, an alarm will be given. | Open the lid, distribute the clothes evenly in the tub and then cover it. |
| No indicator | The clothes are not laid evenly in the tub but not enough to cause the alarm. | Open the lid, distribute the clothes evenly in the tub and then start to spin again. | |
| Insufficient water supply | E4 | The tap is closed, water supply is cut off or water pressure is too low, so the water fails to reach the desired level for quite a long time. | Open the lap or use the machine after the water pressure comes to normal. Open the wash lid, close it and restart to input water. |
| Unavailable preset function | E5 | The lid is unclosed during the preset process (the process will pause and an alarm will be given). | Close the lid. |
| Abnormal water level sensor | E6 | The sensor fails for short or open current, etc. and an alarm will be given. | Contact the authorized technician. |
| Unstoppable inlet or automatic drain | E7 | Abnormalities occur in PCB, inlet valve or water level sensor. | Cut off the power after draining, and try to contact the authorized technician. |
| Memory chips break down | E9 | It can not be read or wrote. Contact the authorized technician. | |
| Fail to power off or power on | Unending process or no indicator | PCB is broken. Contact the authorized technician. | |
Troubleshooting
WM120A
| CauseTroubles Display Solution | |||
| Totally not working | No display | The power plug is not plugged in and power switch is not pressed. | Plug in power plug and press power switch. |
| No display | The outlet has no electricity or the fuse is broken. | Ask an electrician to check the socket or fuse. | |
| No display | The power outage causes program to disappear and the operator must operate it again after the call. | After starting the call, press again to operate each press. | |
| There is no display when voltage is too low, or fuse may be open when voltage is too high. | The voltage is too low or too high. Unplug power plug and wait until voltage is normal. | ||
| Poor drainage | E1 | The outlet of drain pipe is too high or blocked, resulting in the water not being discharged after 5 minutes. | After checking the drain and rectifying the fault, open the cover, close it, and re-enter the drain. |
| Not Spinning | E2 | No cover when washing (pause and alarm) or spin(cover and alarm) | Cover the cover. |
| Spinning touch the shell | E3 | Because the laundry unevenly touches the shell when it is unbalanced during spinning, the washing machine will automatically correct it, and if it is still invalid after two times, it will alarm. | Open the top cover, place the clothes manually and close the cover. |
| Insufficient water injection | E4 | The faucet is not on, the water is stopped or the water pressure is low. After 16 minutes, the water level is less than the set water level. | Open tap or wait until water pressure is normal before use.Open cover, close cover, and re-enter water inlet process. |
| Fail to preset | E5 | The lid is open when preset. Close the lid and try again. | |
| Water level sensor abnormal | E6 | Water level sensor failure, open circuit or short circuit, then automatically alarm. | Please have professional maintenance personnel overhaul. |
| Water intake or automatic drainage | E7 | Computer board, inlet valve, or water level sensor is abnormal. | Turn off power after the water is finished. Please have professional service personnel repair it. |
Troubleshooting
| CauseTroubles Display Solution | |||
| Memory chip failure | E9 | Cannot read and write. Request professional maintenance. | |
| Unable to start or not boot | No display | Computer board failure. Request professional maintenance. | |
Note: When you check and troubleshoot, then start the washing machine. If there is any abnormality, please unplug the power plug and call our customer service phone as soon as possible.
安全注意事项
- 过滤器
- 排水管
- 控制面板
- 波轮
- 调整脚
(位置因型号而异)
配饰


零件识别
控制面板
WM80A 控制面板
- 开/关电源按钮
natural_image
Illustration of a washing machine with a hand holding a power outlet and a cross symbol indicating no change (no text or symbols present)- Injap masuk air
- Kerangka
- Penegang
- Kabel kuasa
-
Kabinet
-
Plat belakang
- Pangkalan
- Penutup basok
- Bekas bahan pencuci
-
Tab dalaman
-
Penapis
- Paip saluran pembuangan
- Panel kowalan
- Pemutar "Pulsator"
- Koki pengimbang (lokasi berbeza bergantung pada model)
Aksesori
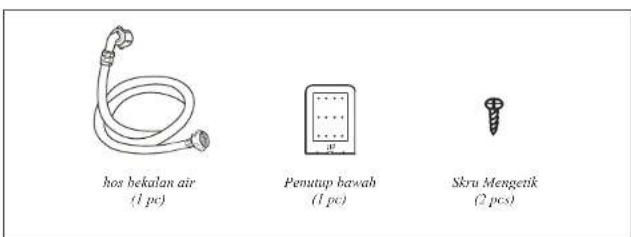
Pengenalan Bahagian
Panel Kawalan
Panel Kawalan WM80A
- Butang Kuasa Hidup/Mati
Panel Kawalan WM100A
1. Butang Power On/Off
6. Kunci "Child Lock"
Panel Kawalan WM120A
1. Butang Hidup/Mati
natural_image
Three identical line drawings of a faucet, a valve, and a pipe with a handle, all without any text or symbols.- ☑ DENOTING IT SHOULD BE PROHIBITED ① DENOTING IT SHOULD BE PAID ATTENTION
- !
- Care & Maintenance
- Filter Box
- The Unit
- Safety Precaution Information
- Attention:
- Parts Identification
- Power On/Off button
- Start/pause button
- Program selection
- Child lock function
- Water level selection
- Spin
- Rinse
- Wash
- Child Lock
- Preset
- Water level
- Program
- WM120A Control Panel
- Program
- Water level button
- Installation
- Place the washing machine on the flat and solid ground
- Horizontal adjustment
- Installation Installation
- Anti-rat bottom board installation
- Outer drain hose installation
- Outlet
- The installation of water inlet hose
- Installation How To Use
- Connection of the power cord
- Note:
- WM80A
- Power Switch
- Washing Program Selector
- Start/Pause Button
- Wash Over
- WM100A
- Water Level Switch
- Diy Switch To Choose Suitable Wash Way
- How To Use
- Preset Selector
- Saving water function to save water
- Fuzzy function
- Child lock
- WM120A
- 安全注意事项
- 配饰
- 零件识别
- 控制面板
- Pengenalan Bahagian
- Butang Power On/Off
- Kunci "Child Lock"
- Butang Hidup/Mati
Brand : Khind
Model : WM100A
Category : Washing machine