
PAR-10Z-7-R - Lighting Soundsation - Free user manual and instructions
Find the device manual for free PAR-10Z-7-R Soundsation in PDF.


| Product Type | LED PAR Light |
| Model | PAR-10Z-7-R |
| LEDs | 7x 10W High-brightness 6-in-1 (RGBWA+UV) |
| Luminous Flux | 2300 lux @ 2m; 990 lux @ 1m |
| Power Consumption | 80W |
| Mains Voltage | 110V ~ 240V, 50-60Hz |
| Control Modes | DMX512 (12CH), Master/Slave, Manual, Sound Active, Auto, IR Remote |
| Dimmer Curves | Standard, Curve 1-4 (selectable via menu) |
| Optical System | 25° angle lens |
| IP Rating | IP20 |
| Housing Material | ABS |
| Working Temperature | -20°C to 50°C |
| Dimensions (WxHxD) | 19 x 14 x 16 cm (excluding bracket) |
| Net Weight | 1.1 kg |
| Packing Dimensions | 34 x 30 x 32 cm |
| Packing Weight | 1.6 kg |
| Mounting | 2x adjustable brackets; safety chain required |
| Accessories Included | IR remote control (battery not included), user manual |
| Warranty | 2-year limited warranty |
| Cleaning | Dry cloth only; do not use solvents |
Frequently Asked Questions - PAR-10Z-7-R Soundsation
User questions about PAR-10Z-7-R Soundsation
0 question about this device. Answer the ones you know or ask your own.
Ask a new question about this device
Download the instructions for your Lighting in PDF format for free! Find your manual PAR-10Z-7-R - Soundsation and take your electronic device back in hand. On this page are published all the documents necessary for the use of your device. PAR-10Z-7-R by Soundsation.
USER MANUAL PAR-10Z-7-R Soundsation
USER MANUAL MANUALE UTENTE
First of all thanks for purchasing a SOUNDSATION® product. Our mission is to satisfy all possible needs of musical instrument, professional audio and lighting users offering a wide range of products using the latest technologies.
We hope you will be satisfied with this item and, if you want to collaborate, we are looking for a feedback from you about the operation of the product and possible improvements to introduce in the next future. Go to our website www.soundsationmusic.com and send an e-mail with your opinion, this will help us to build instruments ever closer to customer's real requirements.
One last thing: read this manual before using the instrument, an incorrect operation can cause damages to you and to the unit. Take care!
The SOUNDSATION Team
Gentile Cliente,
IMPORTANT SAFETY SYMBOLS

The symbol is used to indicate that some hazardous live terminals are involved within this apparatus, even under the normal operating conditions, which may be sufficient to constitute the risk of electric shock or death.

The symbol is used in the service documentation to indicate that specific component shall be replaced only by the component specified in that documentation for safety reasons.

Protective grounding terminal

Alternating current/voltage
Hazardous live terminal
ON
Denotes the apparatus is turned on
OFF
Denotes the apparatus is turned off
WARNING:
Describes precautions that should be observed to prevent the danger of injury or death to the operator.
CAUTION:
Describes precautions that should be observed to prevent danger of the apparatus.
TAKING CARE OF YOUR PRODUCT
▶ Read these instructions
▶ Keep these instructions
▶ Heed all warning
▶ Follow all instructions
WATER / MOISTURE
The apparatus should be protected from moisture and rain and can not be used near water; for example near a bathtub, a kitchen sink, a swimming pool, etc.
HEAT
The apparatus should be located away from heat sources such as radiators, stoves or other appliances that produce heat.
VENTILATION
Do not block areas of ventilation opening. Failure to do could result in fire. Always install according to the manufacturer's instructions.
OBJECT AND LIQUID ENTRY
Objects do not fall into and liquids are not spilled into the inside of the apparatus for safety.
INSTALLATION
Always secure fixture using a safety chain and carrying handles. Never carry the fixture by its cord.
POWER CORD AND PLUG
Protect the power cord from being walked on or pinched particularly at plugs, convenience receptacles, and the point where they exit from the apparatus. Do not defeat the safety purpose of the polarized or grounding-type plug. A polarized plug has two poles; a grounding-type plug has two poles and a third grounding terminal. The third prong is provided for your safety. If the provided plug does not fit into your outlet, refer to an electrician for replacement.
POWER SUPPLY
In case of external power supply, the apparatus should be connected to the power supply only of the type as marked on the apparatus or described in the manual. Failure to do could result in damage to the product and possibly the user. Unplug this apparatus during lightning storms or when unused for long periods of time.
FUSE
To prevent the risk of fire and damaging the unit, please use only of the recommended fuse type as described in the manual. Before replacing the fuse, make sure the unit turned off and disconnected from the AC outlet.
ELECTRICAL CONNECTION
Always disconnect from power source before servicing or replacing fuse and be sure to replace with same fuse size and type. Cut off power before moving, repairing and cleaning the machine. Improper electrical wiring may invalidate the product warranty. To avoid electric shock, all fixtures must be connected to circuits with a suitable ground. Do not power on and power off the fixture in a short time.
DMX CONNECTION
When use DMX controller, please make sure that there is no interference sources (e.g. intercom, high frequency radio waves and radiation source).
CLEANING
Clean only with a dry cloth. Do not use any solvents such as benzene or alcohol.
SERVICING
In case of failure or mis-function occurred, stop using the unit immediately, Do not implement any servicing other than those means described in the manual. Refer all servicing to qualified service personnel only. Only use accessories/attachments or parts recommended by the manufacturer.
WARNING
Please remember the high sound pressure do not only temporarily damage your sense of hearing, but can also cause permanent damage. Be careful to select a suitable volume.
INTERFERENCE FROM CELL PHONE
Using a cell phone near the wireless system can induce noise. If this occurs, move the cell phone further away from the components of the wireless system.
I. UNPACKING
Carefully unpack the box and check the contents to ensure that all parts are present and in good conditions. Package includes following parts:
▶ PAR-10W-7-R PAR light
▶ Remote control (Lithium battery not included)
This user manual
If anything damaged during transport, notify the shipper immediately and keep the packing material for inspection. Again, please save the carton and all packing materials. If the fixture must be returned to manufacturer, it is important that the fixture be returned in the original manufacturer box and packing.

ATTENTION: Packaging bag is not a toy! Keep out of reach of children!!! Keep in a safe place the original packaging material for future use.
I.I. Getting started
Make sure there is enough space around the unit for proper ventilation and prevent overheating; do not place the unit on top of hot devices such as radiators or power amplifiers. The fixture is connected to mains through its mains cord. The product meets the required safety standards.

Make sure that all units must be properly grounded. For your safety, you should never remove any ground connector from electrical devices or power cables, or make them inoperative.
Our products are subject to a process of continual further development. Therefore modifications to the technical features remain subject to change without further notice.
2. ACCESSORIES
SOUNDSATION can supply a wide range of quality accessories that you can use with your this PAR, like DMX Cables, Lighting consoles, and other accessories.
All products in our catalogue has been long tested with this device so we recommend to use Genuine SOUNDSATION Accessories and Spare Parts.
Ask your SOUNDSATION dealer for any accessories you could need to ensure best performance of the product.
3. OVERVIEW
PAR-10W-7-R combines all latest LED technology benefits with DMX and IR remote control in a lightweight housing. It is equipped with 7pcs ultra-brightness 10W LED (6in1) so that it meets most of live or fixed installation application. The compact housing design helps heat radiation so it works more stably in despite of how rigorous condition it is. What's more, it is driven by the latest dimmer technology so it brings you more smooth and excellent color mixture. Finally, the IR remote control function make it very easy use. Even without a DMX controller.
4. MAIN FEATURES
▶ 10W x 7PCS 6 IN1 high brightness LEDs
▶ 2300lux @ 2meter
▶ Advanced dimmer system
▶ IR remote control
5. REAR PANEL CONTROLS

- Display: It shows all menus and functions. Please refer to "7. LED DISPLAY AND BUTTONS OPERATION" at page 10 for further information.

soundsation
- Buttons: The four buttons allow the user to navigate all menus and change value to all functions. Please refer to "7. LED DISPLAY AND BUTTONS OPERATION" at page 10 for further information.
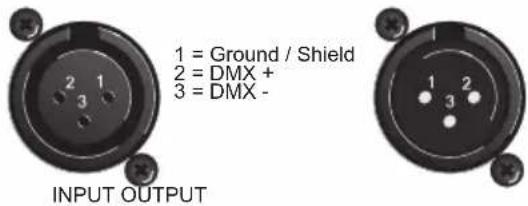
- DMX Signal output: It transfers DMX signal to next fixture. Please use 3pin XLR signal cable.
- DMX signal input: It receives DMX signal from another fixture. Please use 3pin XLR signal cable.
- Power PLUG: This is a grounding-type plug with two poles and a third grounding terminal. The third prong is provided for your safety. If the provided plug does not fit into your outlet, refer to an electrician for replacement.
6. INSTALLATION
6.1. Rigging and Clamps

Pay attention to the safety! Please respectively consider the EN 60598-2-17 and the national standard during the installation. The authorized dealer must only carry out the installation.
The installation of the fixture has to be built and constructed in a way that it can hold 10 times the weight for 1 hour without any harming demolish. The installation must always be secured with a secondary safety attachment, e.g. an appropriate catch net. This secondary safety attachment must be constructed in a way that no part of the installation can fall down if the main attachment fails.
When rigging, de-rigging or servicing the fixture staying in the area below the installation place, on bridges, under high working places and other endangered areas is forbidden. The operator has to make sure that the safety measure and the machine's technical installation is approved by an expert before taking into operation for the first time and after changes before taking into operation another time. He has also to make sure that an expert approves safety measure and the machine's technical installation once a years.

WARNING: The fixture should be installed outside areas where persons may walk by or be seated.

IMPORTANT: Overhead rigging requires extensive experience, including (but not limited to) calculating working load limits, installation material being used, and periodic safety inspection of all installation material and the projector. If you lack these qualifications, do not attempt the installation yourself, but instead use a professional structural rigger. Improper installation can result in bodily injury or property loss.
If the fixture shall be lowered from the ceiling or high joists, professional trussing
systems have to be used. The fixture must never be fixed swinging freely in the room. Before rigging make sure that the installation area can hold a minimum point load of 10 times the projector's weight.

CAUTION: Fixture may cause severe injuries when crashing down. If you have doubts concerning the safety of a possible installation, do not install the fixture!

CAUTION: Use two appropriate clamps to rig the fixture on the truss. Follow the instructions mentioned at the bottom of the base. Make sure that the device is fixed properly! Ensure that the structure (truss) to which you are attaching the fixtures is secure.

DANGER OF FIRE! When installing the device, make sure there is no highly inflammable material (decoration articles, etc.) within a distance of minimum 0.5m.
For overhead use, always install a safety rope that can hold at least 10 times the weight of the fixture.
6.2. Mains Connections
Connect the device to the mains with the power-plug. The wire correspondence is as follow:
| WIRE PIN INTERNATIONAL | |
| Brown Live L | |
| Blue Neutral N | |
| Yellow/Green Earth | |

The earth must to be connected! Pay attention to safety!
Before taking into operation for the first time, the installation has to be approved by an expert.
6.3. DMX-512 Connection
Wires must not come into contact with each other; otherwise the fixtures will not work at all, or will not work properly. Only use a DMX cable, 3-pin XLR plugs and connectors in order to control with the fixture or one fixture with another.

If you are using the recommended controllers, you can connect the DMX output of the
controller directly with the DMX input of the first fixture in the DMX chain. If you wish to connect DMX controllers with other XLR output, you need to use adapter-cables.
BUILDING A SERIAL DMX CHAIN
![graph TD A["DMX 512"] --> B["DC"] C["DMX Termonator"] --> D["DC"] B --> E["Signal Line"] D --> F["Signal Line"] style A fill:#f9f,stroke:#333 style C fill:#f9f,stroke:#333 style D fill:#f9f,stroke:#333](/content/2026/05/938054/images/efb69bcaa2c99507afb10ec4fed14fb8139fced5730022c50d17082139b29d81.jpg)
Connect the DMX output of the first fixture in the DMX chain with the DMX input of the next fixture. Always connect one output with the input of the next fixture until all fixtures are connected.
A word on termination: DMX is a resilient communication protocol, however errors still occasionally occur. Termination reduces signal errors, and therefore best practices include use of a terminator in all circumstances. If you are experiencing problems with erratic fixture behavior, especially over long signal cable runs, a terminator may help improve performance.

To build your own DMX Terminator: Obtain a 120-ohm, 1/4-watt resistor, and wire it between pins 2&3 of the last fixture. They are also readily available from specialty retailers.

Complimentary signal cable can transmits signals to 20 unit fixtures at most. Signal amplifier is a must to connect more fixtures.
7. LED DISPLAY AND BUTTONS OPERATION
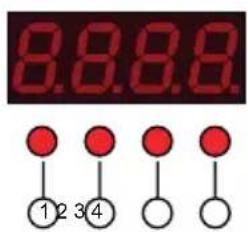
| Sq No. | Display Function | |
| 1 MENU | Enter the menu | |
| 2 DOWN | Next menu | |
| 3 UP | Previous menu | |
| 4 ENTER | Enter the select function |
7.1. LED display function
Press MENU button to choose a function and ENTER button to enter the chosen function; then press UP/DOWN button to select a parameter and ENTER to confirm. Menu operation as follows:
| No. | Display Function Specification (Press" ENTER") | |
| 1 r— | — r000 to r255: | Red from dark to bright |
| 2 | g— — | g000 to g255: Green from dark to bright |
| 3 | b— — | b000 to b255: Blue from dark to bright |
| 4 | n— — | n000 to n255, White from dark to bright |
| 5 | A— — | A000 to A255, Amble from dark to bright |
| 6 | P— — | P000 to P255: UV from dark to bright |
| 7 | F— — | F000 to F255: flash speed, from slow to fast |
| 8 | C— — | C000 to C255: 7 color shade, from slow to fast |
| 9 J— | — 7 color skip, from slow to fast | |
| 10 | S— — | S000 to S255: sound speed, from slow to fast |
| 11 | dr— — | dr-0 standard dimmer; dr-1 dimmer curve1; dr-2 dimmer curve 2; dr-3: dimmer curve3; dr-4 dimmer curve4 |
| 12 | d— — | DMX12 control (please connect a controller) |
8. IR REMOTE CONTROL
PAR-10W-7-R features an IR remote controller. It operates within 5m from the fixture.

| Up* Down* LED off | All LED Full Bright | |
| Red Green Blue White | ||
| Color1 Color2 Color3 Strobo | ||
| Color4 Color5 Color6 | Color Change | |
| Color7 Color8 Color9 Fade | ||
| Color10 Color11 Color12 Sound |

(*) NOTE about Up/Down: press them to change color brightness, strobe/color change/fade speed, or detection sense of sound active.
9. DIMMER CURVES

Ramp Effect Menu Tup (ms) Tdown (ms)
| Standard Dimmer Curve | dr-0 | 0 | 0 |
| Dimmer Curve 1 | dr-1 | 980 | 1010 |
| Dimmer Curve 2 | dr-2 | 1210 | 1320 |
| Dimmer Curve 3 | dr-3 | 1600 | 1710 |
| Dimmer Curve 4 | dr-4 | 1850 | 198 |
10. DMX512 CHANNEL CHART (12CH)
| CH | Function | Specification |
| CH1 | Dimmer R G B | W color from dark to bright |
| CH2 | R dimmer Red | color from dark to bright |
| CH3 | G dimmer | Green color from dark to bright |
| CH4 | B dimmer | Blue color from dark to bright |
| CH5 | W dimmer | White color from dark to bright |
| Ch6 Amber dimmer Amber from dark to bright | ||
| CH7 UV dimmer Uv from dark to bright | ||
| CH8 Strobe 7 color flash speed, from slow to fast | ||
| CH9 Color mix Seven color mix | ||
| CH10 Auto | 0-10 N/A; 11-70: shade; 71-130: skip; 131-190: flash by sound; 191-255: skip by sound. | |
| CH11 Auto Speed DMX10 auto speed, sound adjustment, from slow to fast | ||
| CH12 | Half Power under high temperature | 0-20: Standard Dimmer; 21-40 Dimmer Curve1; 41-60 Dimmer Curve 2; 61-80 Dimmer Curve3; 81-100 Dimmer Curve4; 101-255 N/A |
II. SPECIFICATIONS
| Mains Voltage: | 110V ~ 240V, 50-60HZ |
| Power Consumption: 80W | |
| LED: | 7x 10W High-brightness 6in1 (RGBWA+UV) LEDs |
| Full Color Lux: | 2300 lux @ 2m; 990 lux @ 1m |
| Control mode: | DMX512 9CH, Master/Slave, Manual, Sound Active, Auto |
| Housing Material: | ABS |
| Optical System: | 25° angle lens |
| IP Rate: | IP20 |
| Working Temperature: | -20 °C to 50 °C |
| Dimension (WxHxD): | 19 x 14 x 16 cm (excluding bracket) |
| Net Weight: | 1.1 kg |
| Packing Dimension (WxHxD): | 34x 30 x 32 cm |
| Packing Weight: | 1.6 kg |
| Mounting: | 2x brackets, adjustable |
| Accessory: | Remote Control |
12. WARRANTY AND SERVICE
All SOUNDSATION products feature a limited two-year warranty. This two-year warranty is specific to the date of purchase as shown on your purchase receipt.
The following cases/components are not covered from the above warranty:
• Any accessories supplied with the product
- Improper use
- Fault due to wear and tear
• Any modification of the product effected by the user or a third party
SOUNDSATION shall satisfy the warranty obligations by remedying any material or manufacturing faults free of charge at SOUNDSATION's discretion either by repair or by exchanging individual parts or the entire appliance. Any defective parts removed from a product during the course of a warranty claim shall become the property of SOUNDSATION.
While under warranty period, defective products may be returned to your local SOUNDSATION dealer together with original proof of purchase. To avoid any damages in transit, please use the original packaging if available. Alternatively you can send the product to SOUNDSATION SERVICE CENTER – Via Enzo Ferrari, 10 – 62017 Porto Recanati - Italy. In order to send a product to service center you need an RMA number. Shipping charges have to be covered by the owner of the product.
For further information please visit www.soundsationmusic.com
13. WARNING
PLEASE READ CAREFULLY – EU and EEA (Norway, Iceland and Liechtenstein) only
This symbol indicates that this product is not to be disposed of with your household waste, according to the WEEE Directive (2202/96/EC) and your national law.
This product should be handed over to a designated collection point, e.g., on an authorized one-for-one basis when you buy a new similar product or to an authorized collection site for recycling waste electrical and electronic equipment (WEEE).
Improper handling of this type of waste could have a possible negative impact on the environment and human health due to potentially hazardous substances that are generally associated with EEE. At the same time, your cooperation in the correct disposal of this product will contribute to the effective usage of natural resources.
For more information about where you can drop off your waste equipment for recycling, please contact your local city office, waste authority, approved WEEE scheme or your household waste disposal service.
SOMMARIO
- DISIMBALLAGGIO .... 18
14.1. Per iniziare ....18 - ACCESSORI .... 19
- PANORAMICA....19
- CARATTERISTICHE....19
- CONTROLLI DEL PANNELLO POSTERIORE....19
- INSTALLAZIONE......20
19.1. Occorrente e assemblaggio....20
19.2. Connessioni di rete....21
19.3. Collegare il DMX-512....21 - FUNZIONI DEL DISPLAY E DEI CONTROLLI ......23
20.1. Funzioni del display ....23 - IR CONTROLLO REMOTO....24
- CURVE DIMMER....24
- TABELLA DEI CANALI DMX512 (12CH)....25
- SPECIFICHE....25
- GARANZIA ED ASSISTENZA....26
- AVVISO 26
IMPORTANTI ISTRUZIONI DI SICUREZZA


DMX use of XLR connectors
| Ramp Effect Menu Tup (ms) Tdown (ms) | |||
| Curva Dimmer Standard | dr-0 | 0 | 0 |
| Curva Dimmer 1 dr-1 980 10 | 10 | ||
| Curva Dimmer 2 dr-2 1210 13 | 20 | ||
| Curva Dimmer 3 dr-3 1600 17 | 10 | ||
| Curva Dimmer 4 dr-4 1850 19 | 8 | ||
- TABELLA DEI CANALI DMX512 (12CH)
| CH Funzione Specifica | ||
| CH1 Dimmer R G B W colore da scuro a chiaro | ||
| CH2 Dimmer R Rosso da intenso a meno intenso | ||
| CH3 Dimmer G Verde da intenso a meno intenso | ||
| CH4 Dimmer B Blu da intenso a meno intenso | ||
| CH5 | Dimmer W | Bianco da intenso a meno intenso |
| Ch6 | Dimmer Ambra | Ambra da intenso a meno intenso |
| CH7 | Dimmer UV | Uv da intenso a meno intenso |
| CH8 | Strobo | 7 color flash speed, da basso a veloce |
| CH9 Mix | Colori Sette mix di colori | |
| CH10 | Auto | 0-10 N/A; 11-70: shade; 71-130: skip; 131-190: flash by sound; 191-255: skip by sound. |
| CH11 | Auto Speed | DMX10 auto speed, regolazione del suono, da lento a veloce |
| CH12 | Half Power under high temperature | 0-20: Standard Dimmer; 21-40 Dimmer Curve1; 41-60 Dimmer Curve 2; 61-80 Dimmer Curve3; 81-100 Dimmer Curve4; 101-255 N/A |
- SPECIFICHE
This product is imported in EU by


- USER MANUAL MANUALE UTENTE
- IMPORTANT SAFETY SYMBOLS
- WARNING
- CAUTION
- TAKING CARE OF YOUR PRODUCT
- WATER / MOISTURE
- HEAT
- VENTILATION
- OBJECT AND LIQUID ENTRY
- INSTALLATION
- POWER CORD AND PLUG
- POWER SUPPLY
- FUSE
- ELECTRICAL CONNECTION
- DMX CONNECTION
- CLEANING
- SERVICING
- INTERFERENCE FROM CELL PHONE
- UNPACKING
- I.I. GETTING STARTED
- ACCESSORIES
- OVERVIEW
- MAIN FEATURES
- REAR PANEL CONTROLS
- SOUNDSATION
- RIGGING AND CLAMPS
- MAINS CONNECTIONS
- DMX-512 CONNECTION
- LED DISPLAY AND BUTTONS OPERATION
- LED DISPLAY FUNCTION
- IR REMOTE CONTROL
- DIMMER CURVES
- DMX512 CHANNEL CHART (12CH)
- SPECIFICATIONS
- WARRANTY AND SERVICE
- SOMMARIO
- IMPORTANTI ISTRUZIONI DI SICUREZZA
Brand : Soundsation
Model : PAR-10Z-7-R
Category : Lighting