
SC-MAX770 - Hi-Fi System PANASONIC - Free user manual and instructions
Find the device manual for free SC-MAX770 PANASONIC in PDF.


| Product Type | Hi-Fi System |
| Brand | Panasonic |
| Model Number | SC-MAX770 |
| Dimensions (W x H x D) | 280 mm x 140 mm x 290 mm |
| Weight | 4.5 kg |
| Power Consumption | 55 W |
| Total Power Output (PMPO) | 300 W |
| Supported Media | CD, CD-R/RW, USB (MP3/WMA), FM/AM radio |
| Bluetooth | Yes (version 2.1 + EDR) |
| Audio Inputs | USB port, AUX-in (3.5 mm), FM/AM antenna |
| Speaker Configuration | 2-way bass reflex (full range + tweeter) |
| Sound Enhancement | Preset EQ (Rock, Pop, Classic, etc.), Mega Bass |
| Display | FL display with clock and timer |
| Remote Control | Included (IR) |
| Maintenance | Clean with soft dry cloth; avoid solvents |
| Safety Warnings | Do not open the cabinet; keep away from moisture; unplug during storms |
| Spare Parts Availability | Contact Panasonic service center for remote, speakers, power cord |
| Repairability | Serviceable by qualified personnel; laser class 1 product |
| General Information | Supports AUX for external devices; headphone jack; sleep timer |
Frequently Asked Questions - SC-MAX770 PANASONIC
User questions about SC-MAX770 PANASONIC
0 question about this device. Answer the ones you know or ask your own.
Ask a new question about this device
Download the instructions for your Hi-Fi System in PDF format for free! Find your manual SC-MAX770 - PANASONIC and take your electronic device back in hand. On this page are published all the documents necessary for the use of your device. SC-MAX770 by PANASONIC.
USER MANUAL SC-MAX770 PANASONIC
Thank you for purchasing this product.
Please read these instructions carefully before using this product, and save this manual for future use.
感谢您购买本产品。
Operating Instructions
使用说明书
© Panasonic Corporation 2014
GS
En Cn Ru Ur
VQT5F33
F0214KY0
Do the procedures with the remote control. You can also use the buttons on the main unit if they are the same.
Your system and the illustrations can look differently.
These operating instructions are applicable to the following system.
System SC-MAX770
Main unit SA-MAX770
Speakers SB-MAX770
About descriptions in these Operating Instructions
- Titles to be referred to are indicated as "→ ○○".
- Unless otherwise indicated, operations are described using the remote control.
Table of contents
Safety precautions....2
Note on AC mains lead....3
Supplied accessories ....3
Attaching the speaker feet....3
Placement of speakers....4
Maintenance 4
Preparing the remote control....4
Making the connections....5
Overview of controls 6
Disc 8
USB and internal memory....9
Radio....12
Bluetooth ^® 13
Clock and timers....15
Sound and illumination 15
DJ functions 16
KARAOKE....17
Using a microphone 17
Using the auxiliary input ....17
Troubleshooting....18
System memory reset (initialization) ....20
2 Remote control code 20
Reference 20
Specifications 21
2 Limited Warranty (ONLY FOR AUSTRALIA) 22
Safety precautions
WARNING!
Unit
• To reduce the risk of fire, electric shock or product damage,
- Do not expose this unit to rain, moisture, dripping or splashing.
- Do not place objects filled with liquids, such as vases, on this unit.
- Use only the recommended accessories.
- Do not remove covers.
- Do not repair this unit by yourself. Refer servicing to qualified service personnel.
- Do not let metal objects fall inside this unit.
CAUTION!
Unit
• To reduce the risk of fire, electric shock or product damage,
- Do not install or place this unit in a bookcase, built-in cabinet or in another confined space. Ensure this unit is well ventilated.
- Do not obstruct this unit's ventilation openings with
newspapers, tablecloths, curtains, and similar items.
- Do not place sources of naked flames, such as lighted candles, on this unit.
- Set this unit up on an even surface away from direct sunlight, high temperatures, high humidity, and excessive vibration.
• This unit is intended for use in tropical climates.
- The mains plug is the disconnecting device. Install this unit so that the mains plug can be unplugged from the socket outlet immediately.
- This unit may receive radio interference caused by mobile telephones during use. If such interference occurs, please increase separation between this unit and the mobile telephone.
- This unit utilizes a laser. Use of controls or adjustments or performance of procedures other than those specified herein may result in hazardous radiation exposure.
Battery
- Danger of explosion if battery is incorrectly replaced.
Replace only with the type recommended by the manufacturer.
- When disposing of the batteries, please contact your local authorities or dealer and ask for the correct method of disposal.
- Do not heat or expose to flame.
- Do not leave the battery(ies) in a car exposed to direct sunlight for a long period of time with doors and windows closed.
- Do not break open or short-circuit the battery.
- Do not charge the alkaline or manganese battery.
- Do not use the battery if the cover has peeled off.
- Remove the battery if you do not use the remote control for a long period of time. Keep in a cool, dark area.
CAUTION!
- Use the speakers only with the recommended system. If not, you can cause damage to the amplifier and speakers and can cause a fire.
- Consult an approved service personnel if damage occurs or if there is a sudden apparent change in performance.
- Do the procedures included in these instructions when you attach the speakers.
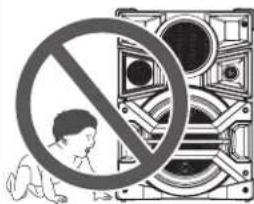
- Be careful when babies or children are near.
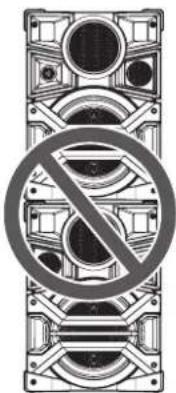
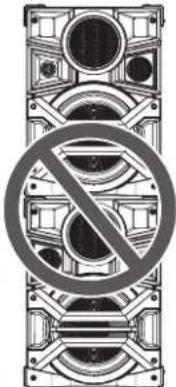
• Do not stack the speakers.
Note on AC mains lead
(For the AC mains plug of three pins)
How to replace the fuse
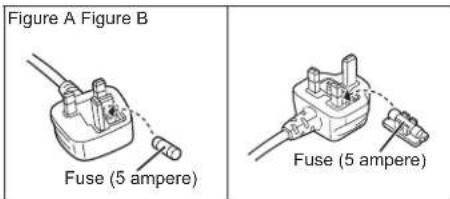
The location of the fuse differ according to the type of AC mains plug (figures A and B). Confirm the AC mains plug fitted and follow the instructions below.
Illustrations may differ from actual AC mains plug.
- Open the fuse cover with a screwdriver.
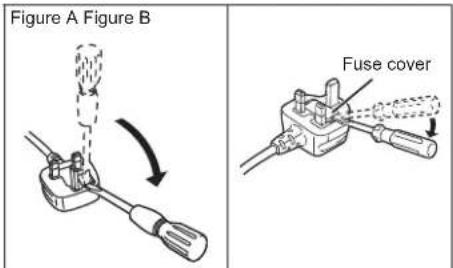
- Replace the fuse and close or attach the fuse cover.
Supplied accessories
Check and identify the supplied accessories.
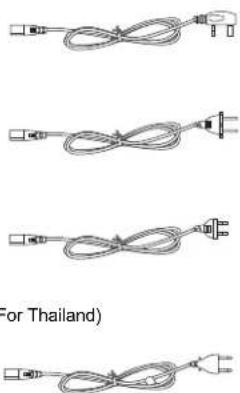
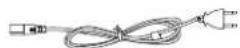
□ 4 x AC mains lead
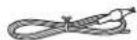
□ 1 x AM loop antenna
□ 1 x FM indoor antenna
□ 8x Speaker foot
☐ 1 x Remote control battery
□ 1 x Remote control
(N2QAYB000915)
Note:
Please use the supplied AC mains lead suitable for the household mains socket. In Saudi Arabia, please use the moulded three pin mains plug.
Attaching the speaker feet
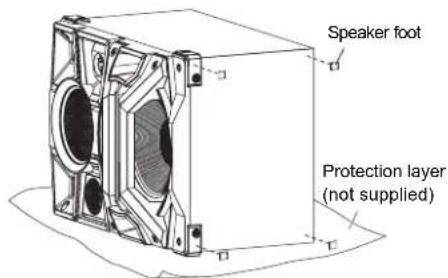
For stability and to prevent damage to the floor, attach the speaker feet to the bottom of the speakers.
Preparation
Put a protection layer below the speakers to prevent scratches.
CAUTION!
Keep the speaker feet out of reach of children to prevent swallowing.
Placement of speakers
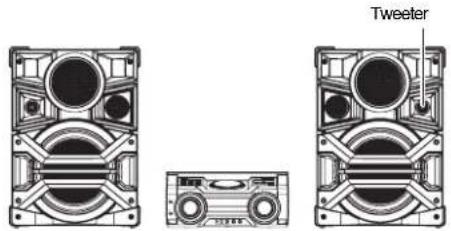
Put the speakers so that the tweeter is on the outside.
Use only the supplied speakers.
You can cause damage to the system and decrease the sound quality if you use other speakers.
Note:
- More than one person is required to move, tilt or carry the speaker.
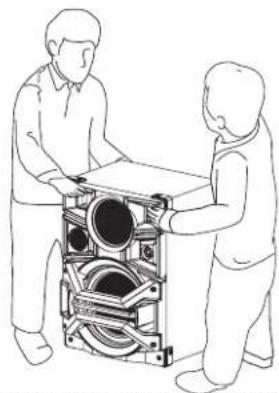
natural_image
Line drawing of two people assembling a large mechanical device (no text or symbols)- Keep your speakers more than 10 cm from the main unit for ventilation.
- Put the speakers on a flat safe surface.
• These speakers do not have magnetic shielding. Do not put them near TVs, PCs or other equipment easily influenced by magnetism. - When you play at high levels for a long period, it can cause damage to the speakers and decrease the life of the speakers.
- Decrease the volume in these conditions to prevent damage:
- When the sound is distorted.
- When you adjust the sound quality.
Maintenance
To clean this system, wipe with a soft, dry cloth.
- Never use alcohol, paint thinner or benzine to clean this system.
- Before using chemically treated cloth, read the instructions that came with the cloth carefully.
Preparing the remote control
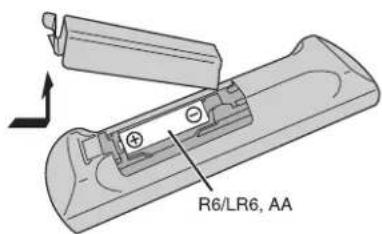
Use alkaline or manganese battery.
Install the battery so that the poles (+ and -) align with those in the remote control.
Making the connections
Connect the AC mains lead only after all the other connections have been made.
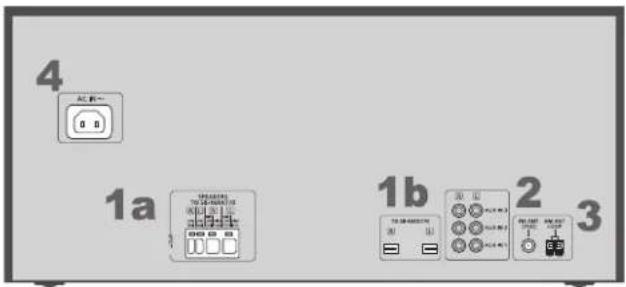
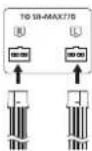
1 Connect the speakers.
Connect the speaker cables to the terminals of the same colour.
1a
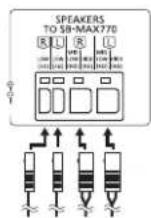
1b
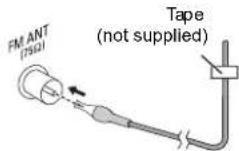
2 Connect the FM Indoor antenna.
Put the antenna where reception is best.
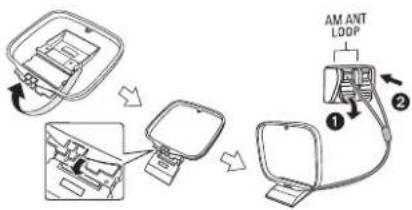
3 Connect the AM loop antenna.
Stand the antenna up on its base until it clicks.
flowchart
graph TD
    A["Initial Setup"] --> B["Intermediate Setup"]
    B --> C["Final Output"]
    style A fill:#f9f,stroke:#333
    style B fill:#ccf,stroke:#333
    style C fill:#cfc,stroke:#333
4 Connect the AC mains lead.
To household mains socket
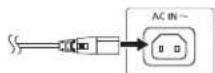
Do not use AC mains lead with other equipment.
Conserving power
The system consumes approximately 0.3 W when it is in standby mode. Disconnect the power supply if you do not use the system.
Some settings will be lost after you disconnect the system. You have to set them again.
Overview of controls
Remote control
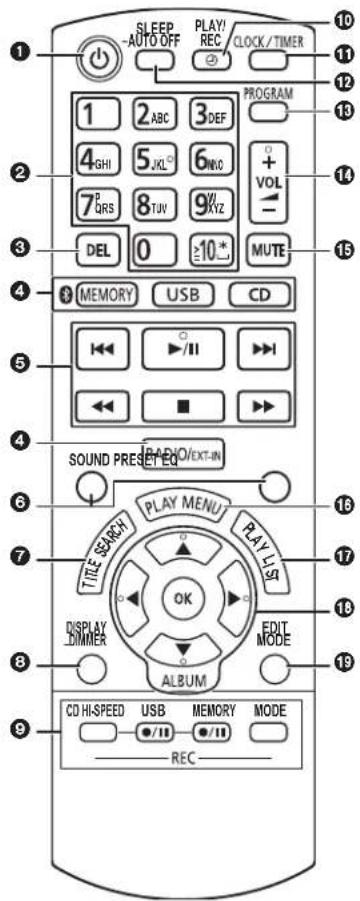
Top view
Front view
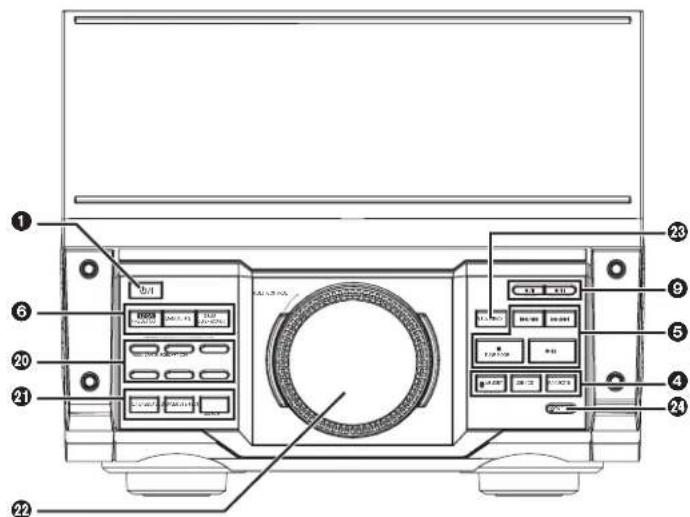
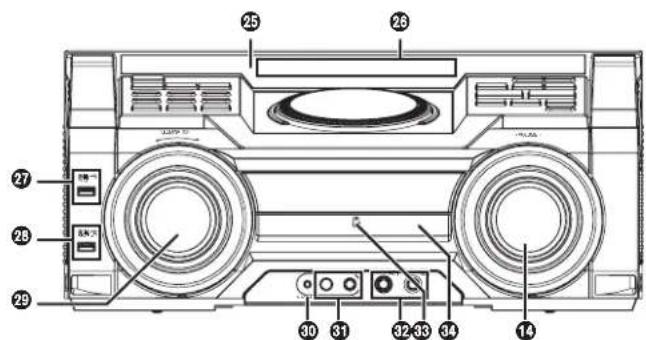
1 Standby/on switch [⏻], [⏻/ɪ]
Press to switch the unit from on to standby mode or vice versa. In standby mode, the unit is still consuming a small amount of power.
② Alphanumeric buttons
To select a 2-digit number
Example: 16: [≥10] → [1] → [6]
To set a character
Example: B: [2] → [2]
③ Delete a programmed track
Delete a selected track in a playlist
4 Select audio source
⑤ Basic playback control
6 Select the sound effects
⑦ Start the title search for internal memory
8 View content information
Press and hold the button: Decrease the brightness of the display panel and turn off the DJ function buttons and illumination, etc.
9 Recording operation control
⑩ Set the play timer or record timer
⑪ Set the clock and timer
12 Set the sleep timer
Press and hold the button: Automatically switch off function switches off the system if you do not use the system for 20 minutes. (Except radio)
13 Set the programme function
14 Adjust the volume of the system
15 Mute the sound of the system
To cancel, press the button again.
"MUTE" is also cancelled when you adjust the volume or when you switch off the system.
16 Set the play menu item
17 Internal memory playlist operation
18 Select and enter buttons
19 Set the edit mode for and internal memory
20 Internal memory playlist direct buttons
Press and hold to add a track to the corresponding playlist.
Press to select the playlist.
DJ function direct buttons
Press [DJ JUKEBOX], [DJ SAMPLER] or [DJ EFFECT-KARAOKE] to switch on the DJ function.
Press [1] to [6] on main unit to select the desired function.
To cancel, press the selected [1] to [6] again.
21 Switch on the DJ function
To cancel, press the button again.
22 Turntable for DJ and multi control
23 Browse playlist of the internal memory
Browse tracks or albums
CD
Turn [MULTI CONTROL] to browse the track.
Press [▶/■] to start playback from the selection.
MP3
Press [ALBUM/TRACK] to select album or track and then turn [MULTI CONTROL] to browse.
Press [▶/■] to start playback from the selection.
24 Open or close the disc tray
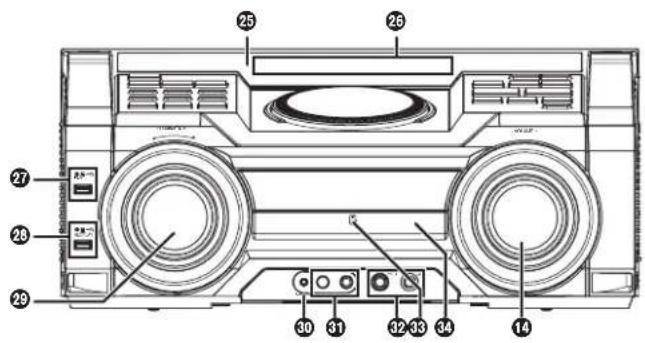
25 Remote control sensor
Distance: Within approximately 7 m
Angle: Approximately 20^ up and down, 30^ left and right
26 Display panel
27 USB A
USB port ( )
USB status indicator
28 USB PLAY
USB port ( )
USB status indicator
29 Select the illumination effect
30 AUX IN 4 terminal
31 Microphone jack
32 Adjust the volume of the microphone
33 NFC touch area
34 Disc tray
Disc
Playing disc
1 Press [OPEN/CLOSE] on the main unit to open the disc tray.
Put in a disc with the label facing up.
Press [OPEN/CLOSE] again to close the disc tray.
2 Press [CD] and then press [▶/■] to start playback.
- Stop playback
Press [■]. - Pause playback
Press [▶/■].
Press again to continue playback. - Skip album MP3
Press [▲, ▼]. - Skip track
Press [◀◀] or [▶▶]
(main unit: [|◀◀/◀◀] or [▶▶/▶▶|]). - Search through track
Press and hold [◀◀] or [▶▶]
(main unit: [|◀◀/◀◀] or [▶▶/▶▶]).
Viewing available information
You can view the available information on the display panel.
Press [DISPLAY-DIMMER] during playback.
Note:
• Maximum characters that can be shown:
approximately 32
• This system supports ver. 1.0, ver. 1.1 and ver. 2 ID3 tags.
• Text data that the system does not support can show
differently.
Play menu
1 Press [PLAY MENU] to select "PLAYMODE" or "REPEAT".
2 Press [◀, ▶] and then press [OK] to select the desired mode.
PLAYMODE
• OFF PLAYMODE
Play all tracks.
• 1-TRACK
Play one selected track on the disc.
Press the alphanumeric buttons to select the track.
• 1-ALBUM MP3
Play one selected album on the disc.
Press [▲, ▼] to select the album.
• RANDOM
Play a disc randomly.
• 1-ALBUM RANDOM

Play all tracks in one selected album randomly.
Press [▲, ▼] to select the album.
REPEAT
• ON REPEAT
Repeat playback.
" 🔍 " appears.
- OFF REPEAT
Cancel repeat playback.
Note:
The setting returns to the default "OFF PLAYMODE" when you open the disc tray.
Programme playback
This function allows you to programme up to 24 tracks.
1 Press [PROGRAM] in the stop mode.
"PGM" or "PROGRAM" is shown.
2 CD
Press the alphanumeric buttons to select the desired track.
Do this step again to programme other tracks.
MP3
1 Press [▲, ▼] to select the desired album.
2 Press [▶▶] and then press the alphanumeric buttons to select the desired track.
3 Press [OK].
Do these steps again to programme other tracks.
3 Press [▶/■] to start playback.
- Cancel programme mode
Press [PROGRAM] in the stop mode.
- Check programme contents
Press [|◀◀] or [▶▶] when "PGM" is shown in the stop mode.
- Clear the last track
Press [DEL] in the stop mode.
• Clear all programmed tracks
Press [■] in the stop mode.
"CLR ALL" is shown.
Within 5 seconds, press [■] again.
Note:
- You cannot use programme playback together with "PLAYMODE" function.
- The programme memory is cleared when you open the disc tray.
Note on disc
- This system can play CD-R/RW with CD-DA or MP3 format content.
- Some CD-R/RW cannot be played because of the condition of the recording.
- MP3 files are defined as tracks and folders are defined as albums.
• This system can access up to:
- CD-DA: 99 tracks
- MP3: 999 tracks, 255 albums
- Disc must conform to ISO9660 level 1 or 2 (except for extended formats).
- Recordings will not necessarily be played in the order you recorded them.
USB and internal memory
You can connect and play music tracks from your USB device.
You can also record sound or music tracks into the internal memory in ".mp3" format.
This system can play or record up to 800 folders (maximum 999 tracks in an album) or a total of 8000 tracks, depending on the available storage capacity.
Connecting a USB device
Preparation
Before you connect a USB device to the system, make sure you do a backup of the data.
Do not use a USB extension cable. The system cannot recognise USB device connected through a cable.
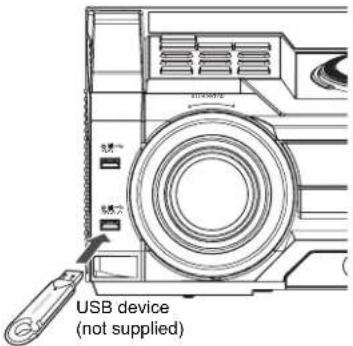
Decrease the volume and connect the USB device to the USB port.
Hold the main unit when connecting or disconnecting the USB device.
USB at a glance
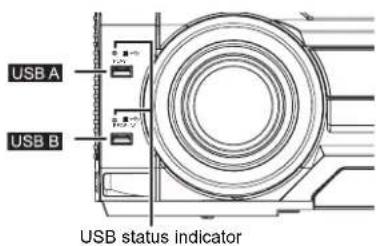
USB A
- Play MP3 tracks.
USB B
• Record/play MP3 tracks.
Note:
USB status indicator blinks during USB recording.
Note:
USB status indicator lights up when selected.
Recording to a USB device or the internal memory
Panasonic cannot be held responsible on the action of consumer to record copyrighted contents which can cause copyright infringement.
Note:
- All recordings are in ".mp3" format.
- You cannot do recording when you are using random playback mode.
- Repeat playback mode is off during recording.
• A new album is added each time you do a recording.
• The sequence of album can change after the recording. - The recordings are kept in a folder named "REC_DATA" in the USB device or the internal memory.
- The recorded tracks will be sorted in the following order automatically.
- Recorded tracks from Audio CD, radio or external input (Sorted by recorded)
- Recorded mp3 tracks from CD or USB device (Sorted by alphabet)
Basic recording
1 Select the source you want to record.
CD
Prepare the disc playback mode.
- Record all tracks
Select "OFF PLAYMODE" (⇒ "Play menu").
• Record programmed tracks
Programme the tracks you want (→ "Programme playback"). - Record a single track
Select "1-TRACK" (⇔ "Play menu").
Make sure the disc is stopped.
Radio
Tune in to the radio station.
External equipment
Connect and play the equipment ( "Using the auxiliary input").
2 Press [MEMORY REC ●/III] or [USB REC ●/III] to start recording.
The name of the folder that keeps the recording is shown.
- Stop recording
Press [■]. "WRITING" is shown.
- Pause recording
Press [MEMORY REC ●/■] or [USB REC ●/■] during recording.
Press again to continue recording.
Note:
You can pause during recording from the radio or AUX (except in SYNCHRO mode). A track mark is added every time you pause ( "Adding track marks").
Note:
- Wait for a few seconds for the system to prepare the USB device before you start recording.
• USB status indicator blinks during USB recording.
Recording MP3 tracks
MP3
You can record MP3 tracks from:
• MP3 disc to USB memory
• USBA Internet Memory
• USBB digital memory, or vice versa
1 Prepare the source you want to record.
- Record all tracks
Select "OFF PLAYMODE" ( "Play menu").
• Record programmed tracks
Programme the tracks you want (→ "Programme playback").
• Record specified album or track
Select "1-ALBUM" or "1-TRACK" (→ "Play menu").
2 Press [MEMORY REC ●/III] or [USB REC ●/III] to start recording.
Example: Recording an album from the USB device to the internal memory.
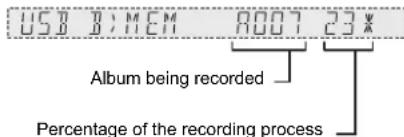
- Stop recording
Press [■]
Recording stops at the last fully recorded track in the album.
For example, if you stop recording during the fourth track, only the first three tracks are recorded.
"NO FILE RECORDED" is shown if no track is recorded.
Note:
- Some tracks can use a longer time to record.
- Some tracks cannot be recorded because of the condition of the source.
- The recorded folder name may be different from the original folder because of the auto rename function.
Basic playback
MEMORY
1 Press [ ,MEMORY] (main unit: [/MEMORY]) to select "MEMORY".
2 Press [▶/■] to start playback.
USB A USB B
1 Press [USB] to select "USB B" or "USB A".
2 Press [▶/■] to start playback.
- Stop playback
Press [■]. "RESUME" is shown.
Press [▶/■] to continue playback.
OR
Press [■] two times to stop the playback fully.
For other operations, refer to "Disc".
Viewing available information
You can view the available information on the display panel.
Press [DISPLAY-DIMMER].
- In the stop mode
Available storage space or remaining recording time of the internal memory or the USB device in USB B - During recording
Information that is related to recording.
• During playback or pause
Information of the current track.
Title search Playlist
MEMORY
You can search for the desired track in the internal memory with title search.
1 Press [TITLE SEARCH]. " *blinks.
2 Press the alphanumeric buttons or [▲, ▼] to select the desired character then press [▶] to select next character.
To delete a character, press [DEL].
TITLE SEA ARR
3 Press [OK].
Press [◀, ▶] to search for previous or next match. "NOT FOUND" is shown if there is no match.
4 Press [OK] to confirm and play the track.
To cancel, press [TITLE SEARCH].
Note:
- This function skip tracks that are created with basic recording (⇒ "Basic recording").
- This function does not work with random or programme playback.
• The character is not case sensitive. - A same track title display will be shown for tracks with the same title.
MEMORY
You can keep up to 6 playlists in the internal memory. Each playlist can keep up to 99 tracks.
Adding tracks to the playlist
1 Select the track you want to add to the playlist.
2 Press [PLAY LIST].
3 Press and hold the alphanumeric button (1 to 6) to add the track to the corresponding playlist. Or press and hold [1] to [6] on the main unit to add the track to the corresponding playlist. Do steps 1 through 3 again to add more tracks.
Listening to the playlist
1 Press [PLAY LIST] and then the alphanumeric button (1 to 6) to select the playlist. Or press [1] to [6] on the main unit to select the playlist.
2 Press [▶/■] to start playback.
- Cancel playlist playback Press [PLAY LIST] two times. OR Press the selected [1] to [6] on the main unit. - View contents of the playlist Press [◀◀] or [▶▶] in the stop mode. OR Turn [MULTI CONTROL] in the stop mode.
- Clear a single track
In the stop mode, press [◀◀] or [▶▶] to select the desired track you want to clear and then press [DEL]. "DELETE?" is shown. Within 5 seconds, press [OK].
- Clear all tracks in a playlist In the stop mode, press [■]. "CLEAR?" is shown. Within 5 seconds, press [OK].
Advanced recording functions
High-speed recording
CD
Recording speed:
CD, CD-R: Up to three times (3x) of the normal speed.
CD-RW: Up to two times (2x) of the normal speed.
1 Put in the disc you want to record.
2 Press [CD].
3 Press [CD HI-SPEED REC] and [USB REC ●/■] or [MEMORY REC ●/■] together to start recording.
Note:
- If you cannot record at high-speed because of the condition of the disc, record the CD at normal speed.
• The sound is muted during high-speed recording.
Adding track marks
When recording from radio or external equipment, you can divide tracks using various modes.
Before recording
Press [REC MODE] to select the desired setting.
• MANUAL
Add a track mark manually.
Press [OK] during recording to add a track mark.
• TIME MARK
A track is automatically divided at 5-minute intervals.
• SYNCHRO
(For AUX source)
Recording starts automatically when the other
equipment starts to play.
Recording pause when it detects silence for
3 seconds.
Note:
- During recording, if you press [OK] or pause recording while using TIME MARK mode, the 5-minute counter is reset.
- You cannot add track marks manually in SYNCHRO mode.
Deleting the recorded tracks
1 MEMORY
Press [MEMORY] (main unit: [/MEMORY]) to select "MEMORY".
USB B
Press [USB] (main unit: [USB/CD]) to select "USB B".
2 Press [▲, ▼] to select the desired album.
3 Press [◀◀] or [▶▶] to select the desired track.
4 Press [EDIT MODE] to select the desired mode.
- TRACK DEL
Delete a single track.
• ALBUM DEL
Delete one album (maximum 999 tracks).
• FORMAT
Format the USB device.
• ALL DEL
Delete all albums in the internal memory.
5 Press [OK].
The selected item to be deleted is shown.
6 Press [OK].
"SURE? NO" is shown.
7 Press [◀, ▶] to select "YES" or "NO" and then press [OK].
Select "YES" to confirm the deletion.
"WRITING" is shown.
Note on USB
Compatible USB devices which are defined as mass storage class:
• USB devices that support bulk-only transfer.
- USB devices that support USB 2.0 full speed.
Note:
- Folders are defined as album.
- Files are defined as track.
- Track must have the extension ".mp3" or ".MP3".
• CBI (Control/Bulk/Interrupt) is not supported.
- NTFS file system is not supported (only FAT 12/16/32 file system is supported).
- Some files can fail to work because of the sector size.
Radio
Manual tuning
1 Press [RADIO/EXT-IN] to select "FM" or "AM".
2 Press [◀◀] or [▶▶] to select the frequency of the required station.
To tune automatically, press and hold the button until the frequency starts changing quickly.
"STEREO" is shown when a stereo broadcast is being received.
Using the main unit
1 Press [RADIO/EXT-IN] to select "FM" or "AM".
2 Press [TUNE MODE] to select "MANUAL".
3 Press [|◀◀/◀◀] or [▶▶/▶▶] to select the frequency of the required station.
Improving the sound quality
When "FM" is selected
1 Press [PLAY MENU] to select "FM MODE".
2 Press [◀, ▶] to select "MONO" and then press [OK].
To cancel, select "STEREO".
"MONO" is also cancelled when you change the frequency.
When "AM" is selected
1 Press [PLAY MENU] to select "BEATPROOF".
2 Press [◀, ▶] to select from "BP 1" to "BP 4" that provides the best reception and then press [OK].
Memory presetting
30 FM and 15 AM stations can be preset.
Automatic presetting
1 Press [OK] to select "LOWEST" or "CURRENT" frequency.
2 Press [PLAY MENU] to select "A.PRESET" and then press [OK].
"START?" is shown.
3 Press [OK] to start presetting.
To cancel, press [■].
Manual presetting
1 Press [◀◀] or [▶▶] to tune in to the station.
2 Press [PROGRAM].
3 Press the alphanumeric buttons to select a preset number.
Do steps 1 through 3 again to preset more stations. The new station replaces any station that occupies the same preset number.
Selecting a preset station
Press the alphanumeric buttons, [◀◀] or [▶▶] to select the preset station.
Using the main unit
1 Press [TUNE MODE] to select "PRESET".
2 Press [◀◀/◀◀] or [▶▶/▶▶] to select the preset station.
AM allocation setting
By main unit only
This system can also receive AM broadcasts allocated in 10 kHz steps.
1 Press [RADIO/EXT-IN] to select "FM" or "AM".
2 Press and hold [RADIO/EXT-IN].
After a few seconds, the display panel shows the current minimum radio frequency. Release the button when the minimum frequency changes.
- To go back to the initial setting, do the above steps again.
• After you change the setting, preset frequencies are erased.
Bluetooth®
You can connect and play an audio device wirelessly through Bluetooth ^® .
- Refer to the operating instructions of the Bluetooth ^® device for details.
- If you intend to use an NFC (Near Field Communication)-compatible Bluetooth ^® device, proceed to "One-Touch Connection (Connecting by NFC)".
- Decrease the volume before connect the Bluetooth ^ device.
Pairing a device
Preparation
- Turn on the Bluetooth® feature of the device and place the device near this unit.
1 Press and hold [MEMORY,-PAIRING] on main unit.
BLUETOOTH PAIRING
2 Select "SC-MAX770" from the Bluetooth ^® menu of the device.
The device connects with this system automatically after pairing is complete.
3 Start playback on the Bluetooth ^ device.
For other operations on main unit, refer to "Playing disc".
Note:
- You can also operate with the remote control.
1 Press [ *MEMORY] to select "BLUETOOTH".
2 Press [PLAY MENU] to select "PAIRING"
3 Press [◀, ▶] to select "OK? YES" and then press [OK].
4 Select "SC-MAX770" from the Bluetooth ^① menu of the device.
- If prompted for a passkey, input "0000".
• A device must be paired to connect.
- You can register up to 8 devices with this unit. If a 9th device is paired, the device that has not been used for the longest time will be replaced.
• This system can only connect to one device at a time.
- When "BLUETOOTH" is selected as the source, this system will automatically try and connect to the last connected device.
One-Touch Connection (Connecting by NFC)
For NFC-compatible Android™ devices only Simply by touching an NFC (Near Field Communication)-compatible Bluetooth® device by the unit, you can complete all preparations, from registering a Bluetooth® device to establishing a connection.
Preparation
- Turn on the NFC feature of the device. - Android device version lower than 4.1 requires the installation of the app "Panasonic MAX Juke" (Free of charge).
1 Enter "Panasonic MAX Juke" in the search box of Google Play™ to search, and then select "Panasonic MAX Juke".
2 Start the app "Panasonic MAX Juke" on the device. - Follow on-screen instructions on your device. - Always use the latest version of the app.
1 Press [MEMORY] (main unit: [MEMORY,-PAIRING]) to select "BLUETOOTH".
2 Touch and hold your device on the NFC touch area of this unit [1]
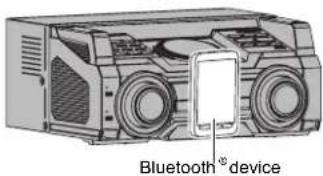
- Once the registration and connection of the Bluetooth® device is complete, the name of the connected device is indicated on the display. Move the device away from the unit. - When the connection is not established even if your device has touched the NFC touch area, change its touching position.
14 3 Start playback on the Bluetooth ^ device.
Note:
- If you touch another device to this unit, you can update the Bluetooth® connection. The previously connected device will be disconnected automatically.
- If the image and sound are out of sync during playback, restart the playback app you are using. If the problem persists, connect the Bluetooth® device and this unit with an audio cable (not supplied).
- When the connection is established, the playback may start automatically depending on the type of device being used.
- The One-Touch Connection may not work properly depending on the type of device being used.
Bluetooth® standby mode
If you enable this function, even when the main unit is turned off, it will turn on automatically when a Bluetooth ^® device sends a connection request.
1 Press [, MEMORY] (main unit: [MEMORY,-PAIRING]) to select "BLUETOOTH".
2 Press [PLAY MENU] to select "STANDBY MODE".
3 Press [◀, ▶] to select "ON STANDBY MODE" or "OFF STANDBY MODE" and then press [OK].
Viewing available information
You can view the following information on the display panel:
- Name of the connected device (maximum 16 characters).
- Bluetooth ^® profile used.
Press [DISPLAY-DIMMER].
Link mode
You can change the transmission speed to prioritize transmission quality or sound quality.
Preparation
If this system is connected to a Bluetooth® device, disconnect it (→ "Disconnecting a device").
1 Press [PLAY MENU] to select "LINK MODE".
2 Press [◀, ▶] to select "MODE 1" or "MODE 2" and then press [OK].
• MODE 1
Emphasis on connectivity.
• MODE 2
Emphasis on sound quality.
Note:
The default setting is "MODE 2".
Disconnecting a device
1 Press [PLAY MENU] repeatedly to select "DISCONNECT?".
2 Press [◀, ▶] to select "OK? YES" and then press [OK].
Note:
A device is disconnected when you:
- Select a different source.
- Move the device out of the maximum range.
- Disable the Bluetooth ^® transmission of the device.
- Switch off the system or the device.
Clock and timers
Setting the clock
This is a 24-hour clock.
1 Press [CLOCK/TIMER] to select "CLOCK".
2 Within 20 seconds, press [▲, ▼] to set the time.
3 Press [OK].
Press [CLOCK/TIMER] to show the clock for a few seconds.
Note:
- Reset the clock regularly to maintain accuracy.
- The clock is reset when there is a power failure or when the AC mains lead is removed.
Play and record timer
Except for Bluetooth ^® source
You can set the timer to come on at a certain time to:
- Wake you up (play timer)
- Record from the radio or the external equipment (record timer)
Play timer and record timer cannot be used together.
Preparation
Set the clock.
1 Press [CLOCK/TIMER] to select "PLAY" or "①R E C".
2 Within 10 seconds, press [▲, ▼] to set the start time.
3 Press [OK].
4 Do steps 2 and 3 again to set the end time.
5 Press [▲, ▼] to select the source you want to play or record and then press [OK].
6 For record timer Press [▲, ▼] to select "MEMORY" or "USB B" to keep the recording and then press [OK].
To start the timer
1 Prepare the audio source.
- Play timer Prepare the music source you want to listen to (disc, USB, internal memory, radio or external equipment) and set the volume.
- Record timer Connect the USB device to USB recording) and tune to the radio station or select the external equipment.
2 Press [PLAY/REC] to select "PLAY ON" or "REC ON".
"PLAY ON" or "REC ON" is shown.
To cancel, press [PLAY/REC] to select "TIMER OFF". The system must be switched off for the timer to operate.
To check the settings
Press [CLOCK/TIMER] to select "PLAY" or
“①R E C ”.
Note:
- The play timer starts at a low volume and increases gradually to the preset level.
- The record timer starts 30 seconds before the set time with the volume muted.
- The timer comes on at the set time every day if the timer is on.
Sleep timer
The sleep timer switches off the system after the set time.
Press [SLEEP-AUTO OFF] to select the setting (in minutes).
To cancel, select "OFF".
30 MIN → 60 MIN → 90 MIN → 120 MIN → OFF
Note:
- The play and sleep timer or the record and sleep timer can be used together.
- The sleep timer always comes first. Be sure not to set an overlap of timers.
Sound and illumination
Adjust the sound effect
You can adjust the sound effect.
1 Press [SOUND] to select the sound effect.
2 Press [◀, ▶] to select the desired setting.
• BASS/MID/TREBLE
-4 to +4
• SURROUND
Select "NORMAL" if the sound is distorted during "HIGH" input level.
• SUPER WOOFER
"SW1", "SW2", "SW3" or "OFF"
• D.BASS
"D.BASS ON", "D.BASS BEAT" or "D.BASS OFF"
Preset EQ
Press [PRESET EQ] (main unit: [ PRESET EQ ] )
to select desired preset.
Using the main unit
You can adjust certain sound effect using the controls on the main unit.
1 Press the button to select the sound effect.
• PRESETEQ
Press [PRESET EQ] (main unit: [LOCASET EQ])
• BASS/MID/TREBLE
Press [MANUAL EQ]
• D.BASS
Press [D.BASS,-SUPER WOOFER]
• SUPER WOOFER
Press and hold [D.BASS,-SUPER WOOFER]
2 Turn [MULTI CONTROL] to select the desired setting.
Illumination effects
By main unit only
You can change the illumination pattern or colour on this system.
Turn [ILLUMINATION] to select pattern or colour.
• PATTERN
Illuminate with pattern in multiple colours.
• COLOR
Illuminate in one colour.
• OFF
Note:
To ensure the illumination effects are shown properly, make sure to arrange the speakers accordingly as in “Placement of speakers”.
DJ functions
DJ functions has the following functions
- DJ jukebox
- DJ sampler
- DJ effects
Using these functions, you can add various effects to the track you are playing back.
If you use the app "Panasonic MAX Juke"
By installing the app "Panasonic MAX Juke" (free of charge) on your Android device, you can use a wider variety of functions.
Download the app "Panasonic MAX Juke" to your Android device. Enter "Panasonic MAX Juke" in the search box of Google Play to search, and then select "Panasonic MAX Juke".
Note:
When recording, the DJ function is cancelled.
DJ jukebox
MEMORY: USB A, USB B
This mode adds a crossfade effect or sample sound mix to the intervals between the tracks you play back.
This function works when you play back the tracks in the USB device or the internal memory.
1 Press [DJ JUKEBOX] on main unit.
- The setting of the unit switches to repeat mode automatically.
- (In the stop mode only) You can change the desired repeat setting by turning [MULTI CONTROL] on main unit.
-RANDOM REPEAT
Play all tracks randomly.
-ALL TITLE REPEAT
Repeat all tracks.
- When displayed "WAITING REQUEST" on the display, you can proceed to the next step unless you use the app "Panasonic MAX Juke".
2 Press [1] to [6] on main unit to select the desired function.
• [1]
Crossfade: The playback track volume gradually becomes small and next track volume becomes large.
• [2] to [6]
Sample Sound Mix: This effect is sounding a sample sound to the intervals between the tracks you play back.
To cancel, press the button again.
To cancel the DJ jukebox
Press [DJ JUKEBOX] on main unit.
Note:
- To change DJ jukebox function ON or OFF with the remote control
1 Press [PLAY MENU] to select "JUKEBOX"
2 Press [◀, ▶] to select "ON JUKEBOX" or "OFF JUKEBOX" and then press [OK].
• To change the desired repeat setting with the remote control
1 Press [PLAY MENU] twice to select "PLAYMODE".
2 Press [◀, ▶] to select desired mode and then press [OK].
If you use the app "Panasonic MAX Juke"
You can call up the tracks you want to play back through the app.
- When displayed "MAKING LIST" on the display, you can call up a part of tracks.
- When displayed "WAITING REQUEST" on the display, You can call up the tracks you want to play back through the app.
DJ sampler
By main unit only
By turning [MULTI CONTROL], you can apply a scratch sound or sample sound to the track you are playing back.
1 Press [DJ SAMPLER].
2 Press [1] to [6] to select the desired sound.
3 Turn [MULTI CONTROL].
To cancel the DJ sampler
Press [DJ SAMPLER].
If you use the app "Panasonic MAX Juke"
- You can change the sample sound on the app. (To return all sample sounds to the factory preset, press and hold [DJ SAMPLER] when the DJ sampler is turned off.)
DJ effects
By main unit only
You can use the DJ effect function to add the sound effects.
1 Press [DJ EFFECT-KARAOKE].
2 Press [1] to [6] to select the desired DJ effect.
• [1] PHASER
Add space and dimension to the sound.
• [2] FILTER
Enhance or filter specific ranges of the sound.
• [3] SOUND CHOPPER
Cut off the sound periodically.
• [4] ELECTRO ECHO
Add digital echo to the sound.
• [5] PITCH SHIFTER
Adjust the keys of the sound.
• [6] HARMONIZER
Add notes to the sound to create harmony.
To cancel, press the button again.
3 Turn [MULTI CONTROL] to select the desired setting.
To cancel the DJ effect
Press [DJ EFFECT-KARAOKE].
KARAOKE
By main unit only
1 Press and hold [DJ EFFECT-KARAOKE]. [DJ EFFECT-KARAOKE] button light up in blue.
2 Press [1] to [3] to select the desired KARAOKE effect.
[1] Vocal cancel
"VOCAL CANCEL", "L", "R", "L+R" or "OFF"
[2] Echo
"ECHO 1", "ECHO 2", "ECHO 3" or "OFF"
[3] Key-control
Turn turntable to select "-6" to "+6".
To cancel the KARAOKE
Press and hold [DJ EFFECT-KARAOKE].
Using a microphone
Preparation
Decrease the volume of the system to its minimum before you connect or disconnect a microphone.
1 Connect a microphone (not supplied) to the microphone jack.
Plug type: ∅ 6.3 mm monaural
2 Turn [MIC VOL, MIN/MAX] on the main unit to adjust the volume of the microphone.
3 If you want to sing with the background music.
Play the music source and adjust the volume of the system.
Note:
- If a strange noise (howling) is emitted, move the microphone away from the speakers, or decrease the volume of the microphone.
- When you do not use the microphone, disconnect it from the microphone jack, and decrease the volume of the microphone level to "MIN".
• This system cannot record from microphone.
Using the auxiliary input
Before connection
- Disconnect the AC mains lead.
- Switch off all equipment and read the appropriate operating instructions.
Note:
Components and cables are sold separately.
To connect a portable audio equipment etc.
You can play music from a portable audio equipment.
Preparation
Switch off the equalizer (if any) of the portable audio equipment to prevent sound distortion.
Decrease the volume of the system and the portable audio equipment before you connect or disconnect the portable audio equipment.
1 Connect the portable audio equipment to AUX IN 4.
Plug type: ∅ 3.5 mm stereo (not supplied)
2 Press [RADIO/EXT-IN] to select "AUX 4".
3 Play the portable audio equipment.
To connect a VCR, DVD player etc.
You can connect a VCR, DVD player etc. and listen to the audio through this system.
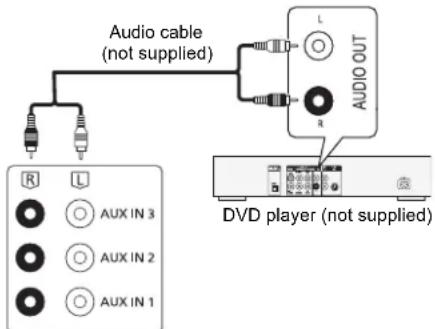
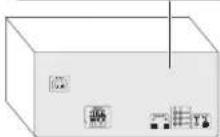
Rear panel of this main unit
1 Connect the external equipment.
2 Press [RADIO/EXT-IN] to select "AUX".
3 Play the external equipment.
Note:
- If you want to connect equipment other than those described, refer to the audio dealer.
- Sound distortion can occur when you use an adapter.
Troubleshooting
Before requesting service, make the following checks. If you are in doubt about some of the check points, or if the solutions indicated do not solve the problem, consult your dealer for instructions.
Common problems
The unit does not work.
- One of the unit's safety devices may have been activated.
Reset the unit as follows:
1 Press [⏻/l] on the main unit to switch the unit to standby.
- If the unit does not switch to standby, press [∅/l] on the main unit for a few seconds. The unit is forcibly switched to standby. Alternatively, disconnect the AC mains lead, wait one minute, then reconnect it.
2 Press [∅/l] on the main unit to switch it on. If the unit still cannot be operated, consult the dealer.
The display panel lights up and changes continuously in standby mode.
- Press and hold [■] on the main unit to select "DEMO OFF".
No operations can be done with the remote control.
- Examine that the battery is installed correctly.
Sound is distorted or no sound.
- Adjust the volume of the system.
- Switch off the system, determine and correct the cause, then switch the system on again. It can be caused by straining of the speakers through excessive volume or power, and when using the system in a hot environment.
A humming sound can be heard during playback.
- An AC mains lead or fluorescent light is near the cables. Keep other appliances and cords away from the cables of this system.
The sound level reduces.
- The protection circuit has been activated due to the continuous use at high volume output. This is to protect the system and maintain the sound quality.
Disc
Display not shown correctly.
Playback does not start.
- You have not put in the disc correctly. Put it in correctly.
• Disc is dirty. Clean the disc. - Replace the disc if it is scratched, warped, or non-standard.
- There is condensation. Let the system dry for 1 to 2 hours.
The total number of tracks displayed is incorrect.
The disc cannot be read.
Distorted sound is heard.
- You put in a disc that the system cannot play. Change to a playable disc.
- You put in a disc that has not been finalised.
USB
The USB device or the contents in it cannot be read.
- The format of the USB device or the contents in it is/are not compatible with the system.
- USB devices with storage capacity of more than 32 GB cannot work in some conditions.
Slow operation of the USB device.
- Large content size or large memory USB device takes longer time to read.
Radio
Sound is distorted.
- Use an optional FM outdoor antenna. The antenna should be installed by a competent technician.
A beat sound is heard.
- Switch off the TV or move it away from the system.
- When in AM tuner mode, select from "BP 1" to "BP 4" that provides the best reception.
A low hum is heard during AM broadcasts.
- Move the antenna away from other cables and cords.
Bluetooth®
Pairing cannot be done.
- Check the Bluetooth ^ device condition.
The device cannot be connected.
- The pairing of the device was unsuccessful. Do pairing again.
- The pairing of the device has been replaced. Do pairing again.
- This system might be connected to a different device. Disconnect the other device and try pairing the device again.
The device is connected but audio cannot be heard through the system.
- For some built-in Bluetooth ^ devices, you have to set the audio output to "SC-MAX770" manually. Read the operating instructions of the device for details.
Sound from the device is interrupted.
- The device is out of the 10 m communication range. Move the device nearer to the system.
- Remove any obstacle between the system and the device.
- Other devices that use the 2.4 GHz frequency band (wireless router, microwaves, cordless phones, etc.) are interfering. Move the device nearer to the system and distance it from the other devices.
- Select "MODE 1" for stable communication.
The One-Touch Connection (NFC feature) is not working.
- Make sure the unit and the NFC feature of the device are turned on. (⇒ 14)
Main unit displays
"USB A NO DEVICE"
"USB B NO DEVICE"
- The USB device is not connected. Examine the connection.
"DEVICE FULL"
- You cannot do recording because the remaining recording time of the USB device is less than the total time of the music source. Change to a USB device which has enough recording time and do the recording again.
"ERROR"
- An incorrect operation was done. Read the instructions and try again.
"ERROR" (during recording)
- You cannot select other playback source (example: radio, USB etc.) or press [◀◀] or [▶▶] during recording. Stop the recording function. - You cannot open the disc tray when recording from an AM source.
"F61"
- Examine and correct the speaker cords connection. - Disconnect the USB device. Switch off the system and then switch it on again.
"F70"
- Examine the Bluetooth ^ device. - Disconnect the Bluetooth ^ device. Switch off the system and then switch it on again.
"F77"
- Switch off the system and then switch it on again.
"NO PLAY"
"UNSUPPORT"
- Examine the content. You can only play supported format. - The files in the USB device can be corrupted. Format the USB device and try again. - The unit may have a problem. Turn the unit off and then on again.
"NO TRACK"
- There is no album or track in the USB device or the internal memory.
"PLAYEROR"
- You played an unsupported MP3 file. The system will skip that track and play the next one.
"REMOTE 1"
"REMOTE 2"
- The remote control and the main unit are using different codes. Change the code of the remote control. - When "REMOTE 1" is shown, press and hold [OK] and [1] for a minimum of 4 seconds. - When "REMOTE 2" is shown, press and hold [OK] and [2] for a minimum of 4 seconds.
"TEMP NG"
- The temperature protection circuit has been activated, and the system will switch off. Let the unit cool down before switching it on again. - Check that the ventilation opening of the unit is not obstructed. - Ensure this unit is well ventilated.
"USB OVER CURRENT ERROR"
- The USB device is using too much power. Disconnect the USB device, switch off the system and then switch on again.
"VBR"
- The system cannot show the remaining play time for variable bit rate (VBR) tracks.
System memory reset (initialization)
Reset the memory when the following situations occur:
- There is no response when buttons are pressed. - You want to clear and reset the memory contents.
1 Disconnect the AC mains lead.
2 While you press and hold [∅/l] on the main unit, connect the AC mains lead again. Continue to press and hold the button (approximately 10 seconds) until "----" is shown.
3 Release [⏻/l]. All the settings are set back to the factory preset. It is necessary to set the memory items again.
Remote control code
When other Panasonic equipment responds to the remote control of this system, change the remote control code for this system.
Preparation
Press [RADIO/EXT-IN] to select AUX input.
To set the code to "REMOTE 2"
1 Press and hold [RADIO/EXT-IN] on the main unit and [2] on the remote control until "REMOTE 2" is shown.
2 Press and hold [OK] and [2] for a minimum of 4 seconds.
To set the code to "REMOTE 1"
1 Press and hold [RADIO/EXT-IN] on the main unit and [1] on the remote control until "REMOTE 1" is shown.
2 Press and hold [OK] and [1] for a minimum of 4 seconds.
Reference
Operation is subject to the following two conditions: (1) This device may not cause harmful interference, and (2) this device must accept any interference received, including interference that may cause undesired operation.
Software update
Occasionally, Panasonic may release updated software for this unit that may add or improve the way a feature operates. These updates are available free of charge. For more details, refer to the following website.
http://panasonic.jp/support/global/cs/ (This site is in English only.)
About Bluetooth®
Panasonic bears no responsibility for data and/or information that can possibly be compromised during a wireless transmission.
Frequency band
- This system uses the 2.4 GHz frequency band.
Certification
- This system conforms to the frequency restrictions and has received certification based on frequency laws. Thus, a wireless permit is not necessary.
- The actions below are punishable by law: - Taking apart or modifying the main unit. - Removing specification indications.
Restrictions of use
- Wireless transmission and/or usage with all Bluetooth ^® equipped devices is not guaranteed.
- All devices must conform to standards set by Bluetooth SIG, Inc.
- Depending on the specifications and settings of a device, it can fail to connect or some operations can be different.
- This system supports Bluetooth ^ security features. But depending on the operating environment and/or settings, this security is possibly not sufficient. Transmit data wirelessly to this system with caution.
- This system cannot transmit data to a Bluetooth ^ device.
Range of use
- Use this device at a maximum range of 10 m.
- The range can decrease depending on the environment, obstacles or interference.
Interference from other devices
- This system may not function properly and troubles such as noise and sound jumps may arise due to radio wave interference if this unit is located too close to other Bluetooth ^ devices or the devices that use the 2.4 GHz band.
- This system may not function properly if radio waves from a nearby broadcasting station, etc. is too strong.
Intended usage
- This system is for normal, general use only.
- Do not use this system near an equipment or in an environment that is sensitive to radio frequency interference (example: airports, hospitals, laboratories, etc.).
Licenses
MPEG Layer-3 audio coding technology licensed from Fraunhofer IIS and Thomson.
The Bluetooth ^26 word mark and logos are owned by the Bluetooth SIG, Inc. and any use of such marks by Panasonic Corporation is under license. Other trademarks and trade names are those of their respective owners.
Google Play and Android are trademarks of Google Inc.
To dispose or transfer this system
This system may keep the user settings information internally. If you discard this system either by disposal or transfer, then follow the procedure to return all the settings to the factory presets to delete the user settings.
- To delete all recorded tracks in the internal memory (refer to page 12).
- To return all sample sounds to the factory preset (refer to page 17).
- To reset system memory (refer to page 20).
Note:
- The operation history may be recorded in the memory of this system.
Specifications
Amplifier section
| RMS output power (each channel driven) | |
| High | 400+400(3 Ω, 1 kHz, 30% THD) |
| Mid-Low | 400+400(3 Ω, 1 kHz, 30% THD) |
| Low | 850+850(5 Ω, 100 Hz, 30% THD) |
| Total RMS output power | 3300 W (30% THD) |
Disc section
| Disc played | |
| 8 cm CD, CD-R/RW | |
| 12 cm CD, CD-R/RW | |
| Pick up | |
| Wavelength | 790 |
| Laser power CLASS 1 | |
| Audio output (disc) 2 ch (FL, FR) | |
| FL = Front left channel | |
| FR = Front right channel | |
| Format CD-DA, MP3 | |
Tuner section
| Frequency modulation (FM) | |
| Preset memory 30 stations | |
| Frequency range | |
| 87.50 MHz to 108.00 MHz (50 kHz step) | |
| Antenna terminals | 75 Ω unbalanced |
| Amplitude modulation (AM) | |
| Preset memory 15 stations | |
| Frequency range | 522 kHz to 1629 kHz (9 kHz step) |
| 520 kHz to 1630 kHz (10 kHz step) | |
Speaker section
| Type 4 way, 4 speaker system (bass reflex) | ||
| Speaker unit(s) | ||
| Super Woofer (Low) 38 cm cone type | ||
| Super Woofer (Mid-Low) 20 cm cone type | ||
| Woofer | 10 cm cone type | |
| Tweeter | W | 6 cm cone type |
| Impedance | High 3 Ω/ Mid-Low 3 Ω/ Low 5 Ω | |
| Output sound pressure | W | 91 dB/W (1 m) |
| Frequency range | 25 Hz to 23 kHz (-16 dB) | |
| 30 Hz to 20 kHz (-10 dB) | ||
Bluetooth® section
| Version | Bluetooth® Ver.2.1 + EDR |
| Output | Class 2 (2.5 mW) |
| Communication distance | |
| Prospective communication distance: About 10 m* | |
| Communication method | 2.4 GHz ba/HD-TH-SS |
| Correspondence profile | A2DP/AVRCP/SPP |
| * Prospective communication distance | |
| Measurement environment: | Temperature 25 °C/Height 1.0 m |
| Measure in “MODE 1” | |
Memory section
| Memory size | 2 GB |
| Media file format support | MP3 |
| Memory record | |
| Bit rate | 128 kbps |
| Memory recording speed | 1x |
| 3x max (CD only) | |
| From CD, MP3, USB recording file format | |
| MP3 (*.mp3) | |
Terminals section
| Microphone jack | Mono, 6.3 mm (2 systems) |
| USB port | |
| USB standard | USB 2.0 full speed |
| Media file format support | MP3 (*.mp3) |
| USB device file system | FAT12, FAT16, FAT32 |
| USB ripping | |
| Bit rate | 128 kbps |
| Recording speed | 1x, 3x max (CD only) |
| Recording file format | MP3 (*.mp3) |
| AUX Input | |
| Terminal | Stereo, 3.5 mm jackStereo, Pin jack |
General
| Power supply | AC 220 V to 240 V, 50/60 Hz |
| SA-MAX770GSK | |
| Power consumption | 330 W |
| Dimensions (W x H x D) | |
| 492 mm x 221 mm x 421 mm | |
| Mass Approx. 7.1 k | g |
SB-MAX770GSK
| Dimensions (W x H x D) | |
| Including the speaker feet: | |
| 576 mm x 794 mm x 542 mm | |
| Excluding the speaker feet: | |
| 576 mm x 786 mm x 542 mm | |
| Mass | Approx. 37.4 kg |
Operating temperature range 0 °C to +40 °C
| Operating humidity range |
| 35% to 80% RH (no condensation) |
Power consumption in standby mode 0.3 W (approximate)
Note:
- Specifications are subject to change without notice. Mass and dimensions are approximate.
- Total harmonic distortion is measured by the digital spectrum analyzer.
Limited Warranty (ONLY FOR AUSTRALIA)
Panasonic Warranty
- The product is warranted for 12 months from the date of purchase. Subject to the conditions of this warranty Panasonic or its Authorised Service Centre will perform necessary service on the product without charge for parts or labour, if in the opinion of Panasonic, the product is found to be faulty within the warranty period.
- This warranty only applies to Panasonic products purchased in Australia and sold by Panasonic Australia or its Authorised Distributors or Dealers and only where the products are used and serviced within Australia or its territories. Warranty cover only applies to service carried out by a Panasonic Authorised Service Centre and only if valid proof of purchase is presented when warranty service is requested.
- This warranty only applies if the product has been installed and used in accordance with the manufacturer's recommendations (as noted in the operating instructions) under normal use and reasonable care (in the opinion of Panasonic). The warranty covers normal domestic use only and does not cover damage, malfunction or failure resulting from use of incorrect voltages, incorrect installation, accident, misuse, neglected, build up of dirt or dust, abuse, maladjustment of customer controls, mains supply problems, thunderstorm activity, infestation by insects or vermin, tampering or repair by unauthorized persons (including unauthorized interests), antibacterial infections, infection, infection, infection, infection, infection, infection, infection, infection, infection, infection, infection, infection, infection, infection, infection, infection, infection, infection, infection, infection, infection, infection, infection, infection, infection, infection, infection, infection, infection, infection, infection, infection, infection, infection, infection, infection, infection, infection, infection, infection, infection, infection, infection, infection, infection, infection, infection, infection, infection, infection, infections
- This warranty does not cover the following items unless the fault or defect existed at the time of purchase:
(a) Cabinet Part(s) (e) DVD, Blu-ray or Recordable Discs
(b) Video or Audio Tapes (f) Video / Audio Heads from wear and tear in normal use
(c) SD cards or USB devices (g) Information stored on Hard Disk Drive, USB stick or SD card
(d) User replaceable Batteries (n) DTV reception issues caused by TV Aerial / Cabling / Wall socket(s) -
Some products may be supplied with Ethernet connection hardware. The warranty is limited on such products and will not cover
(a) Internet and or DLNA connection / setup related problems
(b) Access fees and or charges incurred for internet connection
(c) The use of incompatible software or software not specifically stipulated in the product operations manual.
and
(d) Any indirect or consequential costs associated with the incorrect use or misuse of the hardware, its connection to the internet or
any other device -
To claim warranty service, when required, you should
• Telephone Panasonic's Customer Care Centre on 132600 or visit our website referred to below and use the Service Centre
Locator for the name/address of the nearest Authorised Service Centre.
- Send or take the product to a Panasonic Authorised Service Centre together with your proof of purchase receipt as a proof of purchase date. Please note that freight and insurance to and I or from your nearest Authorised Service Centre must be arranged by you.
• Note that home or pick-up/delivery service is available for the following products in the major metropolitan areas of Australia or the
normal operating areas of the nearest Authorized Service Centres:
- Plasma/LCD televisions / displays (screen size greater than 103 cm)
- The warranties hereby confere do not extend to, and exclude, any costs associated with the installation, de-installation or re-installation of a product, including costs related to the mounting, de-mounting or remounting of any screen, (and any other ancillary activities), delivery, handling, freighting, transportation or insurance of the product or any part thereof or replacement of and do not extend to, and exclude, any damage or loss occurring by reason of, during, associated with, or related to such installation. de-installation, re-installation or transit.
Panasonic Authorised Service Centres are located in major metropolitan areas and most regional centres of Australia, however, coverage will vary dependant on product. For advice on exact Authorised Service Centre locations for your product, please telephone our Customer Care Centre on 132600 or visit our website and use the Service Centre Locator.
In addition to your rights under this warranty, Panasonic products come with consumer guarantees that cannot be excluded under the Australian Consumer Law. If there is a major failure with the product, you can reject the product and elect to have a refund or to have the product replaced or if you wish you may elect to keep the goods and be compensated for the crop in value of the goods. You are also entitled to have the product repaired or replaced if the product fails to be of acceptable quality and the failure does not amount to a major failure.
If there is a major failure in regard to the product which cannot be remedied then you must notify us within a reasonable period by contacting the Panasonic Customer Care Centre. If the failure in the product is not a major failure then Panasonic may choose to repair or replace the product and will do so in a reasonable period of time from receiving notice from you.
THIS WARRANTY CARD AND THE PURCHASE DOCKET (OR SIMILAR PROOF OF PURCHASE)
SHOULD BE RETAINED BY THE CUSTOMER AT ALL TIMES
If you require assistance regarding warranty conditions or any other enquiries, please visit the Panasonic Australia
website www.panasonic.com.au or contact by phone on 132 600
If phoning in, please ensure you have your operating instructions available.
Panasonic Australia Pty. Limited
ACN 001 592 187 ABN 83 001 592 187
1 Innovation Road, Macquarie Park NSW 2113
交流电源线注意事项
(对于 3 针的 AC 电源插头)
如何更换保险丝
natural_image
Line drawing of two people assembling or handling a large mechanical device (no text or symbols visible)使用碱或锰性干电池。
插入电池时,确保对准其极性(+和-)。
连接
① 待机 / 开机开关 [⏻], [⏻/ı]
“SW1”、“SW2”、“SW3”或“OFF”
• D.BASS
“D.BASS ON”、“D.BASS BEAT”或“D.BASS
OFF"
预设 EQ (Preset EQ)
按 [D.BASS,-SUPER WOOFER]
• SUPER WOOFER
按住 [D.BASS,-SUPER WOOFER]
natural_image
Three identical line drawings of electrical plug wires, no text or symbols present(Для Таиланда)
natural_image
Line drawing of two people assembling a large mechanical device (no text or symbols)flowchart
graph TD
    A["Component ①"] --> B["Component ②"]
    B --> C["Component ③"]
    C --> D["Arrow to Component ②"]
    D --> E["Arrow to Component ③"]
    E --> F["Arrow to Component ②"]
    F --> G["Arrow to Component ③"]
    G --> H["Arrow to Component ②"]
    H --> I["Arrow to Component ③"]
    I --> J["Arrow to Component ②"]
    J --> K["Arrow to Component ③"]
    K --> L["Arrow to Component ②"]
    L --> M["Arrow to Component ③"]
    M --> N["Arrow to Component ②"]
    N --> O["Arrow to Component ③"]
    O --> P["Arrow to Component ②"]
    P --> Q["Arrow to Component ③"]
    Q --> R["Arrow to Component ②"]
    R --> S["Arrow to Component ③"]
    S --> T["Arrow to Component ②"]
    T --> U["Arrow to Component ③"]
    U --> V["Arrow to Component ②"]
    V --> W["Arrow to Component ③"]
    W --> X["Arrow to Component ②"]
    X --> Y["Arrow to Component ③"]
natural_image
Line drawing of two people assembling a mechanical device (no text or symbols)30 MIN → 60 MIN → 90 MIN → 120 MIN → OFF
Примітка:
- If you see this symbol -
Information on Disposal in other Countries outside the European Union
This symbol is only valid in the European Union. If you wish to discard this product, please contact your local authorities or dealer and ask for the correct method of disposal.
- 如果看到此符号的话 -
"L+R" "R" "L" "VOCAL CANCEL"
"OFF"
[1]
[2]الصدى
OFF ← 120 MIN ← 90 MIN ← 60 MIN ← 30 MIN
[Figure]
ملاحظة:
natural_image
Technical illustration of a portable electronic device with front panel and internal components (no text or symbols)Bluetooth® جهاز
4 [USB REC ●/II] و [CD HI-SPEED REC] 3
منظر علوي
منظر أمامي
natural_image
Line drawing of two people assembling or inspecting a mechanical device (no text or symbols visible)© Panasonic Corporation 2014
GS
- Table of contents
- Safety precautions
- WARNING!
- Unit
- CAUTION!
- Battery
- Note on AC mains lead
- (For the AC mains plug of three pins)
- How to replace the fuse
- Supplied accessories
- Note:
- Attaching the speaker feet
- Preparation
- Placement of speakers
- Use only the supplied speakers.
- Maintenance
- Preparing the remote control
- Making the connections
- Connect the speakers.
- Connect the FM Indoor antenna.
- Connect the AM loop antenna.
- Connect the AC mains lead.
- Conserving power
- Overview of controls
- Disc
- Playing disc
- Viewing available information
- Play menu
- PLAYMODE
- REPEAT
- Programme playback
- Note on disc
- USB and internal memory
- Connecting a USB device
- Recording to a USB device or the internal memory
- Basic recording
- Select the source you want to record.
- Radio
- External equipment
- Press [MEMORY REC ●/III] or [USB REC ●/III] to start recording.
- - Stop recording
- - Pause recording
- Recording MP3 tracks
- Prepare the source you want to record.
- - Record all tracks
- Basic playback
- MEMORY
- USB A USB B
- Title search Playlist
- Adding tracks to the playlist
- Listening to the playlist
- Advanced recording functions
- High-speed recording
- CD
- Adding track marks
- Before recording
- • MANUAL
- • TIME MARK
- • SYNCHRO
- Deleting the recorded tracks
- MEMORY
- USB B
- - TRACK DEL
- Press [OK].
- Press [OK].
- Note on USB
- Manual tuning
- Using the main unit
- Improving the sound quality
- When "FM" is selected
- When "AM" is selected
- Memory presetting
- Automatic presetting
- Manual presetting
- Selecting a preset station
- AM allocation setting
- Bluetooth®
- Pairing a device
- One-Touch Connection (Connecting by NFC)
- Bluetooth® standby mode
- Link mode
- Disconnecting a device
- Clock and timers
- Setting the clock
- Play and record timer
- To start the timer
- Sleep timer
- Sound and illumination
- Adjust the sound effect
- Press the button to select the sound effect.
- Turn [MULTI CONTROL] to select the desired setting.
- Illumination effects
- By main unit only
- Turn [ILLUMINATION] to select pattern or colour.
- DJ functions
- If you use the app "Panasonic MAX Juke"
- DJ jukebox
- MEMORY: USB A, USB B
- Press [DJ JUKEBOX] on main unit.
- Press [1] to [6] on main unit to select the desired function.
- To cancel the DJ jukebox
- Press [DJ JUKEBOX] on main unit.
- DJ sampler
- DJ effects
- KARAOKE
- Using a microphone
- Using the auxiliary input
- Before connection
- To connect a portable audio equipment etc.
- To connect a VCR, DVD player etc.
- Troubleshooting
- Common problems
- The unit does not work.
- The display panel lights up and changes continuously in standby mode.
- No operations can be done with the remote control.
- Sound is distorted or no sound.
- A humming sound can be heard during playback.
- The sound level reduces.
- Display not shown correctly.
- Playback does not start.
- The total number of tracks displayed is incorrect.
- The disc cannot be read.
- USB
- The USB device or the contents in it cannot be read.
- Slow operation of the USB device.
- Sound is distorted.
- A beat sound is heard.
- A low hum is heard during AM broadcasts.
- Pairing cannot be done.
- The device cannot be connected.
- The device is connected but audio cannot be heard through the system.
- Sound from the device is interrupted.
- The One-Touch Connection (NFC feature) is not working.
- Main unit displays
- "USB A NO DEVICE"
- "USB B NO DEVICE"
- "DEVICE FULL"
- "ERROR"
- "ERROR" (during recording)
- "F61"
- "F70"
- "F77"
- "NO PLAY"
- "UNSUPPORT"
- "NO TRACK"
- "PLAYEROR"
- "REMOTE 1"
- "REMOTE 2"
- "TEMP NG"
- "USB OVER CURRENT ERROR"
- "VBR"
- System memory reset (initialization)
- Remote control code
- To set the code to "REMOTE 2"
- To set the code to "REMOTE 1"
- Reference
- Software update
- About Bluetooth®
- Licenses
- To dispose or transfer this system
- Specifications
- SB-MAX770GSK
- Operating temperature range 0 °C to +40 °C
- Power consumption in standby mode 0.3 W (approximate)
- Limited Warranty (ONLY FOR AUSTRALIA)
- Panasonic Warranty
- THIS WARRANTY CARD AND THE PURCHASE DOCKET (OR SIMILAR PROOF OF PURCHASE)
- SHOULD BE RETAINED BY THE CUSTOMER AT ALL TIMES
- Panasonic Australia Pty. Limited
- 交流电源线注意事项
- (对于 3 针的 AC 电源插头)
- 如何更换保险丝
- 连接
- Information on Disposal in other Countries outside the European Union
Brand : PANASONIC
Model : SC-MAX770
Category : Hi-Fi System