
ASI2212J-D - Access Control System Dahua Technology - Free user manual and instructions
Find the device manual for free ASI2212J-D Dahua Technology in PDF.


| Product Type | Access Control Standalone |
| Brand | Dahua Technology |
| Model | ASI2212J-D |
| Dimensions (W × H × D) | Approx. 130 mm × 130 mm × 30 mm |
| Weight | Approx. 0.3 kg |
| Power Supply | 12 V DC, 1 A (adapter provided by manufacturer) |
| Power Consumption | ≤ 12 W |
| Unlocking Methods | Card, Fingerprint, Password, or combinations (Multi-card, Time Section, Unlock Mode) |
| Card Support | 13.56 MHz (Mifare), 125 kHz (EM) via external reader; up to 5 cards per user |
| Fingerprint Capacity | Up to 3 fingerprints per user; total capacity depends on memory |
| User Capacity | Up to 10,000 users (typical) |
| Wiegand Support | Input/Output: Wiegand 26, 34, 66; pulse width/interval configurable |
| Network Interface | 10/100 Mbps Ethernet (RJ-45); Wi-Fi on select models |
| Protocols | TCP/IP, HTTP, HTTPS, P2P, ONVIF, DHCP |
| Operating Temperature | -10°C to +55°C (14°F to 131°F) |
| Operating Humidity | 10% to 90% RH (non-condensing) |
| Enclosure Rating | IP54 (indoor use recommended) |
| Maintenance | Clean with a soft, dry cloth; avoid liquids and abrasives |
| Security | Tamper alarm, duress alarm, anti-passback, HTTPS, IP address filtering |
| Management | Local keypad menu, Web interface, Smart PSS Lite software |
| Mounting | Wall mount (screws included) |
| Warranty | 2 years (subject to local regulations) |
Frequently Asked Questions - ASI2212J-D Dahua Technology
User questions about ASI2212J-D Dahua Technology
0 question about this device. Answer the ones you know or ask your own.
Ask a new question about this device
Download the instructions for your Access Control System in PDF format for free! Find your manual ASI2212J-D - Dahua Technology and take your electronic device back in hand. On this page are published all the documents necessary for the use of your device. ASI2212J-D by Dahua Technology.
USER MANUAL ASI2212J-D Dahua Technology
natural_image
Abstract geometric composition with gray and blue color blocks (no text or symbols)Foreword
General
This manual introduces the functions and operations of the Access Standalone. Read carefully before using the device, and keep the manual safe for future reference.
Safety Instructions
The following signal words might appear in the manual.
| Signal Words Meaning | ||
 | DANGER | Indicates a high potential hazard which, if not avoided, will result in death or serious injury. |
 | WARNING | Indicates a medium or low potential hazard which, if not avoided, could result in slight or moderate injury. |
 | CAUTION | Indicates a potential risk which, if not avoided, could result in property damage, data loss, reductions in performance, or unpredictable results. |
 | TIPS Provides methods to help you solve a problem or save time. | |
 | NOTE | Provides additional information as a supplement to the text. |
Revision History
| Version | Revision Content | Release Time |
| V1.0.0 | First Release. | November 2022 |
Privacy Protection Notice
As the device user or data controller, you might collect the personal data of others such as their face, fingerprints, and license plate number. You need to be in compliance with your local privacy protection laws and regulations to protect the legitimate rights and interests of other people by implementing measures which include but are not limited: Providing clear and visible identification to inform people of the existence of the surveillance area and provide required contact information.
About the Manual
- The manual is for reference only. Slight differences might be found between the manual and the product.
- We are not liable for losses incurred due to operating the product in ways that are not in compliance with the manual.
- The manual will be updated according to the latest laws and regulations of related jurisdictions. For detailed information, see the paper user's manual, use our CD-ROM, scan the QR code or visit our official website. The manual is for reference only. Slight differences might be found between the electronic version and the paper version.
- All designs and software are subject to change without prior written notice. Product updates might result in some differences appearing between the actual product and the manual. Please
contact customer service for the latest program and supplementary documentation.
- There might be errors in the print or deviations in the description of the functions, operations and technical data. If there is any doubt or dispute, we reserve the right of final explanation.
- Upgrade the reader software or try other mainstream reader software if the manual (in PDF format) cannot be opened.
- All trademarks, registered trademarks and company names in the manual are properties of their respective owners.
- Please visit our website, contact the supplier or customer service if any problems occur while using the device.
- If there is any uncertainty or controversy, we reserve the right of final explanation.
Important Safeguards and Warnings
This section introduces content covering the proper handling of the Access Standalone, hazard prevention, and prevention of property damage. Read carefully before using the Access Standalone, and comply with the guidelines when using it.
Transportation Requirement

Transport, use and store the Access Standalone under allowed humidity and temperature conditions.
Storage Requirement

Store the Access Standalone under allowed humidity and temperature conditions.
Installation Requirements

WARNING
- Do not connect the power adapter to the Access Standalone while the adapter is powered on.
- Strictly comply with the local electric safety code and standards. Make sure the ambient voltage is stable and meets the power supply requirements of the Access Standalone.
- Do not connect the Access Standalone to two or more kinds of power supplies, to avoid damage to the Access Standalone.
- Improper use of the battery might result in a fire or explosion.

- Personnel working at heights must take all necessary measures to ensure personal safety including wearing a helmet and safety belts.
- Do not place the Access Standalone in a place exposed to sunlight or near heat sources.
- Keep the Access Standalone away from dampness, dust, and soot.
• Install the Access Standalone on a stable surface to prevent it from falling. - Install the Access Standalone in a well-ventilated place, and do not block its ventilation.
- Use an adapter or cabinet power supply provided by the manufacturer.
- Use the power cords that are recommended for the region and conform to the rated power specifications.
- The power supply must conform to the requirements of ES1 in IEC 62368-1 standard and be no higher than PS2. Please note that the power supply requirements are subject to the Access Standalone label.
- The Access Standalone is a class I electrical appliance. Make sure that the power supply of the Access Standalone is connected to a power socket with protective earthing.
Operation Requirements

- Check whether the power supply is correct before use.
- Do not unplug the power cord on the side of the Access Standalone while the adapter is powered on.
- Operate the Access Standalone within the rated range of power input and output.
- Use the Access Standalone under allowed humidity and temperature conditions.
- Do not drop or splash liquid onto the Access Standalone, and make sure that there is no object filled with liquid on the Access Standalone to prevent liquid from flowing into it.
- Do not disassemble the Access Standalone without professional instruction.
Table of Contents
Foreword
Important Safeguards and Warnings....III
1 Product Overview....1
1.1 Introduction ...... 1
1.2 Application....1
2 Local Configuration....3
2.1 Configuration Process....3
2.2 Keypad Functions 3
2.3 Standby Screen.... 3
2.4 Initialization....4
2.5 Logging in....5
2.6 Network Communication....6
2.6.1 Configuring IP 6
2.6.2 Configuring Wi-Fi 7
2.6.3 Configuring Wiegand 8
2.6.4 Configuring Serial Port 8
2.6.5 Configuring Modes 8
2.7 User Management....9
2.7.1 Adding New User 9
2.7.2 Viewing User information ....11
2.7.3 Setting Administrator Password....12
2.8 Access Control Management....12
2.8.1 Configuring Unlocking Modes ...... 13
2.8.2 Configuring the Lock Holding Time ....13
2.9 Unlocking the Door....13
2.9.1 Unlocking by Cards....13
2.9.2 Unlocking by Fingerprint....14
2.9.3 Unlocking by User Password....14
2.9.4 Unlocking by Administrator Password 14
2.10 Configuring the System....15
2.10.1 Configuring Time 15
2.10.2 Setting the Volume ...... 15
2.10.3 Restoring Factory Defaults....15
2.10.4 Restarting the Device....16
2.11 USB Management....16
2.11.1 Exporting to USB 16
2.11.2 Importing From USB 17
2.11.3 Updating System....17
2.11.4 Exporting Unlocking Records....18
2.11.5 Exporting/Importing User Information 18
2.12 System Information ....19
3 Web Configurations ......20
3.1 Web on Computer ....20
3.1.1 Initialization....20
3.1.2 Logging In....21
3.1.3 Resetting the Password 22
3.1.4 Configuring Door Parameter 24
3.1.5 Alarm Linkage 26
3.1.5.1 Setting Alarm Linkages ......26
3.1.5.2 Viewing Alarm Logs....28
3.1.6 Time Sections ......29
3.1.6.1 Configuring Time Sections....29
3.1.6.2 Configuring Holiday Groups 29
3.1.6.3 Configuring Holiday Plans ....30
3.1.7 Data Capacity....31
3.1.8 Setting Volume....31
3.1.9 Configuring Network....32
3.1.9.1 Configuring TCP/IP....32
3.1.9.2 Configuring Port....32
3.1.9.3 Configuring Automatic Registration....32
3.1.9.4 Configuring P2P 33
3.1.10 Setting Date....34
3.1.11 Safety Management....35
3.1.11.1 Configuring IP Authority....35
3.1.11.1.1 Network Access....35
3.1.11.1.2 Prohibit PING....37
3.1.11.1.3 Anti Half Connection....37
3.1.11.2 Configuring System 38
3.1.11.2.1 System Service....38
3.1.11.2.2 Creating Server Certificate ....39
3.1.11.2.3 Downloading Root Certificate ....40
3.1.12 User Management 44
3.1.12.1 Adding Users ....44
3.1.12.2 Adding ONVIF Users 45
3.1.13 Maintenance 46
3.1.14 Configuration Management 47
3.1.14.1 Exporting Configuration File....47
3.1.14.2 Importing Configuration File....47
3.1.14.3 Setting Features....48
3.1.14.4 Setting Fingerprint 48
3.1.14.5 Restoring Factory Defaults....49
3.1.14.6 Configuring Port Functions....49
3.1.15 Updating the System....51
3.1.15.1 File Update....51
3.1.15.2 Online Update....51
3.1.16 Version Information ....52
3.1.17 Viewing Online Users....52
3.1.18 Viewing System Logs....52
3.1.18.1 System Logs....52
3.1.18.2 Admin Logs....53
3.1.18.3 Unlock Records....53
3.1.19 Logging Out....53
3.2 Web on Phone....53
4 Smart PSS Lite Configuration ....55
4.1 Installing and Logging In ....55
4.2 Adding Devices ....55
4.2.1 Adding Individually....55
4.2.2 Adding in Batches....56
4.3 User Management ....57
4.3.1 Configuring Card Type....57
4.3.2 Adding Users....58
4.3.2.1 Adding Individually....58
4.3.2.2 Adding in Batches....60
4.3.3 Assigning Access Permission....62
4.4 Access Management 64
4.4.1 Remotely Opening and Closing Door....64
4.4.2 Setting Always Open and Always Close 65
4.4.3 Monitoring Door Status....65
Appendix 1 Important Points of Fingerprint Registration Instructions ....67
Appendix 2 Cybersecurity Recommendations....69
1 Product Overview
1.1 Introduction
Integrated with a powerful processor and a deep-learning algorithm, the can identify fingerprints instantly and accurately. The also supports unlocking the door by cards, passwords, fingerprints, or their combinations. To meet different needs, it also works with a management software to perform more functions.

The fingerprint function is available on select models.
1.2 Application
The is applicable to a variety of scenarios, such as office buildings, schools, industrial parks, apartment complexes, factories, public stadiums, and business centers.

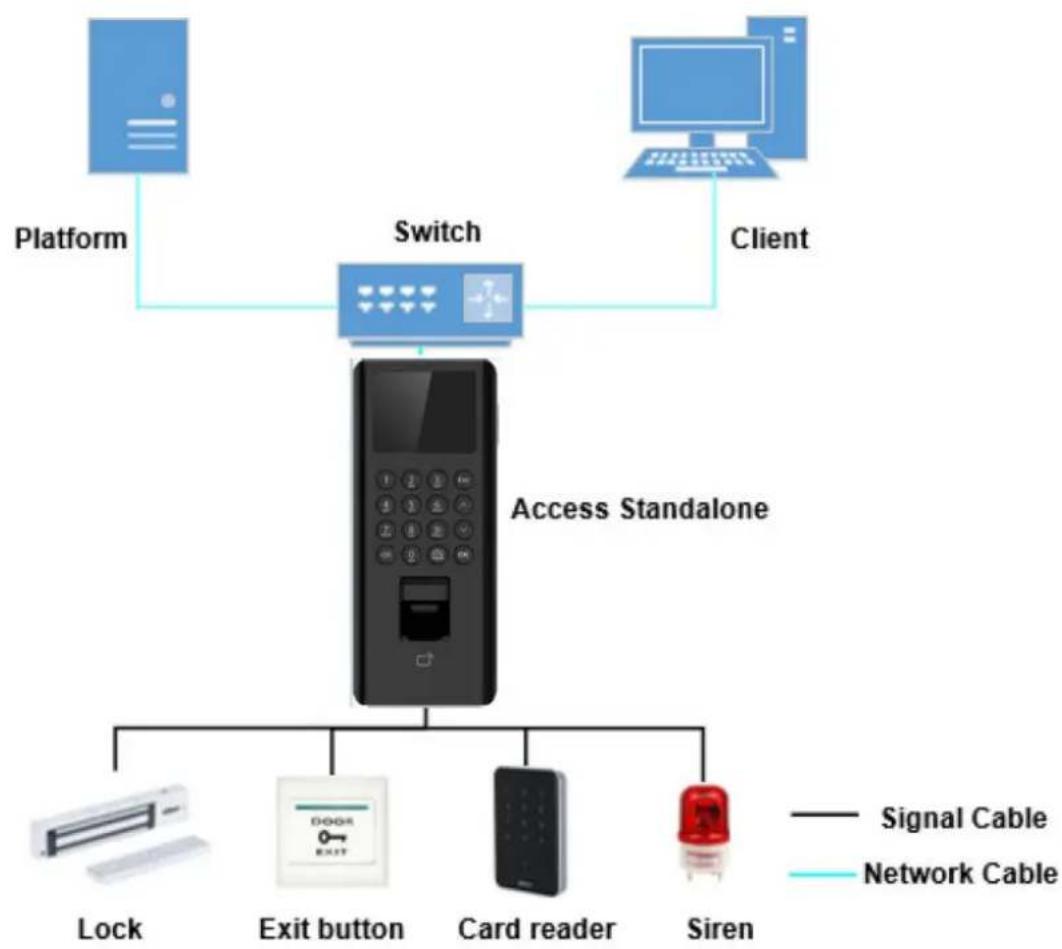
The diagram below is for reference only, and might differ from the actual product.
Figure 1-1 Network diagram
flowchart
graph TD
    A["Platform"] --> B["Switch"]
    C["Client"] --> B
    B --> D["Access Standalone"]
    D --> E["Lock"]
    D --> F["Exit button"]
    D --> G["Card reader"]
    D --> H["Siren"]
    style D fill:#f9f9f9,stroke:#333
    style E fill:#fff,stroke:#333
    style F fill:#fff,stroke:#333
    style G fill:#fff,stroke:#333
    style H fill:#fff,stroke:#333
2 Local Configuration
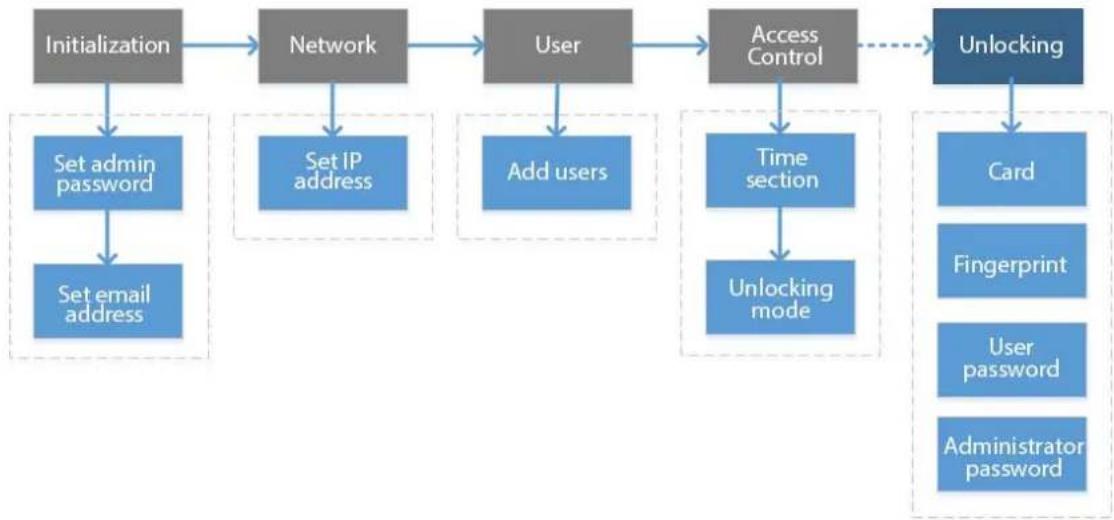
2.1 Configuration Process
Figure 2-1 Configuration workflow
flowchart
graph TD
    A["Initialization"] --> B["Network"]
    B --> C["User"]
    C --> D["Access Control"]
    D --> E["Unlocking"]
    A --> F["Set admin password"]
    F --> G["Set email address"]
    B --> H["Set IP address"]
    C --> I["Add users"]
    D --> J["Time section"]
    J --> K["Unlocking mode"]
    E --> L["Card"]
    E --> M["Fingerprint"]
    E --> N["User password"]
    E --> O["Administrator password"]
2.2 Keypad Functions
Table 2-1 Description of keypad
| Keypad Description | |
| Number or letter | Enter information or select menus. |
| ^ | Use the arrow keys to navigate the menus. |
| ∨ | |
| Esc | Cancel the selection or go back to the previous screen. |
| OK | Go to the selected screen or confirm the changes. |
| Go to the main menu screen. | |
| Backspace. | |
 | Ring the bell, turn to the next page, or change the input method.The doorbell can function only when the Access Standalone is on the standby screen. |
2.3 Standby Screen
You can unlock the door on the standby screen with your card, password, or fingerprint.

- The Access Standalone goes back to the standby screen if there is no operation in 30 seconds.
- The Access Standalone turns off the screen if it stays on the standby screen for 30 seconds.
- The screen below is for reference only, and might differ from the actual product.
Figure 2-2 Standby screen
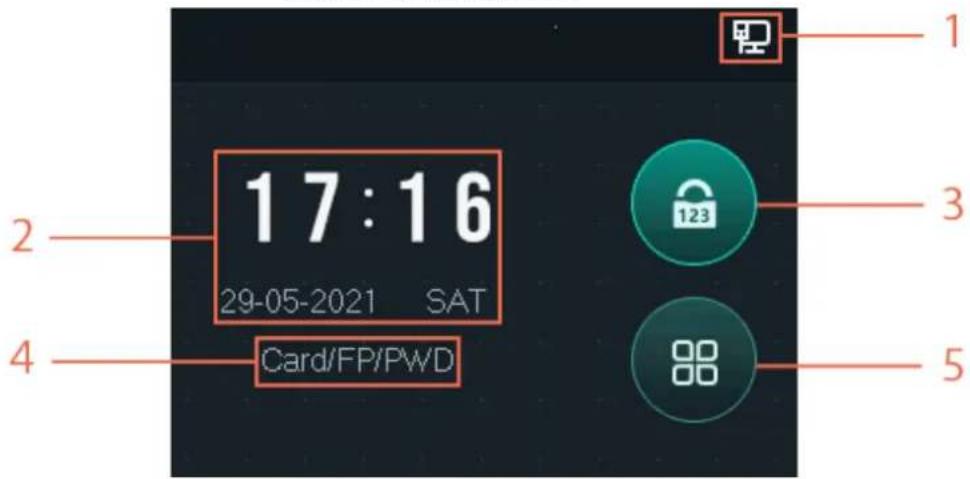
Table 2-2 Standby screen description
| No. Item Description | ||
| 1 | Status | Displays the status of Wi-Fi, wired network (if any), and USB drive. |
| 2 | Date & Time | Time and date. |
| 3 | Unlock the door with password | Enter the user ID and password, or enter the administrator password to unlock the door. |
| 4 | Unlocking methods | Displays the unlocking methods available on the Access Standalone. |
| 5 | Main menu | Tap ☐ to enter the main menu. Only Admin account and users with the administrator permission can access the main menu screen. For details, see "2.5 Logging in". |
2.4 Initialization
For the first-time use or after restoring factory defaults, you need to set the password and email address for the admin account. You can use the admin account to log in to the main menu of the Access Standalone and its webpage.
Figure 2-3 Initialization
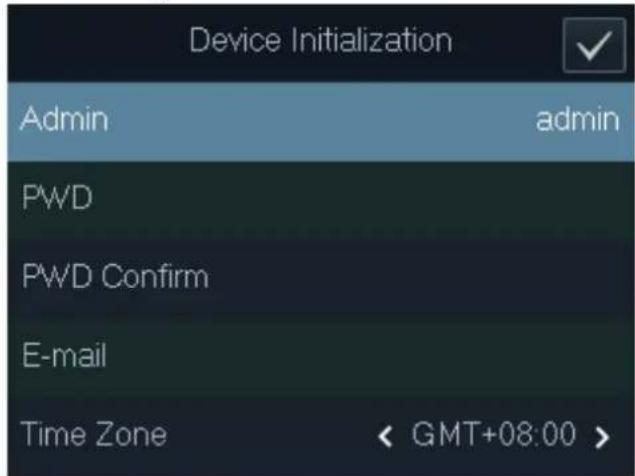

- If you forget the administrator password, send a reset request to your associated e-mail address.
- The password must consist of 8 to 32 non-blank characters and contain at least two types of the following characters: Upper case, lower case, numbers, and special characters (excluding '"; &). Set a high-security password by following the password strength prompt.
2.5 Logging in
Log in to the main menu to configure the Access Standalone. Only admin account and administrator account can enter the main menu of the Access Standalone. For the first-time use, use the admin account to enter the main menu screen and then you can create the other administrator accounts.
Background Information
- Admin account: Can log in to the main menu screen of the Access Standalone, but has no door access permission.
- Administrator account: Can log in to the main menu of the Access Standalone and has door access permissions.
Procedure
Step 1 On the standby screen, tap ∧ and ∨ to select ,and then tap OK.
Step 2 Select a verification method to enter the main menu.

Verification methods might differ depending on the models of the Access Standalone.
- Card: Enter the main menu by swiping card.
- FP: Enter the main menu through the fingerprint.
- PWD: Enter the user ID and password of the administrator account.
- Admin: Enter the Admin password to enter the main menu.
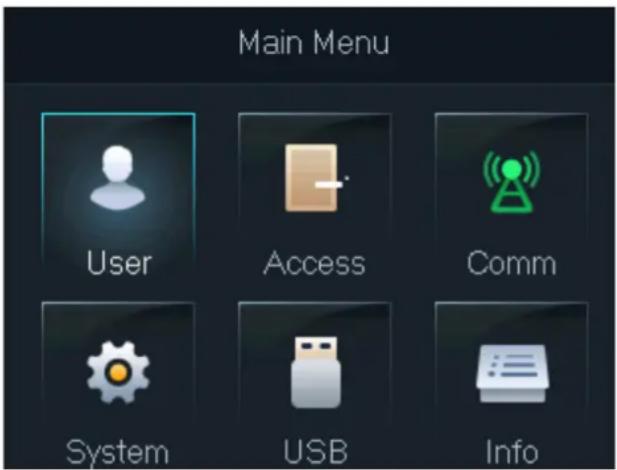
Step 3 On the main menu, tap ∧ or ∨ to navigate the menus, and then tap OK to configure the parameters.

Use the shortcuts to select the menus by simply tapping 1–6.
- To configure user management, tap 1.
- To configure access control, tap 2.
- To configure communication, tap 3.
- To configure system, tap 4.
- To configure USB, tap 5.
- To view system information, tap 6.
Figure 2-4 Main menu
2.6 Network Communication
Configure the network, serial port and Wiegand port parameters to connect the Device to the network or other devices.
2.6.1 Configuring IP
Set IP address for the Access Standalone to connect it to the network. After that, you can log in to the webpage and the management platform to manage the Access Standalone.
Procedure
Step 1 On the main menu, select CommIP Address, and then tap OK.
Step 2 Select IP Address and tap OK to configure parameters.
Figure 2-5 Configure IP
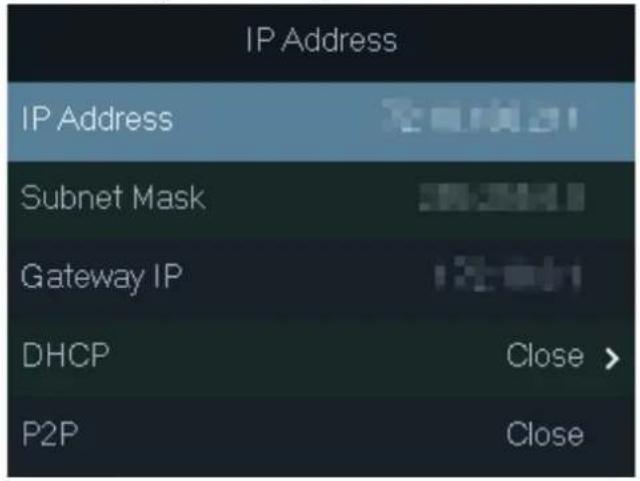
Table 2-3 Description of network parameters
| Parameter Description | |
| IP Address/Subnet Mask/Gateway IP | The IP address, subnet mask, and gateway IP address must be on the same network segment. |
| DHCP | It stands for Dynamic Host Configuration Protocol.When DHCP is turned on, the Access Standalone will automatically be assigned with IP address, subnet mask, and gateway. |
| P2P | P2P (peer-to-peer) technology enables users to manage devices without applying for DDNS, setting port mapping or deploying transit server. |
2.6.2 Configuring Wi-Fi
Connect the Access Standalone to a wireless network. Wi-Fi is only available on select models.
Procedure
Step 1 On the main menu, select CommWi-Fi, and then tapOK
Figure 2-6 Wi-Fi
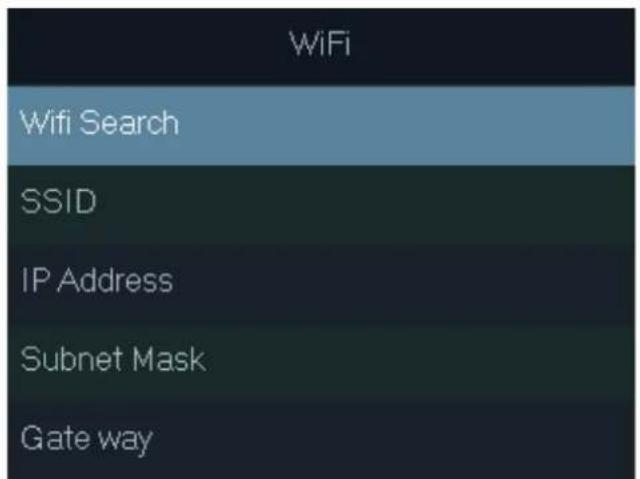
Step 2 Select Wifi > Search, and then tap OK.
Step 3 Select WiFi, and then tap OK to enable the Wi-Fi function.
The Access Standalone will search for and display all available wireless networks.

Tap ◀ or ➕ to go to the previous or next page.
Step 4 Select a wireless network, tap OK, and enter the password.
2.6.3 Configuring Wiegand
Configure Wiegand input or output to connect a card reader or Access Standalone.
On the main menu, select Comm > Wiegand, and then tap OK.
- Select Wiegand Input when you connect an external card reader to the Access Standalone.
- Select Wiegand Output when the Access Standalone functions as a card reader, and you need to connect it to a controller or another access terminal.
Table 2-4 Description of Wiegand parameters
| Parameter Description | |
| Output Type | Select a Wiegand format to read card numbers or ID numbers.Wiegand26: Reads 3 bytes or 6 digits.Wiegand34: Reads 4 bytes or 8 digits.Wiegand66: Reads 8 bytes or 16 digits. |
| Pulse Width | Enter the pulse width and pulse interval of Wiegand output. |
| Pulse Interval | |
| Output Data Type | Select the type of output data.User ID: Outputs data based on user ID.Card No.: Outputs data based on user's first card number, and the data format is hexadecimal or decimal. |
2.6.4 Configuring Serial Port
On the main menu, select CommSerial Port, and then tap OK.
- Select Serial Input when the Access Standalone connects to a card reader.
- Select Serial Output when the Access Standalone functions as a card reader, and the Access Standalone will send data to the Access Standalone to control door access.
◇ UserID: Outputs data based on the ID of the user. - Card No.: Outputs data based on card number when users swipe card to unlock door.
- Select OSDP Input when the Access Standalone is connected to a card reader based on OSDP protocol.
2.6.5 Configuring Modes
Set the Access Standalone to card reader mode or controller mode.
Procedure
Step 1 On the main menu, select Comm > Mode Setting, and then tap OK. Step 2 Select the mode.
- Select Controller when it connects to a card reader.
- Select Card Reader when the Access Standalone functions as a card reader, and you need to connect it to a controller or another access terminal. In this mode, RS-485 is not supported.

In the Card Reader mode, you cannot set the serial input. DOOR_COM and DOOR_NC connect to the CASE and GND of the external Access Standalone for anti-tampering alarm.
Step 3 Select Baud Rate Setting to set the baud rate.
- In the Carrd Reader mode, the baud rate automatically adjust according to the Access Standalone.
- In the Controller mode, you can set the baud rate. The baud of the Access Standalone must be the same to the external device for successful communication.
2.7 User Management
You can add new users, view user/admin list and edit user information.
2.7.1 Adding New User
Procedure
Step 1 Tap ∧ orv to select ☑ in the standby screen, and then tap OK.
Step 2 Log in with the administrator account, and then select User > New User.

The screens in this manual are only for reference, and might differ from the actual product.
Figure 2-7 Add a new user
| New User(1/2) | New User(2/2) | ||
| User ID | 1 | Permission | User > |
| Name | Period | 255-Default | |
| FP | 0 | Holiday Plan | 255-Default |
| Card | 0 | Valid Date | 2037-12-31 |
| PWD | User Type | General > | |
Step 3 Configure the parameters.
Table 2-5 Description of user parameters
| Parameter Description | |
| ID | Each user ID is unique. It can be 18 characters of numbers, letters, or their combination. |
| Name | Enter the name (a maximum of 32 characters, including numbers, symbols, and letters). |
| Fingerprint | Each user can add up to 3 fingerprints. Follow the on-screen instructions and voice prompts to add fingerprints.You can enable the duress fingerprint function under each fingerprint.After the duress alarm function is enabled, an alarm will be triggered if the door is unlocked by the duress fingerprint.[35wY]We do not recommend you set the first fingerprint as the duress fingerprint.Only Access Standalone of fingerprint model supports the fingerprint function. |
| Card | You can register 5 cards for each user. On the card registration page, swipe your card on the card reader, and then the card information will be read by the Device.You can enable the duress card function on the card registration page. After the duress alarm function is enabled, an alarm will be triggered if the door is unlocked by the duress card. |
| PWD | Enter password to unlock the door. The maximum length of the ID digits is 8. |
| Permission | You can select a user permission for the new user.Normal users only have door unlock permissions.Administrators can configure the Access Standalone and unlock the door. |
| Period | A user can only have door access within the defined period. The default value is 255, which means no period is configured. |
| Holiday Plan | A user can only have door access within the scheduled holidays. The default value is 255, which means no holiday plan is configured. |
| Valid Date | Define a period during which the user has door access permissions. |
| User Type | General: General users can unlock the door normally.Blocklist: When users in the blocklist unlock the door, service personnel receive a notification.Guest: Guests can unlock the door within a defined period or for a certain number of times. After the defined period expires or the unlocking times runs out, they cannot unlock the door.Patrol: Paroling users can have their attendance tracked, but they have no unlocking permissions.VIP: When VIP unlock the door, service personnel will receive a notification. The VIP user is not restricted by unlock modes, such as Multi-card and Time Section.Others: When they unlock the door, the door will stay unlocked for 5 more seconds.Custom User 1/2: Same as General. |
Step 4 After you have configured all the parameters, tap Esc.
Step 5 Tap OK to save the changes.
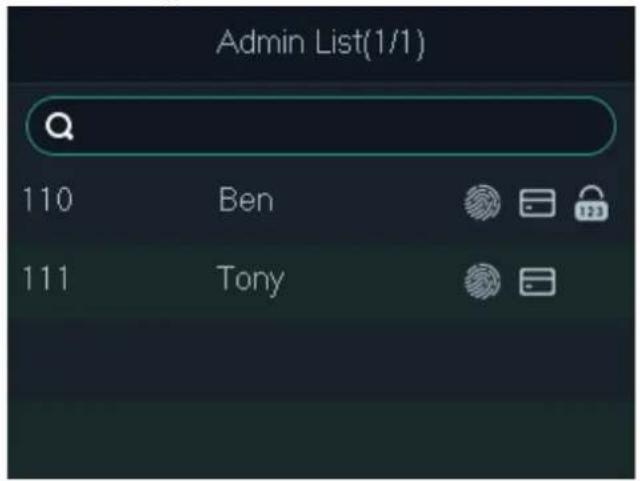
2.7.2 Viewing User information
You can view and search all the general users and admin users, and edit user information.
On the main menu, select User >User List/Admin List, all added users are displayed.
Figure 2-8 User list
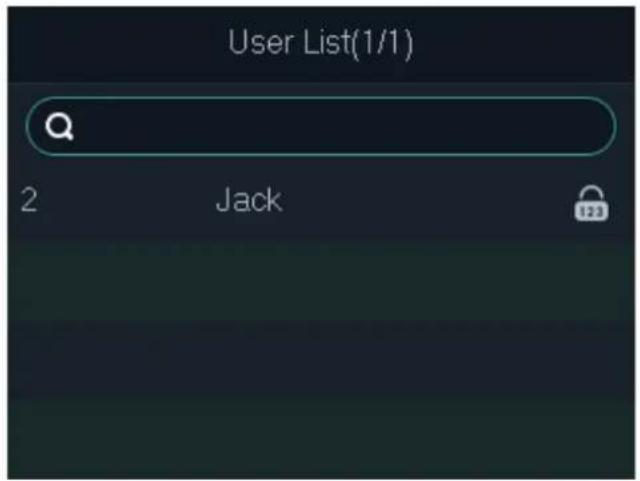
Figure 2-9 Admin list
Edit User information
- Select the user and then tap OK.
- Edit the user information.
- Tap Esc, and then tap OK to save changes.
Search for users
- Select, and then tap OK.
- Enter the ID of the user, swipe the card or place the finger on the fingerprint scanner to search for the user.
Delete users
-
Select the user, and then tap OK.
-
Select 📄 to delete the user.
2.7.3 Setting Administrator Password
You can unlock the door by only entering the admin password. Admin password is not limited by user types. Only one admin password is allowed for the device, but you can set 100 admin passwords through the platform.
Procedure
Step 1 On the main menu, Select User > Administrator PWD
Step 2 Enter the administrator password, and then tap OK.
Figure 2-10 Administrator password
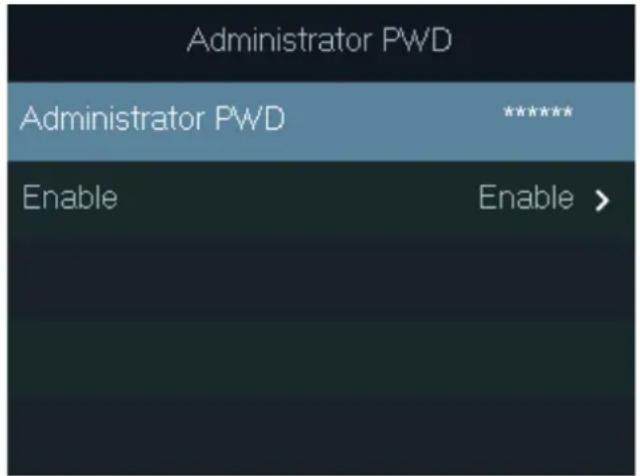
Step 3 Select Enable, and then tap OK to enable the function.
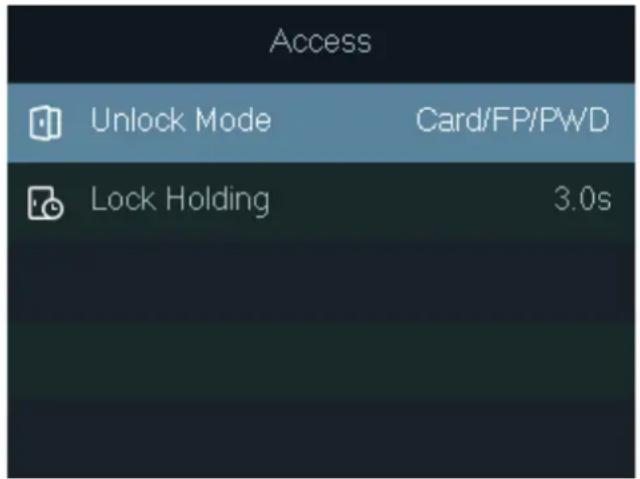
2.8 Access Control Management
Configure the unlocking mode and the unlocking duration.
Figure 2-11 Access control management
2.8.1 Configuring Unlocking Modes
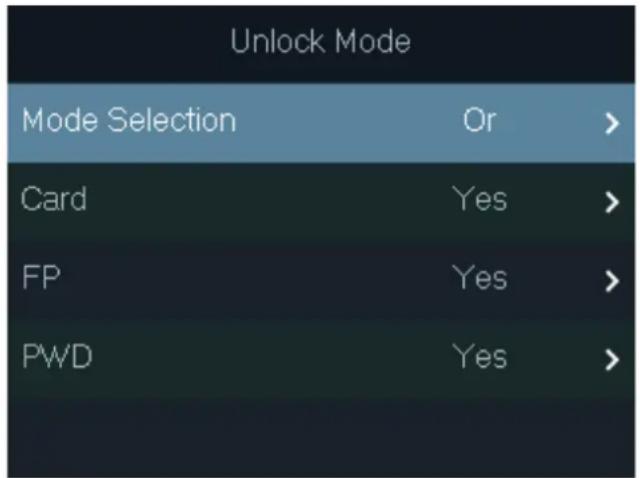
Configure the unlocking combinations. Use card, fingerprint, password, or their combinations to unlock the door. The unlocking methods might differ depending on the models of the Access Standalone.
Procedure
Step 1 On the main menu, select Access > Unlock Mode, and then tap OK.
Step 2 Tap OK to configure the unlocking combinations.
- And: You have to verify all the selected unlocking methods to open the door.
- Or: You can verify one of the selected unlocking methods to open the door.
Figure 2-12 Element (Multiple Choice)
Step 3 Tap Esc.
Step 4 Tap OK to save changes.
2.8.2 Configuring the Lock Holding Time
The door will remain unlocked for the defined period for people to pass through.
Procedure
Step 1 On the main menu, select Access > Lock Holding.
Step 2 Tap OK, and then enter the time.

Tap change the input method.
2.9 Unlocking the Door
2.9.1 Unlocking by Cards
Swipe your card to unlock the door.
2.9.2 Unlocking by Fingerprint
Place your finger on the fingerprint scanner to unlock the door.
2.9.3 Unlocking by User Password
Enter the user ID and password to unlock the door. Unlocking procedure might differ depending on the series of the Access Standalone.
ASI22XXH series
- On the standby screen, tap ∧ and ∨ to select ,and then tap OK.
- Select PWD, and then tap OK.
- Enter the user ID, and then tap OK.
You can tap 📄 to change the input method. - Select PWD, enter the password, and then tapOK.
- Select OK, and then tap OK.
ASI22XXJ series
- On the standby screen, tap ∧ and ∨ to select ,and then tap OK.
- Select PWD, and then tap OK.
- Enter the user ID, and then tap OK.
- You can tap 📋 to change the input method.
-
You can tap to delete.
-
Enter the password, and then tap OK.
-
Tap OK
2.9.4 Unlocking by Administrator Password
Background Information
After you set your administrator password and enable it, you can unlock the door by simply entering the administrator password. Using administrator password to unlock the door without being subject to user levels, unlock modes, periods, holiday plans, and anti-passback except for normally closed door.

To use the administrator password for door access, you need to turn on the function. For details, See "2.7.3 Setting Administrator Password".
Procedure
Step 1 Select 📄 on the standby screen.
Step 2 Select Admin PWD, and then tap OK.
Step 3 Enter the administrator password.
Step 4 Select OK, and then tap OK.
The door is unlocked.
2.10 Configuring the System
2.10.1 Configuring Time
Configure the time of the Access Standalone, such as date, time, and date format.
Procedure
Step 1 On the main menu, select System > Time, and then tap OK.
Step 2 Select a parameter, and then tap OK to edit it.
Figure 2-13 Time settings
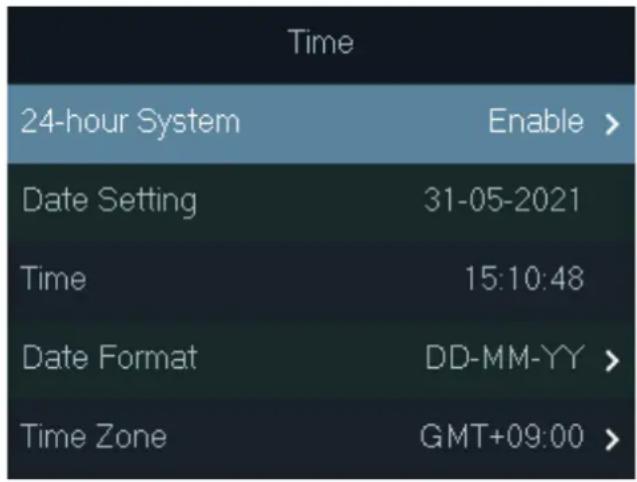
Table 2-6 Description of time parameters
| Parameter Description | |
| 24-hour System | Enable 24-hour format. |
| Date Setting Set up the date. | |
| Time Set up the time. | |
| Date Format Select a date format. | |
| Time Zone Select a time zone. |
2.10.2 Setting the Volume
Adjust the volume of the voice prompt.
Procedure
Step 1 On the main menu, select System > Volume, and then tap OK.
Step 2 Tap the up arrow or down arrow to adjust the volume.
2.10.3 Restoring Factory Defaults
Procedure
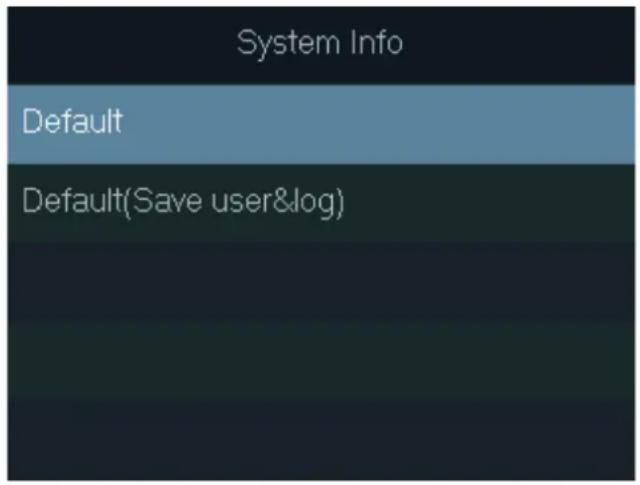
Step 1 On the main menu, select System >Restore Factory, and then tapOK.
Step 2 Select an option, and then tap OK.

Restoring factory defaults might will cause data loss. Please be advised.
- Default: Restores factory defaults and deletes all data, including users, device information, and logs.
- Default (Save user&log): Restores factory defaults and deletes all data except user information and logs.
Figure 2-14 Restore to default settings
2.10.4 Restarting the Device
On the main menu, select System > Reboot, and then tap OK to restart the device.
2.11 USB Management

- Make sure that a USB flash drive is inserted to the before exporting user information or updating system. To avoid failure, do not pull out the USB flash drive or perform any operation during the process.
- If you want to import data from one to another, you must export the data to a USB flash drive first.
You can use a USB flash drive to update the Access Standalone, and export or import user information.
2.11.1 Exporting to USB
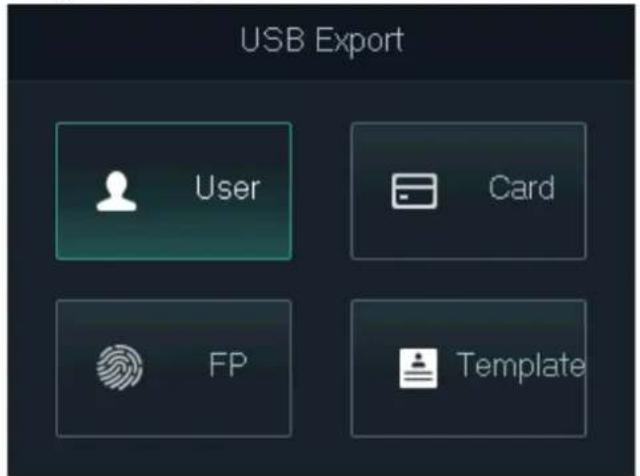
Export data from the Device to a USB flash drive. The exported data is encrypted and cannot be edited.
Procedure
Step 1 On the main menu, select USBUSB Export, and then tap OK.
Step 2 Select the type of data you want to export, and then tap OK.
Figure 2-15 Export data to the USB drive
Step 3 Tap OK.
The selected data is exported to the USB flash drive.
2.11.2 Importing From USB
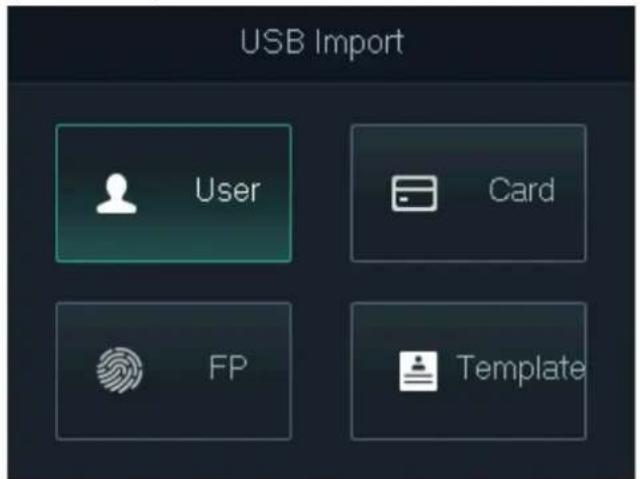
You can import data from USB to the Device.
Procedure
Step 1 On the main menu, select USBUSB Import, and then tap OK.
Step 2 Select the type of data you want to import, and then tap OK.
Figure 2-16 Import data from the USB flash drive
Step 3 Tap OK.
The selected data is imported to the Device.
2.11.3 Updating System
You can use a USB flash drive to update the system of the Device.
Procedure
Step 1 Rename the update file to "update.bin", put it in the root directory of the USB flash drive, and then insert the USB flash drive to the Device.
Step 2 On the main menu, select USBUSB Update.
Step 3 Tap OK.
The Device will restart when update is complete.
2.11.4 Exporting Unlocking Records
Export unlocking records to a USB flash drive.
Procedure
Step 1 On the main menu, select USB > Export Records, and then tap OK.
Step 2 Select the time.
Figure 2-17 Export unlocking records
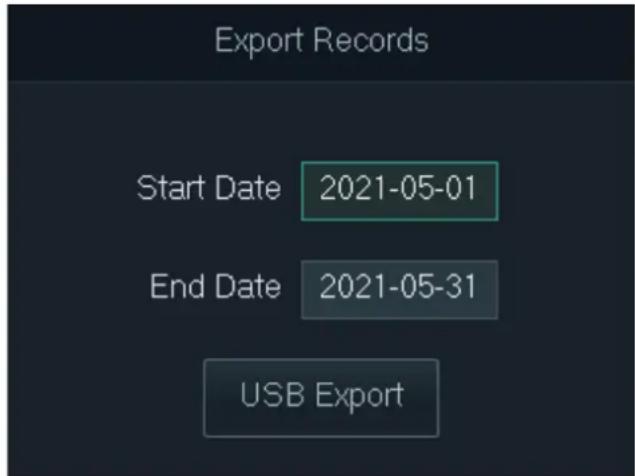
Step 3 Select USB Export, and then tap OK.
The unlocking records are exported to the USB flash drive.
2.11.5 Exporting/Importing User Information
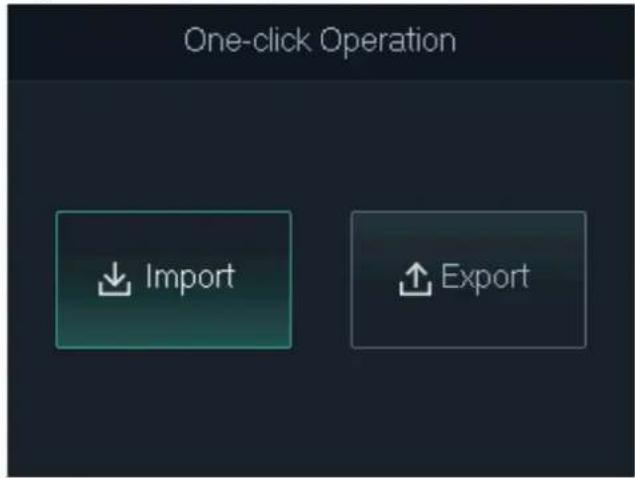
You can import or export user information, including cards and fingerprints.
Procedure
Step 1 On the main menu, select USB > One-click Operation, and then tap OK.
Step 2 Select Import or Export and then tap OK.
- Import: Import user information, including cards and fingerprints.
- Export: Export user information, including cards and fingerprints.
Figure 2-18 Import/export user information
2.12 System Information
On the main menu, select Info, and then tap OK. You can view data capacity and system information of the Device.
- Data Capacity: Displays the number of general users, admin users, cards, fingerprints, unlocking records, and alarm records that have been stored, and the storage capacity.
• Device Version: Displays software and hardware information of the Device.
3 Web Configurations
Open the web browser on your computer or phone. Log in to the webpage to configure and update the Device.
3.1 Web on Computer
3.1.1 Initialization
You need to set a password and link an email address before logging in to the web for the first time.
Procedure
Step 1 Go to the IP address (192.168.1.108 by default) of the Device in the browser.

Make sure the computer is on the same LAN as the Device.
Figure 3-1 Initialization
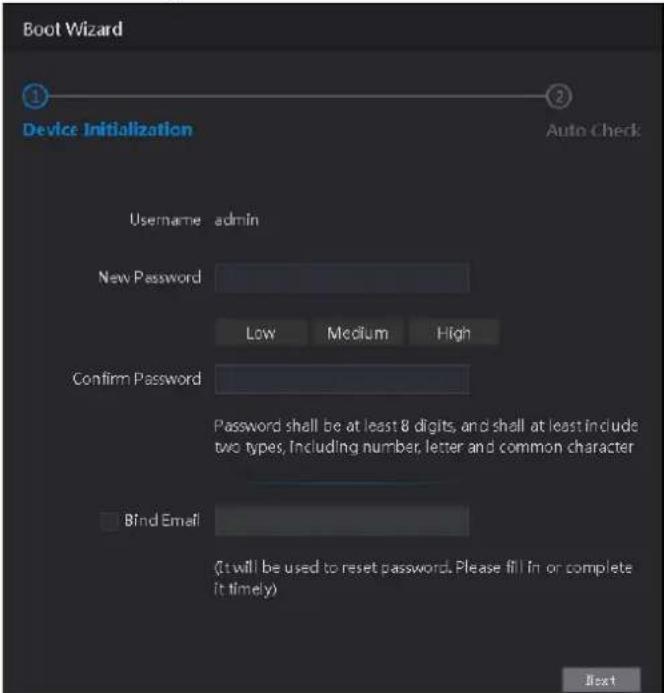
Step 2 Enter the new password, confirm password, enable Bind Email, enter an email address, and then click Next.

- The password must consist of 8 to 32 non-blank characters and contain at least two types of the following characters: Upper case, lower case, numbers, and special characters (excluding ""; &). Set a high-security password by following the password strength prompt.
- Keep the password properly after initialization and change the password regularly to improve security.
- When you need to reset the administrator password by scanning the QR code, you need the associated email address to receive the security code.
Figure 3-2 Auto check
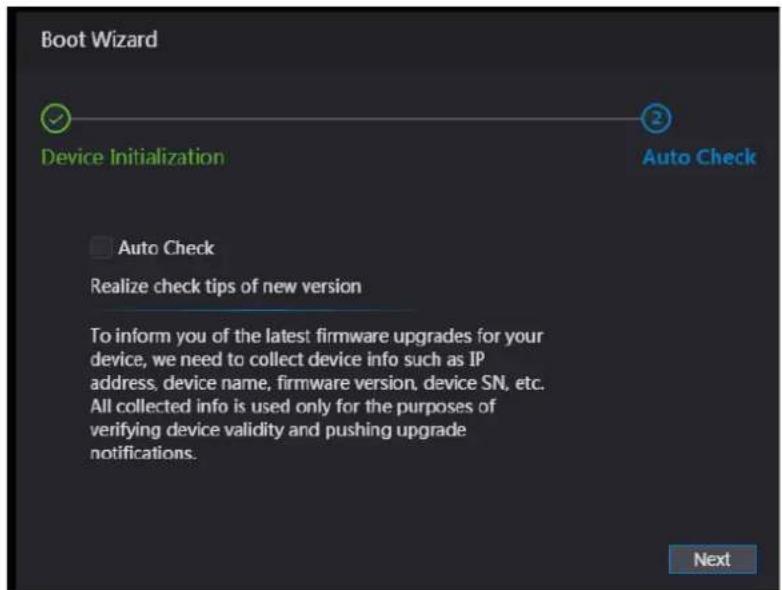
Step 3 Click Next.
Step 4 (Optional) Select Auto Check

We recommend you to select Auto Check to get the latest version in time.
Step 5 Click Next.
Step 6 Click Complete.
3.1.2 Logging In
Procedure
Step 1 Go to the IP address (192.168.1.108 by default) of the Access Standalone in the browser, and press the Enter key.

Make sure that the computer is on the same LAN as the Access Standalone.
Figure 3-3 Login
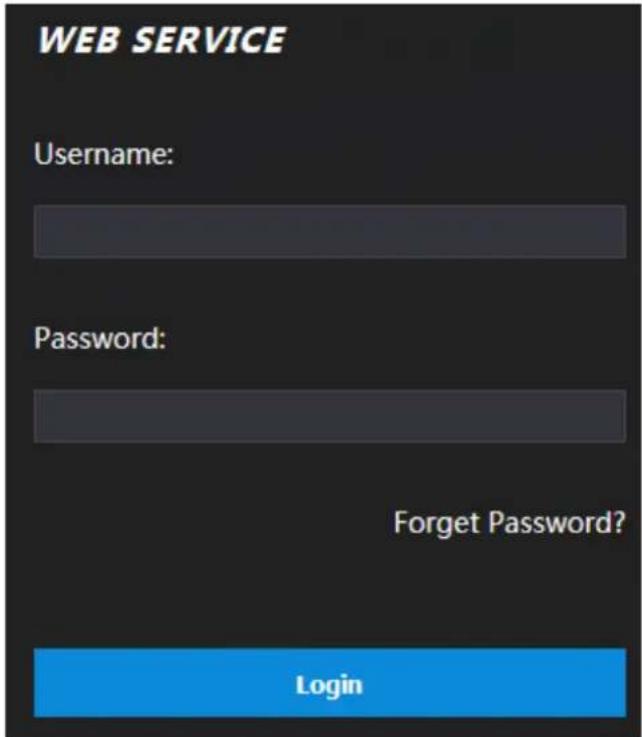
Step 2 Enter the user name and password.

- The default administrator name is admin, and the password is the one you set during initialization. We recommend you to change the administrator password regularly to increase security.
- If you forgot the administrator password, click Forget Password? to reset it. For details, see "3.1.3 Resetting the Password".
Step 3 Click Login.
3.1.3 Resetting the Password
When resetting the password of the admin account, your email address is required.
Procedure
Step 1 On the login page, click Forgot Password.
Step 2 Read the prompt carefully and click OK.
Figure 3-4 Reset prompt
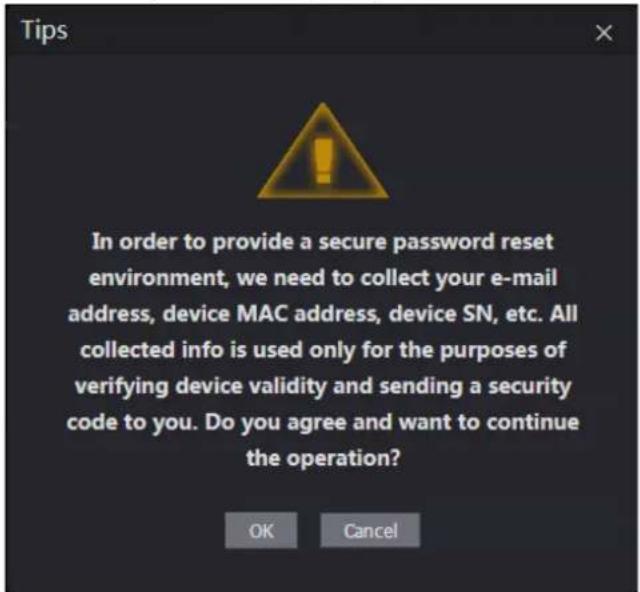
Step 3 Scan the QR code on the window, and you will get the security code.

- A maximum of two security codes will be generated by scanning the same QR code. If security codes become invalid, refresh the QR code and scan again.
- After you scanned the QR code, send the content that you received to the designated email address, and then you will receive a security code.
- Use the security code within 24 hours after you receive it. Otherwise, it will become invalid. If wrong security codes are entered for consecutive five times, the administrator will be frozen for five minutes.
Figure 3-5 Reset Password
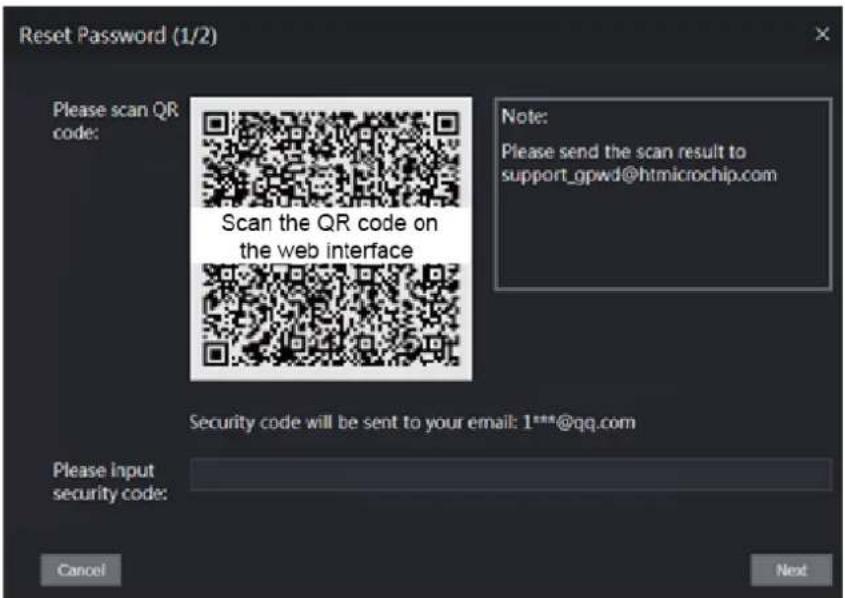
Step 4 Enter the security code you have received.
Step 5 Click Next.
Step 6 Reset and confirm the new password.

The password must consist of 8 to 32 non-blank characters and contain at least two types of the following characters: Upper case, lower case, numbers, and special characters (excluding '"; : &). Set a high-security password by following the password strength prompt.
Step 7 Click OK to complete resetting.
3.1.4 Configuring Door Parameter
Configure the access control parameters.
Procedure
Step 1 Log in to the webpage.
Step 2 Select Door Parameter.
Figure 3-6 Door parameter
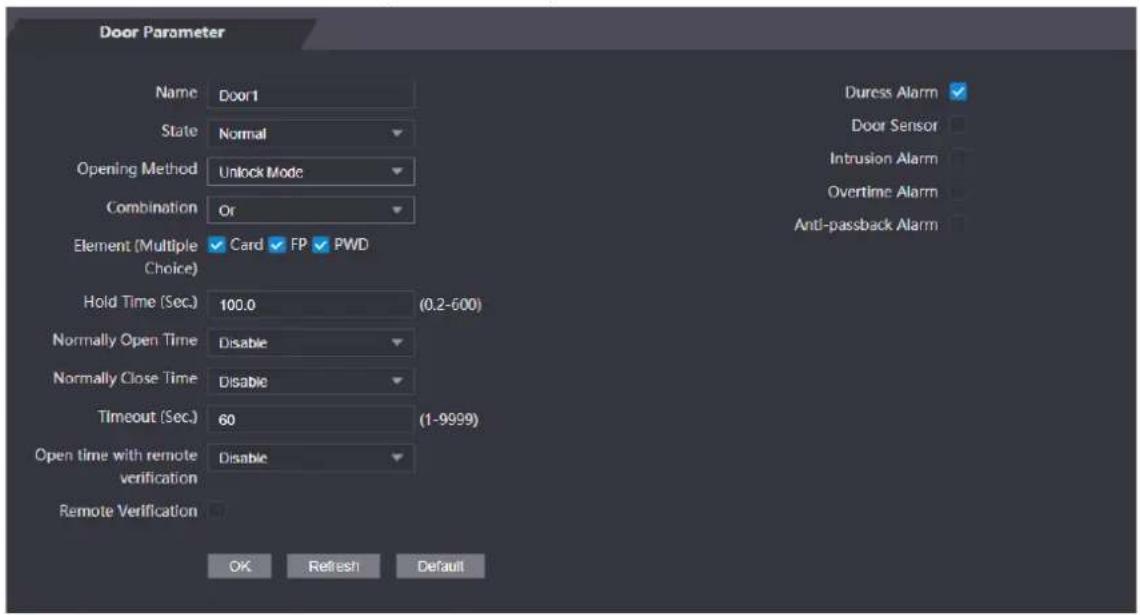
Table 3-1 Description of door parameters
| Parameter Description | |
| Name | Enter a name for the door that the Device controls. |
| State | Select NC for normally closed, or NO for normally open. If either is selected, the defined opening method will not be effective. |
| Opening Method | Time Section: Set different unlock method for defined periods.Multi-card: The user can unlock the door when multiple users and multiple user groups grant access.Unlock mode: set unlock combinations. |
| Hold Time (Sec.) | Unlock duration. The door will be locked again after the duration. It ranges from 0.2 to 600 seconds. |
| Normally Open Time | The door remains open or closed during the defined period. |
| Normally Close Time | |
| Timeout (Sec.) | A timeout alarm will be triggered if the door remains unlocked for longer time than this value. |
| Remote Verification | Set the remote verification door opening period. For details, see "3.1.6.1 Configuring Time Sections". When opening a door is authorized on the device, it needs to be confirmed on the platform before it can be opened. |
| Duress Alarm | An alarm will be triggered when a duress card or duress password is used to open the door. |
| Door Sensor | Intrusion and overtime alarms can be triggered only after Door Sensor is enabled. |
| Intrusion Alarm | When Door Sensor is enabled, an intrusion alarm will be triggered if the door is opened abnormally. |
| Overtime Alarm | A timeout alarm will be triggered if the door remains unlocked for longer time than the Timeout(Sec), which ranges from 1 to 9999 seconds. |
| Anti-passback Alarm | If enabled, users need to verify identities both for entry and exit; otherwise an alarm will be triggered.If a person enters with verification and exits without verification, an alarm will be triggered when they attempt to unlock again, and access is denied at the same time.If a person enters without verification and exits with verification, an alarm will be triggered when the they attempt to unlock again, and access is denied at the same time. |
Step 3 Configure unlock method.
- Time section
1) In the Opening Method list, select Time Section, and then click

Figure 3-7 Time section parameter
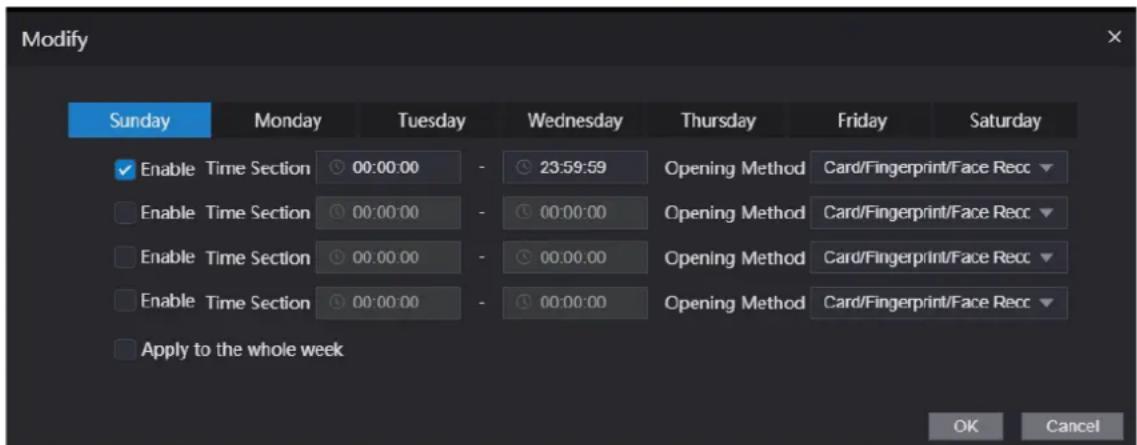
2) Configure the time and opening method for a time section. You can configure up to four time sections for a single day.
3) (Optional) Select Apply to the whole week to copy the configuration to the rest of days.
4) Click OK.
- Multi-card
1) ClickAdd.
2) Select an unlocking method in the Opening Method list., and enter a number for the valid user.
Figure 3-8 Multi-card parameter
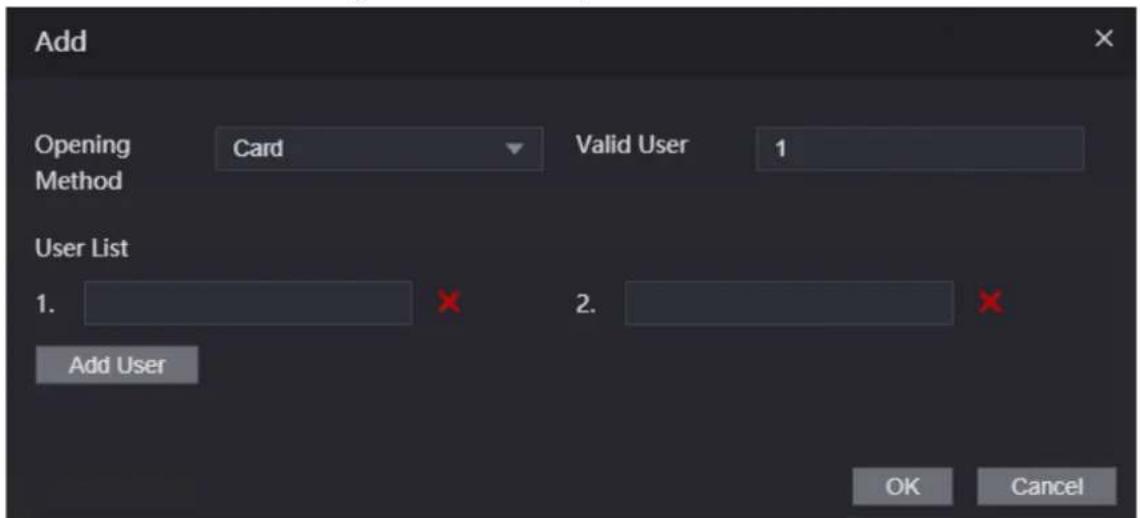
3) In the User List area, enter user ID. For details, see "2.7.1 Adding New User".

- VIP, patrol, and blocklist users cannot be added.
- All the users in different groups must all verify their identities in the group order to unlock the door.
- Unlock mode
1) In the Combination list, select Or or And.
• And means you must use all the selected methods to open the door.
- Or means you can open the door with any of the selected methods.
2) In the Element list, select the unlock method.
Step 4 Configure other parameters.
Step 5 Click OK.
3.1.5 Alarm Linkage
3.1.5.1 Setting Alarm Linkages
Alarm input devices can be connected to the Device, and you can modify the alarm linkage parameters.
Procedure
Step 1 Log in to the webpage.
Step 2 Select Alarm Linkage > Alarm Linkage.
Figure 3-9 Alarm linkage

Step 3 Click ☑ to configure alarm linkage.
Figure 3-10 Modify linkage parameters
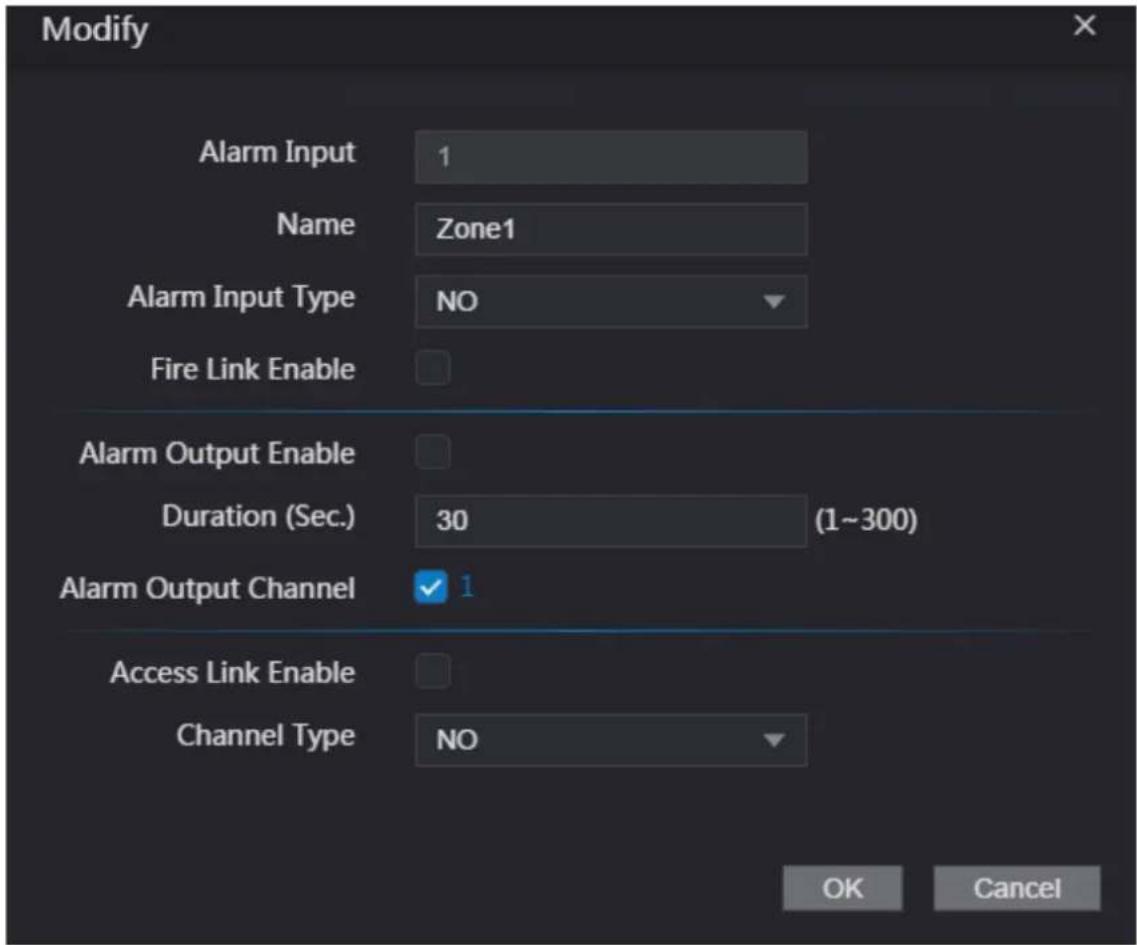
Table 3-2 Description of alarm linkage parameters
| Parameter Description | |
| Alarm Input | You cannot modify the value. Keep it default. |
| Name Enter a zone name. | |
| Alarm Input Type | Select the type according to the alarm device.NO: The circuit of the alarm device is normally open, and it closes when an alarm is triggered.NC: The circuit of the alarm device is normally closed, and it opens when an alarm is triggered. |
| Fire Link Enable | If fire linkage is enabled, the device will generate fire alarms when being triggered. The alarm messages are displayed in the alarm log.If fire link is enabled, alarm output and access linkage are NO by default. |
| Alarm Output Enable | If alarm output is enabled, the relay can generate alarm messages. |
| Duration (Sec.) | Alarm duration. It ranges from 1 s through 300 s. |
| Alarm Output Channel | The Device has only one output channel. Select the output channel according to your alarm device. |
| Access Link Enable | If access linkage is enabled, the Device will be normally on or normally closed when there are input alarm signals. |
| Channel Type | There are two options: NO and NC. |
Step 4 Click OK to save changes.

The configurations on the web will be synchronized with the software client if the Device is added to the client.
3.1.5.2 Viewing Alarm Logs
Procedure
Step 1 Log in to the webpage.
Step 2 Select Alarm Linkage > Alarm Log.
Step 3 Select a time range and alarm type, and then click Query.
Figure 3-11 Query results
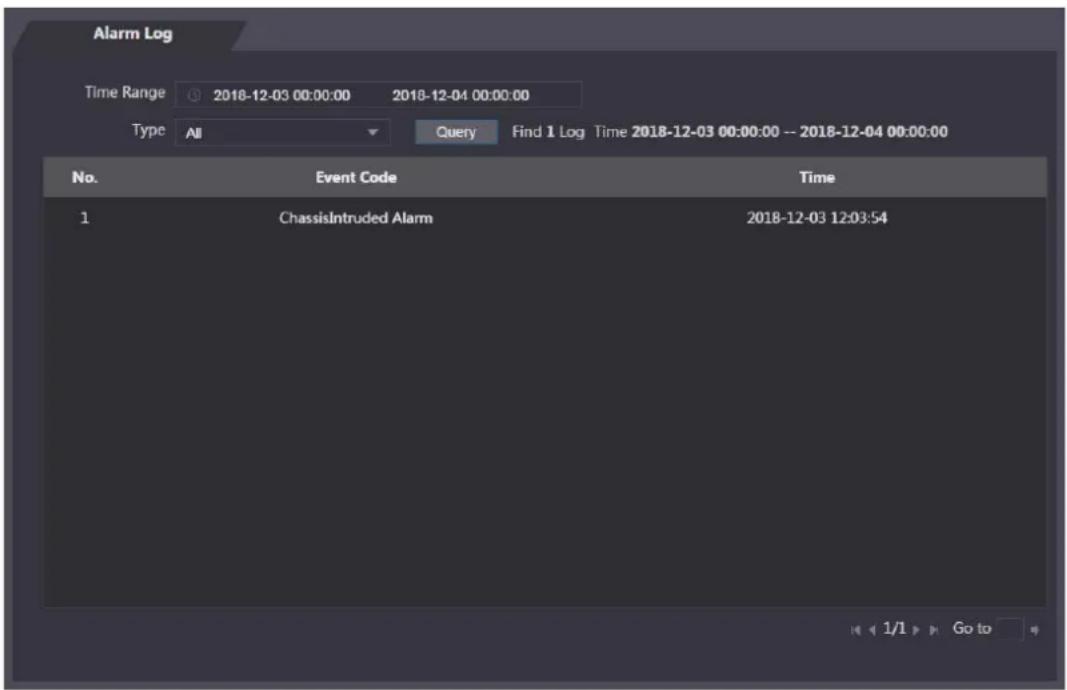
3.1.6 Time Sections
Configure time sections and holiday plans, and then you can define when a user has the permissions to unlock doors.
3.1.6.1 Configuring Time Sections
You can configure up to 128 groups (from No.0 through No.127) of time section. In each group, you need to configure door access schedules for a whole week. A user can only unlock the door during the scheduled time.
Procedure
Step 1 Log in to the webpage.
Step 2 Select Time Section >Time Section.
Step 3 Click Add.
Figure 3-12 Time section parameters
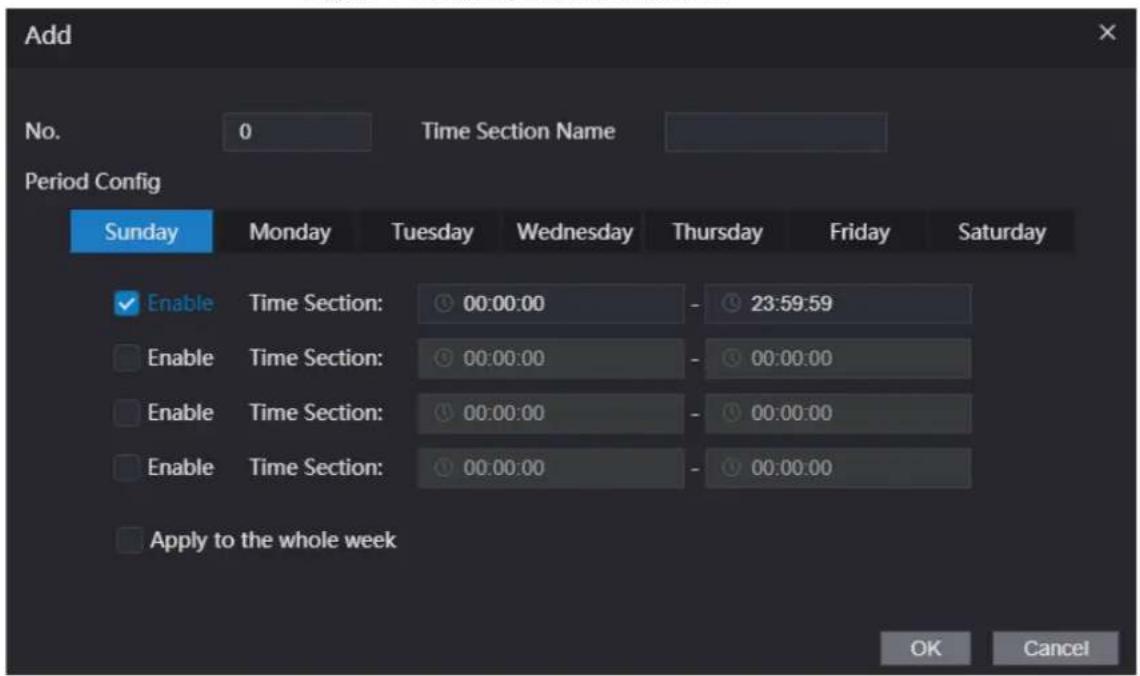
Step 4 Enter No. and name for the time section.
• No.: Enter a section number It ranges from 0 through 127.
- Time Section Name Enter a name for each time section. You can enter a maximum of 32 characters (contain number, special characters and English characters).
Step 5 Configure time sections for each day.
Step 6 You can configure up to four time sections for a single day.
Step 7 (Optional) Click Apply to the whole week to copy the configuration to the rest of days.
Step 8 Click OK to save the changes.
3.1.6.2 Configuring Holiday Groups
Set time sections for different holiday groups. You can configure up to 128 holiday groups (from No.0 through No.127). and up to 16 time sections for a single holiday group. Users can unlock doors
in the defined time sections.
Procedure
Step 1 Log in to the webpage.
Step 2 Select Time Section > Holiday Group > Config.
Step 3 Click Add.
Step 4 Enter a number and a name for the holiday group.
- No.: Enter a section number. It ranges from 0 through 127.
- Time Section Name Enter a name for each time section. You can enter a maximum of 32 characters (contain numbers, special characters and English characters).
Step 5 Click Add.
Step 6 Enter a name in the click OK. Time Section Namebox, select the start date and end date, and then

You can add multiple holidays for one holiday group.
Figure 3-13 Add a holiday
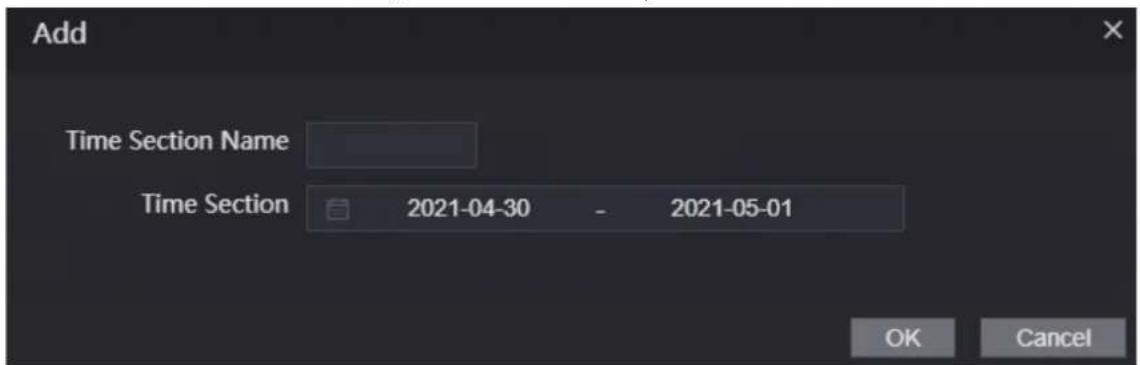
Step 7 Click OK.
3.1.6.3 Configuring Holiday Plans
Assign the configured holiday groups to the holiday plan. Users can only unlock the door in the defined time in the holiday plan.
Procedure
Step 1 Log in to the webpage.
Step 2 Select Time Section > Holiday Plan > Config.
Step 3 Click Add.
Figure 3-14 Add a holiday plan
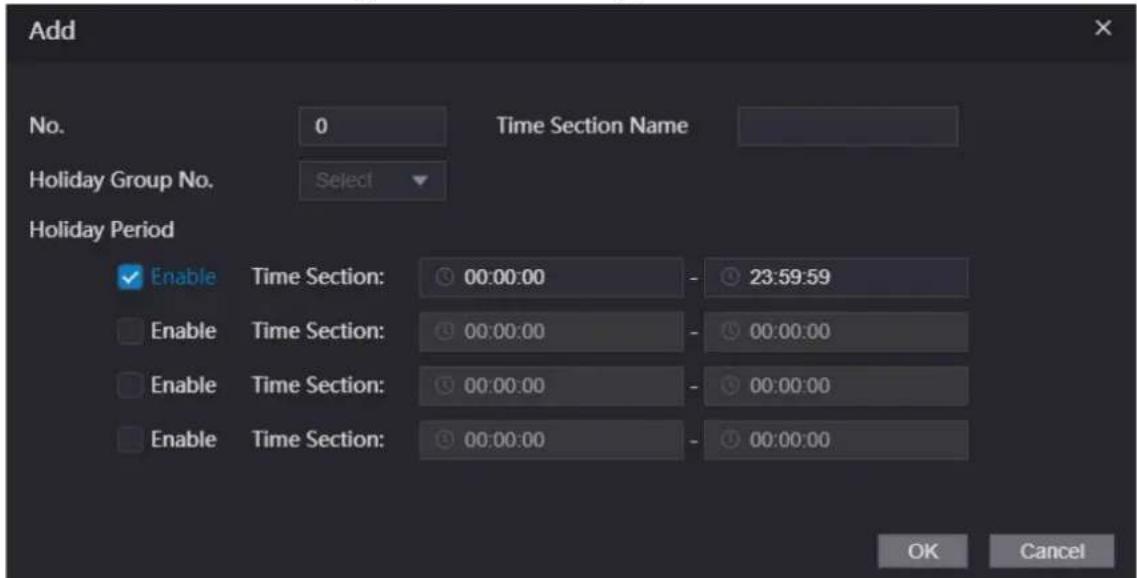
Step 4 Enter a number and name for the holiday plan.
- No.: Enter a section number. It ranges from 0 through 127.
- Time Section Name Enter a name for each time section. You can enter a maximum of 32 characters (contain numbers, special characters and English characters).
Step 5 In the Holiday Group No. list, select the holiday group that you have configured.

Select 255 if you do not want to select a holiday group.
Step 6 In the Holiday Period area, configure time sections in the holiday group. You can configure up to four time sections.
Step 7 Click OK.
3.1.7 Data Capacity
View data capacity such as users, cards, and fingerprints that the Device can store.
Procedure
Step 1 Log in to the webpage.
Step 2 Select Data Capacity.
3.1.8 Setting Volume
Procedure
Step 1 Log in to the webpage.
Step 2 Click Volume Setting, and adjust the volume.
Step 3 Click OK.
3.1.9 Configuring Network
3.1.9.1 Configuring TCP/IP
You need to configure IP address and DNS server so that the Device can communicate with other devices.
Prerequisites
Make sure that the Device is connected to the network.
Procedure
Step 1 Log in to the webpage.
Step 2 Select Network Setting > TCP/IP.
3.1.9.2 Configuring Port
You can limit access to the Access Standalone at the same time through the webpage, desktop client and more.
Procedure
Step 1 Log in to the webpage.
Step 2 Select Network Setting > Port.
Step 3 Configure the port number.

Except Max Connection and RTSP Port, you need to restart the Access Standalone to make the configurations effective after you change other parameters.
Table 3-3 Description of ports
| Parameter Description | |
| Max Connection | You can set the maximum number of clients (such as the webpage, desktop client) that can access the Access Standalone at the same time. |
| TCP Port | Default value is 37777. |
| HTTP Port | Default value is 80. If you want to change the port number, add the new port number after the IP address when you log in to the webpage. |
| HTTPS Port | Default value is 443. |
| RTSP Port Default value is 554. |
Step 4 Click OK to complete the setting.
3.1.9.3 Configuring Automatic Registration
The Access Standalone reports its address to the designated server so that you can get access to the Access Standalone through the management platform.
Procedure
Step 1 Log in to the webpage.
Step 2 Select Network Setting > Auto Register.
Step 3 Select Enable, and enter host IP, port, and sub device ID.
Table 3-4 Auto register description
| Parameter Description | |
| Host IP | The IP address or the domain name of the server. |
| Port | The port of the server used for automatic registration. |
| Sub-Device ID | Enter the sub-device ID (user defined). —When you add the Access Standalone to the management platform, the sub-device ID on the management platform must conform to the defined sub-device ID on the Access Standalone. —When you add the Access Standalone to the management platform, the sub-device ID on the management platform must conform to the defined sub-device ID on the Access Standalone. |
Step 4 Click OK.
3.1.9.4 Configuring P2P
Peer-to-peer computing or networking is a distributed application architecture that partitions tasks or workloads between peers. Users can download mobile application by scanning QR code, and then register an account. You can manage multiple devices on the mobile application. Dynamic domain name, port mapping, and transit server are not required.
Procedure
Step 1 Log in to the webpage.
Step 2 Select Network Setting > P2P.
Figure 3-15 P2P
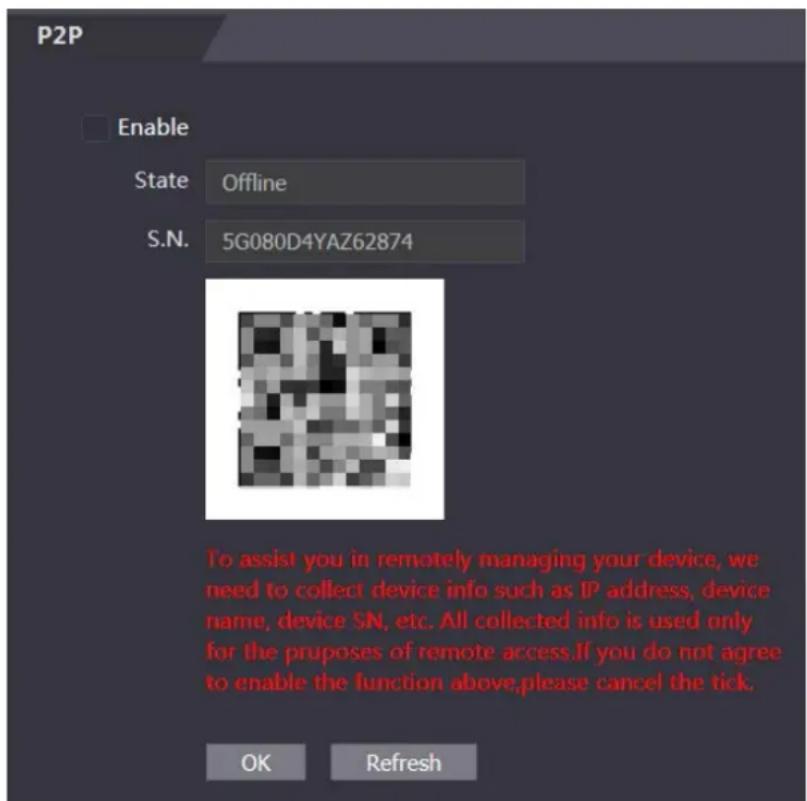

If you want to use P2P, you must connect the Device to the Internet; otherwise this function cannot work properly.
Step 3 Select Enable to enable the P2P function.
Step 4 Click OK.

Scan the QR code on your webpage to get the serial number of the Device.
3.1.10 Setting Date
Procedure
Step 1 Log in to the webpage.
Step 2 Click Date Setting.
Figure 3-16 Date setting
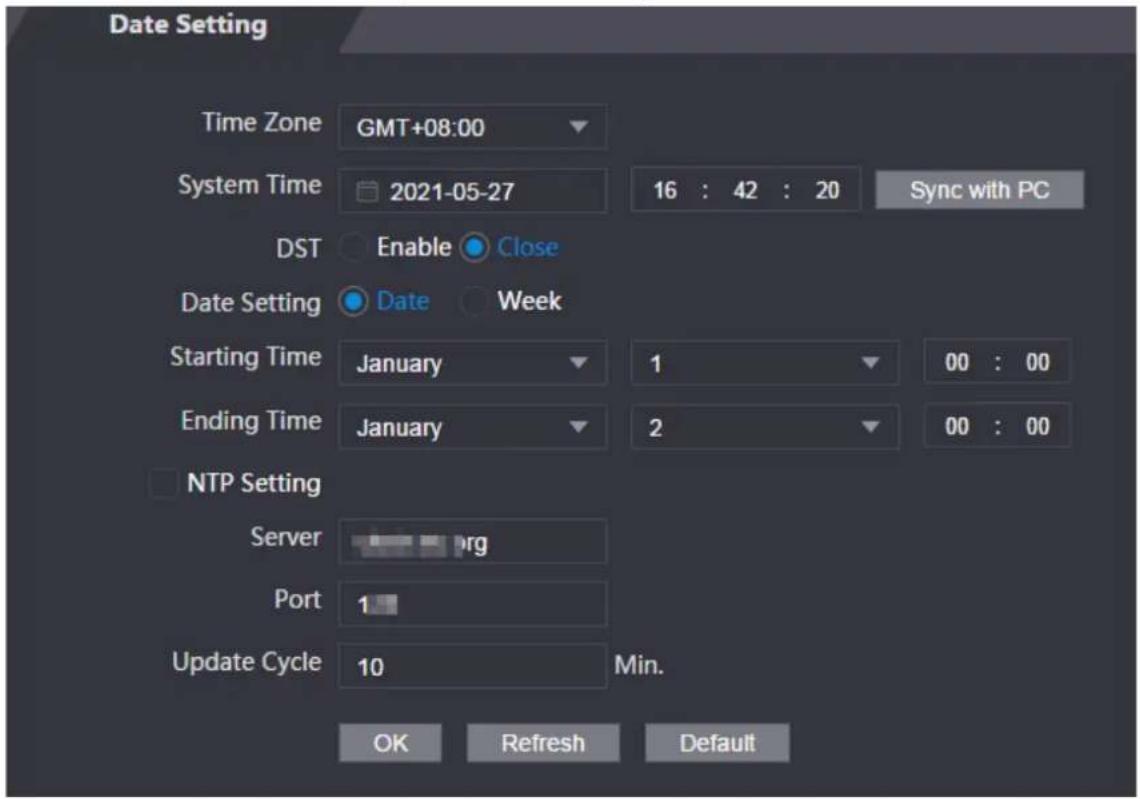
Table 3-5 Data setting description
| Parameter Description | |
| Time Zone | Configure the time zone. |
| System Time | Configure system time.Click Sync with PC, and the system time changes to the PC time. |
| DST | 1. (Optional) Enable DST.2. Select Date or Week in Sate Setting.3. Configure start time and end time. |
| NTP Setting | 1. Select the NTP Setting checkbox.2. Configure parameters.Server: Enter the domain of a NTP server, and the Device will automatically sync time with NTP server.Port: Enter the port of the NTP server.Update Cycle: Enter time synchronization interval. |
Step 3 Click OK.
3.1.11 Safety Management
3.1.11.1 Configuring IP Authority
Procedure
Step 1 Log in to the webpage.
Step 2 Click Safety Mgmt.IP Authority.
Figure 3-17 IP authority
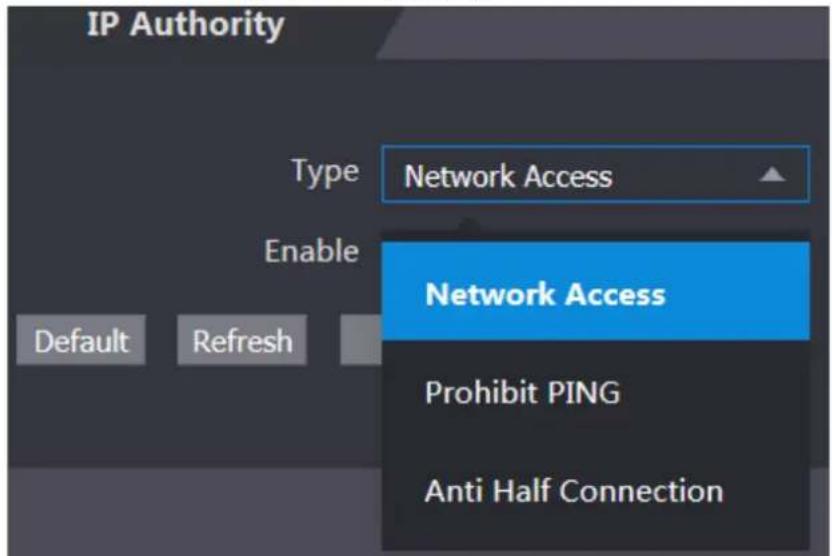
Step 3 Select a cybersecurity mode in the Type list.
• Network Access: Set allowlist and blocklist to control access to the Device.
- Prohibit PING: Enable PING prohibited function, and the Device will not respond to the Ping request.
- Anti Half Connection: Enable Anti Half Connection function, and the Device can still function properly under half connection attack.
3.1.11.1.1 Network Access
Procedure
Step 1 Select Network Access in the Type list.
Step 2 Select the Enable checkbox.
Figure 3-18 Network access
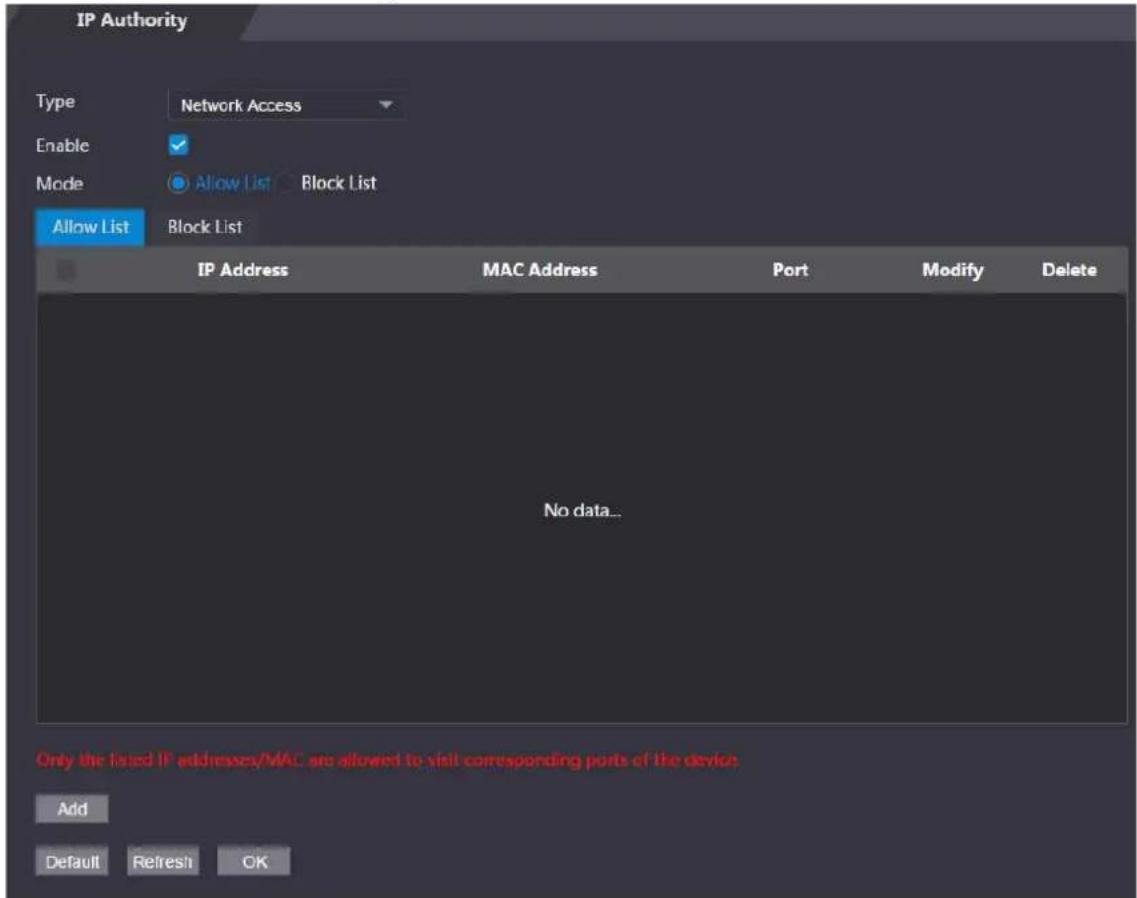
Step 3 Select Allow List or Block List.
Step 4 Click Add.
Figure 3-19 Add IP
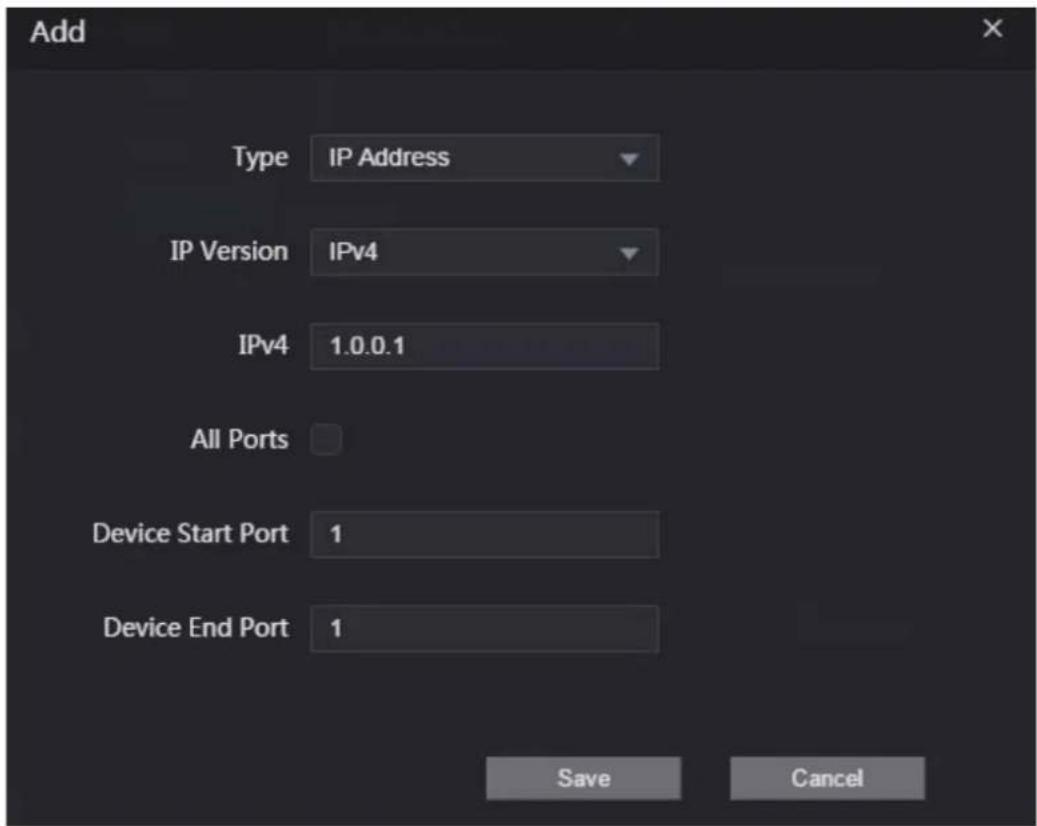
Step 5 Configure parameters.
Table 3-6 Description of adding IP parameters
| Parameter Description | |
| Type | Select the address type in the Type list. |
| IP Version IPv4 by default. | |
| All Ports | Select All Ports checkbox, and your settings will apply to all ports. |
| Device Start Port | If you clear All Ports checkbox, set the device start port and device end port. |
| Device End Port |
Step 6 Click Save, and the IP Authority window is displayed.
Step 7 Click OK.
Related Operations
- Click 📋 to edit the allowlist or blocklist.
- Click ✗ to delete the allowlist or blocklist
3.1.11.1.2 Prohibit PING
Procedure
Step 1 Select Prohibit PING in the Type list.
Step 2 Select the Enable checkbox.
Figure 3-20 Prohibit PING
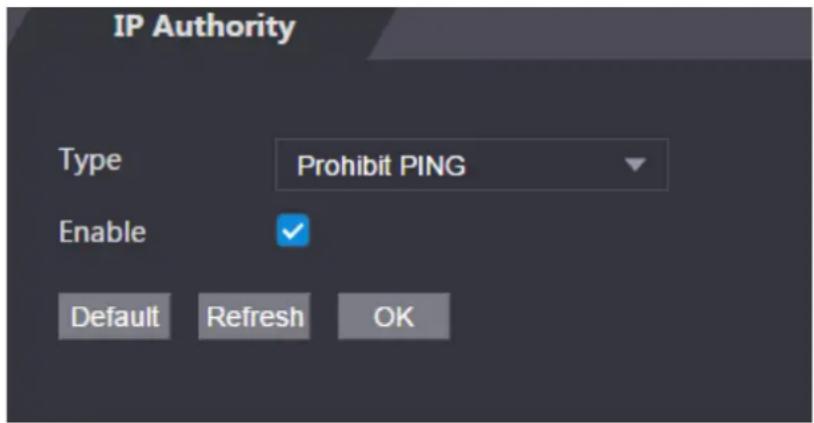
Step 3 Click OK.
3.1.11.1.3 Anti Half Connection
Procedure
Step 1 Select the Anti Half Connection in the Type list.
Step 2 Select the Enable checkbox.
Figure 3-21 Network access
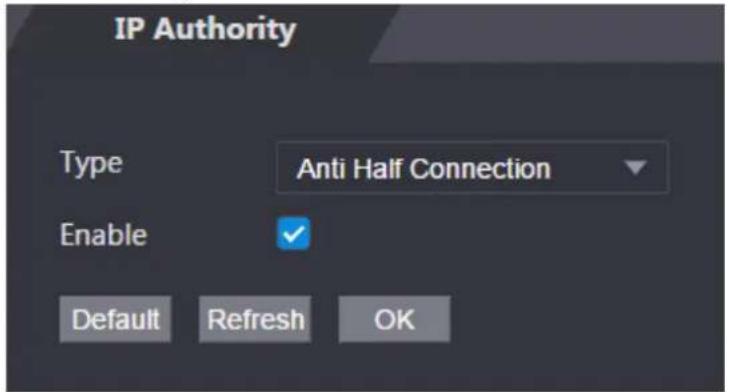
Step 3 Click OK.
3.1.11.2 Configuring System
3.1.11.2.1 System Service
Procedure
Step 1 Log in to the webpage.
Step 2 Select Safety Mgmt. > System Service.
Step 3 Enable or disable the system services.
Figure 3-22 System service
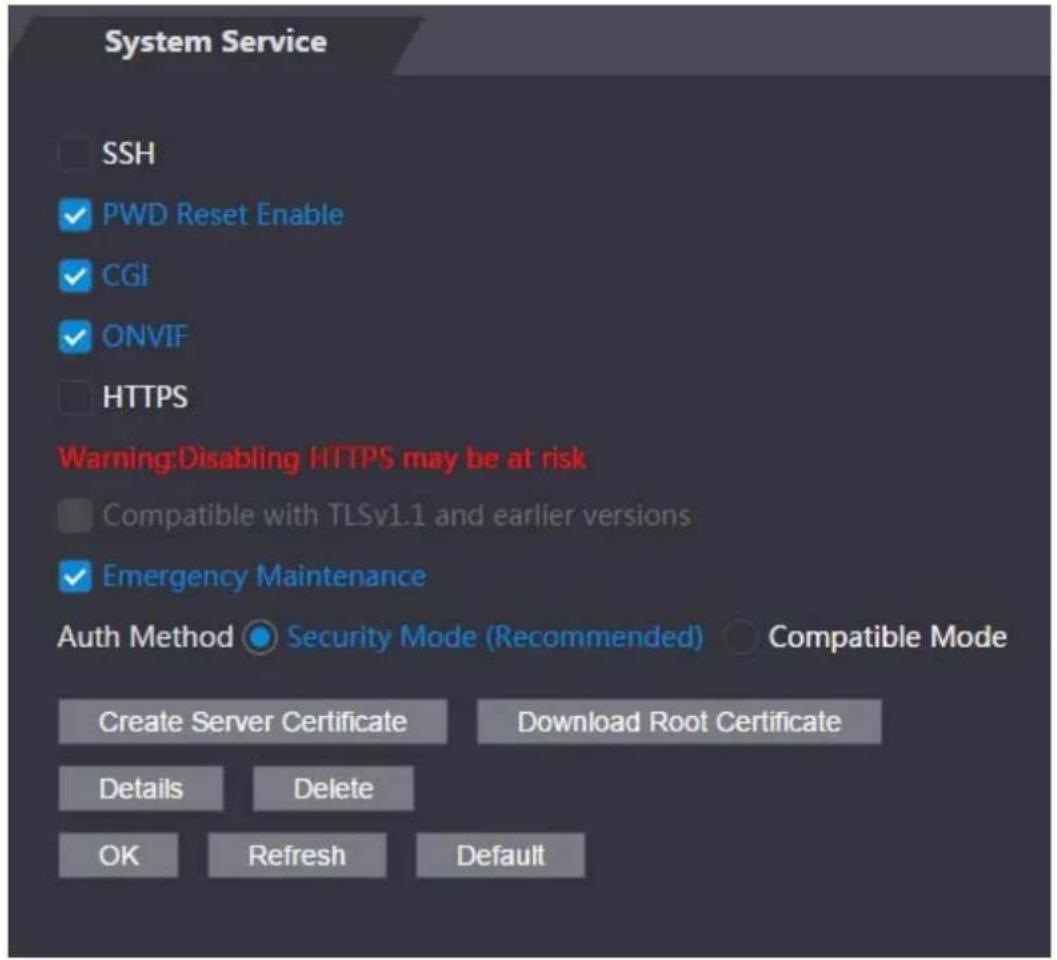
Table 3-7 Description of system service
| Parameter Description | |
| SSH | Secure Shell (SSH) is a cryptographic network protocol for operating network services securely over an unsecured network. When SSH is enabled, SSH provides cryptographic service for the data transmission. |
| PWD Reset Enable | If enabled, you can reset the password. This function is enabled by default. |
| CGI | Common Gateway Interface (CGI) offers a standard protocol for web servers to execute programs similarly to console applications running on a server that dynamically generates webpages. When CGI is enabled, CGI commands can be used. The CGI is enabled by default. |
| ONVIF | Enable other devices to pull video stream of the VTO through the ONVIF protocol. |
| HTTPS | Hypertext Transfer Protocol Secure (HTTPS) is a protocol for secure communication over a computer network. When HTTPS is enabled, HTTPS will be used to access CGI commands; otherwise HTTP will be used. |
| Compatible with TLSv1.1 and earlier versions | Enable this function if your browser is using TLS V1.1 or earlier versions. |
| Emergency Maintenance | Enable it for faults analysis and maintenance. |
| Auth Method | ● Security Mode (recommended): Supports logging in with Digest authentication.● Compatible Mode: Compatible with the login method of old devices. |
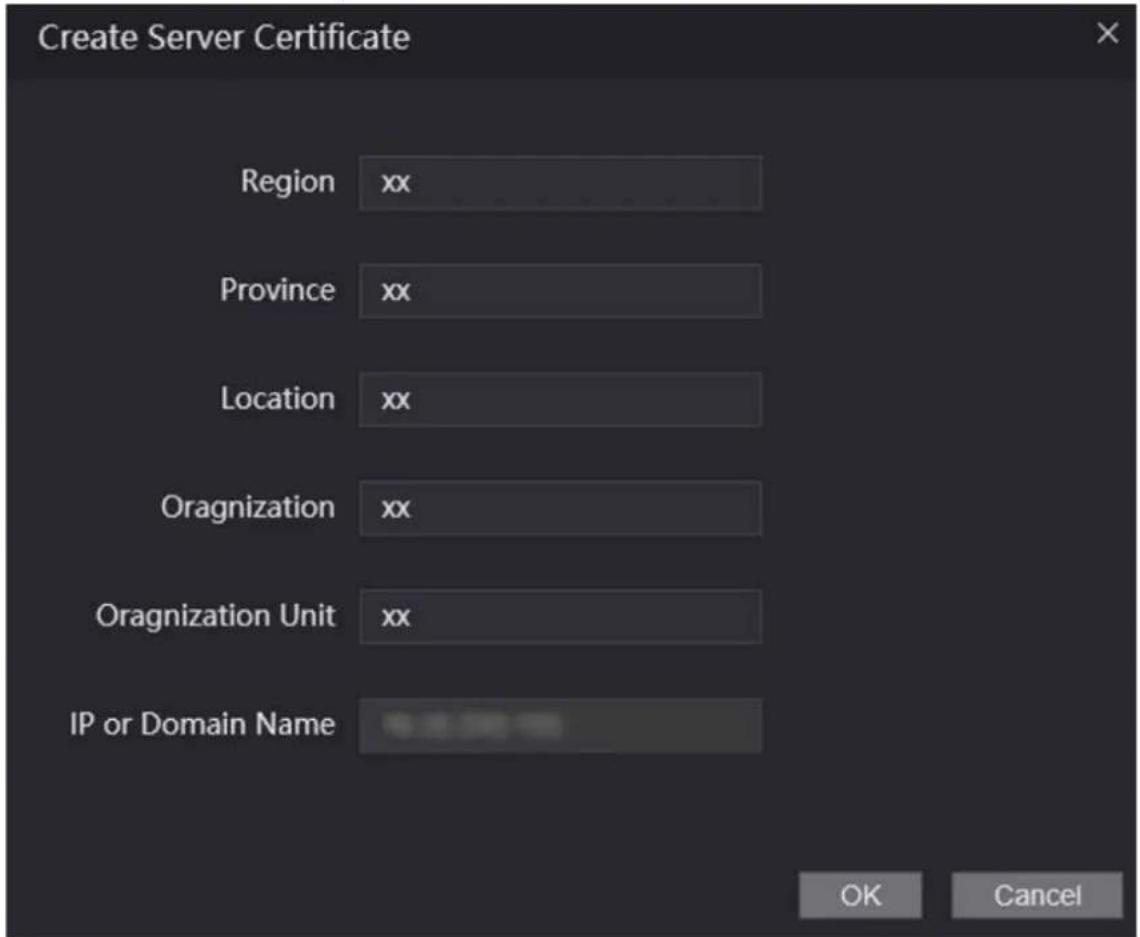
3.1.11.2.2 Creating Server Certificate
Procedure
Step 1 On the System Service page, click Create Server Certificate.
Step 2 Enter information and click OK, and then the Device will restart.
Figure 3-23 Create server certificate
3.1.11.2.3 Downloading Root Certificate
Procedure
Step 1 On the System Service page, click Download Root Certificate.
Step 2 Double-click the file that you have downloaded, and then click Open.
Figure 3-24 File download
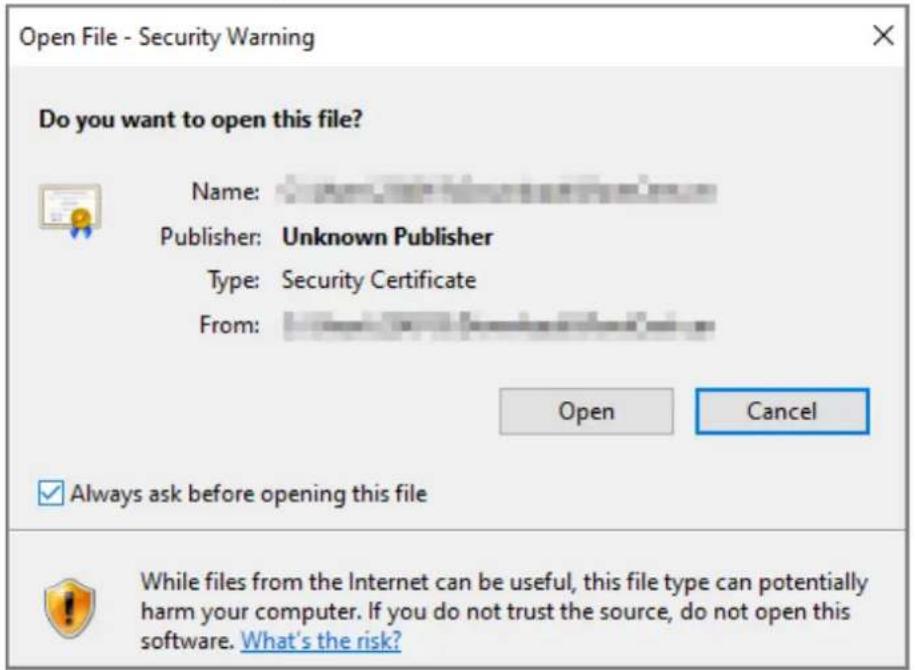
Step 3 Click Install Certificate.
Figure 3-25 Certificate information
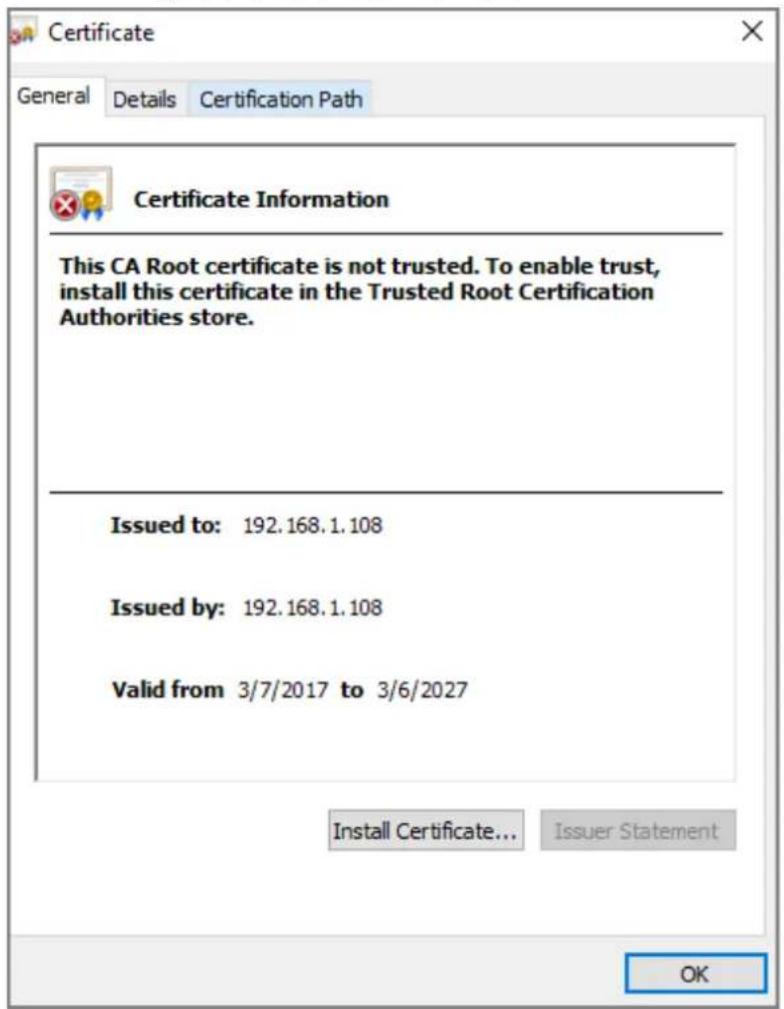
Step 4 Select Current User or Local Machine, and then click Next.
Figure 3-26 Store Location
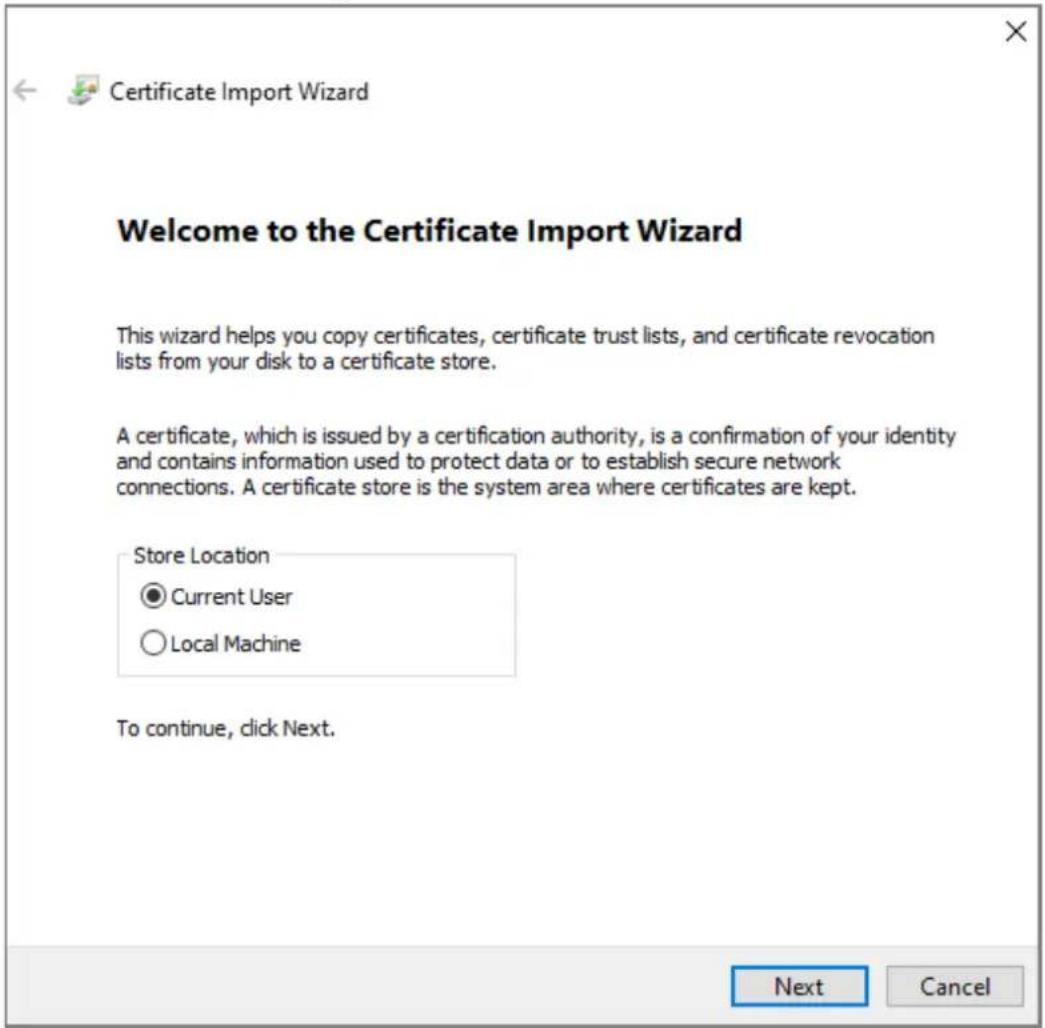
- Current User: Applies to the user that has logged in to the PC.
- Local Machine: Applies to all users that have logged in to the PC
Step 5 Select the appropriate storage location.
1) Select Place all certificates in the following store.
Figure 3-27 Certificate store
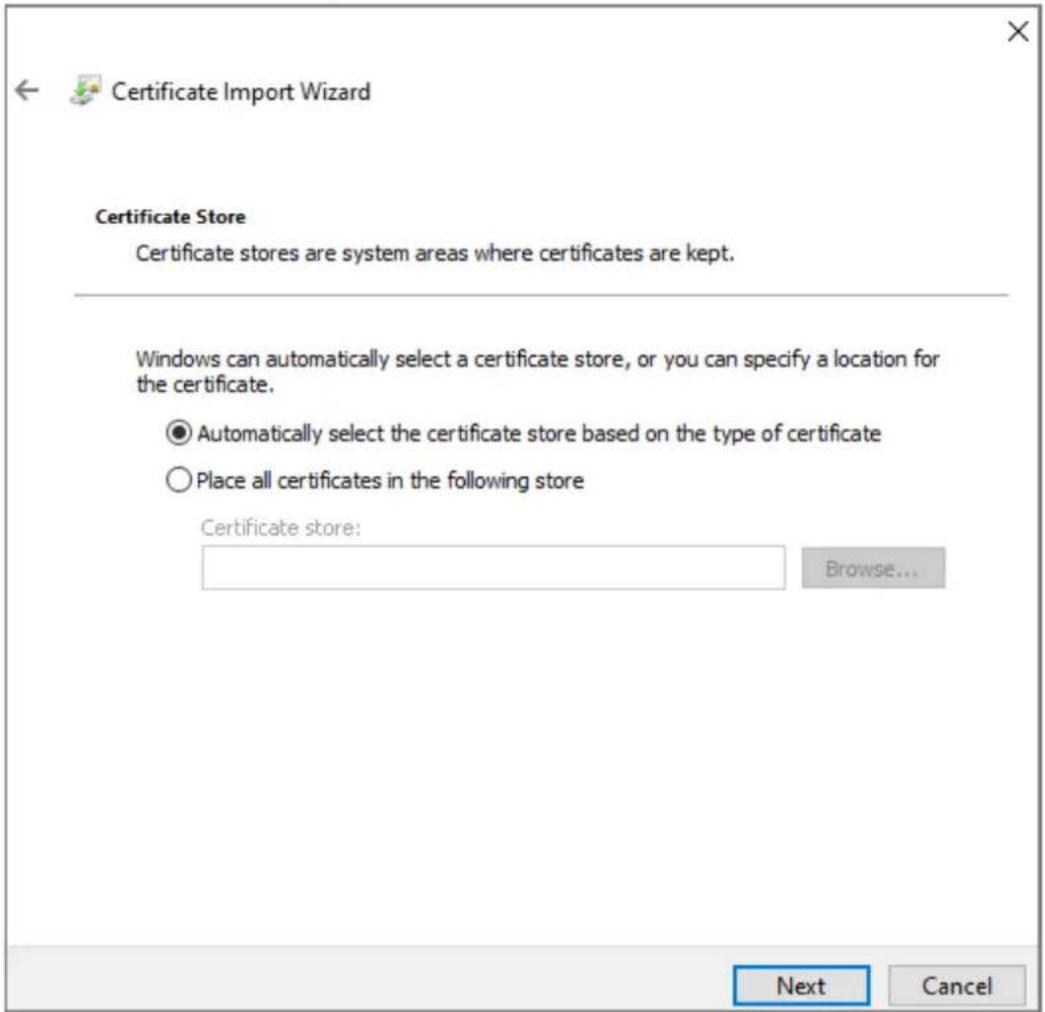
2) Click Browse to import the certificate to the Trusted Root Certification Authorities store, and then click Next.
Figure 3-28 Certificate store
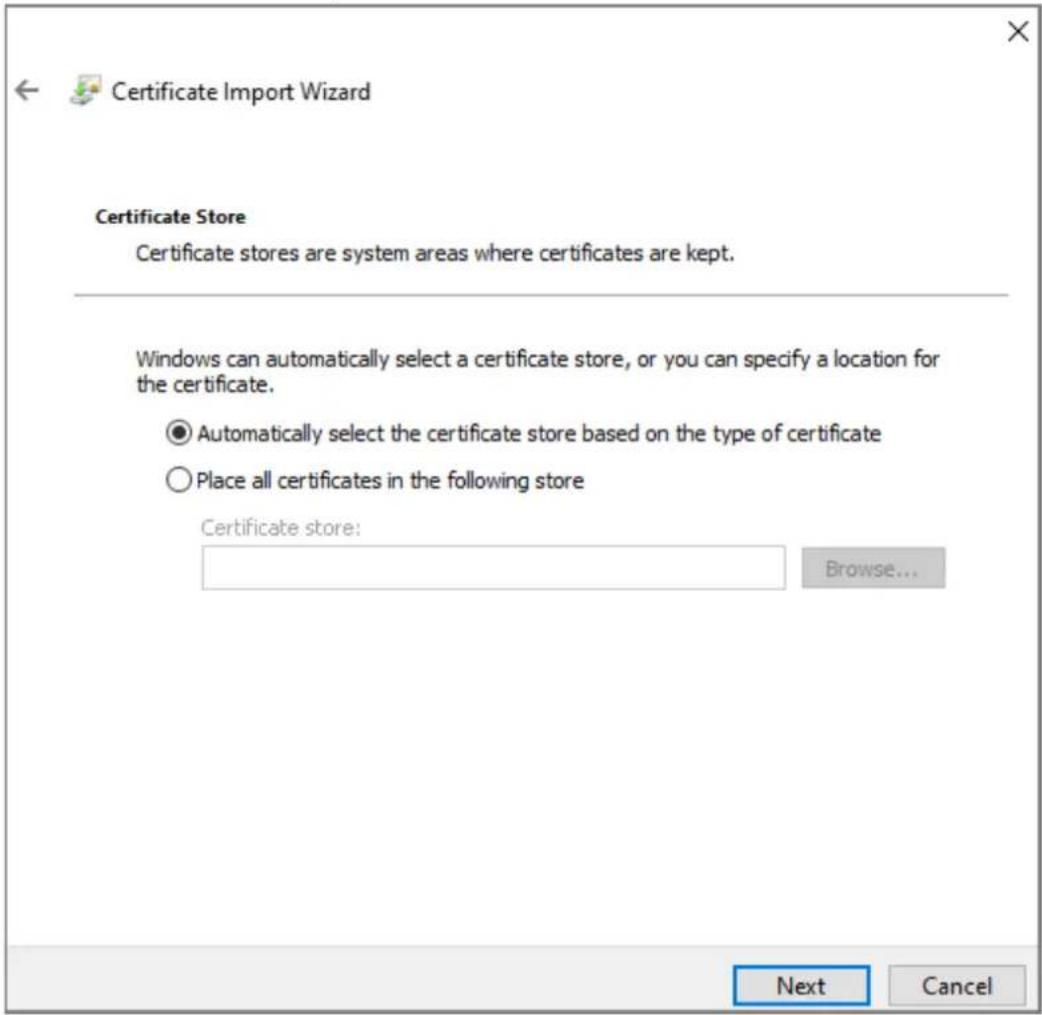
Step 6 Click Finish.
3.1.12 User Management
You can add and delete users, change users' passwords, and link your email address for resetting the password when you forget password.

User refers to the user who logs in to the webpage.
3.1.12.1 Adding Users
You can add new users and then they can log in to the webpage of the Access Standalone.
Procedure
Step 1 Log in to the webpage.
Step 2 Select User Mgmt. > User Mgmt.
Step 3 Click Add.
Figure 3-29 Add user
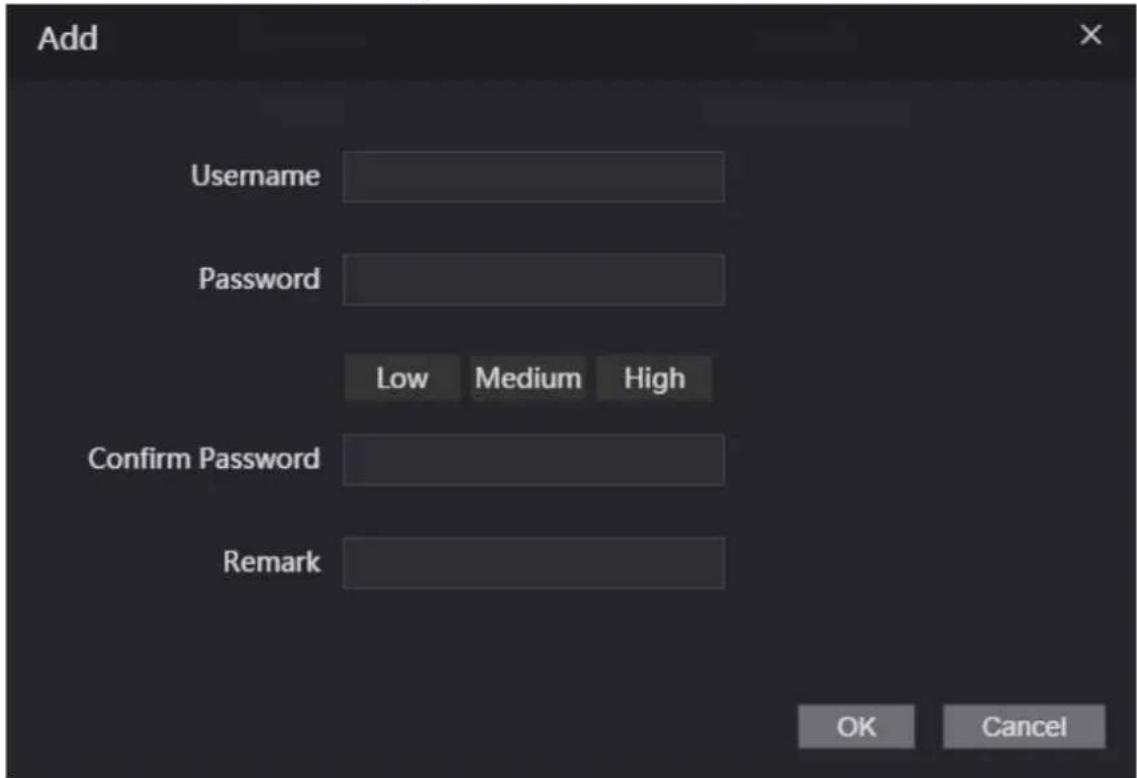
Step 4 Enter username, password, confirm password, and remark.
Step 5 Click OK.
3.1.12.2 Adding ONVIF Users
Background Information
Open Network Video Interface Forum (ONVIF), a global and open industry forum that is established for the development of a global open standard for the interface of physical IP-based security products, which allows the compatibility from different manufactures. ONVIF users have their identities verified through ONVIF protocol. The default ONVIF user is admin.
Procedure
Step 1 On the home page, select User Mgmt. > Onvif User.
Step 2 Click Add and then configure parameters.
Figure 3-30 Add ONVIF user
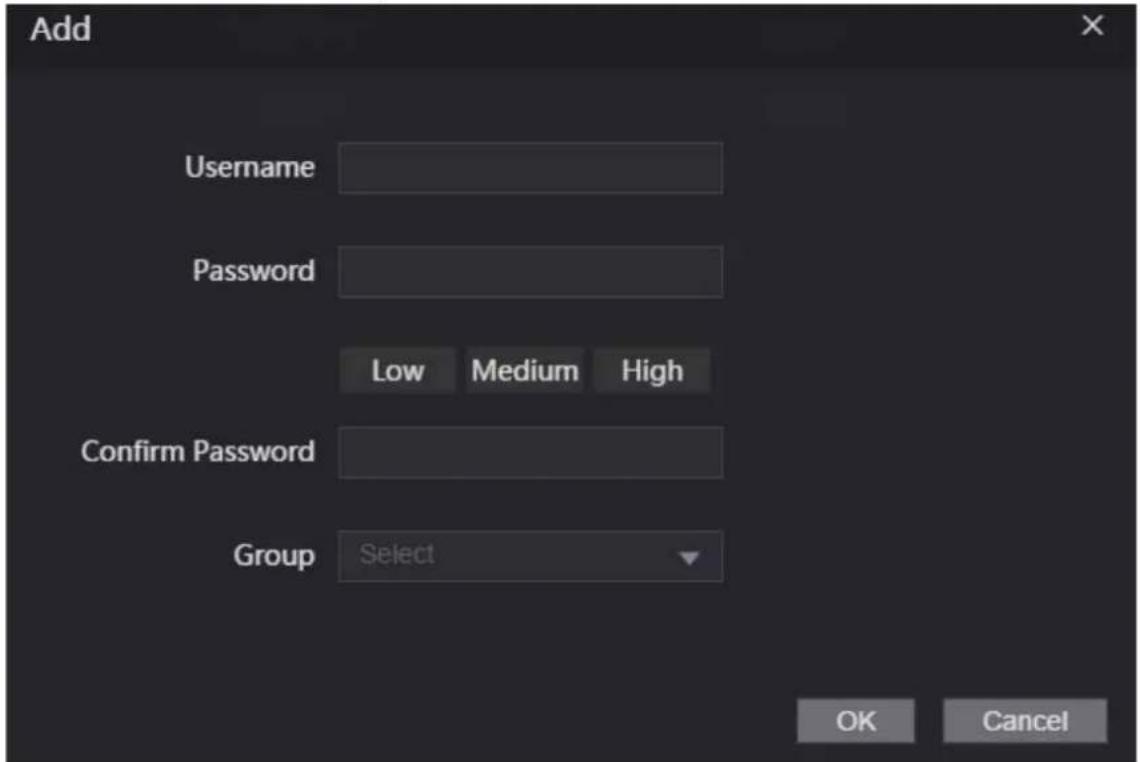
Step 3 Click OK.
3.1.13 Maintenance
You can regularly restart the Device during idle time to improve its performance.
Procedure
Step 1 Log in to the webpage.
Step 2 Select Maintenance.
Figure 3-31 Maintenance
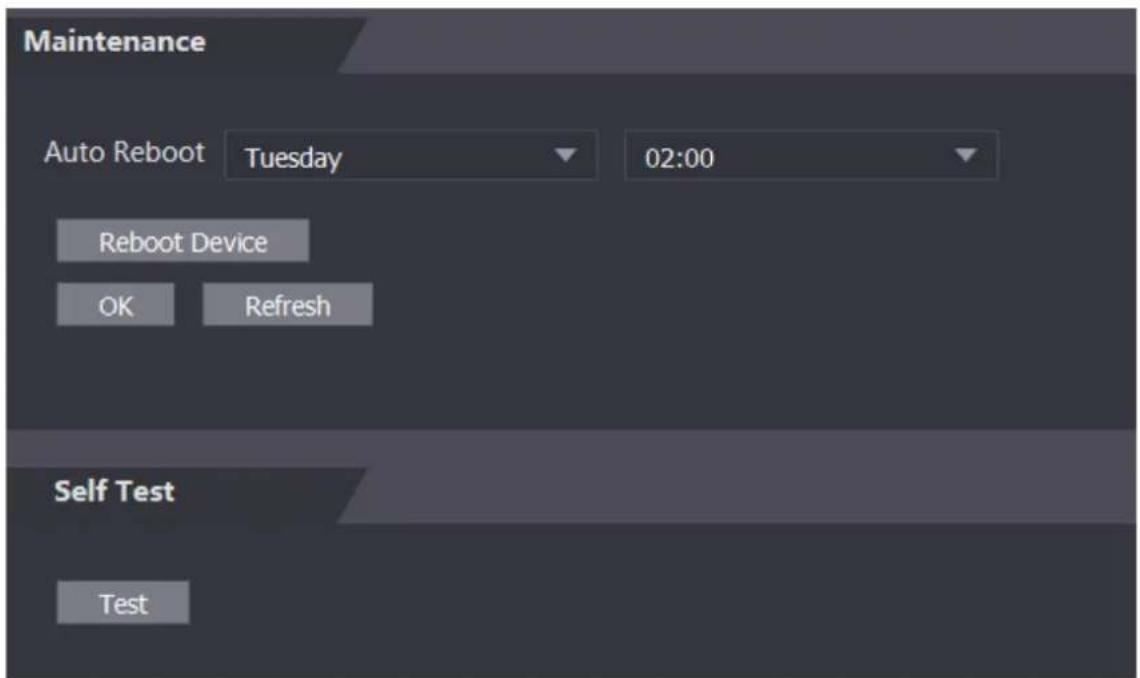
Step 3 Set the time, and then click OK.
The Device will restart at the defined the time.

It is Never by default.
Step 4 (Optional) Click Reboot Device, and the Device will restart immediately.
3.1.14 Configuration Management
When more than one device needs the same configurations, you can configure parameters for them by importing or exporting configuration files.
3.1.14.1 Exporting Configuration File
You can export the configuration file of the Device for backup.
Procedure
Step 1 Log in to the webpage.
Step 2 Select Config Mgmt > Config Mgmt.
Figure 3-32 Configuration management
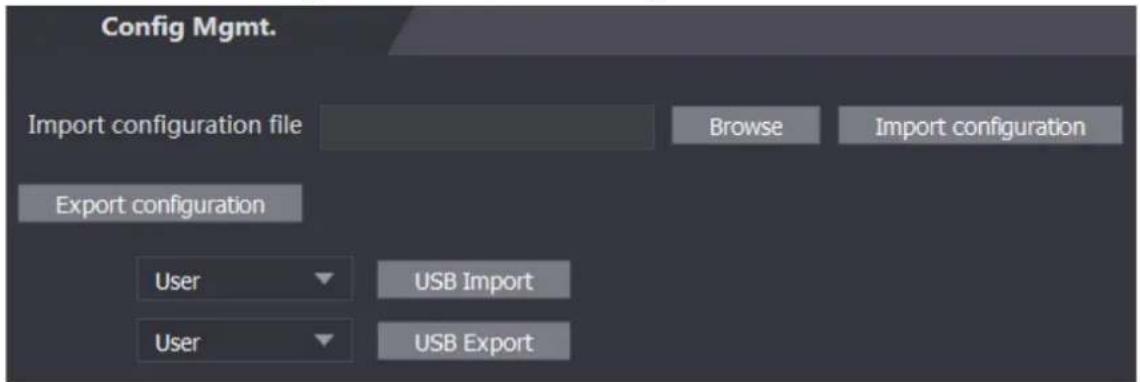
Step 3 Click Export configuration to save the configuration file locally.

IP information of the Device will not be exported.
3.1.14.2 Importing Configuration File
You can export the configuration file from the Device to another one with the same device model.
Procedure
Step 1 Log in to the webpage.
Step 2 Select Config Mgmt > Config Mgmt.
Step 3 Click Browse to select the configuration file, and then click Import configuration.
The Device will restart after importing configuration file.
3.1.14.3 Setting Features
Procedure
Step 1 Log in to the webpage.
Step 2 Select Config Mgmt > Config Mgmt.
Step 3 In the Features area, set the features.
Figure 3-33 Features
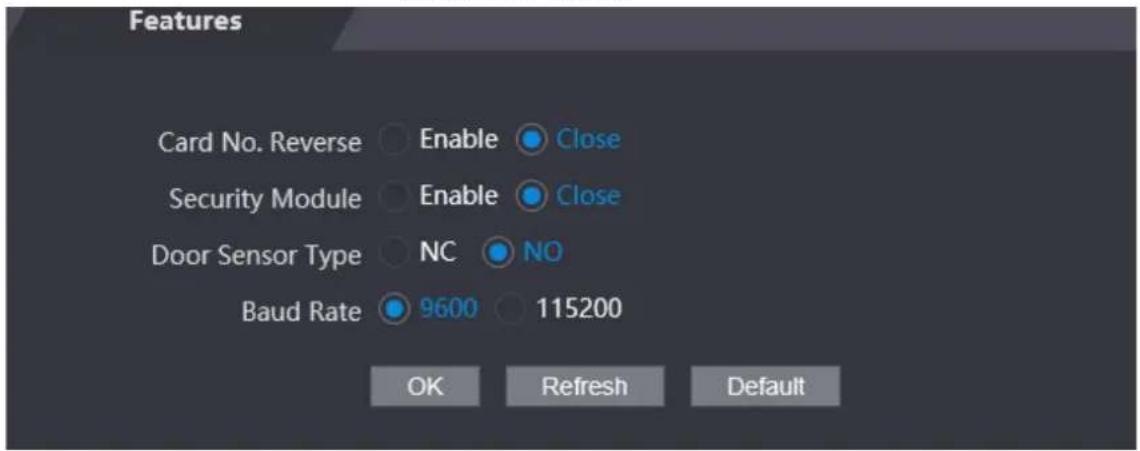
Table 3-9 Description of features
| Parameter Description | |
| Card No. Reverse | Enable Card No. Reverse function, if you set Wiegand output and connect an external device, but the order of the received card number is in consistent with that of the actual number. |
| Security Module | If Security Module is enabled, door exit button, lock and fire linkage are invalid. |
| Door Sensor Type | Set door sensor type:NC: Normally closed.NO: Normally open. |
| Baud Rate | Select baud rate according to the external device. |
Step 4 Click OK.
3.1.14.4 Setting Fingerprint
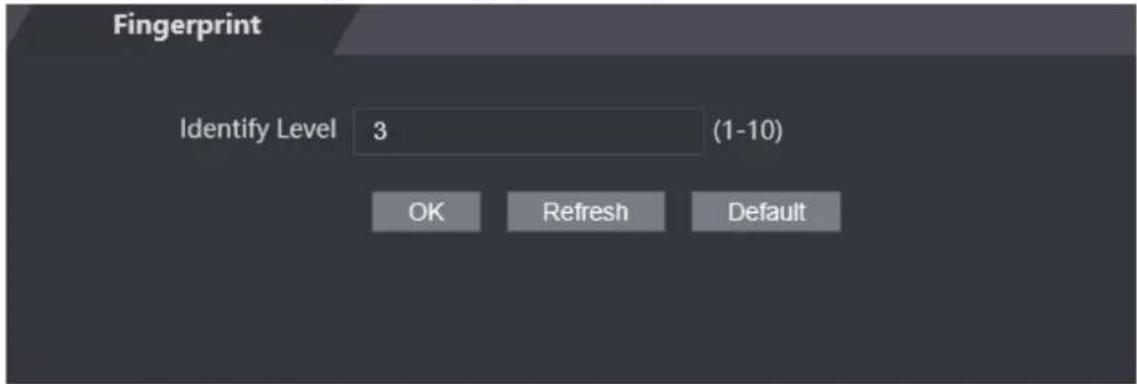
You can set the fingerprint identity level to adjust recognition accuracy rate.
Procedure
Step 1 Log in to the webpage.
Step 2 Select Config Mgmt > Config Mgmt.
Step 3 In the Fingerprint area, set the identity level.
The higher identity level means higher recognition accuracy and higher recognition threshold.
Figure 3-34 Fingerprint identity level
Step 4 Click OK.
3.1.14.5 Restoring Factory Defaults
Procedure
Step 1 Log in to the webpage.
Step 2 Select Config Mgmt. > Default.
Figure 3-35 Default
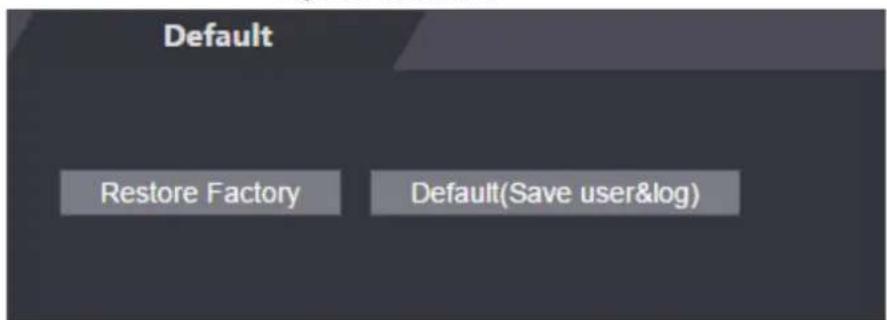
Step 3 Restore factory defaults if necessary.
- Restore Factory: Resets configurations of the Access Standalone and deletes all data.
- Restore Factory (Save user & log): Resets configurations of the Access Standalone and deletes all data except for user information and logs.
3.1.14.6 Configuring Port Functions
Some wires can be used for different purposes. Please use wires based on your needs. For details, see the Quick Start Guide of the Access Standalone.
Procedure
Step 1 On the webpage of the Access Standalone, select Config Mgmt. > Interface Config.
Figure 3-36 Configure port functions (ASI2221J/ASI2212J-D)
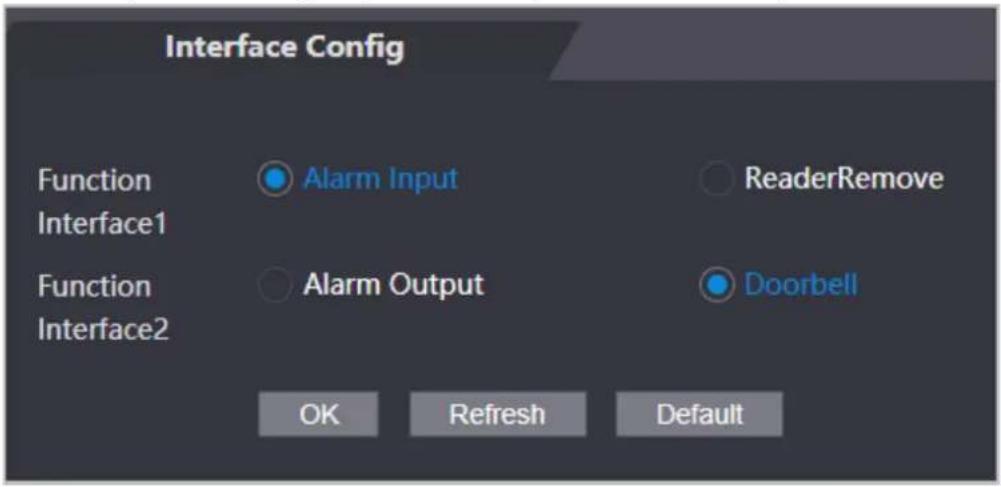
Figure 3-37 Configure port functions (ASI2212J-DPW/ ASI2212J-PW)
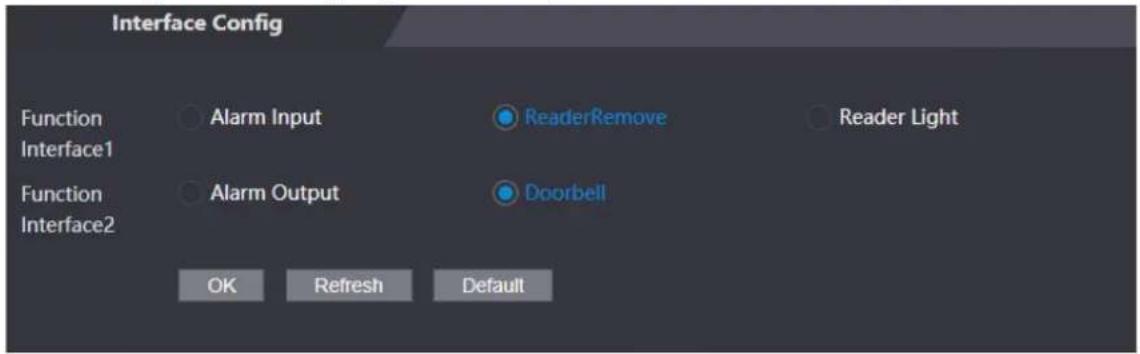
Step 2 Select the function of the port.
Table 3-10 Ports function descriptions
| Model Wiring Description | ||
| ASI2221J/ASI2212 J-D | Alarm input/alarm output | 1. Connects the alarm input device to WG_LED/ALM_IN/CASE and GND.2. Connects the alarm output device to ALM_COM/BELL+ and ALM_NO/BELL-.3. Select Alarm Input from Function Interface1, and then select Alarm Output from Function Interface2. |
| Reader anti-tampering alarm | 1. Connect the CASE wire of the card reader to WG_LED/ALM_IN/CASE.2. Select ReaderRemove from Function Interface1, and then select any option from Function Interface2. | |
| Reader LED | 1. Connect the LED wire of the card reader to WG_LED/ALM_IN/CASE.2. Select Reader Light from Function Interface1, and then select any option from Function Interface2. | |
| Doorbell | 1. Connect the doorbell to ALM_COM/BELL+ and ALM_NO/BELL+.2. Select any option from Function Interface1, and then select Doorbell from Function Interface2. | |
| ASI2212J-DPW/ASI2212J-PW | Alarm input/alarm output | 1. Connects the alarm input device to ALARM1/CASE.2. Connects the alarm output device to ALMRM1_COM/BELL+ and ALMARM1_NO/BELL-.3. Select Alarm Input from Function Interface1, and then select Alarm Output from Function Interface2. |
| Reader anti-tampering alarm | 1. Connect the CASE wire of the card reader to ALARM1/CASE.2. Select ReaderRemove from Function Interface1, and then select any option from Function Interface2. | |
| Doorbell | 1. Connect the doorbell to ALARM1_COM/BELL+ and ALARM1_NO/BELL+.2. Select any option from Function Interface1, and then select Doorbell from Function Interface2. | |
3.1.15 Updating the System

- Use the correct update file. Make sure you get the correct update file from the technical support.
- Do not disconnect the power supply or network, or restart or shut down the Access Standalone during the update.
3.1.15.1 File Update
Procedure
Step 1 On the home page, select Upgrade.
Step 2 In the File Upgrade area, click Browse, and then upload the update file.

The upgrade file should be a .bin file.
Step 3 Click Update.
The Access Standalone will restart after update completes.
3.1.15.2 Online Update
Procedure
Step 1 On the home page, select Upgrade.
Step 2 In the Online Upgrade area, select an update method.
- Select Auto Check, the Access Standalone will automatically check whether the its latest version is available.
- Select Manual Check, and you can immediately check whether the latest version is available.
Step 3 Update the Access Standalone when the latest version is available.
3.1.16 Version Information
View information including MAC address, serial number and more.
Procedure
Step 1 Log in to the webpage.
Step 2 Select Version Info to view version information.
3.1.17 Viewing Online Users
You can view online users who log in to webpage, including their username, IP address, and login time.
Procedure
Step 1 Log in to the webpage.
Step 2 Select Online User.
3.1.18 Viewing System Logs
View and back up system logs, admin logs, and unlock records.
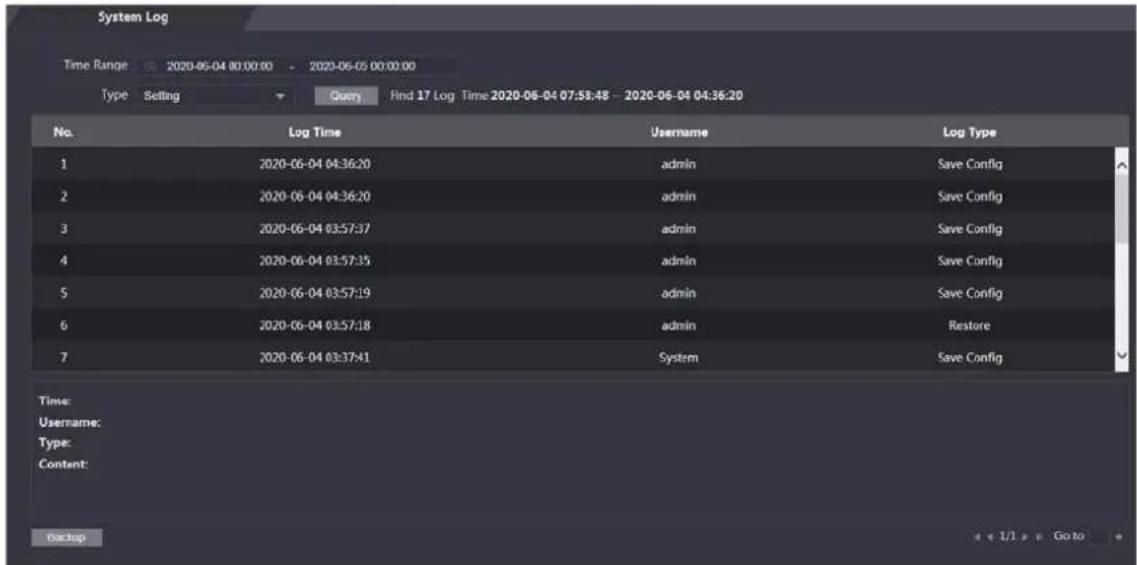
3.1.18.1 System Logs
View and search for system logs.
Procedure
Step 1 Log in to the webpage.
Step 2 Select System Log > System Log.
Step 3 Select the time range and the log type, and then click Query.

Click Backup to download the results.
Figure 3-38 Search for logs
3.1.18.2 Admin Logs
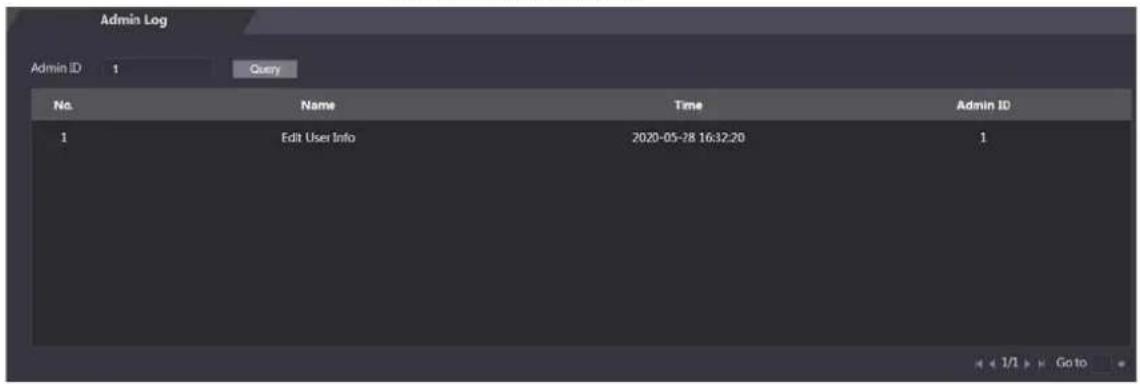
Procedure
Step 1 Log in to the webpage.
Step 2 Select System Log > Admin Log.
Step 3 Enter the admin ID, and then click Query.
Figure 3-39 Admin log
3.1.18.3 Unlock Records
Procedure
Step 1 Log in to the webpage.
Step 2 Select System Log > Search Records.
Step 3 Select the time range and the log type, and then click Query.
Step 4 Click Export Data to download the results.
3.1.19 Logging Out
Click ☑ at the upper-left corner, and then click OK to log out of the webpage.
3.2 Web on Phone
Background Information
Make sure the Access Standalone is on the same LAN as your phone. Connect the Access Standalone to your phone hotspot or connect it and your phone to the same router.

Only certain parameters can be configured on the web portal if you log in on a phone.
Procedure
Step 1 Go to the IP address (192.168.1.108 by default) of the Access Standalone in the browser.
Step 2 Enter the user name and password.

The default administrator name is admin, and the password is the one you set during initialization. We recommend you to change the administrator password regularly to increase security.
Step 3 Click Login.
4 Smart PSS Lite Configuration
This section introduces how to manage and configure the Access Standalone through Smart PSS Lite. You can also configure time attendance rules on the platform, such as shifts, modes, schedules and more. For details, see the user's manual of Smart PSS Lite.
4.1 Installing and Logging In
Install and log in to Smart PSS Lite. For details, see the user manual of Smart PSS Lite.
Procedure
Step 1 Get the software package of the Smart PSS Lite from the technical support, and then install and run the software according to instructions.
Step 2 Initialize Smart PSS Lite when you log in for the first time, including setting password and security questions.

Set the password is for the first-time use, and then set security questions to reset your password when you forgot it.
Step 3 Enter your username and password to log in to Smart PSS Lite.
4.2 Adding Devices
You need to add the Access Standalone to Smart PSS Lite. You can add them in batches or individually.
4.2.1 Adding Individually
You can add Access Standalone individually by entering their IP addresses or domain names.
Procedure
Step 1 Log in to Smart PSS Lite.
Step 2 Click Device Manager and click Add.
Step 3 Enter the device information.
Figure 4-1 Device information
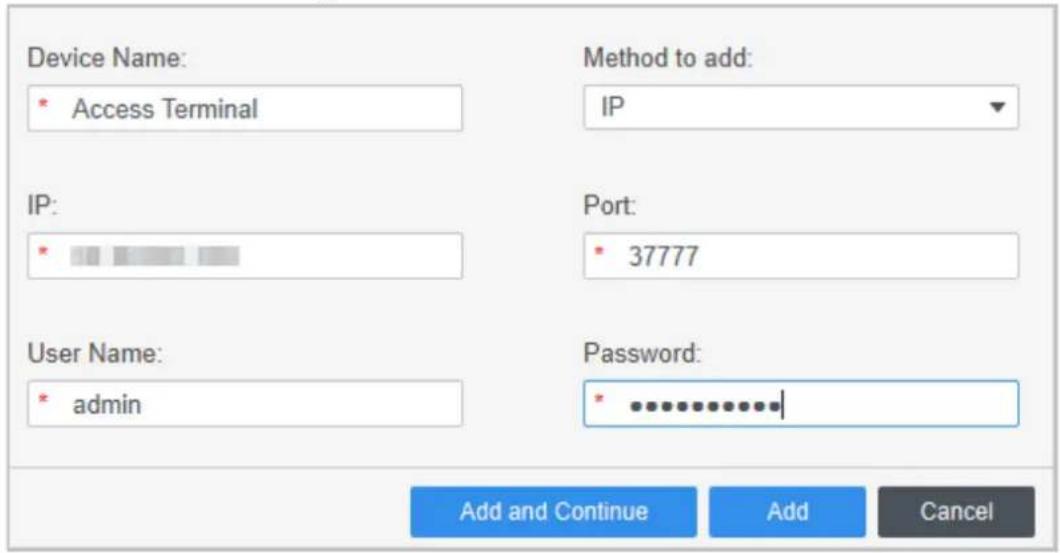
Table 4-1 Device parameters Description
| Parameter Description | |
| Device Name | Enter a name of the Access Standalone. We recommend you name it after its installation area. |
| Method to add Select | IP to add the Access Terminal by entering its IP Address. |
| IP Enter IP address of the Access Standalone. | |
| Port The port number is 37777 by default. | |
| User Name/Password | Enter the username and password of the Access Terminal. |
Step 4 Click Add.
The added Access Standalone displays on the Devices page. You can click Add and Continue to add more Access Standalones.
4.2.2 Adding in Batches
We recommend you use the auto-search function when you add want to Access Standalones in batches. Make sure the Access Standalones you add must be on the same network segment.
Procedure
Step 1 Log in to Smart PSS Lite.
Step 2 Click Device Manager and search for devices.
- Click Auto Search, to search for devices on the same LAN.
- Enter the network segment range, and then click Search.
Figure 4-2 Auto search
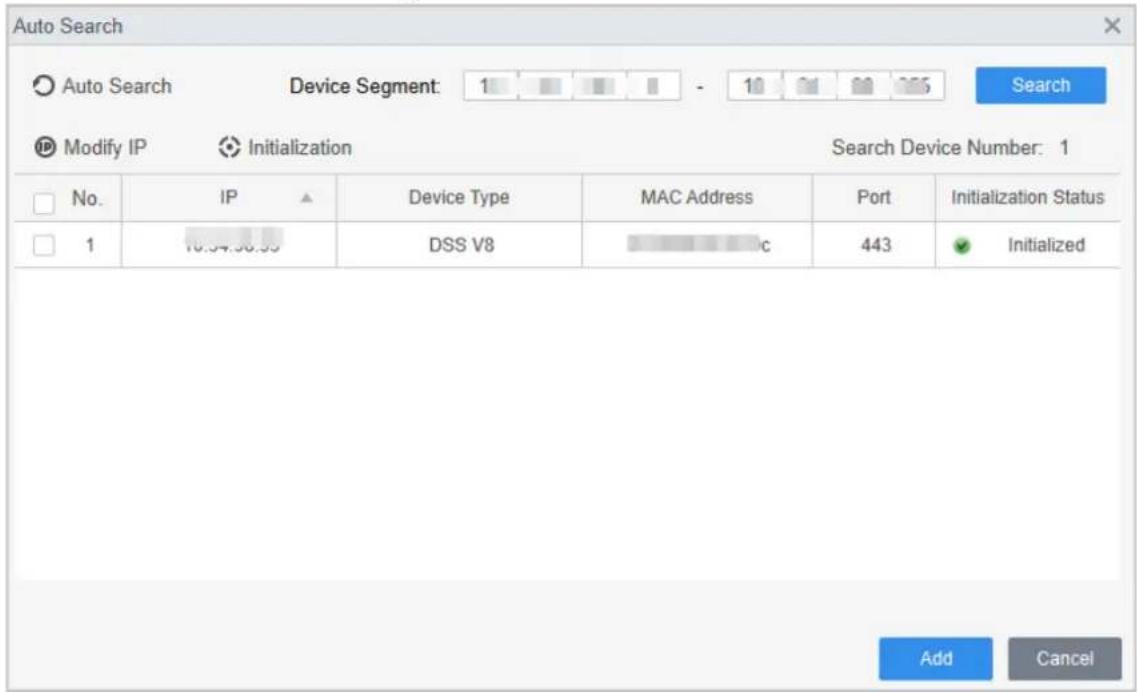
A device list will be displayed.

Select a device, and then click Modify IP to modify its IP address.
Step 3 Select the Access Standalone that you want to add to Smart PSS Lite, and then click Add.
Step 4 Enter the username and the password of the Access Standalone.
You can view the added Access Standalone on the Devices page.

The Access Standalone automatically logs in to Smart PSS Lite after being added. Online is displayed after successful login.
4.3 User Management
Add users, assign cards to them, and configure their access permissions.
4.3.1 Configuring Card Type
Set the card type before you assign cards to users. For example, if the assigned card is an ID card, set card type to ID card.
Procedure
Step 1 Log in to Smart PSS Lite.
Step 2 Click Access Solution > Personnel Manager > User.
Step 3 On the Card Issuing Type and then select a card type.

Make sure that the card type is same to the actually assigned card; otherwise, the card number cannot be read.
Step 4 Click OK.
4.3.2 Adding Users
4.3.2.1 Adding Individually
You can add users individually.
Procedure
Step 1 Log in to Smart PSS Lite.
Step 2 Click Access Solution > Personnel Manger > User > Add.
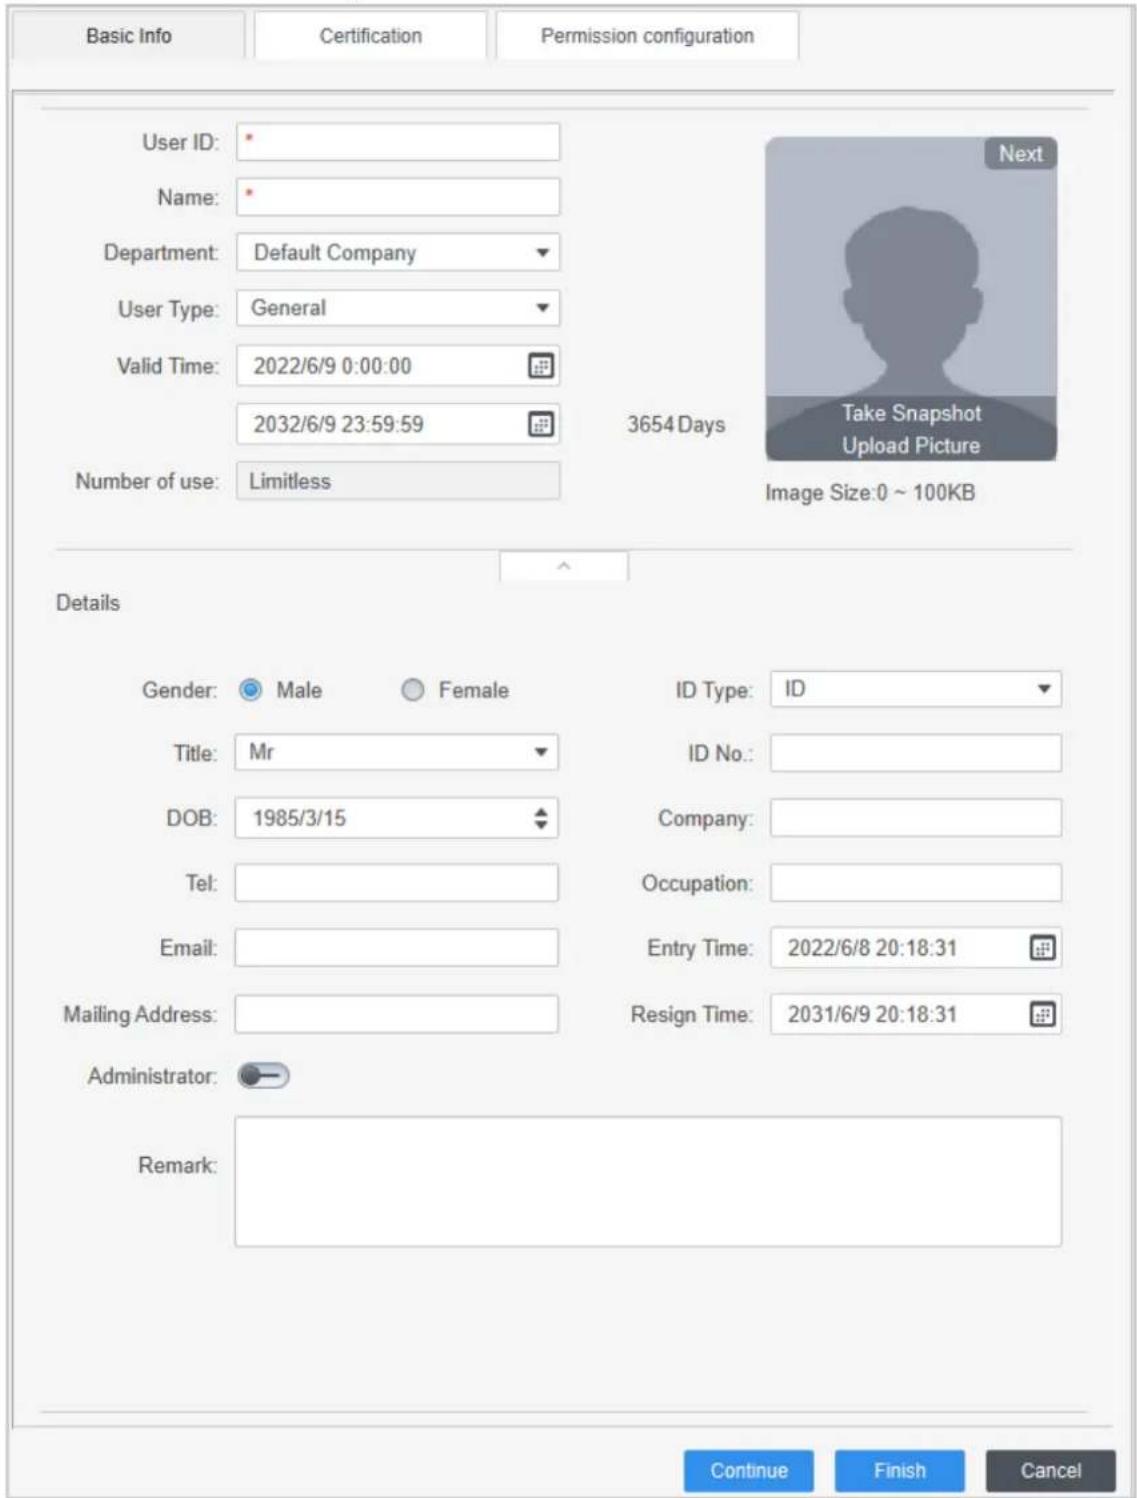
Step 3 Click Basic Info tab, and enter the basic information of the user, and then import the face image.
Figure 4-3 Add basic information
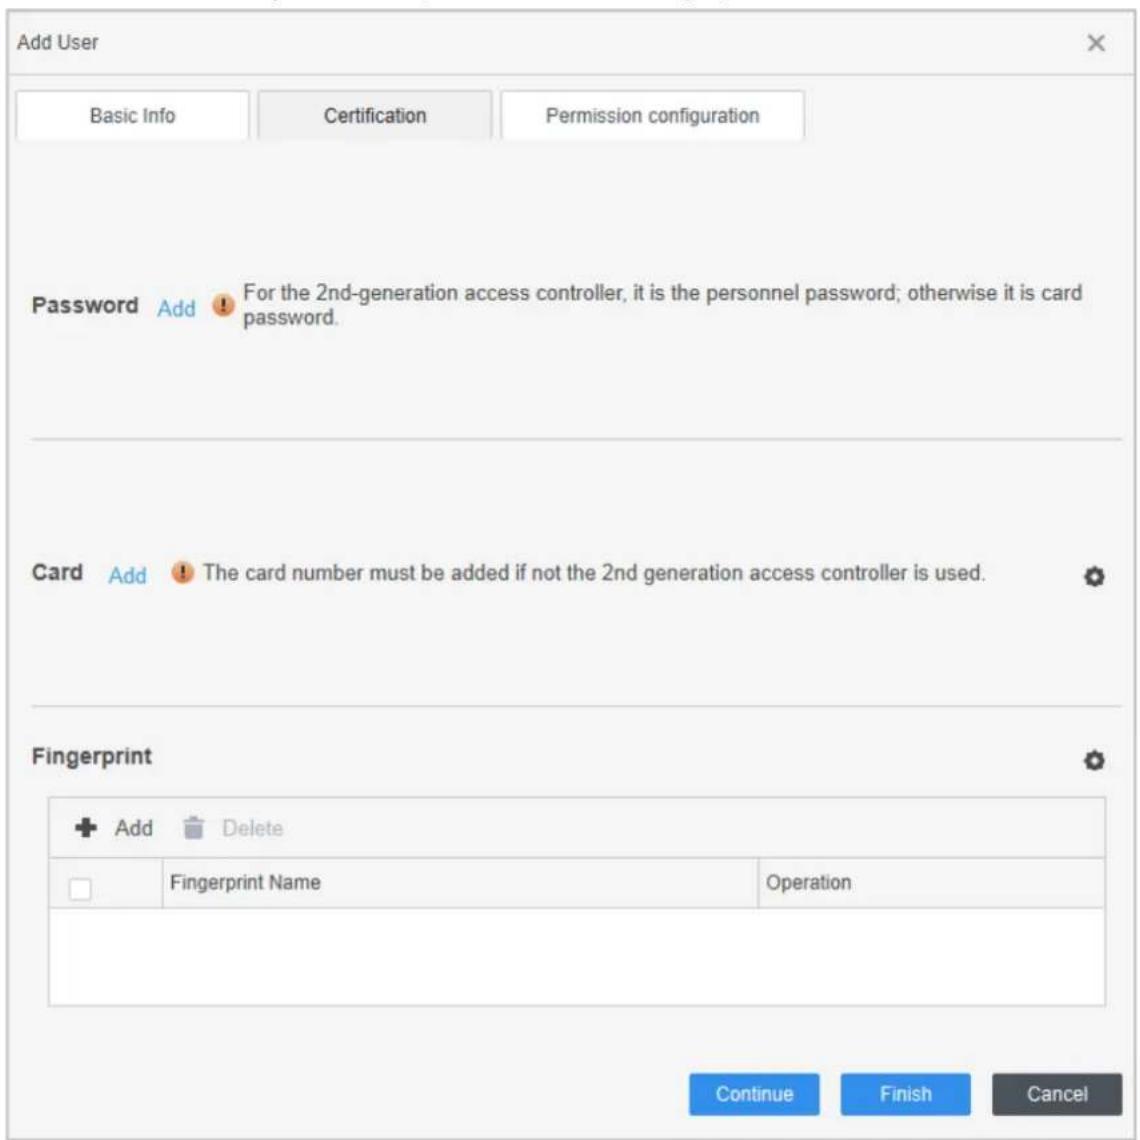
Step 4 Click the Certification tab to add certification information of the user.
- Configure password: The password must consist of 6–8 digits.
-
Configure card: The card number can be read automatically or entered manually. To read the card number automatically, select a card reader, and then place the card on the card reader.
-
On the Card area, click and select Card issuer, and then click OK.
- Click Add, swipe a card on the card reader.
The card number is displayed.
3. Click OK.
After adding a card, you can set the card to main card or duress card, or replace the card with a new one, or delete the card.
- Configure fingerprint.
-
On the Fingerprint area, click and select Fingerprint Scanner, and then click OK.
-
Click Add Fingerprint, press your finger on the scanner three times in a row.
Figure 4-4 Add password, card, and fingerprint
Step 5 Configure permissions for the user. For details, see "4.3.3 Assigning Access Permission".
Step 6 Click Finish.
4.3.2.2 Adding in Batches
You can add users in batches.
Procedure
Step 1 Log in to Smart PSS Lite.
Step 2 Click Personnel Manger >User >Batch Add.
Step 3 Select Card issuer from the Device list, and then configure the parameters.
Figure 4-5 Add users in batches
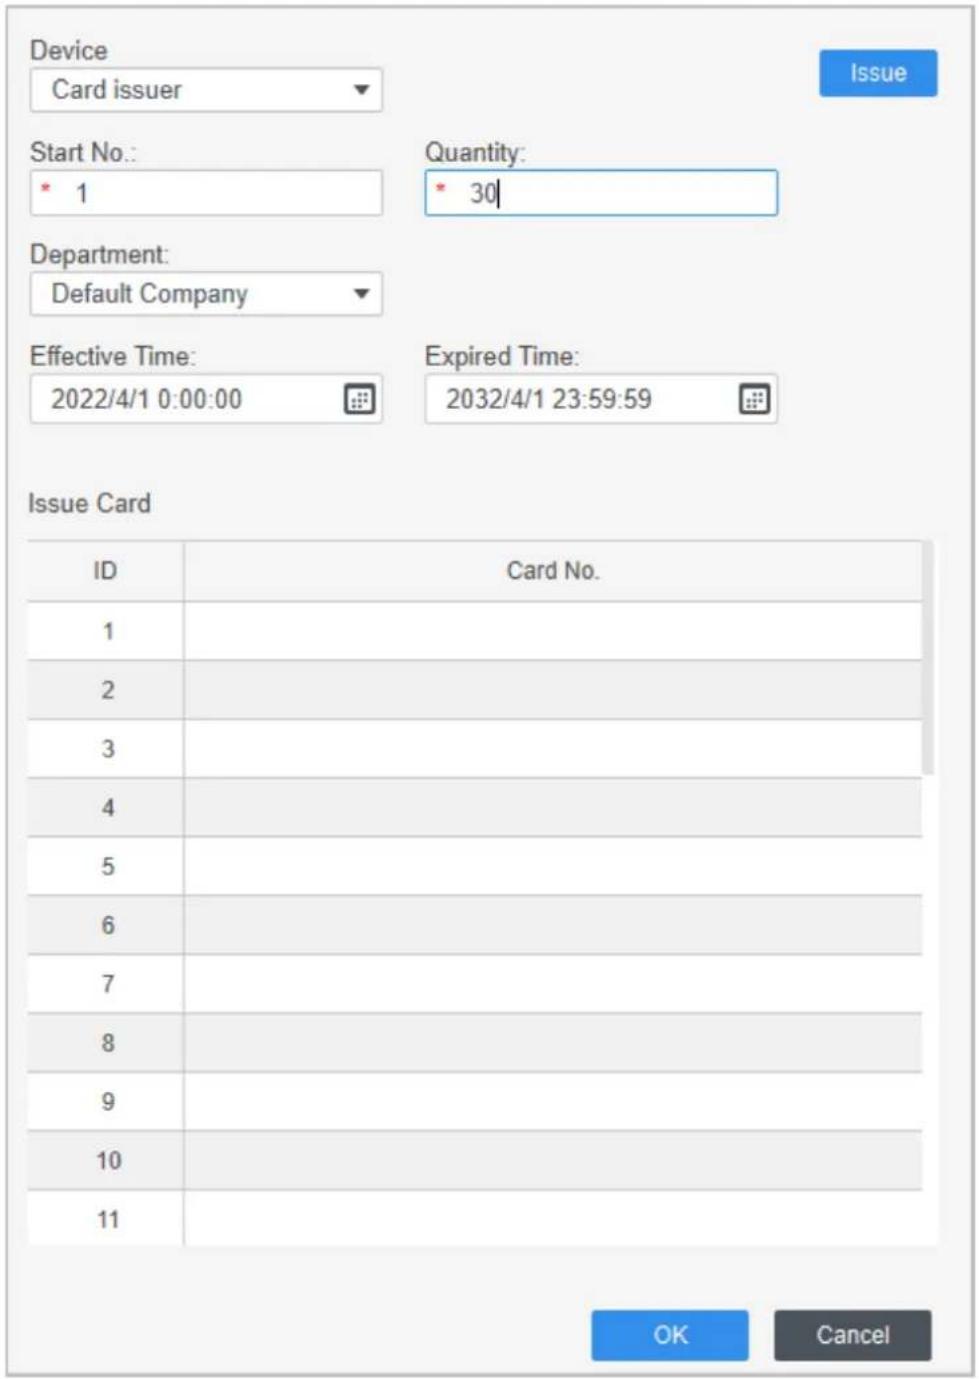
Table 4-2 Add users in batches parameters
| Parameter Description | |
| Start No. | The user ID starts with the number you defined. |
| Quantity | The number of users you want to add. |
| Department | Select the department that the user belongs to. |
| Effective Time/Expired Time | The users can unlock the door within the defined period. |
Step 4 Click Issue.
The card number will be read automatically.
Step 5 Click OK.
4.3.3 Assigning Access Permission
Create a permission group that is a collection of door access permissions, and then associate users with the group so that users can unlock corresponding doors.
Procedure
Step 1 Log in to the Smart PSS Lite.
Step 2 Click Access Solution > Personnel Manger > Permission configuration.
Step 3 Click . +
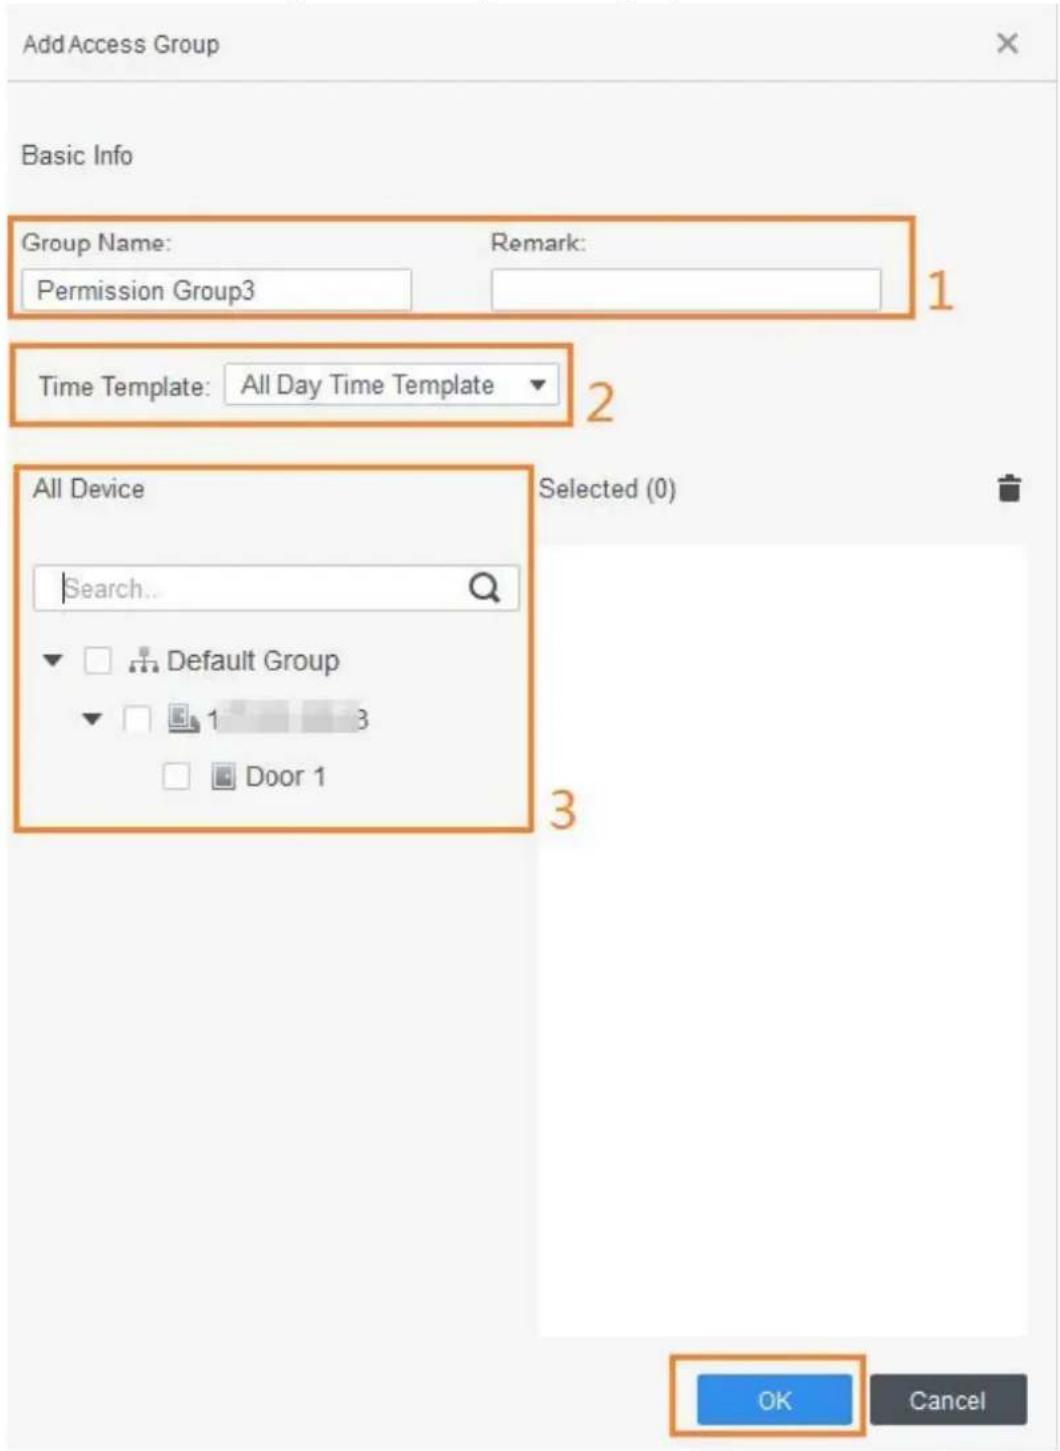
Step 4 Enter the group name, remarks (optional), and select a time template.
Step 5 Select the access control device.
Step 6 Click OK.
Figure 4-6 Create a permission group
Step 7 Click of the permission group you added.
Step 8 Select users to associate them with the permission group.
Figure 4-7 Add users to a permission group
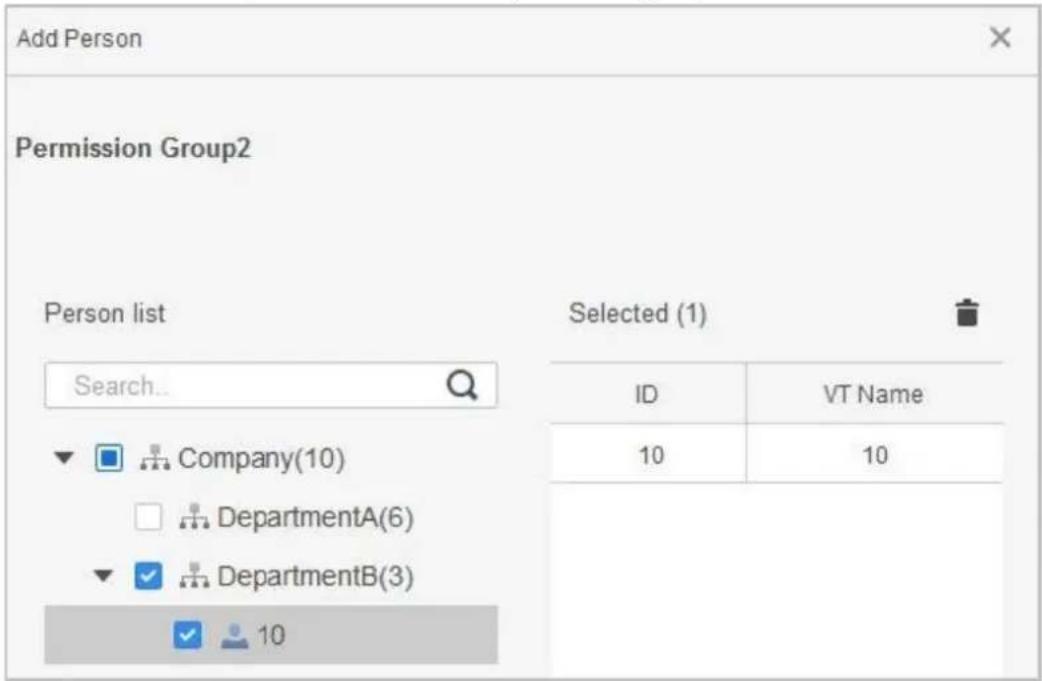
Step 9 Click OK.
Users in the permission group can unlock the door after valid identity verification.
4.4 Access Management
4.4.1 Remotely Opening and Closing Door
You can remotely monitor and control door through Smart PSS Lite. For example, you can remotely open or close the door.
Procedure
Step 1 Click Access Solution > Access Manager on the Home page.
Step 2 Remotely control the door.
- Select the door, right click and select Open or Close.
Figure 4-8 Open door
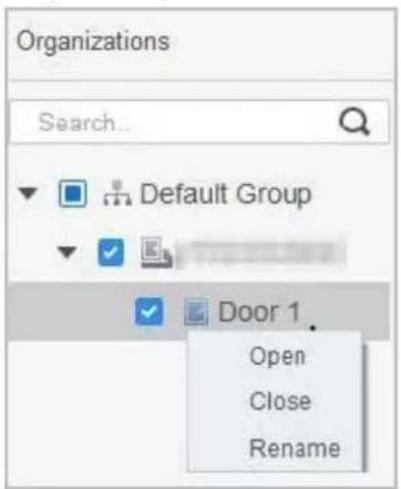
- Click 📄 or ▪ to open or close the door.
Related Operations
- Event filtering: Select the event type in the Event Info and the event list displays the selected event type, such as alarm events and abnormal events.
- Event refresh locking: Click ☐ to lock the event list, and then event list will stop refreshing. Click ☐ to unlock.
- Event deleting: Click 📋 to clear all events in the event list.
4.4.2 Setting Always Open and Always Close
After setting always open or always close, the door remains open or closed all the time.
Procedure
Step 1 Click Access Solution > Access Manager on the Home page.
Step 2 Click Always Open or Always Close to open or close the door.
Figure 4-9 Always open or close
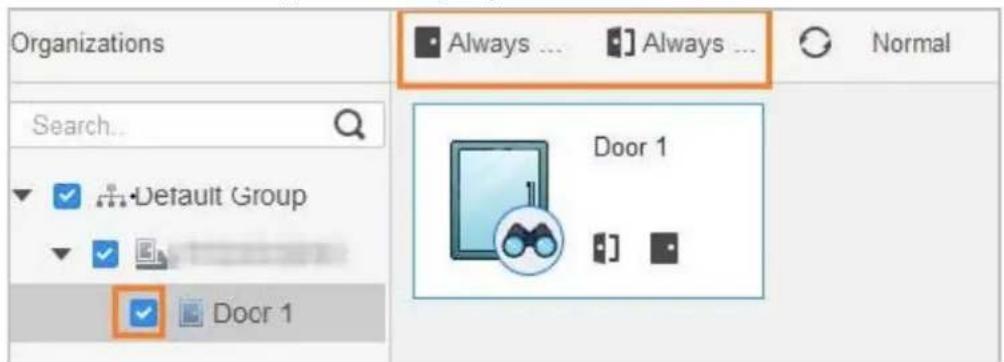
The door will remain open or closed all the time. You can click Normal to restore the access control to normal status, and then the door will be open or closed based on the configured verification methods.
4.4.3 Monitoring Door Status
Procedure
Step 1 Click Access Solution > Access Manager on the Home page.
Step 2 Select the Access Standalone in the device tree, and right click it and then select Start Real-time Event Monitoring.
Real-time access control events will display in the event list.

Click Stop Monitor, real-time access control events will not display.
Figure 4-10 Monitor door status
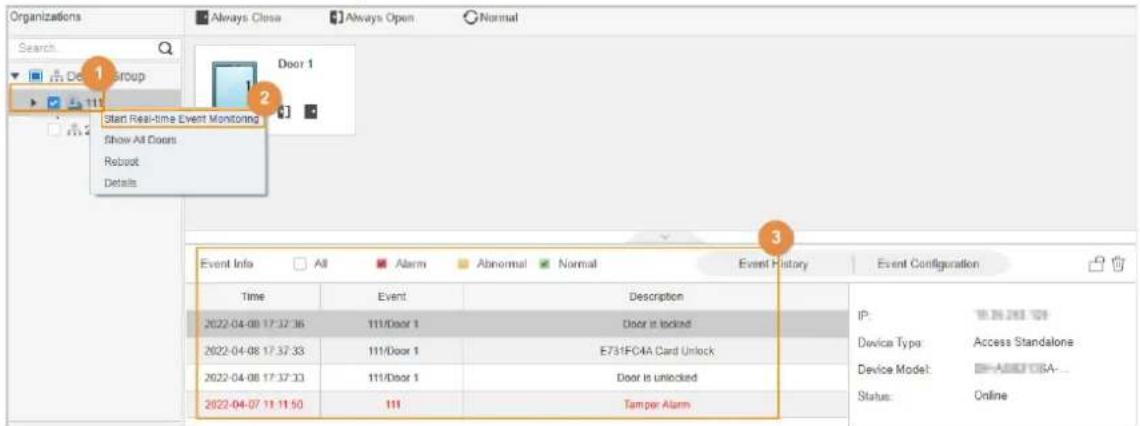
Related Operations
- Show All Door: Displays all doors controlled by the Access Standalone.
- Reboot: Restart the Access Standalone.
- Details: View the device details, such as IP address, model, and status.
Appendix 1 Important Points of Fingerprint Registration Instructions
When you register the fingerprint, pay attention to the following points:
- Make sure that your fingers and the scanner surface are clean and dry.
- Press your finger on the center of the fingerprint scanner.
- Do not put the fingerprint sensor in a place with intense light, high temperature, and high humidity.
- If your fingerprints are unclear, use other unlocking methods.
Fingers Recommended
Forefingers, middle fingers, and ring fingers are recommended. Thumbs and little fingers cannot be put at the recording center easily.
Appendix Figure 1-1 Recommended fingers

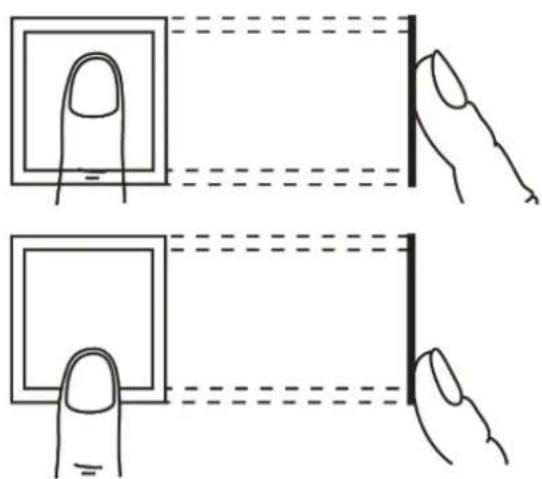
How to Press Your Fingerprint on the Scanner
Appendix Figure 1-2 Correct placement

natural_image
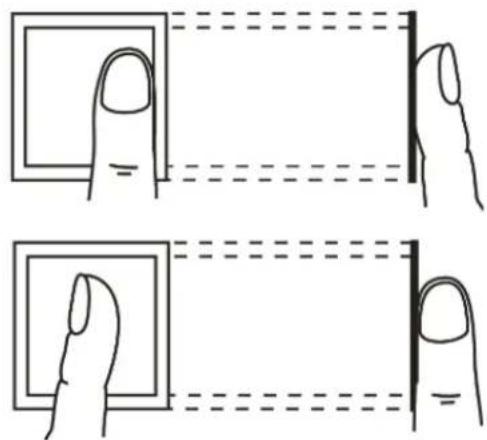
Line drawing of two hands pointing at a square frame and a vertical line, with dashed lines indicating alignment or measurement (no text or symbols)Appendix Figure 1-3 Wrong placement
Appendix 2 Cybersecurity Recommendations
Mandatory actions to be taken for basic device network security:
1. Use Strong Passwords
Please refer to the following suggestions to set passwords:
- The length should not be less than 8 characters.
- Include at least two types of characters; character types include upper and lower case letters, numbers and symbols.
- Do not contain the account name or the account name in reverse order.
- Do not use continuous characters, such as 123, abc, etc.
- Do not use overlapped characters, such as 111, aaa, etc.
2. Update Firmware and Client Software in Time
- According to the standard procedure in Tech-industry, we recommend to keep your device (such as NVR, DVR, IP camera, etc.) firmware up-to-date to ensure the system is equipped with the latest security patches and fixes. When the device is connected to the public network, it is recommended to enable the "auto-check for updates" function to obtain timely information of firmware updates released by the manufacturer.
- We suggest that you download and use the latest version of client software.
"Nice to have" recommendations to improve your device network security:
1. Physical Protection
We suggest that you perform physical protection to device, especially storage devices. For example, place the device in a special computer room and cabinet, and implement well-done access control permission and key management to prevent unauthorized personnel from carrying out physical contacts such as damaging hardware, unauthorized connection of removable device (such as USB flash disk, serial port), etc.
2. Change Passwords Regularly
We suggest that you change passwords regularly to reduce the risk of being guessed or cracked.
3. Set and Update Passwords Reset Information Timely
The device supports password reset function. Please set up related information for password reset in time, including the end user's mailbox and password protection questions. If the information changes, please modify it in time. When setting password protection questions, it is suggested not to use those that can be easily guessed.
4. Enable Account Lock
The account lock feature is enabled by default, and we recommend you to keep it on to guarantee the account security. If an attacker attempts to log in with the wrong password several times, the corresponding account and the source IP address will be locked.
5. Change Default HTTP and Other Service Ports
We suggest you to change default HTTP and other service ports into any set of numbers between 1024–65535, reducing the risk of outsiders being able to guess which ports you are using.
6. Enable HTTPS
We suggest you to enable HTTPS, so that you visit Web service through a secure communication channel.
7. MAC Address Binding
We recommend you to bind the IP and MAC address of the gateway to the device, thus reducing
the risk of ARP spoofing.
8. Assign Accounts and Privileges Reasonably
According to business and management requirements, reasonably add users and assign a minimum set of permissions to them.
9. Disable Unnecessary Services and Choose Secure Modes
If not needed, it is recommended to turn off some services such as SNMP, SMTP, UPnP, etc., to reduce risks.
If necessary, it is highly recommended that you use safe modes, including but not limited to the following services:
- SNMP: Choose SNMP v3, and set up strong encryption passwords and authentication passwords.
- SMTP: Choose TLS to access mailbox server.
- FTP: Choose SFTP, and set up strong passwords.
- AP hotspot: Choose WPA2-PSK encryption mode, and set up strong passwords.
10. Audio and Video Encrypted Transmission
If your audio and video data contents are very important or sensitive, we recommend that you use encrypted transmission function, to reduce the risk of audio and video data being stolen during transmission.
Reminder: encrypted transmission will cause some loss in transmission efficiency.
11. Secure Auditing
- Check online users: we suggest that you check online users regularly to see if the device is logged in without authorization.
- Check device log: By viewing the logs, you can know the IP addresses that were used to log in to your devices and their key operations.
12. Network Log
Due to the limited storage capacity of the device, the stored log is limited. If you need to save the log for a long time, it is recommended that you enable the network log function to ensure that the critical logs are synchronized to the network log server for tracing.
13. Construct a Safe Network Environment
In order to better ensure the safety of device and reduce potential cyber risks, we recommend:
- Disable the port mapping function of the router to avoid direct access to the intranet devices from external network.
- The network should be partitioned and isolated according to the actual network needs. If there are no communication requirements between two sub networks, it is suggested to use VLAN, network GAP and other technologies to partition the network, so as to achieve the network isolation effect.
- Establish the 802.1x access authentication system to reduce the risk of unauthorized access to private networks.
- Enable IP/MAC address filtering function to limit the range of hosts allowed to access the device.
- Foreword
- General
- Safety Instructions
- Revision History
- Privacy Protection Notice
- About the Manual
- Important Safeguards and Warnings
- Transportation Requirement
- Storage Requirement
- Installation Requirements
- WARNING
- Operation Requirements
- Table of Contents
- Important Safeguards and Warnings....III
- Product Overview....1
- Local Configuration....3
- User Management....9
- Access Control Management....12
- Unlocking the Door....13
- Configuring the System....15
- USB Management....16
- Product Overview
- Introduction
- Application
- Local Configuration
- Configuration Process
- Keypad Functions
- Standby Screen
- Initialization
- Logging in
- Background Information
- Procedure
- Network Communication
- Configuring IP
- Configuring Wi-Fi
- Configuring Wiegand
- Configuring Serial Port
- Configuring Modes
- User Management
- Adding New User
- Viewing User information
- Edit User information
- Search for users
- Delete users
- Setting Administrator Password
- Access Control Management
- Configuring Unlocking Modes
- Configuring the Lock Holding Time
- Unlocking the Door
- Unlocking by Cards
- Unlocking by Fingerprint
- Unlocking by User Password
- ASI22XXH series
- ASI22XXJ series
- Unlocking by Administrator Password
- Configuring the System
- Configuring Time
- Setting the Volume
- Restoring Factory Defaults
- Restarting the Device
- USB Management
- Exporting to USB
- Importing From USB
- Updating System
- Exporting Unlocking Records
- Exporting/Importing User Information
- System Information
- Web Configurations
- Web on Computer
- Initialization
- Logging In
- Resetting the Password
- Configuring Door Parameter
- Alarm Linkage
- Setting Alarm Linkages
- Viewing Alarm Logs
- Time Sections
- Configuring Time Sections
- Configuring Holiday Groups
- Configuring Holiday Plans
- Data Capacity
- Setting Volume
- Configuring Network
- Configuring TCP/IP
- Prerequisites
- Configuring Port
- Configuring Automatic Registration
- Configuring P2P
- Setting Date
- Safety Management
- Configuring IP Authority
- Network Access
- Related Operations
- Prohibit PING
- Anti Half Connection
- Configuring System
- System Service
- Creating Server Certificate
- Downloading Root Certificate
- User Management
- Adding Users
- Adding ONVIF Users
- Maintenance
- Configuration Management
- Exporting Configuration File
- Importing Configuration File
- Setting Features
- Setting Fingerprint
- Restoring Factory Defaults
- Configuring Port Functions
- Updating the System
- File Update
- Online Update
- Version Information
- Viewing Online Users
- Viewing System Logs
- System Logs
- Admin Logs
- Unlock Records
- Logging Out
- Web on Phone
- Smart PSS Lite Configuration
- Installing and Logging In
- Adding Devices
- Adding Individually
- Adding in Batches
- User Management
- Configuring Card Type
- Adding Users
- Adding Individually
- Click OK.
- - Configure fingerprint.
- Adding in Batches
- Assigning Access Permission
- Access Management
- Remotely Opening and Closing Door
- Setting Always Open and Always Close
- Monitoring Door Status
- Click Stop Monitor, real-time access control events will not display.
- Appendix 1 Important Points of Fingerprint Registration Instructions
- Fingers Recommended
- How to Press Your Fingerprint on the Scanner
- Appendix 2 Cybersecurity Recommendations
- Mandatory actions to be taken for basic device network security:
- Use Strong Passwords
- Update Firmware and Client Software in Time
- "Nice to have" recommendations to improve your device network security:
- Physical Protection
- Change Passwords Regularly
- Set and Update Passwords Reset Information Timely
- Enable Account Lock
- Change Default HTTP and Other Service Ports
- Enable HTTPS
- MAC Address Binding
- Assign Accounts and Privileges Reasonably
- Disable Unnecessary Services and Choose Secure Modes
- Audio and Video Encrypted Transmission
- Secure Auditing
- Network Log
- Construct a Safe Network Environment
Brand : Dahua Technology
Model : ASI2212J-D
Category : Access Control System