DUCT18HP230V1BD - Air-conditioner GREE - Free user manual and instructions
Find the device manual for free DUCT18HP230V1BD GREE in PDF.

| Product Type | Slim Duct Indoor Unit (B Series) |
| Model | DUCT18HP230V1BD |
| Capacity | 18,000 BTUH |
| Power Supply | 208/230V-1PH-60Hz |
| Sound Pressure Level | As low as 25 dB(A) |
| Fan Speeds | Auto, Low, Medium Low, Medium, Medium High, High, Turbo |
| Operating Modes | Auto, Cool, Dry, Fan, Heat |
| I-Feel Function | Remote controller senses ambient temperature for personalized comfort |
| Sleep Mode | Automatically adjusts temperature for comfortable sleep and energy savings |
| Turbo Mode | Ultra-high speed for quick cooling or heating |
| X-Fan Function | Dries evaporator after shut-off to prevent mildew (Cool/Dry mode) |
| Energy Saving Mode | Automatically optimizes compressor and fan speeds for energy efficiency |
| Vacation Mode (Freeze Guard) | Maintains 46°F (8°C) in heating to prevent freezing |
| Intelligent Defrost | Monitors outdoor coil and defrosts only when needed |
| Self-Diagnosis | Real-time diagnostics with fault code display for easy troubleshooting |
| Power Failure Memory | Returns to last operating mode after power resume (if memory set) |
| WiFi Control | Compatible with Gree+ app for remote operation (requires reset) |
| Controller Options | Wired controller and wireless remote controller included |
| Filter Cleaning | Clean with warm water every 6 months; replace if dirty |
| Safety Precautions | Disconnect power before maintenance; do not splash water; contact qualified technician for repairs |
| Repairability | Only qualified service technicians should service; no user-repairable parts |
Frequently Asked Questions - DUCT18HP230V1BD GREE
User questions about DUCT18HP230V1BD GREE
0 question about this device. Answer the ones you know or ask your own.
Ask a new question about this device
Download the instructions for your Air-conditioner in PDF format for free! Find your manual DUCT18HP230V1BD - GREE and take your electronic device back in hand. On this page are published all the documents necessary for the use of your device. DUCT18HP230V1BD by GREE.
USER MANUAL DUCT18HP230V1BD GREE
natural_image
Exterior view of a white industrial air vent or chamber with blue insulation material (no text or symbols visible)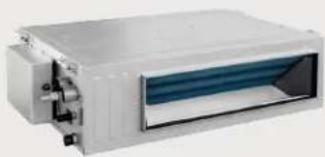
natural_image
Exterior view of a white industrial electrical enclosure with blue insulation (no text or symbols visible)OWNER'S MANUAL
Indoor Unit
MODELS:
DUCT09HP230V1BD
DUCT12HP230V1BD
DUCT18HP230V1BD
DUCT24HP230V1BD
Thank you for choosing our product.
Please read this Owner's Manual carefully before
operation and retain it for future reference.
To download an electric version of this manual visit
https://gree-comfort-dev.web.app/system-documentation/
Thank you for choosing a Slim Duct B Series indoor unit!
You can feel confident in your selection because the same pride in craftsmanship and engineering knowledge that goes into millions of other GREE installed products worldwide has gone into your unit.
Please read this owner's manual carefully before operation and retain it for future reference.
TABLE OF CONTENTS
Nomenclature....3
Safety Precautions....4
Part Names....6
System Functions 7
Wired Controller 9
Operation of Remote Controller 16
Care and cleaning....21
Troubleshooting....22
Energy Saving Tips....23
Warranty....24

Owner's manual FAQ

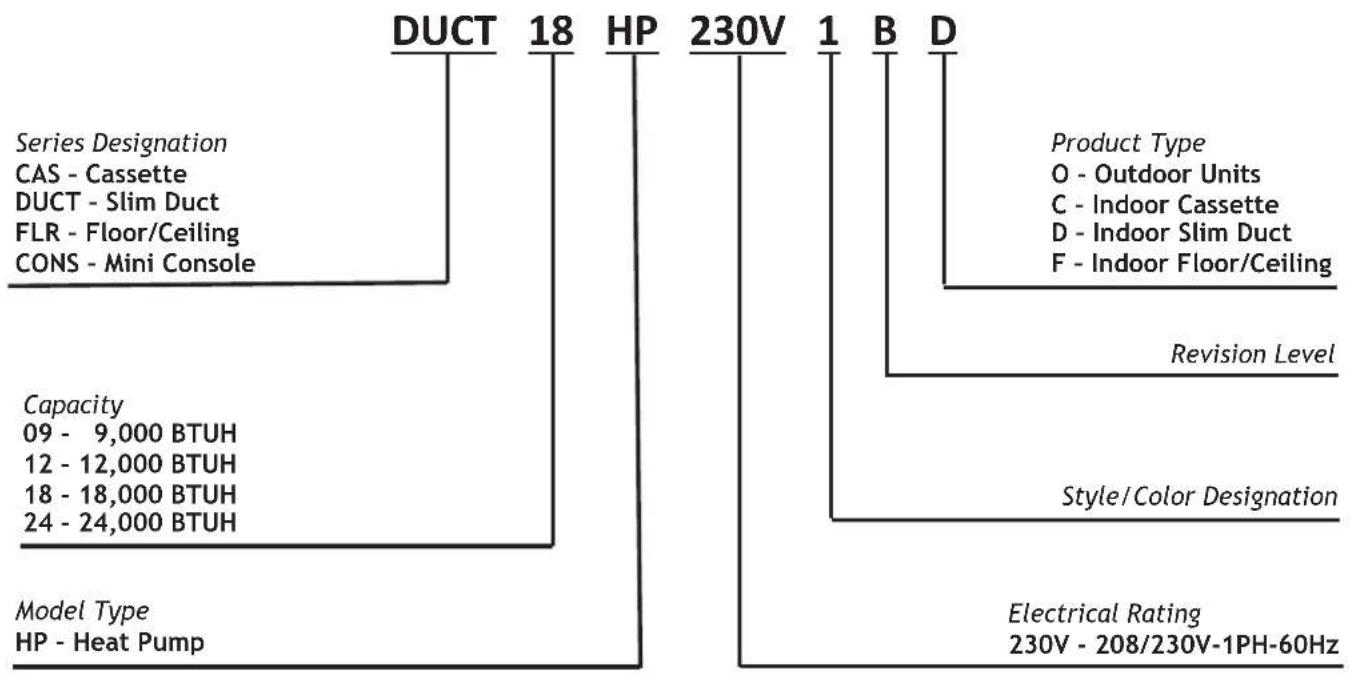
EXAMPLE: DUCT18HP230V1BD
tree
| Level | Item | Description | |---|---|---| | 1 | DUCT | Series Designation | | 1 | 18 | CAS - Cassette | | 1 | HP | DUCT - Slim Duct | | 1 | 230V | FLR - Floor/Ceiling | | 1 | 1 | CONS - Mini Console | | 1 | B | Product Type | | 1 | D | Outdoor Units | | 1 | D | Indoor Cassette | | 1 | D | Indoor Slim Duct | | 1 | F | Indoor Floor/Ceiling | | 1 | Revision Level | | | 1 | Capacity | 09 - 9,000 BTUH | | 1 | Capacity | 12 - 12,000 BTUH | | 1 | Capacity | 18 - 18,000 BTUH | | 1 | Capacity | 24 - 24,000 BTUH | | 1 | Style/Color Designation | | | 1 | Model Type | HP - Heat Pump | | 1 | Electrical Rating | 230V - 208/230V-1PH-60Hz |SAFETY PRECAUTIONS
Please read the following before operation
Recognize safety information. This is the safety-alert symbol. When you see this symbol on the unit and in instructions or manuals, be alert to the potential for personal injury. Understand these signal words: DANGER, WARNING, and CAUTION. These words are used with the safety-alert symbol.
DANGER identifies the most serious hazards which will result in severe personal injury or death.
WARNING signifies hazards which could result in personal injury or death.
CAUTION is used to identify unsafe practices which may result in minor personal injury or product and property damage.
NOTE is used to highlight suggestions which will result in enhanced installation, reliability, or operation.
NOTE: Your actual air conditioning & heating system and related devices may differ from the images shown in this manual.
⚠ WARNING
This appliance is not intended for use by children without responsible adult supervision. Proper care should be taken to ensure safety.
⚠ WARNING
Heat pumps, air conditioners & heating equipment should be installed, started up, and serviced only by qualified installers and service technicians. Air conditioning, heat pumps and refrigeration systems are hazardous due to high voltage electrical components, high refrigerant pressures, and moving parts.
⚠ WARNING
- Disconnect electrical power to the indoor and outdoor units before performing any maintenance or cleaning.
- Do not attempt to repair the GREE system yourself. Incorrect repairs may cause electric shock or fire. Contact a qualified service technician for all service requirements.
- Keep combustible materials away from the unit.
Please read the following before operation
⚠️ CAUTION
- Do not put hands or any objects into the air inlets or outlets. This may cause personal injury or damage the unit.
- When cleaning, be careful not to splash water on the unit. Doing this may cause electric shock or damage to unit.
- Do not use or place any flammable, combustible or noxious substance next to the unit.
- In the event of a failure (burning smell, etc.), immediately disconnect all electrical power to indoor and outdoor units.
- Never try repairing the system yourself; contact a qualified service technician for all repairs.
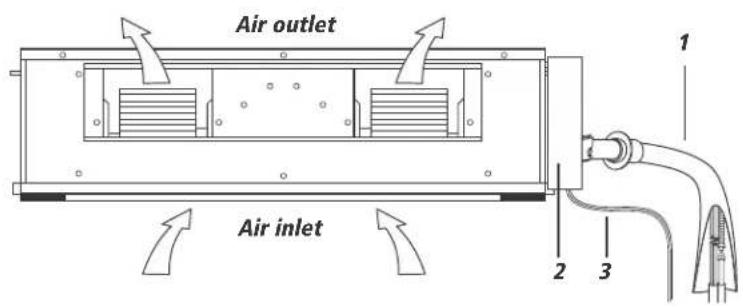
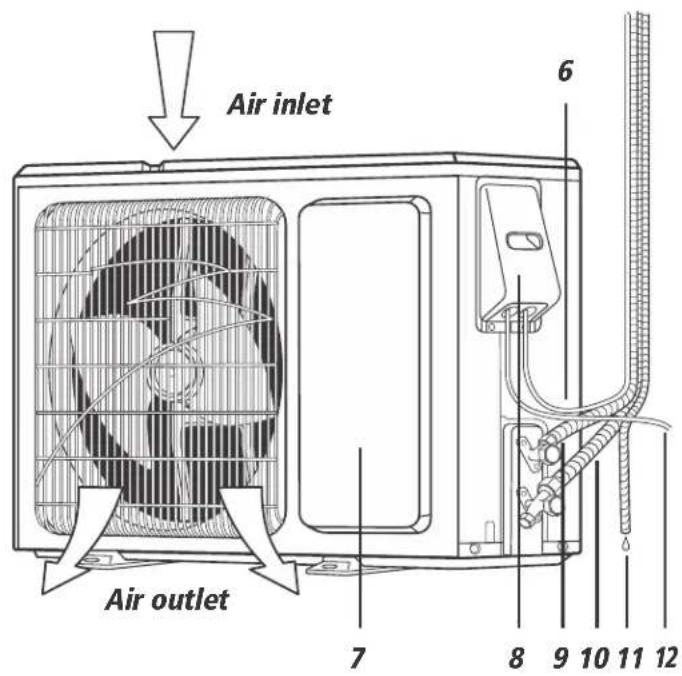
PART NAMES
Indoor unit
⚠️ DISCLAIMER
Not all items shown may be included with equipment purchase. Consult your equipment supplier for a list of all items included for your application.
Part Name
- Gas & Liquid Pipes
- Electric Box
- Interconnection Cable
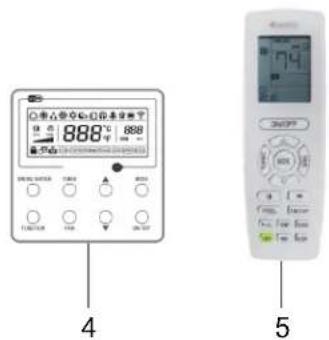
- Wired Controller
- Remote Controller
- Interconnection Cable
- Front Panel
- Service Cover
- Liquid Pipe
- Gas Pipe
- Drain Hose
- Outdoor Power Supply
Outdoor unit
CAUTION
The refrigerant pipe, drain pipe, electrical wiring, and duct for this unit should be installed by a qualified HVAC professional only.
SYSTEM FUNCTIONS
WHISPER QUIET
Not only are the GREE systems energy efficient but they are quiet too. Slim Duct B Series units operate with sound pressure levels starting as low as 25 dB(A).
MULTI FAN SPEEDS
Whether operating in either Cooling or Heating mode, the indoor fan can be set to your choice of fan speed plus Turbo to achieve maximum comfort.
INTELLIGENT PREHEATING
This system guards against the annoying cool air blown into the room in heating mode. The system constantly monitors the discharge air temperature. It will delay the indoor fan until the indoor coil has warmed up to prevent blowing uncomfortable cool air into the room.
I-FEEL FUNCTION
The unit will sense room temperature at the remote controller instead of at the indoor unit. It then adjusts airflow and temperature accordingly for ultimate personal comfort.
TURBO MODE
Use Turbo Mode for situations where you wish to achieve the desired room temperature in the shortest possible time. This mode runs the unit at ultra high speeds for quickest results.
VACATION MODE (FREEZE GUARD)
Vacation mode (freeze guard) sets the unit to 46^ F ( 8^ C) in heating to keep the temperature in the space above freezing.
TIMER MODE
The unit can be programmed to turn ON or OFF after a specific amount of time. The time period is adjustable between one half and 24 hours.
MODE BUTTON
The unit can be set to five different operating modes: HEAT COOL, DRY, FAN ONLY and AUTO.
SLEEP MODE
The system offers a Sleep Mode function for your comfort. The unit will automatically adjust room temperature during your sleep time. This slight change in temperature will not affect your comfort level due to the natural effects that sleeping has on the body but it will save on energy consumption and will lower electric bills.
ENERGY SAVINGS MODE
This feature will automatically select the optimal compressor and fan speeds to allow for energy savings while operating in Cooling or Heating modes. The compressor and fan will automatically slow down as the room temperature reaches the set point.
SELF-DIAGNOSIS
The system has a built-in computer which uses real-time diagnostics which help prolong the unit's life. The automatic diagnosis feature continuously scans for errors or malfunctions and fault codes are shown on the unit display to facilitate troubleshooting and repair.
POWER FAILURE MODE
Power interruptions are no problem for this system. User selections and system parameters are stored in non-volatile memory. These parameters are retained during a power failure. When power is returned, the Slim Duct B Series system will automatically return to the last operating mode.
INTELLIGENT DEFROST
Intelligent Defrost function increases room comfort and saves energy by eliminating unnecessary defrost cycles. In heating mode, the unit will monitor the outdoor coil for frost build up. Once frost buildup has been detected, the system will switch into a defrost mode to remove the frost.
The remote controller and wired controller can be set to display in either °F or °C.
REMOTE LOCK-OUT
The remote controller has a Lock feature. The Lock averts unauthorized access or tampering with system settings.
AGENCY LISTINGS
All systems are listed with AHRI (Air Conditioning, Heating, and Refrigeration Institute) and are ETL certified per UL Standards.
1.1 Outside View of the Wired Controller
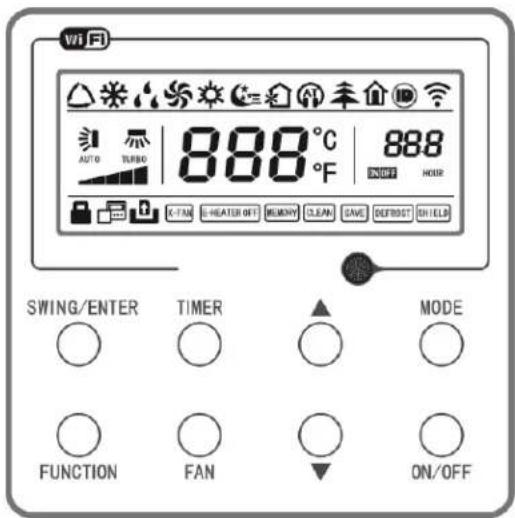
Fig. 1 Outside View of the Wired Controller
1.2 LCD of the Wired Controller
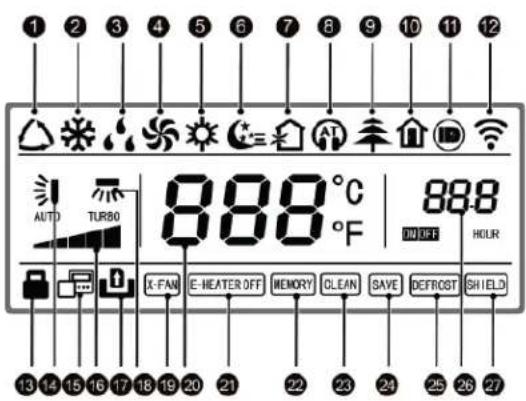
Fig. 2 LCD of the Wired Controller
⚠️ DISCLAIMER
All functions are not available for this unit.
No.Display
-
Auto
-
Cool
-
Dry
-
Fan
-
Heat
-
Sleep
-
Fresh air
-
Quiet
-
Health
-
46°F Vacation mode
-
I-DEMAND
-
WiFi
-
Lock-out
-
Up & down swing
-
Follower wired controller
-
Fan speed
-
No card
-
Left & right swing
-
X-fan
-
Temperature
-
E-heater
-
Memory
-
Clean
-
Save
-
Defrost
-
Timer
-
Shield
Instruction of Display
Automatic mode (under auto mode, the indoor unit will select its operating mode according to the variation of room temperature)
Cooling mode
Dry mode
Fan mode
Heating mode
Display when sleep function is set
This function is unavailable for this unit
Display when sleep function is set
This function is unavailable for this unit
Display when 46°F Vacation mode is set
Display when I-DEMAND function is set
Display when WiFi function is set
Lock-out status, display when lock-out function is set
Display when up and down swing function is set
Icon of follower controller, it will display when follower wired controller is set (this function is unavailable for this unit)
The fan speed set currently (including auto, low, medium low, medium, medium high, high, and turbo)
This function is unavailable for this unit
Display when left and right swing function is set
Display when X-fan function is set
It will display the setting temperature
This function is unavailable for this unit
Memory status (After power failure and re-energizing the unit, it will resume to ON/OFF status of unit before the power failure)
Filter washing reminder (this function is unavailable for this unit)
Display when energy-saving function is set
Defrosting status
Display when timer status is set
Shielding status
2 Buttons
2.1 Buttons on the Wired Controller
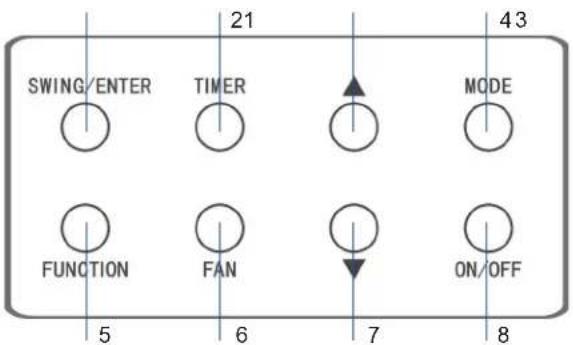
Fia. 3 Buttons on the Wired Controller
No. Display
1 SWING/ENTER
Instruction of Display
① Function selection and cancellation.
② Setting of the up and down swing function.
① Running temperature setting of the indoor unit, range:61\~86°F(16\~30°C).
② Timer setting, range:0.5-24 hr.
3
7 ▼
6 FAN
4 MODE
5 FUNCTION
2 TIMER
8 ON/OFF
3+4 ▲ + MODE
Setting of the auto/ low/ medium low/ medium/ medium high/ high fan speed.Heating mode
Setting of the Cooling/ Heating/ Fan/ Dry/ Auto mode of the indoor unit.
Switchover among the functions of Turbo/ WiFi/ X-fan etc..
Timer setting.
Turn on/off the indoor unit.
Press them for 5s under off state of the unit to Enter/ Cancel the Memory function (If memory is set, indoor unit after power failure and then power recovery will resume the original setting state. If not, the indoor unit is defaulted to be off after power recovery. (Memory off is the factory default setting)
6+7 FAN +▼
By pressing them at the same time under off state of the unit, ✕ will be displayed on the wired controller for the cooling only unit, while ✕ will be displayed on the wired controller for the cooling and heating unit.
3+7 ▲ + ▼
Upon startup of the unit without malfunction or under off state of the unit, press them at the same time for 5s to enter the lock state, in which case, any other buttons won't respond.
4+7 MODE + ▼
Repress them for 5s to quit this state. Under OFF state, the Celsius and Fahrenheit scales can be switched by pressing "MODE" and "▼ for 5s.
2+5 TIMER+FUNCTION
Under OFF state, go to the commissioning status by pressing "FUNCTION" and "TIMER" for five seconds, and let "00" displayed on the temperature display area by pressing "MODE", then adjust the options which is shown on the timer area by pressing "▲" and "▼". There are four options, as follows:
① Indoor ambient temperature is sensed by the return air temperature sensor (01 displayed on the timer area).
② Indoor ambient temperature is sensed by the wired controller (02 displayed on the timer area).
③ The return air temperature sensor is selected under the cooling, dry, or fan mode; while the wired controller temperature sensor is selected under the heating or auto mode. (Q3 is displayed on the timer area).
④ The wired controller temperature sensor is selected under the cooling, dry, or fan mode; while the return air temperature sensor is selected under the heating mode. (04 is displayed on the timer display area).
2+5 TIMER+FUNCTION
Under OFF state, go to the commissioning status by pressing "FUNCTION" and "TIMER" for five seconds. Press "MODE" button to until "01" icon is shown at the temperature display area. The setting status will be show---tn at timer area. Press "▲" and "▼" button to adjust and two options are available: ① Three low levels (01); ② Three high levels (02).
5+6 FUNCTION + FAN
Reset the WiFi function: Under off status, press "FUNCTION" + "FAN" combination buttons on its wired controller for 5s. Once "oC" is displayed, this indicates that reset was successful.
Wired Controller (Continued)
3 Operation Instructions
3.1 ON/OFF
Press ON/OFF to turn the unit ON, press again to turn the unit OFF.
NOTE:
- The state shown in Fig.4 indicates the "OFF" state once power is applied. The state shown in Fig.5 indicates the "ON" state of the unit.
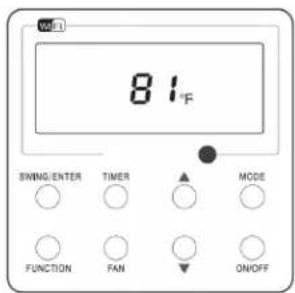
Fig. 4 "OFF" State
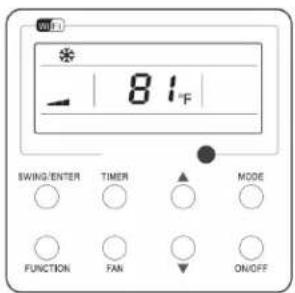
Fig. 5 "ON" State
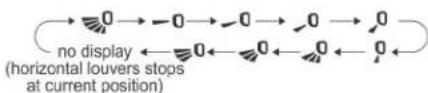
3.2 Mode Setting
Under the "ON" state of the unit, press MODE to switch modes in the following sequence: Auto-Cooling-Dry-Fan-Heating.

flowchart
graph LR
    A["Auto"] --> B["Cooling"]
    B --> C["Dry"]
    C --> D["Fan"]
    D --> E["Heating"]
    E --> A
3.3 Temperature Setting
- Press ▲ or ▼ to increase/decrease the preset temperature. If either is pressed continuously, the temperature will be increased or decreased by 1°F(℃) every 0.5s, as shown in Fig.6.
- In Cooling, Dry, Fan or Heating mode, the temperature setting range is 61°F\~86°F (16°C\~30°C).
- In the Auto mode, the setting temperature is unadjustable.
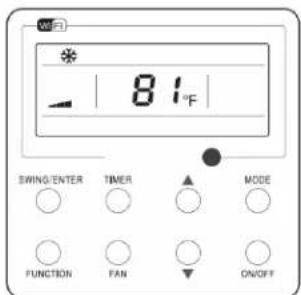
Fig.6
3.4 Fan Setting
Under the "ON" State of the unit, each time you press FAN, the fan speed will change circularly as shown in Fig.7.

flowchart
graph LR
    A["Auto"] --> B["(Low)"]
    B --> C["(Medium low)"]
    C --> D["(Medium)"]
    D --> E["(Medium high)"]
    E --> F["(High)"]
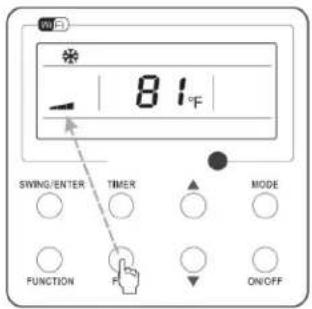
Fig.7
3.5 Timer Setting
- Under the "T-ON | T-OFF" state of the unit, press Timer to set timer off/on.
- Timer ON setting: press Timer, and then LCD will display "xx.x hour", with "hour" blinking. Then, press ▲ or ▼ to adjust the timing value. Then press SWING/ENTER to confirm the setting.
- Timer OFF setting: press Timer, if LCD doesn't display xx.x hour, it indicates the TIMER setting is canceled.
- Timer OFF setting when the unit is turned on is shown as Fig.8.
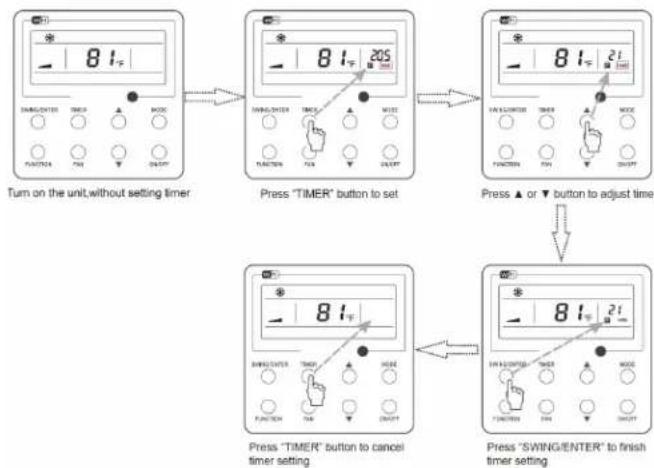
flowchart
graph TD
    A["Turn on the unit, without setting timer"] --> B["Press "TIMER" button to set"]
    B --> C["Press ▲ or ▼ button to adjust time"]
    C --> D["Press "SWING/ENTER" to finish timer setting"]
Fig. 8 Timer off Setting under the "ON" State of the Unit
- 0.5hr. If either is pressed continuously, the set time will increase/ decrease by 0.5hr every 0.5s
Wired Controller (Continued)
3.6 Up & Down Swing Setting
- There are two ways for up and down swing mode: simple swing and fixed swing. Under off status, press "SWING/ENTER" button and "▲" button simultaneously for 5 seconds, then switch for simple swing and fixed swing is done.
- When it is set to be simple swing, under on status, press "SWING/ENTER" button, the mode is activated, press the button again the mode is turned off.
- When it is set to be fixed swing, press "SWING/ENTER" button, the unit will circularly switch the swing mode according to the order shown below:

3.7 Left & Right Swing Setting
- Swing On: Press FUNCTION under on state of the unit to activate the swing function. In this case, ■ will blink. After that, press SWING/ENTER to make a confirmation.
- Swing Off: When the Swing function is on, press FUNCTION to enter the Swing setting interface, with blinking. After that, press SWING/ENTER to cancel this function
- Swing setting is shown as Fia.9.
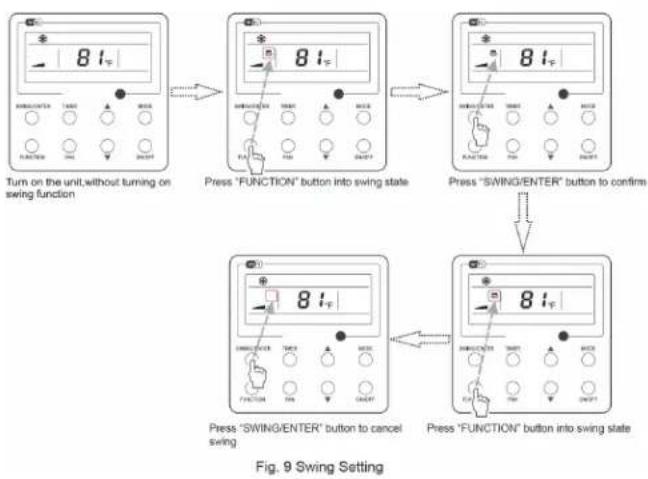
flowchart
graph TD
    A["Turn on the unit, without turning on swing function"] --> B["Press 'FUNCTION' button into swing state"]
    B --> C["Press 'SWING/ENTER' button to confirm"]
    C --> D["Press 'SWING/ENTER' button to cancel swing"]
    D --> E["Press 'FUNCTION' button into swing state"]
NOTE:
- Use the Swing setting procedure to initiate Sleep, Turbo or X-fan.
- Once the setting is completed press "SWING/ENTER" to initiate another setting or it will automatically cancel in 5 seconds.
- Not all functions are available for all units.
3.10 Sleep Setting
- Sleep on: When the unit is ON, press FUNCTION until the unit enters the Sleep setting interface. Press SWING/ENTER to confirm the setting.
- Sleep off: When the Sleep function is activated, press FUNCTION to enter the Sleep setting interface. Then press SWING/ENTER to cancel this function.
- Sleep setting is shown as Fig.11.
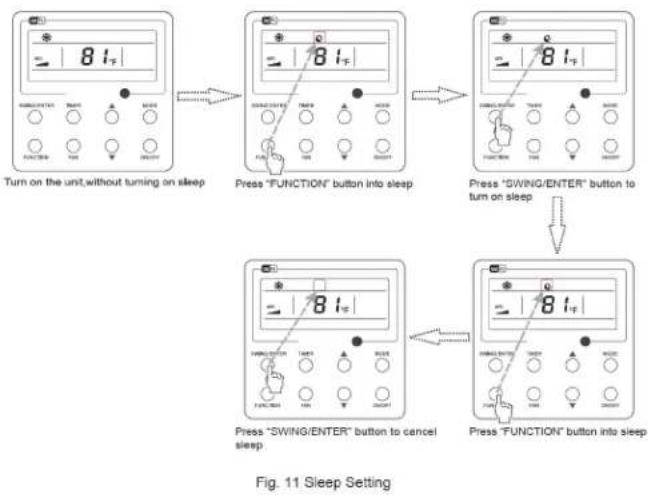
flowchart
graph TD
    A["Turn on the unit, without turning on sleep"] --> B["Press "FUNCTION" button into sleep"]
    B --> C["Press "SWING/ENTER" button to turn on sleep"]
    C --> D["Press "FUNCTION" button into sleep"]
    D --> E["Press "SWING/ENTER" button to cancel sleep"]
3.11 Turbo Setting
- Turbo function: In Turbo the high fan speed initiates quick cooling or heating so the room temperature quickly reaches set point.
- In the Cooling or Heating mode, press FUNCTION till the unit enters the Turbo setting interface, then press SWING/ENTER to confirm the setting.
- When the Turbo function is activated, press FUNCTION to enter the Turbo setting interface and then press SWING/ENTER to cancel this function.
- Turbo function setting is as shown in Fig. 12.
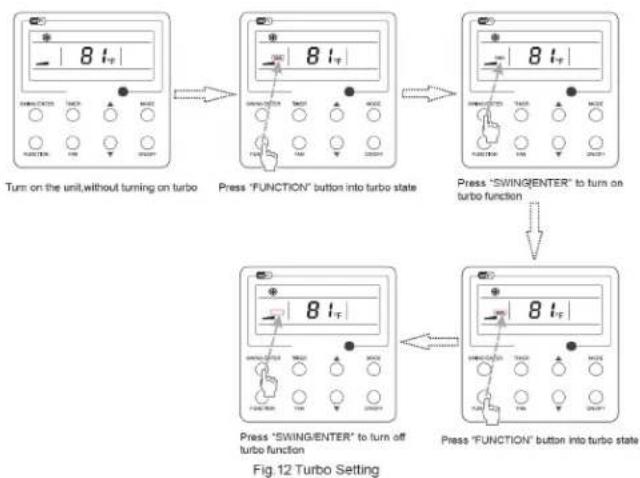
flowchart
graph TD
    A["Turn on the unit, without turning on turbo"] --> B["Press 'FUNCTION' button into turbo state"]
    B --> C["Press 'SWING/ENTER' to turn on turbo function"]
    C --> D["Press 'FUNCTION' button into turbo state"]
    D --> E["Press 'SWING/ENTER' to turn off turbo function"]
Wired Controller (Continued)
3.12 Energy Saving Function Setting
Turn on energy saving function:
1. Energy Saving Setting for Cooling
- When the unit runs under the COOL or DRY mode, press FUNCTION button to select "SAVE" function option, "SAVE" will be flashing on the display. Press▲ or ▼ to adjust the lower limit, then press the SWING/ENTER button to activate.
2. Energy Saving Setting for Heating
- When the unit runs under the HEAT mode, press FUNCTION button to select "SAVE" function option, "SAVE" will be flashing on the display. Press ▲ or ▼ to adjust the upper limit, then press SWING/ENTER button to activate.
NOTE:
- Under energy saving setting mode, press "MODE" button to switch the energy saving setting for COOL or HEAT mode.
Turn off energy saving function:
- If energy saving function has been set, press FUNCTION button on the panel to select "SAVE" function option. When SAVE icon flashes, if you press SWING/ENTER button without pressing ▲ or ▼ button, energy saving function will be canceled; if you press SWING/ENTER button after pressing ▲ or ▼ button, energy saving function will be activated.

flowchart
graph TD
    A["Turn on the unit with the "SAVE" function deactivated"] --> B["Press "FUNCTION" button to select the "SAVE" function option"]
    B --> C["Press ▲ or ▼ to adjust the lower limit"]
    C --> D["Press "SWING/ENTER" button to activate the "SAVE" function"]
    D --> E["Press ▲ or ▼ to adjust the upper limit"]
    E --> F["Press "MODE" button to switch to the "SAVE" setting for heating"]
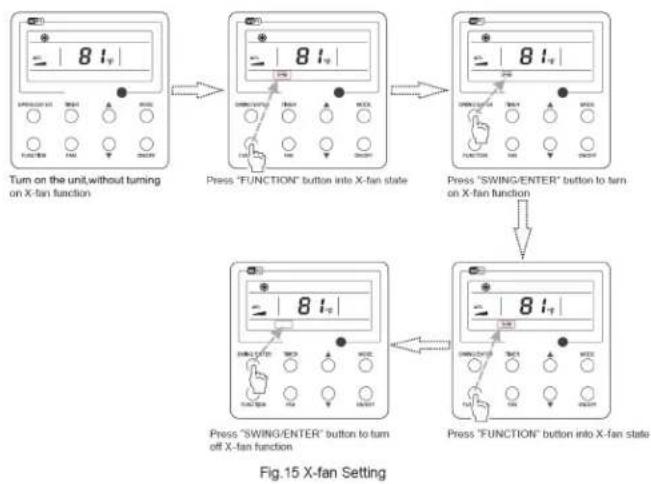
3.13 X-fan Setting
- X-fan function: After the unit is turned off, the water in evaporator of indoor unit will be automatically evaporated to avoid mildew.
-
In the Cooling or Dry mode, press FUNCTION till the unit enters the X-fan setting interface and then press SWING/ENTER to activate.
-
When the X-fan function is activated, press and hold FUNCTION until "X-FAN" appears then press SWING/ENTER to cancel.
• X-fan function setting is as shown in Fig.15
flowchart
graph TD
    A["Turn on the unit, without turning on X-fan function"] --> B["Press "FUNCTION" button into X-fan state"]
    B --> C["Press "SWING/ENTER" button to turn on X-fan function"]
    C --> D["Press "SWING/ENTER" button to turn off X-fan function"]
    D --> E["Press "FUNCTION" button into X-fan state"]
NOTE:
- When the X-fan function is activated, turning off the unit by pressing ON/OFF or by the remote controller, the indoor fan will run at the low fan speed for 2 min, with "X-FAN" displayed on the LCD. If the X-fan function is deactivated, the indoor fan will be turned off directly.
- X-fan function is unavailable in the Fan or Heating mode.
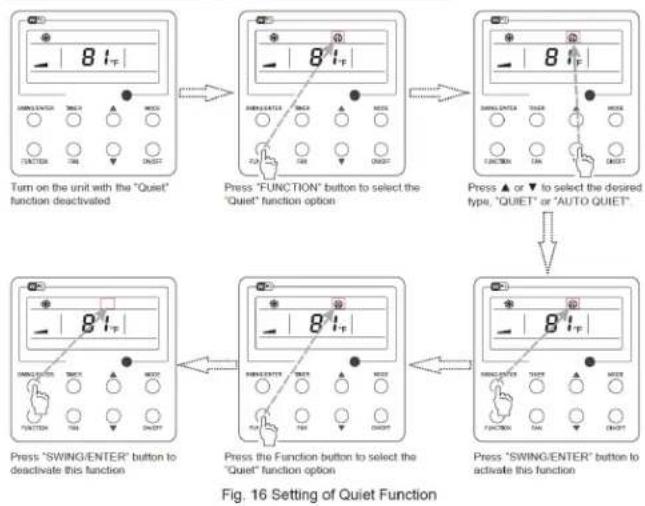
3.14 Quiet Function Setting
Turn on quiet function:
- Under unit on status, press FUNCTION button on the panel to select "Quiet" function option. When "Quiet" or "Auto quiet" flashes, it enters quiet function setting mode. Press ▲ or ▼button to switch between "Quiet" and "Auto quiet" function. Then press SWING/ENTER button to activate this function.
Cancel quiet function:
- If quiet function has been set, press FUNCTION button on the panel to select "Quiet" function option.
- When "Quiet" or "Auto quiet" flashes, if you press SWING/ENTER button without pressing ▲ or ▼ button, quiet function will be canceled; if you press SWING/ENTER button after pressing ▲ or ▼ button, quiet function will be activated.
Wired Controller (Continued)
flowchart
graph TD
    A["Turn on the unit with the "Quiet" function deactivated"] --> B["Press 'FUNCTION' button to select the 'Quiet' function option"]
    B --> C["Press ▲ or ▼ to select the desired type, 'QUIET' or 'AUTO QUIET'"]
    C --> D["Press 'SWING/ENTER' button to activate this function"]
    D --> E["Press the Function button to select the 'Quiet' function option"]
    E --> F["Press 'SWING/ENTER' button to activate this function"]
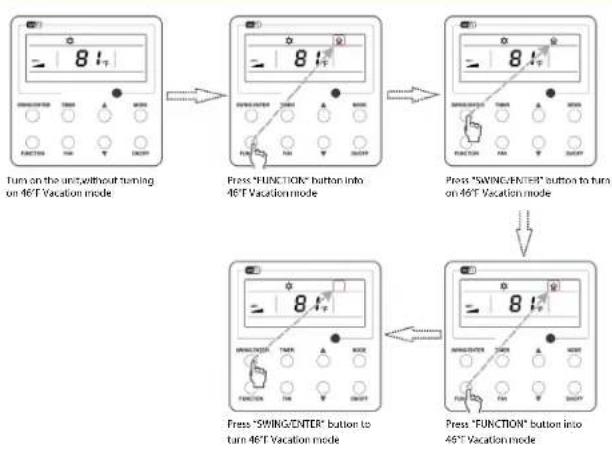
3.15 46°F Vacation mode
- 46°F Vacation ON: Press FUNCTION under on state of the unit till the unit enters the 46°F Vacation mode setting interface. Press SWING/ENTER to confirm the setting.
- 46°F Vacation OFF: When the 46°F Vacation mode is activated, press FUNCTION to enter the 46°F Vacation mode setting interface. After that, press SWING/ENTER to cancel this function.
NOTE:
- This function is only available in heating mode.
- When this function has been set, set temperature is displayed as 46^ F ( 8^ C). In this case, temperature setting and fan speed setting are shielded.
- This function will be cancelled when switching modes.
- This function and sleep function cannot be on simultaneously. If 46^ F Vacation mode is set at first and then sleep/quiet function is set after, 46^ F Vacation mode will be cancelled while sleep function will be activated, and vice versa.
flowchart
graph TD
    A["Turn on the unit, without turning on 46°F Vacation mode"] --> B["Press "FUNCTION" button into 46°F Vacation mode"]
    B --> C["Press "SWING/ENTER" button to turn on 46°F Vacation mode"]
    C --> D["Press "SWING/ENTER" button to turn 46°F Vacation mode"]
    D --> E["Press "FUNCTION" button into 46°F Vacation mode"]
Fig. 18 46 °F Vacation mode Setting
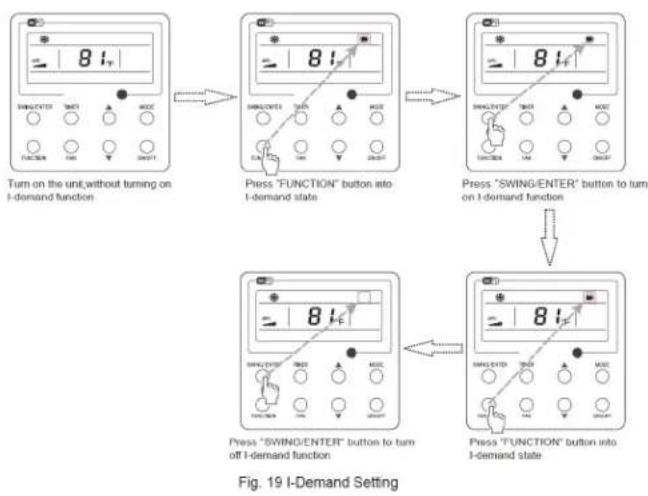
3.16 I-Demand Setting
- I-Demand on: Press and hold FUNCTION when the unit is "ON" till the unit enters the I-Demand setting interface. Press SWING/ENTER to confirm the setting.
- I-Demand off: When the I-Demand function is activated, press FUNCTION to enter the I-Demand setting interface. After that, press SWING/ENTER to cancel this function.
NOTE:
- This function is only available in cooling mode.
- When this function has been set, set temperature is displayed as SE. In this case, the unit will adjust the set temperature automatically to the factory setting and fan will be at lower speed.
- This function will be cancelled when switching modes
- This function and sleep function cannot be on simultaneously. If I-demand function is set at first and then sleep/quiet function is set after, I-demand function will be cancelled while sleep function will be activated, and vice versa.
flowchart
graph TD
    A["Turn on the unit, without turning on I-demand function"] --> B["Press 'FUNCTION' button into I-demand state"]
    B --> C["Press 'SWING/ENTER' button to turn on I-demand function"]
    C --> D["Press 'FUNCTION' button into I-demand state"]
    D --> E["Press 'SWING/ENTER' button to turn off I-demand function"]
3.17 WiFi Function Setting
- "Gree+" APP can be used to control it. Please scan the QR code to download it. APP can only set some common functions of WiFi wired controller: ON/OFF, mode, set temperature, FAN speed, etc.
- When using the APP for the first time, please reset the WiFi function of remote controller (reset WiFi to ex-factory setting): Under off status, press "FUNCTION" + "FAN" combination buttons on the wired controller for 5s. Once "oC" is displayed, this indicates that reset was successful.
- If there is a communication failure for WiFi, after resetting WiFi, the temperature display area of wired controller displays "JF" for 5 seconds, which indicates that the current reset is invalid.
Wired Controller (Continued)
- Press FUNCTION under on state of the unit till the unit enters the WiFi setting interface, the temperature area will display the WiFi status. Press “▲” or “▼” button to turn on WiFi("ON" is displayed) or turn off WiFi ("OFF" is displayed), and then press "SWING/ENTER" button to confirm it.
NOTE:
- WiFi can be only be reset or turned off by the buttons on the wired controller, not the remote controller.
- WiFi networking performance is related to the distance between the wired controller and the router and the obstacles between them. During the installation process, the distance between the wired controller and the router should be as close as possible, and the obstacles should be as little as possible.
- If the WiFi signal is weak, use a WiFi repeater or more powerful router.
- The specific situation depends on the actual installation.
3.18 Other Functions
(1). Lock-out
- If there are no malfunctions, during "ON" or "OFF" state of the unit, press ▲ and ▼ at the same time for 5s till the wired controller enters the Lock-out function. In this case. LCD displays □. After that, repress these two buttons at the same time for 5s to disable this function.
- Under the Lock-out state, any other button press won't get any response.
(2). Memory
- Memory switchover: Under the "OFF" state of the unit, press Mode and ▲ at the same time for 5s to switch memory states between memory on and memory off. When this function is activated, Memory will be displayed. If this function is not set, the unit will be under the "OFF" state after power failure and then power recovery.
- Memory recovery: If this function has been set for the wired controller, the wired controller after power failure will resume its original running state upon power recovery.
- Memory contents: ON/OFF, Mode, set temperature, set fan speed and Lock-out function.
(3). Selection of the Temperature Sensor
- Under OFF state of the unit, press both "FUNCTION" and "TIMER" for five seconds to go to the commissioning status. Under this status, adjust the display in the temperature display area to "00" through the button "MODE", and then adjust the option of the temperature
sensor in the timer display area through the button ▲ or ▼.
- Indoor ambient temperature is sensed at the return air inlet (01 in the timer display area).
- Indoor ambient temperature is the sensed at the wired controller (02 in the timer display area).
- Select the temperature sensor at the return air inlet under the cooling, dry and fan modes while select the temperature sensor at the wired controller under the heating and auto modes. (03 in the timer display area)
- Select the temperature sensor at the wired controller under the cooling, dry and fan modes, and select the temperature sensor at the return air inlet under the heating mode and auto modes (04 displayed in the timer display area).
(4). Selection of the Fan Speed
- Under OFF state of the unit, press both the buttons "FUNCTION" and "TIMER" for five seconds to go to the commissioning status, and then adjust the display in the temperature display area to 01 through the button "MODE" and adjust the setting of the fan speed, which comes to two options.
01: Three low fan speeds; 02: Three high fan speeds.
NOTE:
- After connected with indoor unit, if the type of ambient temperature sensor has not been manually set, the wired controller will select the ambient temperature sensor according to the model of connected IDU; if it connects to Slim Duct type IDU, duct type IDU, floor ceiling type IDU, ceiling type IDU, it will adopt ③, otherwise it will adopt ①. If the type of ambient temperature sensor is set manually, the wired controller will be subject to the manual setting, and will not set according to automatic IDU model selection.
- After setting, press "SWING/ENTER" to make a confirmation and quit this setting status
- Pressing the button "ON/OFF" also can quit this commissioning status but the set data won't be memorized
- Under the commissioning status, if there are no new inputs for 20 seconds, it will go back to the previous state without memorizing the current data.
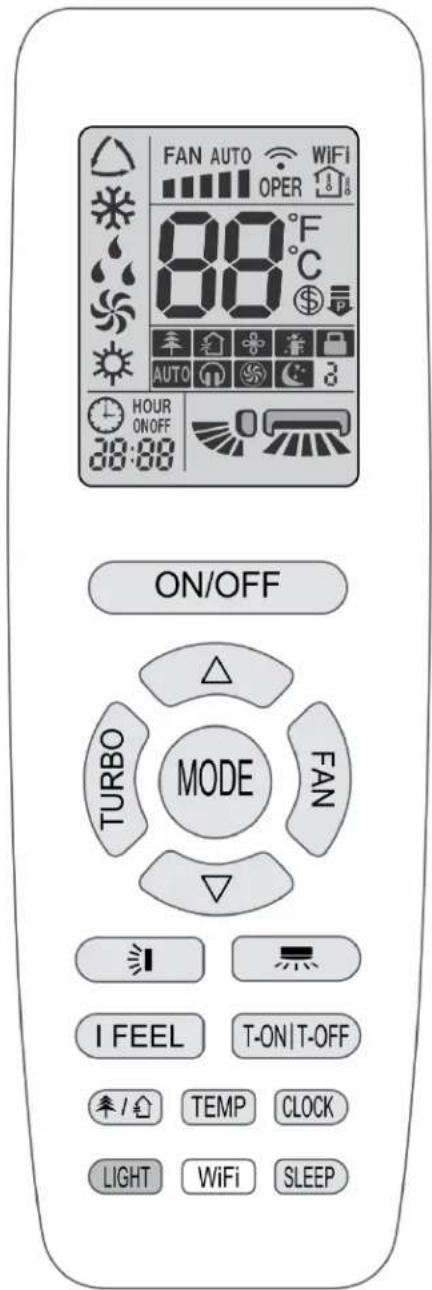
Buttons on remote controller Introduction for icons on display screen
⚠️ DISCLAIMER
All functions are not available for this unit.
 | I-FEEL | |
F   | Set fan speed | |
| [DWSG] | Turbo mode | |
 | Send signal | |
| Operation mode |  | Auto mode |
| [STD2] | Cool mode | |
 | Dry mode | |
 | Fan mode | |
 | Heat mode | |
 | Sleep mode | |
 | 46°F Vacation mode | |
| [WZAK] | Power limiting operation | |
| [H6BY] | Not available | |
 | Not available | |
 | X-FAN function | |
 | Set temp. | |
 | Indoor ambient temp. | |
 | Not available | |
| [TYPE67] type | ||
 | ||
 | Clock | |
 | Set temperature | |
 | WiFi function | |
 | Set time | |
 F F | TIMER ON / TIMER OFF | |
 | Left & right swing | |
| [IWW4Y] | Up & down swing | |
| [2TTA] | Remo te lock-out | |
 | Quiet |
OPERATION OF REMOTE CONTROLLER (Continued)
Introduction for buttons on remote controller
NOTE
- This is a general use remote controller. It could be used with multiple GREE multi-functional models. If a function is not available on your model, pressing the button will have no effect.
- After turning the power on, the unit will give out a sound. When the power indicator light “ U ” is on, you can operate the system using the remote controller.
- The signal icon “# will blink once and emit a “di” sound when the ON button is pushed. This indicates a signal has been sent to the unit to turn on.
ON/OFF
Press this button to turn on the unit. Press this button again to turn off the unit.

Press this button to select your required operation mode.
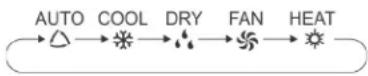
- When selecting the auto mode, the unit will operate automatically according to the factory settings. Press "FAN" button to adjust fan speed. Press "☐" / "☐" button to adjust the fan blowing angle.
- After selecting "COOL", the unit will operate under cool mode. Press the "△" or "▽" button to adjust the set temperature. Press "FAN" button to adjust fan speed. Press "■/ " ▶button to adjust fan blowing angle.
- When selecting DRY mode, the air conditioner operates at low speed under DRY mode. Under DRY mode, fan speed can't be adjusted. Press “/” button to adjust fan blowing angle.
- When selecting "FAN", the unit will operate in a "fan only" mode (no heating or cooling), and all indicators will be off. When All indicators are off, press "FAN" button to adjust fan speed. Press "☐ / " ☐ button to adjust fan blowing angle.
- When selecting "HEAT", the air conditioner operates under heat mode. Press "△" or "▼" button to adjust set temperature. Press "FAN" button to adjust fan speed. Press "≡/ " ▶ button to adjust fan blowing angle.
NOTE
- When selecting the HEAT mode, there will be a 1-5 minute delay to allow the coil to warm up before the fan blows. This prevents cold air blowing at start up.
- Set temperature range from remote controller: 16-30 °C (61-86°F);
- Under AUTO, temperature can be displayed and adjusted.
FAN
Pressing this button can set fan speed circularly as: auto (AUTO), low ( ), medium ( ), high ( ).

NOTE
- Under AUTO speed, the system will select proper fan speed automatically according to factory default setting.
- It's low fan speed under DRY mode.
- X-FAN function: Holding fan speed button for 2s in COOL or DRY mode, the icon "8" is displayed and the indoor fan will continue operation for a few minutes to dry the indoor coil, even though you have turned off the unit. After start-up, X-FAN OFF is defaulted. X-FAN is not available in AUTO, FAN or HEAT modes.
This function helps remove moisture on evaporator of indoor unit after the unit is stopped.
- Having set X-FAN function on: After turning off the unit by pressing ON/OFF button, indoor fan will continue running for a few minutes at low speed. In this period, hold fan speed button for 2s to stop indoor fan.
Turn off the X-FAN function by pressing the ON/OFF button.
OPERATION OF REMOTE CONTROLLER (Continued)
TURBO
Under COOL or HEAT mode, press this button to turn to quick COOL or quick HEAT mode. "icon is displayed on remote controller. Press this button again to exit turbo function and "icon will disappear. This function will allow the unit to run at very high fan speed to reach the desired temperature.
△/▽
- Press “△” or “▽” button to increase or decrease the set temperature 1 °C(2°F). Hold “△” or “▽” button for 2 Sec, set temperature on remote controller will change quickly. Temperature indicator on indoor unit will change accordingly.
- When setting T-ON, T-OFF or CLOCK, press “△” or “▽” button to adjust time. (Refer to CLOCK, T-ON, T-OFF buttons)

Press this button to select left & right swing angle. Fan blowing angle can be selected circularly as below:
flowchart
graph TD
    A["Start"] --> B["Step 1"]
    B --> C["Step 2"]
    C --> D["Step 3"]
    D --> E["Step 4"]
    E --> F["Step 5"]
    F --> G["Step 6"]
    G --> H["Step 7"]
    H --> I["Step 8"]
    I --> J["Step 9"]
    J --> K["Step 10"]
    K --> L["Step 11"]
    L --> M["Step 12"]
    M --> N["Step 13"]
    N --> O["Step 14"]
    O --> P["Step 15"]
    P --> Q["Step 16"]
    Q --> R["Step 17"]
    R --> S["Step 18"]
    S --> T["Step 19"]
    T --> U["Step 20"]
    U --> V["Step 21"]
    V --> W["Step 22"]
    W --> X["Step 23"]
    X --> Y["Step 24"]
    Y --> Z["Step 25"]
NOTE
- Press this button continuously more than 2s, the louver will swing back and forth from left to right, when you release the button, the louver will stop swinging at its present position.
- Under left and right swing mode, when the status is switched from off to pressing this button again for 2s and status will switch to off status; pressing this button again for 2s, will change the swing status according to the sequence shown above.
• This function is not available for this unit
1
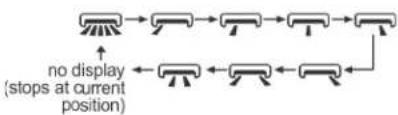
Press this button to select up & down swing angle. Fan angle can be selected circularly as below:
flowchart
graph LR
A["0"] --> B["-0"] --> C["0"] --> D["0"] --> E["0"]
F["0"] <--_G["0"] <--_H["0"] <--_I["0"] <--_J["0"]
style A fill:#f9f,stroke:#333
style B fill:#f9f,stroke:#333
style C fill:#f9f,stroke:#333
style D fill:#f9f,stroke:#333
style E fill:#f9f,stroke:#333
style F fill:#f9f,stroke:#333
style G fill:#f9f,stroke:#333
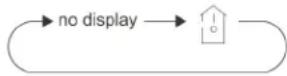
note right of F: "no display (horizontal louvers stops at current position)"
note right of G: "(Horizontal louvers stops at current position)"
- Select “” to select automatic fan circulation. Horizontal louver will automatically swing up & down at maximum angle.
- Select “-” and “an” modulation will stop at that fixed position. Horizontal louver will stop at the fixed position.
- Select “”, will not modulate but blow at a fixed angle.
- Hold "button more than 2s to set your required swing angle. When reaching your desired angle, release the button.
NOTE
- Pressing this button continuously for more than 2s, the louver will swing back and forth from up to down, release the button, will stop the louver at the desired position.
- Under up and down swing mode, when the status is switched from off to ▶ Pressing this button again for more than 2s will turn off the ▶ Status. Pressing again within 2s, will change the swing status to the diagram above.
• This function is not available for this unit
T-ON | T-OFF
- T-ON button
"T-ON" button will set the time for timer on. After pressing this button, "◎" icon disappears and the word "ON" on remote controller blinks. Press "△" or "▽" button to adjust T-ON setting. After each pressing "△" or "▽" button, T-ON setting will increase or decrease 1min. Hold "△" or "▽" button, 2s longer and the time will change quickly until reaching your desired time. Press "T-ON" to confirm. The word "ON" will stop blinking. "◎" icon resumes displaying. Cancel T-ON: If T-ON is initiated, press "T-ON" button to cancel it.
- T-OFF button
"T-OFF" button will set the time for timer off. After pressing this button, "💡" icon disappears and the word "OFF" on remote controller blinks. Press "△" or "▽" button to adjust T-OFF setting. After each press of the "△" or "▽" button, T-OFF setting will increase or decrease 1 min. Holding the "△" or "▽" button for more than 2s the time will change quickly until reaching your desired time. Press "T-OFF" and "OFF" will stop blinking. "💡" icon resumes displaying. To cancel T-OFF when it's on, "T-OFF" button to cancel it.
OPERATION OF REMOTE CONTROLLER (Continued)
NOTE
- Under status, you can set T-OFF or T-ON simultaneously.
- Before setting T-ON or T-OFF, please set the clock.
- After starting T-ON or T-OFF, set to "circulating" mode.
- Your unit will be turned on or turned off according to setting. ON/OFF button has no effect on setting. If you don't need this function, please use remote controller to cancel it.
I FEEL
Press this button to start I FEEL function and “.” will be displayed on the remote controller. When set, the remote controller will send the detected ambient temperature to the controller and the unit will automatically adjust the indoor temperature according to the detected temperature. Press this button again to cancel I FEEL function and “.” will disappear.
- Put the remote controller near the user when this function is set. Avoid putting the remote controller near an object of high or low temperature. When I FEEL function is turned on, the remote controller should be put where the indoor unit can receive the signal sent by the remote controller.
CLOCK
Press this button to set clock time. “💡” icon on remote controller will blink. Press “△” or “▼” button within 5s to set clock time. Pressing the “△” or “▼” button, clock time will increase or decrease 1 min. If you hold “△” or “▼” button for longer than 2s the time will change rapidly. Release this button when reaching your required time. Press “CLOCK” button to confirm the time. “💡” icon stops blinking.
NOTE
• This is a 24 hour clock.
- A delay of more than 5s in setting the ON and OFF times will cancel the set-up and you will have to start over. Operation for TIMER ON/TIMER OFF is the same.
SLEEP
Under COOL or HEAT mode, press this button to start up sleep function. "©" icon is displayed on remote controller. Press this button again to cancel sleep function and "©" icon will disappear.
NOTE
- During this procedure, if no button is pressed within 10 seconds, remote controller will automatically exit the sleep curve setting and resume original display. If ON/OFF, SLEEP, COOLING or HEATING button is pressed during the setting or inquiry procedure, remote controller will also exit the sleep curve setting.
LIGHT
Press this button to turn off display light on indoor unit. "icon on remote controller disappears.
Press this button again to turn on display light. "O" icon is displayed.
TEMP
Press this button to see the indoor set temperature on the unit's display. The setting on remote controller is selected circularly as below:
Function introduction for combination buttons
Energy-saving function
Under COOL mode, press "TEMP" and "CLOCK" buttons simultaneously to start up or turn off energy-saving function. When energy-saving function is started up, "SE" will be shown on remote controller, and the unit will adjust the set temperature automatically, to the factory setting, to achieve maximum energy savings. Press "TEMP" and "CLOCK" buttons simultaneously again to exit energy-saving function.
NOTE
- Under energy-saving function, fan speed defaults to Auto and can't be adjusted.
- Under energy-saving function, you cannot adjust Fan speed or use TURBO.
- If the energy-saving function has been set in the COOL mode, pressing the "SLEEP" button will cancel energy-saving. If the SLEEP function has been set in the COOL mode, starting the energy-saving function will cancel SLEEP.
Vacation mode (freeze guard) Heating in 8°C mode or 46°F mode
In the HEAT mode, press "TEMP" and "CLOCK" buttons simultaneously to start up or turn off this heating function. When this function is started up, "\$" and "46°F (8°C)" will be shown on remote controller, and the space will not fall below 46°F (8°C). Press "TEMP" and "CLOCK" buttons simultaneously again to exit "46°F (8°C)" heating function.
NOTE
- Under 46^ (8°C) heating function, fan speed is defaulted at auto speed and it can't be adjusted.
- Under 46°F (8°C) heating function neither the temperature nor the fan speed can be adjusted. "TURBO" will not work either.
- Sleep function and 46°F (8°C) heating function can't operate at the same time. If 46°F (8°C) heating function has been set under heat mode, pressing the "SLEEP" button will cancel 46°F (8°C) heating function. If sleep function has been set under heat mode, initiating the 46°F (8°C) heating function will cancel SLEEP function.
Remote lock-out
Press “△” or “▽” simultaneously to turn on or turn off Remote lock-out. When Remote lock-out is on, “■” icon is displayed on remote controller. If you operate the remote controller, the “■” icon will blink three times without sending signal to the unit.
Temperature display switchover function
Under OFF status, press “▽” and “MODE” buttons simultaneously to switch temperature display between °C and °F.
Replacing batteries in remote controller
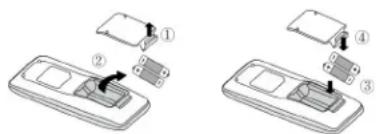
Fig 1 Fig 2
- Lift the cover along the direction of arrow (as shown in Fig 1 ①).
- Take out the original batteries (as shown in Fig 1 ②).
- Place two (AAA 1.5V) dry batteries, and make sure the position of “+” polar and “-” polar is correct (as shown in Fig 2 ③).
- Reinstall the cover (as shown in Fig 2 ④).
NOTICE
- During operation, point the remote control signal sender at the receiving window on indoor unit.
- The distance between signal sender and receiving window should be no more than 26 ft and there should be no obstacles between them.
- Other electronics may interfere with the remote signal, remote controller should be close to indoor unit during operation.
- Replace batteries with an equivalent model when replacement is required.
- When you don't use remote controller for a long time, take out the batteries.
- If the display on remote controller is fuzzy or there's no display, replace batteries.
CARE AND CLEANING

WARNING
- Turn off the air conditioner and disconnect the power before cleaning the air conditioner to avoid electric shock.
- Do not wash the air conditioner with water to avoid electric shock.
- Do not use volatile liquid to clean the air conditioner.
- Do not use liquid or corrosive detergent to clean the appliance and do not splash water or other liquid on it to avoid damaging the plastic components or causing an electric shock.
Clean surface of indoor unit
Only a qualified service person is allowed to perform maintenance.
Before accessing to terminal devices, all power supply circuits must be disconnected.
Clean the filter and the outside panels with warm water, and do not use excessive heat to dry.
NOTE
① Do not operate the air conditioner with the filter uninstalled, otherwise dust would come into the unit.
② Do not remove the air filter except for cleaning. Unnecessary handling may damage the filter.
③ Do not clean the unit with gasolene, benzene, thinner, polishing powder or liquid insecticide, otherwise it would cause discoloration and deformation of the unit.
④ Do not wet the indoor unit in case of electric shock or fire hazard.
Increase the frequency of cleaning if the unit is installed in a room where the air is extremely contaminated. (As a yardstick for yourself, consider cleaning the filter once a half year.)
If dirt becomes impossible to clean, change the air filter.
TROUBLESHOOTING
General problem analysis
Please check below items before asking for maintenance. If the problem still can't be eliminated, please contact local dealer or qualified professionals.
| Problem Check | items Solution | |
| Indoor unit isn't receiving the remote controller signal. | Interference from static electricity | Disconnect power at breaker for 3 minutes. |
| Is the remote controller within the signal receiving range? | Signal receiving range is 26 ft. | |
| Are there any obstacles? | The remote needs to have a clear path to the indoor unit receiver. | |
| Is the remote controller pointing at the receiving window? | Select proper angle and point the remote controller at the receiving window on indoor unit. | |
| Is sensitivity of remote controller low; fuzzy display or no display? | Check the batteries. If the power of batteries is too low, pleasereplacethem. | |
| No display when operating remotecontroller? | Check whether remote controller appears to be damaged. If yes, replace it. | |
| Electronic Interference? | Take the remote controller close to indoor unit. Turn off other electronics and then try it again. | |
| No air coming from indoor unit | Air inlet or air outlet of indoor unit is blocked? | Eliminate obstacles. |
| In the HEAT mode, has the indoor temperature reached the set temperature? | After reaching set temperature, the indoor fan will stop. | |
| You just turned on the HEAT mode. | In order to prevent cold air from blowing out it may take several minutes before the fan starts. This is normal. | |
| Air conditioner isn't coming on | Power failure? Wait until power recovery. | |
| Loose wiring? | Contact your contractor or an electrician. | |
| Circuit breaker has tripped or fuse is burnt out? | Ask professional to replace circuit breaker or fuse. | |
| Wiring is overheating or needs repair. | Ask professional to replace it. | |
| Unit has restarted immediately after stopping operation? | Turn the unit off, wait 3 minutes then turn it back on. | |
| Does the remote controller show the correct setting? | Reset the function. | |
| Mist coming from indoor unit's air outlet | Indoor temperature and humidity is high? | Happens when the indoor air is cooled rapidly. After a while, indoor temperature and humidity will be decrease and mist will disappear. |
| Problem Check | items Solution | |
| Strange smells? | Look for the source of the odor; rugs, furniture, cigarettes, etc. | Eliminate the odor source. Clean the filter. |
| Can't adjust the "Set" temperature | Yourrequiredtemperature exceeds the set temperature range? | Set temperature range: 16°C-30°C (61°F-86°F). |
| Cooling / Heating is insufficient. | Voltage is too low? | May require calling an HVAC technician. |
| Filter is dirty? | Clean the filter. | |
| Set temperature is in proper range? | Adjust temperature to proper range. | |
| Door and window are open? | Close door and window. | |
| Air conditioner operates abnormally | Is there inte rference, such as lightning, wireless devices, etc. | Disconnect power, put back power, and then turn on the unit again. |
| "Water flowing" noise | The unit has just been turned on or off. | The noise is the sound of refrigerant flowing inside the unit, which is a normal. |
| Cracking noise | The unit has just been turned on or off. | This is the sound of friction caused by expansion and/or contraction of panel or other parts due to temperature changes. |
| Air guide louver can't be closed normally | Did you try to adjust the air guide louver manually? Did it stick during normal operation? | Disconnect the power for 3s and then connect the power; if the problem still exits, call an HVAC technician to resolve. |
WARNING
■ When the following occurs, turn the unit off and disconnect power immediately, contact your installing contractor or a licensed HVAC technician.
• Power supply wiring is overheating or damaged.
- There's abnormal sound during operation.
• Circuit breaker trips off frequently.
• Air conditioner gives off burning smell.
- Indoor unit is leaking.
■ Do not try to service or repair the unit yourself.
If the unit operates abnormally it may cause internal or external damage, electric shock or become a fire hazard.
ENERGY SAVING TIPS
- Reduce room setpoint at night: During the night hours, you don't require the same level of conscious cooling or heating. Try using Sleep Mode to gradually relax room temperature and allow the unit to run less and save energy.
- Curtains and shades: In the summer, it is recommended to block the effects of the sun. Close window curtains and shades on the south and west side of your home to help block solar heat. In winter, the sun is your friend. Open curtains and shades to allow solar heat into your room.
- Close doors: If you don't need to heat and cool your whole home, confine the heating and cooling to one room by closing doors.
- Service the unit: Some basic maintenance might be all you need. The outdoor unit will greatly benefit from a good hosing off, leaves, grass clippings and other debris can stick to coil fins and make the unit work up to 15% harder!
- Rearrange the room: Furniture that obstructs the airflow, needs to be removed or rearranged accordingly.
- Try 75 degrees: 75^ is a good point for an air conditioner to run at its optimal performance level. Even a 5-degree change in temperature can make your unit use up to 40% more energy.
- Lighting: Turning lights off can help reduce your heat. Each light bulb is a tiny heater. Your air conditioner must waste energy overcoming the heat from your lights to reach and hold your desired room temperature.
- Zero occupancy: During zero occupancy turn your unit to Auto mode and make sure windows and curtains are closed. Although room temperature may be less than optimal for a few minutes when you return, the unit will soon have the room back to your desired temperature.
- Don't forget the fan: The fan is much like a car. The faster it runs, the more energy it uses. Try saving money by using the comfortable quiet low fan speed as much as possible.
REGISTRATION
FOR WARRANTY SERVICE OR REPAIR:
Contact your installing contractor. You may find the installer's name on the equipment or in your Owner's packet or on your invoice.
https://www.greecomfort.com/warranty-program/#registration
COMPLETE THE PRODUCT REGISTRATION BELOW:
Keep this for your files.

PRODUCT REGISTRATION:
Indoor Model No: ____ Serial No: ____
Outdoor Model No: ____ Serial No: ____
Owner Name: ____ Date of Installation: ____
Address of Installation: Installing Contractor: ____
Address: ____
Phone No. / E-mail: ____
WARRANTY
For current warranty information please visit https://gree-comfort-dev.web.app/warranty-program/


GREE
Air comfort for all
U.S. CONTACT INFORMATION TRADEWINDS, LLC
E-mail: info@twciimate.com
Contractor Support: 888-850-7928 | Mon-Fri 8 AM - 5 PM EST
GREECOMFORT.COM