MKW-10M - Coffee maker MPM - Free user manual and instructions
Find the device manual for free MKW-10M MPM in PDF.


| Brand | MPM |
| Model | MKW-10M |
| Product Type | Automatic Coffee Machine (Bean-to-Cup) |
| Voltage | 220-240 V ~ 50/60 Hz |
| Water Tank Capacity | 1.5 L |
| Bean Hopper Capacity | 250 g |
| Grounds Container Capacity | 15 servings |
| Milk Container Capacity | 0.5 L |
| Pump Pressure | 15 bar |
| Grinder | Adjustable ceramic burr grinder |
| Control Panel | Touch buttons with indicator lights |
| Functions | Espresso, Americano, Latte Macchiato, Cappuccino, Hot Water |
| Milk Frothing | Automatic milk frother with container |
| Programmable Volume | Yes, for coffee, milk foam, and hot water |
| Operating Modes | Default, ECO, Fast |
| Self-Cleaning | Yes, with descaling indicator |
| Auto Shut-Off | Adjustable (10, 20, 30 minutes) |
| Included Accessories | Cleaning brush, needle, milk container, cleaning product packs |
| Manual Languages | EN, DE, PL, RU, and more |
| Safety Features | Grounded plug, automatic shut-off, child safety precautions |
Frequently Asked Questions - MKW-10M MPM
User questions about MKW-10M MPM
0 question about this device. Answer the ones you know or ask your own.
Ask a new question about this device
Download the instructions for your Coffee maker in PDF format for free! Find your manual MKW-10M - MPM and take your electronic device back in hand. On this page are published all the documents necessary for the use of your device. MKW-10M by MPM.
USER MANUAL MKW-10M MPM
natural_image
Modern coffee machine with glass cup and digital display, next to a clear glass tea jar (no visible text or symbols)Automatyczny ekspres do kawy MKW-10M Automatic coffee maker/Автоматическая экспресс-кофеварка/Kaffeevollautomat
PRZED PIERWSZYM UŻYCIEM ZAPOZNAJ SIĘ Z INSTRUKCJĄ OBSŁUGI
PL INSTRUKCJA OBSŁUGI....3
EN USER MANUAL 21
RU ИНСТРУКЦИЯ ПО ОБСЛУЖИВАНИЮ....37
natural_image
Line drawing of a portable coffee machine with a side view showing its lid and base (no text or symbols)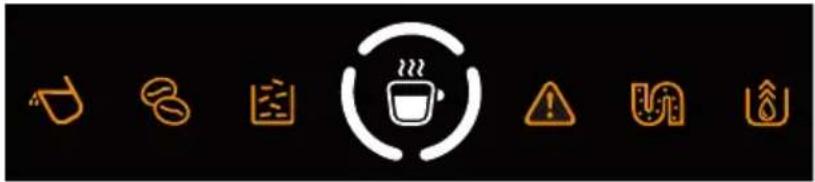
natural_image
Row of seven orange warning icons on black background, including coffee cup, gear, gear, and warning symbol (no text or labels)
natural_image
Five circular icons representing different kitchen utensils or containers (no text or symbols)
natural_image
Line drawing of a coffee maker with a cup and a container, showing a coffee cup being inserted (no text or symbols)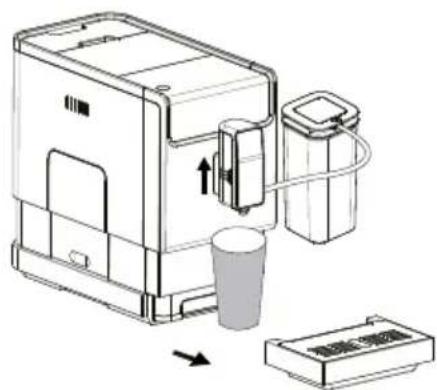
natural_image
Illustration of hands assembling a small mechanical component with a black arrow indicating the process (no text or symbols present)natural_image
Illustration of hands using a tool to adjust a component in a container (no text or symbols)natural_image
Illustration of a hand holding a pen with an arrow pointing to a device component (no text or symbols present)natural_image
Line drawing of a hand inserting a plug into a device component (no text or symbols)natural_image
Technical line drawing of a mechanical device with a checkmark indicating approval (no text or symbols present)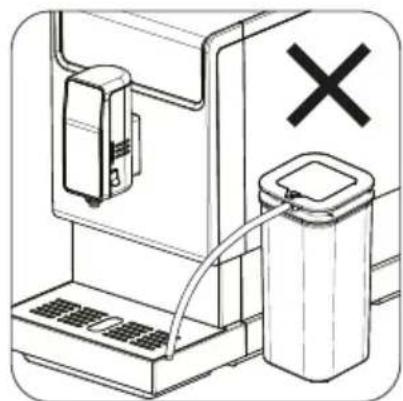
natural_image
Diagram of a device with a switch and battery, no text or symbols presentnatural_image
Line drawing of a modern coffee machine with a cup and tray, no text or symbols presentnatural_image
Line drawing of a mechanical device with a checkmark and a trash bin (no text or symbols)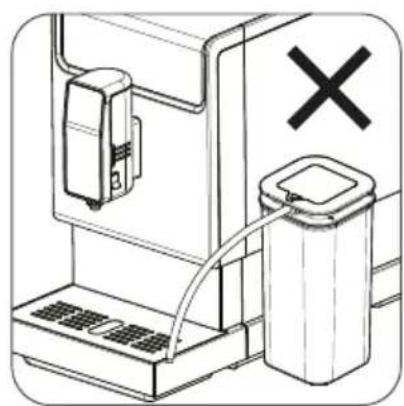
natural_image
Diagram of a mechanical device with a switch and battery, no text or symbols presentGORACA WODA
natural_image
Technical line drawing of a device with internal components and a base component, showing no text or symbols.Wskazówki:
natural_image
Two-step diagram showing hand holding a device with arrows indicating movement, no text or symbols present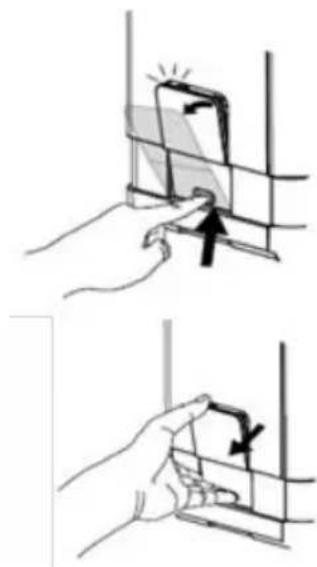
natural_image
Two-step diagram showing hand positioning of a device with arrows indicating motion (no text or symbols)Wskazówki:
natural_image
Illustration of a hand inserting a plug into a device component (no text or symbols visible)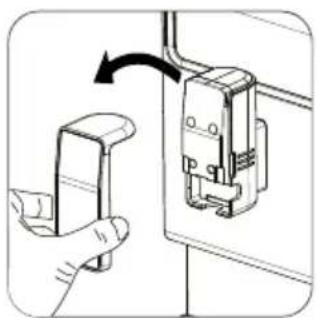
natural_image
Illustration of a hand holding a doorbell with an arrow indicating rotation (no text or symbols)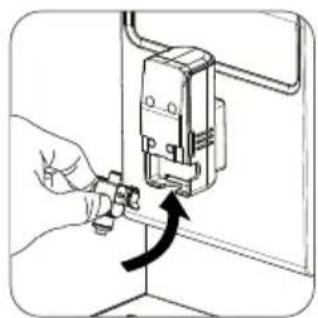
natural_image
Illustration of a hand using a tool to adjust or install an electrical component, with no visible text or symbols.natural_image
Mechanical assembly diagram showing two connected components with a rotation arrow (no text or symbols)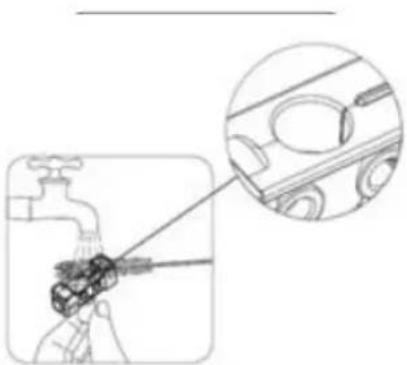
natural_image
Illustration of a hand holding a tool near a faucet, with an inset showing a close-up of the tool (no text or symbols present)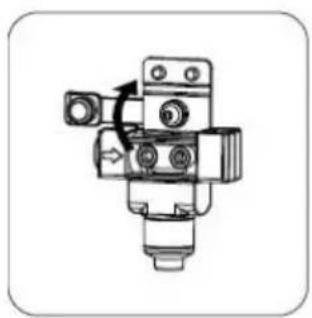
natural_image
Mechanical component diagram showing a valve assembly with no visible text or symbolsnatural_image
Diagram of two mechanical components with directional arrows indicating movement (no text or symbols)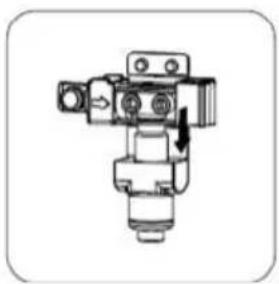
natural_image
Mechanical valve assembly diagram with no visible text or symbols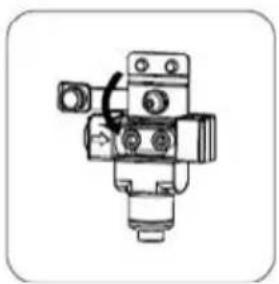
natural_image
Mechanical component diagram showing a valve assembly (no text or symbols visible)natural_image
Illustration of a hand using a tool to adjust or install an electrical component, no text or symbols presentCZYSZCZENIE POJEMNIKA NA MLEKO I RURKI DO MLEKA
natural_image
Line drawing of a hand holding a pen, no text or symbols present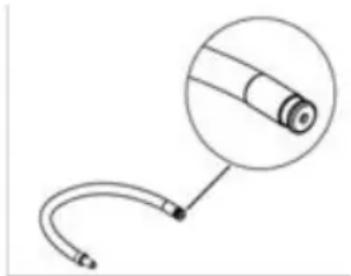
natural_image
Simple line drawing of a medical or laboratory probe with a curved tube and a magnified inset showing the cable (no text or symbols)natural_image
Illustration of a hand inserting a device into a wall, showing light and dark components (no text or symbols)natural_image
Hand holding a small mechanical component or tool, possibly a valve or connector (no text or symbols visible)Read the instructions carefully before use.
Do not immerse the device, cable or plug in water or other liquids!
Take special care when children are near the device!
Fill the tank only with cold water.
- Never use a damaged device, including one with a damaged cord or plug, in which case have it repaired at an authorised service centre.
Use of accessories not recommended by the manufacturer may cause damage to the device, fire or personal injury.
Do not hang the cable on sharp edges or allow it to come into contact with hot surfaces.
Do not use the device outdoors.
Before cleaning, first unplug the device from the mains socket and wait until it has cooled down completely.
Never leave the device connected to a power source unattended.
Do not start the device without water.
Do not place the device near electric or gas cookers, burners, ovens, etc.
▶ Always unplug when not in use or before cleaning.
The device should be switched off when finished working!
Do not use the device for purposes other than those for which it was intended.
The device is intended for domestic use only.
The device should be connected to a mains socket outlet with a grounding pin.
This equipment may be used by children of at least 8 years of age and by persons of diminished physical, mental capacity and lack of experience and knowledge of the equipment if supervision or instruction is provided regarding the safe use of the equipment so that the hazards involved are understood. Unsupervised children should not perform cleaning and maintenance on the equipment.
- Keep the device and its cord out of reach of children under 8 years of age.
Children should be supervised to ensure that they do not play with the equipment/device.
The temperature of the device's surfaces may be higher during operation.
▶ Use the device on a smooth and stable surface.
Do not pull the plug out of the power socket by pulling the cord.
Do not connect the plug to the power socket with wet hands.
For the safety of children, please do not leave freely accessible parts of the packaging (plastic bags, cardboard boxes, polystyrene, etc.).
▶ Use the grinder only for grinding coffee beans.
Do not place the device on a hot or wet surface.
WARNING! Do not allow children to play with the film. Danger of suffocation!

CAUTION! Hot surface!
DEVICE DESCRIPTION
GENERAL DESCRIPTION
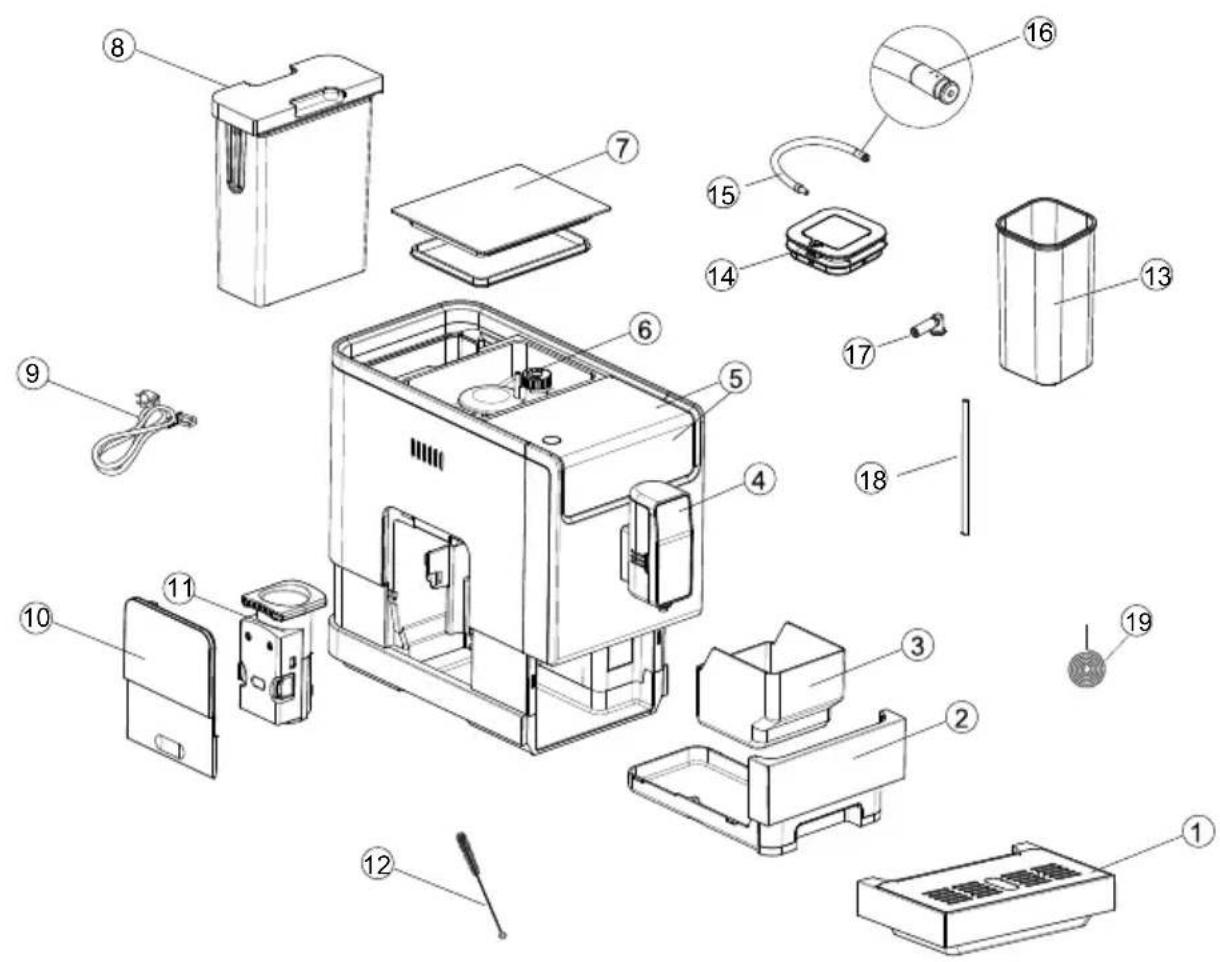
- External drip tray
- Internal drip tray
- Grounds container
- Adjustable coffee dispenser
- Control panel
- Coffee bean compartment
- Coffee bean compartment lid
- Water tank
- Power cable
-
Service doors
-
Brewer
- Cleaning brush
- Milk container
- Milk container lid
- Milk duct
- Milk duct connector
- Rubber connector
- Milk duct
- Needle
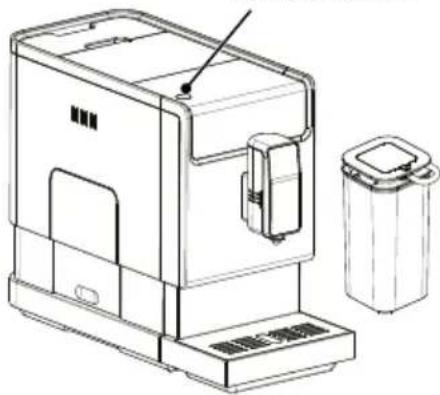
Power on/off button
natural_image
Line drawing of a portable coffee machine with a side view showing a lid and base (no text or symbols)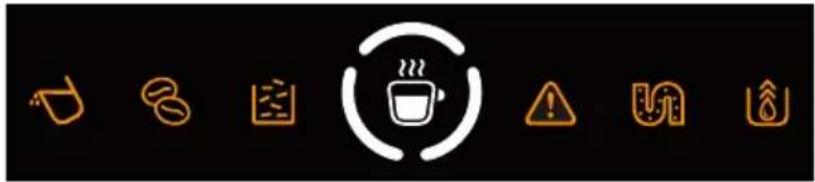
natural_image
Row of seven orange warning icons on black background, including coffee cup, gear, gear, and warning symbol (no text or labels)
natural_image
Five black circular icons representing kitchen utensils: water droplet, refresh, toilet, microwave, and cup (no text or symbols)
Blinks: Low water level / No water tank

No coffee beans

Lights up continuously: the grounds container is full Blinks: The internal drip tray / grounds container is missing

Lights up continuously: brewer is missing / not installed correctly Blinks: The service door is open / incorrectly fitted

Lights up continuously: requires descaling Blinks: Removal of limescale in progress

The system emptying function is activated

Power on/off button

Espresso/americano button

Cappuccino button

The box contains three packs of cleaning products for the self-cleaning process.
INSTALLATION OF THE DEVICE
| 1. Choose a safe and stable surface with an easily accessible power source and allowing a minimum distance from the sides of the device (figure 1). | 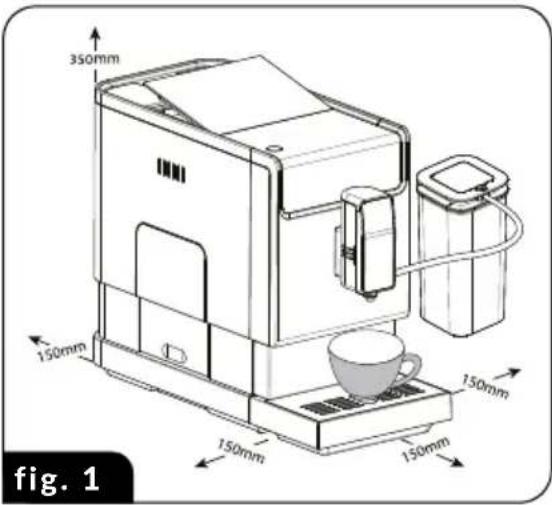 |
| 2. Insert the external drip tray. Make sure it is inserted correctly. | 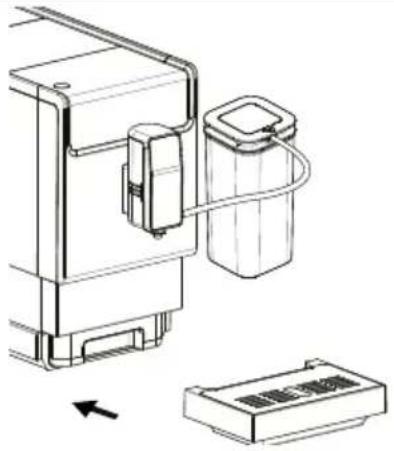 |
| 3. Lift the water tank using the lid as a handle. | 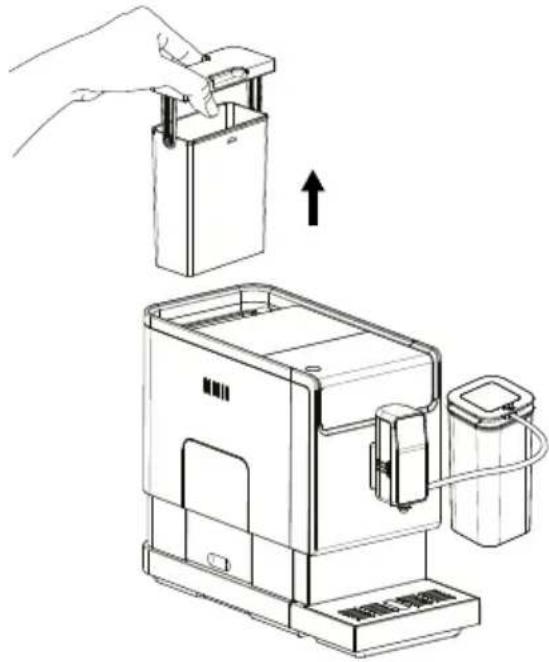 |
| 4. Fill the water tank with water to Max level and place it back in the device.Caution! To prevent the water tank from overflowing or flooding the device, do not pour water directly into the device using another container. | 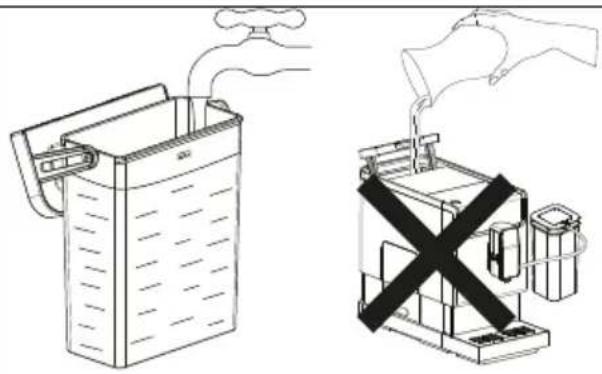 |
IMPORTANT! Never fill the tank with warm, hot, carbonated water or any other liquid that may damage the water tank and the device
| 5. Remove the coffee container lid. | 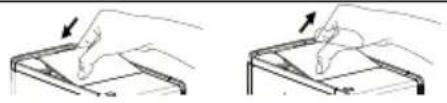 | |
| 6. Fill the container with coffee beans.IMPORTANT! Fill the bean hopper only with coffee beans. Ground coffee, instant coffee, caramelised coffee and other objects can damage the device. | 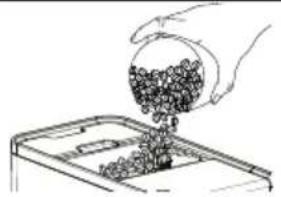 | |
| 7. Replace the container lid. | |
| 8. Straighten the power cord and insert the plug into the socket at the back of the device. Insert the other end of the power cord into a wall socket with the appropriate supply voltage. | 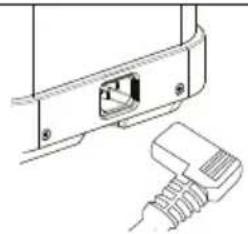 |
PREPARATION OF ESPRESSO/AMERICANO
Turn the device on by pressing the power on/off button. Make sure there is a drip tray under the coffee dispenser and the water tank with water is inside. The device will perform an automatic rinse with a small cup of water. Rinsing can be stopped by pressing the hot water button.
- The device is in standby mode.
- Place a cup under the coffee dispenser. Depending on the size of the cup (too tall or too wide), the drip tray can be removed or the height of the coffee dispenser can be adjusted as follows:
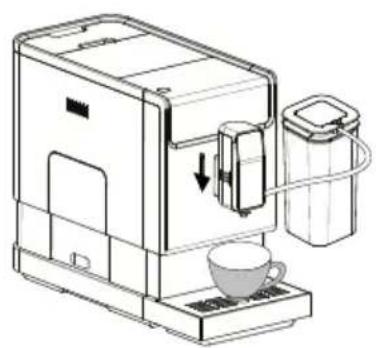
natural_image
Line drawing of a coffee machine with a cup and side arm, showing internal components and a downward arrow indicating flow (no text or symbols)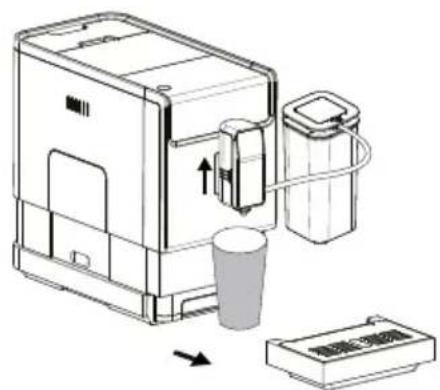
- Press the espresso button, the espresso icon will light up indicating that the device is preparing coffee.
- When the device returns to standby, the coffee is ready to be served.
TIP! The automatic rinse will not appear if the device is only switched off for a short while. This function can be deactivated by following the steps below and activated in the same way.
Step 1: Remove the service door.
Step 2: press the On/Off button until the device beeps twice.
CAUTION! Before first use, press the hot water button to clean the inside of the coffee device.
PREPARATION OF LATTE MACCHIATO
FITTING AN AUTOMATIC MILK FROTHING SYSTEM
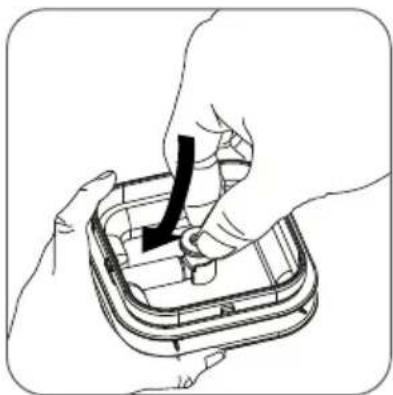
natural_image
Illustration of hands assembling a small mechanical component with a black arrow indicating direction (no text or symbols)- Remove the coffee container lid.
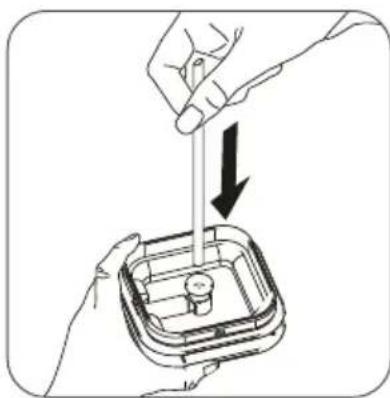
natural_image
Illustration of hands using a tool to adjust or install a component in a container (no text or symbols)- Insert the rigid milk tube into the connector inside the lid.
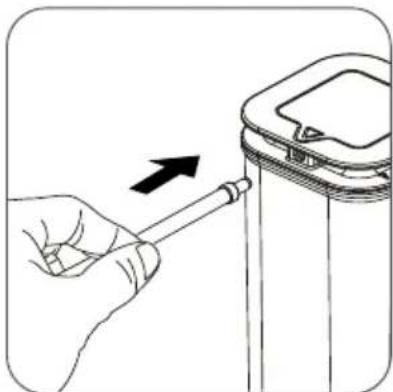
natural_image
Illustration of a hand holding a tool near a cylindrical device with an arrow indicating direction (no text or symbols)- Insert the milk tube plug into the hole on the outside of the milk container lid.
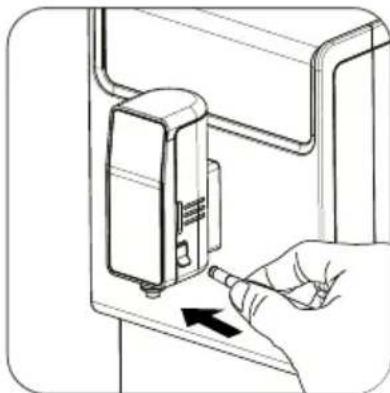
natural_image
Line drawing of a hand inserting a small electronic device into a panel (no text or symbols)- Insert the other end of the tube into the opening on the side of the coffee dispenser.
Caution! To connect the milk tube to the dispenser, fold back the protective rubber cover of the socket.
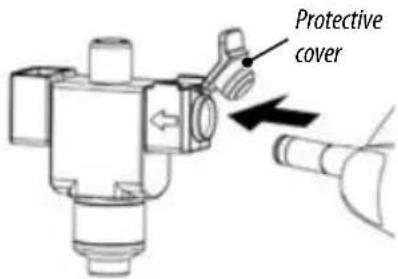
- Fill the milk container and close the lid. Switch on the device by pressing the power on/off button and make sure that the drip tray under the coffee dispenser and the water tank with water are inside. The device will perform an automatic water rinse for a small cup. You can stop this process by pressing the hot water button.
- Place a cup under the coffee dispenser
- Press the latte macchiato button. The other indicators go out and a circular mark around the cup lights up on the front panel to indicate the preparation of the latte macchiato. This indicator lights up during the entire beverage preparation process.
- The device will start dispensing milk and then coffee.
- The preparation will stop automatically. If you want to stop earlier, press the latte macchiato button again during beverage preparation.
- Detach the milk container from the coffee device and place it in the fridge.
- After use, see the "Daily cleaning of the device" chapter, in the automatic cleaning of the milk frothing system section.
Note:
- Clean the automatic milk frothing system before first use.
- Use cold milk (at a temperature of approximately 5°C/41°F) with a protein content of at least 3% to ensure an optimal frothing result
Warning:
- Steam and hot milk may be ejected from the dispenser when brewing starts.
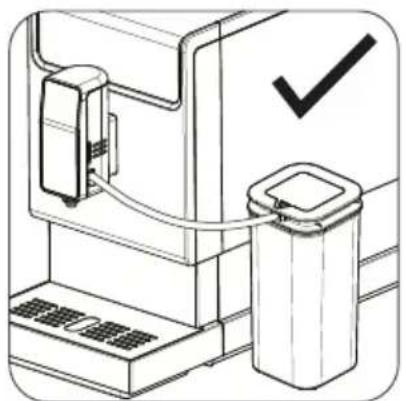
- After use, place the milk tube around the lid of the milk container. Do not let it fall freely to prevent milk spillage caused by the pressure difference
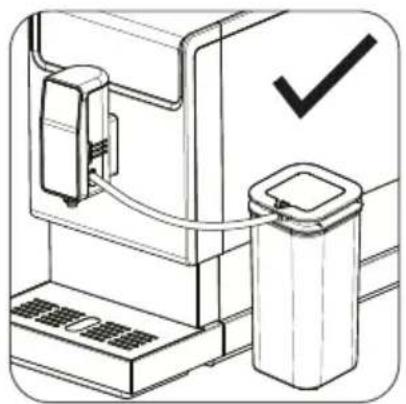
natural_image
Diagram of a mechanical device with a checkmark indicating approval (no text or symbols present)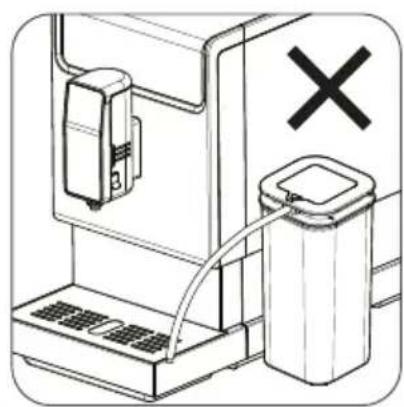
natural_image
Diagram of a device with a switch and battery, no text or symbols presentPREPARATION OF CAPPUCCINO
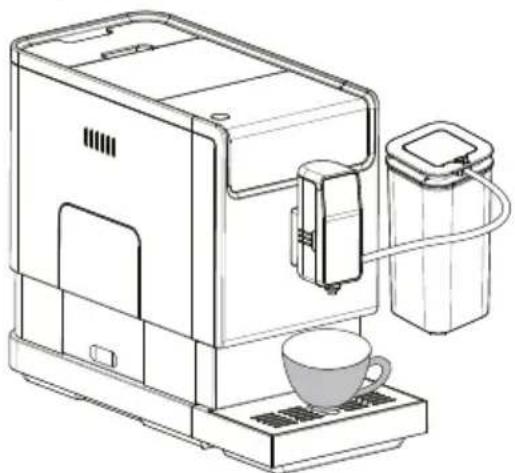
Fitting an automatic milk frothing system as described in the preparation of a latte macchiato.
- Fill the milk container and close the lid. Switch on the device by pressing the power on/off button and make sure there is a drip tray under the coffee dispenser and the water tank with water is inside. The device will perform an automatic rinse with a small cup of water, you can stop it by pressing the hot water button.
- Place a cup under the coffee dispenser.
- Switch on and press the cappuccino button, the other indicators go out and the round mark around the
natural_image
Line drawing of a coffee machine with a cup and a tray, no text or symbols presentcup on the front panel lights up to indicate coffee preparation. This indicator is turned on throughout the beverage preparation process.
- The coffee device will start dispensing milk and then coffee.
- The preparation will stop automatically. If you want to stop the coffee brewing process, press the cappuccino button again during the operation.
- Detach the milk container from the coffee device and place it in the fridge.
- After use, see the "Daily cleaning of the device" chapter, in the automatic cleaning of the milk frothing system section.
Note:
- Cleaning the automatic milk frothing system before first use.
- Use cold milk (at a temperature of approximately 5°C/41°F) with a protein content of at least 3% to ensure an optimal frothing result
Warning:
- Steam and hot milk may be ejected from the coffee dispenser during brewing start-up.
- After use, place the milk tube around the lid of the milk container. Do not let it fall freely to prevent milk spillage caused by the pressure difference.
natural_image
Technical line drawing of a mechanical device with a checkmark indicating approval (no text or symbols present)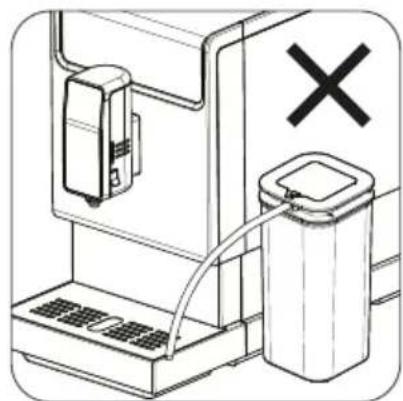
natural_image
Diagram of a device with a battery and switch, no text or symbols presentHOT WATER
- Place a cup under the coffee dispenser.
- Press the hot water button, the other indicators go out and a circular mark around the cup on the front panel lights up to indicate that hot water is being dispensed. This indicator is turned on throughout the beverage preparation process.
CAUTION! Do not use the hot water function continuously for more than one water tank.
DAILY CLEANING OF THE DEVICE
Timely cleaning and maintenance of the device is very important to prolong its life.
CLEANING THE DRIP TRAY AND GROUNDS CONTAINER
Empty and clean the drip tray daily.
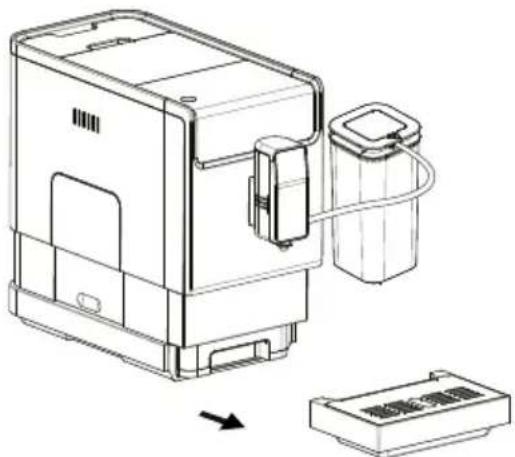
- Remove the external drip tray from the device.
- Empty the water inside the drip tray in the sink and wash it with water. Then dry it.
- Remove the internal drip tray and the grounds container from the coffee device.
- Empty the grounds container, rinse with running water and dry.
- Place the grounds container back in the drip tray.
- Place the inner and outer drip trays in their original position.
natural_image
Technical line drawing of a device with a container and an arrow indicating assembly (no text or symbols)Tips:
- When is constantly lit, it means that the grounds container is full.
- When the icon is blinking, it means that the grounds container is missing.
CLEANING THE BREWER
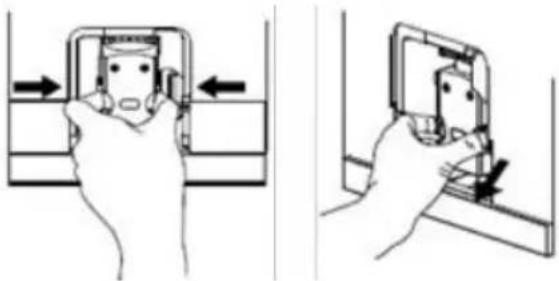
- Press the bottom of the service door to open it.
- Remove the service door.
- Squeeze the brewer release handles together
- Remove the brewer and rinse it under the cold water tap
- Insert the brewer and the service door into their original position.
natural_image
Two-step diagram showing hand holding a device with arrows indicating movement, no text or symbols present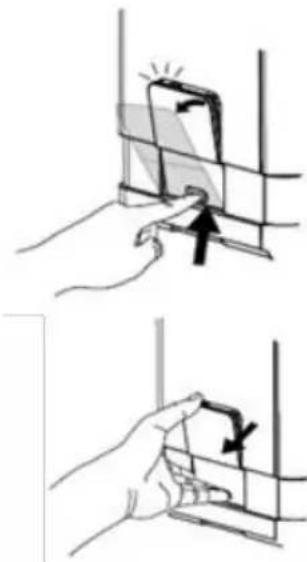
natural_image
Two-step diagram showing hand positioning of a device with arrows indicating motion (no text or symbols)Tips:
- When is lit continuously, it means that the brewer is removed or installed incorrectly.
- When the icon is blinking it means that the service door is removed or incorrectly installed.
CLEANING THE WATER TANK
- Remove the water tank from the device and clean it under running water.
- Fill it with drinking water up to the MAX level and put it back in the device
CLEANING THE AUTOMATIC MILK FROTHING SYSTEM
CAUTION! It is important to do this every day to ensure that the automatic milk frothing function is working properly
- Place a cup under the dispenser.
-
Fill the milk container with fresh water.
-
Connect the milk container to the coffee device as described in the "Preparing a Latte Macchiato" section.
- Press the system clean button.
- The device dispenses hot water and steam to wash the dosing tube and milk spout located in the coffee dispenser.
- Press the button again to stop the water.
- Follow the steps below to clean the milk frother.
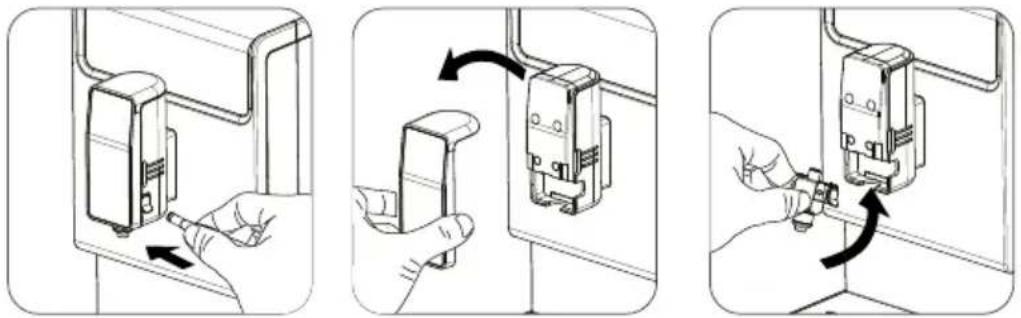
natural_image
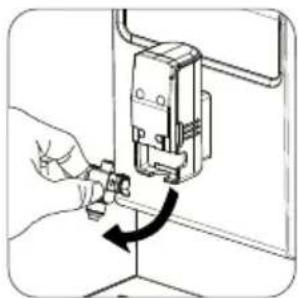
Three-step diagram showing hand tool application on a wall-mounted device, with arrows indicating rotation and adjustment (no text or symbols)Step 1: Remove the dispenser lid and then the milk frother.
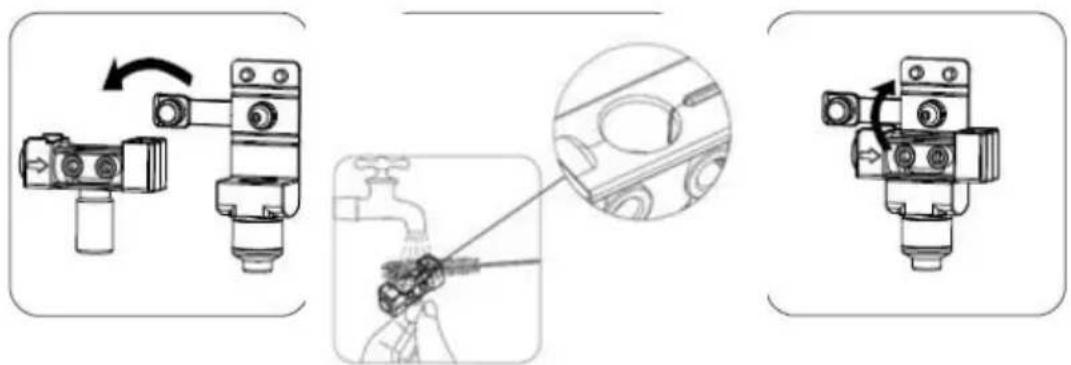
Step 2: Take the milk frother in two and clean it under running water. You can use a cleaning brush to get rid of any milk residue.
natural_image
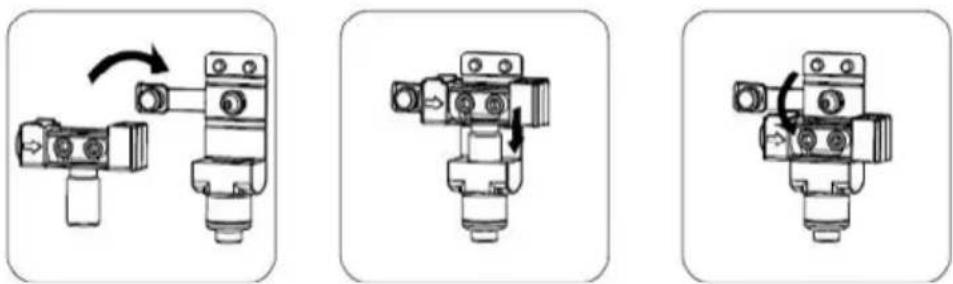
Three sequential diagrams showing mechanical assembly or valve configurations with no visible text or symbolsStep 3: Fit the milk frother into place and attach the cover to the coffee dispenser.
natural_image
Illustration of a hand using a tool to adjust or install a mechanical component, with no visible text or symbols.CLEANING THE MILK CONTAINER AND MILK PIPE
CAUTION! It is important to perform this step every day to ensure that the automatic milk frothing function is working properly.
- Empty the milk container and wash it with fresh water. Remove the rubber connector and milk tube from the container and wash them with fresh water, then reassemble them to the lid (make sure the parts are properly connected).
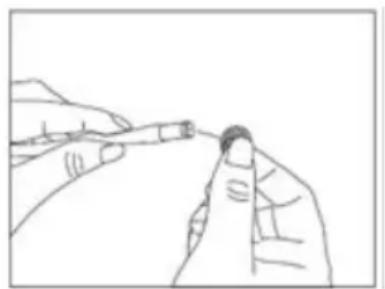
- Clean both ends of the milk tube with fresh water. To ensure that the hole on the milk tube connector is clean (see photo), you can use a needle or brush to clean the hole.
natural_image
Line drawing of a hand holding a pen, no text or symbols present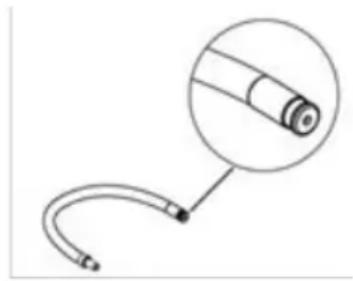
natural_image
Simple line drawing of a medical or laboratory probe with a curved tube and a magnified inset showing a cylindrical component (no text or symbols)- Fill the milk container with fresh water and connect to the device using the milk tube.
- Using the device's cleaning function, the water in the milk container can clean the rigid milk tube inside the container. Cleaning can be stopped by pressing the device cleaning button again.
SWITCHING OFF THE DEVICE
Turn the device off by pressing the power on/off button.
AUTOMATIC SWITCH-OFF
The device is equipped with an automatic shut-off function. Depending on the mode selected, the device will have a different auto shut-off time (see "setting the device up – mode selection").
SETTING UP THE DEVICE
COFFEE/MILK FOAM/HOT WATER QUANTITY CONTROL
The device can store the desired volume of coffee, milk foam and hot water.
Preparation of quantity for espresso / latte macchiato/cappuccino/milk foam/water
- Place the cup under the dispenser.
- Switch on the device, all the buttons will light up.
- Press the espresso / latte macchiato / cappuccino / hot water button, only the desired button will light up.
- While the device is dispensing milk foam, press and hold the selected button again until the milk foam reaches the desired volume. Then release the button and the milk frothing stops, the device beeps twice and stores the programmed volume.
-
While the device is dispensing coffee – press and hold the selected button again until the coffee reaches the desired volume. Then release the button, the coffee dosing will stop and the device will give two beeps and store the programmed volume.
-
When the device is dispensing hot water – press and hold the selected button again until the water reaches the desired volume. Then release the button and the water dosing stops, the device beeps twice and stores the programmed volume.
- Then the espresso / latte macchiato / cappuccino / hot water programme is programmed: each time it is pressed, the device dispenses the set amount of liquid.
Caution! To reset the coffee / milk foam / hot water quantity to the factory settings, press and hold the on/off button and the cappuccino button together for 5 seconds.
GRINDER ADJUSTMENT
The coffee grind thickness can be adjusted in the grinder by turning the control knob in the coffee container:
- When the grinder is grinding coffee beans, you can turn the adjustment knob,
CAUTION! Never make grinding adjustments when the grinder is not working. This can damage the grinder.
- The dots on the control knob indicate the grinding thickness.
MODE SELECTION
The device can operate in three modes: default, ECO and fast. In ECO mode, the device is saving more energy. In fast mode, the user can prepare coffee faster than the default setting.
| ECO Mode Fast mode Default mode | |||
| Lighting up the cups No yes yes | |||
| Pre-brewing* yes No yes | |||
| Automatic switch-off time 10 min. 30 min. 20 min. | |||
| Volume memory | yes yes yes | ||
* Note: The pre-brew function moistens the ground coffee with a small amount of water before full extraction. This increases the volume of ground coffee and increases the pressure in the brewer, which helps extract a fuller flavour from the ground beans.
- When the device is in standby, press and hold ⏻ for 5 seconds.
- The buttons will have the following indications in different settings:
Cappuccino button | Latte macchiato button | Espresso/americano button | |
| In the ECO mode | Continuous lighting | Blinking | Blinking |
| In the fast mode | Blinking | Continuous lighting | Blinking |
| In the default mode | Blinking | Blinking | Continuous lighting |
Press the cappuccino button for ECO mode, the latte macchiato button for Fast mode or the espresso button for Default mode. You will hear two beeps indicating that the mode has been selected.
- If you do not want to change the mode, press ⏻ again or wait 5 seconds for the device to return to standby.
SELF-CLEANING
When 📁 is lit up continuously, this indicates that the device needs to be self-cleaned. The device will remain in good condition if this function is performed at least once a month or more often depending on the hardness of the water used. It is also suggested to
- fill the water tank completely.
- Add one pack of the cleaning product supplied with the coffee device to the water tank.
IMPORTANT! Do not use vinegar or any other cleaning agent to self-clean this device. Unsuitable cleaning agent can damage the device.
- Connect the device.
- Place a large enough container under the coffee dispenser.
- In the standby state, press and hold ⏻ and the espresso button simultaneously for 5 seconds. You will hear a beep when 📋 and the espresso button will be blinking.
- Press the espresso button to start the self-cleaning process. To return to the standby state, press the ⏻ button.
- is blinking, indicating that the device is self-cleaning. Watch out for hot water!
- When all the water in the water tank has been used up the espresso button will be blinking – pour out any remaining solution in the water tank and fill the tank with clean water to the maximum level. When the water is topped up, will turn off. The device will then continue the self-cleaning process. Let the coffee device complete the cleaning process. Do not interrupt this process.
- When the self-cleaning process is complete, the device will automatically switch off.
It is advisable to use the function of emptying the system before a long period of non-use of the coffee device, to protect it from frost and before sending it for service.
- On standby, press and hold the ⏻ button and latte macchiato button for 5 seconds at a time.
- it will start to blink.
- Remove the water tank from the device. 🤒 will light up indicating that the system is in the process of being emptied. You can press 🤊 before removing the tank to return to standby.
- When work is finished – the device switches off automatically
Important! After performing the SYSTEM DRAINING FUNCTION; press the hot water button until water is coming out of the coffee dispenser.
MANUAL RINSING
A manual rinse cycle can be performed to clean the coffee nozzle. It is also advisable to carry out a manual rinse if the device has not been used for a long time.
- In standby, press and hold the ⏻ button and the hot water button simultaneously.
- All buttons will stop lighting up. The machine then dispenses a small amount of water, which is used for rinsing.
DANGER! The water coming out of the device is hot and is collected in the drip tray underneath. Avoid contact with hot water.
- After rinsing, the device will return to the standby state.
CLEANING OF THE DEVICE
- Unplug the power cord from the power outlet.
- Pour out all the water from the internal and external drip trays
- Use a damp cloth or a non-scratch cleaner to clean water spots on the device.
IMPORTANT! Never use abrasive cleaners, vinegar or descalers which are not supplied with the device.
Ground coffee may stick to the coffee outlet above the brewer. It is recommended that you clean the outlet using the following steps to ensure that the ground coffee enters the brewer without any problem.
| 1. Press the bottom of the service door with your finger | 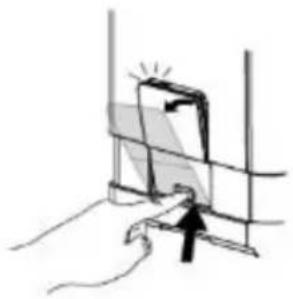 |
| 2. Remove the service door | 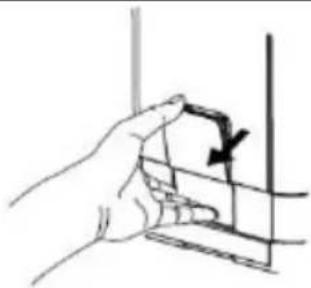 |
| 3. Press the brewing device release handles | 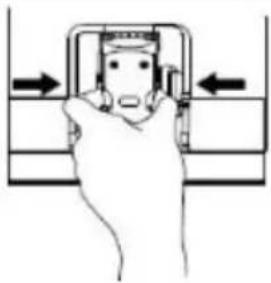 |
| 4. Remove the brewer | 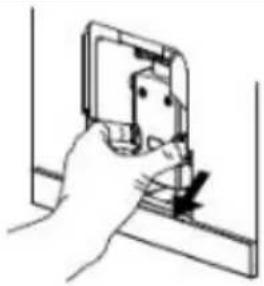 |
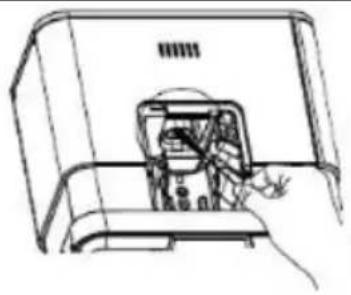
natural_image
Line drawing of a hand inserting a device into a device casing (no text or symbols)PROBLEM SOLVING
| PROBLEM CAUSE SOLUTION | ||
| The device is not working. The device is not connected to the network. | Connect and press the switch.Check the cable and plug. | |
| No or delayed response after several attempts to press a function key on the panel. | The device is subject to electromagnetic interference.Dirt above the panel. | Disconnect the device. Restart after a few minutes.Clean the panel with a cloth. |
| The coffee is not hot enough. The cups have not been heated.The brewer is too cold. | Rinse the machine at least 3 times before making coffee. | |
| Coffee does not pour from the coffee dispenser. | The emptying function of the coffee machine was used previously and not completed correctly. | Press the hot water button until water can come out of the coffee dispenser. |
| The first cup of coffee is of poor quality. The first dosing of the grinder does not give enough coffee beans to grind. | Pour out the coffee. Other coffees will always be of good quality. | |
| No crema is formed on the coffee. Coffee beans are not fresh. Change the coffee beans. | ||
| The touch buttons are not sensitive. | Inaccurate touch button presses. | Press the bottom of the touch button icon (from the front of the device). |
| The machine takes too long to heat up. Excessive limescale in the device. Descale the device. | ||
| The water tank is removed / the water level in the tank is very low but does not light up. | The surface near the water tank connector is wet. | Wipe off the water around the water tank connector. |
| The internal drip tray is filled with a large amount of water. | The coffee is too finely ground. While the grinder is running, turn the grinding thickness in the “+” direction. | |
| The coffee is delivered too slowly or in single drops. | The coffee is too finely ground. While the grinder is running, turn the grinding thickness in the “+” direction. | |
| The no coffee indicator flashes, but there are still plenty of beans in the container. | The internal coffee outlet is blocked. | Follow the instructions (Cleaning the ground coffee outlet). |
| No milk foam. | The milk frother is dirty or incorrectly installed. | Clean the automatic milk frother and make sure it is fitted correctly. |
| No milk foam. | The opening of the milk tube connector is blocked by milk residue. | Check the “Cleaning the device” section in the manual, perform “cleaning the milk container and the milk tube”. Clean the connector and make sure the hole in the connector is clean, use a needle or brush to clean the hole. |
| The opening of the milk tube connector is blocked by milk residues that are difficult to remove. | The milk tube is not cleaned for a long time. | Soak the milk tube in warm water for one hour. Then follow the “cleaning the milk container and tube” instructions in the “Daily cleaning of the dispenser” section, use the milk frothing function to clean until water runs smoothly from the dispenser. Use a needle or brush to clean the hole. |
| The milk does not foam. The type of milk used is not suitable for frothing. | Different types of milk produce different amounts of foam. Full-fat cow’s milk gives the best results. | |
| The milk does not foam. The milk temperature is too high Use cold milk. | ||
| Milk splashes on the table. The milk dosing tube is not correctly positioned. | Check the connection of the container and the milk pipes with the milk frother. | |
| The descaling indicator blinks even after the decalcification process. | The descaling process is not complete. Please be patient and wait for the process to be completed. The device will switch off automatically, do not switch off the device manually. | |
TECHNICAL DATA
Technical specifications are given on the product nameplate.
Length of mains cable: 1,0m

CAUTION! MPM agd S.A. reserves the right to technical changes!
PROPER DISPOSAL OF THE PRODUCT (waste electrical and electronic equipment)
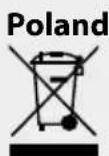
Marking on the product indicates that after the service–life of the product expires, it should not be disposed with other type of municipal waste. Used equipment may have a negative impact on the environment and health of people due to potentially containing hazardous substances, mixtures and components. Mixing electric waste with other types of waste or disassembling those in an unprofessional manner may cause a release of substances that are hazardous to the environment and health. Used equipment should be handed-over to a point for collection of electric waste. In order to obtain detailed information regarding the electric waste collection points, the user should contact the municipal point of electric waste collection or used equipment processing department.
natural_image
Technical line drawing of a portable coffee machine with a side view showing a lid and base (no text or symbols)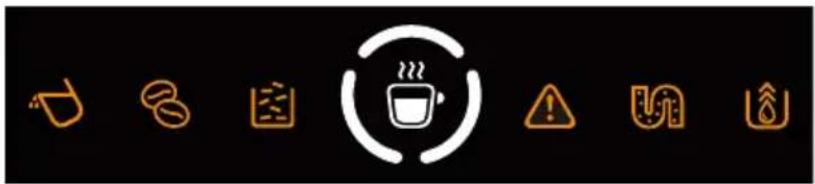
natural_image
Row of seven icons on black background, including coffee cup, gear, warning symbol, and checkmark (no text or labels)
natural_image
Five circular icons representing kitchen utensils: water drop, hand mixer, battery, microwave, and bucket (no text or symbols)
natural_image
Line drawing of a coffee maker with a cup and a side biscuit, showing a coffee machine with a coffee cup and a coffee cup on the base (no text or symbols)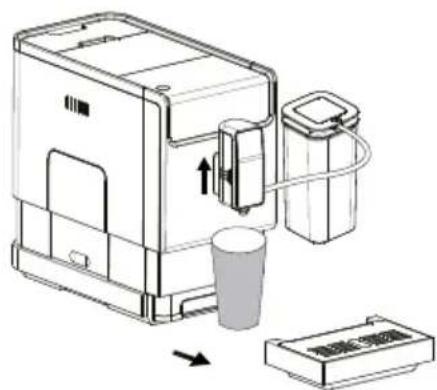
natural_image
Line drawing of hands assembling a small mechanical component (no text or symbols)natural_image
Illustration of hands using a tool to adjust or install a component in a container (no text or symbols)natural_image
Illustration of a hand using a tool to adjust or install a device component (no text or symbols visible)natural_image
Line drawing of a hand inserting a plug into a device component (no text or symbols)natural_image
Technical line drawing of a mechanical device with a checkmark and a trash bin (no text or symbols)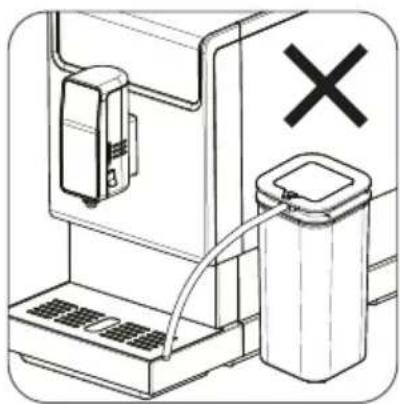
natural_image
Diagram of a water filtration or storage unit with a stopper and a trash can, no text or symbols presentnatural_image
Line drawing of a mechanical device with a checkmark and a trash bin (no text or symbols)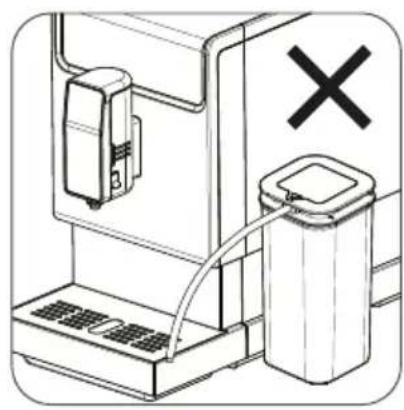
natural_image
Diagram of a mechanical device with a battery and a switch, showing no text or symbols.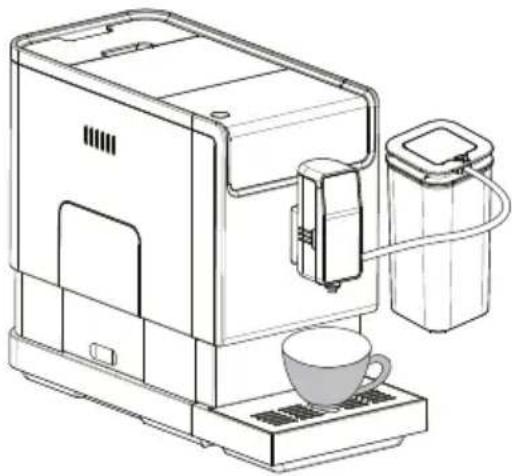
natural_image
Line drawing of a modern coffee machine with a cup and tray, no text or symbols presentГОРЯЧАЯ ВОДА
natural_image
Technical line drawing of a device with a battery and housing, showing internal components and a separate component (no text or symbols)Указания:
natural_image
Two-step illustration showing hand positioning of a device on a wall, with no visible text or symbolsnatural_image
Two-step diagram showing hand positioning of a device on a wall, with arrows indicating movement direction (no text or symbols)Указания:
natural_image
Illustration of a hand inserting a plug into a device component (no text or symbols visible)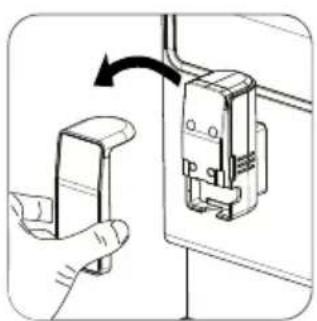
natural_image
Illustration of a hand holding a small mechanical component with an arrow indicating rotation (no text or symbols present)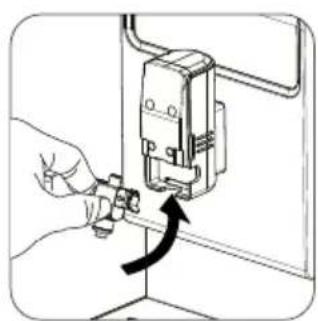
natural_image
Illustration of a hand adjusting a wall-mounted electrical switch component with an arrow indicating rotation (no text or symbols present)natural_image
Mechanical assembly diagram showing two connected components with a rotation arrow (no text or symbols)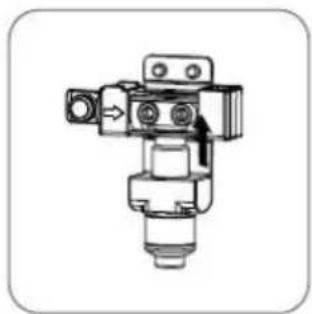
natural_image
Mechanical component diagram showing a valve assembly (no text or symbols visible)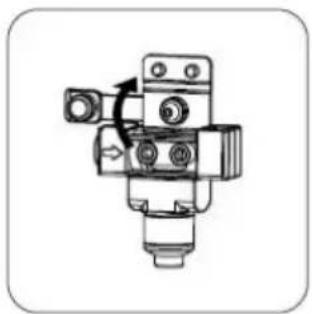
natural_image
Mechanical component diagram showing a valve assembly with no visible text or symbols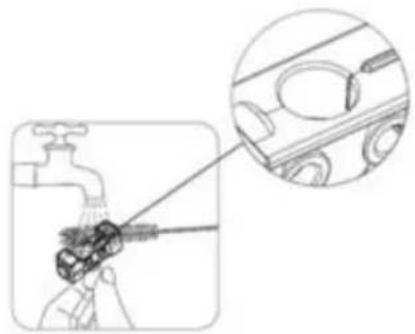
natural_image
Illustration of a hand using a tool to clean or spray the pipe, with an inset showing a car component (no text or symbols present)natural_image
Three identical mechanical valve diagrams showing different configurations (no text or labels)natural_image
Illustration of a hand using a tool to adjust or install an electrical component, no text or symbols presentnatural_image
Line drawing of a hand holding a pen, no text or symbols present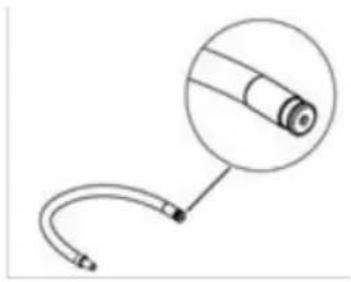
natural_image
Simple line drawing of a medical or laboratory probe with a curved tube and magnified detail (no text or symbols)natural_image
Hand holding a device with a light indicator light above it, no visible text or symbolsnatural_image
Hand holding a grid-like object with an arrow indicating direction (no text or symbols)natural_image
Row of seven orange warning icons on black background, including coffee cup, gear, gear, and warning symbols (no text or labels)
natural_image
Five black circular icons representing kitchen utensils: water droplet, refresh, toilet, microwave, and cup (no text or symbols)
natural_image
Line drawing of a coffee machine with a cup and lid, showing a coffee cup being inserted into the side panel (no text or symbols present)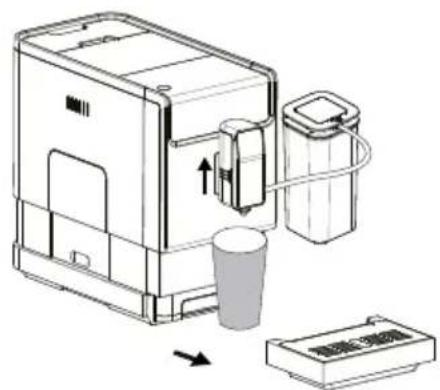
natural_image
Illustration of hands assembling a small mechanical component with a black arrow indicating direction (no text or symbols)natural_image
Illustration of a hand using a tool to lift a small object into a container (no text or symbols)natural_image
Illustration of a hand using a tool to adjust or install a cylindrical component, with an arrow indicating the process (no text or symbols present)natural_image
Line drawing of a hand inserting a component into a device (no text or symbols)natural_image
Diagram of a mechanical device with a checkmark and a trash bin, no text or symbols present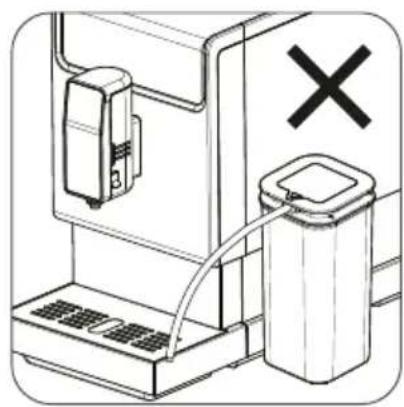
natural_image
Diagram of a device with a switch and battery, no text or symbols presentnatural_image
Line drawing of a modern coffee machine with a cup and a tray, no text or symbols presentnatural_image
Technical line drawing of a mechanical device with a checkmark indicating approval (no text or symbols present)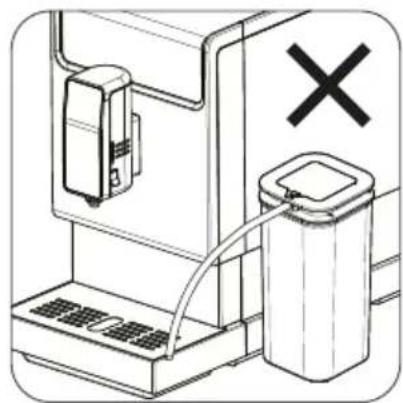
natural_image
Diagram of a device with a battery and switch, no text or symbols presentHEISSES WASSER
natural_image
Line drawing of a device with a battery and internal components, showing a step-down view (no text or symbols)Hinweise:
natural_image
Two-step diagram showing hand positioning of a device on a wall, with arrows indicating movement direction (no text or symbols)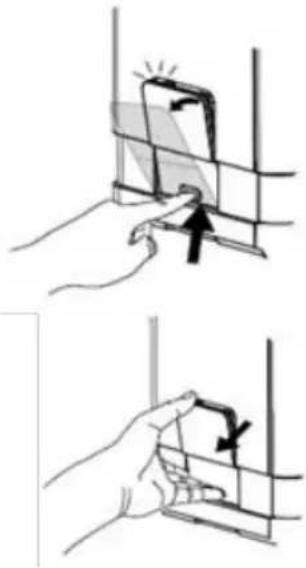
natural_image
Two-step diagram showing hand positioning of a device with arrows indicating motion (no text or symbols)Hinweise:
natural_image
Three-step diagram showing hand tool application on a door panel, with arrows indicating rotation and adjustment (no text or symbols)natural_image
Three sequential diagrams showing mechanical assembly or valve configurations (no text or symbols)natural_image
Illustration of a hand using a tool to adjust or install an electrical switch component (no text or symbols visible)natural_image
Line drawing of a hand holding a pen, poised to write on paper (no text or symbols present)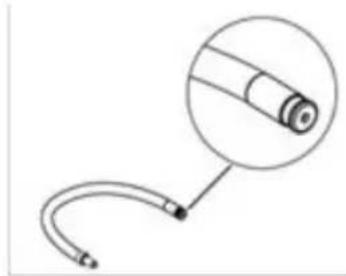
natural_image
Simple line drawing of a medical or laboratory probe with a curved tube and magnified detail (no text or symbols)We wish you satisfaction from using the product and invite you to check a wide range of other MPM appliances
natural_image
Simple line drawing of a vacuum cleaner with a cat and fan (no text or symbols)MPM agd S.A.

- GORACA WODA
- Wskazówki:
- CZYSZCZENIE POJEMNIKA NA MLEKO I RURKI DO MLEKA
- CAUTION! Hot surface!
- DEVICE DESCRIPTION
- GENERAL DESCRIPTION
- INSTALLATION OF THE DEVICE
- PREPARATION OF ESPRESSO/AMERICANO
- PREPARATION OF LATTE MACCHIATO
- FITTING AN AUTOMATIC MILK FROTHING SYSTEM
- Note:
- Warning:
- PREPARATION OF CAPPUCCINO
- HOT WATER
- DAILY CLEANING OF THE DEVICE
- CLEANING THE DRIP TRAY AND GROUNDS CONTAINER
- Tips:
- CLEANING THE BREWER
- CLEANING THE WATER TANK
- CLEANING THE AUTOMATIC MILK FROTHING SYSTEM
- CLEANING THE MILK CONTAINER AND MILK PIPE
- SWITCHING OFF THE DEVICE
- AUTOMATIC SWITCH-OFF
- SETTING UP THE DEVICE
- COFFEE/MILK FOAM/HOT WATER QUANTITY CONTROL
- GRINDER ADJUSTMENT
- MODE SELECTION
- SELF-CLEANING
- MANUAL RINSING
- CLEANING OF THE DEVICE
- TECHNICAL DATA
- PROPER DISPOSAL OF THE PRODUCT (waste electrical and electronic equipment)
- ГОРЯЧАЯ ВОДА
- Указания:
- HEISSES WASSER
- Hinweise:
Brand : MPM
Model : MKW-10M
Category : Coffee maker