
MOT-4520 - Saw Truper - Free user manual and instructions
Find the device manual for free MOT-4520 Truper in PDF.


| Product Type | Chain Saw |
| Brand | Truper |
| Model | MOT-4520 |
| Bar Length | 20 inches |
| Net Weight (without bar) | 11.7 lb |
| Engine Displacement | 45 cc |
| Rated Power (ISO 7293) | 2.2 Hp |
| Maximum Motor Speed | 12,500 RPM |
| Motor Idle Speed | 2,600 - 3,400 RPM |
| Chain Speed | 68.2 ft/s |
| Chain Pitch | 3/8 inch |
| Chain Gauge | 0.05 inch |
| Drive Sprocket | 7 teeth |
| Fuel Tank Capacity | 19.4 oz |
| Oil Tank Capacity | 11.83 oz |
| Fuel/Oil Mix Ratio | 32:1 |
| Vibration (front handle) | 13.1 ft/s² |
| Vibration (rear handle) | 14.4 ft/s² |
| Work Cycle | 30 min rest per tank; max 6 hours daily |
| Spark Plug | Champion RCJ-4 (gap 0.025 inch) |
| Safety Features | Chain brake, anti-kickback protection, hand guard |
Frequently Asked Questions - MOT-4520 Truper
User questions about MOT-4520 Truper
0 question about this device. Answer the ones you know or ask your own.
Ask a new question about this device
Download the instructions for your Saw in PDF format for free! Find your manual MOT-4520 - Truper and take your electronic device back in hand. On this page are published all the documents necessary for the use of your device. MOT-4520 by Truper.
USER MANUAL MOT-4520 Truper
natural_image
Illustration of a Truper chain with a blade and gear, showing cutting process (no text or symbols)
natural_image
Illustration of a Truper chain with a circular cutter cutting into a tree (no text or symbols)
natural_image
Illustration of a person's foot wearing a shoe and adjusting a mechanical device (no text or symbols visible)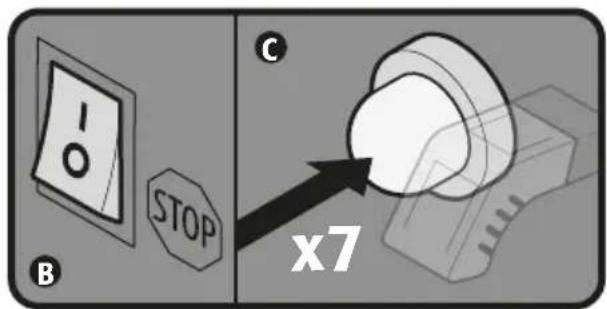


natural_image
Simple 3D diagram of a device with an arrow pointing to it, no text or symbols present
natural_image
Diagram of a car interior showing seat, door, and seatbelt components with measurement arrows (no text or symbols)Apagado del motor
natural_image
Silhouette of a humanoid robot holding a tool, with a circular object nearby (no text or symbols)Caballete de aserran
Fuel Specifications 3

General Motor Tools Safety Warnings 4

Safety Warnings for Chain Saws 5
Parts 7
Safety Devices 8
Fuel and Oil Supply 9
Bar and Chain Mounting 10
Start Up 12
Shut Off 13
Cutting Operations 13
Felling and Bucking 14
Trimming and Pruning 16
Adjustments and Maintenance....17
Troubleshooting 21
Authorized Service Centers 22
Branches 24
Warranty Policy 24

CAUTION
To gain the best performance of the tool, prolong the duty life, make the Warranty valid if necessary, and to avoid hazards of fatal injuries please read and understand this Manual before using the tool.
Keep this manual for future references.
The illustrations in this manual are for reference only. They might be different from the real tool.

Technical data

TRUPER®
| MOT-3314 | MOT-4516 | MOT-4518 | MOT-4520 | MOT-5120 | |
| Codes | 16615 | 16620 | 16625 | 16627 | 16628 |
| Description | Chain Saw | ||||
| Net Weight (without bar) | 10.14 lb | 10.8 lb | 11.7 lb | ||
| Bar Length | 14" | 16" | 18" | 20" | |
| Chain Pitch | 3/8" | 0,325" | |||
| Chain Gauge | 0,05" | ||||
| Drive Sprocket Wheel | 7 sprockets6 sprockets | ||||
| Motor Cylinder Capacity | 45 cc | 51 cc33 cc | |||
| Motor Rated Power(ISO 7293) | 2.2 Hp 2.7 Hp1.5 Hp | ||||
| Maximum Motor Speed | 12500 RPM | ||||
| Chain Speed | 68.2 ft/s64.9 ft/s | ||||
| Motor Idle Speed | From 2600 RPM to 3400 RPM | ||||
| Fuel Tank | 19,4 oz | ||||
| Oil Tank | 11.83 oz | ||||
| Vibration(ISO 7505) | front handle rear handle | 13.1 ft/s14.4 ft/s | 11.4 ft/s225.2 ft/s2 | ||
| Work Cycle | 30 minutes' rest per each tank consumed.Maximum 6 hours daily. | ||||
Fuel Specifications
- The chain saw is built with an air-cooled, 2-stroke motor using unleaded gasoline, high quality self-mixing oil with fuel stabilizer specified for air-cooled 2-stroke motor.
- The motor is certified to function with unleaded gasoline for vehicles with an 87 ([R+M]) octane-rating or higher.
- Do not use any type of pre-mixed gasoline with oil purchased in gas stations, like the one fit for motorcycles.
- DO NOT use automotive oil, nor outboard 2-stroke motor oil.
- The mix ratio shall be 32 parts gasoline per 1 part oil (ratio 32:1). Prepare the mix in a gasoline approved container. Always mix thoroughly before pouring in the motor tank.

Do not use fuel mix that has been stored more than 7 days. Mix only small amounts.

Never smoke near fuel or the area where gasoline is being filled up nor where the mix with red or when operating the chain saw.


other
| Category | Unleaded Gasoline | 2-stroke Motor Oil | Mix | | :--- | :--- | :--- | :--- | | Unleaded Gasoline | + | 118 ml 4 oz | = | | Unleaded Gasoline | + | 1L 1 liter | + | | 2-stroke Motor Oil | = | 6 capfuls | = | Ratio: 32:1 MixGeneral Motor Tool safety Warnings
Keep your work area clean, tidy and well lit.
CAUTION Cluttered and dark areas may cause accidents.

Never use the tool in explosive areas or in the presence of flammable liquids.
DANGER Before starting the motor keep the tool at least 9 meters (30 feet) away from the fill up area.

Keep children and passersby at a safe distance while operating the tool.
WARNING Distractions could cause loosing control and cause accidents.

Avoid contact with power lines and circuits.
DANGER Find and avoid power lines and circuits, especially hidden wiring as well as any grounded object.

Stay alert, use care and common sense.
CAUTION Familiarity with the tool operation could lead to distractions. It could cause accidents.
Refrain from using the tool if tired or under the influence of drugs, alcohol or medication.
DANGER Being momentarily distracted while using the tool could cause severe personal injury.
Operate the tool with guards and protection devices in place and in good working condition.
WARNING Failure to comply with this warning is a hazard of severe personal injury.
Do not force the tool.
CAUTION Working within the tool's working design assures a better and safer job.

Keep the tool in a safe place and out of the reach of children.
WARNING Motor powered tools are dangerous to inexperienced people.

Wear proper clothes.
WARNING Loose clothes, jewelry or long hair could get caught in the mobile parts.

Keep hands away from rotating and/or mobile parts.
WARNING Failure to comply with this warning is a hazard of severe personal injury.

Do not operate the tool in enclosed areas.
DANGER Avoid breathing accumulated carbon monoxide, a potentially deadly odorless toxic gas.

Wear adequate protective safety accessories.
CAUTION Wear eye protection, dust mask, non-skid safety shoes, helmet and ear plugs. These safety gears reduce the risk of injury.


Turn off the tool before adjusting, changing accessories or storin.
WARNING Double check the tool switch is in the off position.
Refrain from operating the tool if the switch is not working or is not properly assembled.
WARNING Failure to complain with this warning is a hazard of personal injury. Immediately send it to a TRUPER Authorized Service Center.
Do not overreach.
CAUTION Good balance and support lead to better controlling the tool in unexpected situations.
Avoid the tool to unintentionally start.
WARNING Double-check the tool motor is off before maintenance or putting it away.

Remove brackets before turning on the tool.
DANGER Additional tools or vices installed in a rotating part could cause severe personal injury.
Service the tool and double-check it is in good working conditions before operating.
CAUTION Carefully check mobile parts, alignment and assembly. Do it periodically. Look for any damaged element or part not working properly. Repair immediately in a TRUPER® Authorized Service Center.
Accessories.
CAUTION Use only accessories or spare parts indicated in this Manual or certified by TRUPER:

Never leave a running tool unattended.
DANGER Turn off and disconnect the tool after using. Set it in a safe position to avoid severe injury.
Never smoke in the proximity of fuel.
DANGER Do not smoke in the proximity of the fuelling area or when using the tool.

Do not touch parts with high temperatures.
The surface of the engine and the exhaust reach high temperatures during the operation of the tool..
Service and repair.
Always go to a TRUPER Authorized Service Center to use identical spare parts and maintain the security of the tool.
General
- Remember, safety is a combination of common sense, an alert mind and knowledge of the use of this tool.
CAUTION • Read carefully the Manual before starting to use the chain saw. Pay attention to the safety rules, the alert symbols and the danger, warning and attention notices in the instructions and in the labels adhered to the tool. These safety rules are meant to alert the user and prevent possible injuries that can be fatal. However, these do not eliminate the danger implied in a faulty operation of the chain saw. If the chain saw is used correctly and only for the specified use, it will deliver many years of safe and reliable service.
- Familiarize yourself with the chain saw with the help of this Instructions Manual. Save it in a safe and handy place to consult frequently and to teach the future chain saw operators. Learn the uses, limitations as well as the possible specific risks.
WARNING • Chain saws are designed exclusively to cut wood. Do not try to cut any other type of material.
DANGER • Never allow people without instructions to operate the chain saw.
- Operate the chain saw only when visibility and light conditions are adequate to see clearly.
Fuel Handling
- Never smoke close to fuel, nor in the gasoline fill up zone or where the mix with oil is being prepared or when operating the chain saw.
• To reduce the risk of fire or burns handle fuel with care. It is very flammable. - Prevent your skin from having contact with gasoline and oil.
- Protect your eyes to prevent spills of gasoline or oil. In the event of accidental contact wash eyes immediately with clear water. If irritation persists consult with your doctor.
- Mix and store fuel in a dedicated gasoline container.
- Mix fuel outdoors away from sparks or flames.
- Before supplying fuel to the chain saw turn off the motor and wait until the motor cools down.
- Before operating the chain saw, wipe clean all the fuel that could have spilled in the chain saw.
- Check for fuel leaks. Correct any leak before using the chain saw to prevent fire of burn injuries.
- Stay away from the filling up area at least at a 30 feet away before starting the motor.
- Never, ever burn spilled fuel to eliminate it.
To Prevent Kickback
Kickback is the sudden and strong movement outwards of the running tool from the cut and in the operator direction. It can cause the operator to loose control and cause a severe body injury. Usually it is caused when the nose of the bar touches an object or the cutting chain is caught in the material about to be cut. To prevent kickback, take the following caution measures:
- Keep all the guards and safety devices incorporated to the chain saw in place and in good repair.
- When operating the chain saw stay alert and do not allow that being familiar with the use of the machine make you pay less attention while using the tool.
WARNING • Use both hands to hold the chain saw firmly when the motor is running. Set the right hand in the rear handle and the left hand in the front handle. Both handles shall be grasped with the fingers, having the thumbs bent below the handles (A). This way of grasping has less possibility to fail in case of a kickback. Keeping the thumbs in the same side of the fingers is dangerous because it lessens greatly controlling the chain saw in case of kickback.
- Operate the chain saw setting the left arm rigid and totally extended.
DANGER • DO NOT make contact with the chain bar nose and the material to be cut or any other obstacle like trunks, branches, fences or any other thing it can hit when operating the chain saw.
- Always cut with the motor running its maximum speed. Press the throttle trigger completely and keep a stable cutting speed.
DANGER • Do not try to reach or cut objects that are out of reach or above chest height.
- Keep the cutting chain well-honed and in optimal conditions.
- Use only spare bars and chains specified by
TRUPER

Safety Warnings for Chain Saws
Before operating the chain saw
DANGER • Never use the chain saw when tired, ill or under the effects of any drug, alcohol or medicine.
- Wear adequate clothes to operate the chain saw: Tight clothes, thick slacks, non-skid safety boots, heavy-duty gloves, safety glasses or protective eyeglasses with side protection under ANSI Z87.1 standard; hearing and head protection. Overalls, jeans and chaps as well as wide-vision full mask are recommended.


WARNING - Remove any accessory or loose clothing that could get trapped in the moving cutting chain. Fasten your hair so it stays above your elbows. - Double check the chain saw is in perfect working conditions. Do not turn on if mal adjusted or not fully assembled so it can run in a safe manner. - Make sure the cutting chain stops moving when releasing the throttle trigger. In the event the chain does not stop, adjust the carburetor (page 20). If after adjusting the carburetor the chain is not stopping when the throttle trigger is released, turn off the chain saw and take it to a TRUPER Authorized Service Center to solve the problem.
- Do not turn on the chain saw if finding in it any accessory or device not specified in this Instructions Manual.
- Double check the chain saw handles are clean, dry and free of oil or fuel.
- Confirm the work area is open and well ventilated.
When Operating the Chain Saw
- Keep all the work colleagues at a safe distance from the chain saw while starting it or operating. A safe distance is 15 feet between the workers.
- Double check the passersby or animals are even farther away from the work area before starting and operating the chain saw. A safe area is at least double than the tallest trees' height in the felling zone.
- Make sure the cutting chain is not making contact with any object before starting the motor.
WARNING • Keep both feet firmly supported on the ground. Do not operate the chain saw if standing on an unstable surface like ladders, scaffolding, trees, etc. Only highly qualified staff can operate the chain saw up in a tree and with the adequate safety equipment.
- Do not start cutting until having the work area clear, good footing on the ground and an escape route considering the trajectory the falling tree will take.
DANGER • Never operate the chain saw single-handedly. Otherwise, the operator and all the people present can get injured.
- Keep every part of your body away from the chain when the motor is running.
- Keep every part of your body away from the muffler. Otherwise it can cause severe burns.
- Do not cut vines or too small undergrowth (smaller than 3" diameter).
DANGER • Use extreme caution when cutting small undergrowth and young trees. The thin material can get caught in the chain saw's chain and get thrown against you with force.
WARNING • Use extreme caution when cutting branches caught under pressure. When cutting, the branch can go back with strength to its original position and in its trip hit the operator. Consider this measure to be all the time out of the reach of the branch.
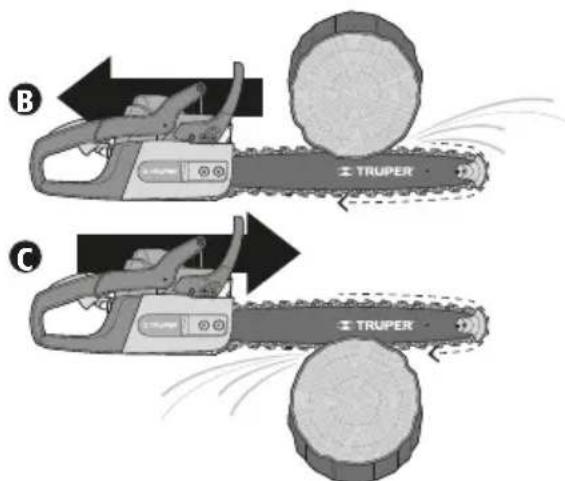
CAUTION • Keep your attention focused to the chain saw reaction when cutting large logs. Due to the force of reaction the chain saw can be pushed towards the operator (B) or pulled towards the trunk (C) as per the movement direction of the chain and depending on the cutting bar edge (upper or lower) that is being used to cut.
After Operating the Chain Saw
CAUTION • Always carry the chain saw with the motor off and the cutting chain brake enabled; the cutting bar backwards and with its scabbard and the muffler away from the body.
WARNING • Shut off the motor and enable the chain brake before setting the chain idle. DO NOT leave the motor running unattended.
CAUTION • Service and repairs in the chain saw shall be carried out only by highly trained personnel. A poorly performed service job can cause an accident with fatal consequences (for example, if inadequate tools are used to dismount or support the flywheel to remove the clutch can cause a structural damage and it may burst).


rear view front view
Chain Brake
- The chain brake (A) function is to swiftly stop the chain displacement and protect the hand if kickback strikes (see page 5). It is designed considering the predictable kickback movement that throws the chain bar upwards and towards the operator, so that when the brake is pushed with the left hand, the chain stops immediately.
CAUTION • Test the chain brake each time you turn on the chain saw and before starting the cut: • With the motor running and pressing the throttle trigger push with the back of your left hand the chain brake towards the chain bar. CAUTION Upon doing this maneuver DO NOT release the front handle. Only turn your left hand forward until making contact with the brake
WARNING • If by any chance the brake would not stop the chain DO NOT operate the chain saw. Turn it off and take it to a TRUPER Authorized Service Center for repairs.
- If the brake works correctly the cutting chain will stop immediately. To set the brake back into the running position, pull the brake lever towards you un hearing a click.
WARNING • Remember the chain brake will not prevent a kickback. It is a safety device to prevent possible injuries after a kickback is produced.
WARNING • Remember that even with adequate maintenance and used in field use conditions, the chain brake functioning cannot be considered totally safe. Stay alert at all times. Use adequate cutting techniques and always use all the safety devices.
Anti-Kickback Protection
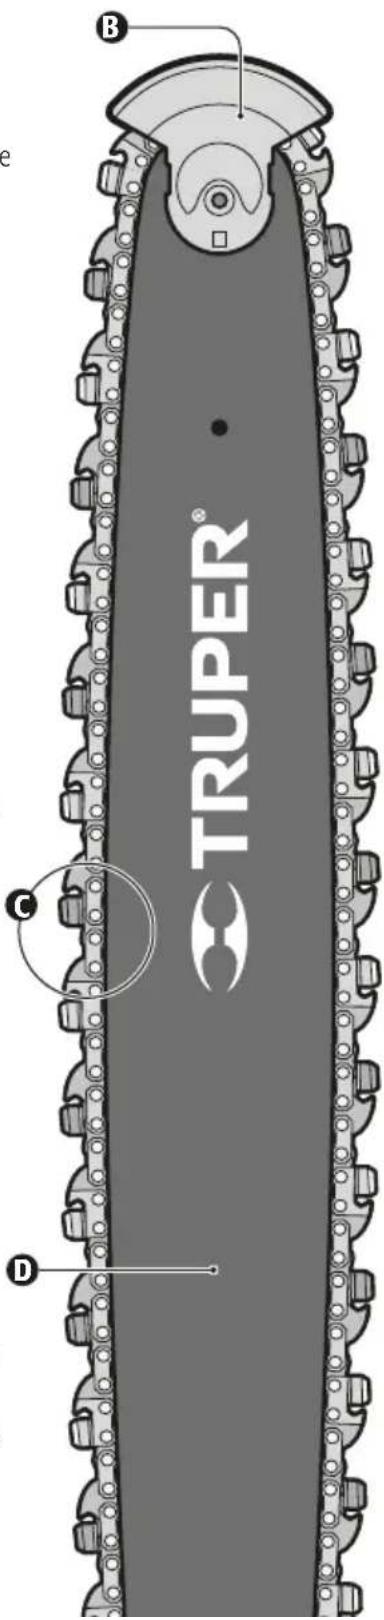
- The guide bar tip is a kickback-generating zone when making contact with an obstacle therefore, it is built with an anti-kickback protection (B). - To prevent kickback when cutting horizontally and leveled with the ground, the protection shall always be on the bar cover side and the chain.
WARNING • Unexperienced people shall never operate the chain saw without the anti-kickback protection set in the bar tip.
DANGER • Only if the user has professional experience and can use the adequate techniques, can remove the protector when passing the bar tip into the cut, when perforating or cutting logs thicker than the length of the bar. The protection shall always be mounted back after finishing those types of cuts.
Cutting Chain for Moderate Cuts (C)
- This type of chain is built with cleaning sprockets (depth gauge) set in front of each cutting sprocket. This prevents the sprockets go too deep in the wood and get stuck causing kickback.
WARNING • To replace worn chains, use only chains certified as moderate kickback.
WARNING • Consider that as the chain wears out due to normal use or the honing process, it loses the capability to reduce the possibility of kickback. The user shall use more caution.
Guide Bar
WARNING • Replace the guide bar (D) with an identical TRUPER brand bar with the kickback protector mounted in the tip.
CAUTION • The lower the chain bar's tip radius is, its capacity to diminish the possibility of a kickback will be lower.

Fuel and Oil Supply
Fuel Supply for the motor
- Follow the Safety Warnings for handling fuel (see page 5).
- Lay down the chain saw on its side so that the fuel and oil caps face upwards.
- Wipe clean the surface of the fuel tank cap to prevent contamination.
- Slowly loosen the fuel tank cap.
- To prevent spilling, use care to pour the fuel mix into the tank. ⚠ CAUTION Follow the fuel specifications (See page 3).
- Before covering the fuel tank check and wipe clean the joints.
- Set immediately the fuel tank cap. Hand-tighten the cap.
- Wipe clean all the fuel spillage.
Oil Supply for The Bar and Cutting Chain
- Use oil specified for bars, chains and the lubrication systems, especially formulated to perform in a wide range of temperatures without the requisite of dilution.
- The chainsaw shall use approximately one tank oil per each of fuel tank consumed.
CAUTION • Do not use dirty, used or contaminated oil. The oil pump, bar or chain may get damaged. - Lay down the chain saw on its side so that the fuel and oil caps face upwards.
- Wipe clean the surface of the oil tank cap to prevent contamination.
- Slowly loosen the oil tank cap.
- Use care to prevent spillages in the tank.
- Before covering the oil tank check and wipe clean the joints.
- Set immediately the oil tank cap. Tighten by hand.
- Wipe clean all the oil spillage.

WARNING
- Never start the motor without
installing the guide bar first, the cutting chain and the bar guard and chain and clutch drum. If these parts are not in place the clutch may shoot out or burst exposing the user to severe injuries.
- Set the switch in the OFF position.
- Pull the chain brake backwards to assure it is in working position (see page 8).
CAUTION • Wear heavy-duty protective gloves to manipulate the chain safely and prevent cuts.
- Remove the bar mounting nuts with a combination key or 5/8" hex key.
- Remove clutch cover and the outer plate in the guide bar.
- Remove the bar mounting nuts with a combination key or 5/8" hex key. - Remove clutch cover and the outer plate in the guide bar.

TRUPER®

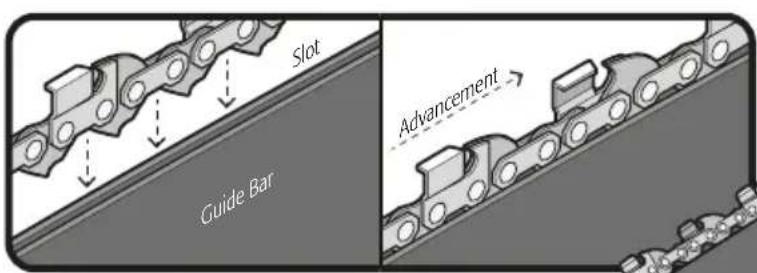
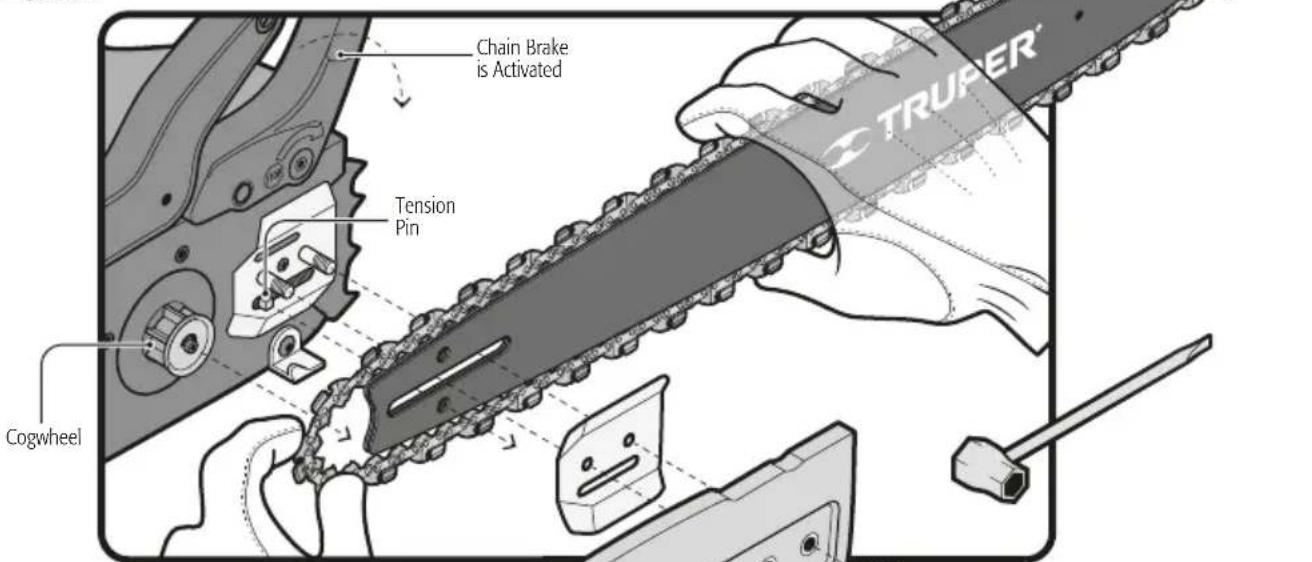
- Extend the chain onto a flat and clean surface in an oval shape, together with the chain bar and straighten any twisted link. The cutting sprockets shall face the chain displacement direction, otherwise reverse the chain position.
- Set the chain traction sprockets around the bar slot.
- Set the chain in a loose manner in the rear side of the bar.
- Extend the chain onto a flat and clean surface in an oval shape, together with the chain bar and straighten any twisted link. The cutting sprockets shall face the chain displacement direction, otherwise reverse the chain position. - Set the chain traction sprockets around the bar slot. - Set the chain in a loose manner in the rear side of the bar.

Bar and Chain Mounting

TRUPER®
- Lift the bar with the chain and fix it to the chainsaw passing the mounting bolts through the bar slot and the loose-fitting space between the bar and the cogwheel. When setting the bar in the bolts double check the tension pin is inside the chain tension orifice.
- Mount outer plate in the guide bar with its angles facing outward of the bar and the large slot facing down to go through the chain tension pin.
- Mount the clutch cover and tighten the mounting nuts by hand so that the bar is free to adjust the chain tension.
Chain Tensioning
- Use a flat screwdriver to turn the chain tension screw (1) until the chain gets adjusted to the bar without any looseness and with the traction links inserted in the bar slot.
- Lift the cutting bar nose to verify if there is still some looseness in the chain. If that is the case, turn again the tension screw 1/2 turn. Repeat the procedure until there is no looseness between the chain and the bar.
- Keep the cutting bar nose risen while tightening the nuts with the key.
- To verify the chain is not too tight try moving it with your hand. If the chain gets stuck or is difficult to move loosen the mounting nuts again and turn the tension screw only 1/4 of a turn. Lift the bar nose and tighten the mounting nuts before checking back the chain tension.
- To check the tension in the chain when heat produced while cutting has distended it, the flat nose of the combination key shall be inserted between the bar lower side and one of the chain link to verify the looseness is 0,05" (2).


Motor Start Up
- Set the chain saw onto a leveled ground where the bar and change make no contact with the ground or any other object.
- Firmly hold the front handle with your left hand, set the right foot onto the rear handle base (A).
- Pull the chain brake backwards to double check it is in the functioning position (see page 8).
CAUTION If the chain starts while the brake is activated the chain saw may be seriously damaged.
- Set the switch into the ON position (B).
- Press completely and release the primer bulb 7 times (C).
• Pull the choke lever all the way out (D).
- Pull the jack-line (E) until the motor seems to start, but no more than 3 times if the environment temperature is higher than 50^ . If the temperature is lower, pull the jack-line (until the motor starts, but no more than 5 times.
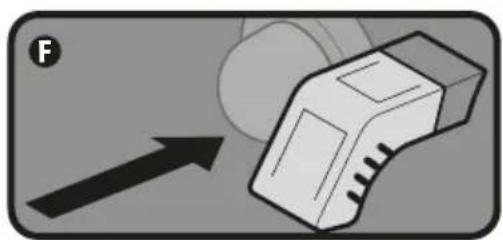
- Push the choke lever all the way (F).
- Pull again the jack-line (E) until the motor starts.
- Once the motor starts leave it running 30 seconds in that position.
- Press and release the throttle trigger to run the motor idle (G).
- The chainsaw is now ready to cut. Hold it by both handles in the right position (see page 5) and lift it to start working.

natural_image
Illustration of a person adjusting a shoe buckle (no text or symbols visible)

natural_image
Simple 3D diagram of a device with an arrow pointing to it, no text or symbols present
natural_image
Diagram of a car interior showing seat, grip, and seatbelt mechanism (no text or symbols)Shutting Off the Motor
- Release the throttle trigger and leave the motor running slow.
- Set the switch into the OFF position (H).
- Allow the chain to stop before setting the chain saw onto the ground.
• To gain an additional degree of safety set the chain brake (I) when not using the chain saw. - If the chainsaw has not stopped despite being in the OFF position, pull the choke lever completely outwards (figure D in page 12). Activate the chain brake to shut off the motor. Go to a TRUPER Authorized Service Center to carry out repairs in the switch before using again the chain saw and prevent unsafe working conditions and possible severe injuries.
CAUTION • Once the chain saw is off release pressure in the tanks. Loosen the caps of both the oil and fuel tanks. Then tighten the caps back.
- Leave the motor cooling down before storing the unit.

Cutting Operations
Right Position for Cutting
- Both feet shall be supported on firm ground. Body weight well balanced. The left foot shall be slightly forward of the right foot.
- Hold the chain saw as indicated in the Safety Warnings for chain saws' section (see page 5).
- Keep the left arm straight. Do not bend the elbow to support in the event a kickback force sets.
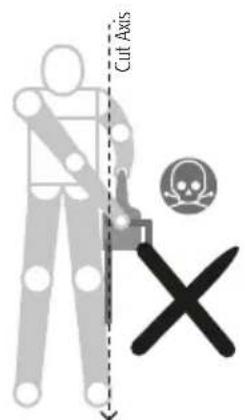
• Always keep the cut axis to your right. To keep free your body to cut axis in case of kickback. - Hold the chain saw close to the body to prevent tension in arms and back.
- Do not try to hold the chain saw left-handed.


Basic Cutting Procedures
If the user has no previous experience in the use of chain saws, practicing with small logs (not smaller than 8" diameter) is recommended. Support the log onto a sawhorse to get familiar to using the saw. Follow the following technique:
- Adopt the right position in front of the log with the chain saw running slow.
- Press the throttle trigger to make the motor reach its maximum speed.
- Start the cut setting the chain bar onto the log.
- Keep the motor in its maximum speed at all times.
- Allow the cutting chain do its job applying slight pressure downwards with the chain saw. Do not try to force the cut at any time, otherwise the chain, the bar or the motor could get damaged.
- Release the throttle trigger as soon as finishing the cut. This way the motor will run slow avoiding unnecessarily wearing out the chain, bar or motor.

Restrictions for felling trees. Do not try it for any reason!

- Do not cut trees under rain or strong winds. Wait to the weather to calm down.
- Do not cut tress with people or animals in the zone. The safe distance for passersby is explained in the section "When operating the Chain Saw" in the Safety Warnings for using chain saw n page 6).
- Do not cut trees if the felling line has not been previously calculated. Avoid being crushed by a falling tree!
Limits for tree felling. Leave this jobs for the professionals!

- Do not cut extremely thin trees.
- Do not cut big trees with rotten branches, loose bark or hollow trunks. Heavy -duty pushing or dragging equipment operated by professionals is needed.
- Do not cut trees close to electric wiring or buildings.
Preparations for felling trees
- Plan ahead at least two escape routes and clear the area to prevent blockages. The optimum escape route is a 180^ off the trajectory calculated for the felled tree with a 45^ margin towards both sides.
• To calculate the fall of the tree, consider the wind direction and strength, inclination and balance of the tree and the placing of its larger branches. - Double check the tree has no dead branches that could fall over the operator while cutting.
How to cut a tree
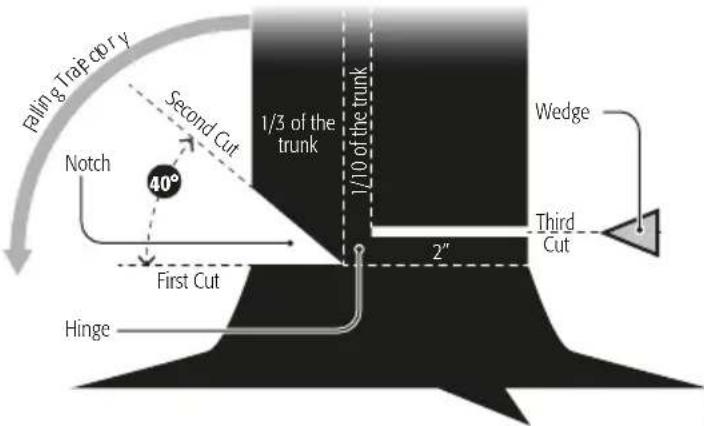
- Cut a notch 1/3 diameter of the trunk in the side calculated it will fall.
- This notch shall be made through two cuts. The first one horizontal and the second one at 40^ .
CAUTION • It is important to make the cuts in the previously mentioned order to prevent a piece of residual wood lean on the chain bar and trap it or shoot it with force into an undetermined direction.
- The third cut shall be made in the opposite side of the notch. It shall be horizontal and shall stay 2" minimum above the horizontal notch but not getting to it. Between the notch and the third cut there shall be a 1/10 distance off the trunk diameter to make a hinge that will control the fall of the tree. This way unexpected movement or trajectory is prevented while it falls or the violent separation of the tree from its stump.
CAUTION • Never make the third cut up the notch. Otherwise the tree could fall out of control.
- When cutting trees with a large diameter stop the rear cut before reaching such a depth makes the tree settled and get trap the chain bar.
- Before going on with the cut insert little by little wooden or plastic wedges in the cut to keep it open.
- Inserting the wedges can be enough to make the tree fall. Otherwise the anti-kickback guard in the chain bar nose shall need to be disassembled to insert it in the cut without removing the wedges and continue until a hinge is formed.

WARNING • Install again the anti-kickback guard as soon as finishing the cut.
- When the tree starts falling, shut off the chain saw and set it onto the ground immediately. Use the optimum escape route to get away. Do not stop paying attention in the event of an eventuality.
WARNING • While making the third cut watch the three crown constantly. Double check the fall keeps going in the planned direction. If for any reason the tree starts falling in the wrong direction or the chain saw gets trapped leave it behind and run for dear life!
Cutting Anchor Roots
- Anchor roots are those that stick out too much from the trunk above the ground. When these roots are too big can make felling a tree very difficult. The anchor roots need to be removed before felling the tree.
- First, make a horizontal cut through the roots, a couple of centimeter off the ground.
- Then, make a vertical cut downwards and leveled to the trunk to separate the root without trapping the chain bar.
CAUTION • It is important to make the cuts in the previously mentioned order to prevent a piece of residual wood lean on the chain bar and trap it or shoot it with force into an undetermined direction.

Bucking
- Bucking is cutting the tree trunk after being felled.
- When bucking always cut one trunk at a time.
- Support small trunks onto a saw horse or between two bigger trunks put together to cut.
WARNING • When in the bucking area the ground is not leveled, stay always in the highest level while cutting to prevent the cut parts will roll upon you.
WARNING • Stay alert at all moments. Sometimes is hard to predict the direction the trunks will take once being cut. It is not possible to always prevent the chain bar get trapped by the trunks.
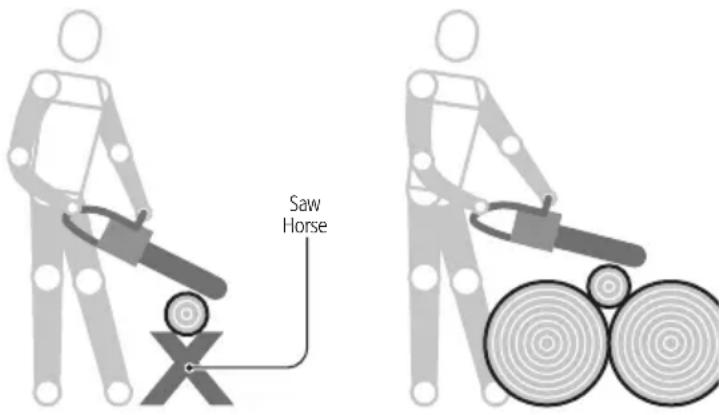
Bucking with a Wedge
- On very thick trunks is advisable to insert wedges into the cut to prevent the chain bar getting trapped in the trunk when it sits into place while being cut.
- If the trunk diameter is too big disassemble the anti-kickback guard from the chain bar nose to insert it into the cut without removing the wedges and continue the job.
WARNING • Install back the anti-kickback guard as soon as finishing the cut.

Bucking Trunks Under Pressure
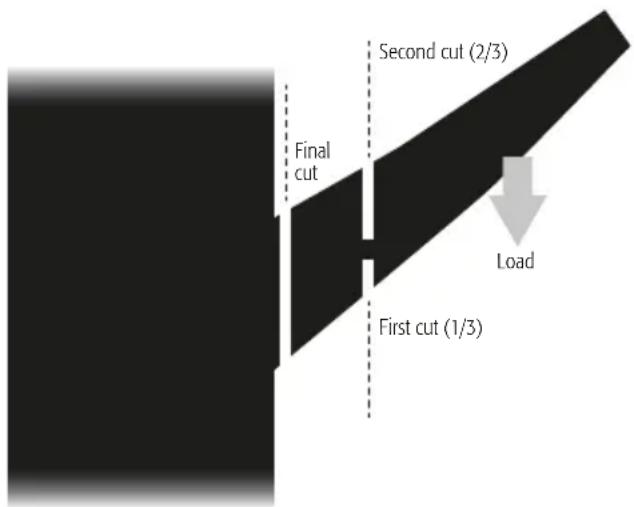
- Make first a 1/3 deep cut with regards to the trunk diameter. Finish with a second 2/3 deep cut in the opposite side. Se the diagram to determine where to make the first cut preventing the chain bar gets trapped by the trunk when binding due to its own weight.
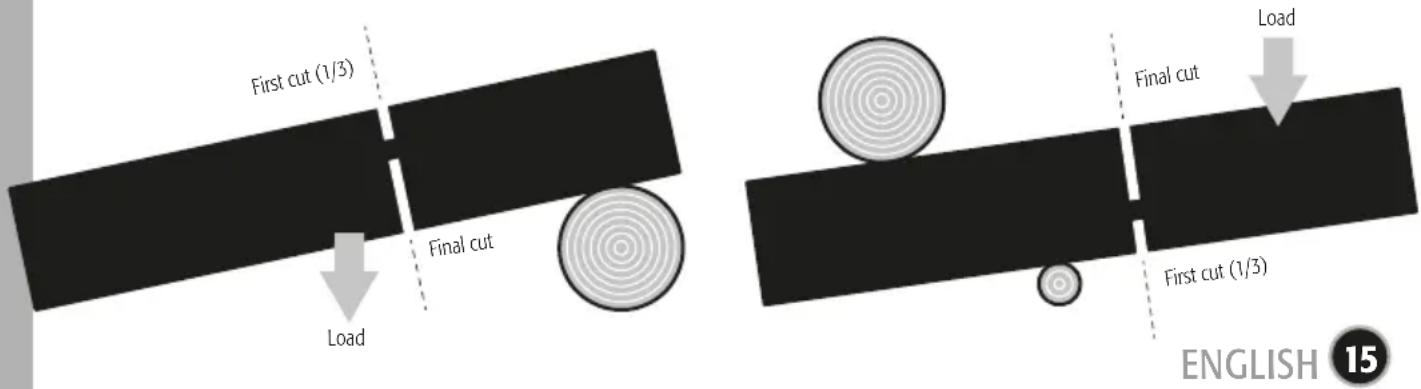
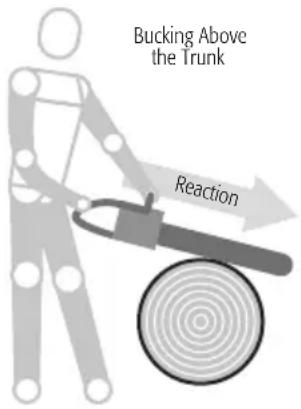
Bucking Above the Trunk
- Start cutting in the upper part of the trunk setting the lower side of the chain bar against the trunk.
• Exercise slight pressure downwards.
CAUTION • Beware of the chain saw reaction. The reaction force will pull the chain saw towards the trunk.
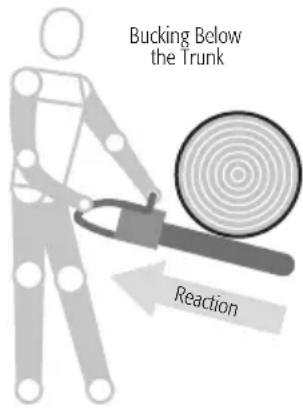
Bucking Below the Trunk
- Start cutting in the lower part of the trunk setting the upper side of the chain bar against the trunk.
• Exercise slight pressure upwards.
CAUTION • Beware of the chain saw reaction. The reaction force will pull the chain saw towards the operator.
Trimming and Pruning
• Similar to the felling job, trimming and pruning shall be made using calm, extreme care and following the Safety Warnings (see pages 5 and 6).
- When cutting a branch, the tree shall be between the operator and the cutting chain.
DANGER • Never cut branches using a ladder, hanging from the tree or standing in a platform or trunk. It is extremely dangerous! Call a professional to handle the branches that are out of reach when standing on the ground and that are above your chest height.
Cutting Operation
- When cutting a branch do not cut flush to the trunk to prevent that the branch when falling will rip the trunk's bark.
- Make the first cut 1/3 deep with regards to the branch diameter. Then, make a second 2/3 cut in the opposite side.
- Finish cutting the branch with a third cut flush to the trunk to allow bark growth and sealing the cut.
- If the branch is too big cut sections to prevent a violent detachment.
Poles
- Pole is a trunk, branch or young tree that has been bent by another trunk or branch pressure accumulating tension which is released with great force if the pressure is released.
DANGER • Poles are very dangerous because may hit the operator causing severe injuries and / or losing control on the chain saw. Stay always alert to this possibility.

Adjustments and Maintenance
- Turn off the chain saw before carrying out any maintenance task.
- Wear heavy-duty protecting gloves.
Cutting Chain Maintenance
- In order to the chain saw can make fast and smooth cuts, the chain needs periodical and adequate maintenant.
Honing the Cutting Chain
- The chain needs honing if the wood shavings generated when cutting are small and dusty. Also, if forcing the chain bar through the wood is necessary to cut or when the chain cuts sideways.
- The chain honing shall be carried out having it mounted and tense in the chain bar (see page 11) and with the chain saw motor off.
- Use a round file with a 5/32" diameter
CAUTION • Be careful and file all the sprockets in the angles specified in the image and the same length specified. Only with uniform sprockets, an adequate and safe cut is accomplished.
- File all the sprockets one by one. First all in the right side and then all in the left side. To pass from one sprocket to the other go through the chain only a little bit so each time you file one sprocket you do it onto the middle of the chain bar.
- Keep the file leveled to the sprocket upper plate. Avoid tilting or balancing the file. Apply soft but firm pressure moving only towards the front of the sprocket. Separate the file from the sprocket in each return movement.
- Give only a few passes on each sprocket.
- Using a wire brush remove the steel shavings produce while shaving.
CAUTION • Operating the chain saw with a poorly honed or dull chain can damage the motor due to the excessive speed and can cause kickback.
WARNING • Operating the chain saw with a damaged chain can cause severe injuries.
WARNING • The cutting chain is very sharp. Use heavy-duty protective gloves to handle it.
CAUTION • If the cutting chain is dull due to contacting nails or stones or due to mud or sand present in the wood, take it to a TRUPER Authorized Service Center to be professionally honed.

Right cutting link
Left cutting link
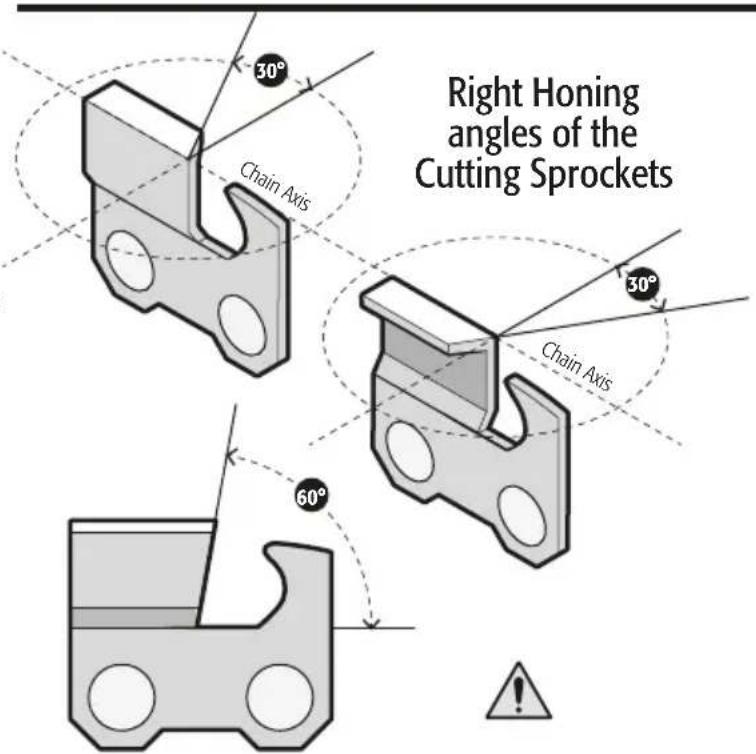
WARNING Any other angle different to the specified lessens the cut quality, damages the motor, the bar and chain and increases the risk of a violent kickback.

Adjustments and Maintenance
Chain Depth Gauge
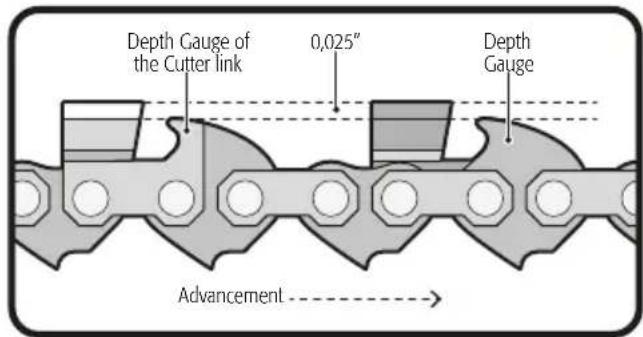
- The chain is built with drive sprockets (depth gauge) placed in front of each sprocket. These prevent the sprockets enter too deep in the wood and get stuck generating kickback.
- Depth gauge shall be checked each time the chain is honed to verify the sprockets have the right height with regards to the drive sprockets upper plate.
- The difference in height of the depth gauge and the sprockets shall always be 0,025".
- When due to normal wear and / or honing the chain, the difference is lower, use a depth gauging instrument and a flat file to make even and verify the difference to 0.025".
- File only the depth gauge. File in the same direction you filed the adjacent sprocket. Use care and do not touch the cutting tip.
• After making even the difference in all the drive, file each sprocket one by one to give them back the original shape making the front round (A).


natural_image
Mechanical gear mechanism diagram showing two connected chains with directional arrows and a central point labeled A (no text or symbols present)Chain Bar Maintenance
- The chain bar shall be cleaned at the end of the cutting journey. Also, checked thoroughly to identify wear or possible damage.
- Apparition of small grooves and lumps in the bar rails are caused by the chain saw normal use. Make them smooth with a file as soon as identified.
- Clean all debris from the lubrication orifice and the cutting chain slot.
- After a week's work reverse the chain bar to distribute the normal wear and make its useful life longer.
CAUTION Remember, the anti-kickback protection shall be set in the clutch cover side to prevent kickback when making horizontal cuts level with the ground.
- After a week's work lubricate the chain bar if it has a cogwheel in the nose. Use a grease syringe to apply lubricant in the lubrication orifice.
- If the rail shows wear do not leave the chain resting on its side, do not allow it to be widened or that the chain bar is bent. Replace the complete bar with a new one.
natural_image
Diagram showing a device emitting a lens, with no visible text or symbols
Anti-Kickback Protection
- Before operating the chain saw double check the anti-kickback protection screws are duly tightened.
- The anti-kickback protection screws have a special hardening. If it is not tight replace it altogether with the guard before operating the chain saw. Do not try to use any other or different screw type.
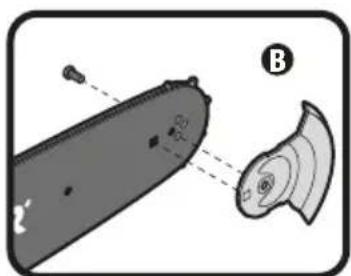
- To set correctly the anti-kickback protection fit together the guard protrusion into the corresponding hole in the bar (B).
- Tighten the screw with your fingers and then, use a 5/16" key to finish tightening exactly 3/4 turn (C).
Adjustments and Maintenance
Air Filter Cleansing
- First, access the air filter by removing the motor cover. Follow these steps:
- Loosen the three screws fastening the chain saw motor cover.
- Set the chain brake.
- Lift the front side of the motor cover over the chain brake lever.
- Lift the rear side of the motor cover over the rear handle.
- Then pull the choke lever completely outwards to prevent contaminating the carburetor during the cleaning process.
- When removing the air filter use compressed air or a brush in the uncovered area to eliminate soil and sawdust as much as possible.
- Remove the air filter loosening the fixing screw and turning the tip of a flat screwdriver between the filter and its base.
- Reliant on the use time, clean the filter superficially only tapping it against a smooth and flat surface to dislodge most of the sawdust and dust particles.
- The air filter can also be cleaned with compressed air. Clean on both sides.
- For a more complete cleansing wash the air filter with a soapy solution, rinse and let dry completely before installing back in the chain saw.
- If using compressed air to dry it, blow air on both sides of the filter.
- Set back the air filter. Verify it matches and rests perfectly in the base before tightening the screw.
General Cleaning
- Using a brush or compressed air clean and clear the ventilation slots in the starter unit each time is necessary.
- Likewise, clean periodically the blades in the motor cylinder and the ventilator blades to remove dirt. Otherwise the motor can get damaged due to overheating.
- Depending on the type of fuel and oil used, or the particular functioning conditions, the exhaust orifice and the muffler can be obstructed with coal deposits. If the chain saw shows loss of power it will be necessary to eliminate such deposits to restore performance. Take the chain saw to a TRUPER Authorized Service Center to carry out this service.
Fuel Filter
- Check periodically the fuel filter. If contaminated or damaged, go to a TRUPER Authorized Service Center to replace it.
Pre-filter Cleansing
- The pre-filter shall be cleaned a least each 25 tanks of fuel used.
- To gain access to the pre-filter remove the motor cover (the removal process is described in the previous paragraphs).
- Remove the starter unit loosening the four screws.
- Remove the ventilator deflector.
- The pre-filter is cube made of synthetic foam. Remove it to clean it.
- When cleaned set it back in place in the same position.
- Set back the fan deflector and the starter unit.

WARNING
- Never try to start the motor
WITHOUT assembling first all the chain saw parts. Otherwise the parts can get fractured and shoot out towards the operator. Can also damage the chain saw and make the Warranty void.

Carburetor Adjustment
CAUTION • Adjusting the carburetor shall only be carried out by the TRUPER Authorized Service Center specialists.
- Before they carry out the adjustments to the carburetor verify the air filter and the ventilation slots in the starter unit are clean (see page 19).
- The motor shall be warm before any adjustment to the carburetor.
- The carburetor is shipped from the factory already adjusted. It only admits limited adjustment to the "L" nozzle (moderate injection) and "H" (intense injection) within a 1/2 turn range. Do not force the nozzles beyond the range to prevent severely damaging the motor.
- The nozzles are inside the upper orifice in the motor cover marked with an "L" and an "H" in one side of the jack line. There are plastic caps that prevent turns to the left with regards to the original adjustment.
Idle speed Adjustment
- The idle speed screw is inside the lower orifice in the motor cover and marked with a "T" in one side of the jack-line.
- If the motor starts, runs and accelerates but cannot run idle, turn to the right the idle screw so that the motor can run idle.
- If the chain advances with the motor set in idle, turn the idle button to the left to reduce the speed so that the chain will not advance.
- If the chain still moves when the motor is in idle speed after adjusting the screw, turn off the chain saw, stop using it until is adjusted in a TRUPER® Authorized Service Center.
DANGER • Using the chain saw with the chain moving when idle can cause severe personal injuries.
Spark Plug Replacement
- The motor need a Champion RCJ-4 spark plug with an electrode gap of 0,025". Replace the spark plug with a similar new one at least every six months.
- To replace the spark plug, remove the motor cover (see page 19).
- Using a special wrench turn left and loosen the worn spark plug and remove it.
- Insert the new spark plug. Tighten to the right using your hand
- Finally, tighten again with 1/4 turn using the spark plug wrench.
CAUTION • Use care to prevent damaging the spark plug thread. Otherwise the motor gets seriously damaged.
Spark Deflector Cleansing
- Spark deflector cleansing shall be carried out by specialists in a TRUPER Authorized Service Center.
Chain Brake
- Remove the clutch. Inspect and clean the chain brake components. Look for wear in the brake band. Replace it if worn to half of its original thickness 0,024" or if malformed
• Always keep the chain brake mechanism clean and lightly oiled. - Check the chain support and replace if damaged.
Chain Saw Storage
When storing the chain saw one month or longer, consider the following:
- Drain all the contents of the fuel tank into a dedicated gasoline container. All the remaining oil can be used in another 2-stroke motor needing a 32:1 ratio.
- Run the motor until consuming all the fuel and it turn off. This way the residual fuel will be eliminated and will prevent gum residues that damage the fuel system.
- Drain all the oil tank contents off the bar and chain. Use a dedicated container for oil.
- Clean the chain saw thoroughly.
- Store the unit in a ventilated space away from corrosive agents like corrosive garden chemicals or de-icing salt. Also, away from children reach.
- Comply with all the government rules regarding safety, handling and storing fuel.
Problem Cause Solution
| The engine fails to start. | The switch is in the OFF position.There is no spark.The motor is flooded. | Set the switch in the ON position.Check the spark. Remove the motor housing. Remove the spark plug from the cylinder. Connect the spark plug cable and set it onto the motor cylinder with the metal part touching the cylinder. Pull the jack-line and observe the spark in the spark plug electrode. If there is no spark repeat the test with a new spark plug.With the ON switch turned off remove the spark plug. Push the choke lever up to the bottom and pull the jack-line 15 to 20 times to eliminate excessive fuel in the motor. Clean the spark plug and set it back in place. Follow the normal start up procedure (see page 12). If the motor is not starting repeat the procedure using a new spark plug. | |
| The motor fails to accelerate adequately. | The carburetor “L” nozzle needs adjusting. | Take the chain saw to a TRUPER® Authorized Service Center to adjust the carburetor. | |
| The motor fails to run adequately in high speed. | The carburetor “H” nozzle need adjusting. | Take the chain saw to a TRUPER® Authorized Service Center to adjust the carburetor. | |
| The motor fails to reach maximum speed and / or emits too much smoke. | The fuel and oil mix is not right.The air filter is soiled.The spark arrester screen is soiled.The carburetor “H” nozzle needs adjusting. | Replace the fuel mix with a fresh one following the specifications in page 3.Clean the air filter (see page 19).Clean the spark arrester screen (see page 20).Take the chain saw to a TRUPER® Authorized Service Center to adjust the carburetor. | |
| The motor starts, functions and accelerates but cannot be set in idle speed. | The idle speed is maladjusted. | Turn right the idle speed screw to increase speed (see page 20). | |
| The chain runs while the motor is in idle speed. | The idle speed is maladjusted. | Turn left the idle speed screw to decrease speed (see page 20). | |
| The bar and chain are very hot and releases smoke. | The chain oil tank is empty.The chain is too tight.The lubrication system is not working. | Fill-up the oil tank. Remember it shall be filled up each time the fuel tank is filled up.Lower the tension in the chain (see page 11).Activate the motor 30 to 45 seconds in medium speed. Stop the motor and look for signals of dripping in the anti-kickback guard or the chain bar. If there is oil present is possible the chain needs honing or the chain bar is damaged. If there is no oil dripping go to a TRUPER® Authorized Service Center to repair the lubrication system. | |
| The motor starts, runs but the chain fails to advance. | The chain brake is activated.The chain is too tense.The chain and chain bar are not properly assembled.The chain and / or chain bar is damaged. | Release the chain brake (see page 8).Lower the tension in the chain (see page 11).Assemble properly the chain and the chain bar (see pages 10 and 11).Replace the chain and / or the chain bar with other similar. | |
In the event of any problem contacting a Service Center, please see our webpage www.truper.com to get an updated list, or call our toll-free numbers 01(800) 690-6990 or 01 (800) 018-7873 to get information about the nearest TRUPER Authorized Service Center.
AGUASCALIENTES
671615 SUPER TOOLS
ZARAGOZA NO. 1205, COL. EL SOL, AGUASCALIENTES, AGS. TEL.: 01(449) 996-5978
BAJA
670796 CONTRURENTAS
CALIFORNIA SUR
PROL. I. ZARAGOZA Y MÁRQUEZ DE LEÓN,
COL. 5 DE FEBRERO, SAN JOSÉ DEL CABO, BCS
TEL.: 01(624) 142-4595
CHIHUAHUA 670032 PROVIND
AV. COLEGIO MILITAR No. 4307 A, COL. NOMBRE DE DIOS C.P. 31100, CHIHUAHUA, CHIH. TEL.: 01(614) 424-4000
671530 FERRETERÍA AMAYA S.A. DE C.V.
AV. ORTIZ MENA No. 81, COL. CENTRO C.P. 33800
PARRAL, CHIH. TEL.: 01(627) 522-2600
COAHUILA 670712 INDUSTRIAL FERRETERA DE MONCLOVA, S.A. DE C.V. BLVD. HAROLD R. PAPE No. 1000, COL. CENTRO C.P. 25700 MONCLOVA, COAH. TEL.: 01(866) 632-0174 FAX: 01(866) 633-0719
COLIMA 671742 SURTIDORA DE FERRETERÍA AV. ANTONIO LEAÑO ÁLVAREZ No. 527 COL. PONCIANO ARRIAGA. TECOMÁN, TEL.: 01(313) 324-2000 y 7666 FAX: 325-2700
CHIAPAS 671770 TORNILLOS Y HERRAMIENTAS PINEDA 17
PONIENTE No. 20-A, COL. CENTRO TAPACHULA, CHIAPAS
TEL.: 01(962) 626-2807
671709 FERRETERA MANDIOLA, S.A. DE C.V. 5a
NORTE PONIENTE No. 1615-B, COL. MOCTEZUMA,
C.P. 29000, TUXTLA GUTIERREZ, TEL.: 01(961) 602-1544
671747 CENTRO DE SERVICIO DEL SURESTE
LIBRAMIENTO SUR ORIENTE S/N km 6.5
COL. TRABAJADORES, TUXTLA GUTIÉRREZ, CHIAPAS
TEL.: 01(961) 223-2350
670515 FERRETERÍA CASUA
RAMÓN CORONA No. 72, COL. BARRIO SANTA LUCÍA C.P.
29250, SAN CRISTOBAL DE LAS CASAS, CHIS.
TEL.: 01(967) 678-6283
671601 MATERIALES DE CONSTRUCCIÓN DE LOS ALTOS, S.A. DE C.V. FRANCISCO I. MADERO No.5, COL. CENTRO, C.P. 29200, SAN CRISTOBAL DE LAS CASAS, CHIS.
671730 MATERIALES Y ACEROS BALAM S.A.
PERIFERICO NORTE-PONIENTE No. 50 COL. BISMAR, SN.
CRISTOBAL DE LAS CASAS TEL.: 01 (967) 678-6162 y 7422
670781 PREFABRICADOS DE PALENQUE, S.A. DE C.V.
km 1 CARRETERA PALENQUE - PAKAL-NÀ S/N ENTRADA
LIENZO CHARRO C.P. 22960, PALENQUE, CHIS. TEL.: 01
(916) 345-1523 | 345-1533
MEXICO CITY 671829 EL FUERTE DE LAS HERRAMIENTAS S.A. DE C.V. PONIENTE 140 No.618 LOCAL B, COL. INDUSTRIAL VALLEJO, AZCAPOTZALCO, C.P. 02300 TELS.: 01(55) 5587-7959 y 7731
670995 EL MONSTRUO DE CORREGIDORA S.A. DE C.V. CORREGIDORA No.22, COL. CENTRO C.P. 06060 CIUDAD DE MÉXICO TEL.: 01(55) 5522-4861 | 71 y 01(55) 5522-5031, FAX: 01(55) 5522-5021
671370 ADMINISTRADORA FERRETERA, S.A. DE C.V.
CORREGIDORA No. 76-A, COL. CENTRO C.P. 06060
CIUDAD DE MÉXICO TEL.: 01 (55) 5522-9976 FAX: 01(55)
5522-9966
671131 CERRADA PINO SUAREZ No. 24, COL. ZONA ESCOLAR C.P. 07230, GUSTAVO A. MADERO, CIUDAD DE MÉXICO TEL.: 01(55) 2207-0882
671137 INGENIERÍA SUMINISTROS Y SERVICIOS
INDUSTRIALES CALZADA DE GUADALUPE No.525-A,
COL. ESTRELLA, C.P. 07810, GUSTAVO A. MADERO,
CIUDAD DE MÉXICO TEL. Y FAX: 01(55) 5577-9331 | 5781-7079
DURANGO 670350 TORNILLOS ÁGUILA, S.A. DE C.V. MASURIO No. 200 ESQUINA GALIO, COL. LUIS ECHEVERRIA C.P. 34250, DURANGO, DGO. TEL.: 01(618) 817-1946 | 818-2655
671671 ENRIQUE CARROLA ANTUNA NO. 406 COL. CIÉNEGA, DURANGO, DGO. TEL.: 01(618) 825-2710
ESTADO DE 671600 ABC DE MATERIALES, S.A. DE C.V. MÉXICO VENUSTIANO CARRANZA No. 104 COL. LOS ÁNGELES TOTOLCINGO, ACOLMAN, EDO. DE MÉXICO TEL.: 01(55) 2958-8504
671723 FERRETERA TECAMAC S.A. DE C.V. CARR. MEXICO-PACHUCA km 37.5 TECAMAC, EDO. DE MÉXICO. TEL.: 5934-6396 Y 5934-6271
671765 TLAPALERIA CRUZ AV. CUAUHTEMOC No. 3 COL. BO. SAN JOSÉ, TEQUIXQUIAC, TEL.: 591-91-203-44
671025 SERVICIO Y VENTA DE HERRAMIENTAS VG AV. DE LOS MAESTROS No. 14, COL. LEANDRO VALLE C.P.54040, TLANEPANTLA DE BAZ, EDO. DE MÉXICO, TEL.: 01(55) 2628-3120 Y FAX: 01(55) 5398-2104
670050 ABRASIVOS Y SOLDADURAS ESPECIALES DE TOLUCA ISABEL LA CATÓLICA SUR No. 101 ESQ. MIGUEL HIDALGO COL. STA. CLARA C.P. 50090, TOLUCA, EDO. DE MÉXICO, TEL.: 01(722) 773-1117 | 773-1116 | 214-9458, FAX: 01(722) 215-2145
This product, its parts and components have a one year cover against any defects in material and/or workmanship as well as its function, without expense for the customer. This warranty excludes the following: 1) when product is used under different from normal conditions; 2) usage in breach of the operating manual furnished or; 3) when this product has been altered or repaired by personnel not certified by TRUPER.
This warranty shall be effective with the supplier selling the product, or at TRUPER Authorized Service Centers listed in this manual.
This warranty shall be effective when presenting the product and the valid Warranty policy duly stamped by the supplier or the proof of purchase.
To comply with this warranty, Truper will cover transportation expenses in case consumer's address is out of range from TRUPER® Authorized Service Centers listed herein or at the website www.truper.com or at our toll free numbers: 01 (800) 690-6990 or 01(800) 018-7873.
In the event of any problem regarding the validity of this warranty please call toll free numbers mentioned above.
Parts, components, consumables and accessories when applicable may be acquired at TRUPER Authorized Service Centers listed herein.
Stamp of the business:
Date of purchase:

1 YEAR
Imported by: TRUPER, S.A. de C.V.
Parque Industrial No.1, Jilotepec, C.P. 54240, Estado de México, México TEL. 01(761) 782 91 00, FAX 01(761) 782 91 70, (TIN) R.F.C.: THE-791105-HP2
www.truper.com

- Apagado del motor
- CAUTION
- Fuel Specifications
- General Motor Tool safety Warnings
- General
- Fuel Handling
- To Prevent Kickback
- Safety Warnings for Chain Saws
- Before operating the chain saw
- When Operating the Chain Saw
- After Operating the Chain Saw
- Chain Brake
- Anti-Kickback Protection
- Cutting Chain for Moderate Cuts (C)
- Guide Bar
- Fuel and Oil Supply
- Fuel Supply for the motor
- Oil Supply for The Bar and Cutting Chain
- WARNING
- TRUPER®
- Bar and Chain Mounting
- Chain Tensioning
- Motor Start Up
- Shutting Off the Motor
- Cutting Operations
- Right Position for Cutting
- Basic Cutting Procedures
- Restrictions for felling trees. Do not try it for any reason!
- Limits for tree felling. Leave this jobs for the professionals!
- Preparations for felling trees
- How to cut a tree
- Cutting Anchor Roots
- Bucking
- Bucking with a Wedge
- Bucking Trunks Under Pressure
- Bucking Above the Trunk
- Bucking Below the Trunk
- Trimming and Pruning
- Cutting Operation
- Poles
- Adjustments and Maintenance
- Cutting Chain Maintenance
- Honing the Cutting Chain
- Chain Depth Gauge
- Chain Bar Maintenance
- Air Filter Cleansing
- General Cleaning
- Fuel Filter
- Pre-filter Cleansing
- Carburetor Adjustment
- Idle speed Adjustment
- Spark Plug Replacement
- Spark Deflector Cleansing
- Chain Saw Storage
Brand : Truper
Model : MOT-4520
Category : Saw