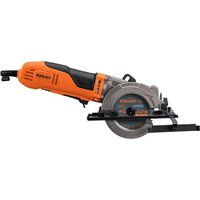
SICI-4-1/2A - Saw Truper - Free user manual and instructions
Find the device manual for free SICI-4-1/2A Truper in PDF.


| Product Type | Compact Circular Saw |
| Model | SICI-4-1/2A |
| Code | 100123 |
| Voltage | 127 V~ |
| Frequency | 60 Hz |
| Current | 6 A |
| Power | 1 Hp |
| Speed | 5000 RPM |
| Cutting Capacity (90°) | 1 11/16" (43 mm) |
| Cutting Capacity (45°) | 1 1/8" (29 mm) |
| Blade Diameter | 4-1/2" (114 mm) |
| Arbor Size | 3/8" (9.5 mm) |
| Insulation Class | Class II |
| IP Rating | IP20 |
| Work Cycle | 30 min work / 15 min rest, max 3 hours daily |
| Conductors | 18 AWG x 2C, 221°F insulation temperature |
| Power Cord Grip | Type Y |
| Thermal Insulation (Motor Winding) | Class E |
| Safety Features | Retractable guard, safety switch, double insulation |
| Included Accessories | Parallel guide, wrench, blade |
| Maintenance | Carbon brush replacement at authorized service center |
| Warranty | 2 years (defects in manufacturing) |
Frequently Asked Questions - SICI-4-1/2A Truper
User questions about SICI-4-1/2A Truper
0 question about this device. Answer the ones you know or ask your own.
Ask a new question about this device
Download the instructions for your Saw in PDF format for free! Find your manual SICI-4-1/2A - Truper and take your electronic device back in hand. On this page are published all the documents necessary for the use of your device. SICI-4-1/2A by Truper.
USER MANUAL SICI-4-1/2A Truper
SICI-4-1/2A
natural_image
Electrical outlet diagram showing a power plug connected to a wall socket (no text or symbols)natural_image
Technical illustration of a mechanical device with two views: top shows internal components, bottom shows close-up of a tool (no text or symbols)Puesta en marcha
SICI-4-1/2A
Technical Data 3
Power Requirements 3

General power tool safety warnings 4

Safety warnings for circular saws 5
Parts 7
Start Up 8
Maintenance 9
Authorized Service Centers 11
Warranty Policy 12

CAUTION
To gain the best performance of the tool, prolong the duty life, make the Warranty valid if necessary, and to avoid hazards of fatal injuries please read and understand this Manual before using the tool.
Keep this manual for future references.
The illustrations in this manual are for reference only. They might be different from the real tool.
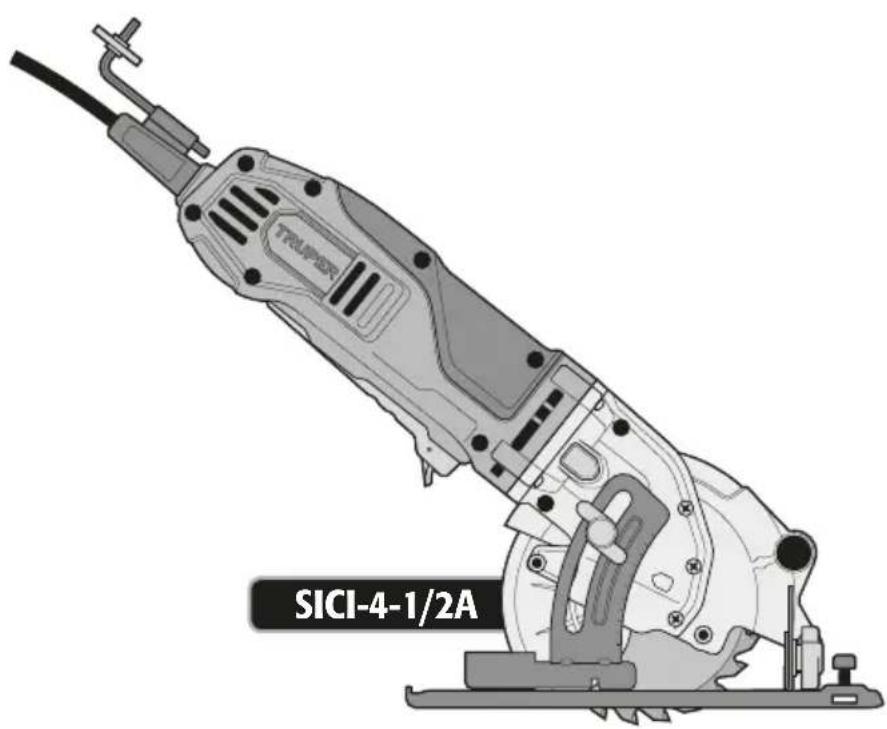
SICI-4-1/2A
| Code | 100123 | |
| Description | Compact Circular Saw | |
| 4-1/2" 3/8" | Diameter shaftDiameter disk | |
| Voltage | 127 V~ | |
| Frequency | 60 Hz | |
| Current | 6 A | |
| Power | 1 Hp | |
| Speed | 5000 RPM | |
| Cutting capacity | 90° 1 11/16" 45° 1 1/8" | |
| Work Cycle | 30 minutes' work per 15 minutes' rest.Maximum 3 hours daily. | |
| Conductors | 18 AWG X 2C with 221 °F insulation temperature. | |
| Insulation | Class II | IP Grade IP20 |
Power Cord Grips used in this product: Type "Y".
Tool Build Quality: Reinforced insulation
Thermal insulation on motor winding: Class E
WARNING Avoid the risk of electric shock or severe injury. When the power cable gets damaged
it should only be replaced by the manufacturer or at a TRUPER® Authorized Service Center.
The build quality of the electric insulation is altered if spills or liquid gets into the tool while in use.
Do not expose to rain, liquids and/or dampness.
WARNING Before gaining access to the terminals all power sources should be disconnected.

Power Requirements
WARNING Tools with double insulation and reinforced insulation are equipped with a polarized plug (one prong is wider than the other). This plug will only fit in the right way into a polarized outlet. If the plug cannot be introduced into the outlet, reverse the plug. If it still doesn't fit, call a qualified electrician to install for you a polarized outlet. Do not alter the plug in any way. Both insulation types eliminate the need of both a grounded third power cord with three prongs or a grounded power connection.
WARNING When using an extension cable, verify the gauge is enough for the power that your product needs. A lower gauge cable will cause voltage drop in the line, resulting in power loss and overheating. The following table shows the right size to use depending on cable's length and the ampere capability shown in the tool's nameplate. When in doubt use the next higher gauge.

natural_image
Illustration of a power outlet connected to a wall-mounted socket (no text or symbols)Ampere Capacity
| from 0 A and up to 10 A | 3 (one grounded) | 18 AWG(*) | 16 AWG |
| from 10 A and up to 13 A | 16 AWG | 14 AWG | |
| from 13 A and up to 15 A | 14 AWG | 12 AWG | |
| from 15 A and up to 20 A | 8 AWG | 6 AWG |
* It is safe to use only if the extensions have a built-in artifact for over current protection.
AWG = American Wire Gauge. Reference: NMX-J-195-ANCE
WARNING When operating power tools outdoors, use a volteck grounded extension cable labeled "For Outdoors Use". These extensions are specially designed for operating outdoors and reduce the risk of electric shock.

WARNING! Read carefully all safety warnings and instructions listed below. Failure to comply with any of these warnings may result in electric shock, fire and / or severe damage. Save all warnings and instructions for future references.
Work area
Keep your work area clean, and well lit.
Cluttered and dark areas may cause accidents.

Never use the tool in explosive atmospheres, such as in the presence of flammable liquids, gases or dust.
Sparks generated by power tools may ignite the flammable material.

Keep children and bystanders at a safe distance while operating the tool.
Distractions may cause loosing control.

Electrical Safety
The tool plug must match the power outlet. Never modify the plug in any way. Do not use any adapter plugs with grounded power tools.
Modified plugs and different power outlets increase the risk of electric shock.

Avoid body contact with grounded surfaces, such as pipes, radiators, electric ranges and refrigerators.
The risk of electric shock increases if your body is grounded.
Do not expose the tool to rain or wet conditions.
Water entering into the tool increases the risk of electric shock.
Do not force the cord. Never use the cord to carry, lift or unplug the tool. Keep the cord away from heat, oil, sharp edges or moving parts.
Damaged or entangled cords increase the risk of electric shock.
When operating a tool outdoors, use an extension cord suitable for outdoor use.
Using an adequate outdoor extension cord reduces the risk of electric shock.
If operating the tool in a damp location cannot be avoided, use a ground fault circuit interrupter (GFCI) protected supply.
Using a GFCI reduces the risk of electric shock.
Personal safety
Stay alert, watch what you are doing and use common sense when operating a tool. Do not use a power tool while you are tired or under the influence of drugs, alcohol or medication.
A moment of distraction while operating the tool may result in personal injury.
Use personal protective equipment. Always wear eye protection.
Protective equipment such as safety glasses, anti-dust mask, non-skid shoes, hard hats and hearing protection used in the right conditions significantly reduce personal injury.


Prevent unintentional starting up. Ensure the switch is in the "OFF" position before connecting into the power source and / or battery as well as when carrying the tool.
Transporting power tools with the finger on the switch or connecting power tools with the switch in the "ON" position may cause accidents.
Remove any wrench or vice before turning the power tool on.
Wrenches or vices left attached to rotating parts of the tool may result in personal injury.
Do not overreach. Keep proper footing and balance at all times.
This enables a better control on the tool during unexpected situations.
Dress properly. Do not wear loose clothing or jewelry. Keep hair, clothes and gloves away from the moving parts.
Loose clothes or long hair may get caught in moving parts.

If you have dust extraction and recollection devices connected onto the tool, inspect their connections and use them correctly.
Using these devices reduce dust-related risks.
Power Tools Use and Care
Do not force the tool. Use the adequate tool for your application.

The correct tool delivers a better and safer job at the rate for which it was designed.
Do not use the tool if the switch is not working properly.
Any power tool that cannot be turned ON or OFF is dangerous and should be repaired before operating.
Disconnect the tool from the power source and / or battery before making any adjustments, changing accessories or storing.
These measures reduce the risk of accidentally starting the tool.
Store tools out of the reach of children. Do not allow persons that are not familiar with the tool or its instructions to operate the tool.
Power tools are dangerous in the hands of untrained users.

Service the tool. Check the mobile parts are not misaligned or stuck. There should not be broken parts or other conditions that may affect its operation. Repair any damage before using the tool.
Most accidents are caused due to poor maintenance to the tools.
Keep the cutting accessories sharp and clean.
Cutting accessories in good working conditions are less likely to bind and are easier to control.
Use the tool, components and accessories in accordance with these instructions and the projected way to use it for the type of tool when in adequate working conditions.
Using the tool for applications different from those it was designed for, could result in a hazardous situation.
Service
Repair the tool in a ☒ TRUPER Authorized Service Center using only identical spare parts.
This will ensure that the safety of the power tool is maintained.
Safety warnings for circular saws
Kickback
Kickback is the sudden and strong movement the tool experiences outwards from the work piece that can lead the operator to lose control or even cause him injuries. Usually this happens when the cutting disc is stuck into the piece or due to an inefficient operation. To avoid kickback the following caution measures should be used:
- Use perfectly maintained cutting discs. Double-check discs are properly mounted. Badly mounted, bent, damaged discs or with worn or dull teeth have a tendency to get stuck into the material causing kickback.
- When operating the tool, hold it firmly setting one hand on the handle and the other hand on the auxiliary handle. Always use both hands. Keep good balance and footing to be able to resist the force of possible kickback.
- To make cuts align the disc with the cut axle and wait for the disc to reach its highest speed before starting to cut. Do not try to cut setting the disc teeth on top of the work piece. It could cause kickback.
- To restart working inside the cut, center the disc into the cut and double-check the discs are not buried into the material.
- If while operating the tool you notice the disc is bending or the cut is interrupted, release the switch and hold the tool inside the work piece until the disc comes to a complete stop. Do not try to remove the disc while still moving. This could cause kickback.
- To minimize the risk of having the disc stuck and cause kickback, before cutting a wood piece remove all the nails. Damp, warped wood or chipboard needs special attention during the cut. When using large wood planks use supports close to both sides of the cutting line to avoid the plank to warp, close the cut and trap the disc. Wood resin and gum hardened on the disc make the saw run slow. Use resin and gum remover, hot water or kerosene to remove buildup. DO NOT use gasoline.
- Use extreme care when making a pocket cut on wall or blind spots. The disc may get into contact with hidden objects and cause kickback.
- While operating the tool, do not set your hand or body aligned with the cut axis, because if kickback sets there is a severe injury hazard.
- Before starting a cut, the levers to adjust cutting depth and bevel should be tight and secured. If they move during the cut, they may cause the disc to bend and cause kickback. Setting excessive cutting depth increases the load on the unit and the disc might bend inside the cut. It also increases the possibility that the cut closes and increases the available area on top of the cutting disc.
General measures
DANGER • Move away your hands from the cutting area and the cutting disc. To prevent from accidental injury and loosing control, firmly hold the tool with both hands by the handle and the auxiliary handle.
WARNING • The accidental contact with a rotating cutting disc may cause severe personal injury.
DANGER • NEVER hold the work piece to cut with your hands or on top of your leg. Hold the work piece adequately to avoid your body making contact with the cutting disc, and to prevent the disc from bending or loosing control of the tool or the work piece.
DANGER • Do not try to remove debris material when the disc is running.
WARNING • Remember that the guards do not protect you from the moving disc below the work piece. Therefore never squat or try to put your hand below the work piece when the machine is running.
CAUTION • Double-check retractable guard and the spring are working properly before each time you use the tool. If the guard is not moving freely or is not closing instantly, service the machine.
WARNING • Do not bring the disc near your body when carrying the tool. If it accidentally starts the retractable guard may open and make contact with your clothes.
CAUTION • Operating the tools holding it by the insulated parts prevents the user from getting and electrical discharge if the disc makes contact with hidden cabling.
- ALWAYS keep the electric supply cord away from the cutting area. The electric supply cord SHALL NEVER hang on top of the work piece when making the cut.
- Wear always safety glasses with side protection. If dust is produced wear also a dust mask.


Safety warnings for circular saws
Retractable guard
Before each use double-check if the retractable guard and the spring are working correctly. If the guard is not moving freely or not closing instantaneously service them before further operation with the tool.
The retractable guard could work slowly because of damaged parts, gummy deposits or debris accumulation. To prevent from this possibility clean regularly the insides of both guards and the disc axis. Use kerosene or compressed air. Before cleaning disconnect the machine and remove the cutting discs.
The retractable guard can be opened manually. Make this only when changing discs and when making cuts such as cut marking or combined cut. Using the guard lever open the retractable guard. As soon as the disc gets into the material, release the lever. For any other type of cuts the guard should operate automatically. Never leave the retractable guard in the open position.
The retractable guard might bend due to a stroke or if it falls. Before operating the tool, verify it moves freely in every angle and cutting depths. The guard should not touch the cutting disc or any other part of the tool.
WARNING Verify the retractable guard covers the disc before setting the saw on a bench or on the floor. A disc rotating due to inertia could cause the saw to move backwards cutting whatever objects in its way. Verify the disc stops moving after turning off the tool.
WARNING Remember that the guards do not protect you from the moving disc below the work piece. Never squat or put your hand below the work piece when the tool is running..
Toxic materials
Dust coming from some materials have chemical substances known to cause cancer, birth and reproductive defects. Some of these chemical substances are:
- Lead in lead-based paint.
- Arsenic and Chromium in wood treated with chemical substances.
- The risk involved due to exposure to these substances varies with the frequency this type of job is made. To reduce being exposed to the chemicals work in well-ventilated areas, use the adequate safety equipment, such as dust-mask specifically designed to filter microscopic particles.


Saw Dust Ejector.
Saw dust is blown through the back and sideways, as far away as possible from the operator. The motor cooling air is ejected through the housing and it also helps ejecting saw dust. The saw dust ejector can be used attached to an external suction unit.

Retractable Guard.
The retractable guard opens automatically when the blade gets inside the work piece. When the cut is finished, the retractable guard is closed to cover the blade.
Motor.
The saw has the power you need. It cools down through and extra-large fan. The use may overheat the motor! Allow the motor to cool down setting the no load speed.

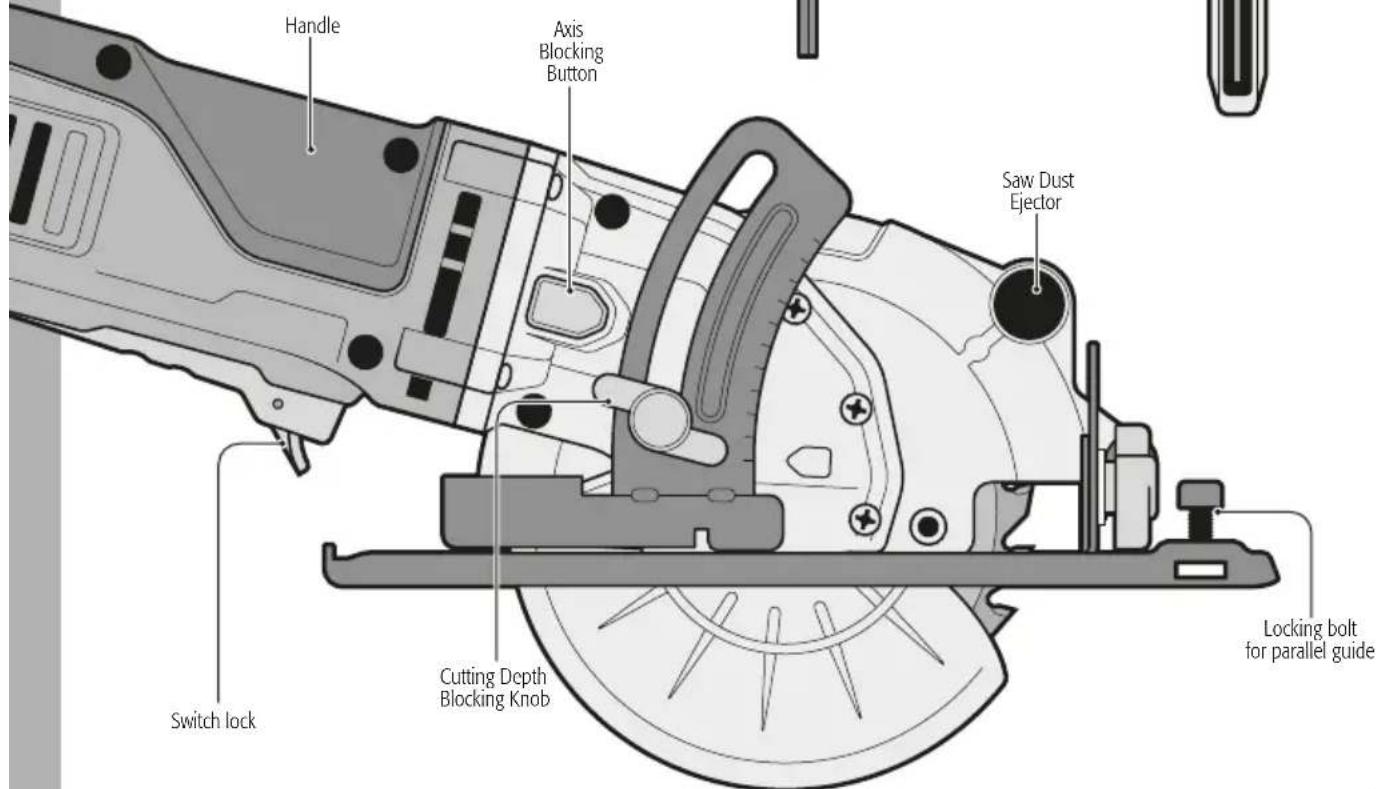
The circular saw is a multipurpose tool to cut soft or hard wood, plywood, resopal covered materials, etc..

CAUTION
This tool is not designed to cut metal or masonry, cement or bricks.
Turning On
- Connect the plug in the power supply.
- Turn ON the tool pushing the switch lock backward (a), then, press lightly the switch (A).
• To stop the tool, release the switch (A).
NOTE: Safety switch prevents accidental ignition.

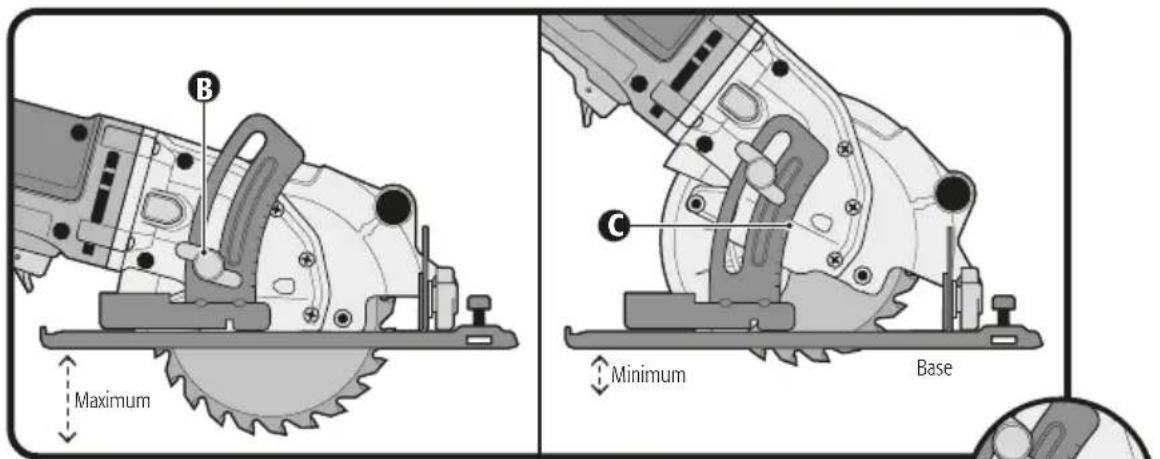
Adjusting the Cutting Depth
- Loosen the cutting depth blocking knob (B).
- Having the base fixed, lift the housing until the blade is sticking out of the base to the desired depth. Use the depth guide (C) as reference.
- Tighten de cutting depth blocking knob to prevent the housing to move while cutting.
- Cutting depth may de up to 1-11/16"
- Cutting depth shall be equal to the work piece thickness or to protrude out of the piece one tooth of the to prevent accidents.

CAUTION

natural_image
Circular diagram showing a mechanical or electrical component with no visible text, numbers, or symbols.Cutting Angle Adjustment
- Loosen the bevel lock knobs (D).
- Fix the base and turn the housing until the blade is in the desired angle.
- Tighten the cutting angle adjustment knobs to prevent the housing to move while cutting.

natural_image
Technical illustration of a mechanical device with two views: top shows internal components, bottom shows a close-up of a tool mechanism (no text or symbols)Start Up
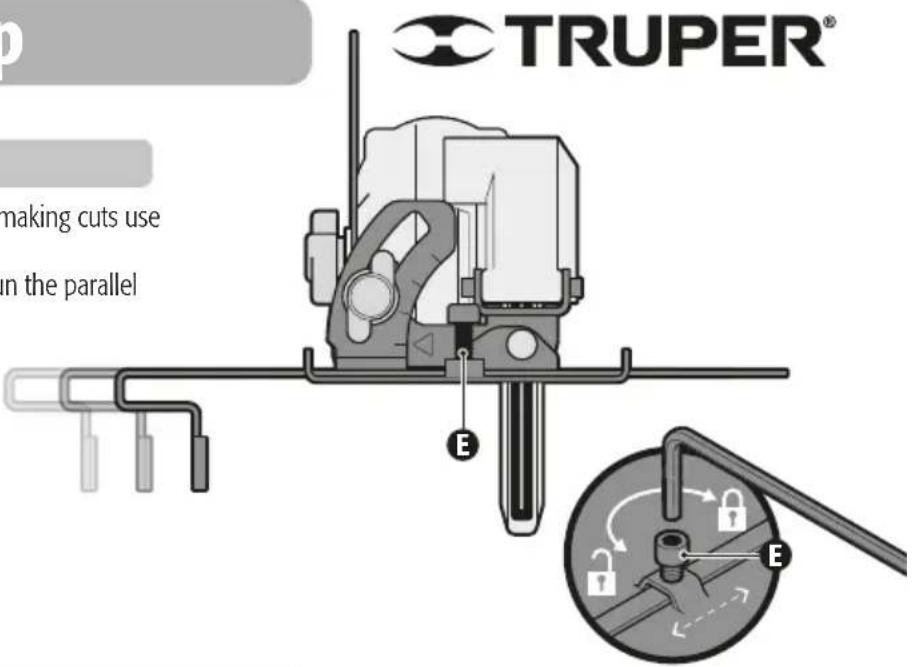
Parallel Guide Adjustment
- To keep the work piece width fixed when making cuts use the parallel guide.
- To adjust width, loosen the bolt (E) and run the parallel guide into the desired position.
Maintenance
Blade Replacement
When the cutting blades are worn out replace them immediately.
WARNING specified for this tool are
4-1/2". Never use another type or size of blade. Otherwise it can cause severe personal injuries, damage the tool and make the Warranty void.
- Never use washers and bolts with damaged or blades that are not correct. The bolts and washers included are specially designed for this model of tool, to offer an excellent performance and deliver safety in the operation.
-
Use blades with the orifices having the size and shape that fits the axis. Otherwise, the blades rotate in an eccentric movement cause loss of control.
-
Disconnect the tool and adjust cutting depth to the minimum (see page 8).
- Open fully the retractable guard (F) and keep it in that position with the aid of the lever.
- Set the wrench (G) in the hexagonal bolt (H) and keep on pressing the axis blocking button (I). Turn the bolt in a clockwise direction. The cutting disc will rotate at the same time as the bolt until the axis is totally blocked when the blocking button fits completely.
- Loosen and remove the bolt. Remove the washer (J) and the blade. Release the axis blocking button.
- Set a new cutting blade (K). Double check the direction in the printed arrow matches the arrow embossed in the tool guard.
- Set the washer (J) in the blade and insert the hexagonal screw (H).
- Press again the axis blocking button. Using the wrench (G), tighten the hexagonal bolt in a clockwise direction: Once the blade is secure, release the axis blocking button.

Only clean, sharp and perfectly set blades can guarantee a good cut. Keep handy extra cutting discs to have sharp blades always available
Keep in mind to disconnect the tool before cleaning or servicing.
Every component in the tool is an important part of the insulating system and should only be serviced in a
TRUPER Authorized Service Center.
When sending the tool to maintenance, ALWAYS ask for TRUPER original spare parts.
When cleaning the plastic parts of the tool, refrain from using solvents. Most plastic materials are susceptible to damage when commercial type solvents are applied.
Use a clean cloth or pressurized air to clean dirt, coal or dust.
WARNING! NEVER put the tool in contact with brake oil, petroleum-based products, penetrating oils, etc. Those products contain chemical substances that damage or destroy plastic.
WARNING When using pressurized air to clean particles ALWAYS wear safety glasses with side protection or a face mask. If it expels too much dust, also wear an anti-dust mask.
It is not advisable to use this tool for extensive work in fiberglass materials, gypsum wallboard, plaster or stucco. The particles are highly abrasive for any power tool components. If using the tool with those materials, it is very important to frequently blow pressurized air to increase the useful life of the tool.

Carbon Brush Replacement
- Carbon brushes shall be checked periodically and replaced always in a TRUPER® Authorized Service Center when worn.
• After being replaced ask to inspect if the new carbon brushes can move freely in the carbon brush housing. Ask to turn ON tie tool 5 minutes to make even the contact between the carbon brushes and the commuter. - Use only original TRUPER® spare carbon brushes specifically designed with the hardness and resistance adequate for each type of motor. Carbon brushes that are out of specification may damage the motor.
- When replacing carbon brushes, always replace both.
In the event of any problem contacting a Service Center, please see our webpage www.truper.com to get an updated list, or call our toll-free numbers (800) 690-6990 or (800) 018-7873 to get information about the
nearest TRUPER Authorized Service Center.
This product, its parts and components have a two year warranty against defects in its manufacture, operation and workmanship, except when: the product has been used in conditions other than those recommended, or has not been operated according to the instructions, or has been altered or repaired by personnel not authorized by TRUPER. In order to make the warranty valid or to purchase components and spare parts, you must present the product and its proof of purchase at Av. San Isidro #110, Col. Industrial San Antonio, ALC. Azcapotzalco, C.P. 02760, CDMX, Mex. or at the store where you bought it, or at a TRUPER service center listed in the attached warranty policy and/or at www.truper.com. Transportation costs resulting from compliance of this warranty will be covered by TRUPER. For questions or comments, call 800-690-6990.
Imported by: Truper, S.A. de C.V., Parque Industrial #1, Jilotepec, Edo. de México, México. C.P. 54240, Made in China
Stamp of the business:

2 YEARS
Delivery date:
- Puesta en marcha
- CAUTION
- Power Requirements
- Work area
- Electrical Safety
- Personal safety
- Power Tools Use and Care
- Service
- Safety warnings for circular saws
- Kickback
- General measures
- Retractable guard
- Toxic materials
- Saw Dust Ejector.
- Retractable Guard.
- Motor.
- Turning On
- Adjusting the Cutting Depth
- Cutting Angle Adjustment
- Start Up
- Parallel Guide Adjustment
- Maintenance
- Blade Replacement
- Carbon Brush Replacement
Brand : Truper
Model : SICI-4-1/2A
Category : Saw