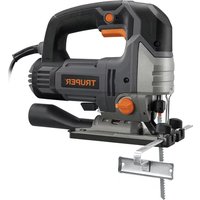
CALA-NX6 - Saw Truper - Free user manual and instructions
Find the device manual for free CALA-NX6 Truper in PDF.


| Product Type | Hand Saw |
| Brand | Truper |
| Model | CALA-NX6 |
| Blade Length | 24 inches (610 mm) |
| Teeth Per Inch (TPI) | 8 |
| Blade Material | High-Carbon Steel |
| Handle Material | Ergonomic Plastic with Rubber Grip |
| Weight | 1.2 lbs (0.54 kg) |
| Dimensions (L x W x H) | 26 x 4 x 1 inches (66 x 10 x 2.5 cm) |
| Application | Wood cutting (crosscut and rip cuts) |
| Safety Features | Blade guard (plastic scabbard), slip-resistant handle |
| Maintenance | Clean with dry cloth; apply light oil to blade after use; store in dry place |
| Spare Parts Availability | Replacement blades and handles available from Truper |
| Manual Languages | English, Spanish (and others via request) |
Frequently Asked Questions - CALA-NX6 Truper
User questions about CALA-NX6 Truper
0 question about this device. Answer the ones you know or ask your own.
Ask a new question about this device
Download the instructions for your Saw in PDF format for free! Find your manual CALA-NX6 - Truper and take your electronic device back in hand. On this page are published all the documents necessary for the use of your device. CALA-NX6 by Truper.
USER MANUAL CALA-NX6 Truper
natural_image
Illustration of a TRUPER 1000 power tool with a labeled end (CALA-NX6), no other text or symbols visible.CALA-NX6
natural_image
Electrical outlet diagram showing a power plug connected to a wall with three socket outlets (no text or labels)natural_image
Illustration of a hand using a TRUPER power tool to adjust a piece of wood (no text or symbols visible)forma correcta de sostener la sierra caladora fo

natural_image
Illustration of a hand using a Truperjacks machine to cut a saw, with no visible text or symbols on the device itself.rrecta de sostener la sierra caladora
natural_image
Diagram of a mechanical device with a curved component and a dashed arrow indicating motion (no text or symbols)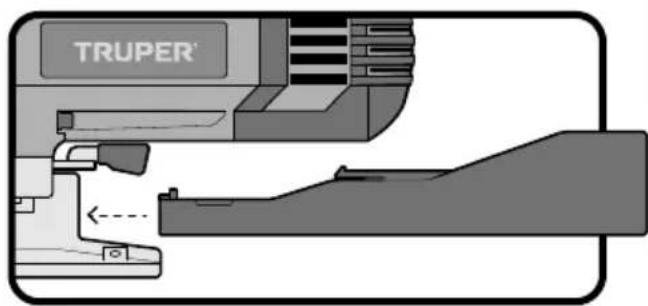
Puesta en marcha
natural_image
Illustration of a sewing machine tool with no visible text or symbolsnatural_image
Illustration of a mechanical component with a force arrow labeled 'F' pointing to a specific area (no text or symbols present)Power requirements 3

General power tool safety warnings....4

Safety warnings for jig saws. 5
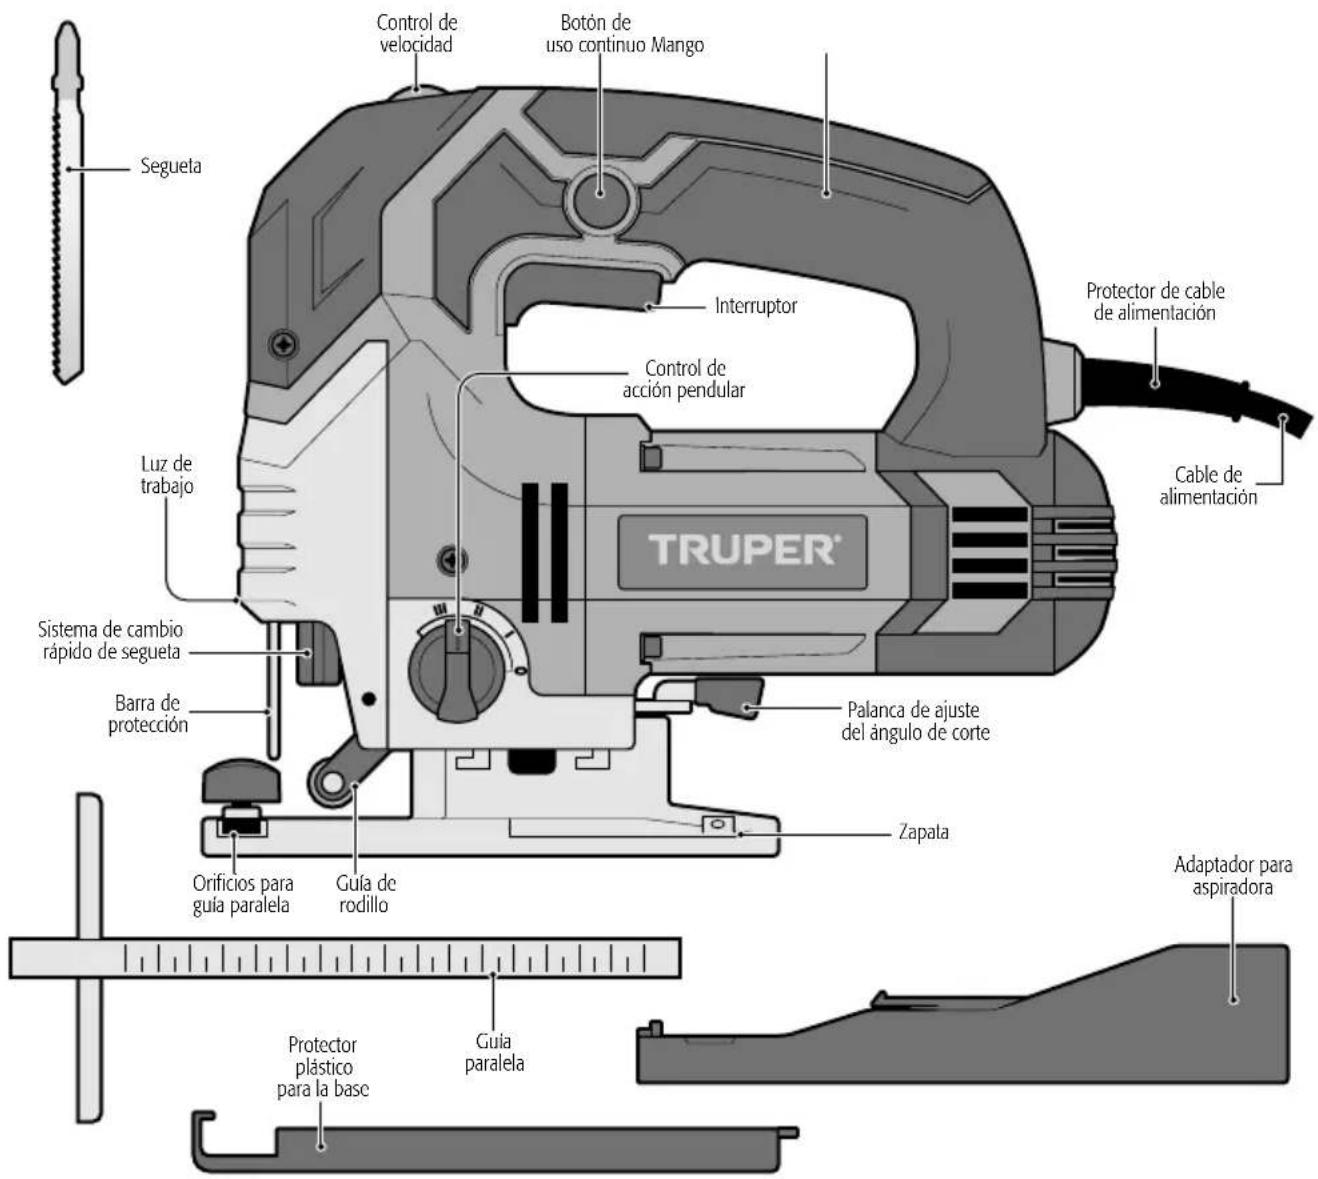
Parts 6
Assembly 6
Start up 7
Maintenance 9
Authorized service centers 10
Branches 12
Warranty policy 12

CAUTION
To gain the best performance of the tool, prolong the duty life, make the Warranty valid if necessary, and to avoid hazards of fatal injuries please read and understand this Manual before using the tool.
Keep this manual for future references.
The illustrations in this manual are for reference only. They might be different from the real tool.

CALA-NX6
| Code | 15348 |
| Description | Jig Saw |
| Voltage | 120 V~ |
| Frequency | 60 Hz |
| Current | 6,25 A |
| Power | 1 Hp |
| Variable Speed | 800 - 3 000 strokes / min |
| Miter cutting | 0° - 45° left / right |
| Cutting Capacity | Wood 4,7" | Aluminum 0,78" | Metal 0,39" |
| Duty Cycle | 50 minutes work per 20 minutes idle. Maximum 6 hours per day. |
| Conductors | 18 AWG x 2C with insulating temperature of 221 °F |
| Insulation Quality | Class II IP Grade IP20 |
Power Cord Grips: Type Y.
Build Quality: Reinforced insulation.
Thermal Insulation on Motor Winding: Class E.
WARNING Avoid the risk of electric shock or severe injury. When the power cable gets damaged
it should only be replaced by the manufacturer or at a TRUPER® Authorized Service Center.
The build quality of the electric insulation is altered if spills or liquid gets into the tool while in use.
Do not expose to rain, liquids and/or dampness.
WARNING Before gaining access to the terminals all power sources should be disconnected.

Power requirements
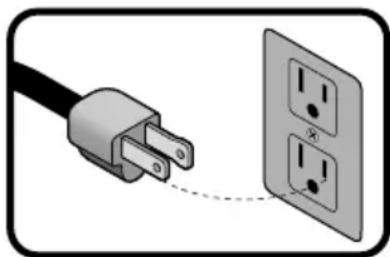
WARNING Tools with double insulation and reinforced insulation are equipped with a polarized plug (one prong is wider than the other). This plug will only fit in the right way into a polarized outlet. If the plug cannot be introduced into the outlet, reverse the plug. If it still doesn't fit, call a qualified electrician to install for you a polarized outlet. Do not alter the plug in any way. Both insulation types eliminate the need of both a grounded third power cord with three prongs or a grounded power connection.
WARNING When using an extension cable, verify the gauge is enough for the power that your product needs. A lower gauge cable will cause voltage drop in the line, resulting in power loss and overheating. The following table shows the right size to use depending on cable's length and the ampere capability shown in the tool's nameplate. When in doubt use the next higher gauge.
natural_image
Illustration of a power outlet cable connected to a wall-mounted socket (no text or symbols)Ampere Capacity
| from 0 A and up to 10 A from 10 A and up to 13 A from 13 A and up to 15 A from 15 A and up to 20 A |
Number of Conductors
| 3 (one grounded) |
Extension gauge
| from 6 ft to 49 ft | | higher than 49 ft |
| 18 AWG(*) | 16 AWG |
| 16 AWG | 14 AWG |
| 14 AWG | 12 AWG |
| 8 AWG | 6 AWG |
* It is safe to use only if the extensions have a built-in artifact for over current protection.
AWG = American Wire Gauge. Reference: NMX-J-195-ANCE-2006
WARNING When operating power tools outdoors, use a volteck grounded extension cable labeled "For Outdoors Use". These extensions are specially designed for operating outdoors and reduce the risk of electric shock.

WARNING! Read carefully all safety warnings and instructions listed below. Failure to comply with any of these warnings may result in electric shock, fire and / or severe damage. Save all warnings and instructions for future references.
Work area
Keep your work area clean, and well lit.
Cluttered and dark areas may cause accidents.

Never use the tool in explosive atmospheres, such as in the presence of flammable liquids, gases or dust.
Sparks generated by power tools may ignite the flammable material.

Keep children and bystanders at a safe distance while operating the tool.
Distractions may cause loosing control.

Electrical Safety
The tool plug must match the power outlet. Never modify the plug in any way. Do not use any adapter plugs with grounded power tools.
Modified plugs and different power outlets increase the risk of electric shock.

Avoid body contact with grounded surfaces, such as pipes, radiators, electric ranges and refrigerators.
The risk of electric shock increases if your body is grounded.
Do not expose the tool to rain or wet conditions.
Water entering into the tool increases the risk of electric shock.
Do not force the cord. Never use the cord to carry, lift or unplug the tool. Keep the cord away from heat, oil, sharp edges or moving parts.
Damaged or entangled cords increase the risk of electric shock.
When operating a tool outdoors, use an extension cord suitable for outdoor use.
Using an adequate outdoor extension cord reduces the risk of electric shock.
If operating the tool in a damp location cannot be avoided, use a ground fault circuit interrupter (GFCI) protected supply.
Using a GFCI reduces the risk of electric shock.
Personal safety
Stay alert, watch what you are doing and use common sense when operating a tool. Do not use a power tool while you are tired or under the influence of drugs, alcohol or medication.
A moment of distraction while operating the tool may result in personal injury.
Use personal protective equipment. Always wear eye protection.
Protective equipment such as safety glasses, anti-dust mask, non-skid shoes, hard hats and hearing protection used in the right conditions significantly reduce personal injury.


Prevent unintentional starting up. Ensure the switch is in the "OFF" position before connecting into the power source and / or battery as well as when carrying the tool.
Transporting power tools with the finger on the switch or connecting power tools with the switch in the "ON" position may cause accidents.
Remove any wrench or vice before turning the power tool on.
Wrenches or vices left attached to rotating parts of the tool may result in personal injury.
Do not overreach. Keep proper footing and balance at all times.
This enables a better control on the tool during unexpected situations.
Dress properly. Do not wear loose clothing or jewelry. Keep hair, clothes and gloves away from the moving parts.
Loose clothes or long hair may get caught in moving parts.

If you have dust extraction and recollection devices connected onto the tool, inspect their connections and use them correctly.
Using these devices reduce dust-related risks.
Power Tools Use and Care
Do not force the tool. Use the adequate tool for your application.

The correct tool delivers a better and safer job at the rate for which it was designed.
Do not use the tool if the switch is not working properly.
Any power tool that cannot be turned ON or OFF is dangerous and should be repaired before operating.
Disconnect the tool from the power source and / or battery before making any adjustments, changing accessories or storing.
These measures reduce the risk of accidentally starting the tool.
Store tools out of the reach of children. Do not allow persons that are not familiar with the tool or its instructions to operate the tool.
Power tools are dangerous in the hands of untrained users.

Service the tool. Check the mobile parts are not misaligned or stuck. There should not be broken parts or other conditions that may affect its operation. Repair any damage before using the tool.
Most accidents are caused due to poor maintenance to the tools.
Keep the cutting accessories sharp and clean.
Cutting accessories in good working conditions are less likely to bind and are easier to control.
Use the tool, components and accessories in accordance with these instructions and the projected way to use it for the type of tool when in adequate working conditions.
Using the tool for applications different from those it was designed for, could result in a hazardous situation.
Service
Repair the tool in a TRUPER Authorized Service Center using only identical spare parts.
This will ensure that the safety of the power tool is maintained.
Safety warnings for jig saws
Select the adequate blade
CAUTION • Select the adequate blade for the material. Reduce the risk of severe personal injury and make the job faster.
WARNING Do not use dull or damaged blades. Bent blades may break easily and could cause kickback. CAUTION Handle blades with care. The teeth are very sharp.
Before operating the jig saw
DANGER • Double-check wall, floors, and ceilings to prevent making contact with power wires and / or pipes.
CAUTION • Before starting to cut verify there are no nails or screws along the cutting line.
- Clamp and secure the work piece if possible to prevent it from moving.
• This jig saw is intended for manual use. Do not fix it.
After operating the jig saw
WARNING • Metal parts and accessories may get very hot if the tool is used for long periods of time.
CAUTION • Remove the Jig saw from the work piece only when it stops moving.
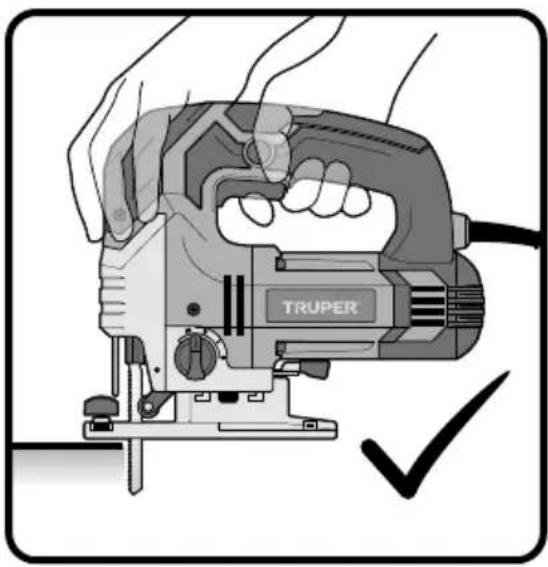
natural_image
Illustration of a hand using a TRUPER power tool to adjust a piece of wood (no text or symbols visible)right way to hold the jig saw wrong wa
While Operating the Jig saw
CAUTION • Hold the tool by the insulated griping parts when there is risk of making contact with hidden wiring or the tools cable. Contact with "live" wiring will electrify the exposed metal parts of the tool and send and electric shock to the operator.
- Use a bench vice or other practical way to support and secure the work piece onto a firm platform. Holding the work piece with your hand against your body makes it unstable and could cause loosing control.
WARNING • Keep your hands away from the cutting area. Do not overreach over the material to be cut. The distance of your hand with the blade is out of sight.
CAUTION • Never stop the blade by applying force on its side.
- When operating the jig saw always assure it is firmly held.
- When operating the jig saw sit it firmly against the material. It reduces vibration, stops the tool from jumping or breaking the blade.

natural_image
Illustration of a hand using a TRUPER ultrasonic griddler to cut the step, with no text or symbols present.the jig saw
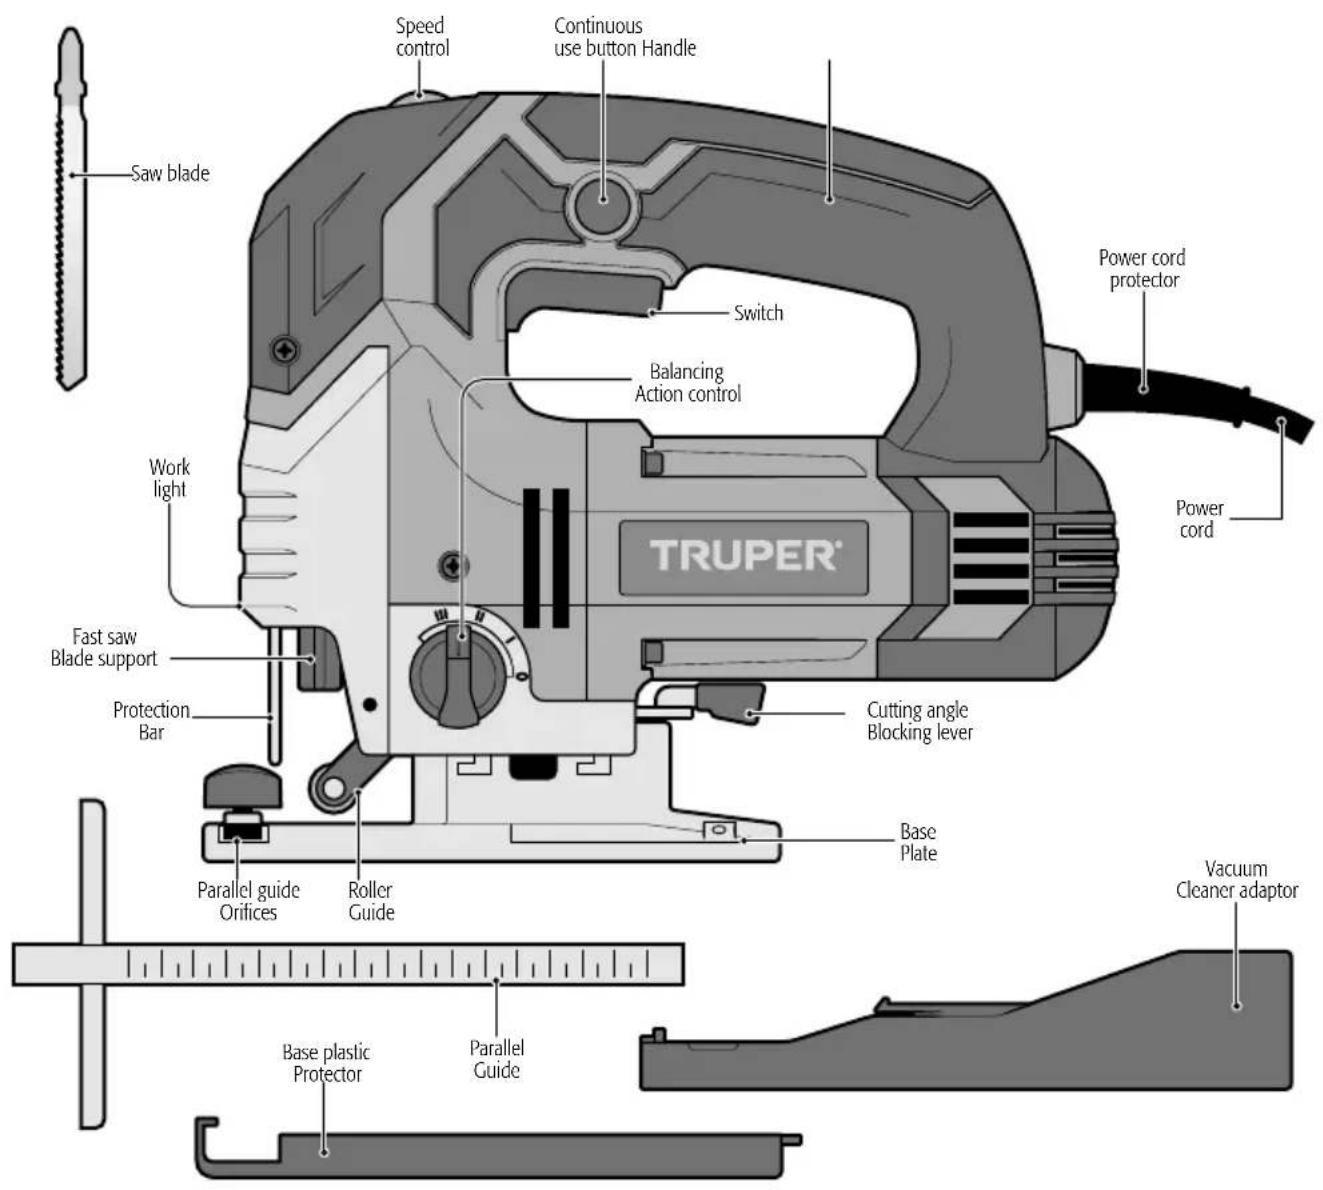
Assembly
Base Plastic Protector
The tool is equipped with a protection for the base plate. It protects delicate surfaces. To set up hook the protector up front of the base plate and then press it into the rear part until hearing a click.
Vacuum Cleaner Adaptor
Mount the vacuum cleaner adaptor un the opening found in the base plate. Verify the vacuum cleaner adaptor tip is inside the corresponding opening in the housing.

natural_image
Diagram of a mechanical device with a curved handle and dashed motion arrows indicating movement (no text or symbols)
Start up
Installation of the Saw Blade
- With the jig saw in an inverted position turn the fast support (A) counterclockwise. Fully insert the saw blade into the saw blade slot (B) with the cutting teeth to the front. Release the support to let the jaw catching the saw blade.
- Try to move the saw blade to double check it is firmly secured.
- Double check the saw blade is properly set and it can easily run in the roller guide slot (C). Otherwise the balancing action will not work right and the saw blade will not be supported while cutting.
CAUTION
- Use only the saw blade type shown.

Start Up and Operation Control
- Intermittent Operation:
Connect the plug into the power outlet.
Press the switch (D) to start the tool.
To stop the tool, simply release the switch.
• Continuous Operation:
Connect the plug into the power outlet.
Press the switch (D) and block it pressing the continuous use button (E).
To stop the tool, press and release the switch.


natural_image
Illustration of a mechanical device with lever and base components (no text or symbols)The work light turns on when the switch is pressed.
Speed Control
- The tool can run in different speeds. These are selected by adjusting the speed control found in the tool rear side (F).
- Adjust speed with the speed control according to the material, its thickness and the blade specification you will use (it is also possible doing it while operating no-load). See the speed guide to select them.
WARNING
- Avoid using the tool in low speed in
long periods of time. The tool's motor can get damaged.

natural_image
Simple line drawing of a mechanical component with no text or symbolsSpeed Guide
Material Speed
| Wood | 5-MAX |
| Metal | 3-4 |
| Aluminum | 3-5 |
| PVC | 3-4 |
| Ceramics | 3-5 |
Balancing Action Control
The balancing action varies the saw glade cutting angle to increase the cut efficiency. This can also be adjusted while no-load operation. To see more details, see the balancing action selection table. Do not use excessive force on the saw blade when cutting with balancing action. The saw blade only cuts when going upwards.

Thin materials.
Fine Cuts
Closed turns

Thick materials (Steel and plywood)
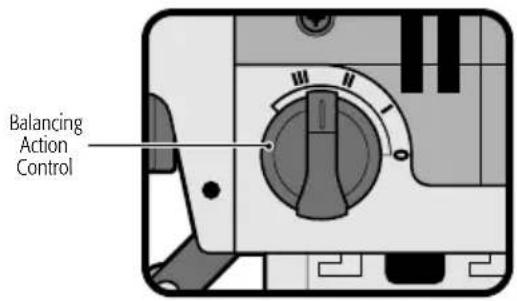

Thick materials (Wood and plastic)

Fast cuts
(Soft wood)
Cutting in the grain
direction
Cutting Angle Adjust
To make bevel cuts adjust the cutting angle in the base plate.
- Release the angle blocking lever (A).
- Once the adjustment lever is free, push the baseplate to the front to release the locking system and turn it to the desired angle, matching the guide with the graduated marks (0°, 15°, 30°, 45°) (B).
- When making cuts with non-established angles use a protractor or a graded circle.
- Secure the base plate into the desired angle tightening strongly the blocking angle. The marks in the angles in the base plate are accurate for most of the needs, but checking the angle with a protractor and making a trial cut on a piece of scrap wood is recommended.

Additional Tips
- If the tool is overheated in excess, especially when working in low speeds, set speed to the maximum and let it run with no load during 2 or 3 minutes to cool down the motor.
- Avoid prolonged use in low speeds.
- For an easier begin cutting in low speed at the beginning of the cut and then increase to the right speed.
- The saw blade cuts when traveling upwards and can chip the upper side of the work piece. Use care the upper surface is not visible when finishing the job.
• Occasionally, sparks can be observed though the ventilation slots. It is normal and does not damage the tool.
Cutting laminated materials
Use a blade with fine teeth when cutting most of laminated materials or thin wood. To reduce splintering in the edges fasten scrap wood pieces on both faces of the work piece and make the cut.
CAUTION Do not use the balancing action when cutting closed circles or angles.
Tilt cut
Tilt cut can only be made onto soft materials like wood, aerated concrete, gypsum sheets, etc. Use only short blades. Set the front edge of the base plate onto the work piece and start the tool. Press firmly against the work piece and gently tilt the blade onto the piece. Continue cutting through the cutting line.
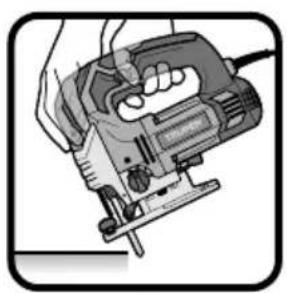
natural_image
Illustration of a hand holding a small electronic device with a power tool (no text or symbols visible)Cutting metal
Use a blade with fine teeth to work on iron materials and a rough blade to work with non-iron materials. When cutting thin metal sheets fasten some wood on both sides of the sheet to reduce vibration or to prevent tearing the metal. Both wood and metal shall be cut. Do not force the blade when cutting thin metal or steel thin sheets. These are harder materials and the cut takes longer. Excessive force on the blade may reduce its useful life or damage the motor. To reduce heat when cutting metal, add some lubricant on the cutting line.

Maintenance
WARNING Disconnect the cable from the power outlet before making adjustments, service or maintenance on the tool.
Cleansing and care
- Keep the tool free of dust. Never use water or chemical-based cleansing materials. Clean only using a clean and dry cloth.
- Keep the ventilation slots always clean and free of obstructions to guarantee the right cooling of the motor.
- Regularly inspect all the assembly screws and double-check they are properly tightened. If a screw is loos, tighten immediately.
- Both the armor and the motor are the power tool heart. Use extreme care not to affect them with oil or water.
- Double-check the power cable regularly to detect any type of damage. Go to a TRUPER Authorized Service Center when damaged.
Service
Service to the tool shall only be performed in a TRUPER® Authorized Service Center. Service and maintenance performed by non-qualified people may result dangerous and can cause personal injury and make the warranty void.
Carbon brush replacement
- Checked periodically the carbon brushes when worn. Replace only at a TRUPER Authorized Service Center.
• After replacing the carbons ask the technician to double-check the new carbon brushes can move freely in the carbon housing. Ask to have the tool turned on and keep it running 5 minutes to make even the contact of carbons and commuter. - Use only original TRUPER® spare carbon brushes, designed specifically with the right strength and electric resistance for each type of motor. Carbon brushes with different specifications may damage the motor.
- When replacing carbon brushes both carbons should be replaced simultaneously.
In the event of any problem contacting a Service Center, please see our webpage www.truper.com to get an updated list, or call our toll-free numbers 01(800) 690-6990 or 01 (800) 018-7873 to get information about the nearest TRUPER Authorized Service Center.
AGUASCALIENTES
671615 SUPER TOOLS
ZARAGOZA NO. 1205, COL. EL SOL, AGUASCALIENTES, AGS. TEL.: 01(449) 996-5978
BAJA
670796 CONTRURENTAS
CALIFORNIA SUR
This product, its parts and components have a three year cover against any defects in material and/or workmanship as well as its function, without expense for the customer. This warranty excludes the following: 1) when product is used under different from normal conditions; 2) usage in breach of the operating manual furnished or; 3) when this product has been altered or repaired by personnel not certified by TRUPER.
This warranty shall be effective with the supplier selling the product, or at ☒ TRUPER® Authorized Service Centers listed in this manual.
This warranty shall be effective when presenting the product and the valid Warranty policy duly stamped by the supplier or the proof of purchase.
To comply with this warranty, Truper will cover transportation expenses in case consumer's address is out of range from TRUPER® Authorized Service Centers listed herein or at the website www.truper.com or at our toll-free numbers: 01 (800) 690-6990 or 01(800) 018-7873.
In the event of any problem regarding the validity of this warranty please call toll-free numbers mentioned above.
Parts, components, consumables and accessories when applicable may be acquired at TRUPER Authorized Service Centers listed herein.
Stamp of the business:

3 YEARS
Date of purchase:
Imported by: TRUPER, S.A. de C.V.
Parque Industrial No.1, Jilotepec, C.P. 54240, Estado de México, México
TEL. 01(761) 782 91 00, (TIN) R.F.C.: THE-791105-HP2
www.truper.com
- Puesta en marcha
- CAUTION
- Power requirements
- Work area
- Electrical Safety
- Personal safety
- Power Tools Use and Care
- Service
- Safety warnings for jig saws
- Select the adequate blade
- Before operating the jig saw
- After operating the jig saw
- While Operating the Jig saw
- Assembly
- Base Plastic Protector
- Vacuum Cleaner Adaptor
- Start up
- Installation of the Saw Blade
- Start Up and Operation Control
- Speed Control
- WARNING
- Speed Guide
- Balancing Action Control
- Cutting Angle Adjust
- Additional Tips
- Cutting laminated materials
- Tilt cut
- Cutting metal
- Maintenance
- Cleansing and care
- Carbon brush replacement
- AGUASCALIENTES
- SUPER TOOLS
- BAJA
- CONTRURENTAS
- CALIFORNIA SUR
Brand : Truper
Model : CALA-NX6
Category : Saw